In the settlement of New Eridu, the last remnants of civilization gather. With unyielding will and steely determination, New Eridu leveraged the Hollows – spherical dimensional anomalies that warp reality and produce horrors from within them – to extract valuable resources that would help humanity not only survive, but thrive. But now that New Eridu has become mankind’s final haven, it once again looks to the Hollows to build a utopia.
Also, there’s good money to be made from poking around those nasty Hollows, and that’s good enough of a reason for us to do it.

Zenless Zone Zero (ZZZ)is the latest offering of mobile gaming giant Hoyoverse, and as expected, it brings a lot to the table – a distinctive visual and audio style that screams personality, memorable and striking characters, and above all, smooth, refined, and most importantly fun action gameplay. In this game, you’ll be playing as the siblings Wise and Belle – collectively known as the proxy Phaethon – and delve into the Hollows (illegally, I might add) and unearth both secrets and treasures alongside your Agents. And no, you don’t actually fight. That’s why you’re called a proxy, after all.
Zenless Zone Zero is available on the Google Play Store, the App Store, and on PC on the official website. The game can be quite taxing for those without strong mobile devices (not to mention the tons of loading screens), so I recommend playing it on PC at least until some optimizations come out. For reference, I’ll be using screenshots from the PC version for this guide.
In this beginner’s guide for Zenless Zone Zero, we’ll be covering the following topics:
- Agent Basics – let’s begin with the characters: who are they, what they can do, and how to build them up.
- Proxy Combat – both the basics and intricacies of Zenless Zone Zero’s action combat.
- Sourcing Materials – upgrades aren’t cheap. Here’s where to find more of the stuff you’ll need.
- Navigating the Gacha – knowing when, where, and how to pull on the gachas is an important lesson, too!
Lastly, if you’re looking for a TLDR, feel free to jump to the “Quick Tips” subsections.
Agent Basics
Agents in Zenless Zone Zero serve as your playable characters. Each of them brings something unique to the table, so it’s your responsibility to understand how to both read and strengthen them. Here’s all you need to know about your Agents.
Quick Tips:
- Zenless Zone Zero has a basic stat system. The only outliers are Impact (affects Daze damage), PEN/PEN Ratio (flat/% of DEF this character bypasses), Anomaly Mastery (Anomaly buildup speed), and Anomaly Proficiency (Anomaly damage).
- Leveling up raises a character’s HP, ATK, and DEF. Every so often, you’ll need to promote a character (which requires special materials) to raise a character’s level cap.
- Level caps are also determined by your Inter-Knot level.
- You can use duplicates of a character in their Mindscape Cinema (constellations/eidolons). Each duplicate unlocks one node and there are six nodes per character. Nodes provide powerful passive bonuses.
- Characters have multiple skills. Leveling up a skill raises its numbers but requires Attribute chips.
- When it comes to leveling, skills are bunched together – Dash Attack/Dodge Counter, Quick/Perfect Assist/Assist Follow-Up, EX/Special Attack, and Chain Attack/Ultimate. This means that leveling up the Dash Attack skill also levels up an Agent’s Dodge Counter.
- Core Skills are passive abilities that greatly affect how a character plays. You unlock more Core Skill nodes by leveling up a character and paying materials (think ascension passives in Genshin Impact or major passive traces in Honkai: Star Rail). These passives can be found labeled A-F in the upper part of the skill tree.
- An Agent’s Specialty helps determine their combat role. The five Specialties are Attack, Stun, Support, Anomaly, and Defense.
- An Agent’s Attribute affects the type of Anomaly buildup they contribute to. The five Attributes are Fire, Electric, Ice, Physical, and Ether.
- There are no fixed elemental weaknesses in the game.
- Factions show an Agent’s affiliation. These aren’t just flavor text – some characters gain bonuses based on the Factions of their party mates.
- W-Engines are weapons. They can be leveled and promoted in the same way as heroes (except with different materials). Leveling up a W-Engine raises the amount of ATK and substat it grants.
- Each W-Engine also has a passive ability that only activates if it’s equipped to an Agent of a specific Specialty. If the Agent doesn’t much the W-Engine’s Specialty, they’ll still gain the ATK and substat boost, just not the passive ability.
- Identical W-Engines can be fused to increase the level of their passive ability. A W-Engine can be fused up to four times; each fusion gives it a star that denotes its fusion level.
- Drive Discs are similar to artifacts from Genshin Impact. Each agent can equip six Drive Discs.
- Drive Discs have a main stat and several substats. As they gain levels, the main stat boost increases and substat rolls are made. The higher the rarity of a Drive Disc, the higher its level cap and potential substat rolls.
- Drive Discs have set bonuses when you equip 2 or 4 pieces from that set. Since you have 6 slots, you can do a 4-2 or a 2-2-2 setup. These set bonuses tend to be quite powerful so try and match Agents with Drive Discs that benefit them the most.
- Drive Discs are unlocked in roughly the mid-game (around mid-20s Inter-Knot level). Don’t worry about them too much when you get them – focus on equipping everyone first before trying to grind for perfect discs.
- Bangboos are pets that can be brought into battle, where they automatically run around and use their skills. You unlock Bangboos in the latter parts of chapter 1.
- Bangboos can level up and promote like your Agents.
- Bangboo skill levels are raised by fusing duplicates.
- If you can’t decide on an early game team, I recommend the trifecta of Attack-Stun-Support; you get Anby, Nicole, Billy, and Corin (via mail) for free so you have characters who can fill each slot.
Stats
Let’s start with the most basic aspect of Agents – their stats.

The stats in Zenless Zone Zero are:
- HP – health. Represents how much damage an Agent can take before they become incapacitated.
- ATK – raw attack power. Used as the basis for pretty much everything an agent can do, from normal attacks to Ultimates.
- DEF – defense power. Affects incoming damage reduction.
- Impact – affects how much Daze damage an Agent does; the higher, the better.
- Crit Rate – the chance to land a critical hit.
- Crit DMG – the bonus damage of a critical hit.
- Anomaly Mastery – affects Anomaly buildup speed; the higher this is, the faster a character can inflict Anomalies.
- Anomaly Proficiency – affects the damage dealt by this character’s Anomalies.
- PEN – the amount of flat DEF this character ignores when attacking. Doesn’t always show up in the stats screen.
- PEN Ratio – the percent of DEF this character ignores when attacking.
- Energy Regen – how quickly this Agent regains Energy (not Decibels!)
You may notice that certain stats are in yellow; these are recommendations on what stat to focus on for that Agent.
Leveling Up
The easiest way to increase an Agent’s stats is by leveling them up. Each level grants a small increase to an Agent’s HP, ATK, and DEF. To level up an Agent, give them Investigator Logs.

At certain levels, Agents will need to be promoted to raise their level cap.

Promotion requires Dennies as well as Certification Seals that match a character’s Specialty; the higher the promotion level, the rarer the seals you’ll need. Note that while promotion raises level cap, the maximum level you can raise your Agents to depends on your Inter-Knot level. The current (July 2024) maximum level is 60.
Mindscape Cinema
Pulling duplicates of a character in the gacha allows you to unlock their Mindscape Cinema.

Each duplicate of a character unlocks the next node in their Mindscape Cinema. Each node gives a unique passive boost to a character.
Since characters have six nodes, you’ll need to pull a character a total of seven times to fully unlock their mindscape. There’s not much you can do to build this up aside from getting lucky in the gacha (or swiping, if push comes to shove) but keep mindscape bonuses in mind – some of them can be quite potent.
Skills
Next up are a character’s skills.

Agents have the following skills at their disposal:
- Basic Attack
- Dash Attack/Dodge Counter
- Quick Assist/Perfect Assist/Assist Follow-Up
- Special Attack/EX Special Attack
- Chain Attack/Ultimate
- Core Skill
We’ll discuss these skills in greater detail in the “Proxy Combat” section.
Bolstering Skills
Skills can be strengthened by spending Attribute Chips on them. You’ll need to gather chips of the same Attribute as the Agent (for example, Electric Agents require Electric Chips) as well as pay Dennies.

Each level boosts a skill’s numbers by a considerable amount, though as with promoting Agents, the higher the skill level, the rarer the chips and other materials (Hamster Cage Passes are like crowns) you’ll need.
Note that skills are leveled by batches in the same order as I wrote them down above. Leveling up your Chain Attack, for instance, also levels up your Ultimate. That said, it’s still prudent to ration out your skill leveling materials.
Related: Zenless Zone Zero Tier List: Ranking New Eridu’s Finest Characters
Core Skills are unique in that they provide a baseline passive that adjusts how a character works, and they can be enhanced (the letters A-F in the top half of the skill tree) by getting an Agent to a minimum level and paying both Dennies and materials. These are similar to ascension passives in Genshin Impact and major passive traces in Honkai: Star Rail. Don’t forget to level these up as you strengthen your characters!
Specialty
Each Agent has a Specialty that helps you determine what their intended combat role is supposed to be.

The five Specialties in Zenless Zone Zero are:
- Attack Agents excel at just one thing – dealing damage.
- Stun Agents pave the way for your DPS characters by dealing large amounts of Daze damage and rendering foes vulnerable to attack.
- Anomaly Agents use the power of their Attribute to both rapidly build up Anomalies and deal more damage with them.
- Support Agents help your other Agents shine, whether it’s by buffing their allies or debuffing their foes.
- Defense Agents hold the line like no other, soaking up enemy hits and preparing massive counterattacks.
Attribute
Each Agent also has an elemental Attribute which can be seen beside their Specialty.

There are five Attributes in Zenless Zone Zero: Fire (orange flame), Electric (blue bolts), Ice (light blue snowflake), Physical (yellow hit marker), and Ether (purple star). Note that there are no hard and fast rules for elemental weaknesses in the game – Attributes serve pretty much only to determine what kind of Attribute Anomaly an Agent can inflict.
Factions
Agents also belong to different Factions.

Factions aren’t just for flavor text – some characters, like Nicole, gain bonuses when paired up with characters of the same Affinity or Faction!
W-Engines
W-Engines serve as Zenless Zone Zero’s weapon system.

Each W-Engine has both a main and a substat. As with Agents, you’ll need to level up W-Engines by feeding them W-Engine leveling materials (Power Supplies, Batteries, and Energy Modules). Every so often, you’ll also need to ascend a W-Engine using components that correspond to that W-Engine’s Specialty. These Specialties are the same as characters: Attack, Stun, Support, Defense, and Anomaly. The higher the ascension level, the rarer the components you’ll need. Components come from Combat Simulations and can also be crafted from lower rarity components.

A W-Engine’s Specialty doesn’t just determine what type of components it needs. Each W-Engine also carries a passive ability that only kicks in if it’s equipped to an Agent of the same Specialty. For example, the Roaring Ride W-Engine triggers random effects on hit if it’s equipped to an Anomaly Agent.

Note that mismatched W-Engines and Agents still gain the main and substat boost from the W-Engine, they just won’t get the passive ability.
W-Engines can be fused with identical copies to strengthen their passive ability:

This can be done up to four times. The number of stars indicates how many times a W-Engine has been fused.
Lastly, W-Engines also have rarity, with rarer W-Engines generally being better than their more common brethren.
Drive Discs
Drive Discs are Zenless Zone Zero’s version of the artifact system that’s prevalent in Hoyoverse games. You unlock them later on – roughly Inter-Knot level 25 – so they’re more of mid-game stuff, but we’ll talk about them nonetheless.

Agents can equip six Drive Discs at once. Each Drive Disc raises a main stat and several substats. As a Drive Disc gains levels (feed it WHAT), its main stat bonus increases, and every three levels will increase one of its substats randomly or gain a new substat (if possible and depending on rarity). The higher the rarity of a Drive Disc, the more substats it can roll (not to mention better potential numbers from said substats), and the higher its level cap.
Drive Discs also belong to sets. By equipping two or four discs from a set, you can trigger passive bonuses that give your Agents an extra edge. Since there are six slots for Drive Discs, you can opt to trigger either a 4-2 or a 2-2-2 set bonus. These set bonuses are very powerful, so always try to equip Agents with sets that are suitable for their kit!
As with Genshin Impact and Honkai: Star Rail, always do the highest difficulty you can manage, and don’t sweat over getting perfect Drive Discs off the bat. Instead, focus on getting a full set of discs for your most-used characters before coming back to grind.
Bangboos
Bangboos are those cute chubby robots you’ve been seeing all around New Eridu. They’re essentially Zenless Zone Zero’s pets, and while they play a lesser role than your Agents, learning about them is vital to assembling a good team.

Bangboos assigned to your team serve as AI-controlled companions that will use their attacks and skills to help you. They’re essentially a fourth party member that nonetheless offers some free extra firepower to your squads.
Like Agents, Bangboos can be strengthened by increasing their level. You can feed them software once you’ve unlocked the Bangboo shop. You’ll also need to promote them every so often to raise their level cap.

To level up a Bangboo’s skills, you’ll need to sacrifice duplicates of that Bangboo. Thankfully, each sacrificed duplicate raises all skills by one level. A Bangboo can only fuse with five duplicates.
Who Do I Build?
Now that we know all about Agents, it’s time to answer an important question – just who the heck are you supposed to build?

Honestly, all the characters in Zenless Zone Zero are pretty good. But for simplicity’s sake, if you can’t decide on a team, I suggest using a core of one Attack, one Stun, and one Support Agent. Coincidentally, you get three free characters that can fill these roles – Anby (Stun), Nicole (Support), and either Billy or Corin (you get Corin in the mail as a pre-registration reward even if you didn’t preregister).
Proxy Combat
Zenless Zone Zero’s combat is fast, frantic, and fun. And while anyone can just mash buttons and win (eventually), a good proxy will familiarize themselves with both the basics and team-based tactics available to them. Here’s all you need to know about Zenless Zone Zero’s battle system.
Quick Tips:
- You can freely switch between Casual and Challenge Mode. Challenge Mode pretty much just buffs enemy stats.
- There are no extra rewards for clearing stages on Challenge Mode. Play however you wish.
- Casual/Challenge Mode are separate from Hard Mode stages.
- You unlock Training Mode by going through Chapter One of the main story. I strongly recommend practicing with your characters as Zenless Zone Zero’s combat is very complex and getting the most out of it requires patience and dedication.
- Each Agent has a Core Skill that more or less dictates how they will function on the battlefield. Pay attention to their Core Skills and build around them.
- Basic Attacks allow an Agent to perform their normal attack combo. Most Agents have special functions tied to their Basic Attack, so be sure to read up on their skills.
- Special Attacks can be used at any time; don’t mistake the grayed out button for “off cooldown” as there’s no cooldown in this game. These attacks always deal damage of an Agent’s Attribute and allow you to build up status anomalies.
- While an Agent fights, they build up Energy, which is the rainbow-colored bar below their health. Once their Energy reaches or surpasses the triangle mark on their Energy bar, an Agent’s Special Attack becomes their EX Special Attack – the button will light up to let you know. EX Special Attacks are even stronger than Special Attacks.
- Hitting enemies builds up their Daze gauge, which can be found below their health bar. Once filled up, an enemy will be Stunned – they won’t be able to fight back and take increased damage. This means that ideally, you’ll want to stun enemies first before unleashing your damage dealers.
- Attacking a stunned enemy with a heavy attack (last hit of a Basic Attack combo, Ultimate, Ex/Special Attack, dodge counter, or a Chain Attack) triggers a Chain Attack, where you call in another party member to use their Chain Attack skill.
- Normal enemies can be chained once, elite enemies twice, and bosses thrice per Stun. As of writing (July 2024) there is no clear indicator of how many chains an enemy can take – you’ll just have to memorize which foes are elites or bosses.
- If you manage to stun another foe during a Chain Attack, you can unleash a Chain Attack on it.
- If you re-stun a foe, you can hit it with Chain Attacks again.
- Your equipped Combat Bangboo can add its Chain Attack to the last chain in a combo, depending on the type of enemy (for example, you can always add a Bangboo to the 3rd chain against a boss, but you can’t if the enemy can only be chained twice). The Bangboo Chain Attack occurs simultaneously with your last Agent, so you’re essentially getting one free chain.
- Dodging gives you invincibility frames. You can dodge twice in a row before a short cooldown.
- Dodging just before an attack lands (either during the flash or before the hitbox touches you) triggers a Perfect Dodge. During a Perfect Dodge, tap attack to perform a Dodge Counter.
- Dash by running around for a while or holding down the dodge button. While dashing, tap Basic Attack to perform a Dash Attack.
- Switching between characters is a powerful offensive and defensive tool. Switching out during a golden flash triggers the next Agent’s Defensive or Evasive Assist, which parries the enemy and inflicts a good amount of Daze or heavily slows them down (respectively). Each special assist costs one Assist Point.
- Melee characters tend to have Defensive Assists, while ranged characters have Evasive Assists.
- Some attacks will flash red and can’t be assisted into. Red flashes generally occur for three reasons: you don’t have enough Assist Points, the attack is unblockable, or your next character doesn’t have the right assist type (for example, Defensive Assist can’t parry ranged attacks).
- You can only have six Assist Points at once, which are indicated by the pips around the switch button. Chain Attacks restore one point per chain, while Ultimates restore three points.
- Anomalies are triggered when you hit an enemy with enough attacks of one Attribute. Each Attribute has its own anomalous effect.
- The buildup of different anomalies can happen together – if you hit an enemy with an Ice then an Ether attack, both its Freeze and Corruption anomalies will build up.
- Anomalies last 10 seconds, cannot crit, do not build up Daze, use the stats of each character that helped build up the bar (the percent contribution of each character will be calculated in the anomaly’s damage), use the stats of the characters when they applied buildup, and use the enemy’s stats during damage ticks.
- Disorder happens when you apply a different anomaly to a foe that’s already under another anomaly. This will cause a big burst of damage and Daze.
- Blue bars on a foe’s health bar indicate shields. Shields break faster when hit with that foe’s Affinity weakness. You’ll also usually get a message indicating what Affinity will work best.
- Fighting generates Decibels, which can be seen on the left side of the screen. Once you have 3,000 Decibels, you can consume them to use your active character’s Ultimate. Decibels carry over between combat encounters in the same stage and will stop being produced if you have 3,000.
- Note that Decibels are shared between party members. Only one person can use their ultimate per 3,000 Decibels.
- To maximize your ultimates, use your buffs and debuffs, stun your enemy, then switch to your main damage dealer and let loose.
Casual and Challenge Mode
Zenless Zone Zero has two difficulty options for its campaign: Casual and Challenge.

In Casual Mode, the game is more forgiving; conversely, Challenge Mode ramps up the difficulty by increasing enemy HP and attack power. Note that I haven’t observed any differences in AI between the modes (I could b– the only real difference is that Challenge Mode has tougher foes that demand more from players in terms of both gameplay skill and character building. There are also no extra rewards for completing stages in Challenge Mode, so play with whatever mode you like best.
This difficulty can be changed at any time, either via the settings menu or on the mission select screen.

Lastly, note that these difficulty modes are separate from Hard Mode stages!
Training Mode
One more thing before we start is that Zenless Zone Zero does have a training mode. To unlock it, you’ll need to progress through the first story chapter (with Nekomata) until you finish the coffee shop part-time job quest, which will end with you visiting the Hollow Investigative Association. This will net you a VR headset with which you can enter the training room.

The training room boasts a robust selection of options: you can change what enemy type you’d like to fight, whether it fights back or stands in place, its level, if it can be stunned, if it has infinite HP, and if you have infinite Energy for the training session. There are also specialized training courses for each Agent, which lets you practice with them and get used to their Core Skill, rotations, and optimal team role. If you’re thinking that this sounds exactly like training mode for fighting games, you’d be right.
While you can get by just mindlessly mashing buttons, Zenless Zone Zero’s combat is anything but simple. Thus, I strongly urge you to practice both basic and advanced character and team strategies in the training room.
Basic Combat Controls
First, a rundown of your basic combat controls.

- At the top left of the screen are your agents. The green bar represents their health, while the bar below them shows their Energy. The mark in their Energy bar shows how much Energy they need to switch to their EX Special Attack – more on that in a little bit.
- Next, the lower right. From left to right, these are the Basic Attack, Dodge, Special/EX Special Attack, and Switch buttons.
- Mashing the Basic Attack button will cause your Agents to perform their normal combo. Bear in mind that most Agents have special abilities tied to their Basic Attack that require certain conditions.
- Dodge causes your Agent to dash forward in the direction they’re facing. This has invincibility frames. More on dodges later.
- The Special and EX Special Attack button uses your Agent’s skill. This can be used at any time, even if the button is grayed out. When you’ve accumulated enough Energy by fighting, the button will light up, and pressing it will cause the Agent to use their EX Special Attack at the cost of some Energy.
- Switch changes to the next character in your team (1-2-3-1), and can be used to perform Quick, Defensive, or Evasive Assists in the right circumstances. More on that later.
- Lastly, the button above the four is the Ultimate button, which requires you to build up 3,000 Decibels before it can be used.
Core Skill
As we mentioned earlier, each Agent has a Core Skill that forms the main idea of their kit.

Make sure to read each character’s Core Skill before assigning them to a team as synergistic team building goes a long way!
Basic Attacks
Basic Attacks are the fastest offensive tool available to your agents. To use them, mash the fist button; each press will perform the next attack in their normal combo.
However, bear in mind that most, if not all agents have special abilities tied to their Basic Attack. Anby, for example, can change her fourth combo hit to become Thunderbolt instead of Turbo Volt by holding down or delaying the fourth hit. Others, like Billy, can hold their Basic Attack button down to switch stance.

Special and EX Special Attacks
Each Agent has a Special attack that they have access to at all times – yes, even if it’s grayed out.

Special and EX Special Attacks are powerful tools that not only tend to do more damage than normal attacks (barring animation time) but also always deal damage of that Agent’s Attribute, allowing them to build up status anomalies.
As Agents stay on the field, they build up Energy – the rainbow-colored bar below their health. Once the bar reaches or surpasses the triangle marks, that Agent’s Special Attack button will become colored; tapping it at that point will consume Energy and perform their EX Special Attack. EX Special Attacks tend to cost between 40 to 60 Energy, which differs from Agent to Agent.

EX Special Attacks tend to be much more potent than their non-empowered form, so don’t hesitate to unleash them whenever you feel you need them.
Daze
As you hit enemies, you may notice that a gauge below their health bar fills up. That represents their daze gauge, and once it’s filled up, it’ll glow rainbow and the enemy in question will enter a stunned state. While an enemy is stunned, it will not only be unable to act, but it will also take more damage than usual.

This means that, ideally, your first objective in combat should be to stun enemies with high Daze attacks before unleashing your DPS Agents to mop up.
Enemy Daze gauges go from 0-100; at 100, they’ll be stunned. You can use the number beside the enemy’s health bar to more accurately determine how close they are to getting stunned.

Chain Attacks
Stunned enemies not only take more damage from attacks but also open themselves to Chain Attacks – formidable team-based combo moves.
To trigger a Chain Attack, you’ll need to perform a heavy attack, which is any of the following:
- The last hit of an Agent’s normal attack combo.
- Special or EX Special Attack.
- Dodge Counter.
- Ultimate.
- Another Chain Attack.
Once you land the heavy attack (and have at least one other party member still standing), the Chain Attack selection screen will pop up, where you need to select whose Chain Attack you want to use next.

Different types of enemies can be hit with different numbers of Chain Attacks: common mooks can only be chained once, elite enemies can be chained twice, and bosses can be chained thrice. Since Chain Attacks themselves count as heavy attacks – thus triggering the next Chain Attack selection – this means that you can quickly unleash a barrage of hurt on bosses. Do note that there’s nothing stopping you from unleashing multiple Chain Attacks if you manage to stun more enemies during a Chain Attack!
Unfortunately, there’s (as of July 2024) no in-game indicator of how many chains you can perform on an enemy, so you’ll just have to memorize the number based on the enemy itself.
Once enough time has passed or you’ve performed all your chain attacks, the stunned enemy’s Daze gauge will turn gray and deplete; when it runs up, they’ll stand up and start looking for revenge. However, this also opens them up to getting stunned and chained again.
Bangboos also have a Chain Attack that can be used during the last chain in a combo. This means that if you have a full party of three, the Bangboo can only be added on the third chain, a party of two can only Bangboo Chain on the second combo, and so on. However, unlike your Agents, using a Bangboo’s Chain Attack does not count towards the maximum number of times an enemy can be chained, and it will execute its attack together with the final member.

This effectively means that you’re getting one extra free Chain Attack.
Dodge, Dodge Counters, and Dash Attacks
The dodge button is a versatile tool. You can use it not only to avoid danger, but also for other things like chasing distant foes, repositioning to a better spot, and so much more. But while it’s handy, bear in mind that you can only perform two consecutive dodges in a row before your dodge goes on cooldown. Don’t panic dodge!

Dodging enemy attacks is usually just a simple matter of tapping the dodge button before the attack lands. However, doing this perfectly – dodging just before the attack lands – will trigger a perfect dodge, which causes the game to slow down for a brief moment and the screen to gray out. If you attack during a perfect dodge, you’ll unleash your character’s dodge counter, a powerful counterattack.
Try to sneak in dodge counters for extra damage whenever you can, as they not only deal decent damage but also count as a heavy attack for both building up Daze and initiating Chain Attacks.
Last are Dash Attacks, which are kind of a weaker version of Dodge Counters. There are two ways to perform Dash Attacks:
- Run around until your character picks up speed or hold the dodge button down to dash, then attack.
- Attack immediately after performing a normal dodge.
Assists
Note: On PC, you can switch characters in reverse order by tapping C; LB and RB on controllers have the same effect. I would recommend against doing this as Chain Attacks and Assists are tricky enough to manage even with one-way switches.
Teams of Agents in Zenless Zone Zero are comprised of three members, so it makes sense that you should be able to switch between party members. What may not be immediately apparent, however, is that switching is in itself a powerful offensive and defensive tool. While you can always tap on the Switch button to switch to the next character in your team (1-2-3-1), you can also tap on it during specific times to trigger an assist, a special switching maneuver.
There are two special assists in the game. The first is the Quick Assist, which you can trigger when your active character is in the launched state or during certain recovery animations from your own attacks (such as Nicole’s chain attack). This will cause them to immediately switch out to the next character in your team, who will perform their Quick Assist skill. Bear in mind that Quick Assists are more of a recovery tool to help you get back into the fight, not deal damage.

The other is the two Perfect Assists, namely the Defensive or Evasive Assist. These can be triggered by hitting the Switch button while an enemy flashes gold. Depending on your character type (melee characters generally use Defensive Assist, while ranged Agents use Evasive Assist), you’ll interrupt the enemy with your new character.

These types of assists are especially useful as they allow you to maintain momentum during combat while potentially switching to a stronger character, which is great if you’ve been using the previous character to set up. Defensive Assists also parry the enemy, which deals some Daze gauge damage, while Evasive Assists trigger Vital View, slowing enemy actions for a short period.
Do note that only gold flashes allow you to trigger these assist types – some attacks, which flash red, can’t be Perfect Assisted into. Red flashes are caused by:
- Not having the right kind of Perfect Assist on your next character. Defensive Assists, for example, can’t parry ranged attacks.
- Not having enough Assist Points. More on those in a little bit.
- Some attacks are just straight-up unparryable.
You can perform an Assist Follow-Up by tapping the attack button after a Defensive or Evasive Assist, which lets you get in some extra damage.
Now, for all the good that assists can do for you, they’re not an unlimited resource. Each Defensive or Evasive Assist costs you one assist point. Assist points are indicated by the yellow pips around your Switch button:

To replenish your assist points, you can use Chain Attacks or Ultimates. Chain Attacks replenish one point per Chain Attack, while Ultimates restore three points. You can have up to six assist points at once.
Attribute Anomalies
As mentioned earlier, using your Agents’ EX/Special Attacks will cause them to attack with their Attribute, which builds up an enemy’s status anomaly bar.

Different types of attacks cause different levels of anomaly buildup, and once the circle is complete, it’ll be drained, and the enemy will be afflicted with a different effect based on how the bar was filled up. Each Attribute has its own anomaly:
- Physical damage = Assault, which deals a large chunk of damage. This also inflicts Flinch, which causes the enemy to take 10% more Daze damage.
- Fire damage = Burn, which rapidly deals DOT damage. Enemies weak to Fire can also be interrupted by this damage.
- Electric damage = Shock, which deals extra damage when an enemy is hit. Can interrupt enemies weak to Electric.
- Ice damage = Freeze. Like Assault, this creates a large one-time chunk of damage when the frozen enemy is hit with a heavy attack. This also increases the crit damage taken by the frozen enemy.
- Ether damage = Corruption, which causes enemies to take extra Ether damage when hit. Can also interrupt enemies weak to Ether.
A few things to note about anomalies:
- All anomalies last for 10 seconds.
- Anomalies cannot crit.
- Damage from anomalies (both DOTs and the one-time burst effect from Freeze and Assault) do not build up Daze.
- Stats are snapshotted when the Attribute was applied, not when the anomaly is triggered. This means that if you want to maximize anomaly damage, you’ll need buffs all throughout Attribute application, not just at the end.
- However, enemy stats are applied during the activation of damage ticks.
- Anomaly damage is computed from all characters who contributed to its buildup. This is based on how much percent of a character filled up the bar; if character A contributes 60% to the bar and character B fills up the remaining 40%, the anomaly will use 60% of A’s stats and 40% of B’s stats.
- Anomaly buildup is based on the element that damaged it; different elements trigger different anomalies. More on that in Disorder below.
- Anomalies of the same type share a three second internal cooldown.
- Enemies gain resistance to the same type of anomaly if repeatedly applied.
Disorder
So, by applying multiple instances of the same type of elemental damage, we can trigger an anomaly. But what happens if we apply different damage types? Disorder, that’s what.
Disorder happens when you apply a different anomaly while an enemy is already suffering from a previous anomaly – for example, applying Burn to a Shocked enemy. Disorder deals a massive chunk of damage and Daze damage to the enemy afflicted by it.

Even without heavy anomaly stat investment, Disorder damage is very potent (although nobody has accurate numbers for it just yet). However, you’ll need to do some careful team building if you want to incorporate Disorder into your bag of combat tricks – not only will you need to have characters of multiple Attributes on your team, but at least one of them needs to be strong enough to apply a second anomaly during the 10-second window of the first anomaly!
Shields
As you progress through the game (or if you have Ben), you may notice that some enemies have a portion of their health bar covered in blue.

These blue segments represent shields, which must first be depleted before you can inflict any lasting harm to the foe in question. While you can break a shield by hitting it with any attack, shields shatter quickly if you use Attributes that the foe in question is weak to. More often than not, that Attribute will be the one recommended by the game; you’ll also usually get a message notifying you which Attribute works best.
Ultimates
As your Agents fight, they’ll gain Decibels. The number of Decibels you currently hold can be found on the left side of the screen.
In general, the more powerful the attacks you use, the more Decibels they’ll generate. Once you’ve accumulated 3,000 Decibels, you’ll be able to use their ultimate, an incredibly powerful ability.

There are a few things to keep in mind regarding Decibels:
- Decibels persist across the mission. If you don’t think the current batch of enemies needs to be hit with an ultimate, you can hold on to your Decibels until a tougher foe emerges.
- You can only hold a maximum of 3,000 Decibels. All ultimates use 3,000 Decibels.
- Decibels are shared across the team. This means that optimal ultimate use requires preparation; you’ll want to buff your DPS, debuff your enemies, switch to your main DPS, and stun your enemy to maximize the damage an ultimate will do.
Sourcing Materials
Knowing how to fight is one thing, but getting the materials you need to ensure your Agents and Bangboos can keep pace with the challenges the game throws at you is another. In this section, we’ll discuss the various ways to get resources, the daily loop, and where to find some nice freebies.
Quick Tips:
- You can tap an item in your inventory to see where to get more of it.
- Increasing your Inter-Knot level opens more of the game’s features. Do quests to raise your Inter-Knot level.
- You also get rewards for each Inter-Knot level you achieve.
- Set up your video store as soon as you log in. Random Play is essentially an AFK Denny farm that occasionally nets you experience materials.
- You unlock more promoters and tapes by going through the story and by doing quests. Some Agents can also serve as promoters once their Trust Rank has been raised.
- Promoters have a passive bonus.
- The higher a tape’s level, the higher its base income.
- Three genres will be marked as hot every day. Try to offer high-level tapes that match those genres to maximize your earnings.
- Scratch cards grant you Dennies and rarely, Polychromes. You can get one card per day from the dog across the street.
- Noodles grant buffs to your Agents for three battles. Noodle buffs work in every mode except Shiyu Defense.
- One battle needs to pass before you can change your noodle buff.
- Coffee grants 60 stamina as well as a material drop rate buff for one enemy card in Simulations.
- Available coffee buffs change from day to day. On Sundays, every buff is available.
- You can only drink one coffee per day.
- Combat Simulations let you grind for resources at the cost of stamina. You can change both the lineup and number of enemies you’ll face, which lets you tailor your grinding experience.
- Hollow Zero is a weekly roguelike mode similar to the Simulated/Divergent Universe. Complete Hollow Zero runs to get weekly prizes and raise your Investigation License, which also earns you one-time rewards.
- Hollow Zero parties are separated at the start. You’ll need to find support (phone) nodes to get your other party members. If you bring a Bangboo, it’ll accompany your first character.
- Resonia are like blessings/curios in Honkai: Star Rail. Each one provides passive buffs to make your Hollow Zero runs easier.
- Resonia comes from some nodes and can also be bought at shops in the Hollow Zero map.
- Getting four and eight Resonia of one type gets you an Advanced Resonium I and II (respectively). You do not lose the fused Resonia.
- Resonia can be catalyzed in shops. This upgrades that Resonium’s stats.
- The Primer is a set of one-time quests – with free stuff and Inter-Knot experience up for grabs.
- Errands refer to your daily tasks. You can finish errands with one stroll down Sixth Street, and this grants 60 Polychromes daily. Don’t forget to do these.
- You can also select two optional weekly objectives for your Errands which nets you some bonus rewards.
- Chests can be found by exploring the world.
- There’s a free and paid battle pass. Experience caps at 10,000 per week, though seasonal quests bypass this.
- Always join events. A lot of your beginner rewards can be found in the Events page.
- Apart from the aforementioned sources, you can also get free Polychromes from achievements and Cooperation Exercises in the early game.
Reference Sheet
If you’re already comfortable with Zenless Zone Zero’s resource loop and just need to know where to go to reliably find stuff (at least in the early game), here’s a quick reference sheet:
| Resource | Where Do I Reliably Get It? |
| Dennies | Quests, errands, chests, stage pickups, Random Play, scratch cards, Simulations |
| EXP Materials | Quests, errands, chests, stage pickups, Random Play (sometimes), Simulations |
| Attribute Chips (for leveling skills) | Quests, chests, Simulations |
| Specialty Seals (for promotion) | Quests, chests, Simulations |
| W-Engine Components (for W-Engine promotion) | Quests, chests, Simulations |
| Polychromes | Quests, errands, scratch card (rarely, there seems to be a pattern), stage clear reward (once only for perfect Hollow data clear), Hollow Zero |
Item Sources
One important thing to note here is that you can tap an item to find out where to get more of it. Simply tap on an item in your inventory to see – and fast travel to – the source.

Inter-knot Level
Your Inter-Knot level shows how recognizable your new account has become. While rebuilding Phaethon won’t be easy, there’s not much we can do but take one step at a time to regain the glory and prestige that we used to have.

The Inter-Knot level is essentially your account level. The higher this level is, the more features you unlock, and the stronger your Agents (and foes) can become. More difficulty isn’t necessarily a bad thing as high Inter-Knot levels are required to not only progress through the main story but also make grinding more efficient.
To increase your Inter-Knot level, you’ll need to complete main story quests as well as random commissions. Look out for NPCs and items with a blue icon above them…

…as these NPCs will give you commissions that you can do for more Inter-Knot experience. You can also search for commissions on the Inter-Knot itself. To do this, go to Menu -> Inter-Knot -> Notifications. To sift through which posts are news and which are quests, you can filter your feed here:

You also get rewards each time you raise your Inter-Knot level. To claim these, go to the main menu, then Inter-Knot, and finally Inter-Knot Level.
The Video Store
Random Play isn’t just a front for your illegal proxy operations. By carefully managing your video rental store, you can nab yourself a reliable source of Dennies and other materials. You can manage your store by talking to the clerk at the storefront counter – by default, this is Bangboo 18.

To get Random Play running, you’ll need to assign both a promoter and three tapes.
Promoters provide different passive bonuses. To unlock more promoters, you’ll need to progress through the story. Some Agents can also work as promoters for your store, though to unlock them, you’ll need to raise their Trust Rank.

Next are the tapes. Tapes have both a level and a genre. The higher a tape’s level, the more income it’ll generate for you. Genre, on the other hand, changes from day to day. You get more tapes as you play through the game as well as from chests and quests.

Before you open the store for the day, take a look at the hot genres for the day. You can see them at the top of the Random Play menu:

To maximize your profits, try to assign high-level tapes that match the current hot genres. Do note that once you confirm the day’s selection of both promoter and tapes, you can’t close the shop!
Scratchcards
The next daily task you need to do on Sixth Street is to claim your daily scratch card. You can do this by visiting the dog at the newsstand across the street.

Scratch cards provide you with a small amount of Dennies – or Polychromes, if you’re lucky – each day. This resets at server rollover, so be sure to claim your freebies before the reset!
Noodles and Coffee
The last Sixth Street task is to get something to eat. There are two stores you should visit: Waterfall Soup for noodles and Coff Café for coffee.
At Waterfall Soup, you can buy noodles that provide your Agents with various combat buffs for three battles – and you can always come back and buy more if you need to. Do note that once you buy a noodle buff, you can’t switch it until one battle has passed.

Noodles are cheap, but General Chop often runs promos on certain noodles, so be sure to check out his offerings. Each item on the menu offers a different buff, and as you progress through the game, you’ll unlock more types of noodles. You’ll also be happy to know that noodle buffs work in every game mode except Shiyu Defense.
To check if a noodle buff is active, check this icon in the team selection screen:

Next is Coff Café. Unlike noodles, coffee can only be purchased once per real-life day. There’s a good reason for this – coffee not only gives you 60 stamina but also provides drop rate buffs for one card in simulation battles.

Each real-life day offers different types of buff coffees, and every type of buff coffee is available on Sunday.
The available coffee buffs are:
- Monday/Thursday: Fire Chip, Attack & Def Seal/Component.
- Tuesday/Friday: Freeze Chip, Stun & Anomaly Seal/Component.
- Wednesday/Saturday: Ether & Physical & Shock Chips, Support Seal/Component.
- Sunday: All buffs available.
Do note that some events can add coffees on days when they are absent. This usually follows the Attribute of the current rate-up character.
The HIA
The Hollow Investigative Agency (HIA) is where you’ll be spending your stamina to get various resources, such as Dennies, chips, seals, components, and more.

At the HIA, you can select what type of resource to grind for as well as how difficult and rewarding the challenge will be. First, select the resource type. Next, add or remove enemy cards to the simulation. Cards on the left of the screen are the current enemy lineup, while cards on the right show what enemies you can add.

The more enemies there are in a simulation battle, the more stamina you’ll consume and the more rewards you’ll earn. This allows you to fine-tune your grinding. For example, if you need lots of Dennies, you can slot the maximum number of enemies so your battles become more efficient; on the other hand, if you only need a few Attribute chips, you can just run with one enemy card.
As your Inter-Knot level increases, you can also opt to increase enemy level to make your rewards even better.
Hollow Zero
Hollow Zero is Zenless Zone Zero’s version of the Simulated/Divergent Universe from Honkai: Star Rail. It’s a weekly roguelike dungeon where your Agents will be tested to the utmost. Initially, only the Qualification Assessment area will be open. As you progress through the game and meet requirements, more difficult (and more rewarding) zones will reveal themselves to you.

On the surface, Hollow Zones look and play like a regular stage. However, there are three things you need to consider when diving into these dungeons: party size, Resonia, and Pressure.
Let’s start with party size. Unlike regular stages, you initially have just one character (plus Bangboo, if you bring one) in Hollow Zero. The other characters you select for your team can be added to your party via support nodes, which look like this:

As you level up, you’ll be able to bring more characters in, allowing you to build teams that can tackle any challenge.
Next up is Resonia. Resonia refers to various buffs (think blessings and curios in Honkai: Star Rail) that give your Agents an edge in combat. Each Resonia has a rank, from B to S, which indicates its rarity and general usefulness.

Resonia can both be fused and catalyzed. Fusion occurs when you obtain four or eight copies of a single type of Resonium, resulting in gaining an Advanced Resonium I or II (respectively). Note that you don’t lose the Resonia involved in the Fusion – you just gain a new advanced one. You can see a Resonium’s type here:

Catalyzation, on the other hand, upgrades a Resonium’s numbers directly. This only occurs via special events or by buying catalysts from shops.
Resonia is acquired from certain nodes on the map, such as floor bosses, but can also be reliably purchased from shops, which sell both Resonia and catalyzation services. You pay for these services in Gear Coins, much like in normal maps.
Last is Pressure. Each step you take on the map gives you 10 Pressure. Once you hit 100 Pressure, it’ll be dispersed, and you’ll receive a Corruption, a negative effect usually in the form of a debuff for your Agents or a buff for your enemies.

You can gain a total of five Corruptions per Hollow Zero dive, and you can view your current Corruptions to the left of your Pressure readout. If you take too long and you manage to reach five Corruptions, the last one will be a very difficult boss modifier. Don’t dally and clear the dungeon as quickly as possible to ensure you get the maximum rewards!
While Hollow Zero can be difficult, completing dives can be very rewarding. Not only do you get a whole bunch of Polychromes, Boopons, and Bangboo materials (which you pretty much only get from this mode), but you also gain Investigation License experience, which nets you some nice one-time rewards.

Lastly, Hollow Zone bounties are put up every week:

These optional objectives can be completed for even more rewards.
Primer
The Primer is essentially your newbie quest guide. In it, you’ll find a bunch of tasks that you can (and should) accomplish to get some neat loot.

While they’re one-time rewards, be sure to clear your Primer quests – you don’t want to miss out on the Inter-Knot experience and Master Tapes it offers.
Errands
Errands are Zenless Zone Zero’s version of daily quests. They’re trivially easy and provide great rewards – including 60 Polychromes – so really, there’s no excuse for skipping them.

To claim your daily reward, tape on the green flames in the Engagement panel. This gives you Polychromes, Inter-Knot experience, Dennies, and some experience materials.
You can also select two optional weekly objectives which will grant you some extra goodies. May as well while you’re at it, right?
Chests
Roaming the world isn’t just good for exercise – you might find missing cargo trucks too.

Cargo trucks are essentially chests. Each one provides a small number of Polychromes, Inter-Knot experience, and other materials. Be sure to snoop around each location to unearth these goodies!
The Battle Pass
Zenless Zone Zero has both a free and paid battle pass, both of which offer nice rewards.
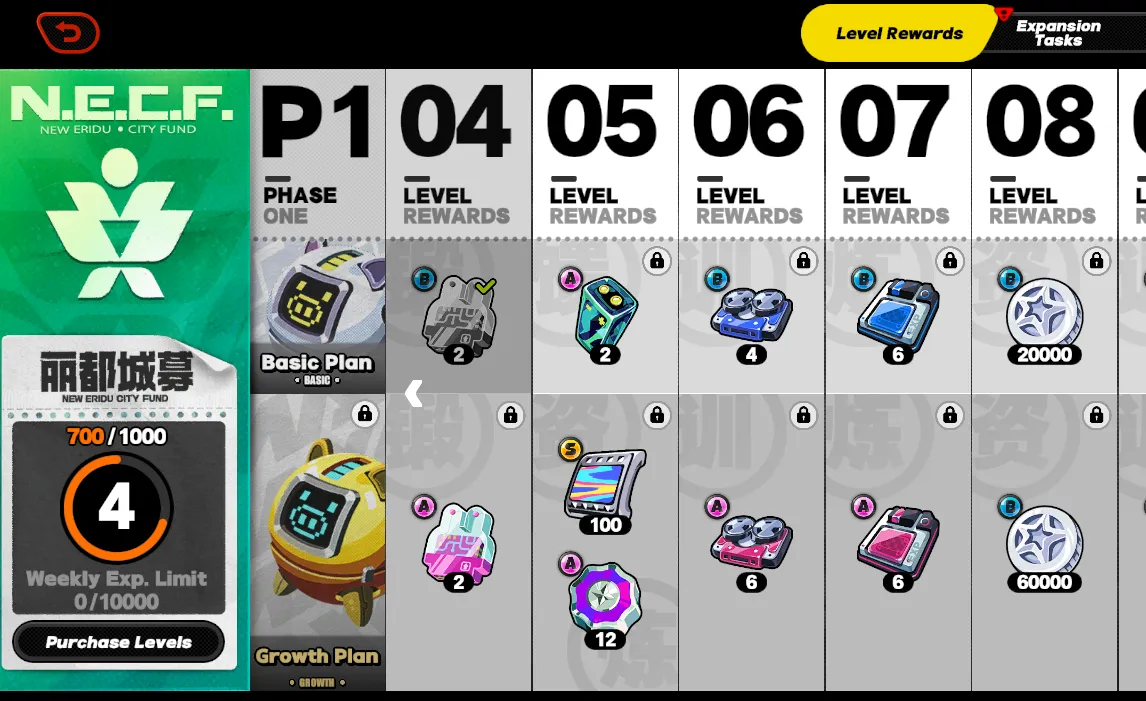
Completing missions nets you battle pass experience, which levels up your battle pass and gets you rewards. There’s a cap of 10,000 battle pass experience per week, though seasonal missions don’t count towards this cap.
Like in Genshin Impact and Honkai: Star Rail, the paid battle pass also allows you to select an A-rank W-Engine at level 30.
Events
As with any live service game, it’s always very important to participate in events. You can see the current events by tapping this button:

This will show you the requirements for participating in various events and will also show you where to start event quests. Do note that many beginner benefits, such as free Encrypted Master Tapes and large one-time Master Tape rewards can be found here.
Free Polychromes
Lastly, there are a lot of free Polychromes in the game, if you know where to look. In general, it’s always worth checking any UI element with a red exclamation point, though if you want to fast track it, here’s where to find the shiny stuff. Bear in mind that some of these have already been mentioned above.
- Chests
- Quests.
- Primer Quests.
- Daily Errands! Completing all your dailies (seriously, just one stroll down Sixth Street will do it) nets you 60 Polychromes per day.
- Clearing stages with the maximum amount of Hollow Investigation Data. Collect all the nodes below to gain data. Note that you can only earn Polychromes once per stage!

- Achievements; get there via the main Menu -> More -> Achievements. There are lots of achievements in different categories; be sure to visit them all.
- Scratch cards (rarely, there seems to be a pattern, but more testing is needed)
- Complete Cooperation Exercises via the VR Headset – you can claim Polychromes and other prizes via the lower left button. Note that you can only play Cooperation Exercises for Agents you have on your account.
Navigating the Gacha
Finally, let’s talk about Zenless Zone Zero’s gacha. Understanding how these systems work is key to maximizing your resources in any gacha game, so let’s dissect the different currencies and banners in the game, as well as how to reroll your account to get your desired starter S-rank Agent.
Quick Tips:
- Premium currency is divided into Monochromes and Polychromes.
- Monochromes are what you get when you swipe. They’re used to pay for item bundles, presumably costumes in the future, and can be converted to Polychromes at a 1:1 ratio. You cannot earn Monochromes in the game. The only way to get them is buying them.
- Polychromes are used to buy quality-of-life features such as more stamina. They’re also mostly used to buy Master Tapes for the gacha. Polychromes can be earned via in-game means.
- There are three banners: Stable Channel (standard/beginner banner), Exclusive Channel (rate-up character), and W-Engine (rate-up weapon). The Stable Channel only accepts Master Tapes, while the Exclusive and W-Engine Channels require Encrypted Master Tapes.
- The Bangboo channel uses its own currency – Boopons – which are earned via in-game challenges.
- Your first 50 pulls on the standard banner are the beginner banner: you get a 20% discount on 10-pulls (so you can do a 10-pull with just 8 Master Tapes), and you get a guaranteed S-Rank Agent within 50 pulls. Always do 10-pulls here while you have the discount.
- The Exclusive and W-Engine Channels require Encrypted Master Tapes. It is wise to only spend Polychromes on Encrypted Master Tapes as limited characters/weapons are more powerful than those on the standard banner.
- You are guaranteed at least one A-rank per 10 pull on all banners.
- Hard pity for character banners is at 90 pulls; soft pity is at roughly 75 though note that this is an undocumented feature. Hard pity on the W-Engine and the Bangboo banners is at 80 pulls.
- Pity is exclusive to each banner but carries over.
- The Bangboo banner lets you select an S-rank Bangboo, which you’re guaranteed to get during an S-rank pull. Changing your selected Bangboo does not reset pity count.
- 50/50 exists and carries over; failing to get a rate-up Agent or W-Engine guarantees the next one will be the currently featured Agent or W-Engine.
- You get Residual and Fading Signals from your pulls in the gacha, which can be spent in the Signal Shop. This system is similar to Starglitters in Genshin Impact or Undying Embers in Honkai Star Rail. Be sure to nab the monthly Master Tapes, and recycle any Residual Signals into more Encrypted Master Tapes!
- Hoyoverse games require an account, meaning that the only way to reroll will be to make a new account on another email. If you want to reroll, you will need to make a new account every time you do it – not to mention that you’ll barely have any Polychromes/Encrypted Master Tapes even after getting to the gacha system.
- All of the starter S-rank Agents are good. While they have different roles, each of them offers great utility to every player.
Monochromes and Polychromes
First, let’s talk about the difference between Monochromes and Polychromes, beginning with Monochromes, which is Zenless Zone Zero’s paid currency.

When you swipe your credit card to buy in-game currency, you’ll get it in the form of Monochromes. Monochromes can be used for:
- Paying for cash shop item bundles and maybe costumes (if ever Hoyoverse decides to implement those).
- Exchanged for Polychromes, with a 1:1 exchange ratio.
Note that you cannot earn Monochromes in-game, ever, since they’re used to pay for item bundles.
Next up are Polychromes. These colorful film reels are used for:
- Paying for QOL services, such as Battery refreshes or battle pass levels.
- Buying Master Tapes and Encrypted Master Tapes (gacha tickets); both types cost 160 Polychromes each.
Unlike Monochromes, Polychromes can be earned in-game, whether via achievements, first-time completion rewards, events, or more. Note, however, that you cannot convert Polychromes to Monochromes!
Banners
Now, for the banners. Zenless Zone Zero follows a very similar banner scheme to Hoyoverse’s other games in that there’s a standard banner (Stable Channel), rate-up character banner (Exclusive Channel), rate-up weapon banner (W-Engine Channel), and Bangboo Channel (which has its own section at the bottom). Different banners require different types of Master Tapes: regular (black) Master Tape is used for the standard banner, while Encrypted (rainbow) Master Tape is used to pull on all rate-up banners. Be sure you’re buying the right kind of Master Tape as they aren’t interchangeable.

Let’s start with the standard banner as it’s a vital tool for new proxies. This is the one labeled “Stable Channel” in the left-hand panel.

Zenless Zone Zero’s standard banner is also its beginner banner, so don’t worry about missing out. As the beginner banner, the standard channel offers:
- A 20% discount on 10-pulls as long as the beginner banner is still up. This means that you save two Master Tapes every time you do a 10-pull. Always do 10-pulls while this is active.
- A guaranteed A-rank Signal – either a W-Engine or an Agent – every 10 pulls. You can get more than one A-rank per 10-pull if you’re lucky.
- A guaranteed S-rank Signal – guaranteed to be an Agent – within 50 pulls.
Once you’ve done 50 searches on the Stable Channel (you’ll earn more than enough Master Tapes going through the early game), it will change its behavior:
- One guaranteed A-rank Signal per 10 pulls.
- One guaranteed S-rank Signal per 90 pulls.
- You can select one of six S-rank Agents – Grace, Alexandrina, Koleda, Nekomiya, Soldier 11, or Von Lycaon – to join you once you’ve pulled a total of 300 times on the Stable Channel. Beginner banner pulls count towards this.
The Exclusive Channel is for the current rate-up character. It functions in pretty much the same way as the Stable Channel, except it requires Encrypted Master Tapes:
- One guaranteed A-rank Signal per 10 pulls. Weighted towards the featured A-rank Agents on the banner. Note that you can still get W-Engines on this banner.
- One guaranteed S-rank Signal per 90 pulls. Weighted towards the featured S-rank Agent on the banner.
Next is the W-Engine Channel:
- One guaranteed A-rank Signal per 10 pulls. Weighted towards the featured A-rank W-Engines. You can still get Agents from this.
- One guaranteed S-rank Signal per 80 pulls. Weighted towards the featured S-rank W-Engine.
It is always wise to funnel your resources into getting only Encrypted Master Tapes as limited Agents and W-Engines are much stronger than standard banner 5*.
Finally, there’s the Bangboo Channel. This channel uses its own currency – Boopons –
Pity
You can’t have a gacha game without pity, and luckily, Zenless Zone Zero has a simple pity system.

Pity in Zenless Zone Zero works as such:
- Each pull on a banner that is not an S-rank signal raises the pity count by one. Ten pulls would raise the pity count by ten. Pity count is exclusive to each banner; pulling on the Stable Channel does not increase your pity count for the Exclusive Channel.
- If you’ve pulled 90 times on the Stable or Exclusive Channel and have not received an S-rank signal, the 90th pull is guaranteed to be an S-rank signal. This occurs at 80 pulls on the W-Engine Channel. This is what’s known as “hard pity”.
- While not official, player experience indicates that Zenless Zone Zero also has “soft pity” – starting from a certain number of pulls (roughly 70 for the Stable and Exclusive channels and lower for the W-Engine Channel), the base chance of getting an S-rank signal increases per pull. This goes up until it finally hits 100% at 90/80 pulls, meaning that odds are you very likely won’t have to go all the way to 90/80 pulls to get your S-rank.
- When pulling on the Exclusive or W-Engine Channels, there’s a chance that the S-rank you get will not be the featured Agent or W-Engine. If this happens, the next S-rank signal you get on that banner is guaranteed to be the featured Agent or W-Engine. Essentially, you’ll want 180 pulls to score a 100% chance of getting a specific Agent or W-Engine.
- The Bangboo banner allows you to select an S-rank Bangboo. You have a 100% chance of obtaining that Bangboo if you get an S-rank signal. Changing your selected Bangboo while you’ve accumulated pity will not reset the pity counter!
Lastly, you’ll be happy to know that both pity and 50/50 carry over between limited banners.
Signal Shops
Each Agent or W-Engine you get from the gacha also gives you some Residual or Fading Signals, depending on their rarity. You get eight Residual Signals per A-rank pull, and 20 Fading Signals per B-rank pull. If you’ve already played Genshin Impact or Honkai: Star Rail, this system will likely be familiar to you and you can skip ahead.

These signals can then be spent in the Signal Shop (either via the Store or at the lower left of the gacha menu) to buy some neat stuff.
The Residual Signal shop lets you buy:
- Encrypted or regular Master Tape (your choice, but again, I suggest you always go for Encrypted) for 20 Residual Signals. You can buy as many of these as you want.
- Some S-rank W-Engines for 600 Residual Signals. You can buy these once a month.
- Two A-rank Agents, each costing 140 Residual Signals. These characters can only be bought once per month and rotate monthly.
Meanwhile, the Fading Signal shop offers:
- Five each of Encrypted and Regular Master Tapes, which cost 90 Fading Signals each (so to get five Encrypted and Master Tapes will cost you a total of 900 Signals). These reset every month. Since you’ll be swimming in Fading Signals anyway, be sure to visit this store whenever a new month rolls over!
- Skill upgrade materials (50 of all Attributes) for 12 Fading Signals each. Resets monthly.
- Agent/W-Engine/Drive Disc experience materials. Agent exp materials cost six signals while the other two cost five signals each. Limited to 80 per month per type.
- Dennies, if you really need them. Fifteen signals nets you 6000 Dennies, and once you’ve bought that 80 times in a month, you can buy more – but at a markup.
The Bangboo Channel, on the other hand, yields Bangbucks that can be spent in the Bangbuck shop:
- You can buy 5 Boopons per month. Each one costs 20 Bangbucks.
- You can buy a Marcel Modified Party once per month for 1200 Bangbucks. Honestly, I have no idea what this does, but I think it can be used as a substitute for an S-rank Bangboo duplicate.
- Two A-rank Bangboos can be bought for 200 Bangbucks each – great if you’re looking to add specific Bangboos to your collection or require duplicates. These rotate monthly.
- Ten Concentrated Cooling Fluid for promoting Bangboos; each one costs 16 Bangbucks. Resets monthly.
- 25 Bangboo System Widgets for leveling your Bangboos; each one costs 8 Bangbucks. Also resets monthly
- 2,500 Dennies for 2 Bangbucks each. Can be bought an unlimited amount of times, but there are better things to buy here.
Reroll Guide
Bear in mind that Hoyoverse games no longer allow guest accounts, so we’re doing this the old, hard way. That said, if you’re really determined to reroll in Zenless Zone Zero, here’s how.
- Prepare a bunch of new Hoyoverse accounts. Don’t forget the emails of each. You can use salted emails to expedite this process…but not by much. To create salted emails, first create a main e-mail then a bunch of salted e-mails by adding a period to it. So something like zzzreroller@gmail, zzz.reroller@gmail, z.zzzreroller@gmail, and so on. This ensures that you only need to keep your eyes on the master account.
- Play through the game. Even with the skip button (tap the upper right, then “skip”) this will take a while. You’ll probably spend half an hour just unlocking the gacha system.
- Pull. Maybe you’ll get lucky. At the very least you’ll be able to get your starter 5* if you progress a bit further.
- Fail to get the character you wanted, cry, and do it all over again.
As with other guides, I don’t recommend rerolling in Zenless Zone Zero as it’s far too much effort for barely any Encrypted Master Tapes (good luck getting an S-rank with the base rates) and all of the starter S-rank Agents are good.
Promo Codes
Lastly, here’s a bunch of codes to nab you some free stuff – including Polychromes. These codes work as of July 26, 2024.
- ZZZHOYOLAB – 10,000 Dennies, 3 Official Investigator Logs.
- ZENLESSLAUNCH – 60 Polychromes, 16,666 Dennies, 3 Official Investigator Logs
- CATCHABOO – 30 Polychromes.
- ZENLESSGIFT – 50 Polychromes, 2 Official Investigator Logs, 3 W-Engine Power Supplies, 1 Bangboo Algorithm Module.
To A Brighter New Eridu
Whether it’s to restore the good name of Phaethon, to guide Hollow Raiders (and collect a fat paycheck in the process) through the depths of danger, or to uncover the mystery of the four Keys, you can now rest assured that you’ll be able to make progress towards creating a better future not just for New Eridu, but for humanity as a whole.
That concludes this beginner’s guide to Zenless Zone Zero, and I hope I was able to help you find your footing and set the stage for future victories. If you have any corrections to make or any suggestions on how to improve this guide (especially for totally new players), make yourself heard in the comment section below!