TheoTown is a casual sandbox, city-building and management simulation game that allows you to create a city according to your own design. The game was created by indie developer, Lobby Divinus, and published by the company, blueflower, both of which hail from Germany. Initially released on June 5, 2019, the game was received positively among various platforms such as Android, iOS, Microsoft Windows, Linux, Classic Mac OS.
Many of the elements of TheoTown’s gameplay can be found in similar mobile games such as SimCity BuildIt and Pocket City 2, both of which we have also covered in our website previously. All three games have a similar system of balancing residential zones, commercial zones, industrial zones and recreational structures to advance your city but take different approaches to other aspects of the game.
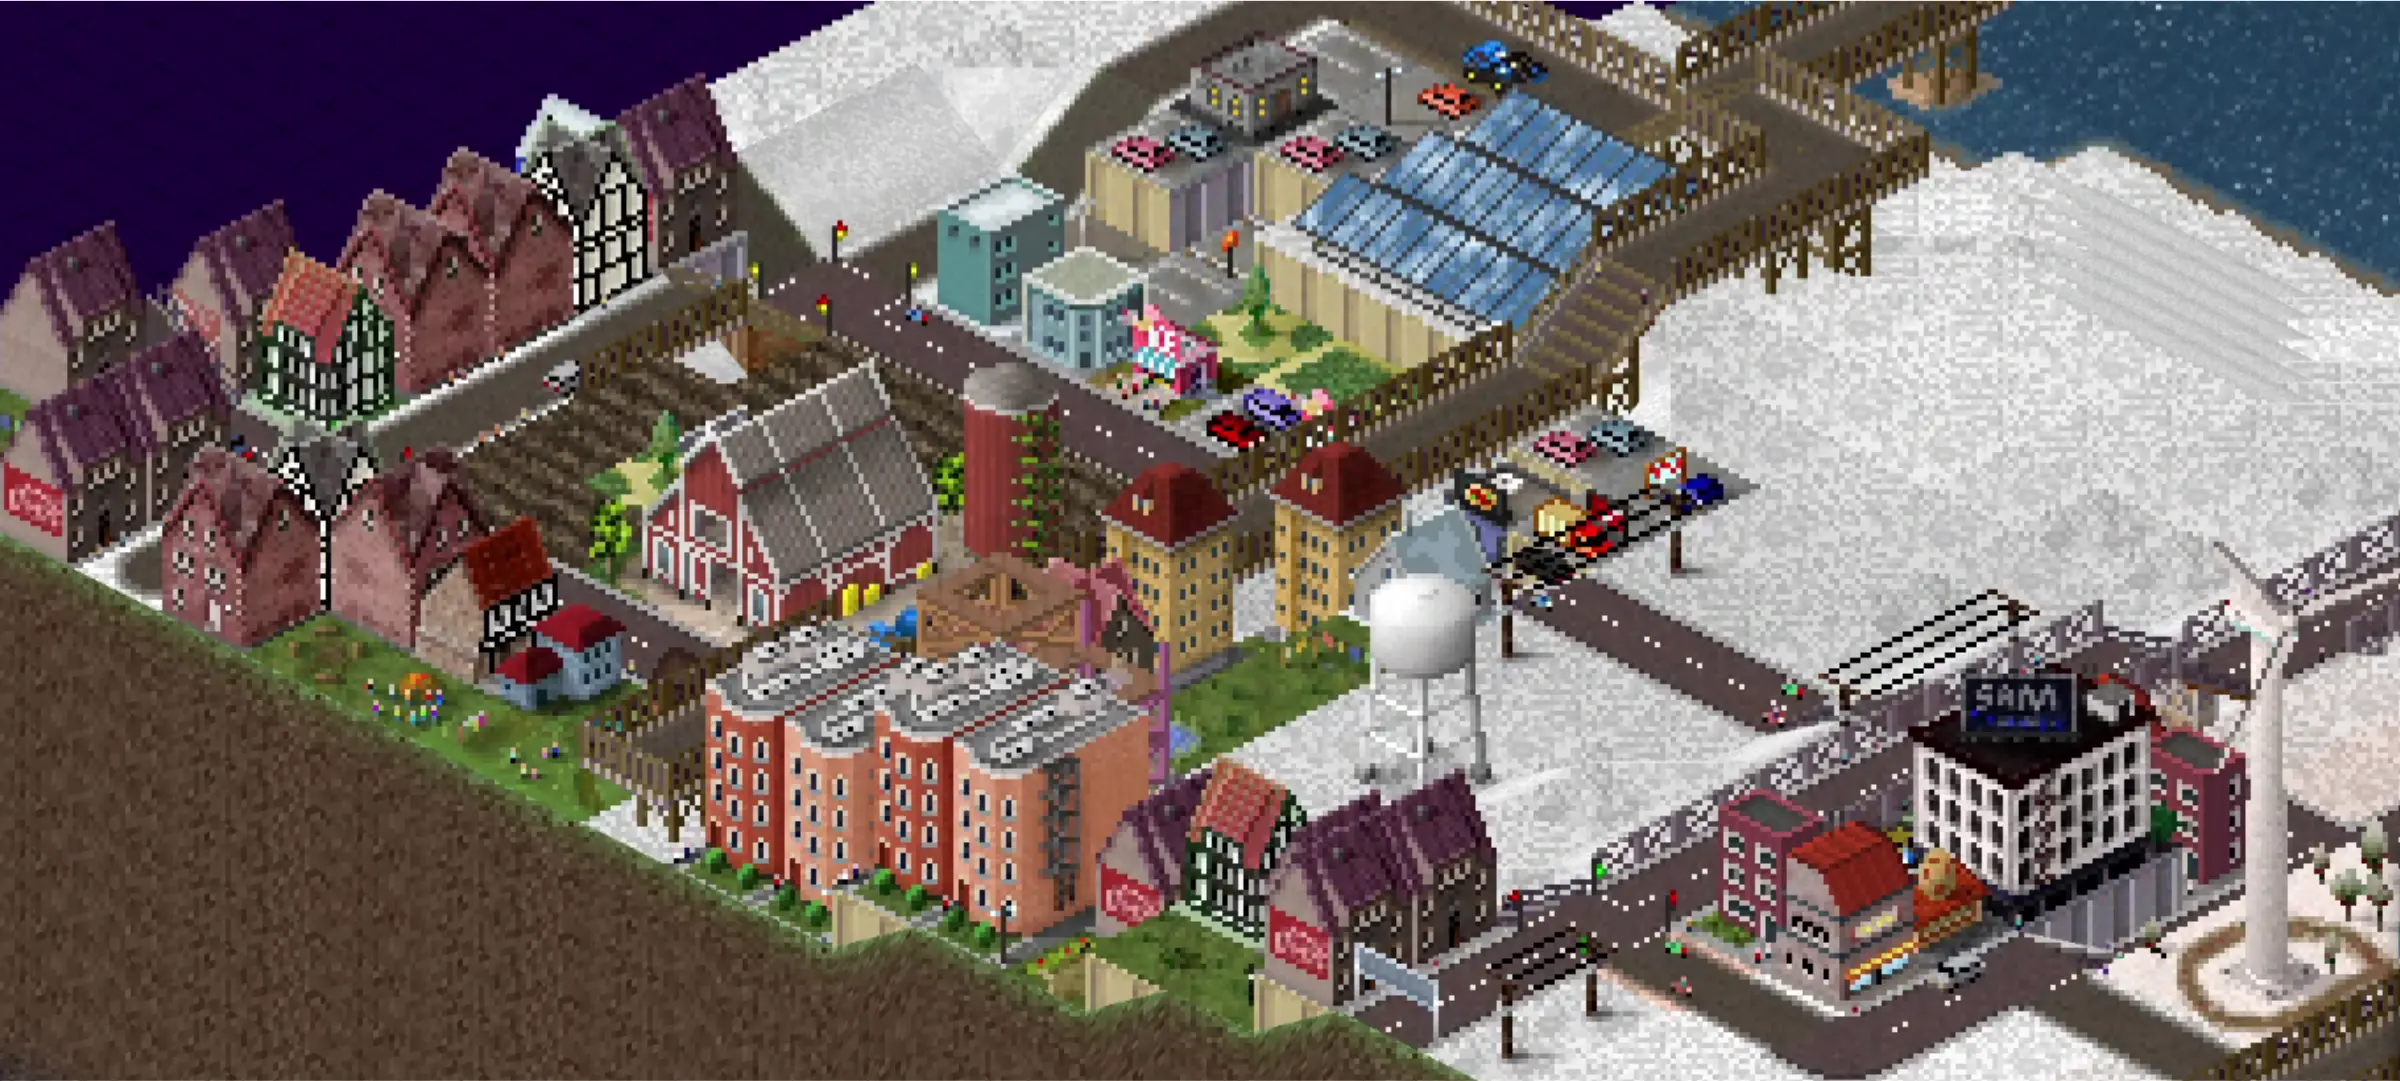
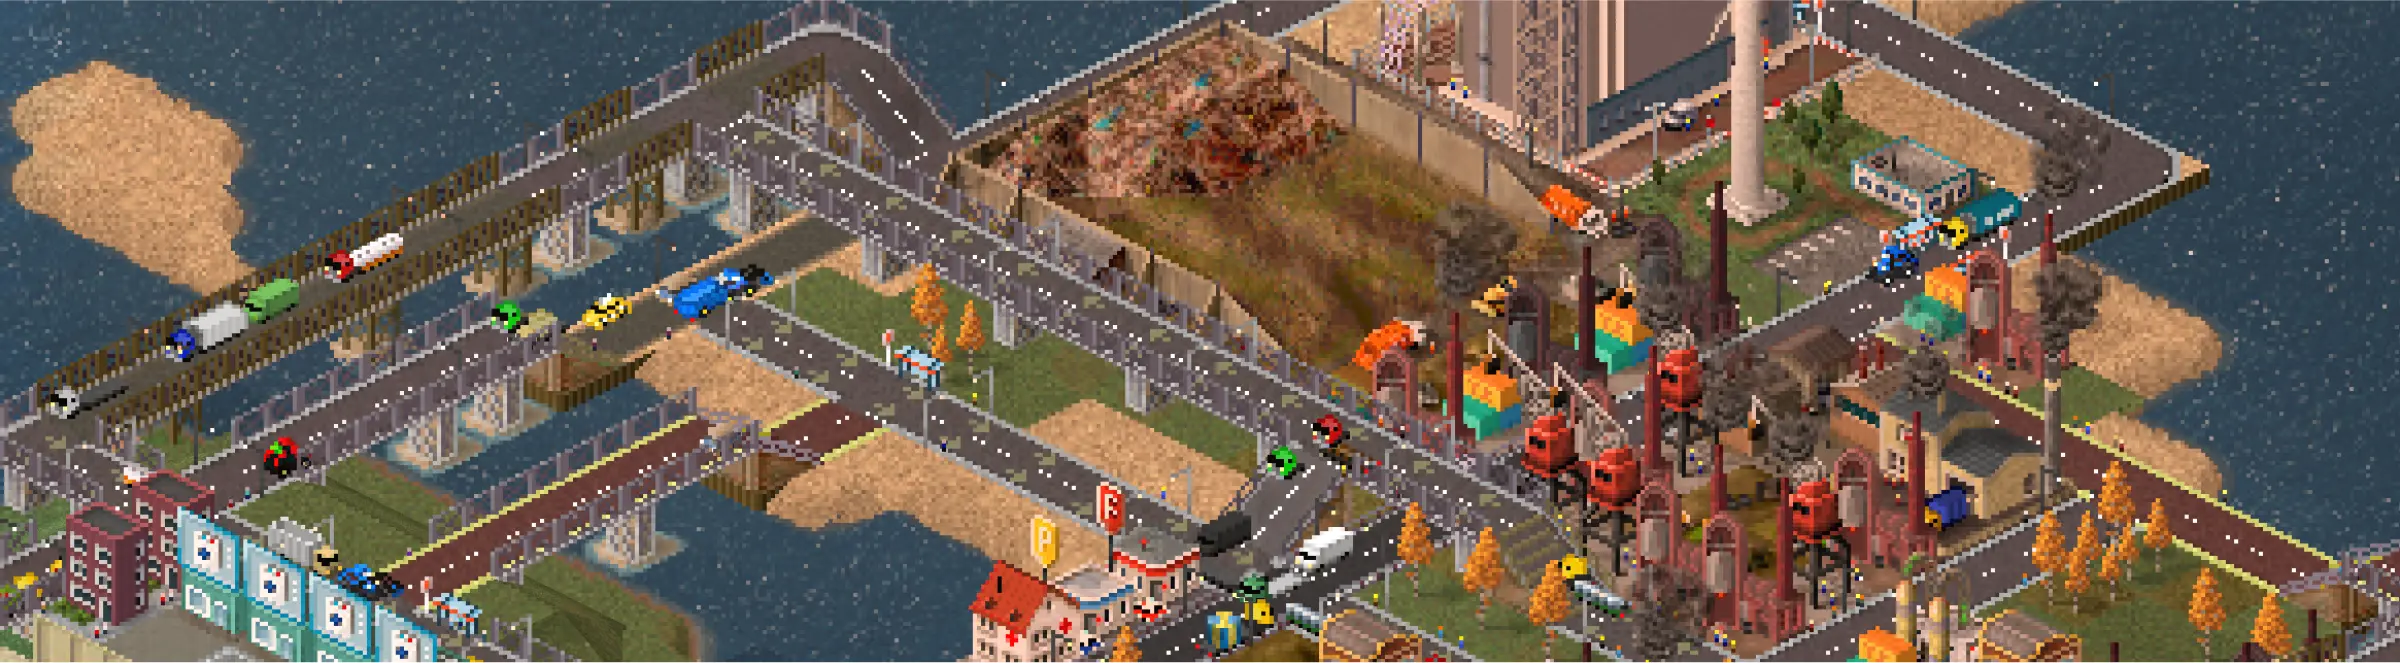
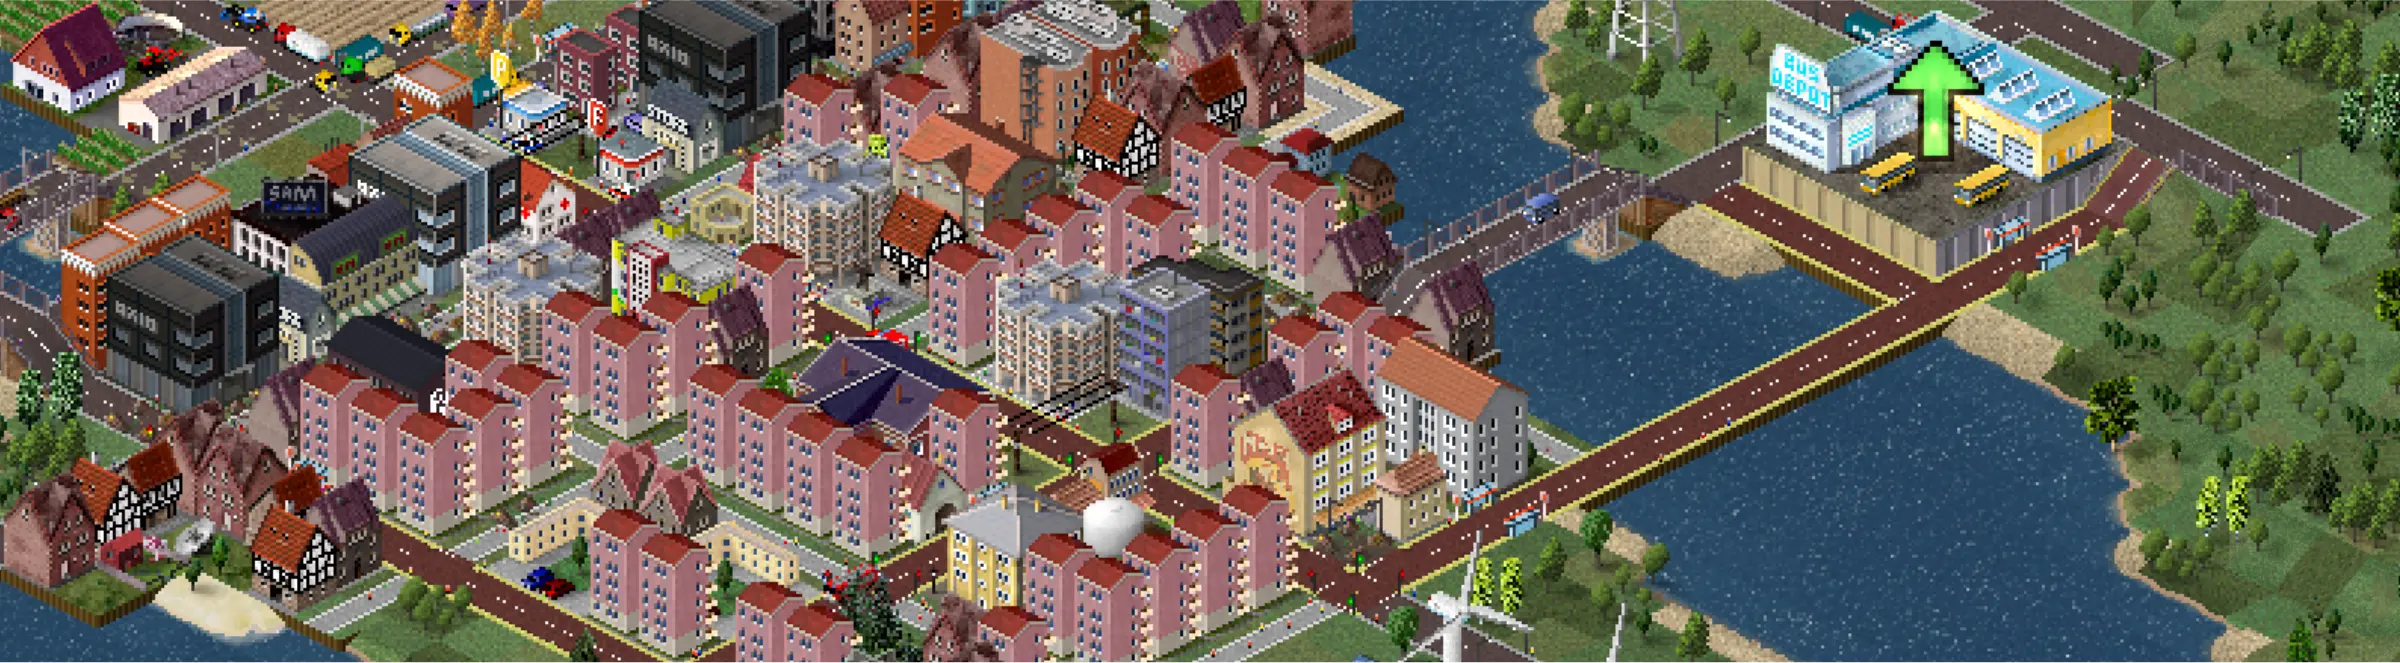
From our experience, TheoTown’s gameplay has a very detailed and realistic approach to traffic systems and transportation, giving players an interesting challenge while juggling the needs and demands of the city. There’s also a great deal of control granted to the player when it comes to the environment of your city. You can customize the land from the terrain and plant life down to the elevations and water forms which can make for some interesting creations.
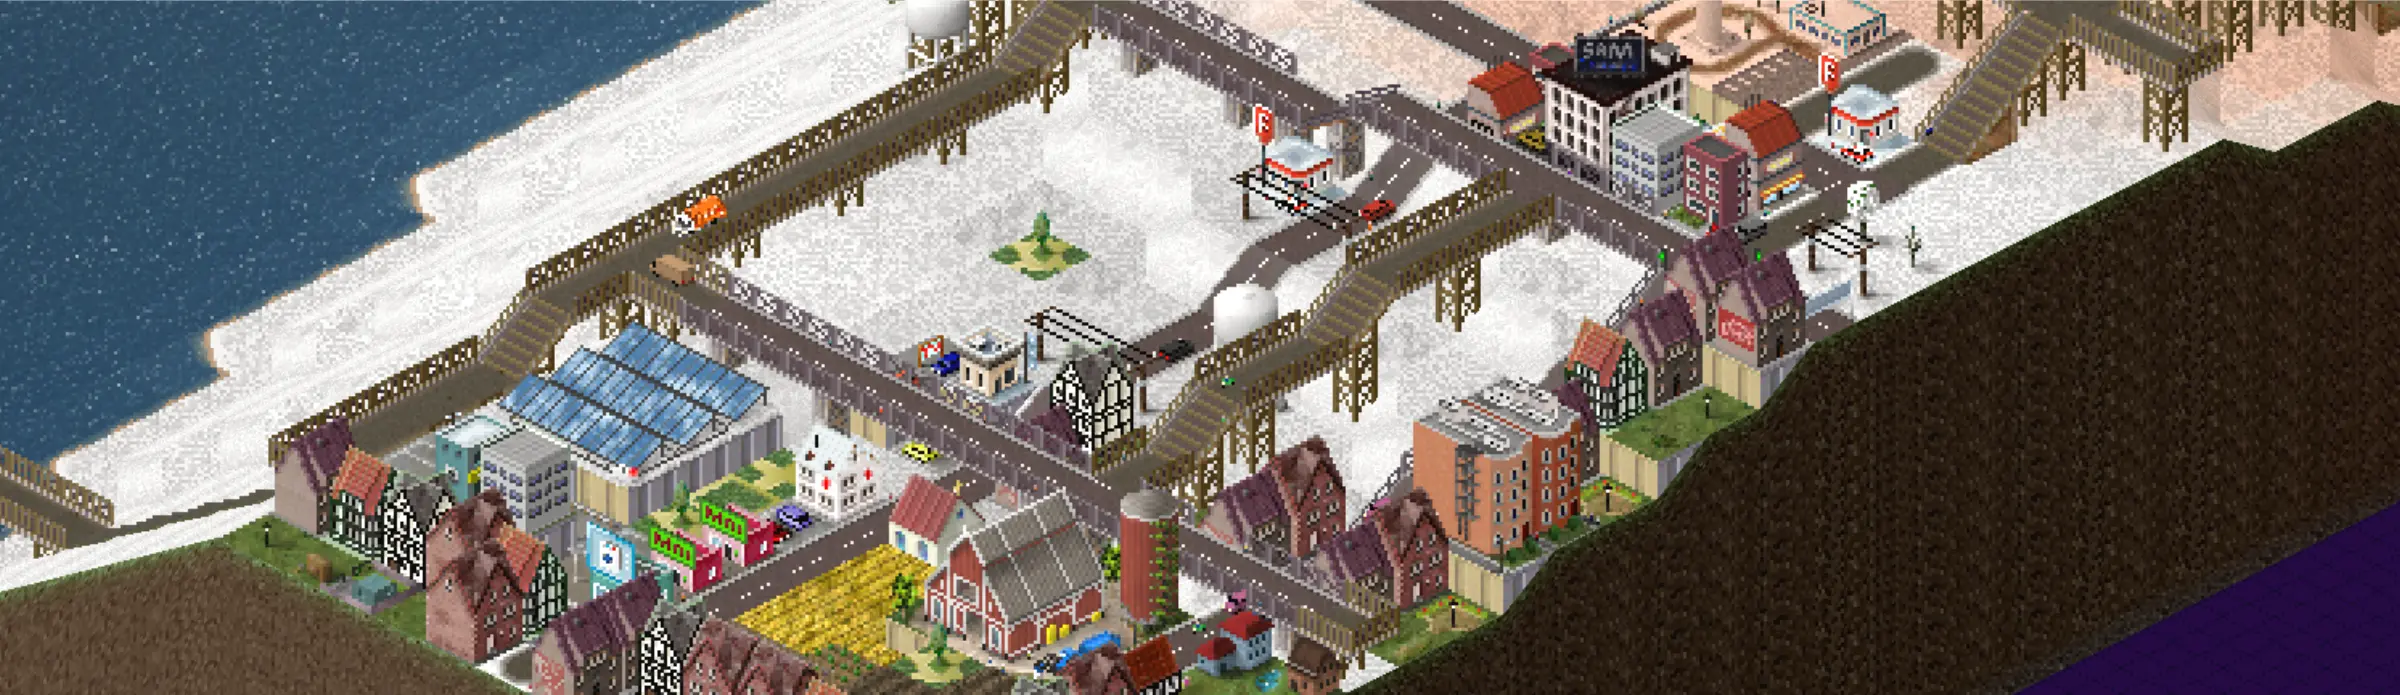
Another aspect that keeps it apart from these two other city-building games is the fact that the graphics are created entirely in pixel art but still lets you view it in 4 different angles. This game’s retro aesthetic paired with its soothing background music and laid back gameplay makes for a very relaxing time before you turn off your lights for bed.

TheoTown is a captivating game that can entertain most players who are suckers for simulation and management games and we at Level Winner have found ourselves spending countless hours trying to create the best road networks and the most functional town we could. We realized that the game had a lot of depth to it and had moments where we felt stuck because we weren’t sure how certain aspects of the game worked.
After spending several days on the game, we present to you our handy dandy beginner’s guide to TheoTown! In this guide, we hope to help new players familiarize themselves with the various tools of the game and teach them some strategies that can help them create the city of their dreams!
To make it easy to maneuver through this lengthy guide, we have divided this article into 4 distinct parts: City Planning, Increasing Your Inhabitants’ Happiness, Protecting And Destroying Your City, and General Tips.
City Planning
In this section, we’ll be discussing the most important aspects of the game when it comes to planning and constructing your city. There were some instances where we found ourselves lost and confused over what certain tools were for and how they were used. We’ve compiled everything that we feel can be useful to know for new players of the game.
Creating Regions
At the start of the game, a region will already be built for you and the game will greet you with a short tutorial of how to play the game. However, if the current region is not to your liking, you can always create a new one after the tutorial (unless you decide to skip it). To do this, tap the “New region” button at the upper left corner of your screen. There are many ways to customize the region to your liking:

- Seeds – You can input a number, randomize one with the dice icon, choose one of the presets with the icon next to it, or load one with the folder icon.
- Size – You can select a region size between Huge (2.5 sqmi), Giant (10 sqmi), Even bigger (40 sqmi).
- Layout – This determines the chunks of the region you can work on at a time. A 2×2 layout will always be divided by 4 squares. A circle layout on the other hand will have one large square with several smaller squares above, below and to the sides of it. For this layout, the small squares at the corners will always be empty.
- Map Preview – This is where you can see what your region’s map will look like. Tapping the squares will give you the following option:
- Exclude – Turns an area black, making it empty.
- Include – Adds a map to an empty area.
- Merge – Merges 4 squares into 1 larger square.
- Split – Splits 1 square into 4 smaller squares.
- Trees – Toggling this will generate trees on top of the terrain.
- Decorations – Toggling this will generate decorations on top of the terrain.
- Terrain – Gives you the option to add Hills and Rivers. It also lets you choose the terrain’s Roughness which dictates how rocky and uneven the land is. You can choose between Flat, Less, Default, More, and Extreme.
- Biomes – Allows you to choose what biomes you want your terrain to have or not have. Note that not all biomes will show up in 1 region or map even if all of them are checked. The game will typically choose 4-5 biomes randomly from the list.
After pressing continue, you can name your region. If you want to change your region’s name, simply tap the pencil icon next to the region’s name at the lower right corner of the screen at the region view.

The region you made will be generated and divided into locked sections. At the start, you can unlock 1 section immediately and create a new city. If you choose another section, you’ll need to wait for 30 minutes before it gets unlocked. The third section you choose will require you to get at least 1,000 inhabitants first.
The other closer sections may also have this rule while the sections which are much further can only be unlocked once you unlock one of its closer areas. Because of the wait time, we recommend unlocking one of the sections immediately after the first one so that if you want to work in another city, you won’t need to wait for it later. By then, you may also be able to unlock your third city.
If you create another region, that new region will be the one that will always be loaded by default whenever you open the game. If you want to work on your other regions, simply tap the right and left arrow keys at the lower right corner of the screen to look through them. At the start, you’ll have 3 regions: Theonia (tutorial map), Tributaries, and Flat Earth.
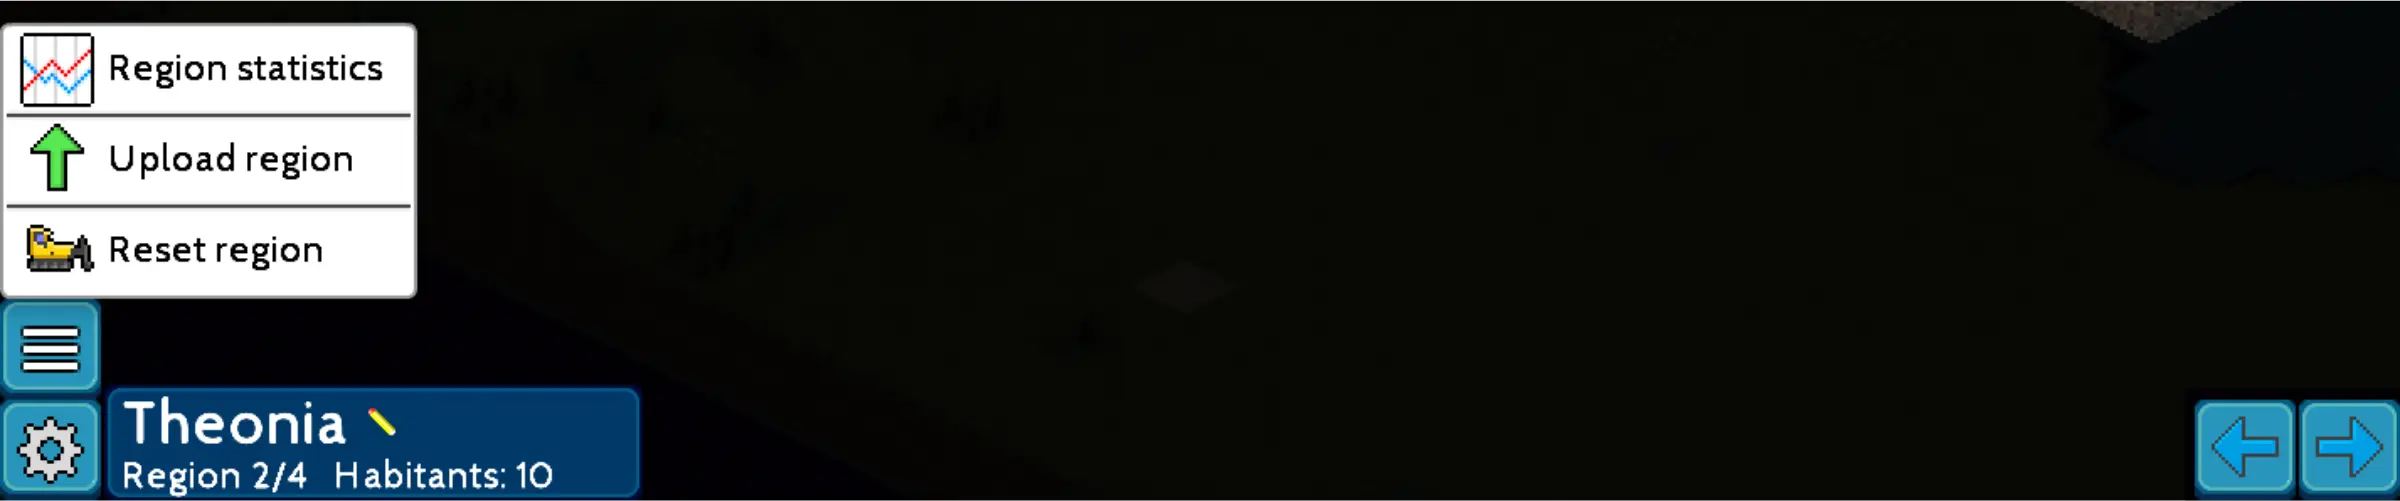
You can also tap the button with three horizontal lines for more options for your regions.
- Delete region – This deletes the region that is currently shown on the screen. All regions can be deleted except for the first three regions. For those regions, “Reset region” appears for that option instead, bringing it back to its original state.
- Upload region – This will let you save the region that is currently shown on the screen online and let other players access and build on it. You can add a password to it if you don’t want other random players to access it. However, before you can do this, you’ll need to spend 200 Diamonds. If you don’t have enough, check the “How to Get Diamonds” section of our guide.
- Region statistics – This will list down the number of cities and habitants you have as well as their general happiness, along with energy and water they’ve produced and used.
Creating Single Cities
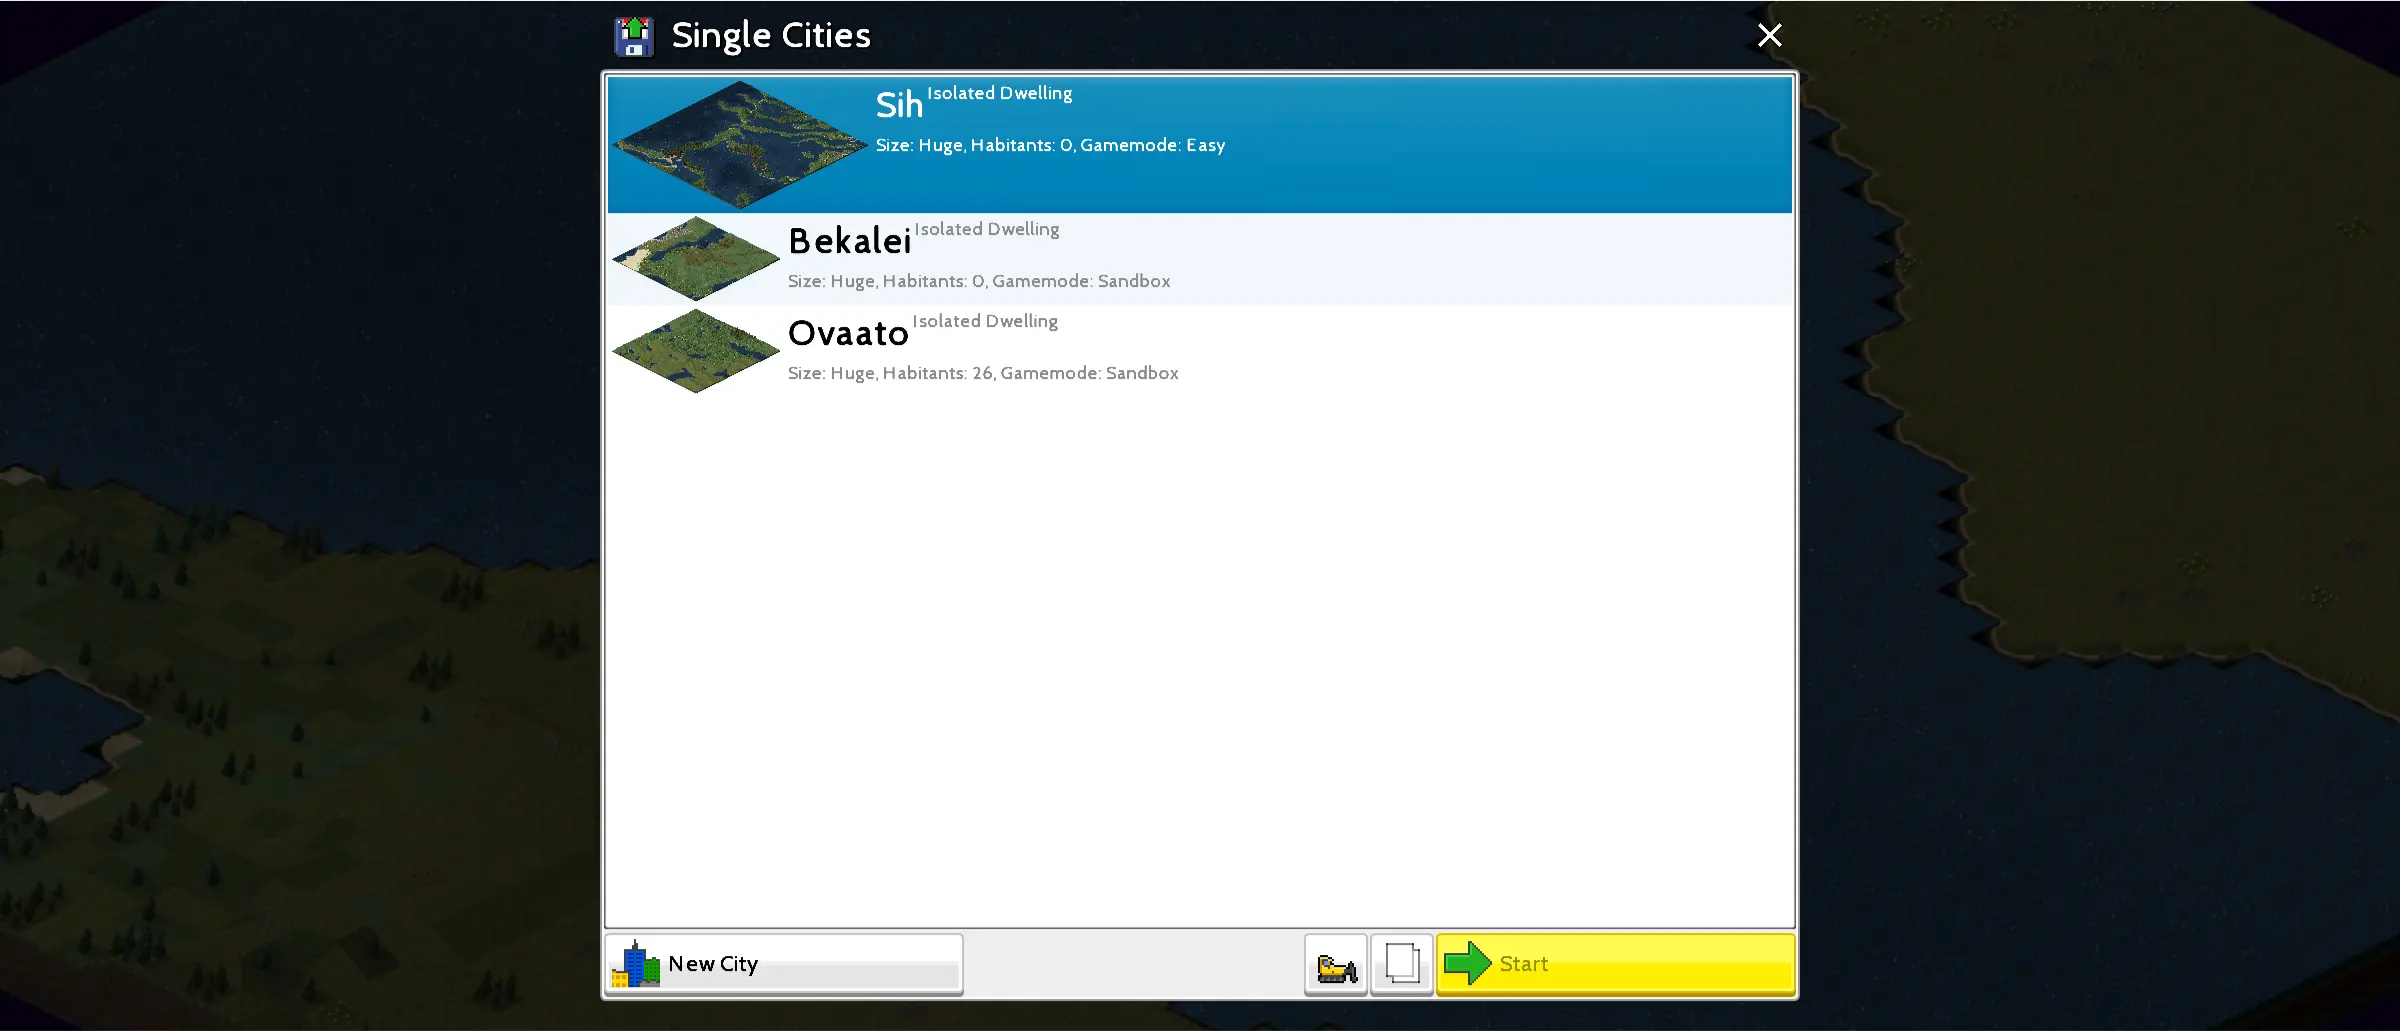
You can create a single city that’s not connected to any region by tapping the “Single Cities” button at the upper left part of the screen. The process of creating a new city is just the same as creating a region but you will only have 1 square generated. You can choose between Small (0.04 sqmi), Medium (0.16 sqmi), Big (0.63 sqmi), or Huge (2.5 sqmi).
Unlike making a region, you can name your city, write your name as the author, and choose the game mode between Easy, Middle, Hard, and Sandbox. Sandbox will allow you to build structures anything right off the bat except for structures that require you to build something else before you unlock them.
This is actually our recommended mode for players who want to test out certain features of the game and experiment. If you want to reload the single cities you’ve created, you can access them through the same button. These cities can be deleted and duplicated in game through the same menu.
Basic Building Tools
Before you start constructing your city, you’ll need to familiarize yourself with the basic building tools and its functions.
Build

The hammer icon at the upper left corner of your screen opens up the build menu. Everything that can be built will be shown there along with other building tools. Below are the ones that allow you to build structures for your city:
- Recent – Displays recently built structures.
- Plugins – Displays player-made plug-ins that you’ve downloaded from the Plugins menu found in the settings.
- Terrain – Displays options to change the terrain type, as well as add hills, rocks, mountains, asphalt, and plants. It also contains the Ground Tool.
- Transport – Displays everything related to transportation such as roads, road decorations, airports, and so on.
- Zones – Displays options to create Residential, Commercial, and Industrial zones.
- Services – Displays options to build structures that provide important services such as fire department, education, health, police and military.
- Supply – Displays options to build utilities for energy, water, waste disposal, and funeral.
- Public – Displays options to build structures that increase happiness of inhabitants such as parks, sports facilities, management buildings, awards, religious buildings, and decorations.
- Landmarks – Displays options to build tourist attractions that can generate income.
- Agency – Displays options to build futuristic structures that unlock more buildings and upgrades.
To place your structure, select one of these options and a grid will appear over the whole map. Depending on the type of structure, the approach to building is different. If you change your mind about something you placed, you can tap undo. Be warned that there is a limit to how many times you can go back to a previous state.
Remove
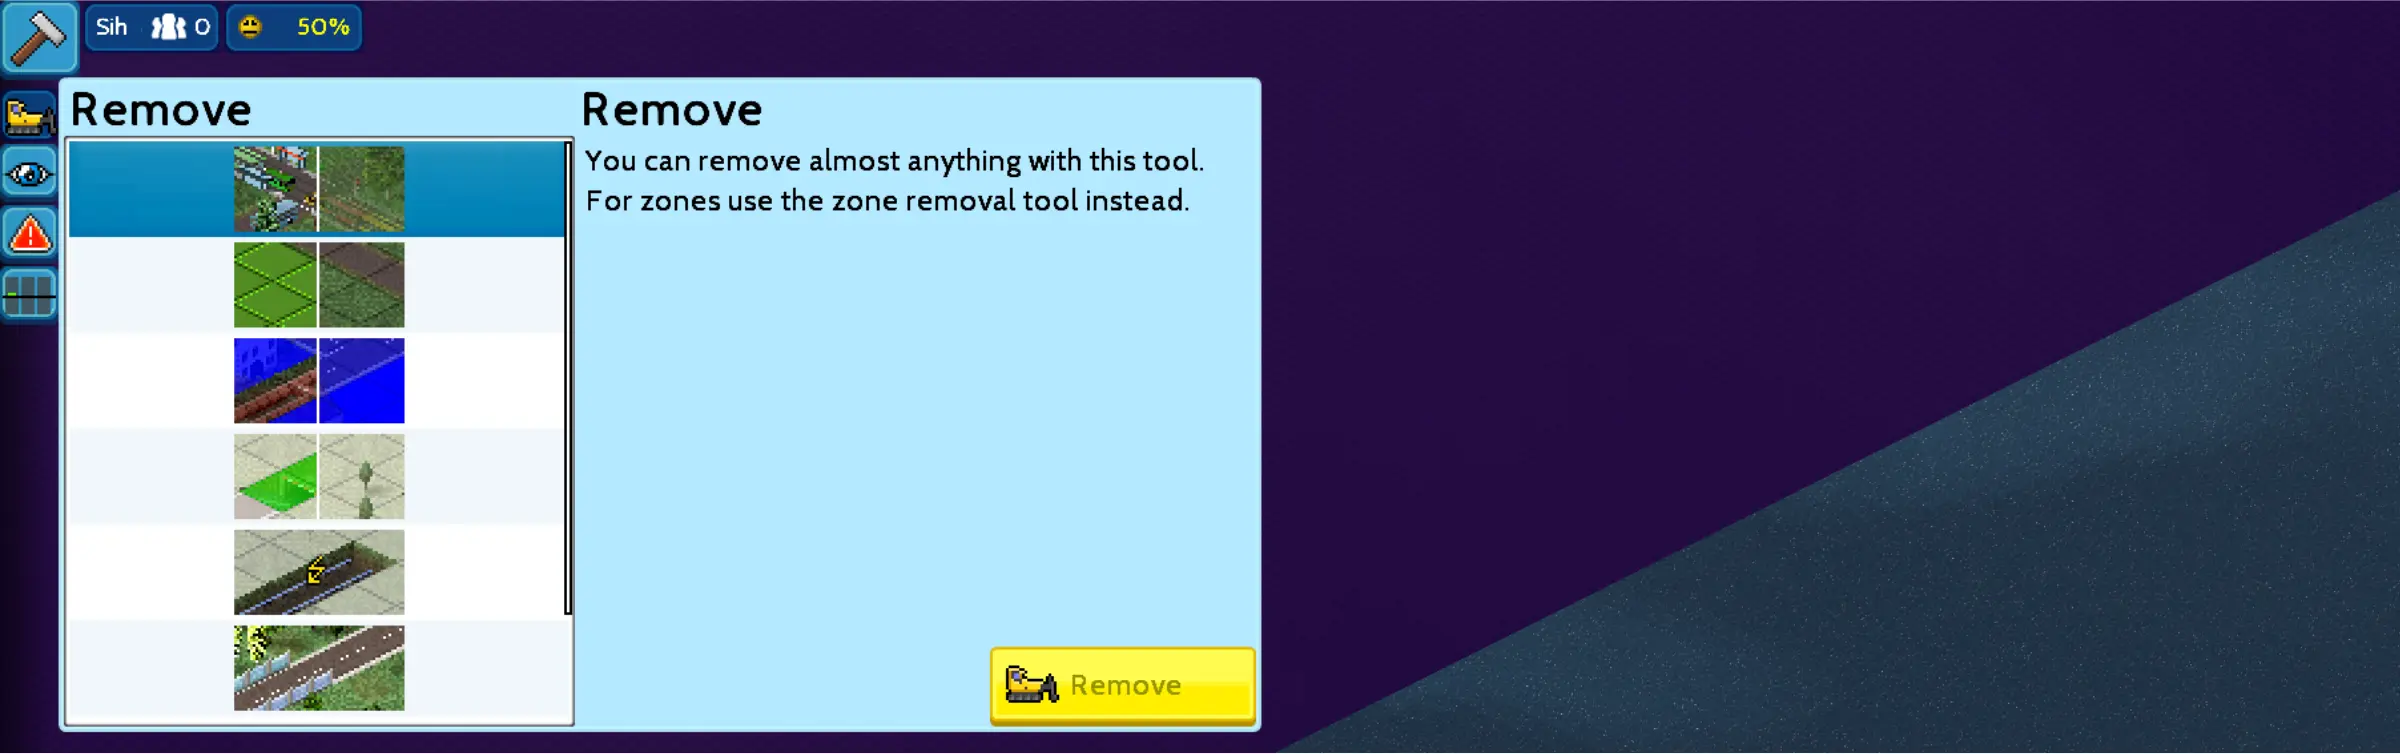
The bulldozer icon just below the hammer icon allows you to open the remove menu which lets you remove structures. Removing structures will give you back 50% of the money you spent to build it in some cases. Different remove tools must be used for specific structures:
- Remove – removes just about anything that isn’t specified by the other tools on the list such as roads, bus stops, and buildings to name a few. It will not remove what the other tools are made to remove. Using this on zones will only destroy the buildings which will be rebuilt with new ones according to the zone assigned to it.
- Remove zone – removes zones you’ve placed. Using this on zones with structures will automatically remove those structures as well.
These other tools are self-explanatory:
- Remove pipes
- Remove tunnel
- Underground wires
- Remove road deco
- Remove metro tunnel
- Remove fence
Move Building
This tool can be found in the build menu and allows you to move buildings you’ve already built from one place to another. Moving a building will still cost money (about 30% of the original building price), but will cost a lot less than destroying the building and building it again. However, a moved building will rebuild itself and take time just like when you first built it. Take note that some buildings and structures cannot be moved such as buildings created from the zone menu and the bus depot.
Eyedropper

This tool allows you to tap a structure or road you’ve built before to copy them and let you build the exact same one. Take note that not all buildings and structures can be copied by this tool and you will still need to use your city’s money to build them.
Label
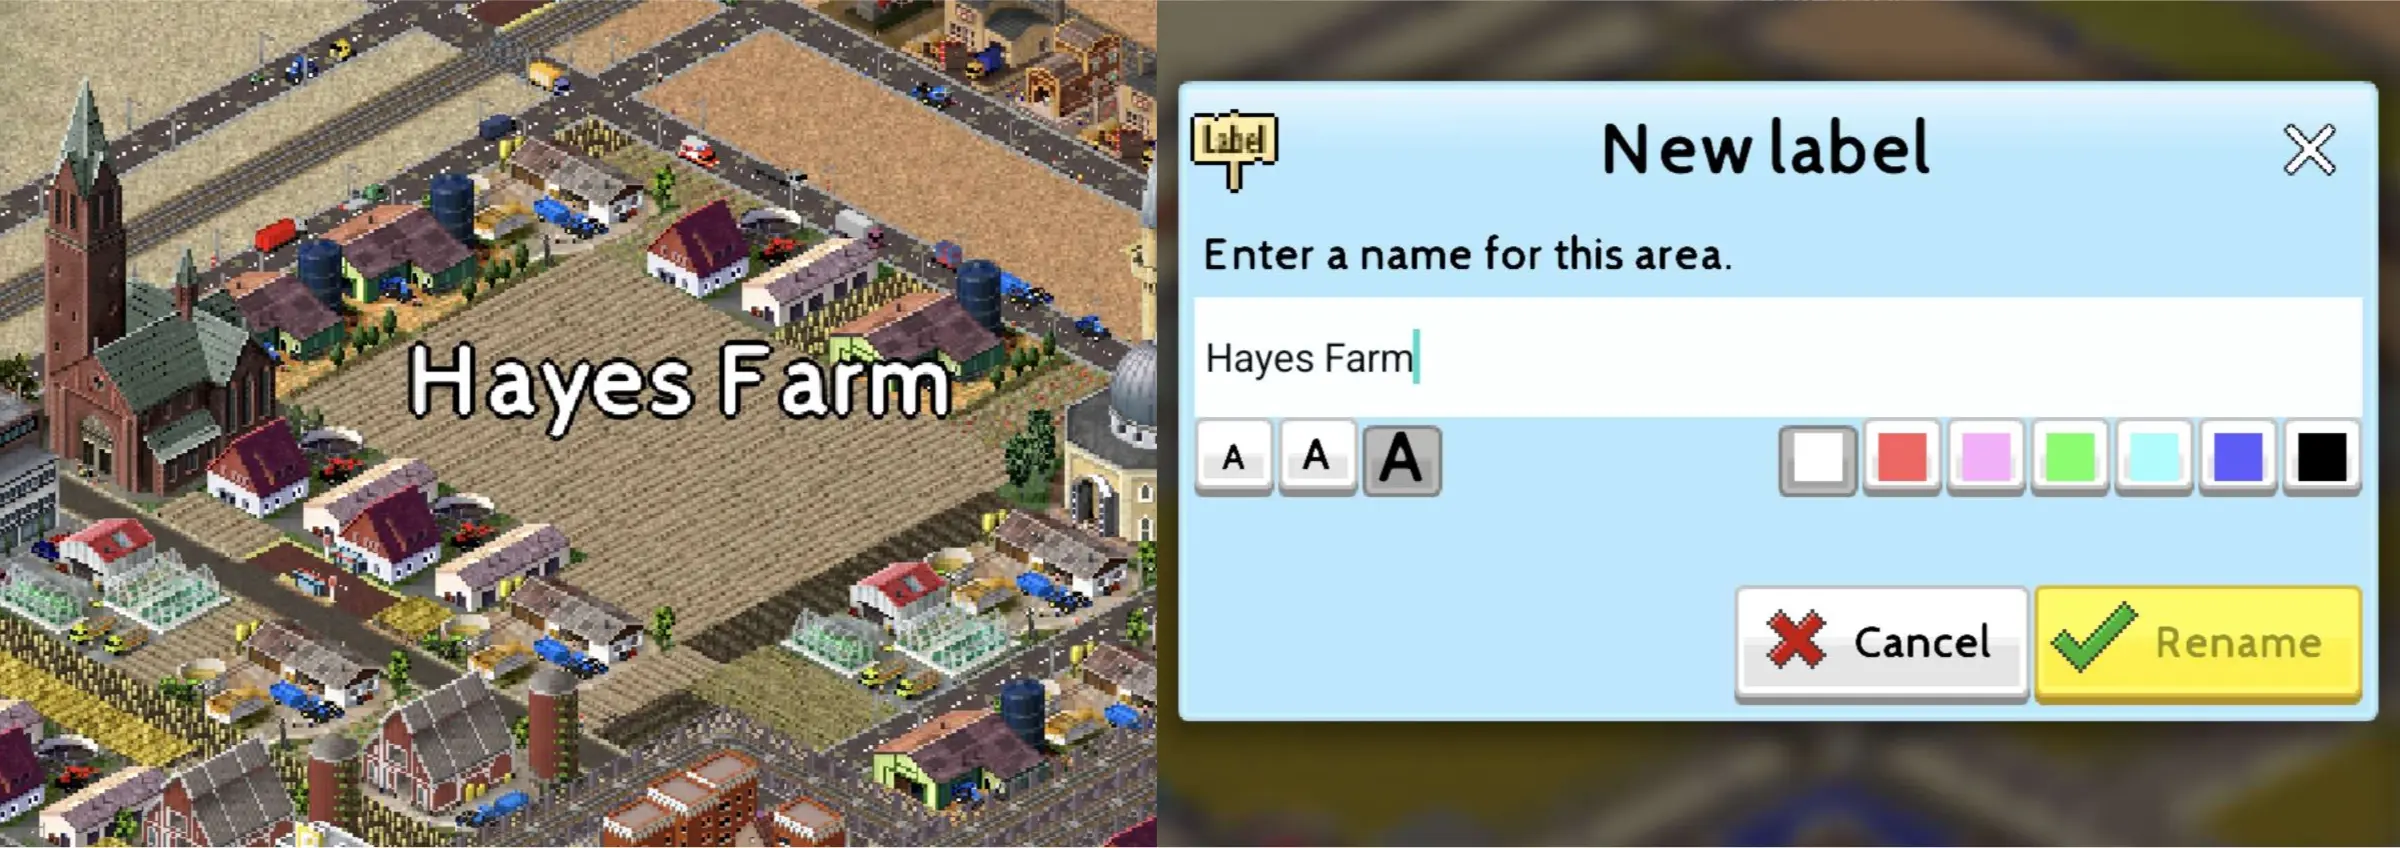
This tool allows you to add labels to certain areas of your city. The text can be customized in size and color. When zoomed in, the text becomes smaller and turns translucent.
Mini-map
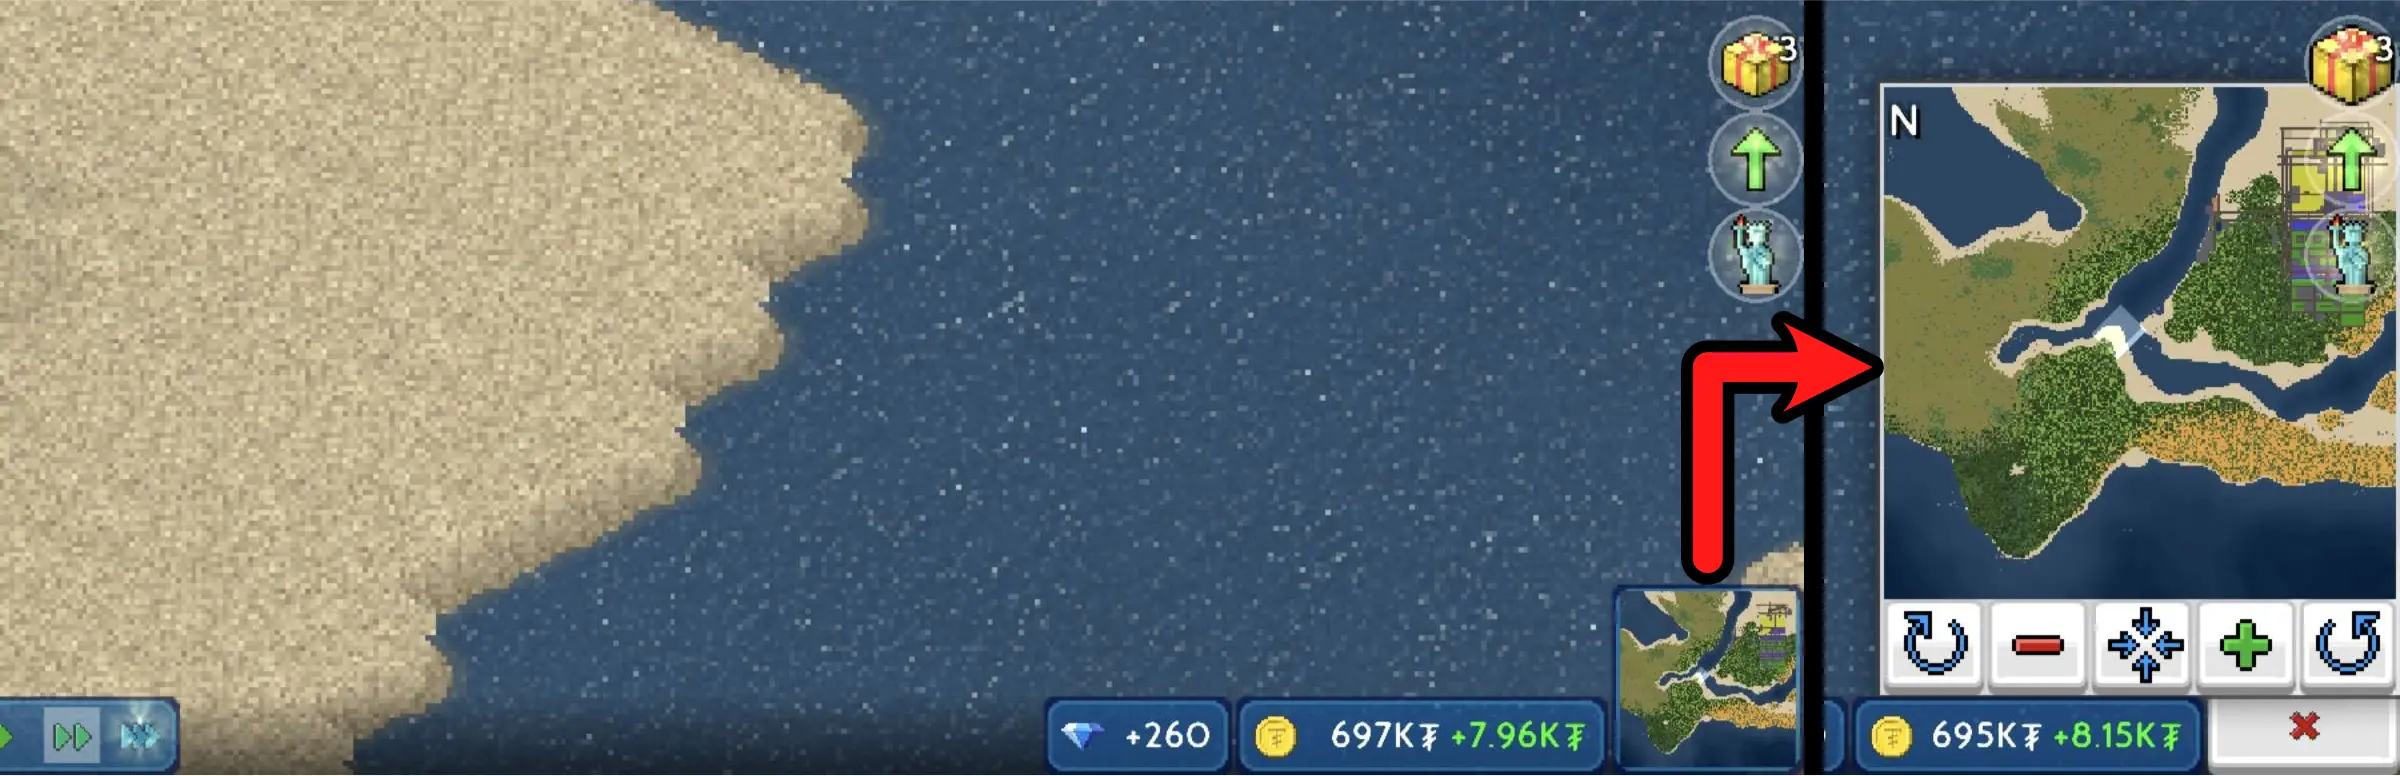
The mini-map can be found at the lower right corner of your screen while you are inside one of your cities. Tapping it will enlarge it and provide several buttons to help you navigate.
- Curved Arrow Buttons – allow you to rotate your map and change its perspective. This is useful in constructing your city because seeing how it looks from different angles can help you find problems in your layout like a road that’s not connected to anything or a building that’s blocked from your view because of a skyscraper.
- Minus (-) and Plus (+) Buttons – allow you to zoom in and out of your map.
- Four Arrow Button – allows you to view the center of the map.
- Mini-map Rectangle – the white rectangle represents how much of the map can be seen on your screen at your current view. You can also slide it around to view specific parts of the map.
Time Bar

The time bar allows you to see the flow of time and the current day of your world. You can also use it to pause time, or play it at 1x, 2x, or 3x speed.
Pausing can be useful for planning and constructing your city because you can apply many major changes without gaining any repercussions until you have completed it. An example of this is reconstructing roads. If a Landfill, which collects trash, cannot reach residential zones because the road is broken, it can make your inhabitants sick after some time has passed.
If you pause and fix the roads before that happens, you won’t have to deal with the potential outbreak of illness. Pausing can also prevent disasters from dealing too much damage before you apply a fix to it like building a fire department near the area of a burning building and calling the fire brigade on it.
Speeding up time on the other hand not only speeds up the passage of time but also the construction of buildings and the flow of income. If you’re feeling impatient and can’t get anything done because a building isn’t finished yet or you don’t have enough money to build more structures, this can make things easier. However, if you want to get x3 speed, you can only have it for 10 minutes after paying 20 Diamonds or watching an ad.
Other Features
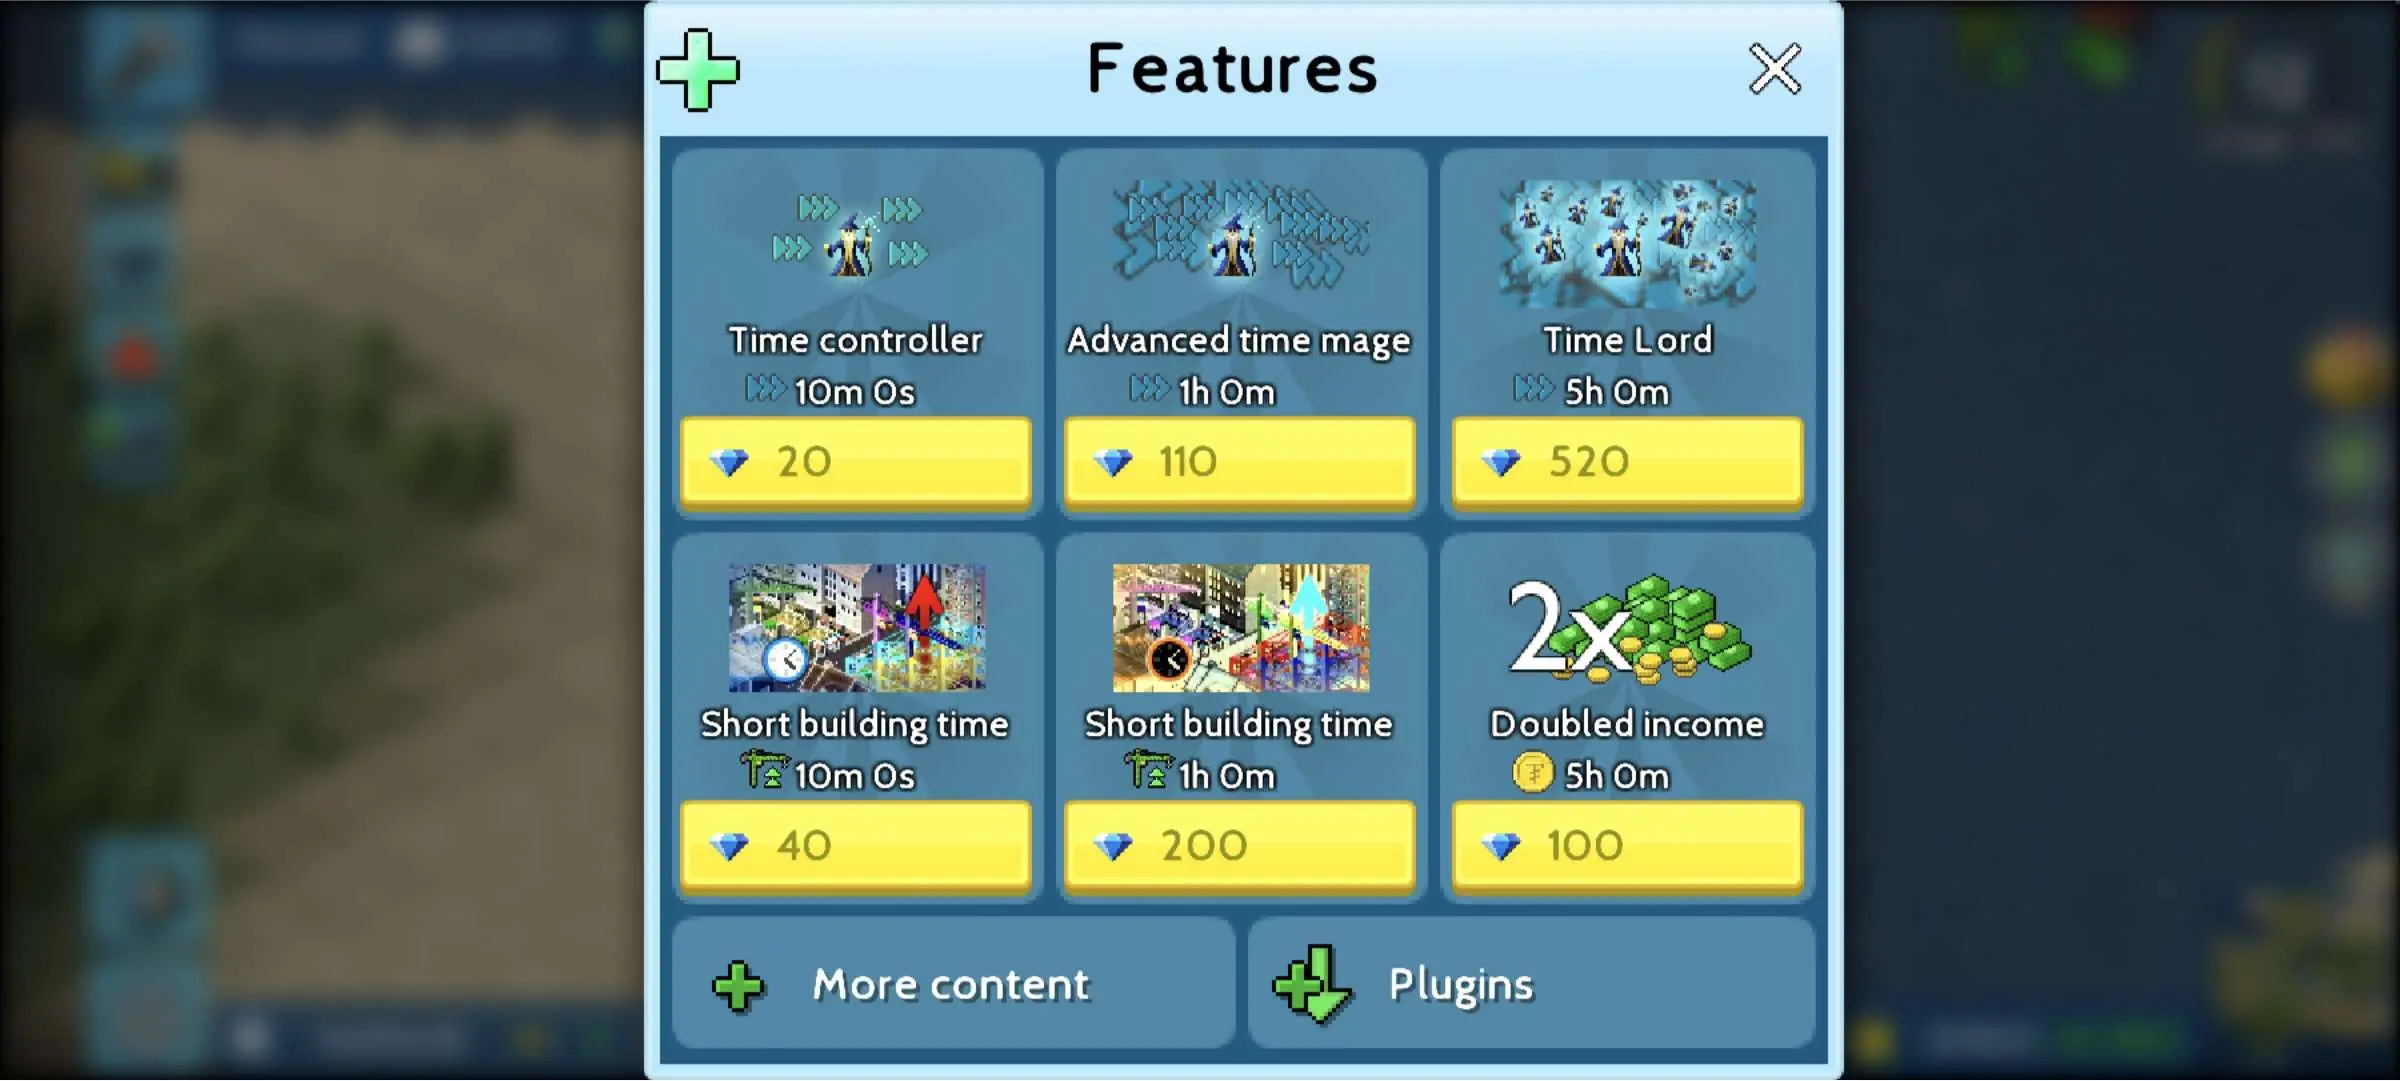
If you want your game to run at x3 speed for a longer period of time, you can go to Settings > Features for more options that can be bought with Diamonds. There are also options that can shorten building time, double your income, slow down your speed, and a few decorative add-ons. One of our recommended features would be the Underground Wires which are bought for 100 Diamonds. These will keep your wires underground, giving you more space to work with and getting rid of those electric posts.
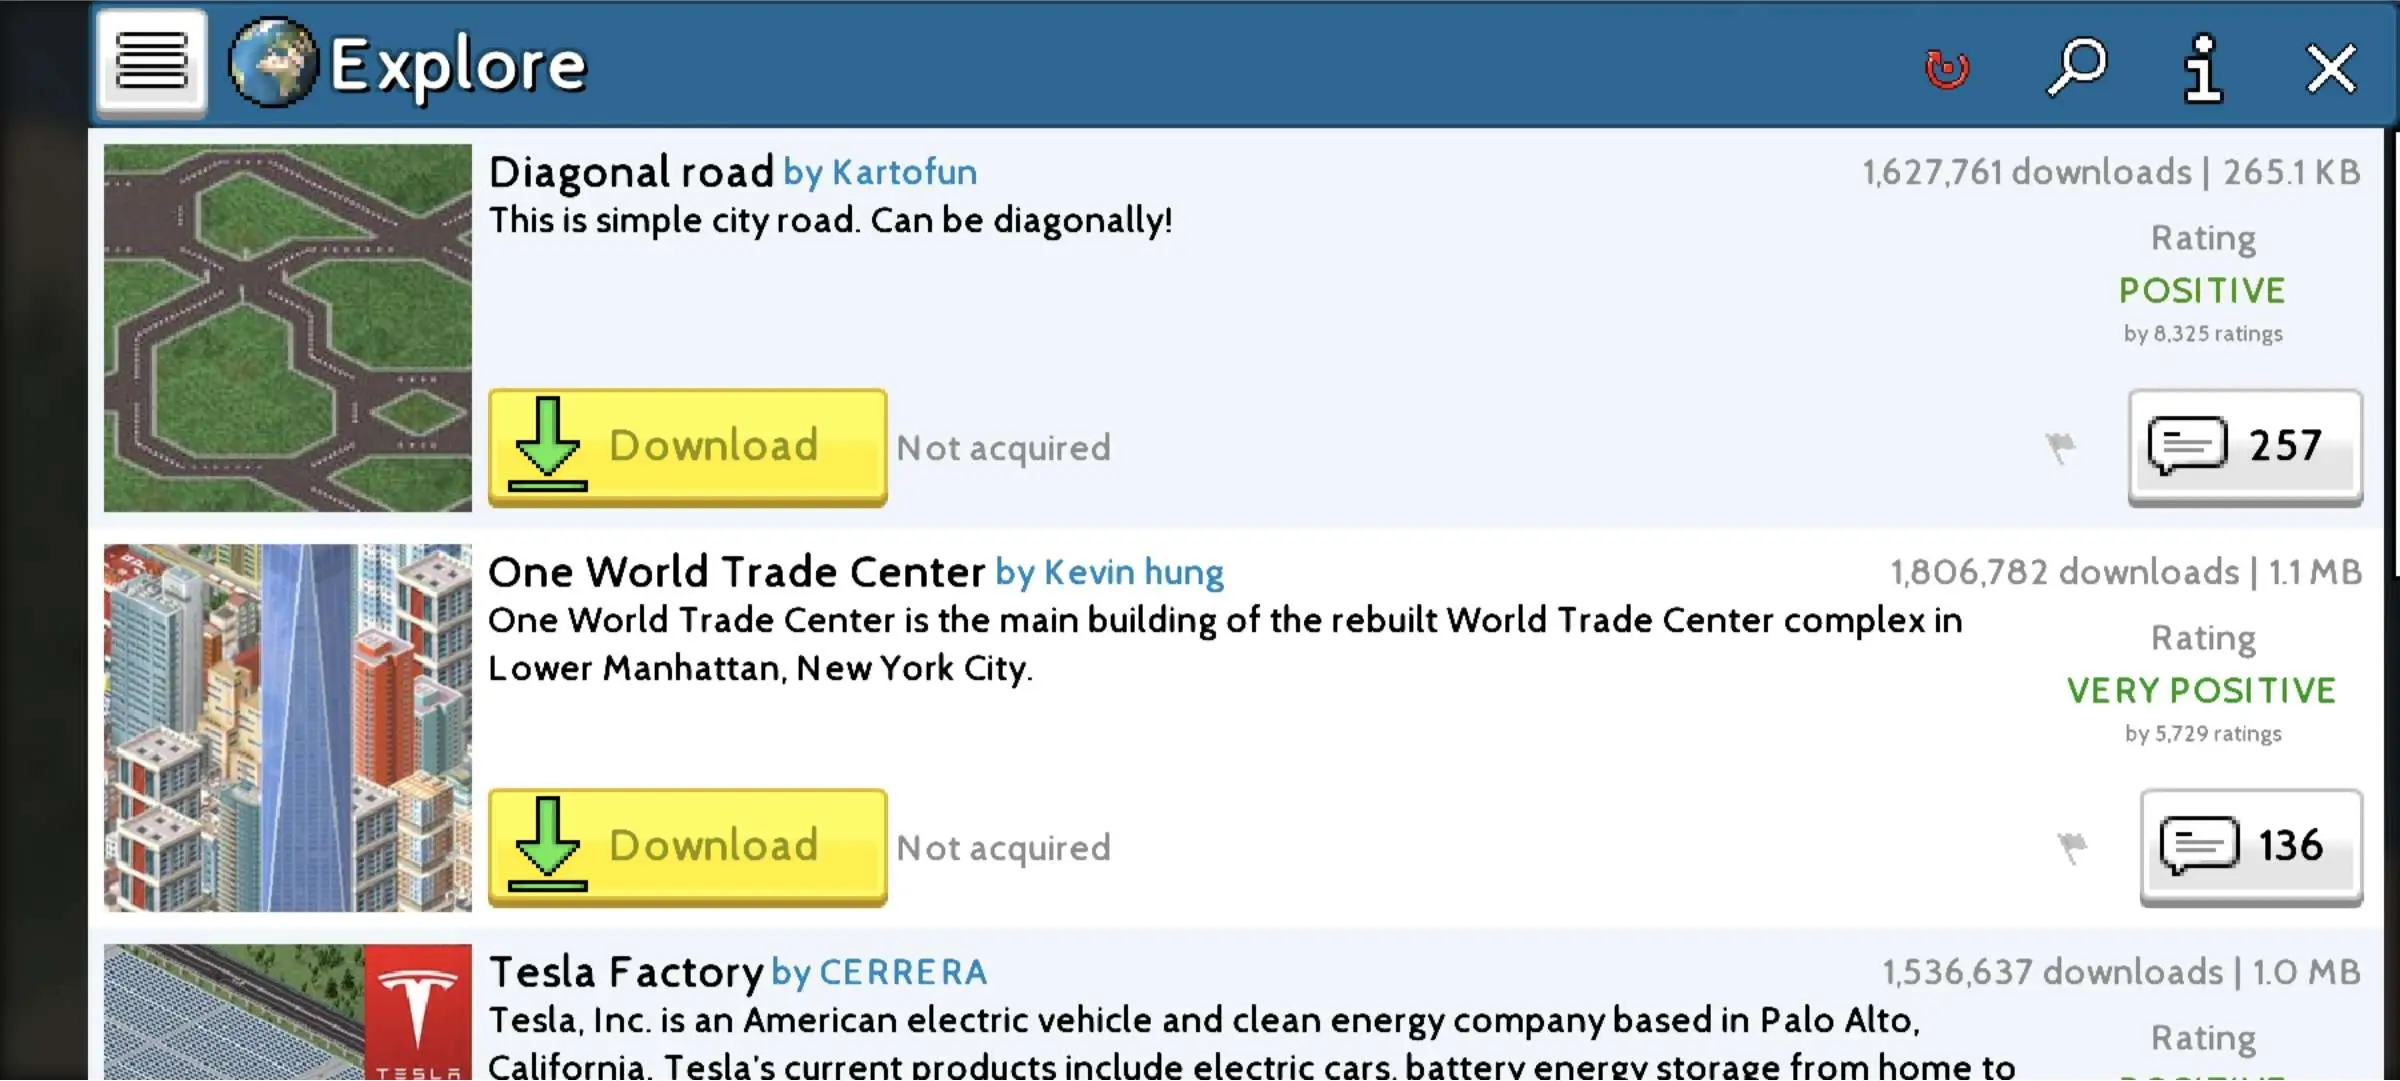
There are also some free community-made plug-ins you can find under Settings > Plug-ins that you can download and apply to your game. These can provide many structures unavailable in the base game as well as quality-of-life features that you may find useful.
Aside from these tools, there are also the Ground Tool and Tree Planter Tool which will be discussed in the “Shaping Terrain” section.
Shaping Terrain

There are many options to shape the terrain of your city and each of them are used differently.
Land and Asphalt

When building land and asphalt terrain, the process is similar to building zones where you select a starting point and an endpoint to create a square. You can also tap squares individually to design them the way you want.
Water

When adding water, you are given the option to choose its depth from -1, -2, -4, -8, -16, and -32. The deeper the water is, the darker it will be.
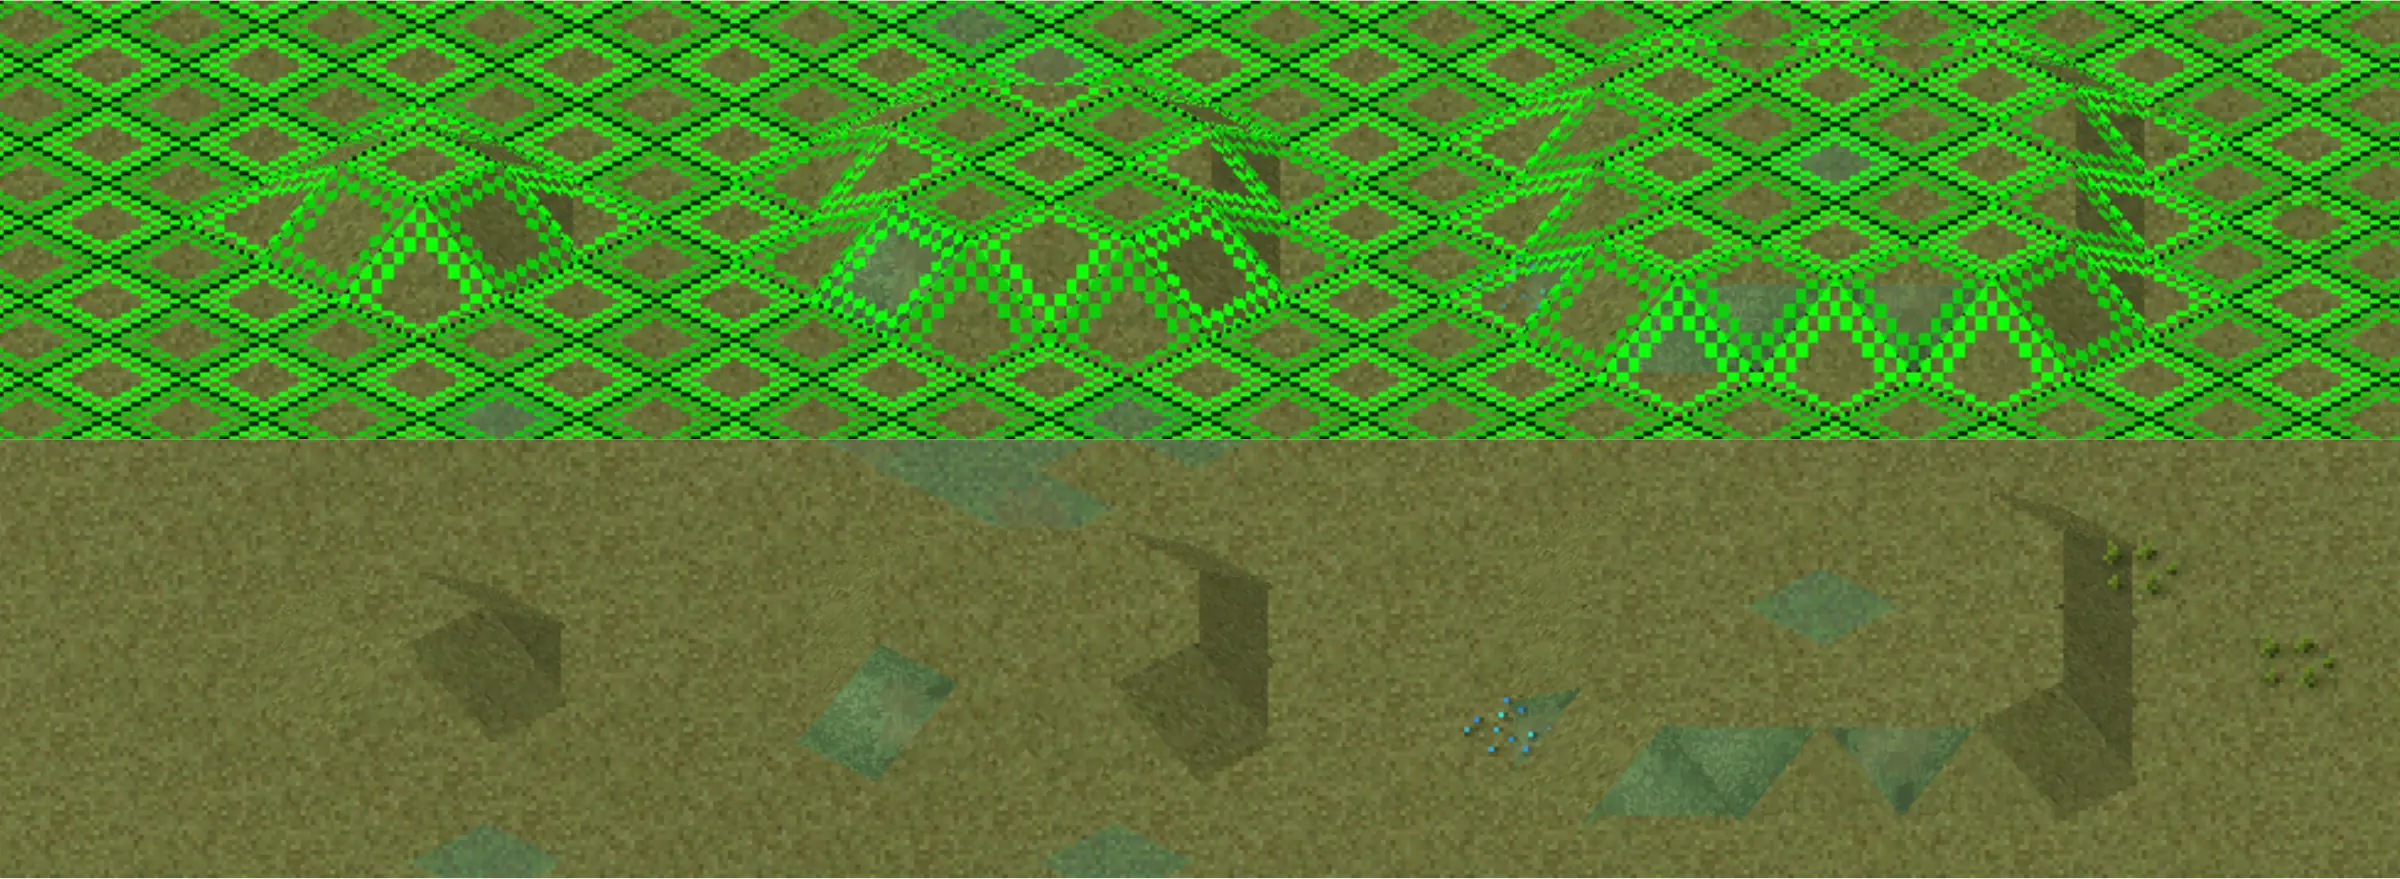
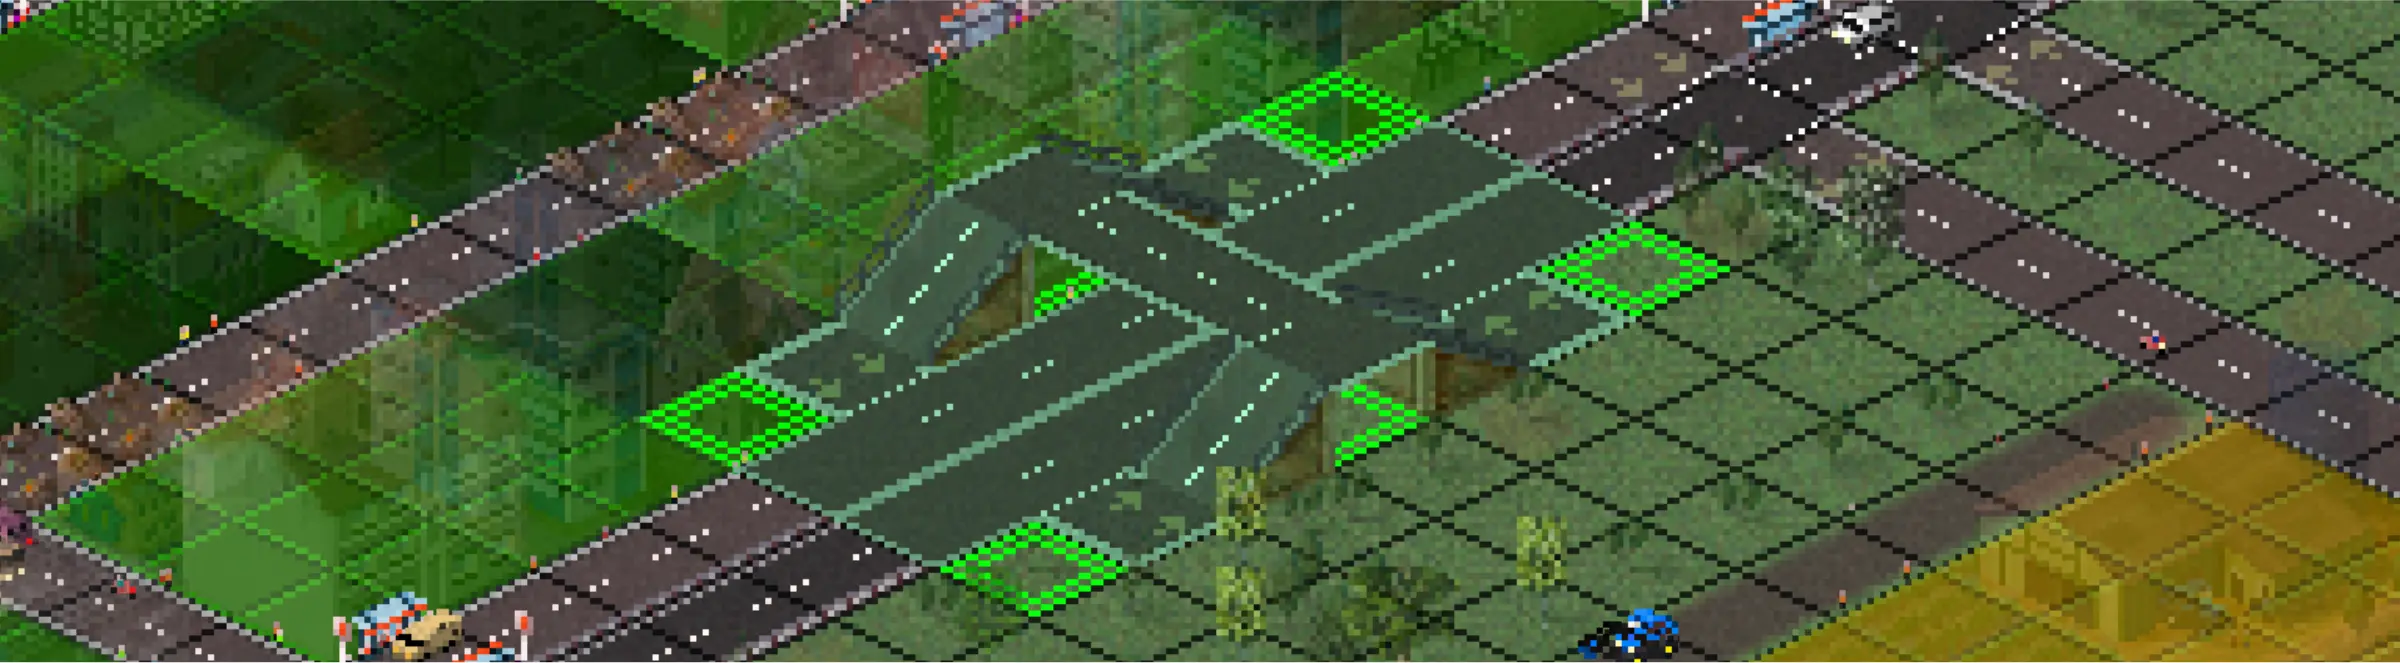
From our observations, having “Smooth Depth” on seems to make the water change color based on the changes you make to its surroundings. In the image below, the one to the right, which has the option turned off, retains its original color or darkness as squares of water in increasing depth were added from right to left.
The one to the left, which has the option turned on, has the colors shifting as squares of water in increasing depth were added from right to left. In short, “Smooth Depth” emulates how water flows, increasing in volume towards the area with the most depth.
Sea Rocks and Mountains

When placing objects such as sea rocks or mountains, the process is similar to some buildings where you simply choose a spot. Unlike mountains, sea rocks have variants.
Plants and the Tree Planter Tool

Adding plants to the terrain works the same way but provides an option to randomize the variants you place, as signified by the dice icon. This allows you to create more natural-looking forests. However, if you want more control over what specific tree is planted, browsing through the other variants without the dice icon will allow you to do that.
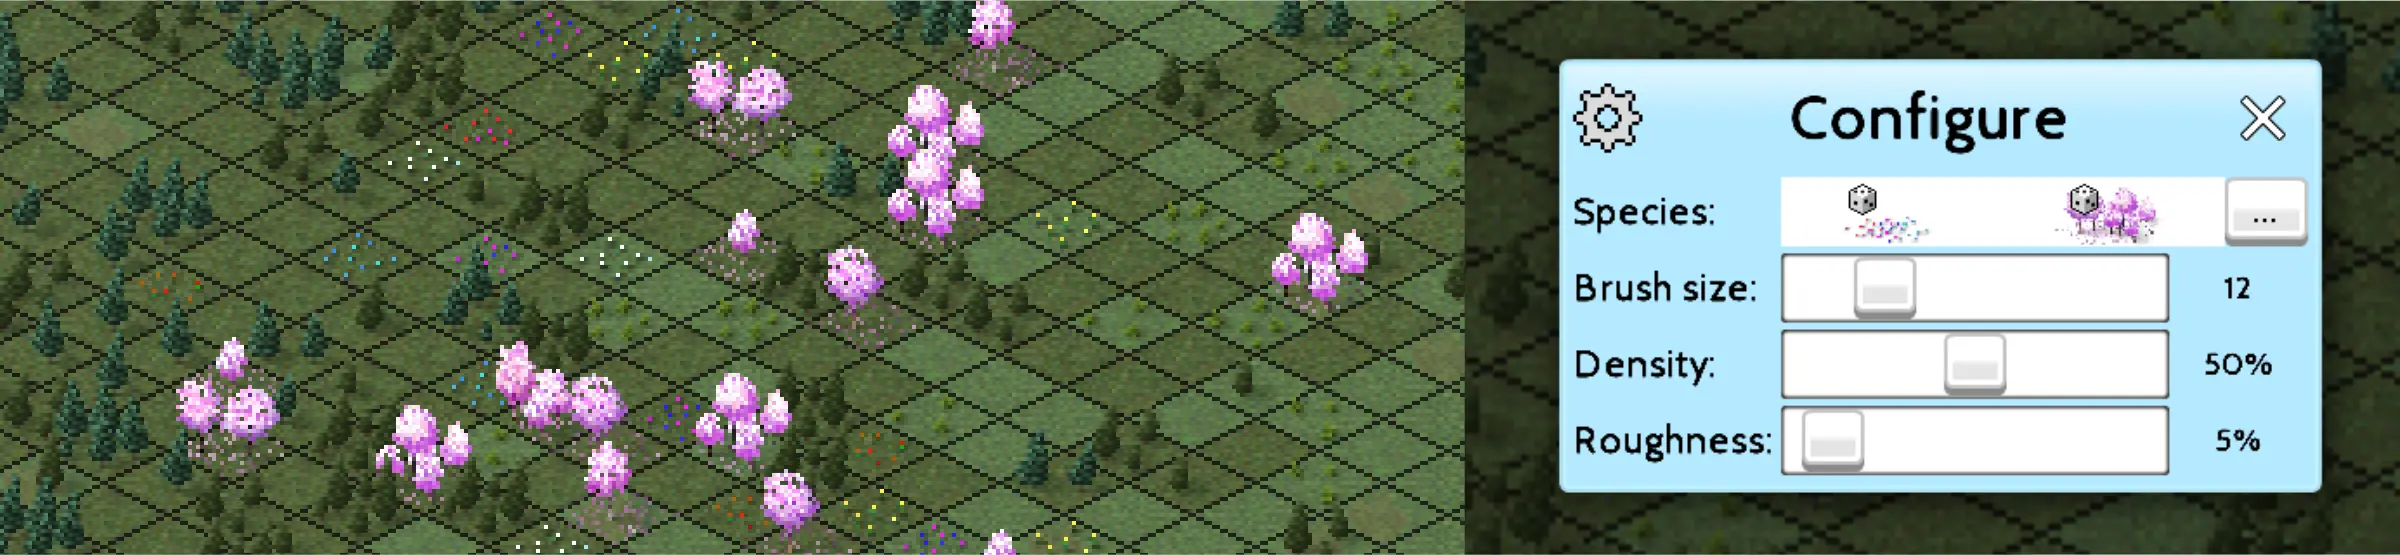
For an even more randomized experience that covers a wide scope while saving you time, you can use the “Tree Planter” tool. This tool is used like a paintbrush but seems to only be used one tap at a time from our experience on mobile. It can be configured to change its size, density, and roughness and have up to 15 species of plants. Density determines the amount of plants placed while Roughness determines how much the amount of plants fade at the edges.
Hills and the Ground Tool
The “Hills” option does not just allow you to form elevated land but also allows you to create plains and depressions or sunken land. All three of these options have 3 sizes.
The “Ground Tool” on the other hand works the same way as the “Tree Planter” tool wherein you can configure variants in terrain type for Ground and Slope as well as the Decorations along with Brush size, Density and Roughness. Keep in mind that the area you use it on will always have slopes at the edges. You cannot create an elevation without slopes.
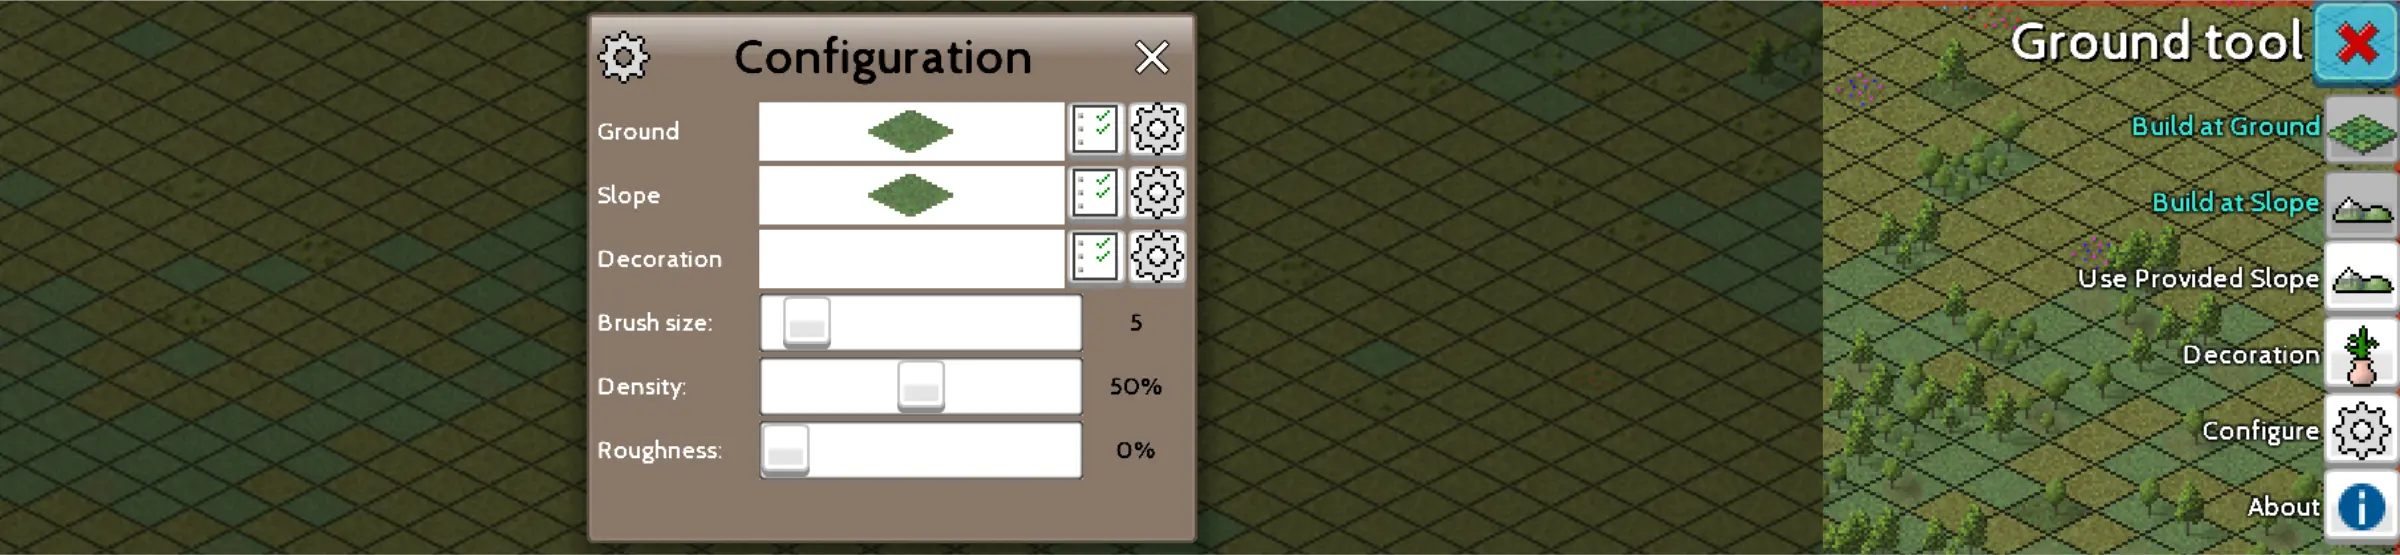
Outside of that configuration menu are a few more options. “Build at Ground” is activated by default and allows you to apply your chosen terrain on the ground. “Build at Slope” allows you to apply the same terrain you placed on the ground on the slopes.
“Use Provided Slope” allows you to apply the terrain you chose for the slope from the configure menu. “Build at Slope” cannot be used as it is without “Build at Ground” or “Use Provided Slope” since these two options determine what type of terrain is placed. Alternatively, “Use Provided Slope” will always override the terrain applied to “Build at Ground.”
“Decoration” allows you to add decorations to the terrain you placed. Keep in mind that decorations can only be placed on the ground and not on the slopes. Regardless of your brush’s configuration, all terrain placed will always have a decoration on it if this option is active along with “Build at Ground”. If you want the decorations to be more spaced out from the terrain you placed, you need to place the terrain and your decorations separately.
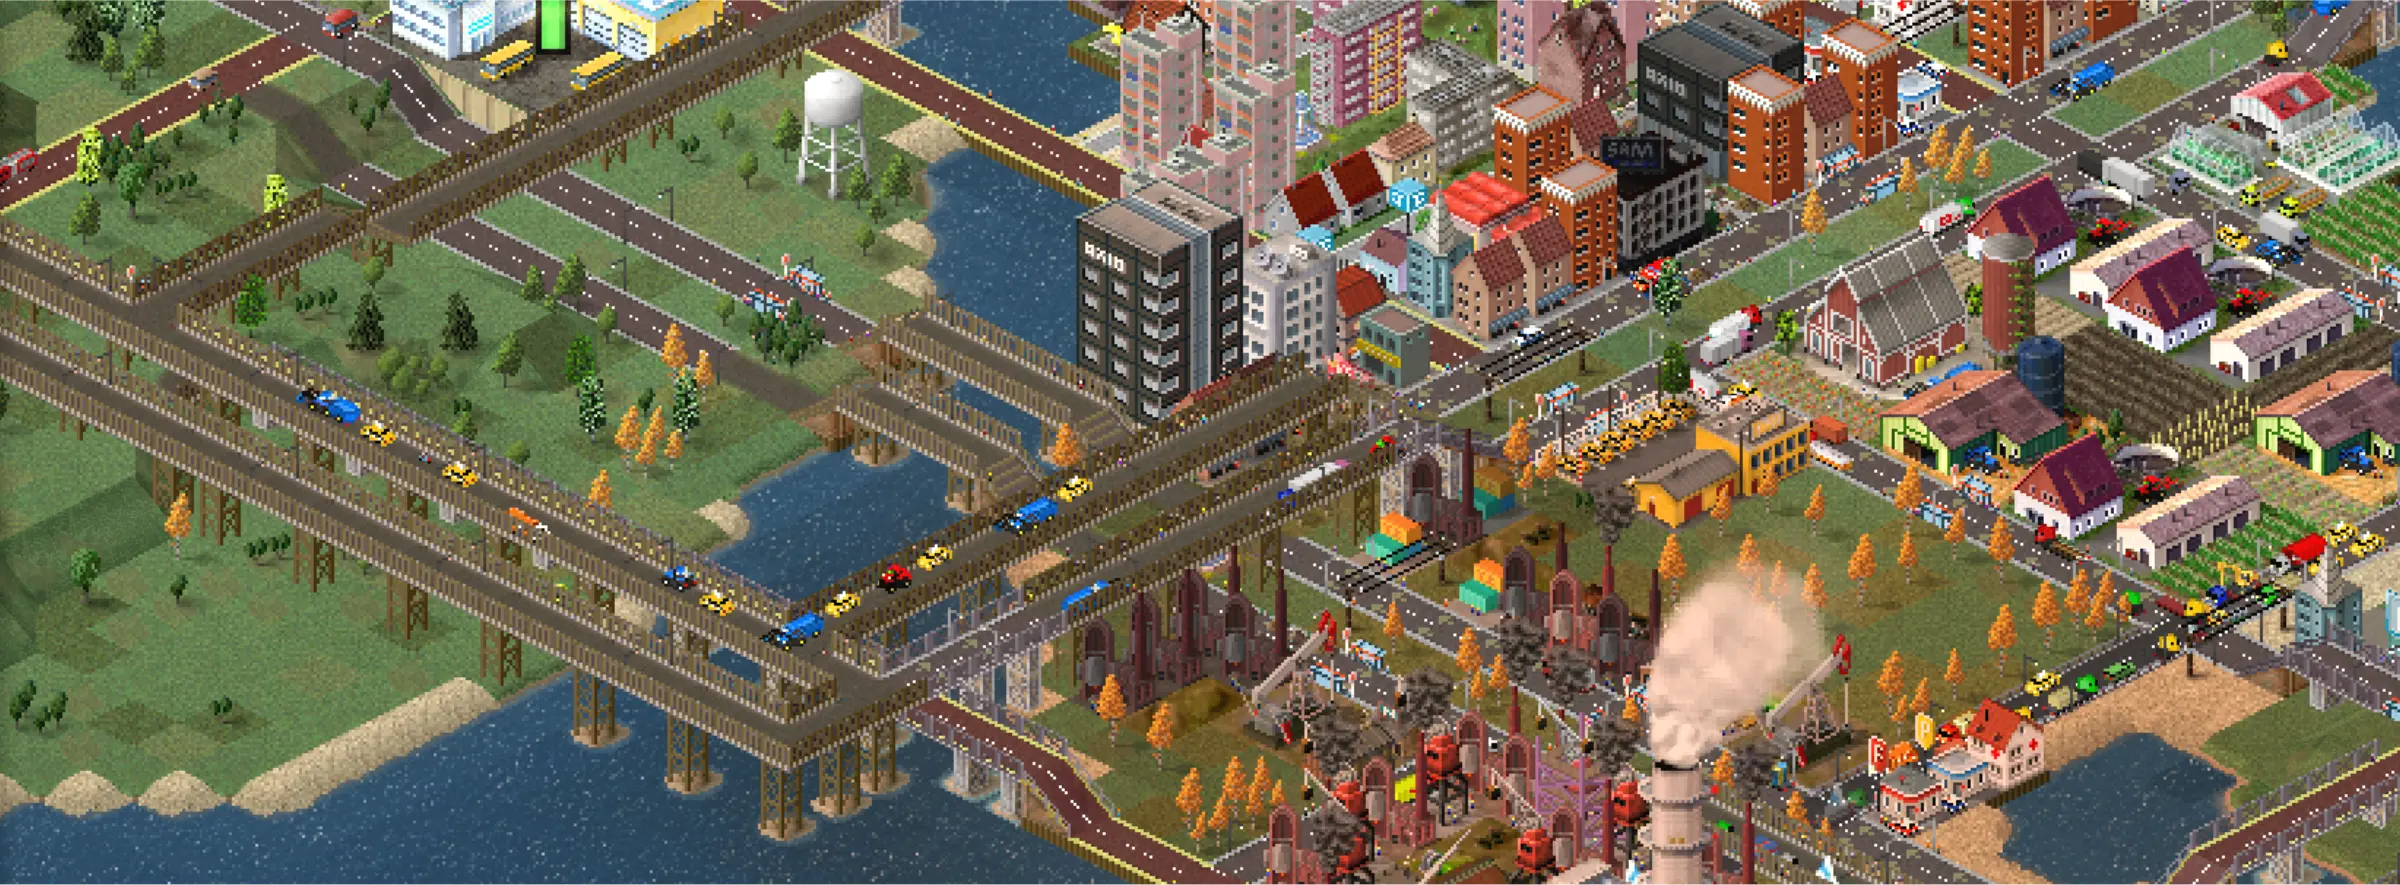
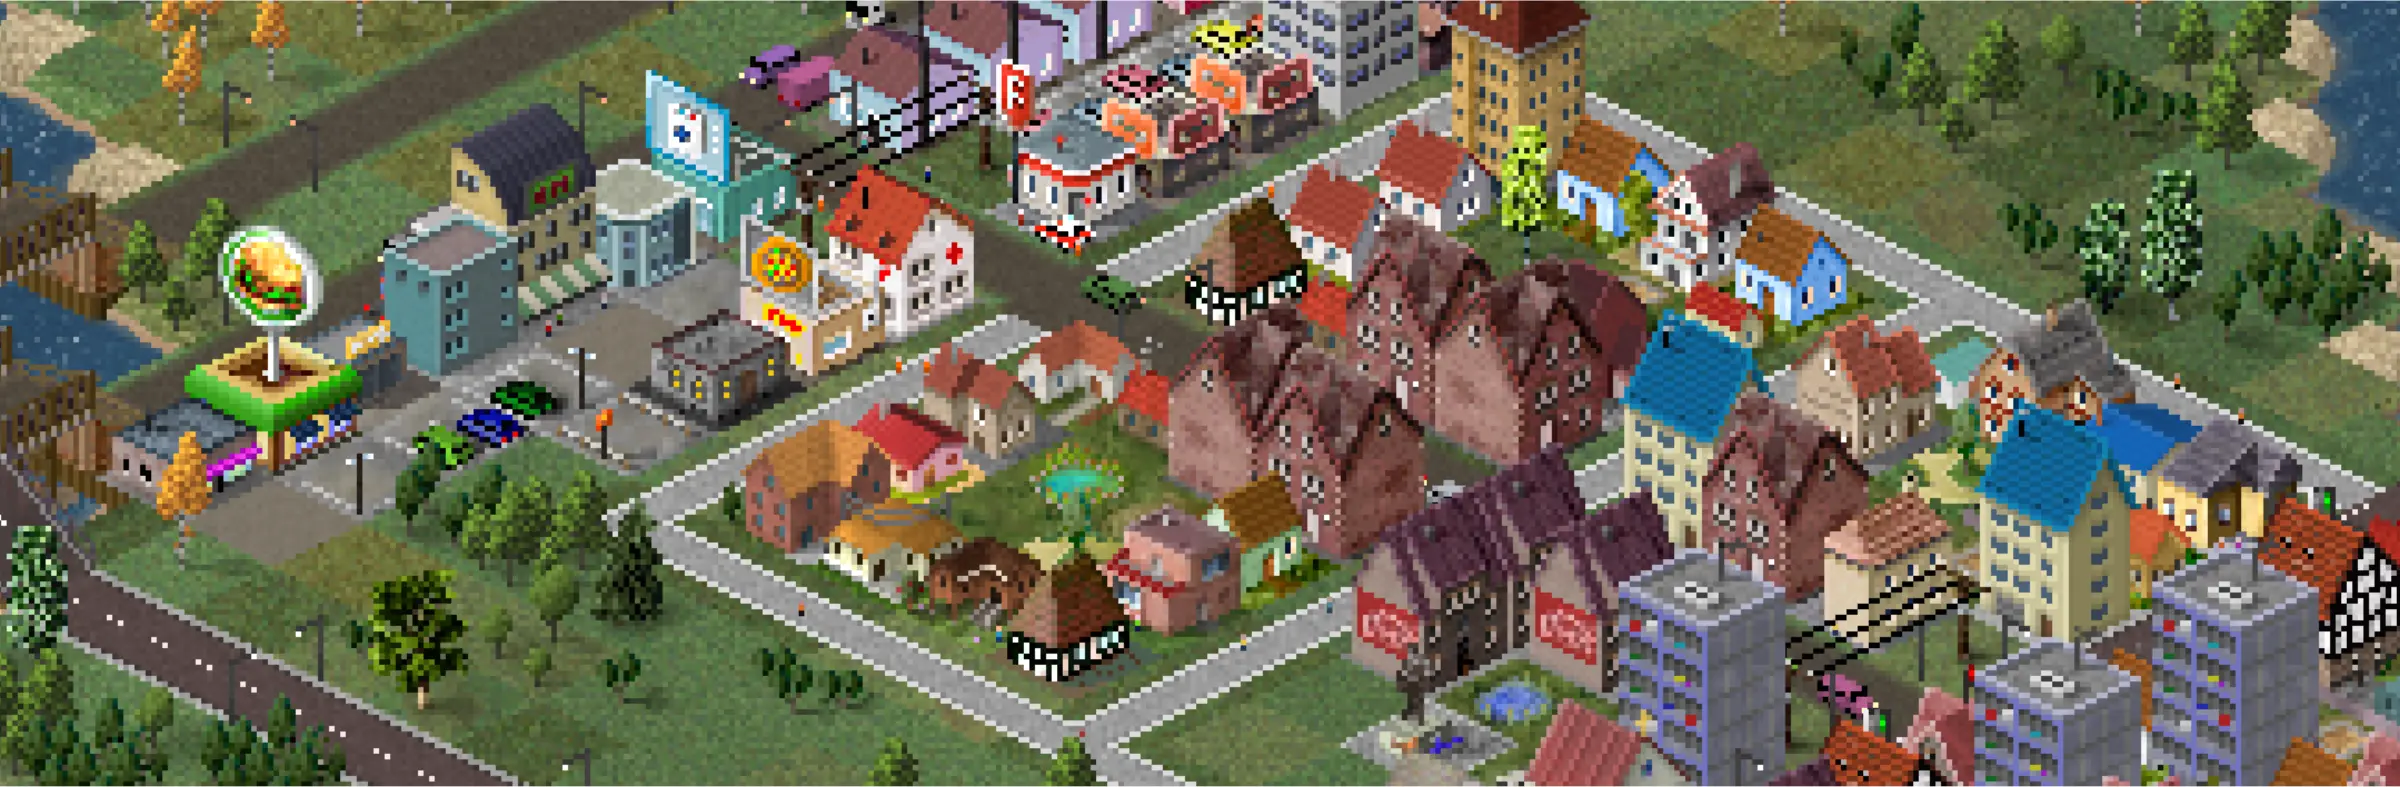
Planning Zones
There are three main zones in the game to keep track of: Residential, Commercial, and Industrial. Each zone has a role in the city and they must be constructed in a certain layout for maximum efficiency.
Residential Zones
Residential zones are where houses, condominiums, or apartments are built for your inhabitants to live in and are represented by green and teal squares.
- They must be built away from industrial zones and supply buildings that produce pollution such as factories.
- They can be built around industrial zones and supply buildings that do not produce pollution such as farms and water towers.
- Roads around these zones should ideally be free from traffic because the noise pollution can decrease your citizen’s happiness. Noise pollution from certain structures like wind turbines can also affect noise pollution.
- A good road network with a good mix of one-way and two-way roads is ideal. Bus-only roads can also decrease traffic in these areas. Pavements on the other hand can break down areas into smaller sections.
- They should be built close to commercial areas so that inhabitants can travel to them with ease for their needs and for their work.
Commercial Zones
Commercial Zones are where shops and stores are built and are represented by blue and purple squares.
- They must be built close to residential zones so that inhabitants can travel to them easily for their needs and their workplaces.
- They must be built close to industrial zones so that those zones can supply them with the products that they sell.
- They must be built close to the main road to make it easy for inhabitants and trucks to get to them.
- Pollution and noise pollution isn’t an issue for these areas.
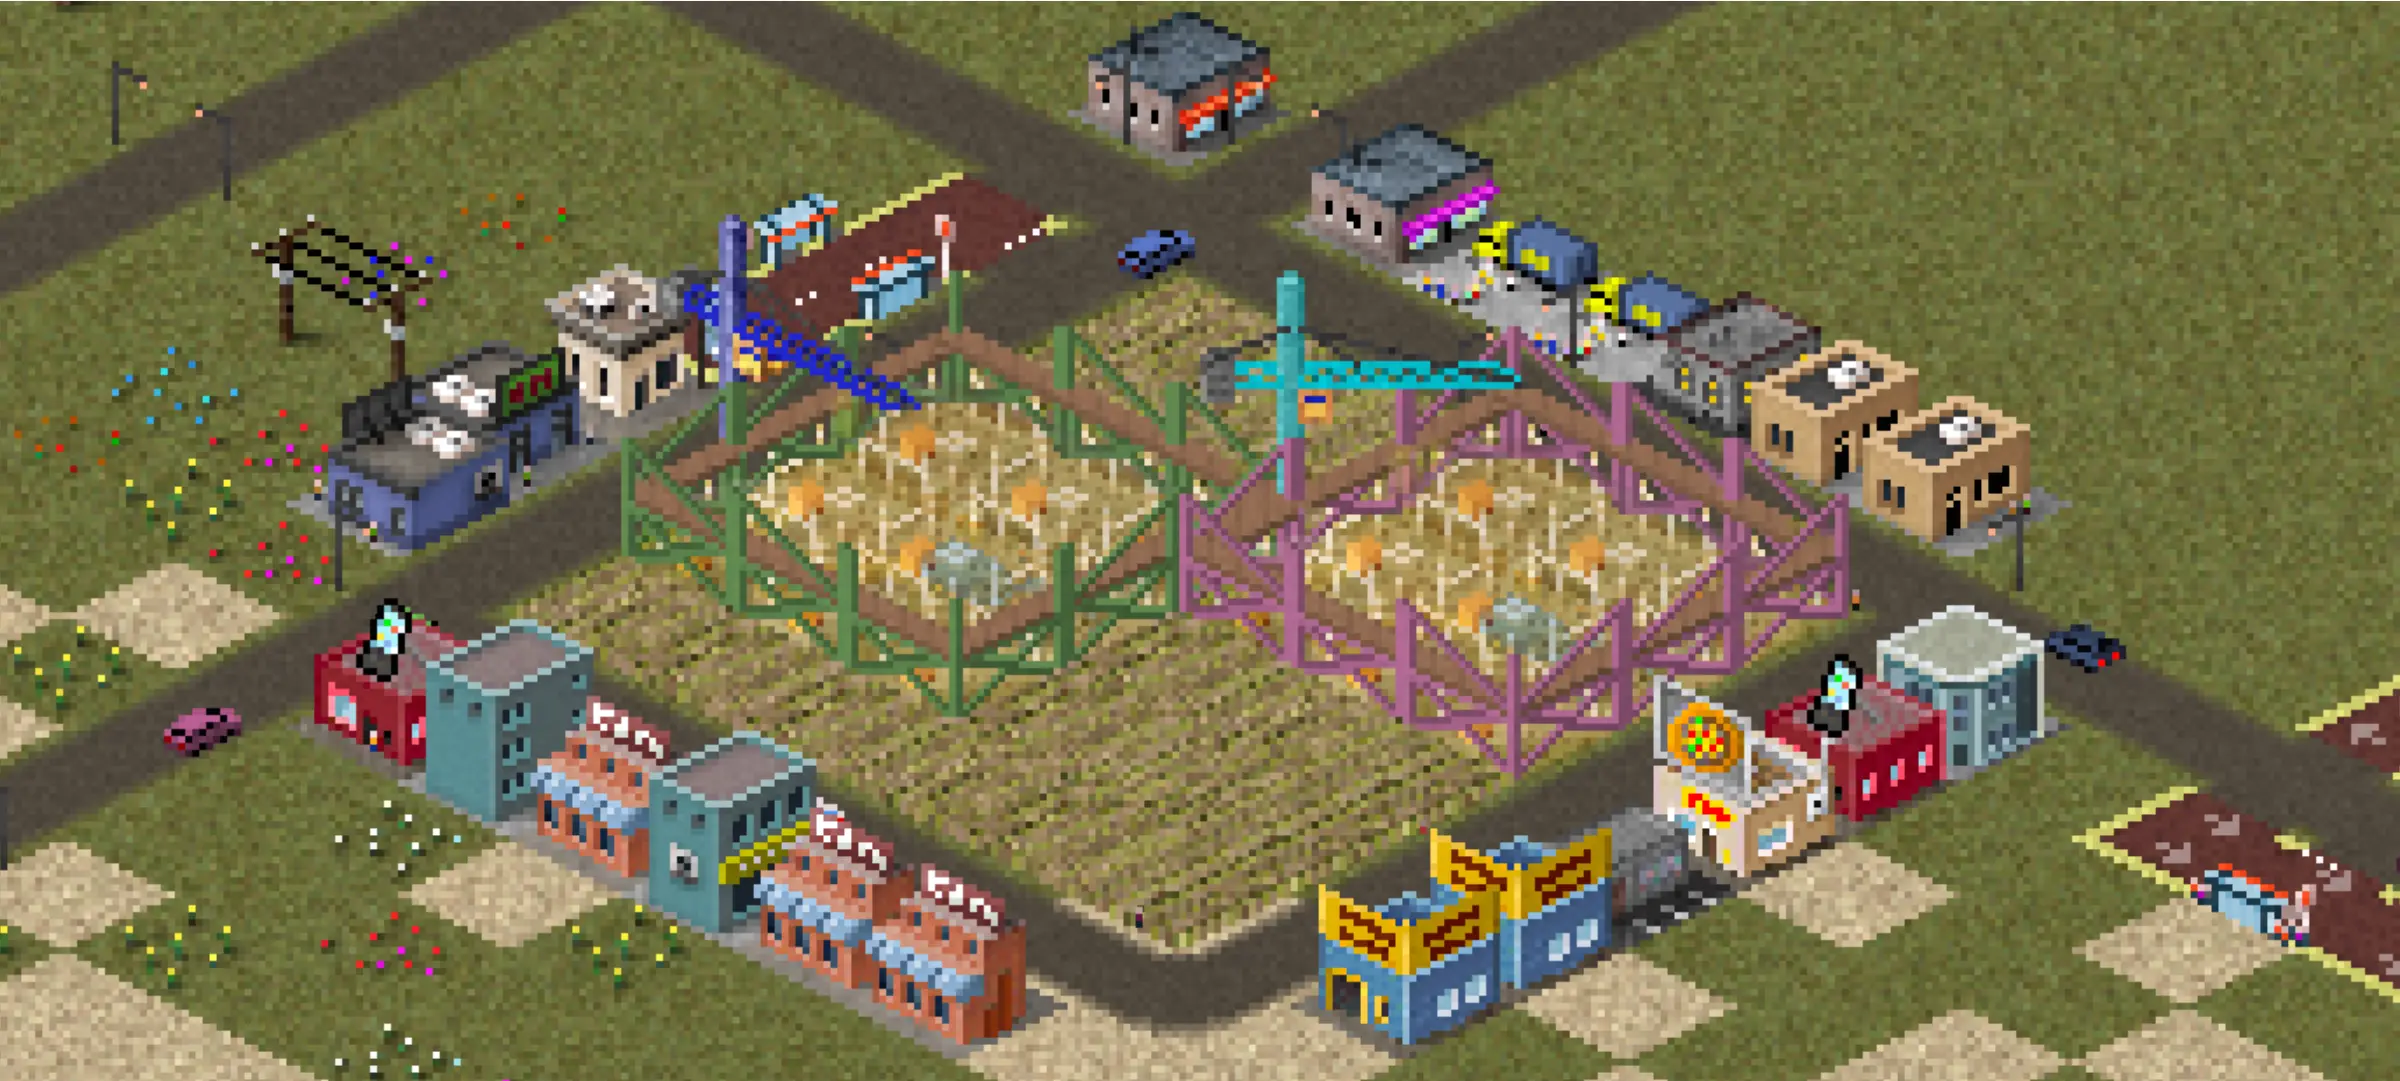
Industrial Zones
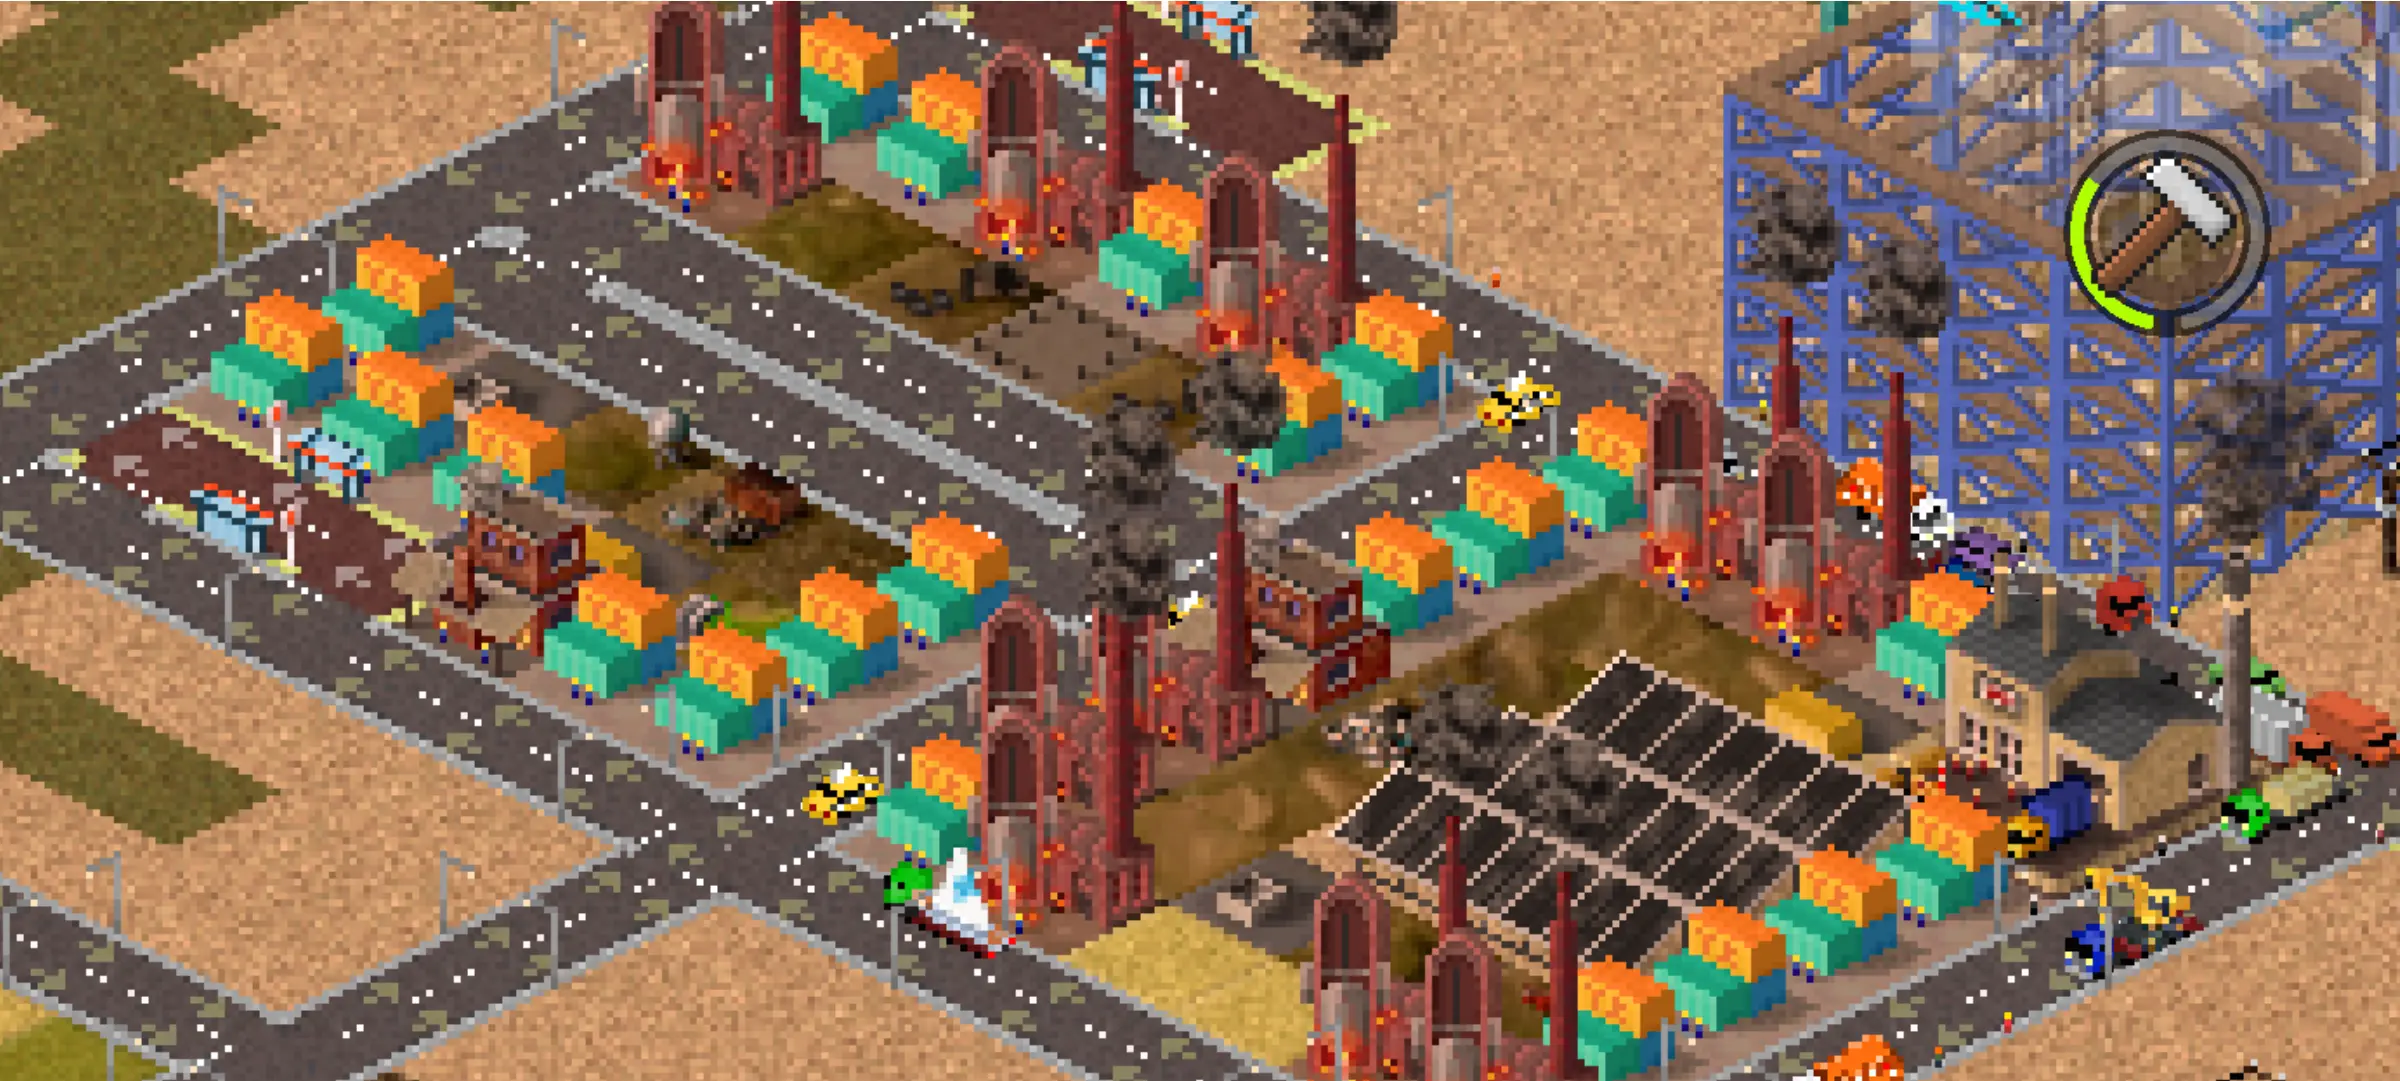
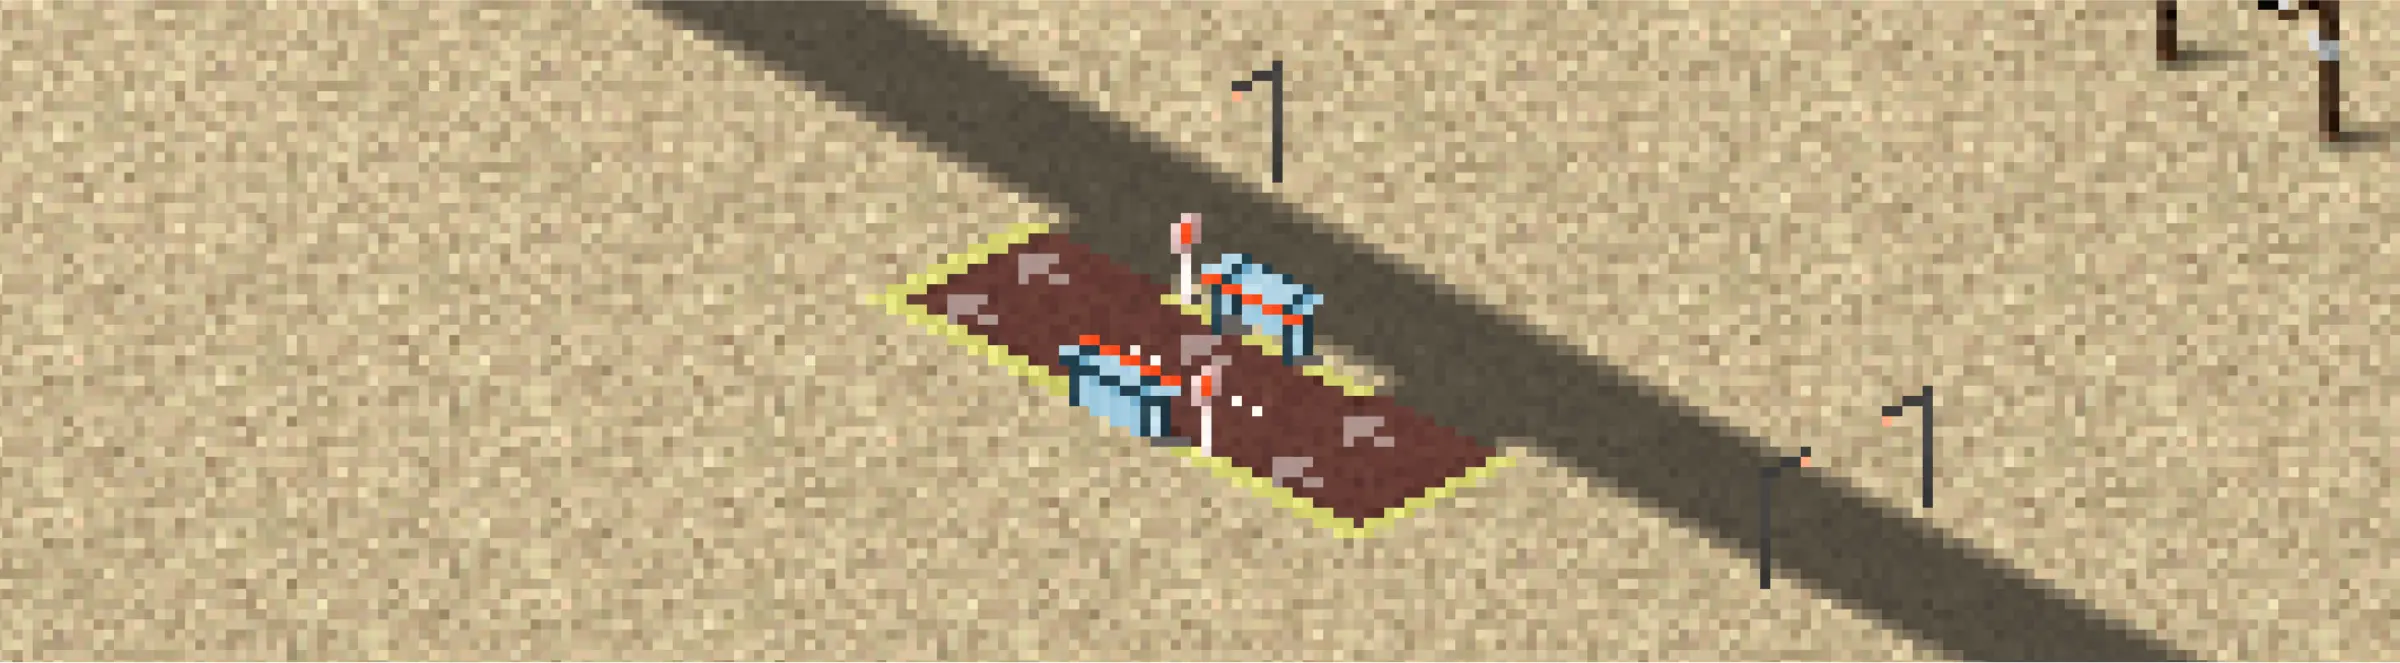
Industrial Zones are where production buildings and areas are made and are represented by yellow and orange squares. The regular industrial zones and the harbor build factories and areas that produce pollution and noise pollution while farms are the more eco-friendly option. Both provide your commercial zones with products to sell and inhabitants with workplaces.
- They must be built close to commercial zones for an easy way to transfer goods they produce to stores.
- They must be built close to the main road. Alternatively, they can also transfer their goods through trains.
- Pollution and noise pollution isn’t an issue for these areas.
- Traffic is the most heavy in these areas. A good transportation network with trains, a mix of one-way and two-way roads with bridges or tunnels are important for these zones.
- Farms are ideally built on large plots of land to create large fields. They can safely be integrated among residential areas since they produce no pollution.
Building The Zones
When building zones, you need to select an area by tapping two squares of the same row or column to create a strip and tapping two squares in a diagonal line to create a square or rectangle. Tapping the “Add Roads” option will allow you to automatically generate a road along the left and bottom side of the zone.
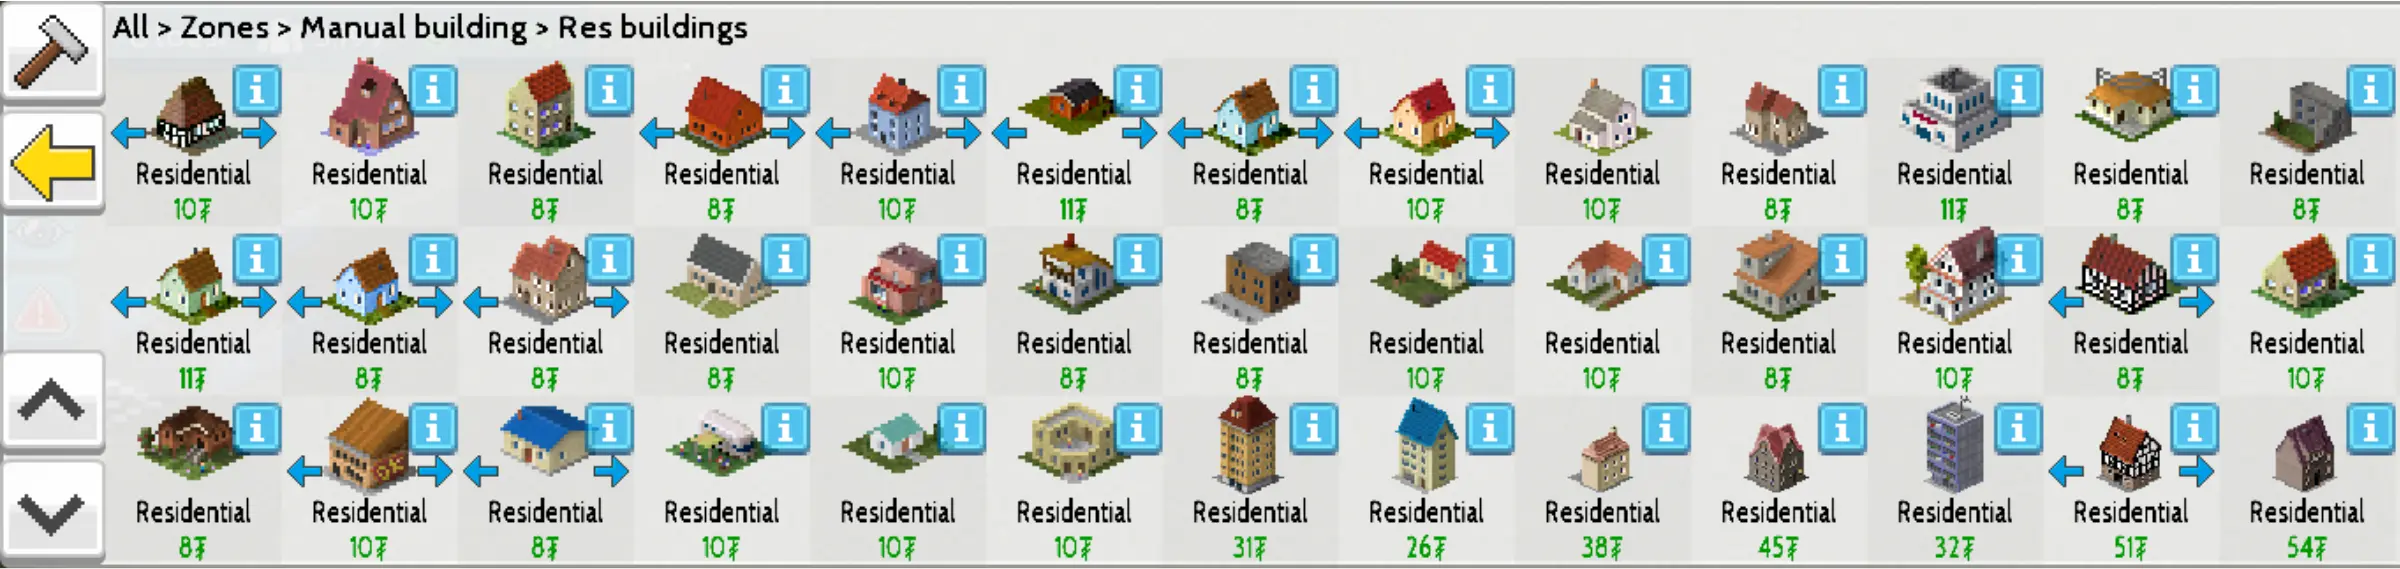
Over time, the area will randomly generate buildings based on the zone you assigned to it. If you’re unhappy with what was built, you can remove the buildings with the remove tool and it will regenerate new ones. If you want something more specific, you can select the “Manual building” option to choose and place the structures yourself.
The area created by the Residential, Commercial and Industrial options will only construct buildings 2 rows or 2 columns from the road at the start. The area too far away from the road will be blank. You can choose to keep those areas blank while you work on your city as these areas can eventually be filled up with tall buildings and skyscrapers that require more space.
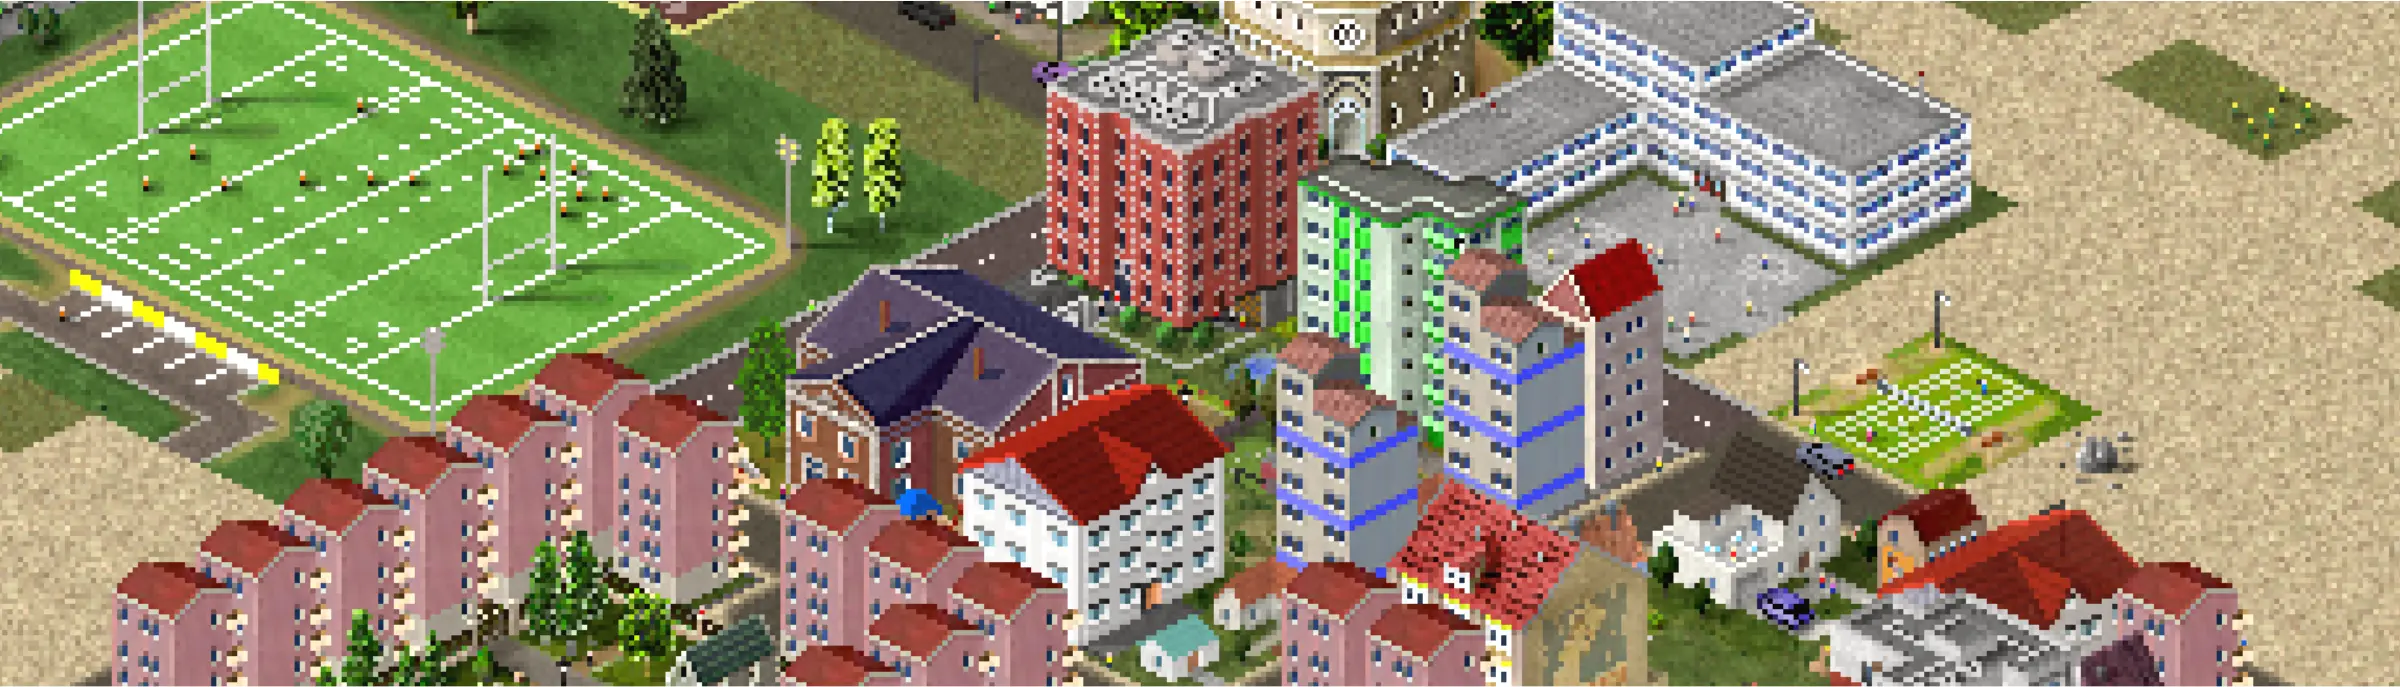
Dense versions of the three zones can yield more inhabitants than the basic one, allowing you to use less space to meet your city’s demands for the zones. However, keep in mind that buildings constructed here can turn into towering skyscrapers. While some players may love the addition of these structures, there are some that may not want them since they can cover up your view of other buildings. In those cases we have a few recommendations:
- Stick to just using the regular versions of zones. It will require you to build more regular zones when the demand for them increases, but these zones will never make skyscrapers that are too tall.
- Make smaller zones or divide them with roads, pavements, decorations or other structures. These will prevent the automatic construction of skyscrapers.
- Manually build your zones. Through the manual building option, you can choose specific buildings to place so that you’ll never have to worry about your zones creating a building you don’t want it to.
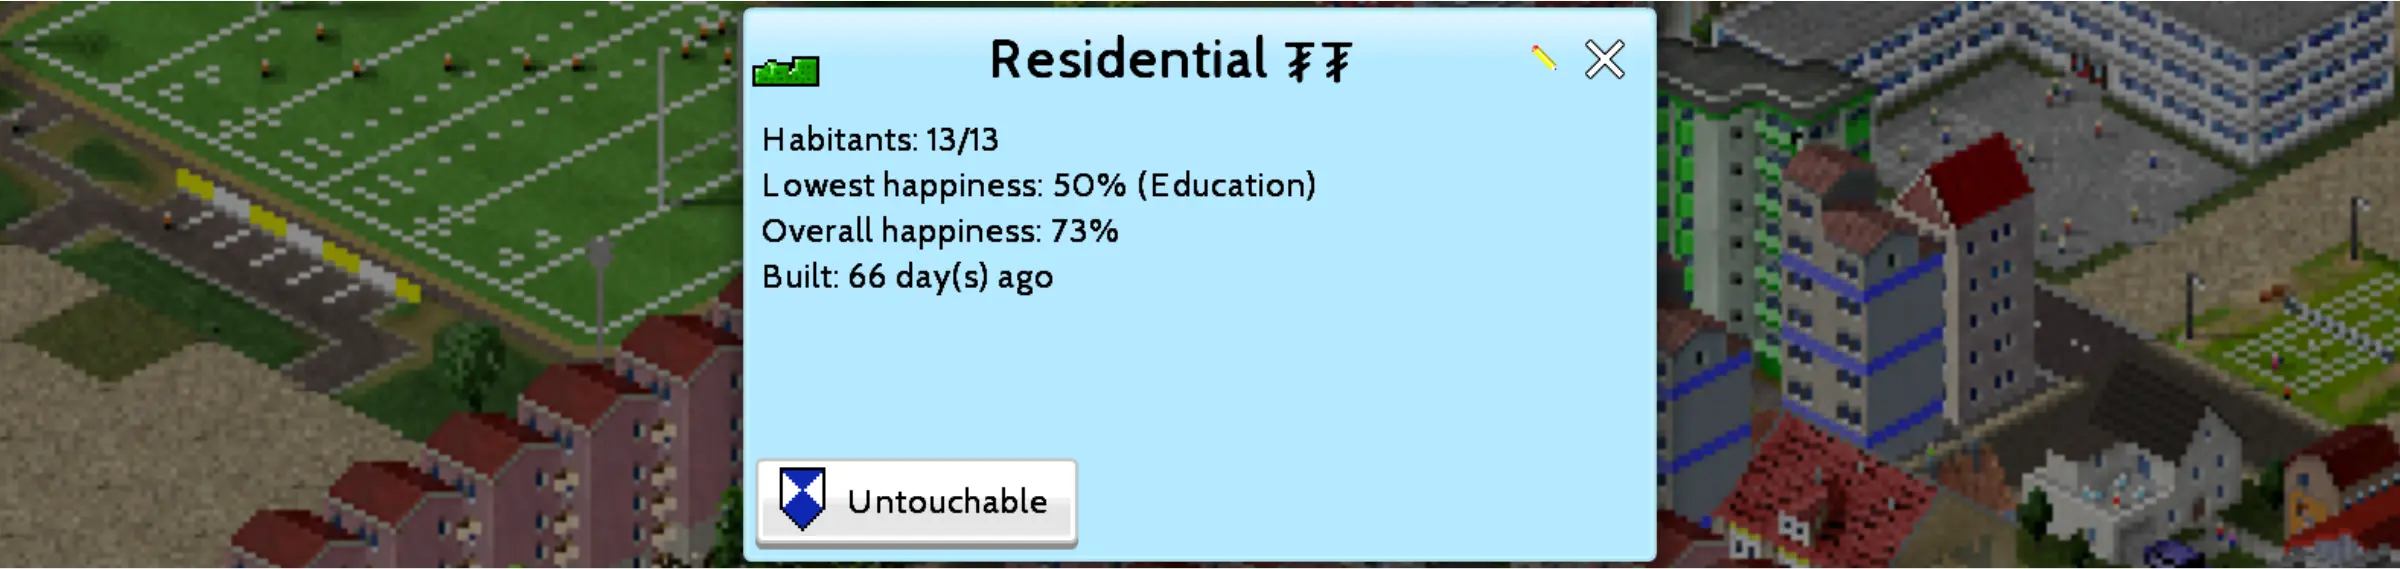
Buildings in these three zones can be marked as “untouchable” to prevent them from being auto-replaced by another building. In Sandbox mode, this status is automatically applied to all buildings from these zones.
Managing Demands For The Zones
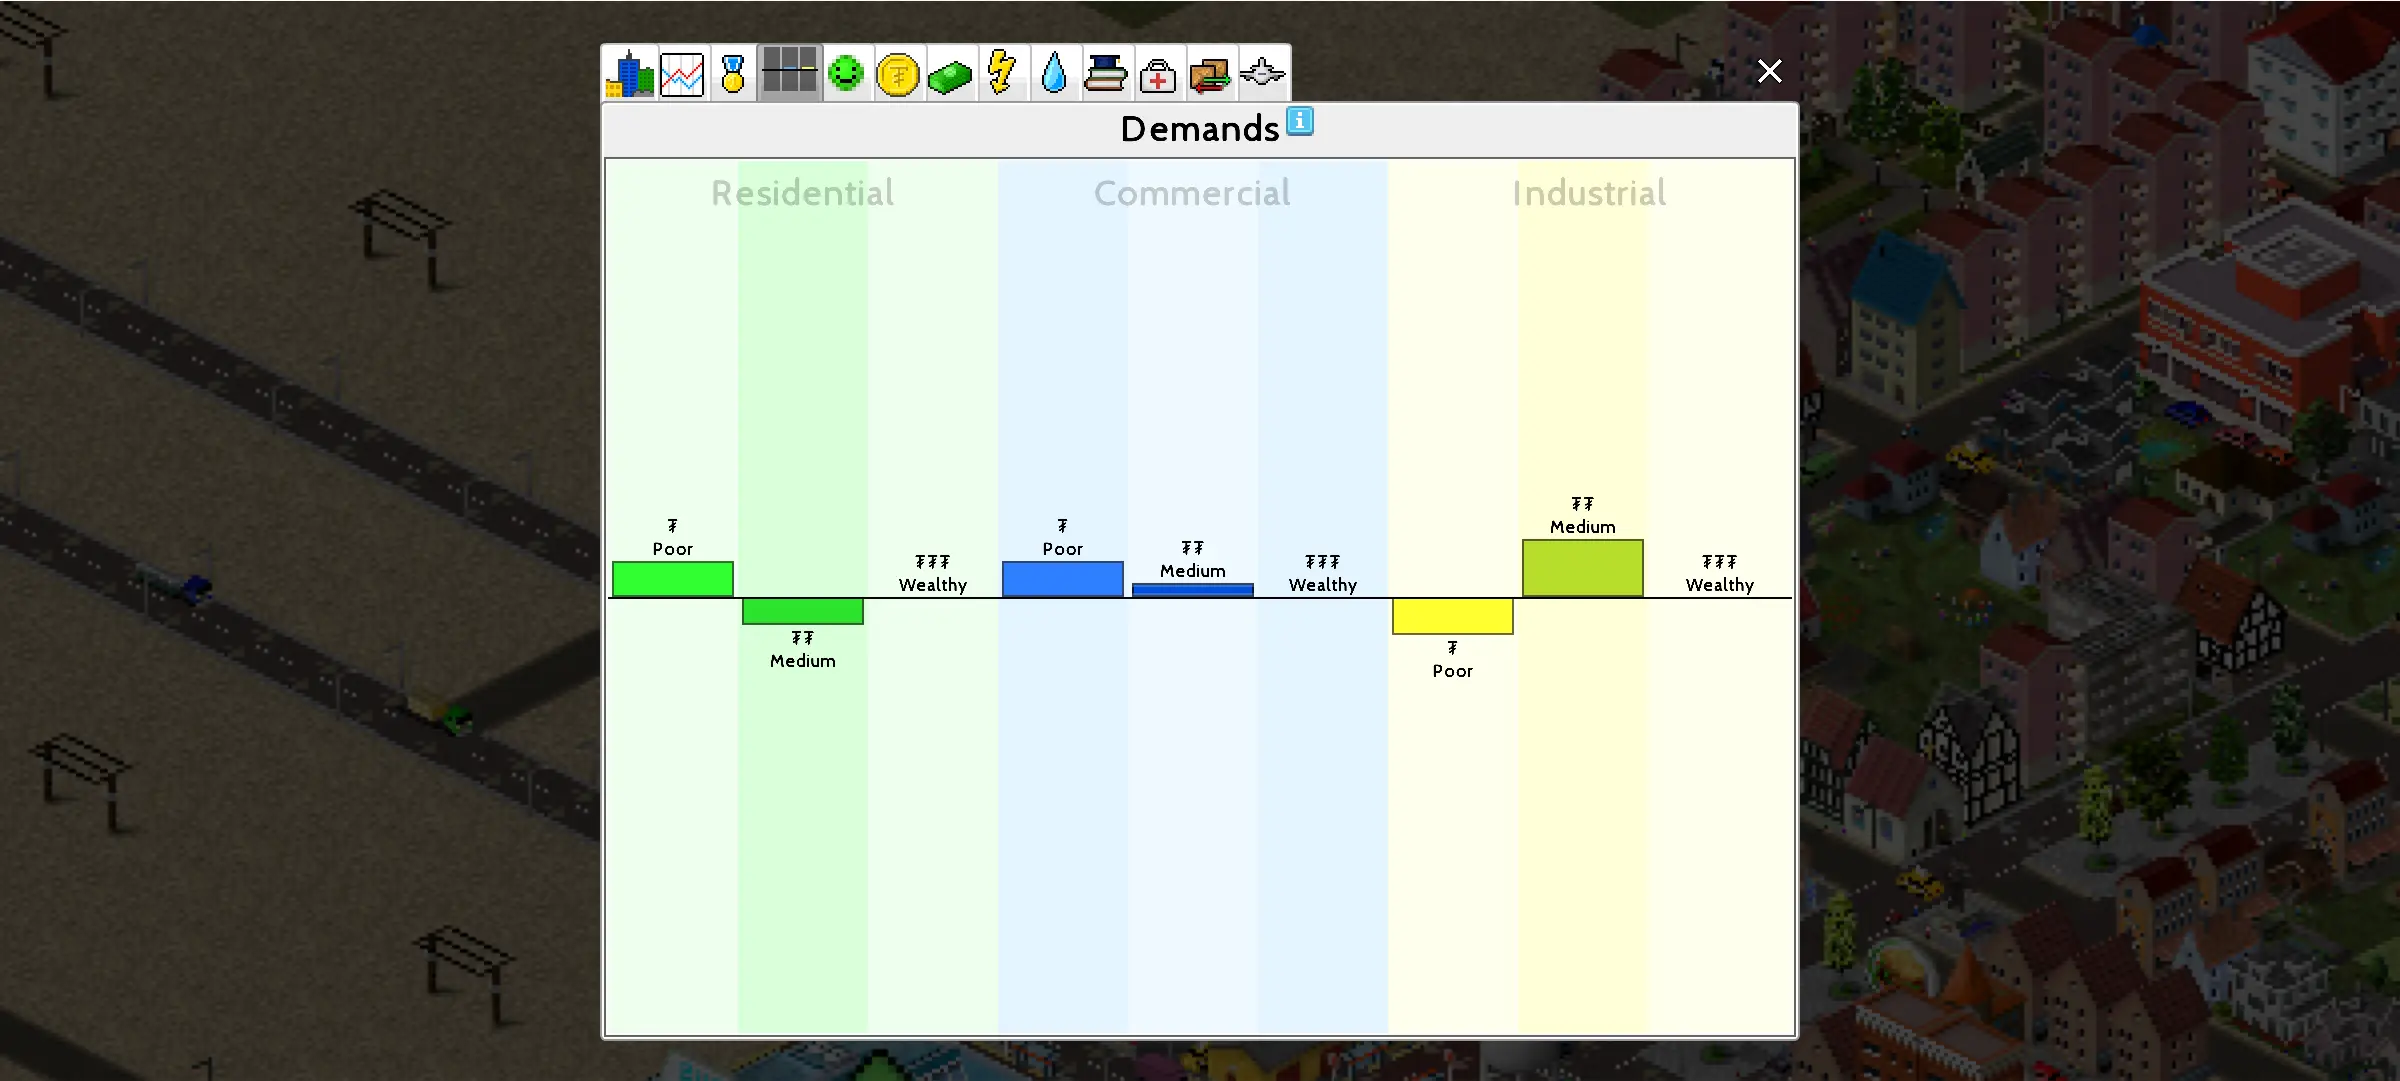
At the upper left side of your screen, you’ll see a button with 3 vertical bars. The bars that appear represent the current zone demands of your city. Tapping it will give you more details on them in the form of a graph. Bars above the line means that there is a demand for that particular zone while bars below the line mean that there is too much of that zone at the moment.
You won’t need to destroy those zones when that happens but it does mean you’ll need to create a demand for them by improving your city. Increasing inhabitants’ happiness by meeting their needs with supply buildings, public buildings, landmarks and service buildings will make your city more attractive, increasing the demand for residential zones. More inhabitants will eventually increase the demand for both commercial and industrial zones.
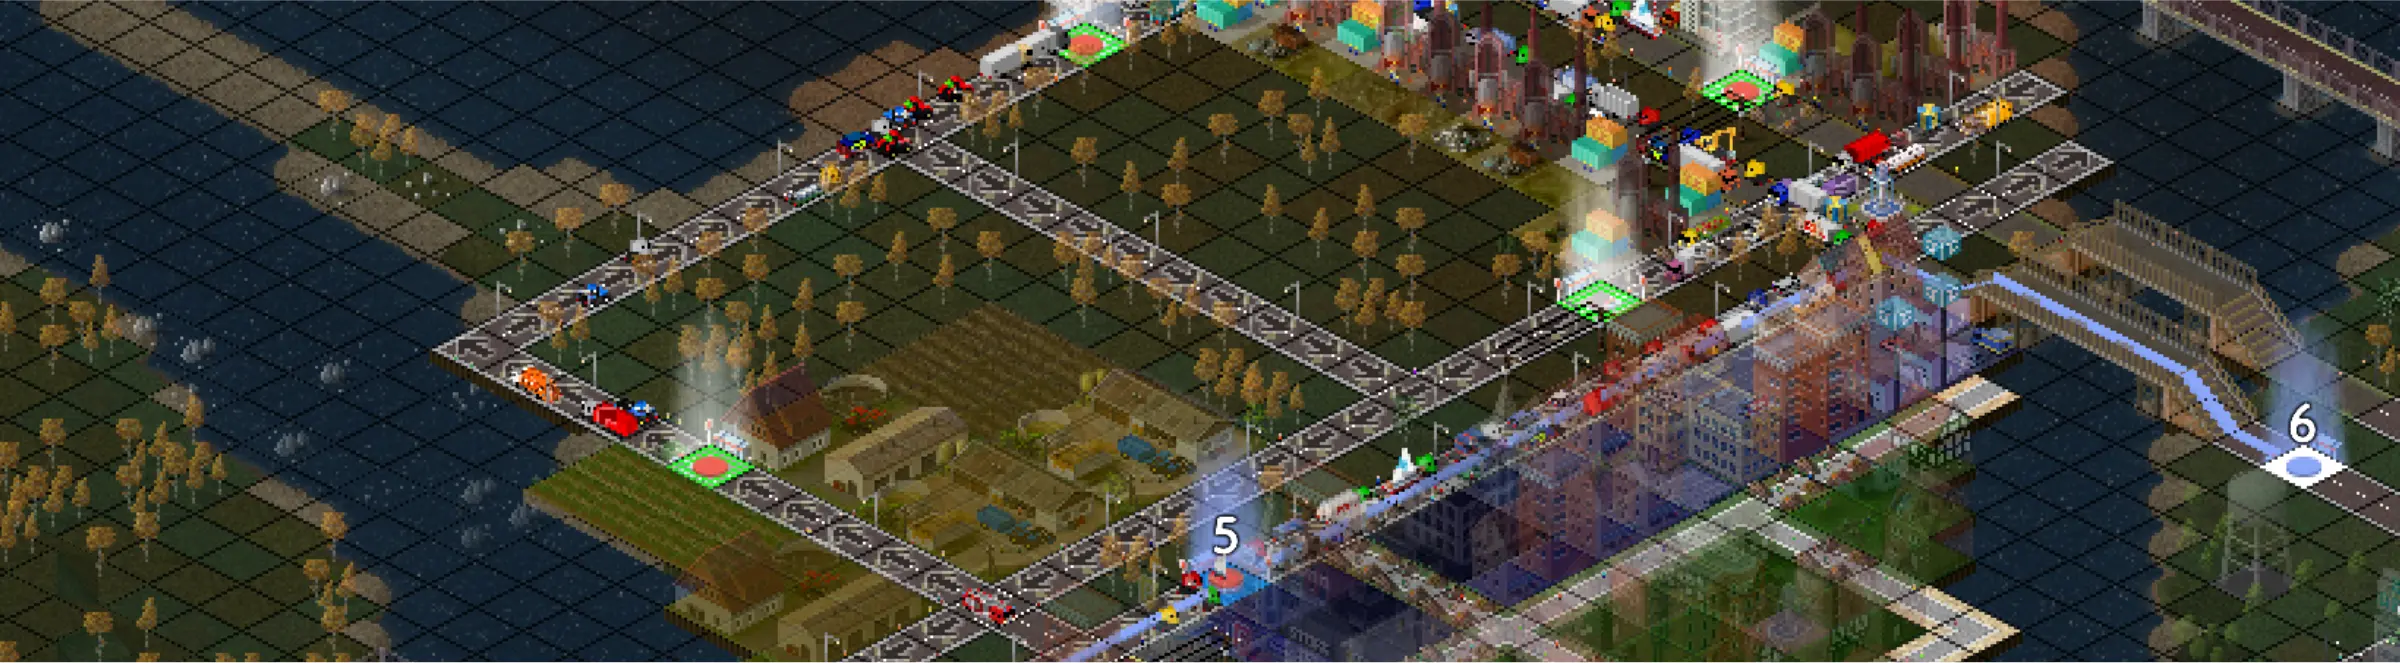
Managing Traffic And Transportation
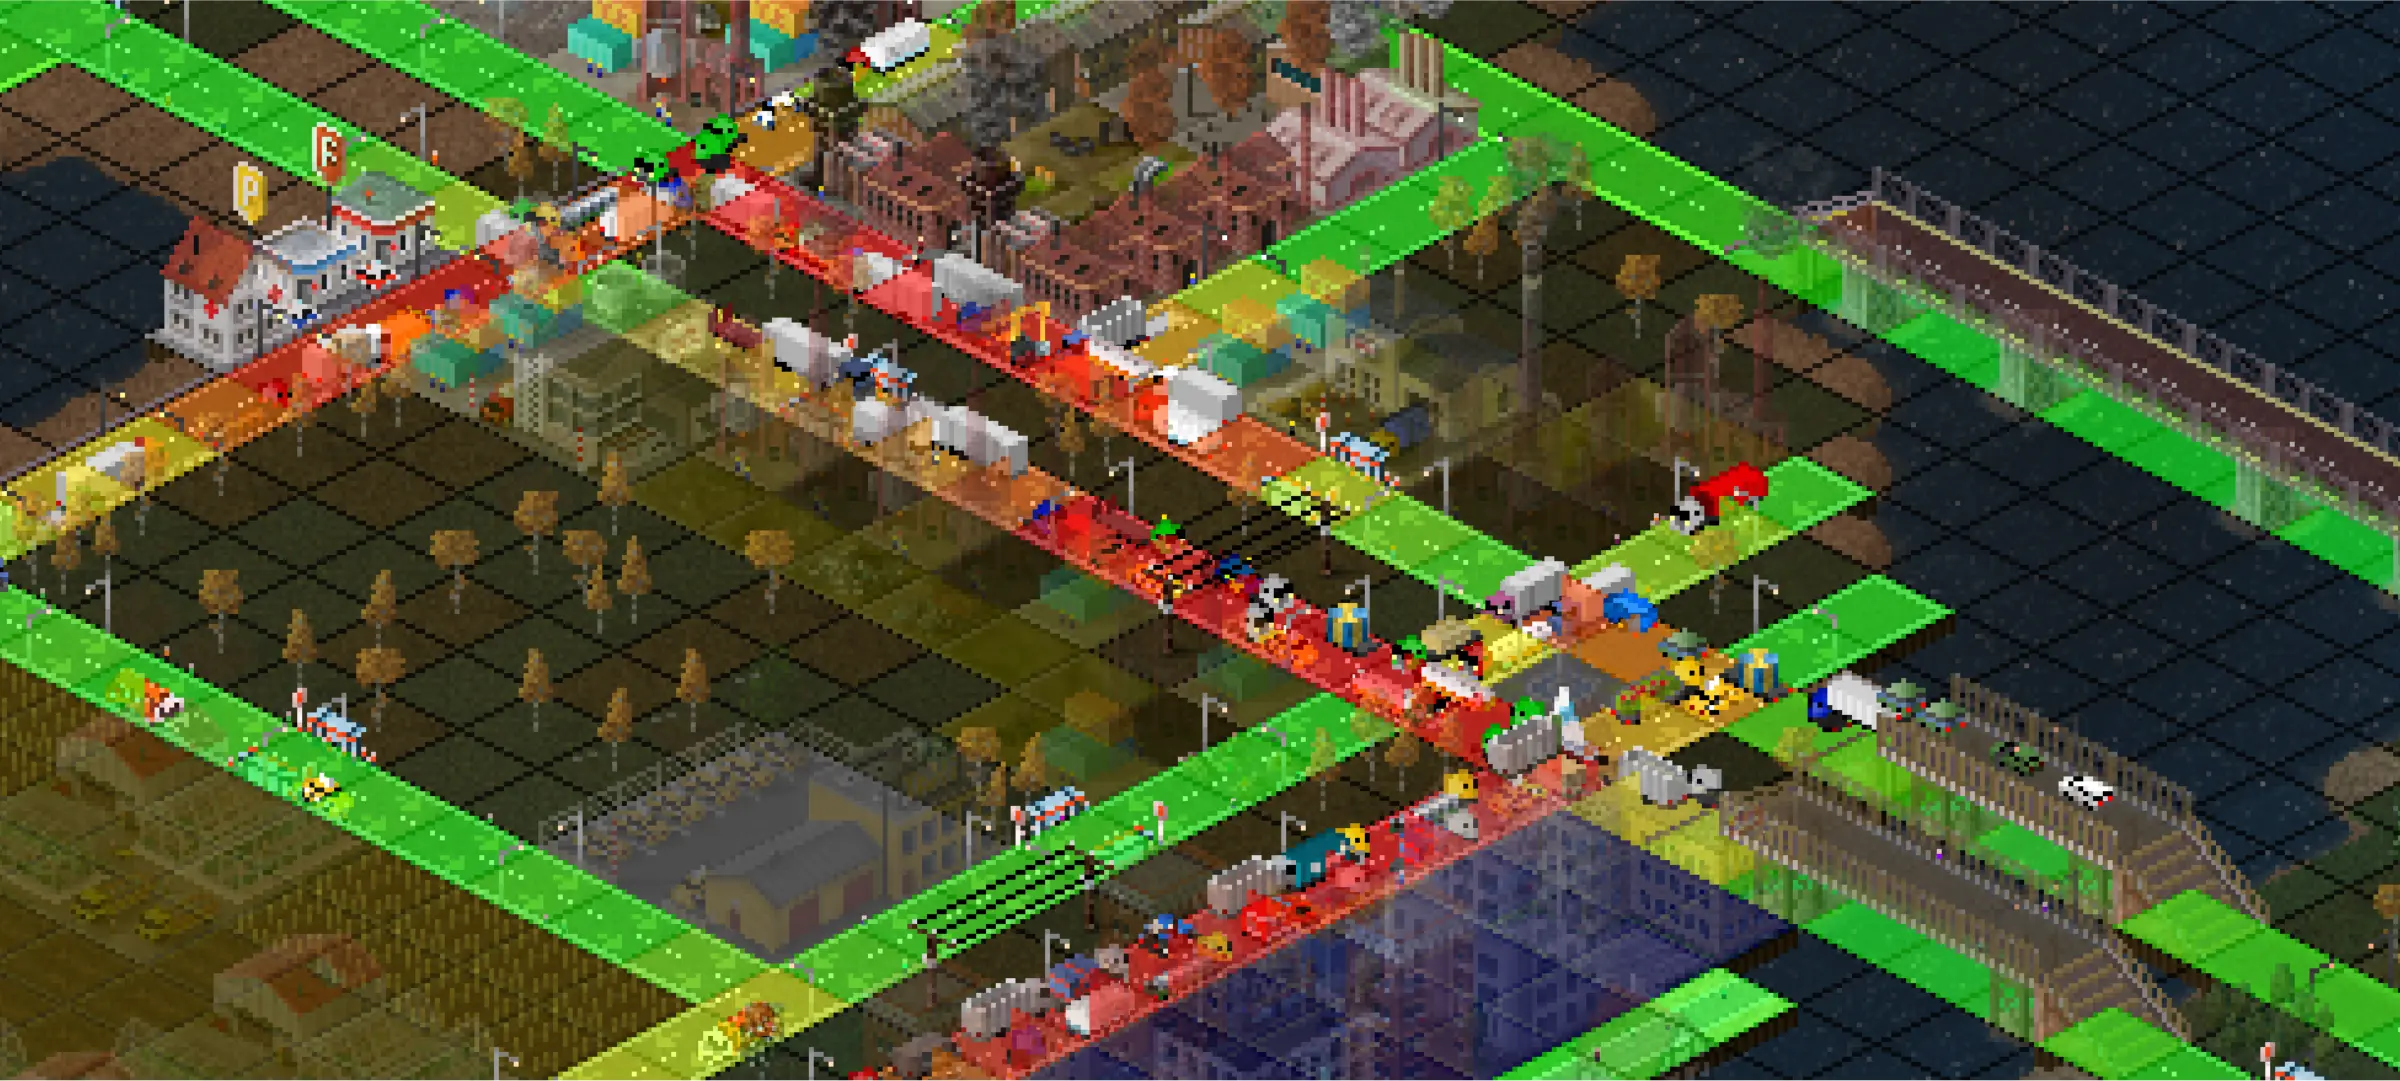
Traffic and Transportation play a big role in the development and progress of your city as well as the happiness of your inhabitants. Knowing how to construct a good road network is a crucial skill that can elevate your city’s performance.
Building Roads
When building roads, you need to tap two squares that are on the same row or column. Roads are the most complicated to build among all of the structures and require a bit of trial and error until you get what you want. Because of this, we recommend starting off with dirt roads (the cheapest one) and make sure to choose the dark gray variant because the other one will not give you the option to create elevated roads. Roads can be built across water to make bridges regardless of how deep it is.

The “Join Roads” option is highlighted by default and will allow you to automatically join roads when you build overlapping ones.

The “Use Decorations” option allows you to add decorations like traffic lights, borders and so on. The decorations cannot be chosen and will differ depending on the type of road you place. If you want to choose your own decorations, you can build them separately under Transport > Road decoration.

The “Bridge” option allows you to build an elevated road over another road. Depending on the starting and end points of your bridge, it can curve over the road or slope up then go straight. It is very possible to create a flyover even without this option by using the “Higher” option and making sure the road is higher than the road under it. If you want a flat bridge over the water, build some terrain before building a road.

The “Higher” or “Lower” options allow you to choose how high or how low the road you make will be. There are 4 levels of height that you can make these roads in but the change in elevation in your map’s terrain can also affect how high your roads can become. If you’ve already made roads previously, they will be highlighted to show you at what level the road that you’re about to build is at. Use these highlighted roads as a guide to know if a road you’re about to make can connect to them or not.

Once you tap on one of the squares, you will notice that the two options have changed to either “Upwards,” “Downwards” or both. Choosing any of them will generate slopes in between straight roads towards your chosen point. Not choosing any of these options will allow you to create a straight road.
Tapping towards a higher or lower road while one of these are selected will allow you to connect your new road to it. Take note that you may have to tap the square a few tiles past your chosen point to make sure that they will connect successfully.
Slopes will automatically be generated and depending on how far the connection is, it may produce several slopes and straight roads. If you want it to have a consistent slope or straight line without breaking, you’ll have to make shorter roads and manually adjust until you have successfully connected them in the way that you desire.
Roads can also be constructed under the space of your elevated roads. This can be useful to conserve space and shorten the distance between areas. The same can be said for tunnels.

Country roads and all other roads that are unlocked after that will give you the “Constant Height” option. This ensures that the road you build will not create any downward or upward slopes. This option can also be used to create tunnels which are bought with Diamonds, even in Sandbox mode, unless you have the Road Authority building in your city.
This building will allow you to make tunnels without spending Diamonds and will overall make building roads cheaper. This building can be found under Public > Management and costs 120 Diamonds. Because of the cost, we only recommend building this in cities that you are dedicated to building on.

At some point, you’ll eventually unlock better roads for your city. If you want to upgrade them, there is no need to rebuild them. Simply choose the new road you want and build over your existing road to replace them. The same method works when replacing road decorations.
Most buildings need to be connected to roads so you’ll need to make sure your roads are at the same level as your buildings since these buildings cannot be elevated like roads can. The only time they sort of do is when they are built on top of cliffs. They will fill up the gap of the cliff in order to build the structure.
Reducing Traffic
As we played the game, we discovered a few tricks to reduce traffic in the game. Their applications are on a case-by-case basis and may work well for some cities and not for others. Feel free to experiment with these tips until you find what fits:
Use One-Way Roads
One-way roads can be a huge help in regulating traffic. These roads force cars to drive in only one direction and can be used to make road networks that lead to areas efficiently. If you are to use these, make sure that your inhabitants have ways to go back to the other direction. This can be made by making a loop with your one-way roads or by creating two of them in opposite directions with a road that connects them.
Use Roundabouts
Roundabouts are a great way to get cars to where they need to go without disrupting the flow of traffic in intersections. They can be done by placing a mini-roundabout at the center of an intersection or by creating one with one-way roads. Take note of the natural flow of traffic when creating the second one to avoid confusion!
Use Bridges, Underpasses, Tunnels And Interchanges
Making roads that can overlap each other not only saves space, it also shortens the amount of time needed for someone to go from one place to another.
Once you’ve gotten to the point of building large cities with various roads, interchanges can be a great way to help your inhabitants get where they need to go. These are meant for large road networks and allow for various U-turns for the cars that need them. They are best placed in the middle of your city.
Use Taxis, Buses And Bus-Only Roads
Placing Taxi and Bus depots can reduce the amount of cars on the road because more people will be able to travel in the same vehicle. Taxi depots only need to be placed for them to function, but Bus depots have a whole system that you can customize.
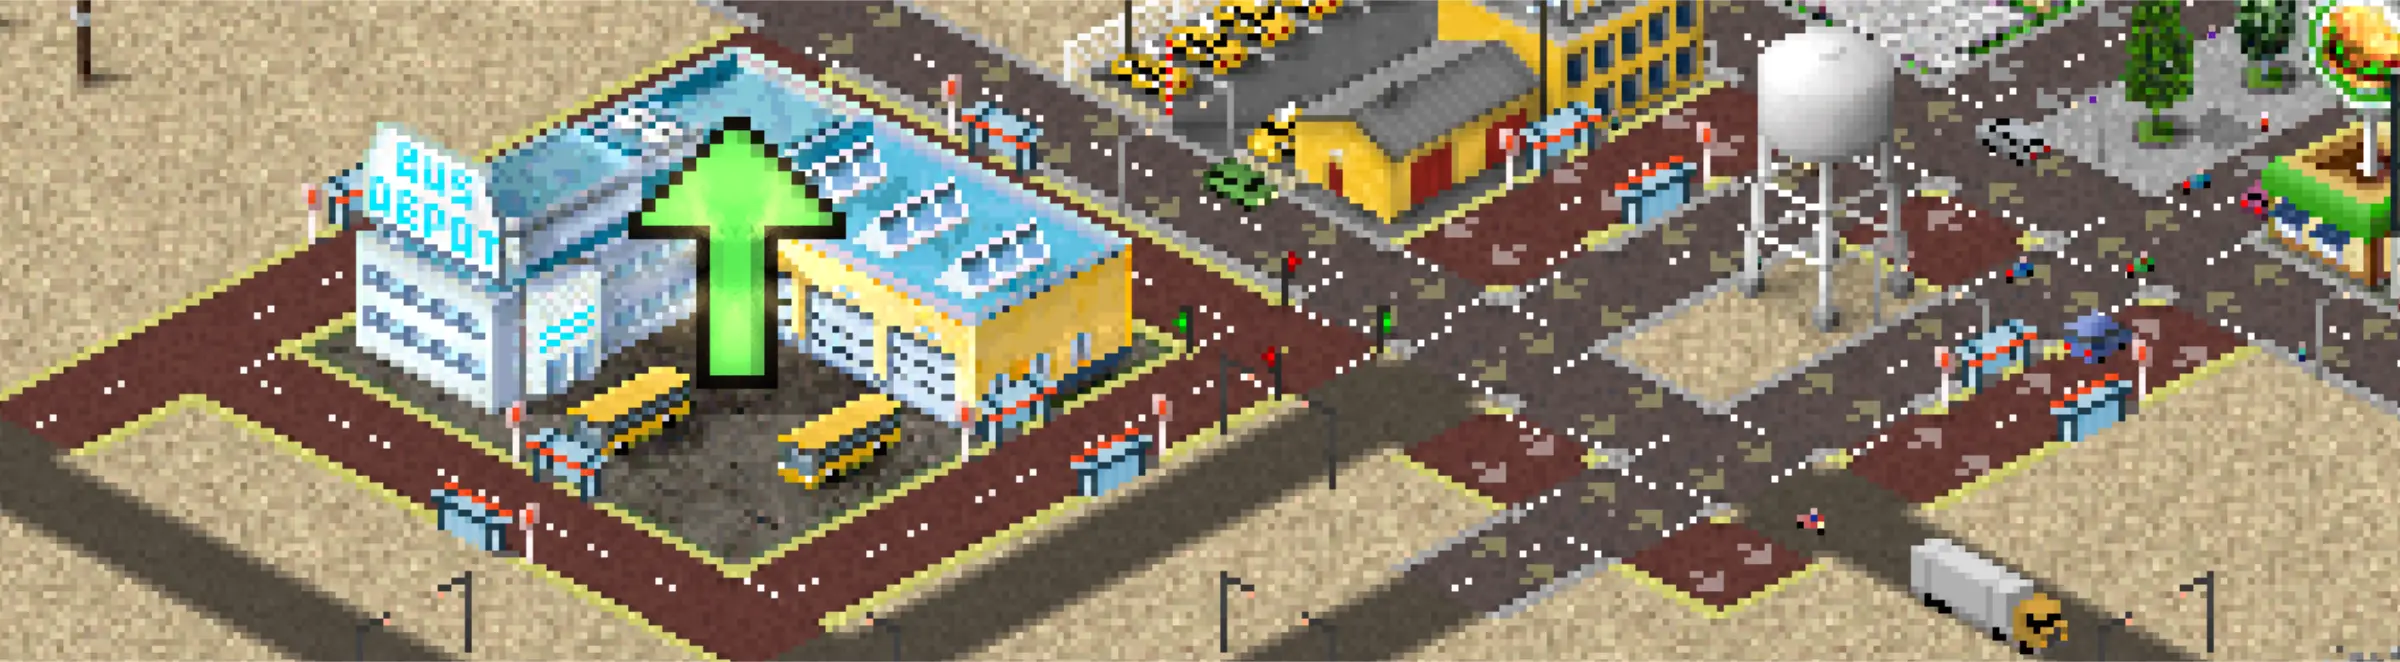
Bus depots rely on a ticket system to obtain their upgrades. Tickets are generated automatically per second and the amount of buses you unlock and upgrade will increase it. They rely on bus stops for their routes and the more efficient they are, the more tickets will flow in.
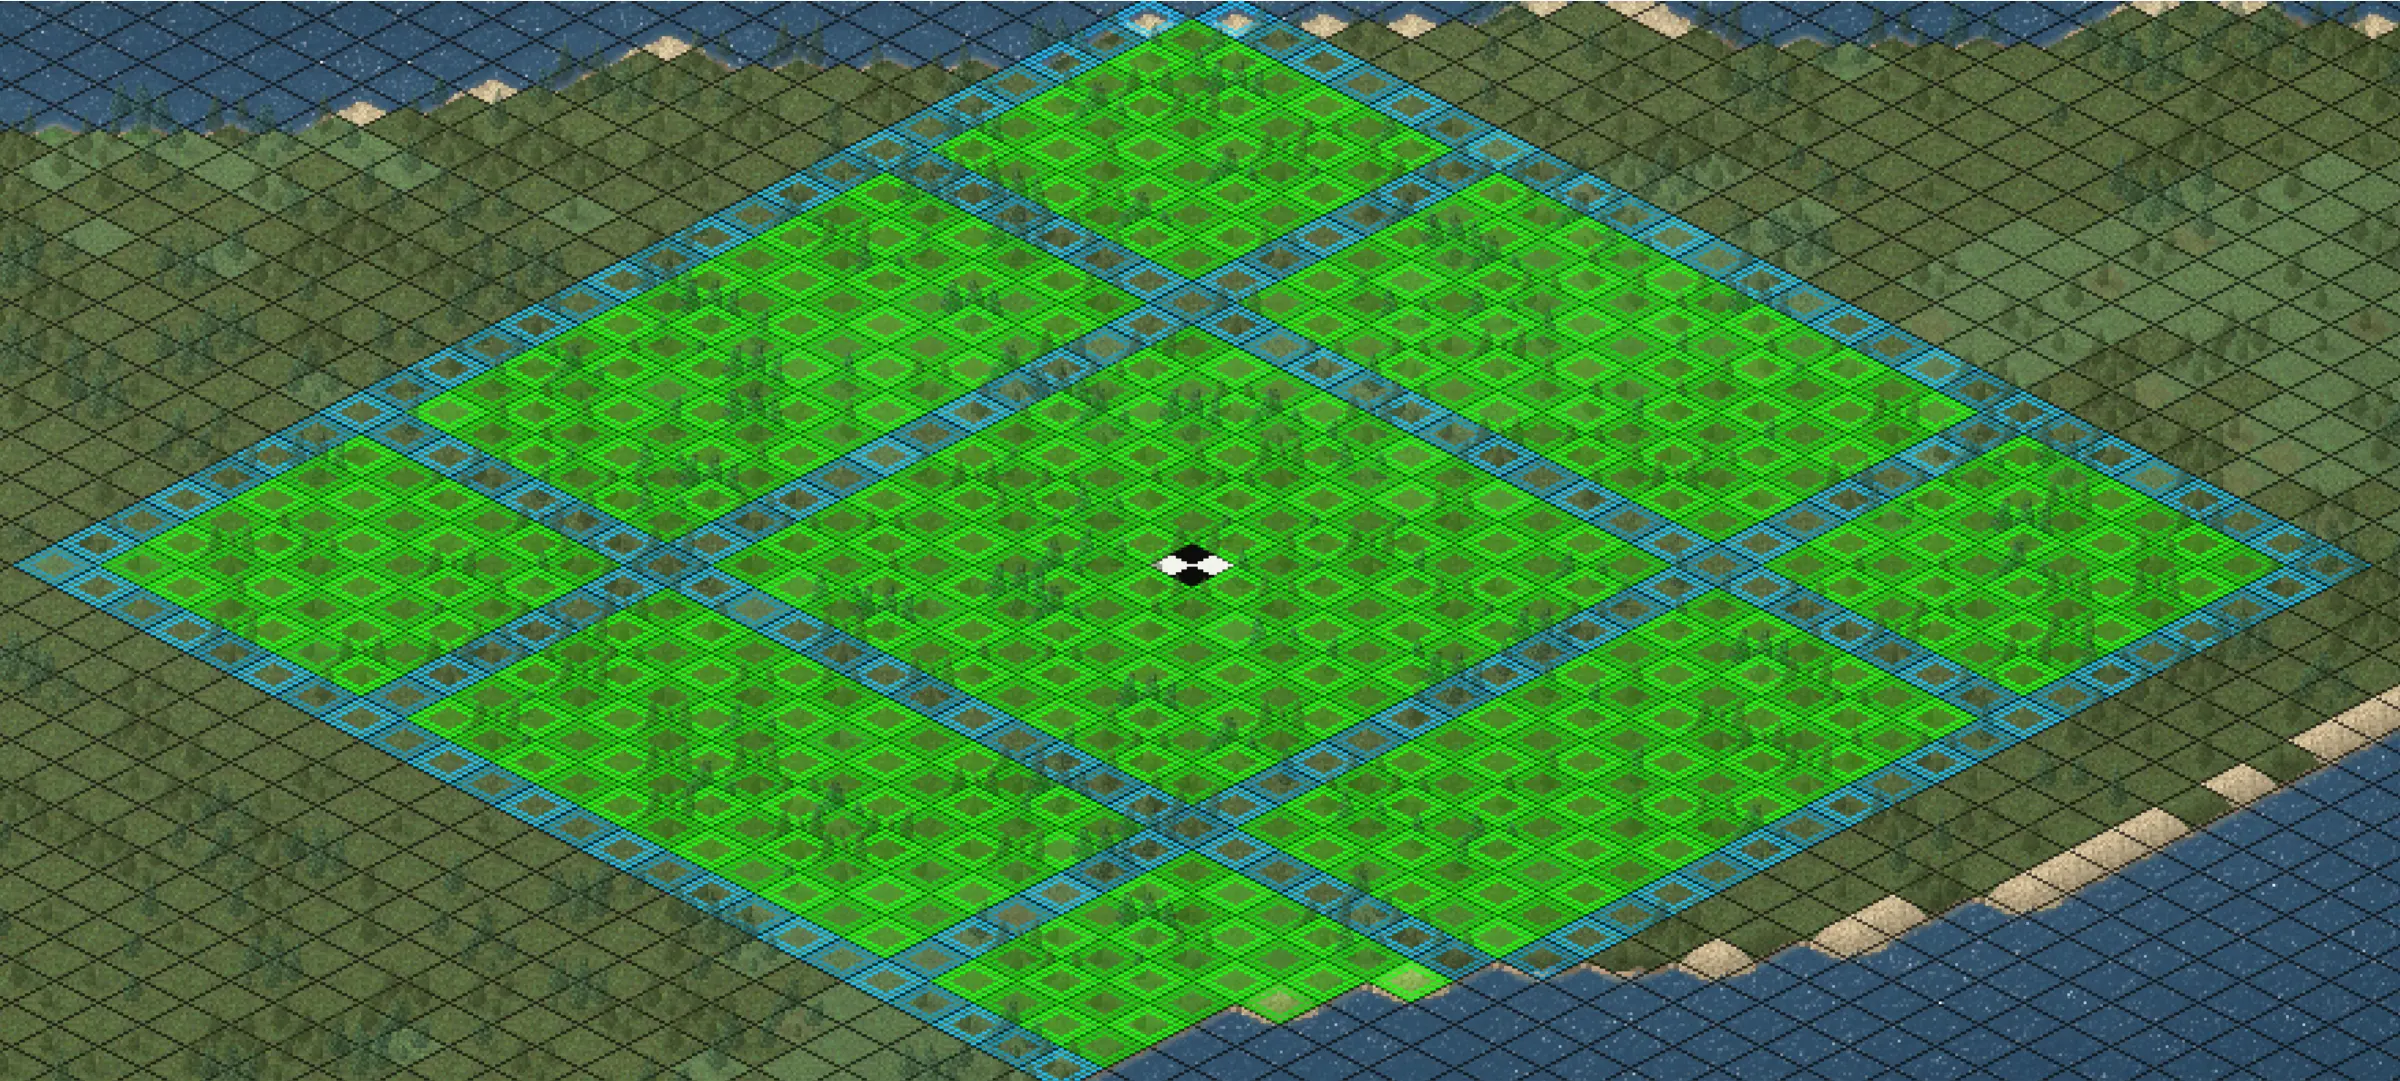
When placing bus stops, the areas of the map that it covers are highlighted in green. The goal is to be able to cover as much of the area as possible so inhabitants can get to where they need to go. For areas that are too far away, it is better to just create another bus depot for it or a different mode of transportation rather than make your buses travel distances that are far and take too long since this can make them an ineffective mode of transportation.
Buses can have their own dedicated bus-only roads. Despite the name, these red roads can also be used by emergency services like the police, fire department, and the hospital. These make it easy for buses to avoid traffic and go at a steady pace to bring their passengers to their destinations.
In our experience, we found that the best way to place bus stops is by utilizing these roads that are placed through blocks of zones and buildings or placed by a small section near the road. Loading and unloading passengers can create traffic so having these can be helpful in keeping traffic flowing. As much as possible, avoid placing these at the center or too close to intersections.
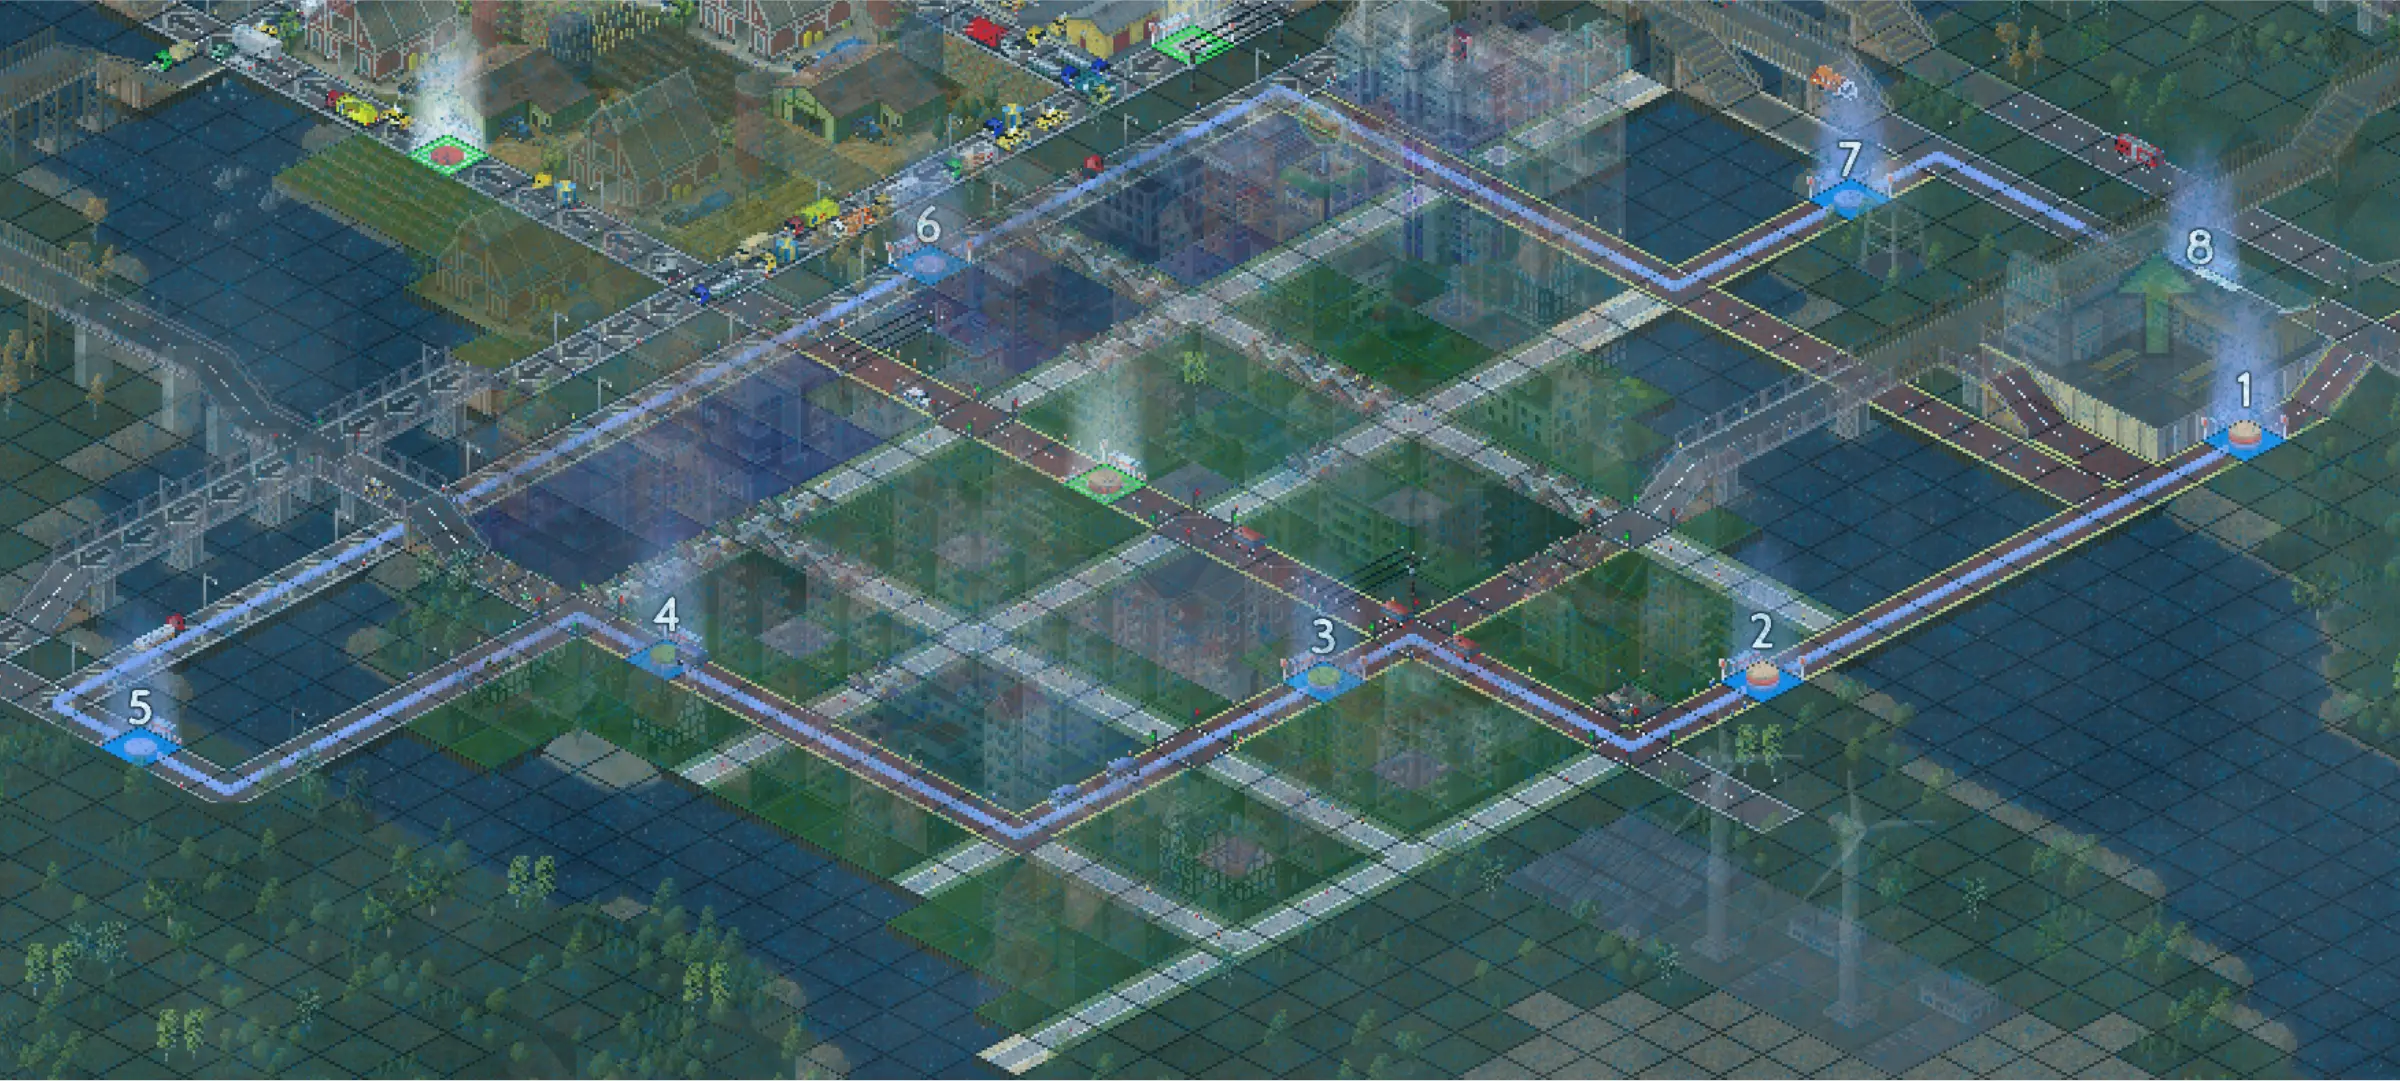
The bus routes are automatically generated based on the bus stops you’ve placed in your city. However, if you want them to run effectively, customizing them yourself is recommended. This can be done by tapping your bus depot and tapping the “Route” button. This highlights the bus stops in the area and allows you to tap them in the order you want your bus to go through them. The lesser twists and turns a bus needs to do, the more efficient they will be.
Increasing Your Inhabitants’ Happiness
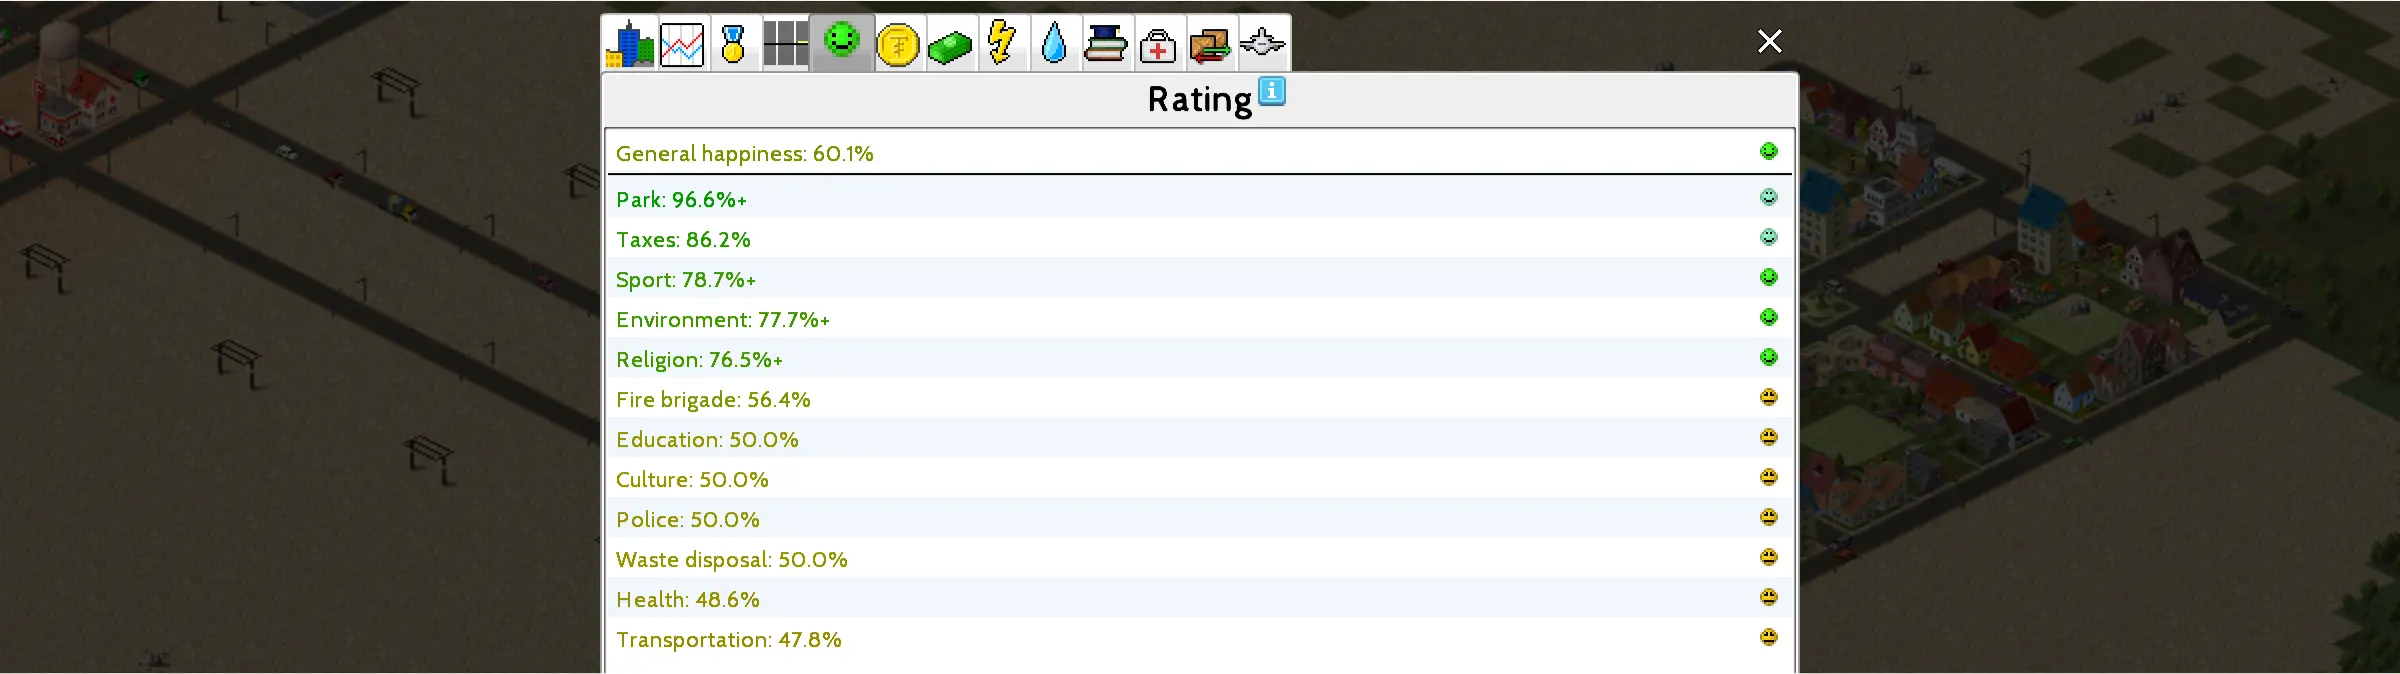
The growth of your city is heavily reliant on your inhabitants’ happiness. Happier residents are bound to work harder, become wealthier, pay more taxes, and influence the arrival of more residents. The rating of your inhabitants’ happiness can be found at the upper left portion of the screen next to the happy (or sad) face and tapping it will show you a more detailed breakdown of the factors that affect it.
These are influenced by several factors which we have divided into four categories: Resources, Services, Lifestyle and Transportation. Transportation has been heavily explained in the previous section so we will instead be focusing on the first 3 factors for this section.
Supplying Resources To Buildings

There are four major resources that every city needs to function and survive: Energy, Water, Waste Disposal, and Funeral. Energy and Water are essential at the start while Waste Disposal and Funeral would follow a few levels after. However, once those two resources are unlocked, don’t wait too long to construct the facilities for them if you don’t want problems in the future.
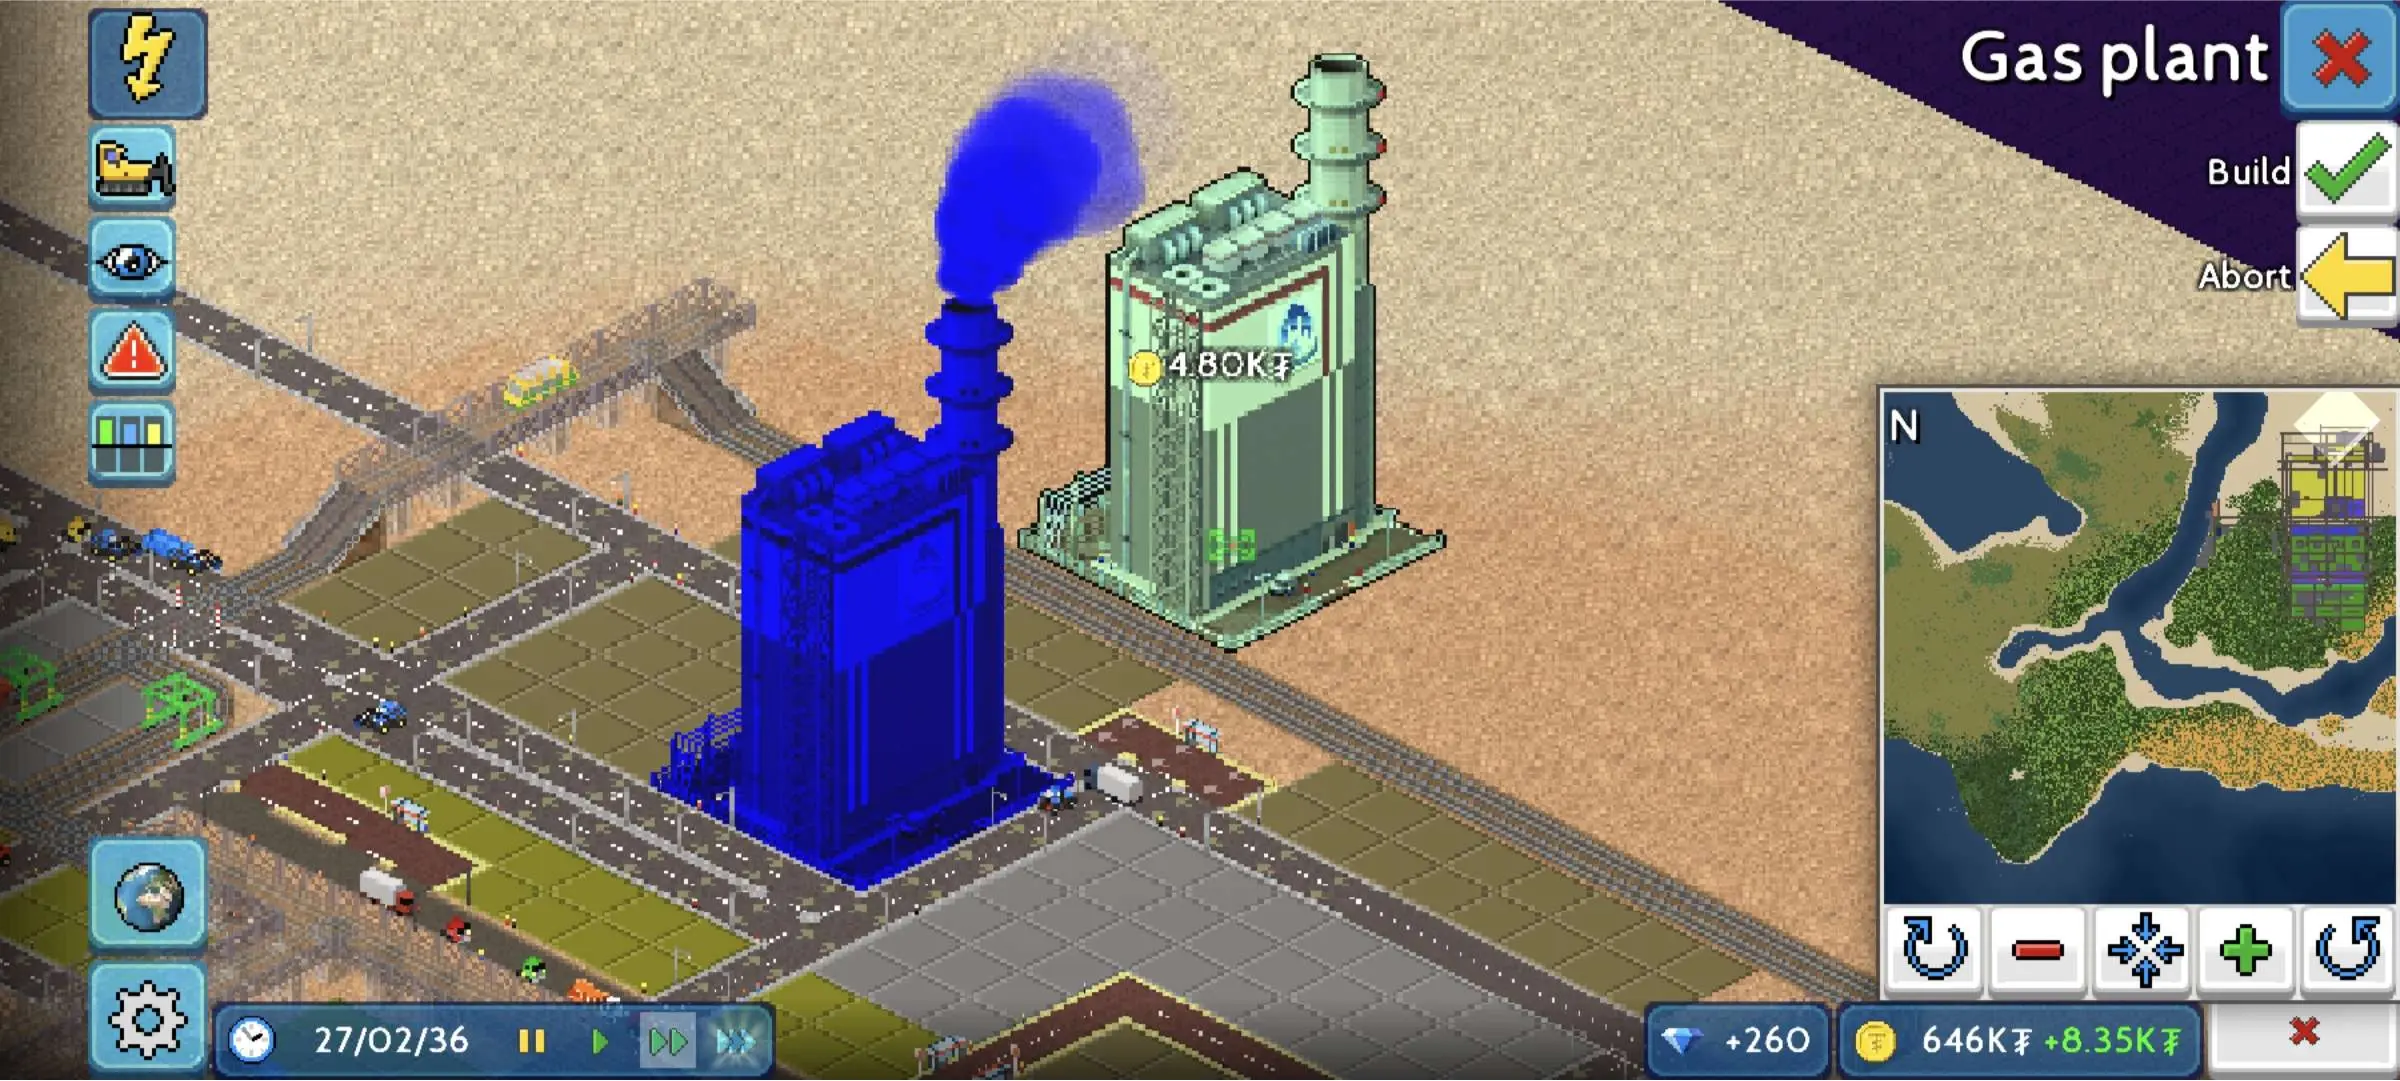
Energy
Energy keeps the lights on and keeps everything running in your inhabitants’ day to day life. Almost every structure you make in your city requires this resource. You need to build an energy-generating structure and wires to distribute it.

Energy generators can vary their effect on the environment and their requirements for becoming functional. Solar Panels, Wind Turbines and River Power Plants can stand alone and do not need to be connected to roads whereas Gas Plants, Coal Plants, and Nuclear Power Plants are the opposite. Wind Turbines and River Power Plants may not produce any pollution that’s harmful to the air, but they will still produce noise pollution which may bother inhabitants if they are close to residential areas.
Solar Panels on the other hand may not produce any pollution or noise pollution, but they don’t produce much electricity. You’ll need a good balance or a good layout to keep your buildings powered while keeping your inhabitants happy.
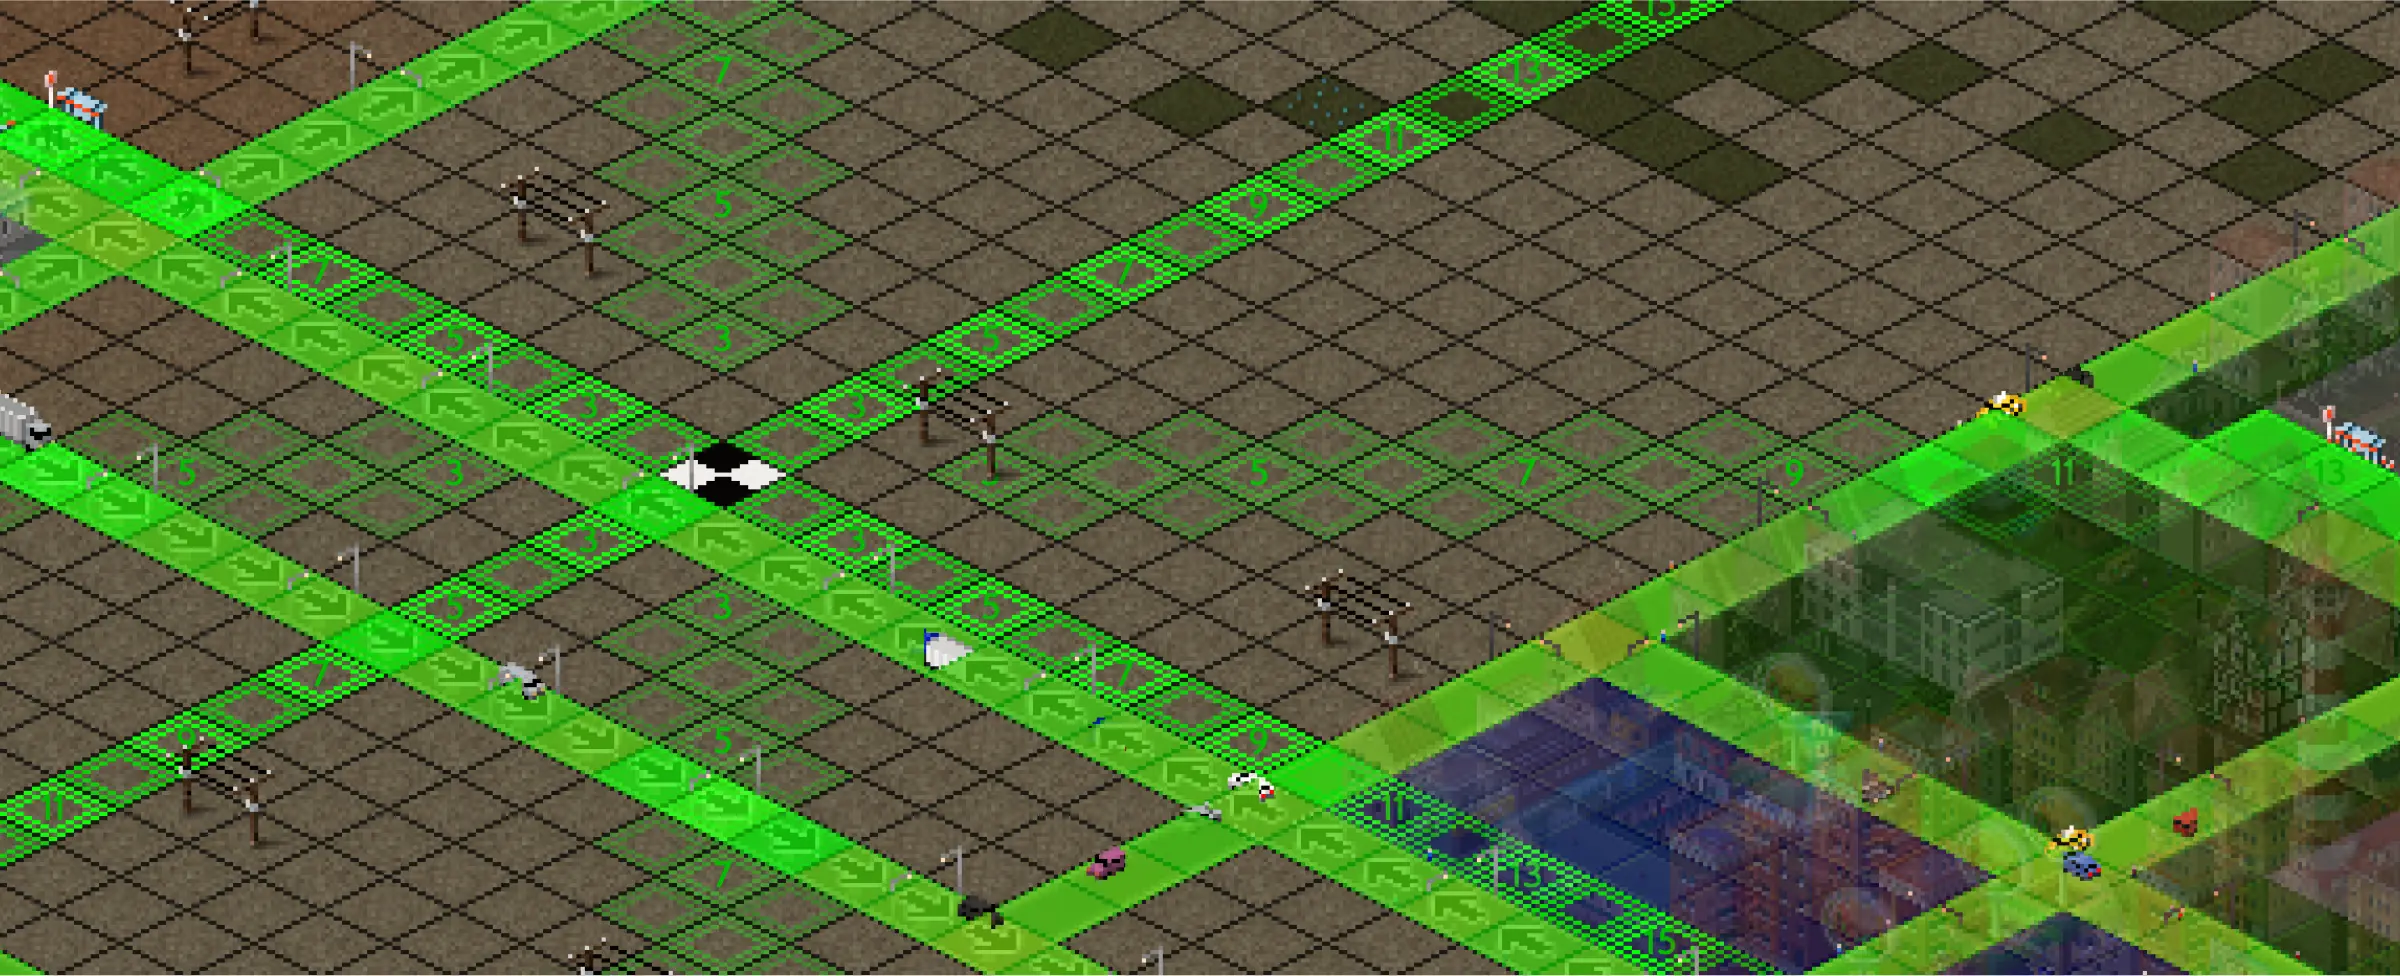
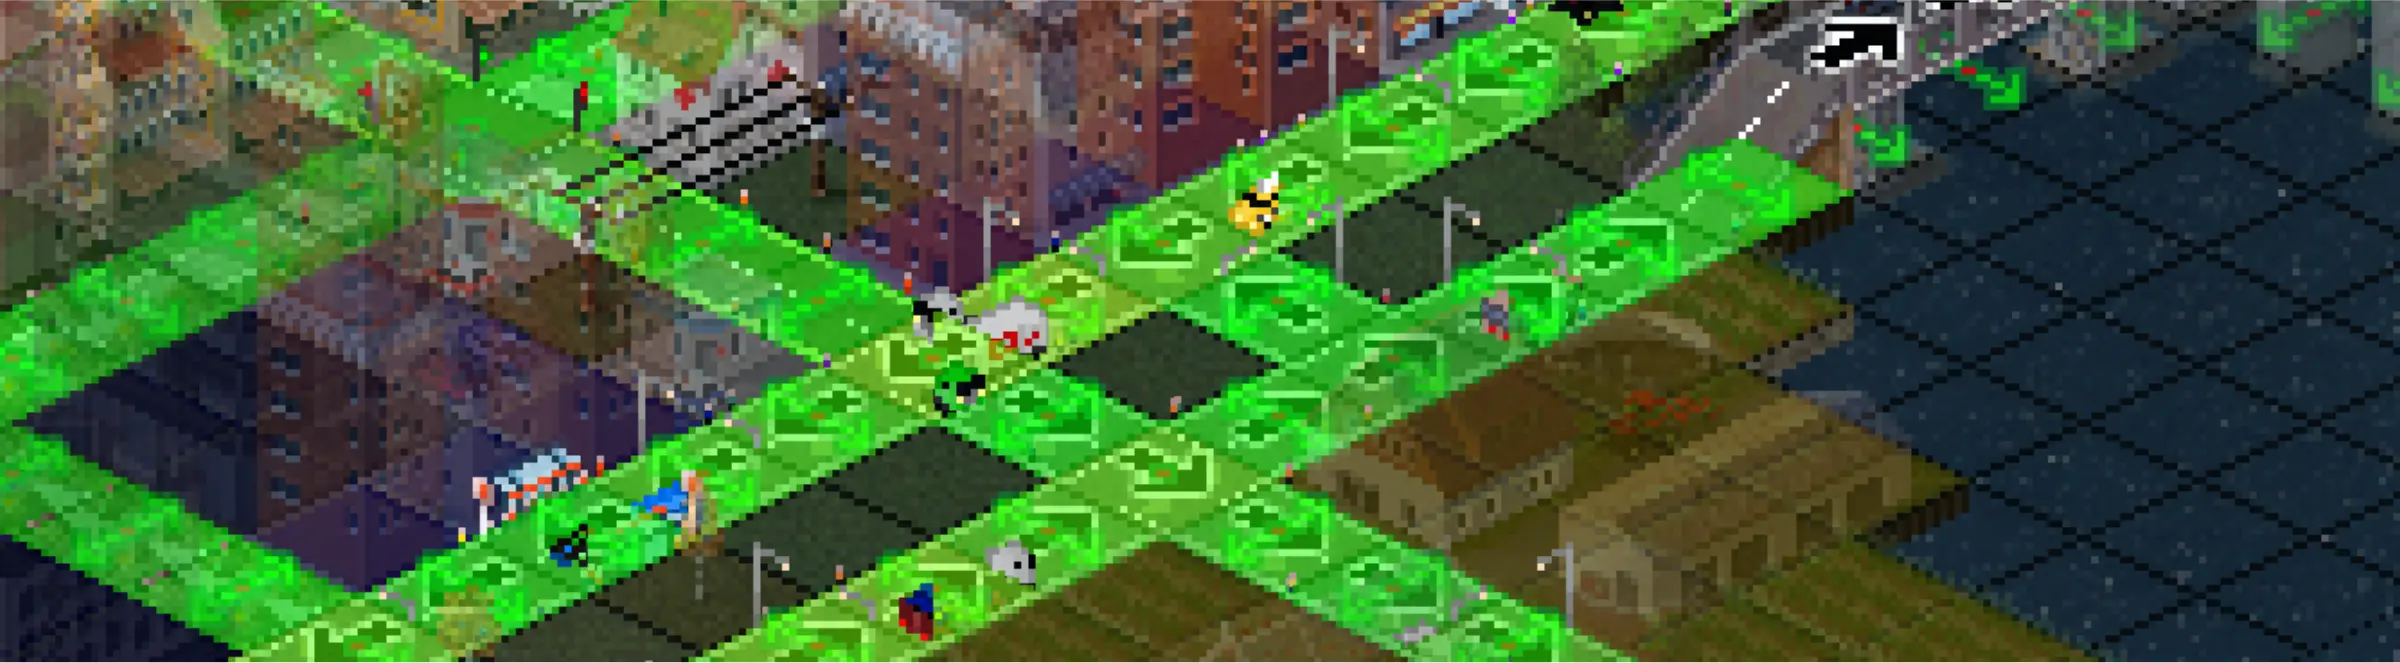
Once you’ve built your energy generator, you’ll need to build wires to connect them to your buildings. When placing wires, you’ll see areas highlighted in blue which represent the areas that are supplied with electricity. The red tiles on the other hand represent the areas that are in need of electricity.
The immediate instinct we had when we started was to create long lines of wires. However, we later learned that this was not necessary. You actually only need to use up two tiles at a time to further the reach of your generator.
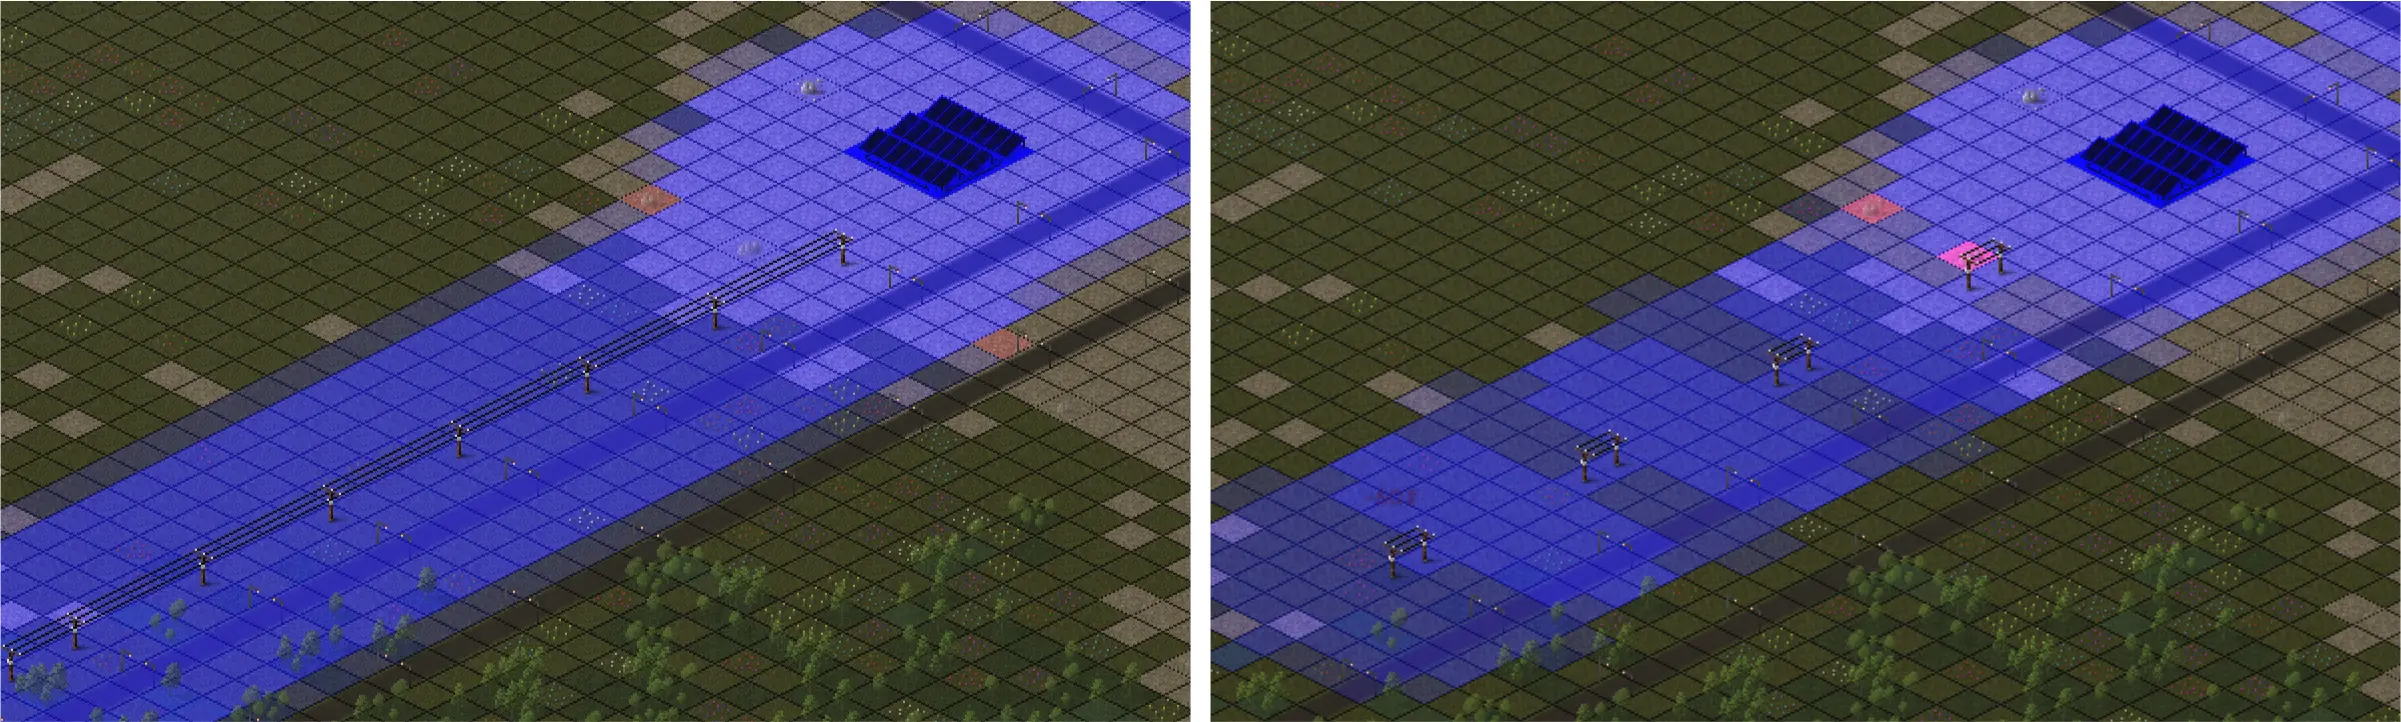
The trick is to place one end of the wire on one of the faded tiles (the further the better) then the other end of the wire on a tile that’s not affected. From the faded tile, it will immediately spread the energy generator’s reach to 5-6 tiles. Keep doing this until all of your buildings are sufficiently powered.
Water
Water is an important resource for every building and household. In one instance during our playthrough, a building not having water even caused it to go up in flames! To supply your inhabitants with fresh and clean water, you’ll need a water container or pump, and pipes to distribute it.
In cases of a polluted water source, you’ll need to build a Filter Plant. Water containers like Water Towers do not need to be connected to roads nor do they need to be near water, but Filter Plants and Water Pumps of all sizes do. The best part about water containers and pumps is that they do not produce any pollution or noise pollution so you can build them near residential areas if you want to.

Once you’ve built your water container or pump, you’ll need to connect them to other areas of your city using pipes. Unlike wires, these are built underground and will not affect any buildings above ground and can only be viewed while placing pipes.
They do however need to be built in a line from the source to the area that needs it. There is no hard or fast rule to placing pipes, but we did discover a helpful trick that would allow you to maximize its use without spending too much money placing so much of them.
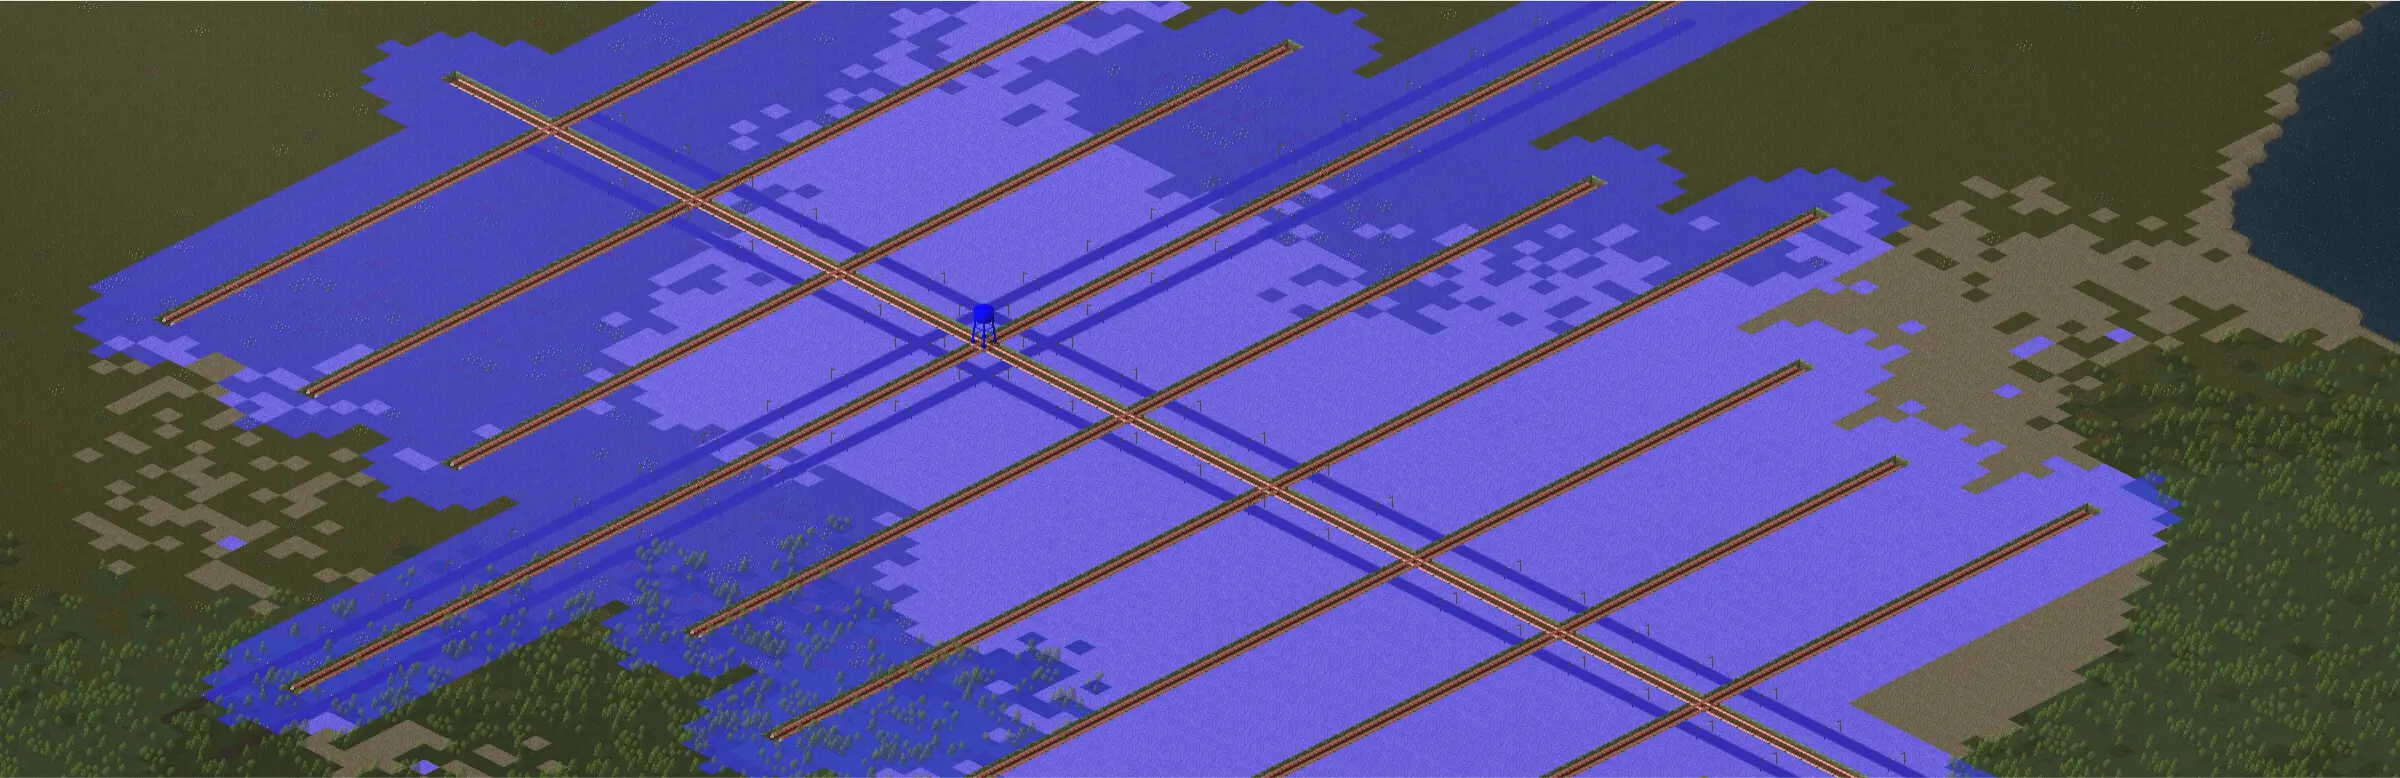
Just like with wires, when placing pipes, the blue tiles will represent the areas that are supplied with water while red tiles will represent the areas that are in need of it. What you want to do is to create a long line from the water container or pump that you’ve built then create intersecting lines across that.
Pipes will always supply water at a 4-tile radius, so placing tiles with 8-tile gaps in between will be able to cover all areas nicely. Even though you may not need a certain area supplied with water, it’s still a good idea to supply them in case you decide to redesign or reorganize your city.
Waste Disposal
Waste Disposal is essential for keeping your city clean and pristine. Having the necessary facilities for this will prevent diseases and epidemic outbreaks from occurring. These must be placed away from residential areas since they create pollution that can upset your inhabitants.
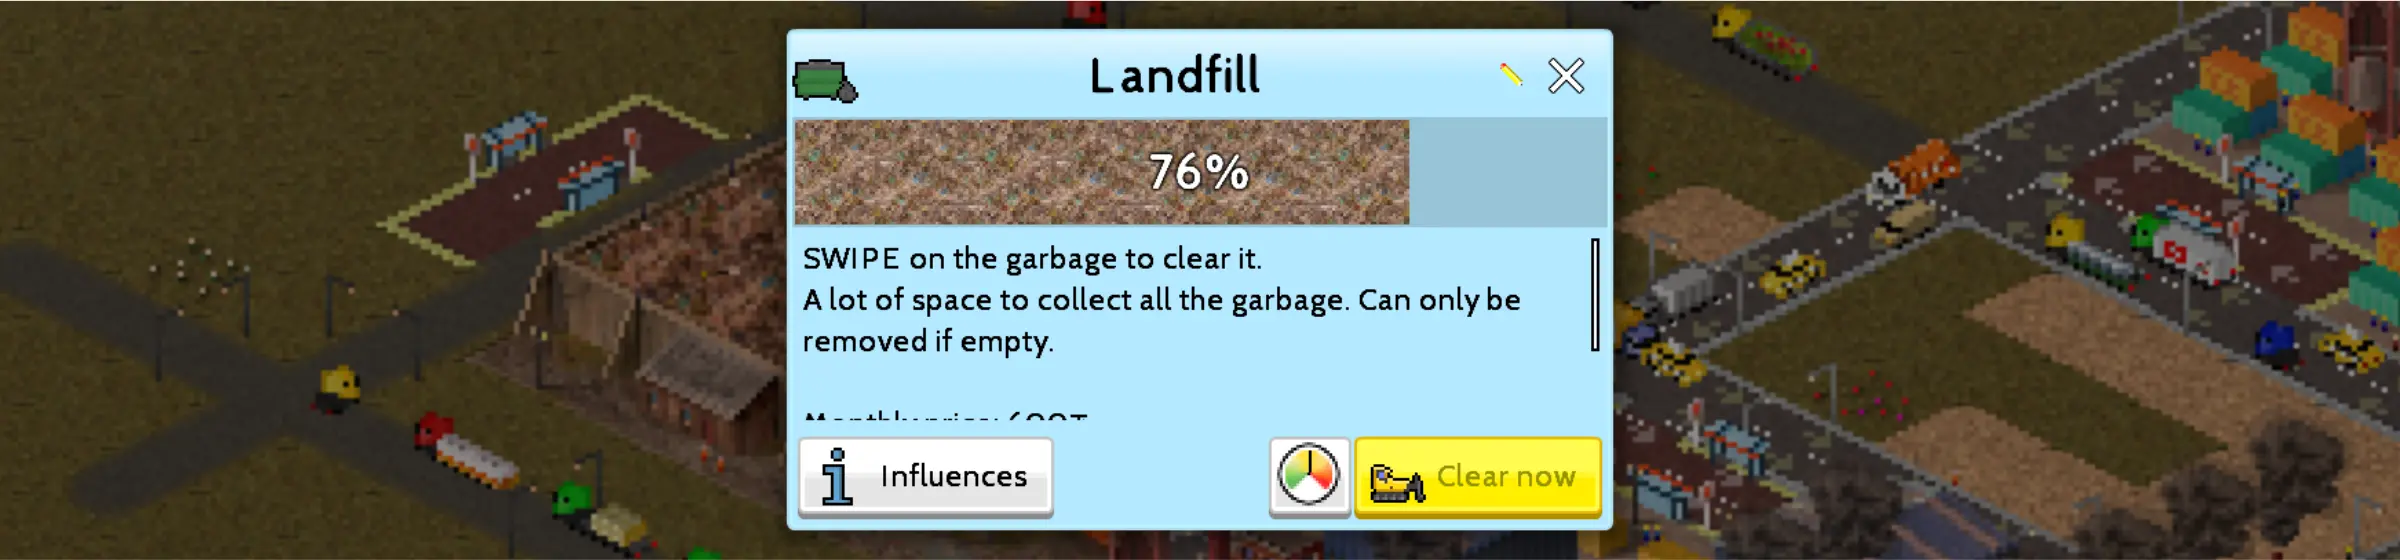
Unlike the first two resources, waste disposal facilities only need to be connected to roads to function. There are only 3 buildings you can construct from this category in the base game: Landfill, Waste Incinerator, and the Buyback Center.

The Landfill, which is unlocked at Rank 1 (Hamlet), can store a large amount of waste but it needs manual input from the player to get rid of them. This is done by pressing and dragging around the screen while the landfill’s window is open until it is completely empty. Take note that if you decide to get rid of the Landfill, you’ll need to empty it first.
The Waste Incinerator, which is unlocked at Rank 6 (Town), will automatically incinerate trash it collects, making Landfills unnecessary. The Buyback Center is the most eco-friendly option, recycling trash and allowing inhabitants to buy them. However, this option is also a lot pricier and requires 150 Diamonds to purchase.
Funeral
Funeral services are responsible for taking care of the bodies of those who have passed. They do not create pollution and functions like a park, making it safe to build around the residential area. They can also increase the happiness of your inhabitants and prevent sickness that can be developed from being around corpses.

The Cemetery, which is unlocked at Rank 2 (Village), and the Big Cemetery, which is unlocked at Rank 6 (Town), serves as a place to bury the dead. They only need to be connected to the road to serve its function. The Crematorium, on the other hand, which is unlocked at Rank 10 (City) burns the bodies of dead people and can save plenty of space in your city. However, they need to be connected to the road, an energy source, and a water source just like most buildings in your city.
Providing Services To Inhabitants
Aside from providing resource management for your inhabitants, you also need to take charge in providing services that can protect and ensure their safety, as well as create a space that encourages learning. These services are: Fire Department, Education, Health, Police, and Military. All services except for Education are used for emergencies. Like every other building in the game, they must be connected to roads, supplied with water and powered by energy.

The Fire Department, Health, and Police buildings are best placed together as they work in conjunction with one another when something wrong happens. It also helps you keep track of which areas are covered a lot easier.
The Military buildings can be placed in its own specific area away from civilization or among residents to make them feel safe depending on the structure. Education buildings on the other hand are best placed among residential areas to increase your inhabitants’ happiness.
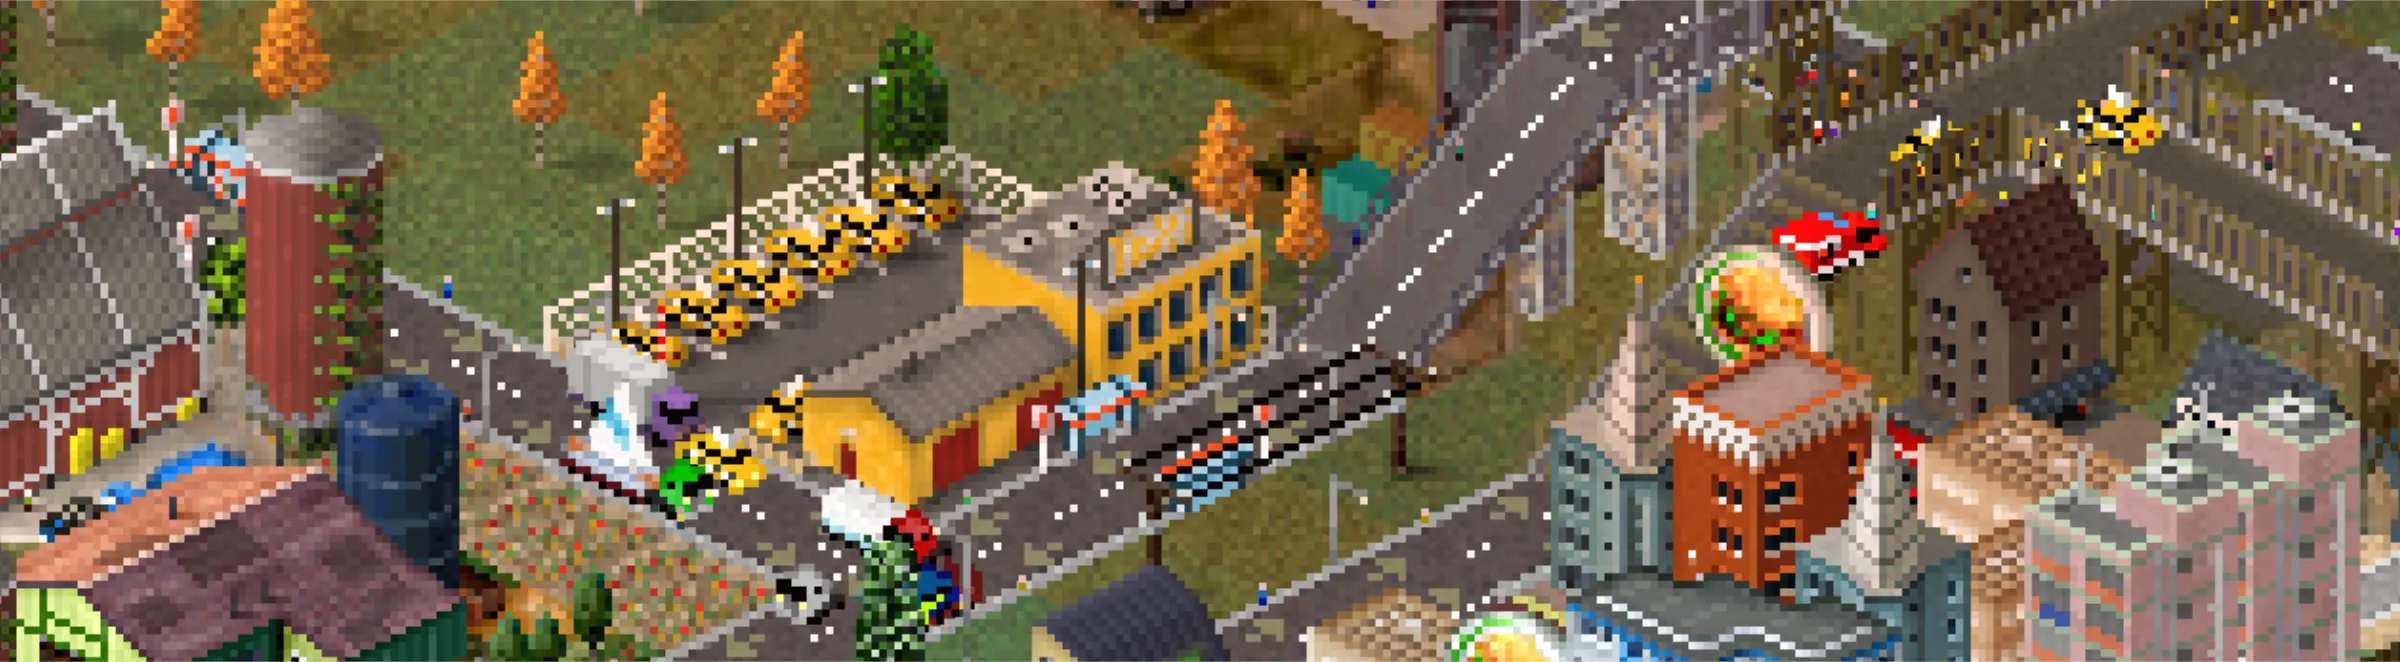
Fire Department

The Fire Department is in charge of putting out fires and making sure the damage doesn’t spread further. There isn’t much of a difference in terms of function between the three buildings you can construct for this service aside from the number of cars they can send out and the reach of their service.
A Small Fire Department, which is unlocked at Rank 1 (Hamlet), can hold one car and have a small service radius while a regular-sized Fire Department, which is unlocked at Rank 4 (Village), can hold two and have a larger radius. The Main Fire Station, which can only be bought with 60 Diamonds, can hold many cars and has a huge radius. Upgrading this is also possible by spending 200 Diamonds.
Education

Education buildings are in charge of educating the youth and enriching the knowledge of the elderly. There are 6 buildings that can be unlocked for this service at Rank 3 (Village), Rank 6 (Town), Rank 9 (Small City), Rank 10 (City), and Rank 11 (Big City). They are best placed at the center of multiple residential buildings and close to a bus stop for easy access.
Health

Health buildings help keep your inhabitants in tip-top shape. In case of illness, these facilities step in to cure your sick residents and prevent them from causing an epidemic outbreak. The facilities for these can be unlocked at Rank 1 (Hamlet), Rank 6 (Town), Rank 8 (Large Town), and Rank 10 (City)
Functionally speaking, there’s not much difference between the 4 buildings that can be constructed for this service, but each rank increases the amount of patients that can be treated at a time. All can be bought with regular money except for the Modern Hospital which requires 75 Diamonds to purchase.
Police

The Police Department is in charge of keeping the peace in your city. Their mere presence can prevent crime from taking place. The Small Police Department, unlocked at Rank 2 (Small Village), Police Department, unlocked at Rank 5 (Small Town), and the Modern Police Department, unlocked at Rank 7 (Big Town), act as a deterrent to criminal activity and are quick to act during crime and protests. S.W.A.T. HQ, unlocked at Rank 10 (City), serves as a special unit that is deployed during riots. Prison, unlocked at Rank 13 (Small Metropolis), on the other hand are designed to keep criminals and reform them into citizens that are less likely to repeat their crimes
Military

The Military base is part of the Guardian Garrison Bundle and will only be unlocked after purchasing it for 420 Diamonds. They are not an essential part to city building and can be fully ignored, but the addition of this will also bring the inclusion of foreign threats such as UFOs.
Improving Your Inhabitants’ Lifestyle
Once you’ve supplied your inhabitants with Resources, Services, and Transportation, it’s time to put your attention to improving their Lifestyle. To do that, you’ll need to balance their Taxes, and build structures among residential areas that provide recreation such as Parks and Sport Centers, that support their Religion, that improve their Environment, and that increase their Culture. Lifestyle can also influence the wealth of your inhabitants.
Taxes

Taxes for the different zones of your city can be found by tapping the button for zone demands at the upper left portion of the screen (it’s the one at the bottom of the column), then tapping the tab with the coin icon. You can tap the (- -), (-), (+), and (++) symbols to decrease or increase the amount of taxes you earn from them per month. By default, these are set to 7.0%.
If you need more money to spend for building, there may be a need to increase it but this can also decrease your inhabitants’ happiness if they struggle to meet them. However, if you’ve managed to improve other areas of their life, they will be more willing to pay their taxes, even if you’ve raised them considerably. Balance is key and paying attention to your citizens’ happiness is what can make a difference between a thriving city and a struggling one.
Park

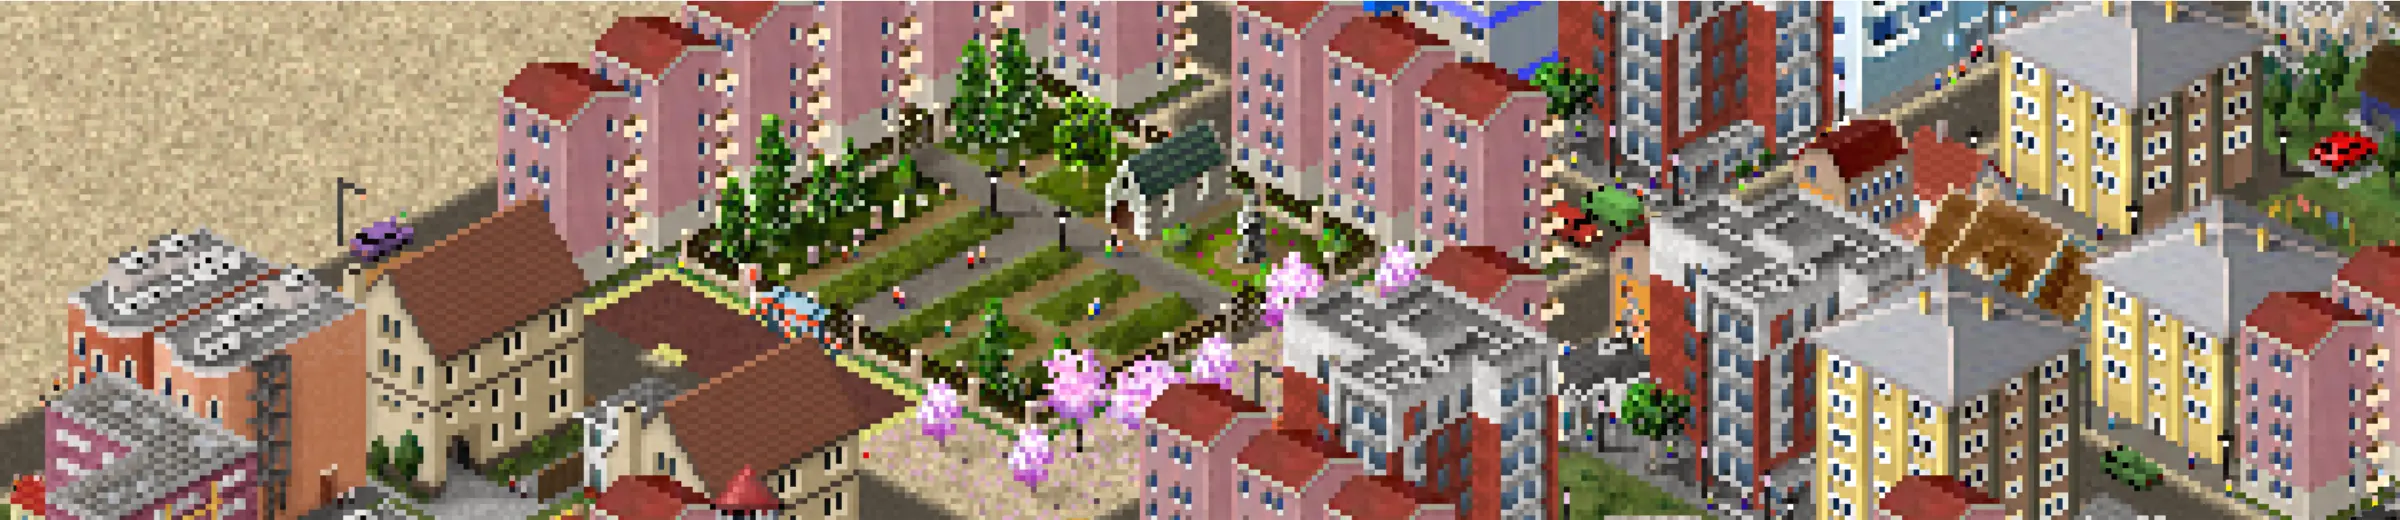
Parks are one of the cheapest structures you can build at the start of your game which can give small increases to your residential area’s overall happiness. Having them scattered about your blocks of residences can make a huge difference to your city’s status as well as their aesthetic.
Sport

Sport Centers are what we consider as upgraded parks. It gives a little more happiness to your inhabitants but they do take up a lot more space than most parks. Make sure to leave large spaces while planning your residential areas to make room for them!
Religion

Religion is an important part of many people’s daily lives so it makes sense that the presence of religious buildings can increase your inhabitants’ happiness. The bigger the church or mosque, the larger its reach and influence.
Environment

The state of the environment of your city will dictate its livability. No one would want to live in a polluted area. Placing plants and trees may make your city visually more appealing, but the most important thing you need to do to keep your citizens happy in terms of environment is to keep factories, power plants, and other pollutants away from residential areas.
Once the DSA Headquarters are unlocked at Rank 22 (Megalopolis), you can invest in its upgrades to unlock Research Centers and hi-tech facilities that can improve your city’s control over pollution and the state of the environment.
Culture

Culture can increase your city’s happiness and wealth while also bringing in monthly income from those who come to see them. Structures under Awards and Landmarks can greatly affect your city’s culture. Awards must be earned before they can be unlocked and bought and have a limit. Landmarks, on the other hand, can be bought straight away but must all be purchased with Diamonds. Landmarks in the game are modeled after real-life structures all over the world.
Protecting And Destroying Your City
Once your city has grown to a sizable degree, emergencies and disasters will start to emerge. As the creator, it is up to you to protect your inhabitants or bring them to ruin.
Emergency Services
On the upper left corner of your screen, you’ll see a button with the red caution symbol on it. Tapping it will reveal the options to call upon services that can deal with your current predicament. Take note that these services will only be available if the building or structure required for it has already been built. If you are playing the game with sound, you’ll immediately be able to tell if trouble is afoot when the music changes to a more serious and urgent tone.
- Call Police – requires police buildings. Can be used to stop criminals and passive protests. If passive protests are not stopped in time, they can turn into riots.
- Call Fire Brigade – requires fire department buildings. Can be used to put out fire. Must be called quickly to prevent fire from spreading further.
- Call Ambulance – requires hospital buildings. Can be used to help in accidents or epidemic outbreaks.
- Call SWAT – requires the SWAT HQ building. Can be used to break up riots.
- Call Garbage Truck – requires waste disposal buildings. Can be used to collect garbage from the road.
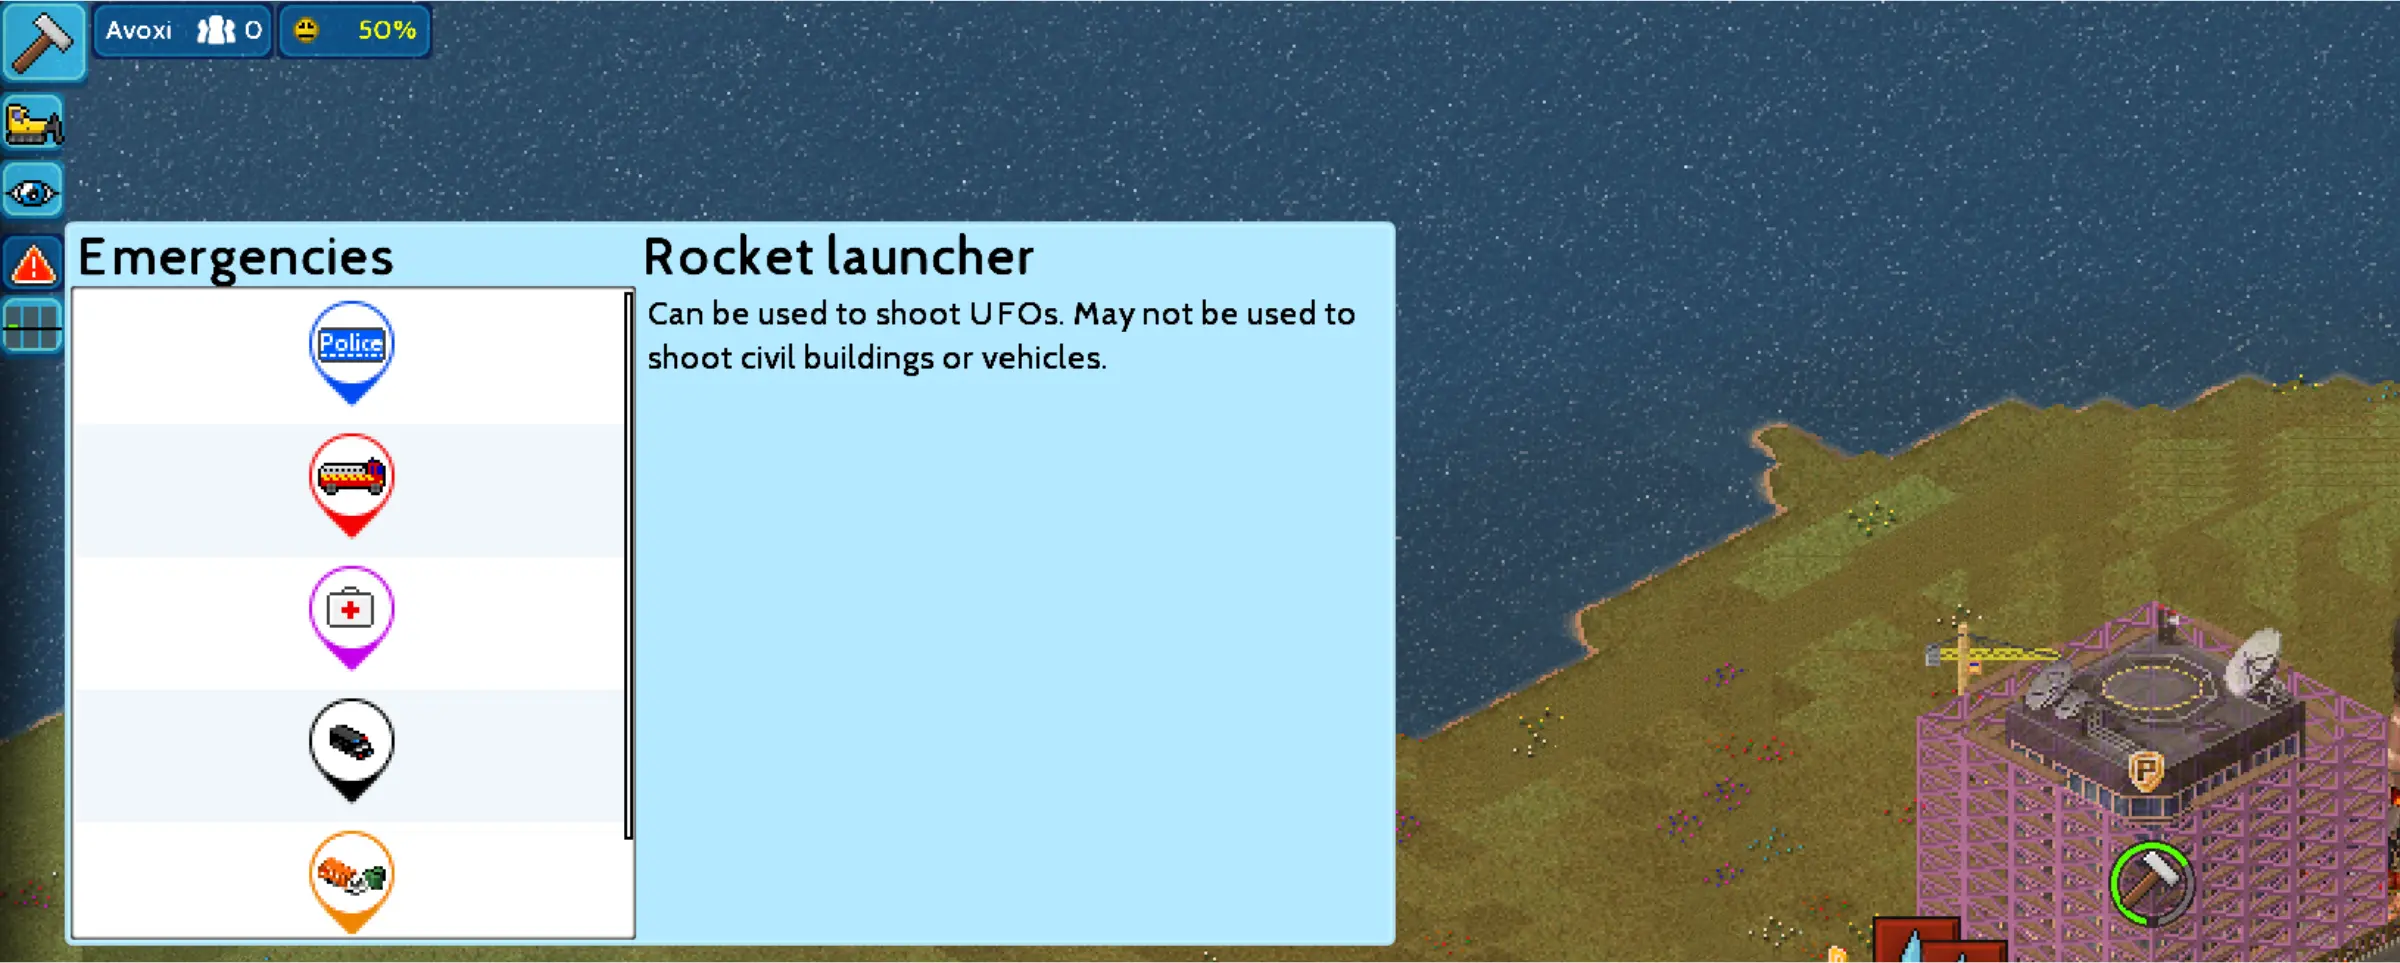
- Rocket Launcher – requires the Rocket Launcher building found under Military.
For the first five services listed above, you’ll need to have a usable road for them to drive on to get to your emergency. They can drive on any road, even bus-only roads, except for pavements. If a building was in the middle of a residential zone and was surrounded by pavements instead of roads, your emergency crew will not be able to help that resident.
Disasters
Keep in mind that certain disasters cannot be stopped or resolved by your emergency services. In fact, some disasters won’t even occur naturally and can be inflicted by you yourself! Building your city can be lots of fun but sometimes the little gremlin in us just wants to watch the world burn.
Fortunately for you, TheoTown gives its players the ability to go ham and lay waste to the city you’ve created (or downloaded). Open up the build menu, tap “Disasters” and you’ll see a variety of options to cause chaos and destruction to your unwitting inhabitants!
But before you do that, if you’re pretty attached to the city you’re destroying, make sure to make a backup or at least turn off the auto-save function found in Settings > Settings > Other.
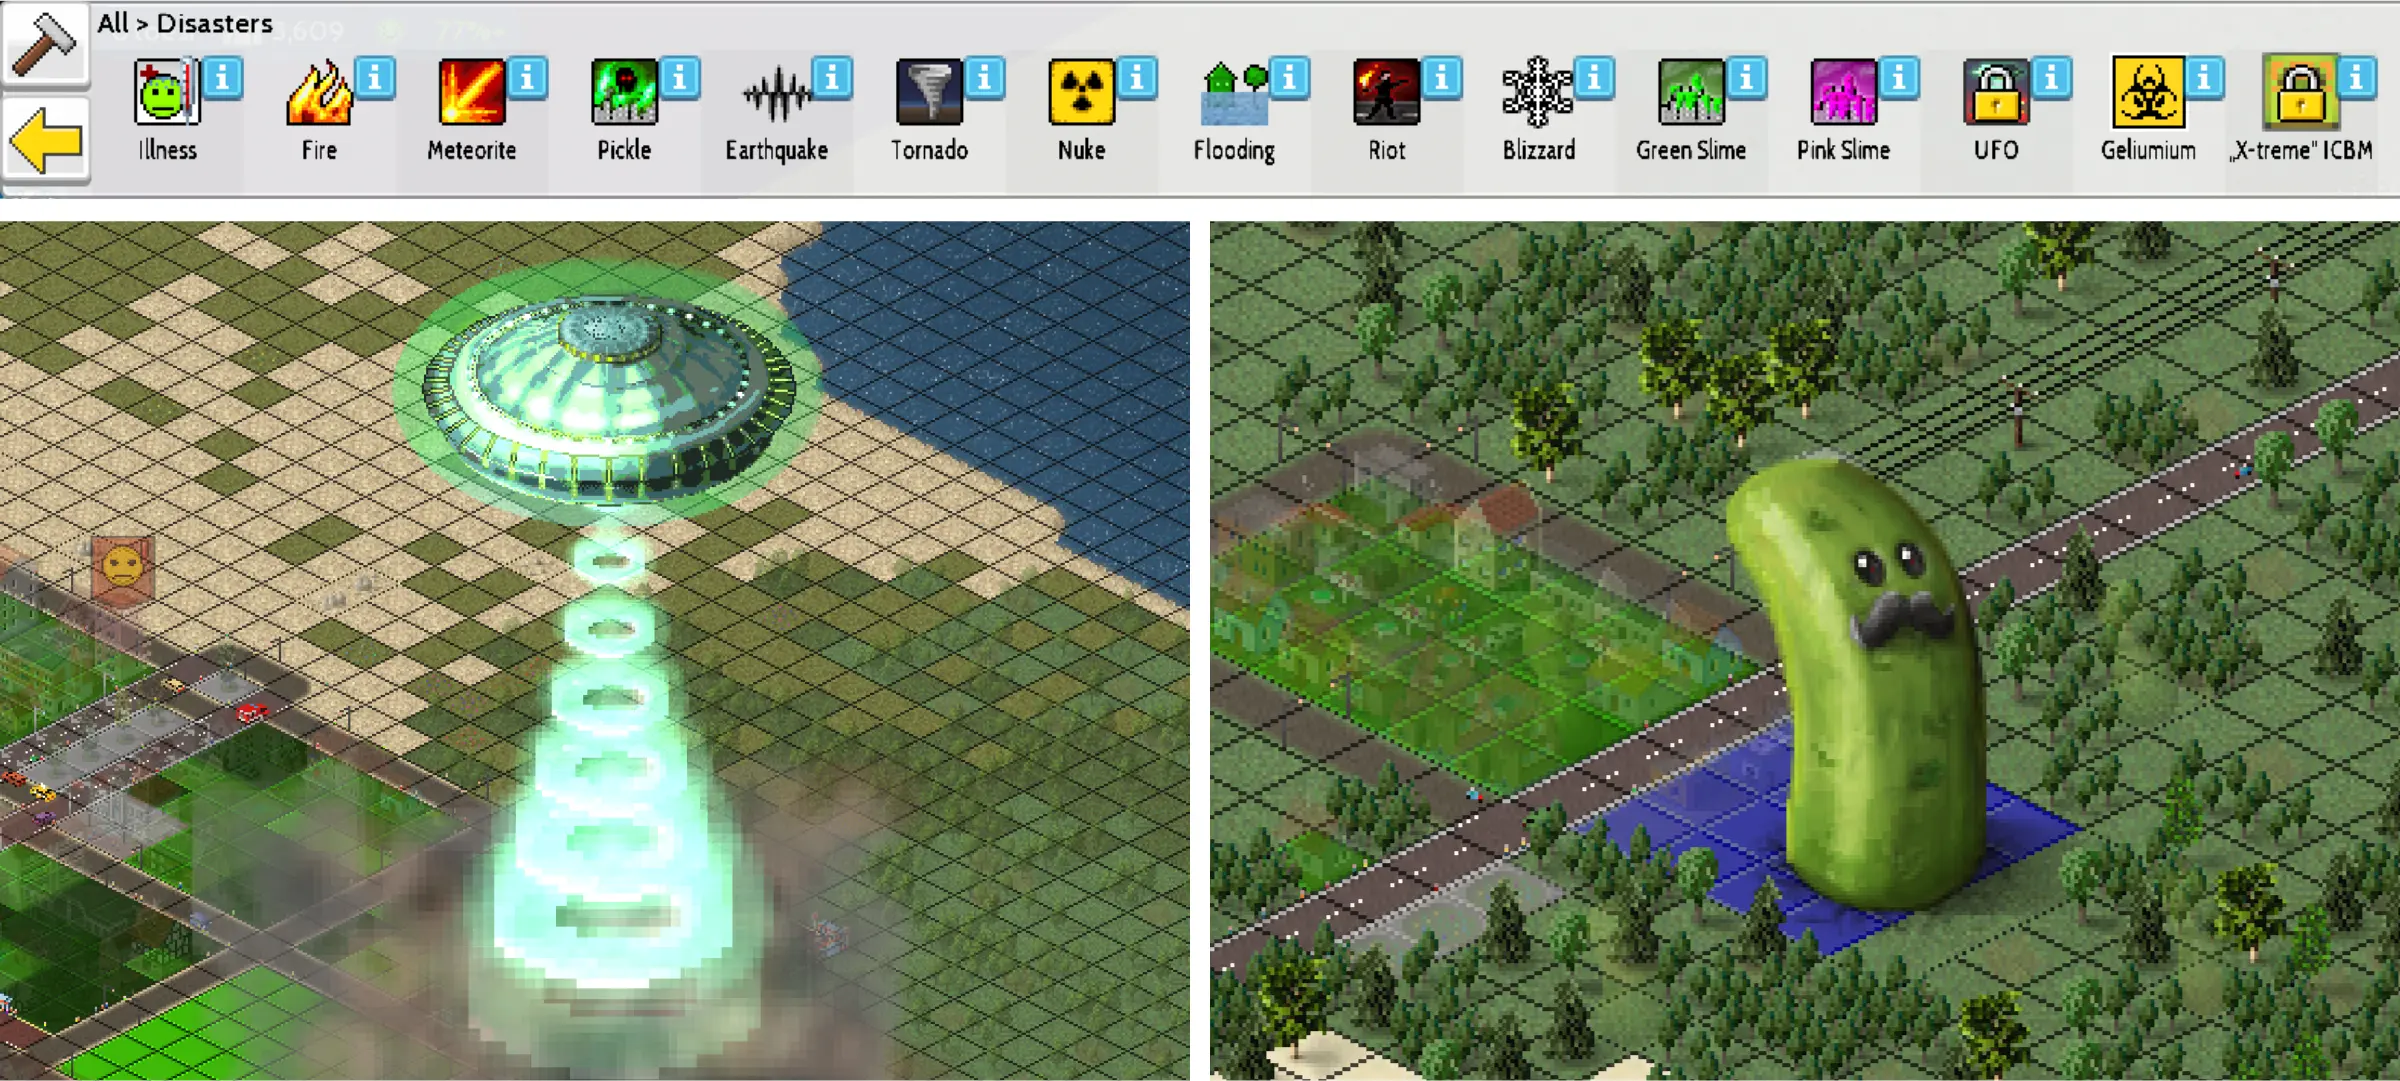
Below are some disasters you can inflict and what you can do to resolve them if you decide to:
- Illness – makes people ill. It can spread to other inhabitants. Can be stopped by calling an ambulance.
- Fire – burns structures which can spread to other nearby structures. Can be stopped by calling the fire brigade.
- Meteorite – crashes a meteorite towards an area and burns its surroundings. Cannot be stopped but the fires can be put out by calling the fire brigade.
- Pickle – summons a giant pickle and its minions to destroy your city. If left alive, it can start spawning civilized pickles that use roads. Can be defeated by surrounding it with water, removing the mini pickles with the Remove tool, or surrounding it with DSA Containment Walls.
- Earthquake – summons an earthquake that can destroy buildings, trees, and roads in the area you choose. Cannot be stopped.
- Tornado – summons a tornado that can destroy buildings, trees and roads in the area you choose. Unlike earthquakes, the tornado will continue to move in a direction, destroying everything in its path until it reaches the end of the map. Cannot be stopped.
- Nuke – creates a nuclear explosion in the area, leaving radioactive waste and scraps. Can be caused by nuclear power plants. Cannot be stopped.
- Flooding – temporarily covers part of your city in water, washing away some structures. Cannot be stopped.
- Riot – summons mobs which destroy and burn structures. Can only be placed on roads and be stopped by SWAT teams. Fires have to be put out by the fire brigade. Mobs will eventually dissipate after some time.
- Blizzard – covers your city in snow temporarily. Cannot be stopped. May leave permanent snow which can be removed with the Remove tool.
- Green and Pink Slime – part of the Slime Attack Pack that costs 70 Diamonds. This covers your city in slime temporarily and may destroy buildings, structures and roads it covers. Can be stopped by surrounding it in water. Will eventually dissipate in time after some time if left alone.
- UFO – part of the Military Base Pack that costs 420 Diamonds. Will fly over your map and destroy random structures, leaving radiation and pollution. Can be stopped by using the Rocket Launcher on them.
- Geliumium – releases a virus on your city, destroying everything in its path. Can be contained by encasing it in DSA Containment Walls and neutralized by setting it on fire, summoning a meteor on it or nuking it. Will dissipate after some time if left alone.
- Xtreme ICBM – requires you to build an armed ICBM which can be built from the Agency menu. Can blow up your city. Cannot be stopped.
Auto Disasters

Don’t want to destroy your city but want a little spice to keep it interesting? Turn on auto-disasters! In Settings > Settings > Auto Disasters, there is an option to automatically spawn meteorites, floods, tornados, earthquakes, nukes, and or UFOs randomly in your city. You can pick and choose which ones you want or don’t want.
General Tips
In this section, we’ll be discussing some general tips that we believe each beginner may want and need to know about.
Benefits Of Connecting Your Account
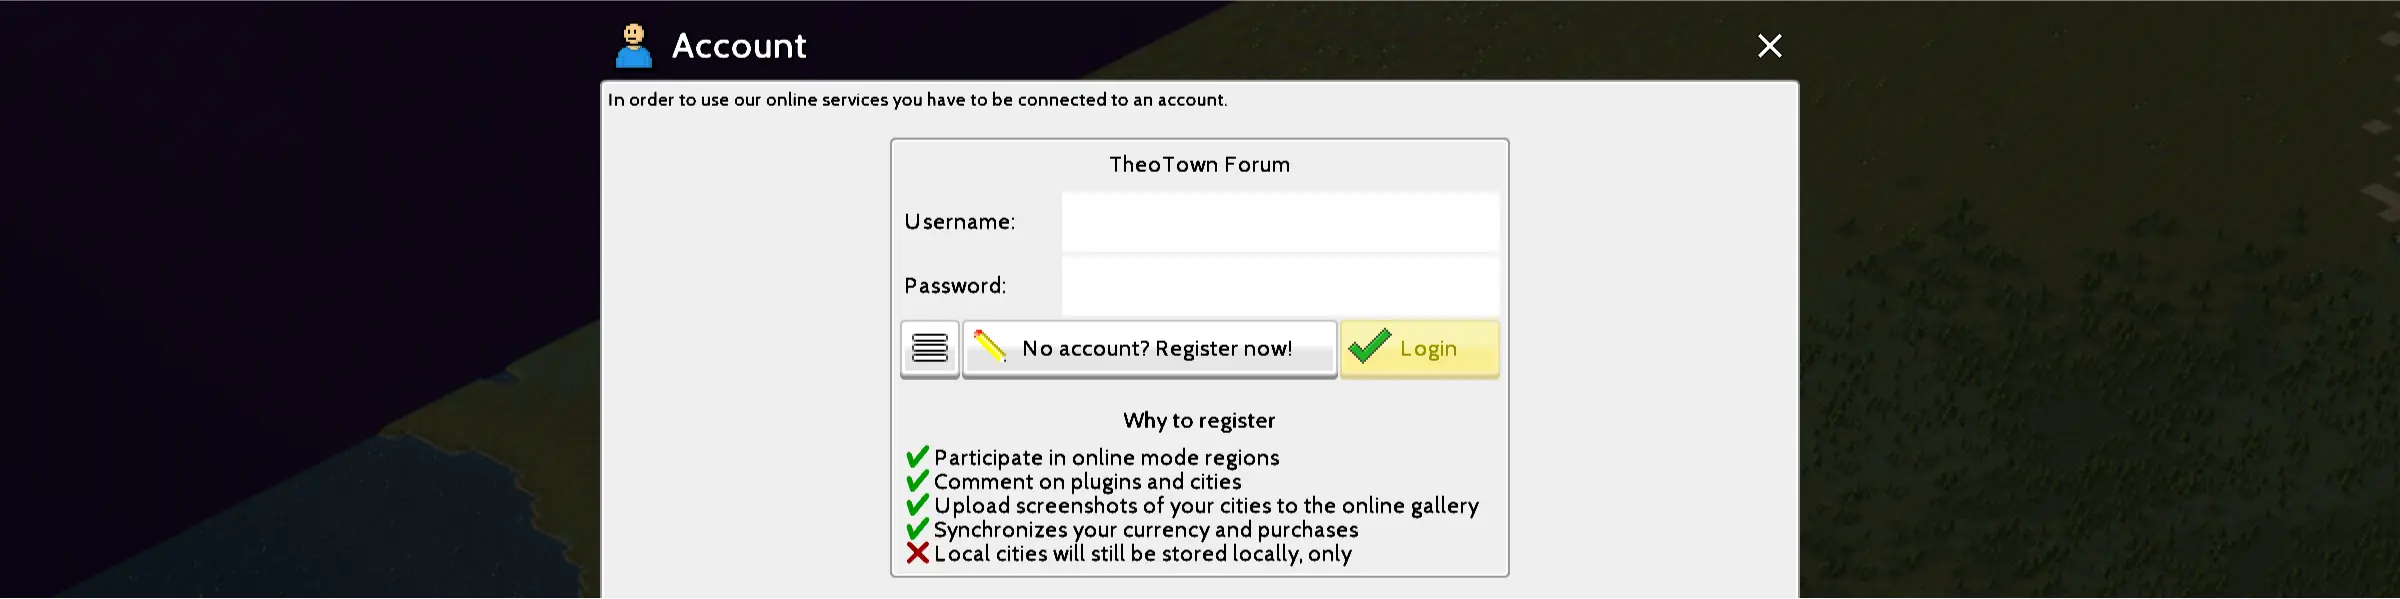
TheoTown has their own dedicated forum at https://forum.theotown.com which you can connect to the game in your phone or steam account. This will allow you to be part of the community and participate in online mode regions, comment on plugins and cities, upload screenshots of your cities to the online gallery, and synchronize your currency and purchases.
Because of this, we highly recommend registering for an account if you are planning to play the game for the long term or want to keep your purchases on record. You can do this by going to Settings (cogwheel icon at the lower left corner of the screen) > Account. However, this does not save your progress online like how other mobile games do.
All local cities you create and save will only be stored on your device. It is also important to note that any Diamonds you earn from the game are account bound and will be retained even if you make a new region or map, reset it, or delete it as long as you earned them while using an account.
Finding Your Save Files On Mobile
Uninstalling your game from your mobile device will delete your progress since all maps and regions are saved locally (except for the regions you upload). For android, there is an option that pops up to keep the app data before you uninstall the game. If you want to keep them safe or transfer it to another device, this is where you can find them:
- Android:
- On your phone, they can be accessed through: /storage/emulated/0/Android/data/info.flowersoft.theotown.theotown/files
- On your computer (while the phone is connected), they can be accessed through: This PC\(phone name)\Internal storage\Android\data\info.flowersoft.theotown.theotown\files
- iOS: On your phone, open the ‘Files’ app then go to Locations > On My iPhone > TheoTown.
- Windows: Go to C:\Users\(username)\TheoTown or %USERPROFILE%\TheoTown.
- Linux: Go to ~/TheoTown.
- MacOS: Go to /user/TheoTown.
We recommend uploading your files to a Dropbox or Google Drive account and then redownloading it from your phone if you ever want to reopen old saves.
How to Get Diamonds
Diamonds are the premium currency of the game and can be obtained in a variety of ways aside from buying them from the shop:
Rank Up Your City
Playing the game and ranking up your city can reward you with a couple of Diamonds. However, the amount isn’t much, especially since it does take a while before you rank up if you’re not too familiar with the game yet.
Daily Delivery
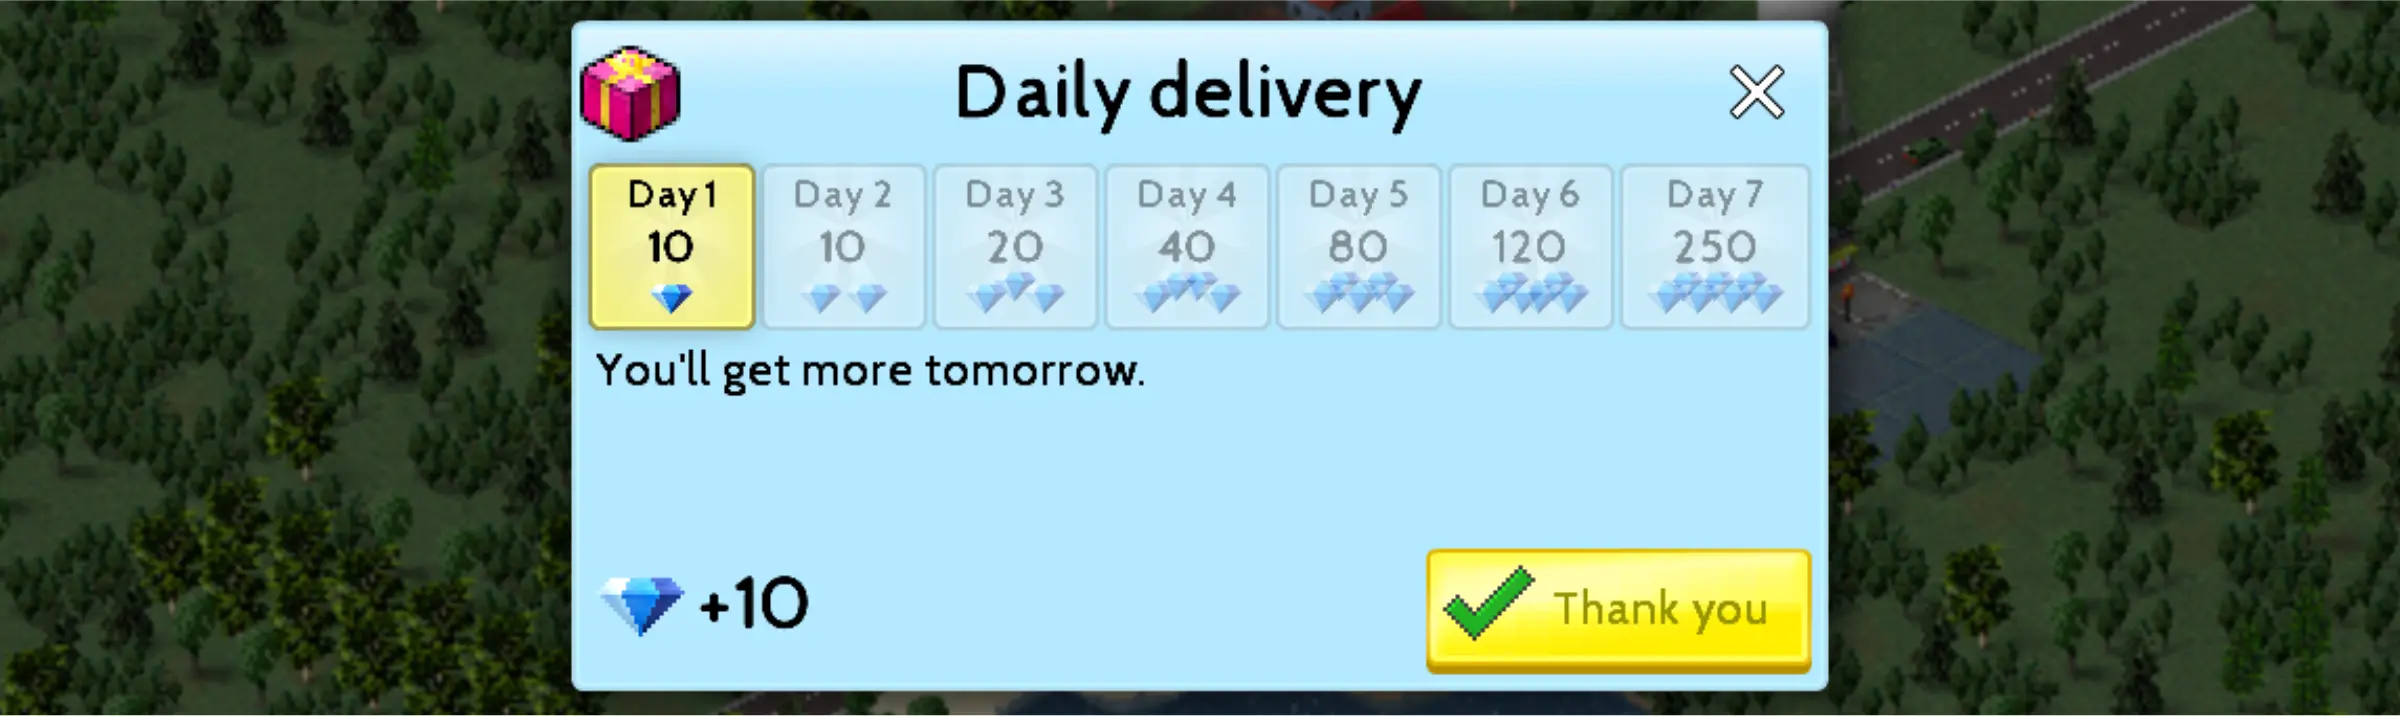
Once you are in one of your cities, tap the red gift box on the upper right side of your screen. You’ll be given a few Diamonds per day, and it’ll increase in number the more days you log into the game. By day 7, you can have up to 250 Diamonds. Take note that if you miss a day, you’ll have to start all the way back to day 1.
Watch Ads
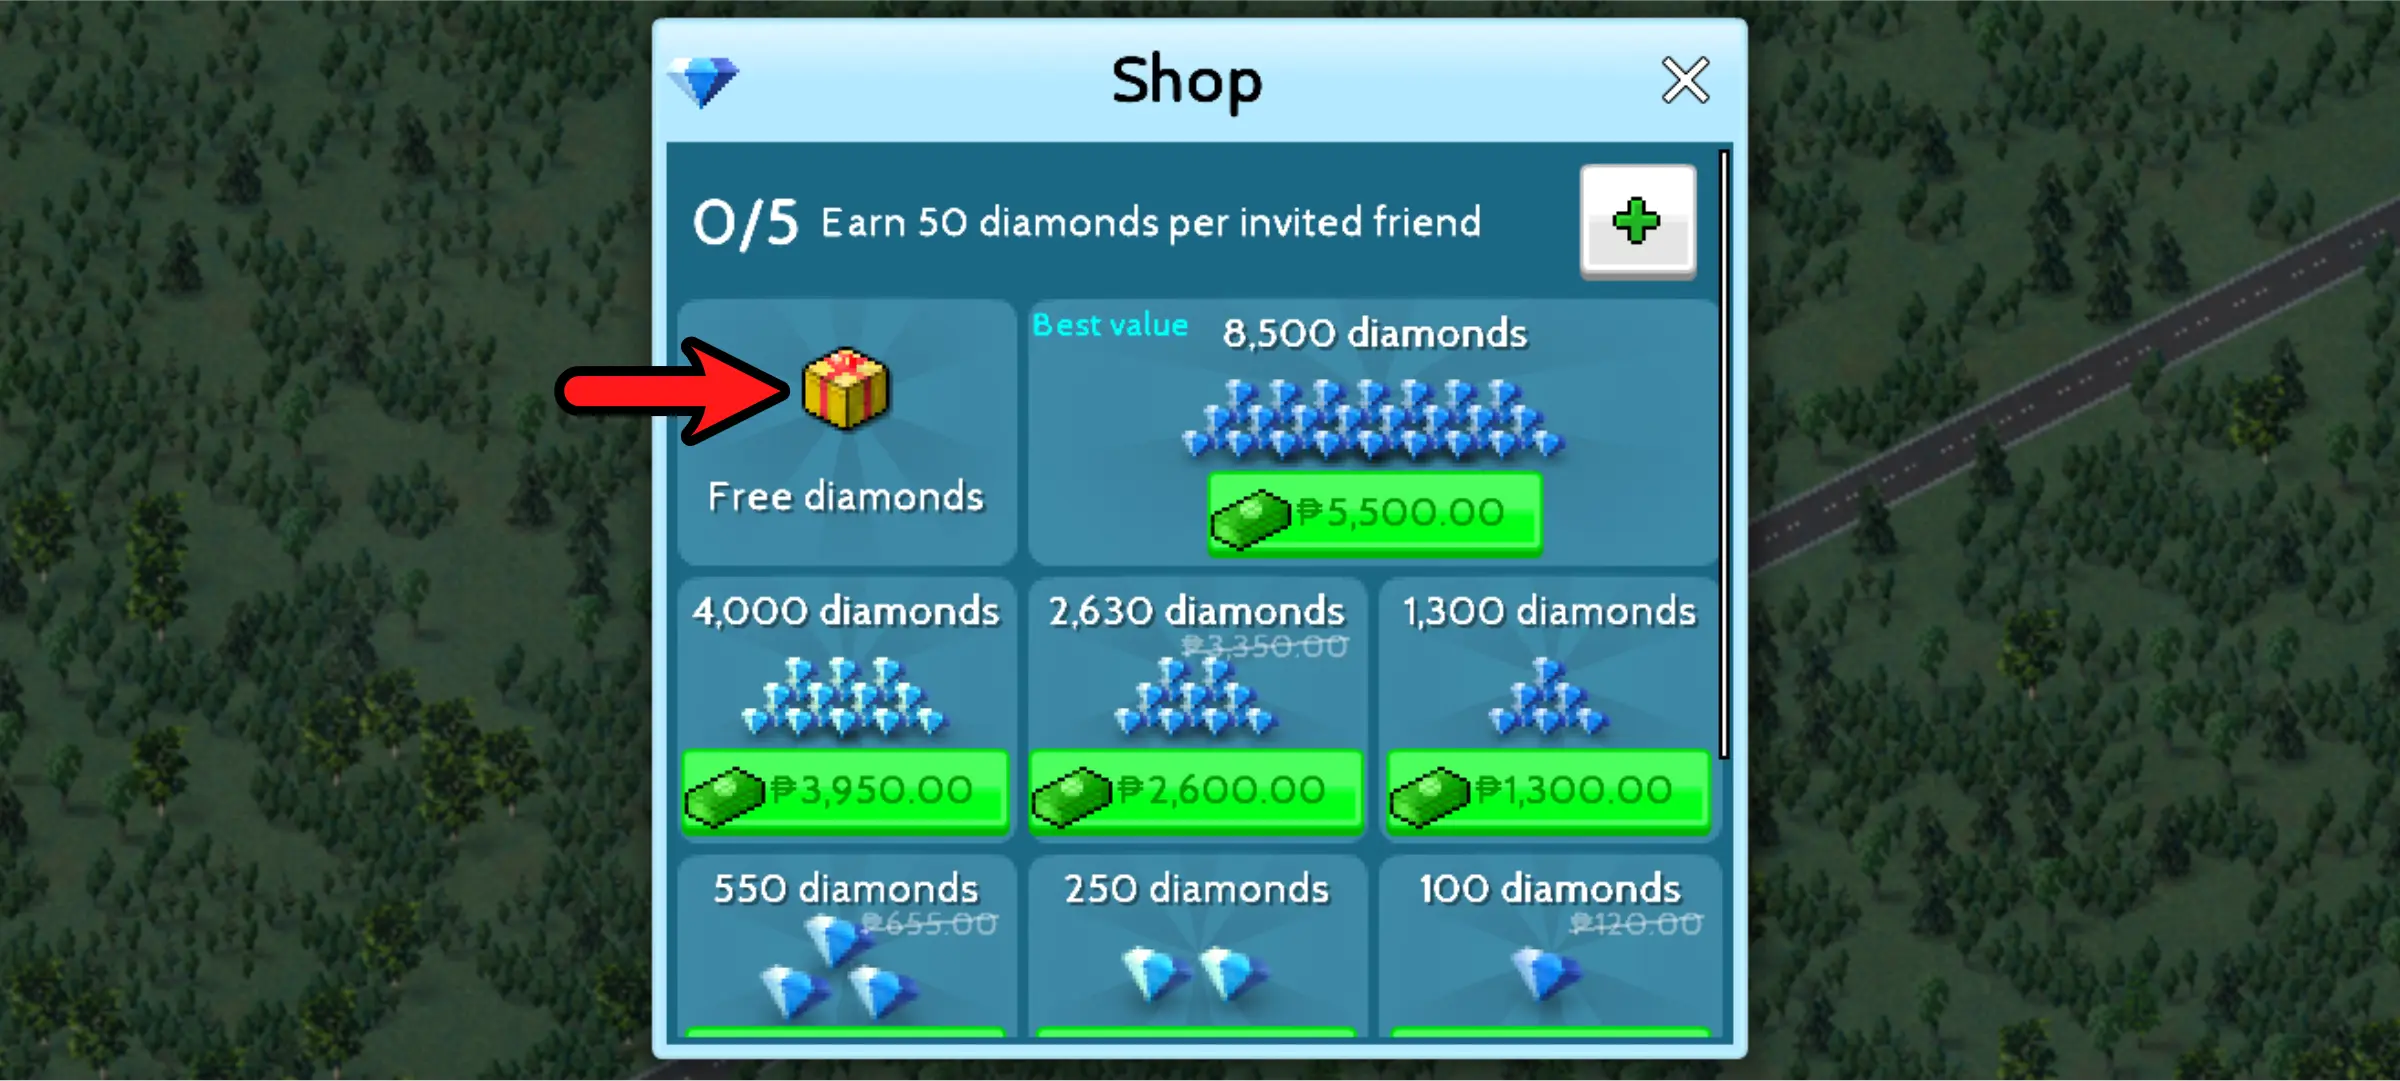
Once you’ve collected your daily delivery, a yellow gift box will appear in its place. Tapping this will make a prompt pop up offering you 15 diamonds in exchange for watching an ad. You can do this three times per hour. You can also access the same option at the shop.
Invite Your Friends

Inviting a friend through the Shop menu will earn you 50 Diamonds for each friend. You can only invite up to 5 friends and earn up to 250 Diamonds.
Among all of these methods, Daily Delivery and watching ads are the best ways to accumulate those Diamonds. If you’re busy working on something or doing chores, you can open up your game for a bit to watch a few ads once in a while. By the time you get the chance to sit down and play, you’ll have all the Diamonds you need without breaking your wallet!

And this marks the end of our Beginner’s Guide to TheoTown! We hope that this article brought you one step closer to understanding the core mechanics of the game and creating the city of your dreams! Since the game is rich in depth and it would be impossible to cover everything in one guide, we recommend joining the official TheoTown Forums (https://forum.theotown.com) or their official discord server (https://discord.gg/theotown) to engage with the community and get tips from other players of the game. You can also take some time to check out random in-game tips by going to Settings > Tips.
What kind of creative cities are you working on? Which plugins would you recommend? Are there other games you’d love for us to cover? We’d love to hear your thoughts down at the comment section below!