Captured and imprisoned on the evening of the rebellion, you were saved by a strange woman and her companions. However, all was for naught: she died, and as you were caught between both the loyalists and rioters, you followed her into the long sleep.
But it seems that fate wasn’t done with you yet.
Now rise – it’s time to take up arms once again and venture to time’s beacons to set right what once went wrong.

Sword of Convallaria is a tactical grid-based RPG that bears many similarities to tactics games but most especially Final Fantasy Tactics. In Sword of Convallaria, you head the titular mercenary group and travel across the country, taking on contracts and vanquishing foes with both raw strength and strategic acumen. With a deep battle system and two distinct gameplay modes – one of which is the gacha and the other is a full-blown single-player campaign where your actions have consequences – Sword of Convallaria is sure to delight both newcomers and veterans of the tactics genre.
Sword of Convallaria is available for mobile devices via the Google Play Store and the App Store. You can also get it on PC via Steam or a standalone launcher on the game’s website. For reference, I’ll be using images from the PC client.
In this beginner’s guide for Sword of Convallaria, we’ll be going over several topics:
- Character Building – every RPG should begin with at least a basic understanding of its characters, and that’s just what we’ll do.
- Combat School – fighting is much more than hitting someone until they die. Here, we’ll tackle the various tools you have at your disposal as well as some tips and tricks to make combat easier.
- Gathering Resources – where to get the various things you’ll need to beef up your characters, as well as where to find the many freebies hidden in Sword of Convallaria.
- Navigating the Gacha – because understanding when and where to pull and how to maximize your chances of getting the character you want is important for games like this.
- Spiral Mode – the Spiral of Destinies mode may as well be its own game. We’ll discuss the differences between Elysium and Spiral mode here, as well as how to run your town and mercenary company.
Lastly, you can jump to the “Quick Tips” subsections if you’re looking for a TLDR.
A Foreword – Game Modes
Before we begin, let’s talk about the different game modes in Sword of Convallaria. There are three modes: Fool’s Journey, Crossing Worlds, and Spiral of Destinies.

- Fool’s Journey is the standard gacha RPG mode that you see in most character-based mobile RPGs, where you clear stages in a chapter-based campaign and take on multiple battlefields.
- Crossing Worlds is the resource dungeon mode, where you can collect various materials to make your units stronger.
- Spiral of Destinies is the story/campaign mode, where you’ll use various beacons to travel to different points in time and play out history from different points of view. Each playthrough (starting a new chapter) requires a Key of Destiny; you get more of them from progressing in Fool’s Journey, from events, or you can buy more in the shop.
- Note that Keys of Destiny expire!
The key differences between the two modes are:
| Fool’s Journey | Spiral of Destinies |
| Battles cost Endurance (stamina). | Battles cost no Endurance. |
| Progression is gated by completed stages. Clear the previous stages to access the next ones. | Progression is gated by Keys of Destiny. You need a key to start/restart a chapter. |
| Characters come from the gacha. | Your characters are limited to the story you’re currently playing. You can also bring companions – characters you’ve earned from the gacha – but their presence will not interfere with the story and the game will act as if they aren’t there. |
| Weapons come from the gacha, quests, and Crossing Worlds. | Weapons must be forged at the Sword of Convallaria HQ. Companions come with no gear equipped; you need to make them new items. |
| Characters and weapons can be developed freely. | Characters must be trained at the Sword of Convallaria HQ. Companions do not retain their levels/ranks/bond bonuses from Elysium. |
As you can see, the Fool’s Journey (and Crossing Worlds, by extension) is the “gacha” part of Sword of Convallaria while the Spiral of Destinies is the “story” mode.
This guide will cover basics from both main modes (as Crossing Worlds is just resource mode). In this guide, we’ll be focusing on the gacha part first – character building, combat, and resource gathering – before jumping into the Spiral of Destinies mode and how things are different there.
That said, to get the best story experience, you should play the Fool’s Journey and Spiral of Destinies chapters together – prologue with prologue, chapter one with chapter one, and so on – though of course, nothing’s stopping you from playing as you wish.

Character Building
Every RPG must start with the hero characters. In this section, we’ll talk about the ins and outs of each of your units as well as how to strengthen them to ensure that they’ll be more than ready to tackle whatever challenges await in both the Sea of Chaos and history itself.
Quick Tips:
- As characters gain levels, their stats increase.
- Characters can only level up until your account level (Voyager Level). Keep playing to earn account experience and raise the level cap on your units.
- Experience is earned by either participating in battle or eating experience. Common Experience that you earn is thrown into a pool which can then be distributed as you please – even to units on standby.
- Movement and jump height are an important concept in Sword of Convallaria. Most units have a move range of 3 and a jump height of +/- 2 (meaning they can only ascend/descend to tiles within 2 height of their current tile).
- Seekers tend to have more movement than other types.
- Units can also gain ranks to improve their combat prowess. Each rank grants a substantial boost in stats but requires special materials, Elysium Coins, and sometimes a minimum level.
- Some ranks give you the choice between two skills to add to a unit’s repertoire. Note that your choice of skill is free, and you can buy the other one with Castalia, which can be earned from Fool’s Journey, quests, and events.
- Note that Castalia is uncommon. Always read through both skill choices and, if in doubt, look up some in-depth character guides to help you make your choice.
- A unit’s rarity is important not only because rarer units tend to have better stats but also because the rarer a unit is, the more skill nodes it gets in its rank tree. Thus, it’s a good idea to reserve early game investment (when you don’t have too many resources to go around yet) for epic and legendary units.
- There are several skill types in Sword of Convallaria:
- Traits are a character’s core passive. These can be upgraded up to 5 times by sacrificing Memories of that character (essentially pulling duplicates). Leveling up a character’s trait also boosts their core stats by a good amount.Basic attack is always free. Units can learn new basic attacks via their rank tree.Units can have up to three active or passive skills. Active skills cost NRG and have a cooldown, and units generate 1 NRG at the end of their turn. Passive skills only need to be slotted to have an effect.
- Reaction skills trigger in response to something. There’s usually a limit on how many times a reaction skill can trigger per round.
- Each unit has a type. The types are Breaker (red), Defender (green), Seeker (blue), Watcher (yellow), and Destroyer (purple).
- Breaker beats Defender, Defender beats Seeker, Seeker beats Breaker.
- Watcher beats Destroyer.
- Destroyer has no type advantage, but Destroyers tend to have higher stats all around.
- You deal bonus damage when attacking with a type advantage and deal less damage when attacking with a type disadvantage.
- Each unit can equip three pieces of gear – a weapon (a unit can only equip weapon types that correspond with their model, i.e., sword users can’t equip axes), a trinket, and a tarot whisper (which not only has base stats but also gains substats as it levels up).
- Gear can be upgraded in three ways:
- Advancement, where you use Radiant Powder to increase an item’s level and boost its raw stats. You will need to limit break items with Radiant Ore at certain thresholds. Note that this is gated by account level. You can get both Radiant Powder and Radiant Ore from Radiant Forging in Crossing Worlds.
- Gear Star Level-up, where you sacrifice duplicates to improve an item’s passive ability and boost its raw stats. Items with no passive ability will still get the stat boost.
- Gear Engraving, which is endgame stuff, but is essentially substat rolling and synergy.
- Gear in Elysium is acquired from Crossing Worlds or the gacha. Gear in the mortal world is acquired by crafting.
- Cultivating your bonds with characters improves their performance; for each bond level you have with a character, they gain a 1% stat boost. You get 500 free Spirits of Hearts per day (caps at 3,000) that can be dispensed as you wish. You can also use Bond Charms or bring along characters in Elysium battles (bond experience earned is proportionate to the Endurance spent).
- Bond bonuses only apply in Elysium.
- Each unit belongs to at least one faction or category. These come into play with certain skills or field objects, such as banners.
Levels and Stats
Let’s start with the most basic property of characters – levels and stats. Each character has a level, which serves as a general indicator of how strong they are. Note that levels are gated by your account level (Voyager Level) – to raise this, keep clearing stages to get account experience.

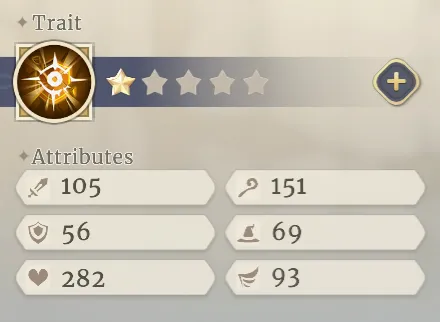
Each level raises a character’s stats. Stats can be seen in the lower part of the character sheet (and on an info panel in combat). The stats in Sword of Convallaria are:
- Max HP – determines how many hits a character can take before it dies. Important for everyone.
- P.ATK – physical attack. Determines how strong a character’s physical skills are.
- P.DEF – physical defense. Mitigates damage from physical attacks.
- M.ATK – magic attack. Like P.ATK, but for magic-based attacks.
- M.DEF – magic defense. Lowers damage taken from enemy magic attacks.
- SPD – speed. Determines the turn order in a fight.
Note the lack of crit rate and crit damage in the base stats. Characters can still crit though.
To level up a character, they’ll need to earn experience. This can be done by bringing them into battle, or better yet, feeding them Common Experience, which is earned from clearing stages. Common Experience is stored in a pool, which can then be distributed to your characters as you please.

Movement Stats
There are some other stats you need to take note of. These are move and jump height.
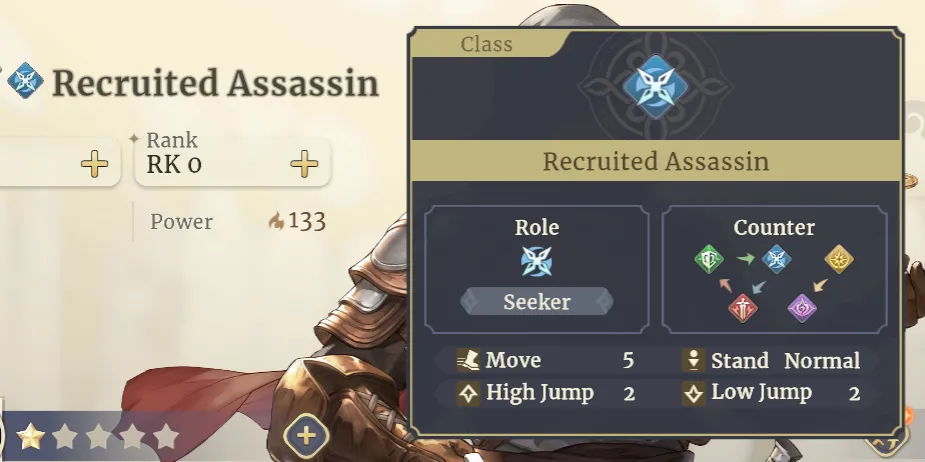
- Move shows how many tiles a character can normally cross (barring terrain effects, etc.) during their turn. Most units have a move of three, except for Seekers who usually have a move stat of five.
- Jump height shows the maximum number of height units can ascend/descend. In most cases, this is two, meaning that units can move to tiles of different height as long as those tiles are within two points of elevation (for example, a unit can move from height 1 to 3, but not 1 to 4). Keep this stat in mind as fighting from the high ground confers several advantages. Note also that moving to tiles with a +/-2 change in height costs one extra movement point.
Ranks
Apart from levels, units can also gain ranks to further improve their combat abilities.
Ranks, like levels, improve stats whenever a rank is gained. Compared to levels, the stat boost you get from ranks is quite substantial, so it’s in your best interest to rank up your stars. Unlike levels, however, ranks also unlock new skills at certain nodes!

At certain rank nodes, you’ll be given the choice of two skills. Your choice will be free, but don’t fret – you can still buy the skill you didn’t choose by spending Castalia. Castalia can be earned from the Fool’s Journey, events, and clash mode. However, do note that Castalia is pretty uncommon; if in doubt, read through each skill choice carefully, and don’t be afraid to look up in-depth character guides.
However, ranking up isn’t free. Apart from the usual Elysium Coin cost, you’ll also need to spend class medals – the higher the rank, the rarer the medals you need. These medals can be earned from Crossing Worlds.
Rarity
Tied to the rank system is a character’s rarity. The higher a character’s rarity, the better (in general) they’ll perform. More importantly, the higher their rank, the more skill nodes they get in their rank tree!

Common and rare units can earn up to eight skills (four for free) from ranks, epic units can earn up to 10 (five for free), and legendary units can learn up to 12 (six for free). This gives legendary units a huge advantage when it comes to character building as they have a wider choice of skills to select from, and the long and short of it is to restrict investments (at least in the early game when you don’t have too many resources yet) to epic or legendary characters.
Skills and Traits
All units have access to powerful skills to make combat easier. There are five types of skills in Sword of Convallaria: traits, basic attacks, active skills, passive skills, and reaction skills.
Let’s start with traits. Each unit – even your nameless cannon fodder – has a unique trait, which serves as its core passive. A unit’s trait often determines whether or not they have a place on your team. For example, let’s take Maitha’s Shield of Convallariatrait.
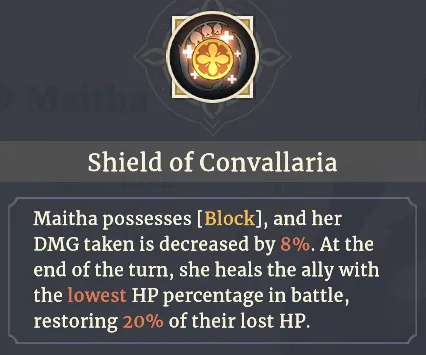
Shield of Convallariadoes three things:
- Passively gives Maitha 8% more DEF.
- Grants her Block, which gives her a 50% chance to face her attacker (only on frontal or side attacks); triggering Block also decreases incoming damage by 20%.
- Heals the most wounded ally for 20% of their max HP at the end of turn.
As you can see, her trait alone gives Maitha a huge advantage over the common Defenders you’ll be pulling. Don’t forget to check a new unit’s traits whenever you pull – you might just find the perfect match for your team.
Traits can be upgraded by spending Memories of a character, which you usually get by pulling their duplicates. Each duplicate you pull scores you 50 Memories. Memories can also be earned – albeit slowly – in Memory Retrieval mode in Crossing Worlds. Upgrading a trait also gives a small boost to a character’s stats. Traits can be leveled up to five times.
Tap this button to level up a trait:

Next are the basic attack and active skills.

Basic attacks are always free to perform but aren’t as powerful as skills. However, by earning ranks, you’ll unlock new types of basic attacks for your characters – some of which may be more useful as the character grows into their niche.
Active skills, on the other hand, are much stronger than basic attacks. However, active skills can’t be used indefinitely. Apart from a cooldown, active skills also consume NRG; the amount of NRG it consumes is indicated by the number of stars on the skill. Characters naturally regenerate one NRG at the end of their turn.

However, you’ll be happy to know that characters can equip up to three active skills – either from their tree or from Spiral of Destinies mode – so built-up characters will have a wide range of tools for tackling different situations. On a side note, don’t forget that if you learn new skills from the rank tree, you’ll need to equip them!
Next up are passive skills.

These are simple: some characters earn passive skills on their rank nodes. Just assign them to a skill slot and, as long as the conditions are met, the character will receive that boost.
Last are reaction skills. As their name implies, these skills are triggered in response to something – usually an enemy’s attack, but sometimes they activate when receiving a buff or debuff.

Note that reaction skills often have a restriction on how many times they can activate per round, so there’s no Dragonheart spam like in Final Fantasy Tactics.
Unit Types and Counters
Sword of Convallaria uses unit types to determine who’s strong against who. Yes, it’s essentially elemental rock-paper-scissors.

The five types are Defender (green shield), Seeker (blue shuriken), Breaker (red sword), Watcher (yellow spark), and Destroyer (purple eye). The weakness relations are as follows:
- Breaker beats Defender, Defender beats Seeker, Seeker beats Breaker. Color-wise, that’s Red > Green > Blue > Red.
- Watcher beats Destroyer. That’s Yellow > Purple if you’re using colors.
- Destroyer is a unique case in that it doesn’t have a type advantage against anyone. However, Destroyers tend to have much higher stats than other roles to compensate for their lack of type advantage; in that sense, they can be said to have an advantage over everyone that isn’t a Watcher – though they don’t receive any weakness or resistance benefits.
Attacking and defending with the right type of unit is very powerful. Hitting an enemy with a type it’s weak to causes the attack to do bonus damage, while hitting an enemy that’s strong against your type will make your attack weaker.
Lastly, there’s a small visual indicator of a type advantage, if you haven’t memorized it yet:

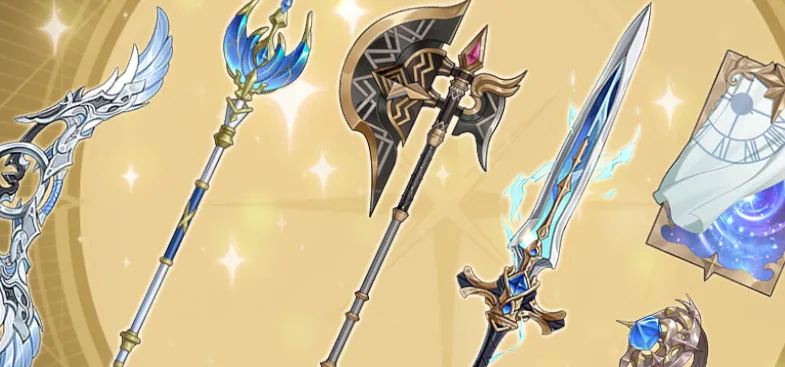
Gear
Your heroes can equip powerful arms and armor to give them an edge in combat. These items not only raise a character’s stats, but also provide potent passive abilities and, in some cases, give a character new life by giving them new skills!

Each character has slots for three pieces of equipment – a weapon, a trinket, and a tarot whisper.
A few things before we dive in:
- Characters can pretty much only equip weapons that correspond to their pixel art. This means that sword wielders can only equip swords/weapons, only axe wielders can use axes, and so on.
- You’ll unlock the weapon and trinket slots fairly early on, but you’ll need to reach 3-1 of the Fool’s Journey to unlock the tarot whisper slot.
- While all gear boosts main stats, tarot whispers also gain substats as they level up.
- Gear has rarity; the rarer the gear, the better it is.
Now, gear both imparts bonus stats and sometimes has a passive bonus that either further improves stats or gives a character a boost in another way. Take this, for example:

The Spring Tonic trinket not only gives a sizeable amount of P.ATK, M.ATK, and Max HP, but also gives its bearer a new skill. Try to match characters with gear that complements their existing abilities, and note that rarer gear tends to not only have better stats but also more complex (and useful) passive abilities.
Pieces of gear can be upgraded in three ways to increase their power:
- Advancement, where you sacrifice Elysium Coins and Radiant Powder to increase an item’s level. At certain thresholds, you’ll need to spend Radiant Ore to boost the item’s level limit before you can strengthen it further. Note that gear level is also gated by your account level.
- You get Radiant Powder and Radiant Ore from the Radiant Forging mode in Crossing Worlds.
- Gear Star Level Up, where you sacrifice duplicates of that piece of gear to improve its passive ability as well as raise its stats. Items with no passive ability will only get the stat boost from this.
- Gear Engraving. This comes in much later in the game, so we won’t discuss it in-depth. Essentially, it’s the random substat and substat type-matching grindy endgame you see in most character RPGs.

Note that gear in Elysium (Fool’s Journey and Crossing Worlds) is different from gear in the mortal world (Spiral of Destinies). To get gear in Elysium, you can fight in the Weaponry Trial mode (you need to clear 2-17) or roll in the gacha. To get gear in the real world, you’ll need to forge (and upgrade) it at the Sword of Convallaria headquarters – which we’ll discuss at greater length in its own section.
Bonds
The more you get to know your heroes, the better they’ll fight. This is represented in the Bonds system.

Bonds come in multiple levels; each level grants a tiny stat boost (1% to all stats), but some levels also grant some rewards such as account avatars. Mostly, you’ll be doing it for the stat boost.
To raise bonds, you’ll need to perform Spiritual Forging, which is a fancy way of saying “long tap on a button”. Spiritual Forging requires Spirits of Heart; to earn the stuff, just log in daily to get 500 free Spirits. You can only store 3,000 Spirits of Heart at once.
Other ways to earn bond experience are by using Bond Charms (lower left in the bond screen) for a massive amount of exp per charm, or by bringing along characters to fights. The more Endurance a fight consumes, the more bond experience they get. Lastly, you can invite characters to your home in Elysium, where they’ll gain bond experience over time depending on how cozy the place is – put more furniture to increase the speed at which they gain bonds.

This also means that bonds are exclusive to Elysium game modes.
Bonds are unlocked after clearing chapter one, “Army of One”, in Fool’s Journey.
Categories
Lastly, each unit belongs to at least one category. A unit’s affiliations can be seen in its info panel…

…and you can tap on each icon to see the category, as well as who else belongs to that category.
Categories aren’t too important, though do note that some skills and field objects (such as banners) confer bonuses to units in specific categories.
Combat School
Now that you know all about your units and how to beef them up, let’s take a look at how battles are conducted in Sword of Convallaria as it’s a lot more than just beating up each other until someone loses.
Quick Tips:
- Combat flow in Sword of Convallaria goes as such:
- At the start of combat and a new round, units take their place in the turn order. Higher SPD means a higher place in the turn order.During their turn, units can move and attack. You cannot move after attacking. Attacking (or using a skill) counts as ending that unit’s turn. Instant Skills are the exception to this. Units gain 1 NRG at the end of their turn.
- You instantly win upon completing the required victory conditions.
- The Standby button means End Turn. Use this if you want to move without attacking.
- You can tap on a unit’s info panel (upper right) to see its stats as well as any buffs or debuffs affecting it. Tap on a buff/debuff to bring up an explanation of all current buffs/debuffs.
- You can always check the stage objective by tapping the upper leftmost button. Remember that not every battle has to end in a slugfest – it’s often prudent to just stick to the objective.
- There are some quick and easy ways to deal more damage or dispatch foes:
- Always use type counters. This is very important.
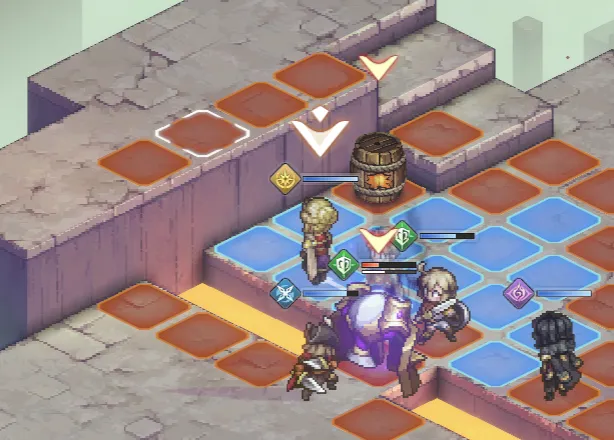
- Stage hazards, such as Luxite barrels, boulders, wine barrels, and more present prime opportunities to take out multiple foes.
- Units both take and deal less damage as they lose HP; this is reflected in the Injured or Dying states.
- Hitting enemies from behind does more damage.
- Utilize knockback to push enemies into instant death hazards such as holes or deep water.
- Knockback units into each other.
- Pushing units off high places deals damage depending on how far they fell.
- Talents allow your commander to participate in battle by calling in powerful skills, such as nukes, buffs, or heals.
- Using a talent costs Talent Preparation (TP) and incurs a cooldown. TP is regenerated during each of your units’ turns.
- There are 5 talent trees, each corresponding to a unit type. Each tree not only gives you usable talents but also provides passive bonuses to units of that type.
- A tree’s rank determines which nodes you can invest in. To raise rank, keep unlocking and developing nodes. Note that some nodes are also gated by account level.
- Investing in the talent tree requires Star Particles and Star Dust (specific to each tree). Both can be earned in the Star Trial game mode.
- Don’t forget to equip your talents before combat!
- Always bring the maximum number of units you can.
- Before a battle starts, survey the area, look for enemies with type weaknesses, and arrange your starting formation to counter the enemy’s first attack.
- You can tap on any object, hazard, enemy, or pickup and tap the info button on the lower right to get more information on it. This lets you determine how to best use or avoid various obstacles as well as examine your foes’ skills and buffs/debuffs in greater detail.
- Sword of Convallaria uses a lot of keywords. Whenever you see keywords in a bracket, like [this], you can tap on the bracketed word(s) to get a better explanation.
- Before attacking an enemy, a window will pop up that shows the predicted result of that combat. The window will also account for counterattack damage. Use this prediction to strategically pick your fights.
- If a unit’s icon gets crossed out in the prediction screen, that indicates that the unit will die as a result of that combat.
- Enemy reinforcements are denoted by red tiles. You can’t block them by staying on the tiles.
- You can turn on threat range and turn order via the buttons on the left side. These will help you make better choices in battle.
- Threat range highlights tiles that your enemies can reach in purple. You’ll also be able to see which enemies threaten those tiles.
- Turn order adds a shield with a number to the side of each unit. This number indicates who’ll act next.
- Backtrack allows you to rewind to a certain point in the current battle – useful if you’ve made a mistake or if things didn’t work out the way you expected. You can backtrack thrice per battle.
- If you’re confident in the strength of your party or are in a rush, you can use auto combat. Be warned – while handy, the auto combat AI isn’t what I’d call smart. Be prepared to take manual control especially in protect or escort missions.
Combat Flow
Battles in Sword of Convallaria follow this general order:
- At the beginning of combat and the start of each round (a round is completed once every living unit has taken its turn), every unit takes its place in the turn order. The higher a unit’s SPD, the higher up it’ll be in the turn order, which means it’ll get to act sooner.
- During a unit’s turn, it replenishes one NRG. A unit can move and attack on its turn. Units cannot move after attacking or using a skill. Doing either of these counts as ending your turn. The main exception to this is skills labeled Instant Skills, which will allow a unit to continue moving after skill use.
- Each stage has different win and loss conditions. Completing all objectives instantly results in victory.
Combat UI
Before we begin, we should go over the basic combat controls as well as the rules. Let’s start with your interface.

This interface appears on the right side of the screen when it’s your turn. There’s a bunch of buttons on the right:
- Standby ends your turn. If you want a unit to pass or move without attacking, hit the standby button once you’re happy with their position.
- Note that you cannot move after attacking. Attacking automatically ends a unit’s turn unless it has an ability that states otherwise. If you’re going to move, do it before attacking.
- Move allows you to move to a specific tile. Useful if there are tiles with different heights in a small area.
- Tactics brings up your usable talents. We’ll talk about that in a while, but essentially, these are abilities that your character can use – even if they’re off the field.
At the bottom of the screen are your basic attack and any active skills you’ve set. The NRG cost of each skill can be seen below its icon; once again, a unit generates one NRG at the end of its turn.
The upper right of the screen gives you details on the current unit…

…where you can see the status of the unit as well as any buffs and debuffs affecting it. You can tap on buff and debuff icons to see what each of them does.
Lastly, if you’ve forgotten the stage objective, you can tap on the upper leftmost button to get a reminder. Not every battle needs to be fought to the bloody end!
Increasing Damage Output
There are a bunch of easy tricks you can do to get more damage out of your units. Here’s a quick list of some common techniques you can use:
- Always use type counters! Enemies are usually clustered by type, meaning that a single well-placed hero can deal with lots of foes and speed up stage clears.
- Use stage hazards. Levels in Sword of Convallaria often revolve around using objects such as Luxite barrels, boulders, or wine barrels to deal with multiple foes at once.
- Units gain the Injured and Dyingdebuffs as they lose health. These debuffs both decrease the damage a unit does and increase the damage it takes. Be pragmatic – take out dying enemies as quickly as you can to minimize the damage they can do to your heroes.
- Hitting enemies from behind does more damage.
- Some tiles, such as deep water or holes, instantly kill units knocked into them. Use this to quickly deal with particularly sturdy or troublesome foes.
- In the same vein, you can smash units against each other via knockback for some extra damage.
- Units take fall damage. The bigger the fall, the more damage. Knock foes off high places to amplify your damage!
Talents
If you need even more damage or utility on the battlefield, you can call upon your vast array of talents to assist your heroes.

Talents are essentially spells that your commander can cast. These powerful abilities give you a massive advantage in combat as you’ll be able to deal extra damage, buff, support, or heal your units on demand!
To use a talent, tap on the “Tactics” button during one of your units’ turns, then select which talent you’d like to use. Just like skills, you’ll have to equip the talents you’ve learned, this time via the “Talents” menu at the bottom of the screen in Elysium.

Once you’ve selected the talent you want to use, confirm it (just as you would with an attack) and watch the sparks fly. Do note that the range of a talent is determined by where your units currently are, so you can’t just snipe enemies at the far end of the battlefield.
Now, talents can’t be used indefinitely. Each talent consumes a different amount of Talent Preparation (TP) points, which regenerate at the rate of roughly three points at the end of each friendly unit’s turn. When used, talents go into cooldown as well, so be sure to take that into account.

Talents are earned and developed in their own tree, once again accessible through the “Talents” menu in Elysium. This’ll bring you to the talent screen, where five paths will be presented to you, each of which corresponds to a hero type. Each tree not only unlocks talents for you to use but also provides passive bonuses to characters of that type.
Each tree has a rank. The more you invest in a tree, the higher its rank becomes, and the more of the tree becomes unlocked.

To unlock and develop nodes on a tree, you’ll need to spend Elysium Coins, Star Particles, and Star Dust specific to that tree. Both Star Particles and Star Dust can be earned in the Star Trial Crossing Worlds stage. Note that nodes are also gated by account level.

Last but not least, don’t forget to equip your talents before combat. As with your heroes, you can bring three talents with you into battle.
Battle Preparations
Now that we’re done juicing up our units and calling in the fantasy equivalent of tactical nukes, let’s get to the part where we learn more about the battlefield.
There are two things you can do before a battle starts: add more units to your party and fix their formation. Sword of Convallaria is a game that greatly rewards pre-planning, so a bit of foresight will help you get those coveted stage stars!

Before committing to a formation, it’s always a good idea to scan the battlefield. Look for enemies with type weaknesses, predict their movement, and place heroes in key positions to intercept and counter your enemies.
The Info Button
Sword of Convallaria’s battlefields are vast and varied, and you’ll only very rarely run into flat plains where you and your opponent just run to the middle and punch the daylights out of each other. Most, if not all stages, have several objects and hazards that a cunning commander can use to turn the tides. The easiest example of this is the numerous Luxite barrels that show up in early stages – hit them and they explode for a massive amount of damage.
Luckily, we don’t have to go in blind. Any time you see a tile with a new object or tile hazard, simply tap on the tile in question and look for this button, then tap it.

This will bring up information regarding the tile and any objects on it. It always, always pays to check new tile hazards and objects as they present not only hazards you need to avoid but new and probably more effective ways to take down your foes.
Note that there are also pickups, such as tarot cards, which provide hefty bonuses to whoever picks them up; once again, you can tap on the info button to see what buffs you’ll get from the card, which in turn allows you to determine who among your heroes will get the most mileage out of it.
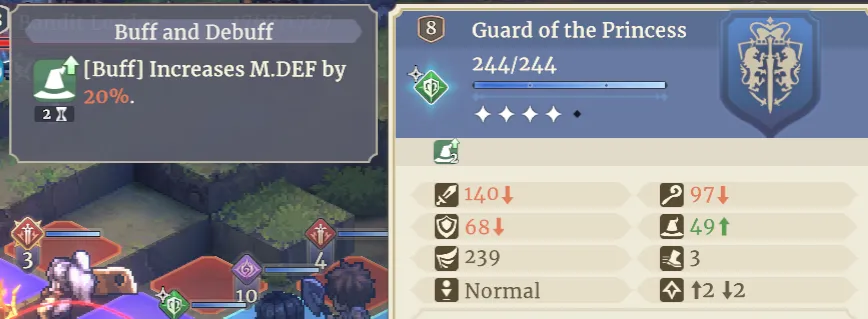
The info button also works on enemies. Simply select a foe and tap on the info button:

This will bring up that enemy’s stats, buffs and debuffs, and skills. Knowledge is power!
Explanation Text
Sword of Convallaria, thankfully, uses keywords. Any time you see a term in brackets, like [this], you can tap on it to get an explanation.

As you play, you’ll memorize what some of these keywords do, but as a new player, be sure to familiarize yourself with them.
Combat Prediction

Combat prediction helps you decide whether to fight an enemy or not. Before an attack action is confirmed, this UI will pop up:
In this info panel, you can see how much damage your unit is expected to do without crits or other mitigating factors (in this case, it’s 342, which you can see above my guy), as well as type advantage (if any) and counterattack damage (if the enemy has a reaction skill or counter ability). Use this tool to pick your fights carefully.
Lastly, note that a red cross mark sometimes appears in combat prediction:

This indicates that the unit will die as a result of combat – a great tool for securing kills.
Reinforcements
Occasionally, enemies will call in reinforcements in the middle of a fight. Red tiles mark where the reinforcements will be coming from. Fortunately, this gives you enough time to prepare and switch up your tactics so you don’t get overwhelmed.

Note that you can’t block reinforcements by parking units on the highlighted tiles.
Threat Range and Turn Order
To help you make decisions in combat easier, there are two buttons on the left side that you can trigger:

These two buttons are threat range and turn order. Let’s go over each of them.
The top button is threat range. When this is on, you’ll be able to see which tiles are dangerous to end your turn on, as well as which enemy units will be able to hit you. These tiles will be colored purple.

The lower button shows the turn order. When this is on, a small shield will appear to the upper left of every character on the field, which shows in which order they’ll take action. Take note that this is relative to whoever is acting now – so the unit with 1 will act next, 2 will act after them, and so on.
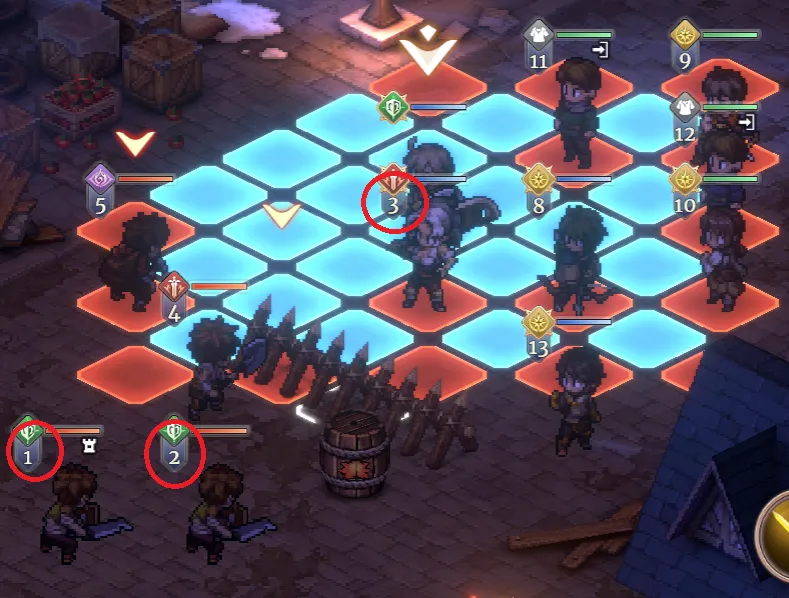
Use turn order to organize combined attacks and get out of sticky situations!
Backtrack
Made a mistake with your movements, or got yourself stuck in a bad situation? We’ve all been there. Luckily, we have the ability to backtrack.

To access backtrack, tap on the hourglass at the top of the screen during a battle. This will bring up a menu where you can choose where to rewind – either by character or the entire round.
You have three uses of backtrack per battle.
Auto Combat
If you’re confident that your heroes can manage just fine without you, you can opt to use auto combat.

Be warned – while auto combat is handy, it’s not perfect. For starters, I don’t recommend it for any mission that isn’t “defeat all enemies” or “defeat a boss”.It’s also particularly bad at escort or protect missions, often moving units that need to be protected into the frontlines. The auto combat AI also will not use talents, nor does it care about collateral damage from AOE, so if you’re in a stage with a lot of obstacles or need to snipe a key target, get ready to switch to manual.
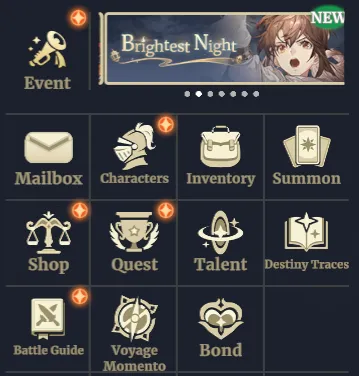
Gathering Resources
Now, let’s talk about where to get the stuff you’ll need to pump your warriors up. While most of them can be found in Crossing Worlds, there are a lot of freebies up for grabs if you know where to look, and this section will walk you through the obvious and not-so-obvious methods of gathering resources.
Quick Tips:
- You can tap on an item’s icon in your inventory or on the upper right to see where to get more of it.
- Crossing Worlds is the main farming mode. In Crossing Worlds, you can spend Endurance to gather resources such as Common Experience, gear, Memories, talent materials, and more.
- Each mode in Crossing Worlds has stages of increasing difficulty. The higher the difficulty, the more the rewards you’ll get, and the higher their quality will be.
- Specific stages in Crossing Worlds will be marked for Extra Rewards. These stages are determined by real-life day. You can claim these bonus rewards by completing a stage that you’ve already cleared – so do the highest difficulty one you’ve already finished.
- Clearing a stage for the first time does not consume your Extra Reward bonus.
- The Tower of Conquest is a weekly challenge mode that offers a ton of resources, but most importantly serves as a renewable source of Hope Luxites.
- Combat in each tower floor is subject to an environment effect as well as a mutation – both of which are modifiers that help and hinder you (respectively). Always be sure to play around these.
- Clear 5 stages every week to claim your weekly tower reward. You also get a second reward based on your highest floor when the tower resets.
- The Tower of Conquest resets every week. On reset, the environment, mutations, and enemy lineups will change. You’ll also be sent down a few floors, based on your placement.
- Voyage Momento is a series of quests that challenge you to complete certain objectives in the game. There are a lot of fantastic rewards here, such as Hope Luxites, legendary weapons, free copies of Maitha, Faycal, and Rawiyah, and more!
- Voyage Momento also gives out extra freebies for finishing each chapter of Fool’s Journey. Don’t forget to grab your extra stuff.
- The Destiny Traces system tracks your achievements in Spiral of Destinies and gives you prizes (mostly Hope Luxites) for completing certain tasks.
- You also get a small amount of Hope Luxites for seeing certain cutscenes.
- The Astrarium outside your Elysium HQ gives you a small amount of Hope Luxites whenever you get a new tarot card.
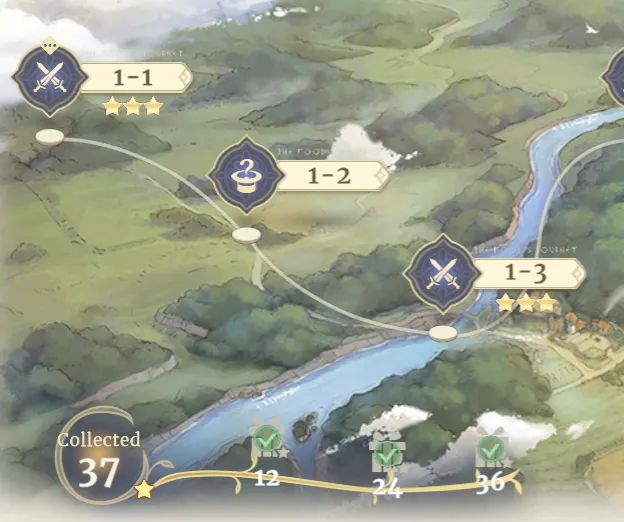
- Each stage in Fool’s Journey has 3 stars, each of which is gated by a condition. Earning all 3 stars earns you some nice rewards, as well as a small payout of Hope Luxites.
- Earning enough stars in a chapter also entitles you to an extra reward, which you can redeem at the bottom of the screen when selecting a stage in that chapter.
- Daily quests earn you some Voyager Experience and a random assortment of resources if you earn enough activity points, which are earned by completing daily tasks.
- Don’t forget to tap on the chests at the bottom of the dailies screen to redeem your prizes.
- Achievements net you some resources (mostly Hope Luxite) for completing certain feats. These can be found on the same screen as your daily quests.
- The Cornucopia is Sword of Convallaria’s battle pass. Complete quests to earn experience; gain levels to unlock rewards. There’s both a paid and free track.
- The shop has a small number of freebies. The most important one here is the free Keys of Destiny under the Pack -> Weekly Purchase Limit.
- Always, always join events. Live service games almost always have an event running, and joining in nets you some free stuff.
- For new players, you can get up to 30 Secret Fates (10 every 10 Voyager Levels), claim your 7-day newbie login rewards (if you missed the screen), and participate in the Dawn starter quest, which involves Spiral of Destiny. Note that Dawn expires; you have around 30 days from when you first log in to complete it.
Item Source
Before we begin, it’s very important to know about the Item Source button. Any time you need more of a specific resource, you can look at its info panel in your inventory to see where to get more of it.

You can also tap on each source to be taken directly to that place, whether it’s a shop or a grinding area. Nifty!
Crossing Worlds
In Crossing Worlds, you can take on various challenges, each of which will score you different resources. By spending Endurance, you can farm for Common Experience, equipment, rank-up materials, and more. If the item isn’t called “Hope Luxite”, chances are you can get it from Crossing Worlds.

Each farming stage in Crossing Worlds has multiple difficulties. The higher the difficulty, the more powerful the foes, but more and rarer resources will drop. Always strive to clear Crossing Worlds on the highest difficulty you can manage. Do note that you need to unlock stages in increasing difficulty (you need to clear difficulty 1 to access difficulty 2, and so on) which is annoying but necessary.
Once you clear 2-15 of Fool’s Journey, you’ll be able to sweep stages to automatically clear them.
Finally, you can get extra rewards from each Crossing Worlds stage once per day.

A few things to take note of:
- Each type of stage in Crossing Worlds gives a once-per-day extra reward. This means one extra reward for Level-Up Training, one extra reward for Rank-up Trial, and so on.
- Which stage gives an extra reward changes per day. Think of it as an extra incentive for grinding those specific stages.
- You only get extra rewards for completing a difficulty that you’ve already cleared. If you challenge and clear a new difficulty, you will not get the extra reward bonuses, nor will that count as using up your daily extra reward.
Tower of Conquest
The Tower of Conquest mode within Crossing Worlds bears special mention, as it’s among the most difficult challenges the game has to throw at you.

Each floor you clear nets you Tower Emblems, which will determine the prizes you can redeem. You can get up to four weekly rewards by earning five emblems. You also get a first-time reward for clearing each stage, as well as a bigger one-time floor clear reward the first time you finish the boss level of a floor. Naturally, the higher you go, the fiercer your foes and the more dangerous the mutations, but the better the rewards – not just resources, but equipment, rank-up materials, and tons of Hope Luxites. You’ll also get Conqueror’s Insignias, which can be spent in the Insignia Shop.

Not only are the enemies in the Tower of Conquest especially vicious, but they also benefit from mutations – powerful modifiers that demand that you play around them. You have three lives in the Tower of Conquest. Failing a challenge costs a life, and lives regenerate at the rate of one per 30 minutes.

To counter the mutation, an environmental buff will be applied as well. You can see the environment on the left side of the screen of the tower menu, and you can tap on it to get more info. Be sure to use the environment to your advantage while accounting for the additional hazards that mutations present!

The Tower of Conquest resets weekly, which changes the environment, floor mutations, and enemy lineups. You’ll also be pushed down the tower a bit – the general rule is two floors down if you didn’t clear a stage on your current floor, one floor down if you did. The weekly reset also allows you to re-earn weekly rewards, making this mode an incredible source of Hope Luxites.

Note that while the tower resets on the dot, it takes one day for the actual change to reflect. If you haven’t been getting your weekly rewards, just sit tight – they’ll arrive on the next day.
Voyage Momento
Sword of Convallaria’s beginner (and progression) quests all reside in the Voyage Momento. You can access this feature via the buttons on the left side of the screen while in Elysium.

Each phase of the Voyage Momento will challenge you to complete some tasks. These quests are designed to push you harder and further and are a good way to get used to the rhythm of the game and test your capabilities.
The rewards are also very much worth it: not only do you get a ton of common resources from finishing the individual quests, but you’ll also get legendary weapons and characters – Maitha, Faycal, and Rawiyah!
The Voyage Momento also has a series of challenge quests, which involve clearing the last stage of each Fool’s Journey chapter.

Be sure to drop by to claim your goodies after clearing a chapter.
Destiny Traces
Creating new beacons in time doesn’t just let you resume your Spiral of Destinies runs from new save points. As you work to achieve your ideal world, Elysium will record your efforts and reward you accordingly via the Destiny Traces system.
By completing certain feats in Spiral of Destinies, you’ll unlock new records in Destiny Traces. Once you’ve completed all the requirements for a new emblem, you’ll unlock it – as well as some prizes, mostly Hope Luxites. It’s not much, but it’s something.
Apart from emblems, you’ll also be rewarded for certain achievements and remembrances (cutscenes) that you’ve seen or completed in Spiral of Destinies. Once again, you’ll get a small amount of Hope Luxites from each.
Destiny Traces can be accessed from the bookshelf in Elysium.
Astrarium
The Astrarium outside your Elysium HQ is your ticket to the multiple timelines. And, more importantly, it’ll reward you for each tarot card you retrieve in Fool’s Journey.

Each card you add to your Astrarium not only improves its ability to navigate time but also nets you some Hope Luxites. It’s not much, but you’ll want all the Hope Luxites you can get.
Star Level
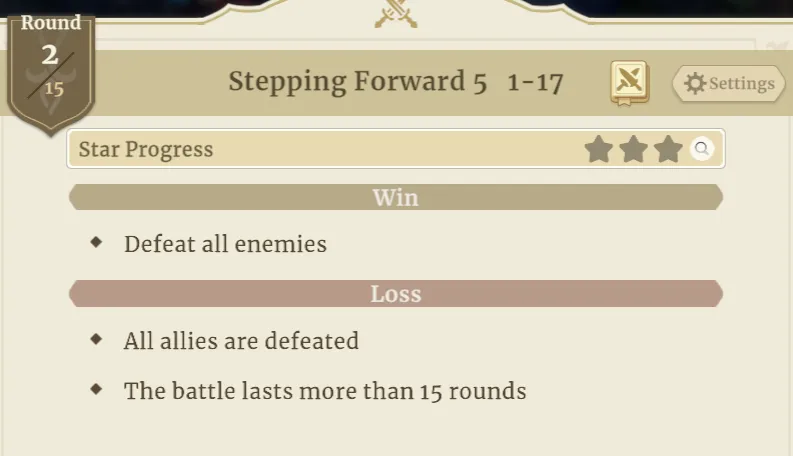
Each stage has up to three stars that you can earn. Each star is locked behind a certain requirement – the first one is attained just by completing the stage, but the other two often involve extra challenges, such as completing the stage within a certain number of rounds or not losing a certain number of units.

You can tap on the magnifying glass in the “Star Progress” panel when selecting a stage to see the requirements.
Each chapter in Fool’s Journey also has extra rewards – such as Elysium Coins, gear, Hope Luxites, and even Castalia – if you earn enough stars in its chapters. To claim your rewards, look here:
Daily Quests
Sword of Convallaria has a bunch of daily quests you can do to get some Hope Luxites, Endurance, random resources, and Voyager experience. To access your daily quests, go to the main menu, then tap Quest.

Each completed daily quest also gives you some activity points. Once you earn enough activity points, you can claim an extra reward by tapping each gift box at the bottom of the screen. Always try to go for the maximum amount of points per day as that will net you 60 Hope Luxites.
Achievements
You can also get a small amount of Hope Luxites for completing certain feats. To view your achievements (and more importantly claim your achievement rewards), go to the same menu as your daily quests, and then tap “Achieved” on the left side of the menu.

Each completed achievement nets you a small reward – usually Hope Luxites – though you can also get Common Exp, Radiant Ore, and other resources.
Cornucopia
The Cornucopia is Sword of Convallaria’s battle pass system. There’s both a paid and a free track.

As with most battle passes, you earn experience for your pass by completing certain daily, weekly, and seasonal quests. Each level earns you new prizes, with the paid track naturally getting you more stuff. Still, it does reward you for just playing the game.
You can access the Cornucopia via the buttons on the left side of the screen while in Elysium.
Shop Freebies
You can visit the item shop to get some freebies, such as Hope Luxites. You also get a free package of stuff at certain account levels, though note that there’s both a free and paid version of these. No points for guessing which one is more valuable. Free is free, though.

Most importantly, you can get two Keys of Destiny for free every week in the shop. These can be redeemed from Pack -> Weekly Purchase Limit -> Weekly Free Gift. Be sure to nab those Keys, especially if you love playing the campaign!
Events
Live service games thrive on a bustling population, and thus, they often hold lots of events to both drum up interest from new players and retain their existing playerbase. Sword of Convallaria is no exception. To see the current events in the game, go to the main menu, then select “Events”.
This will show you the current events, gacha banners, and more. Most importantly, some newbie rewards are tucked away here:
- Promise of Secret Fates nets you 10 Secret Fates each when you hit Voyager Levels 10, 20, and 30.
- Sail On, Voyager! is a daily login event that nets you resources, furniture, an avatar frame, and a free copy of Faycal. In case you missed the daily prize, you can access it here.
- Dawn is a series of starter quests that challenges you to run the Sword of Convallaria mercenary group in Spiral of Destinies mode. This is a limited-time quest (you have about 30 days to finish it when you first log in), so try and finish it ASAP.
Navigating the Gacha
The last thing you need to know about Sword of Convallaria’s gacha mode is the gacha system itself. Hope Luxites saved are Hope Luxites earned, after all, so here’s a breakdown of the game’s currencies, banners, pity system, and more.
Quick Tips:
- The three most basic premium currencies are Astral Gems, Hope Luxites, and Secret Fates.
- Astral Gems are “hard” premium currency and are what you get when you swipe. These are used for buying bundles and packages in the item shop and can be converted to Hope Luxites at the store.
- There’s no direct interface for converting Astral Gems to Hope Luxites. You need to visit the store and buy the Hope Luxite pack. The Hope Luxite packs on offer correspond to each tier of Astral Gem; i.e., if you buy 60, 300, 680 Gems (and so on), there are corresponding 60, 300, 680 (and so on) Luxite packs. This also means that leftover Gems from item packages are tricky to use and can’t be converted directly.
- You cannot earn Astral Gems in-game, nor can you convert Hope Luxites into Astral Gems.
- Hope Luxites are used to pay for QOL services or event currency. The most common use for these, however, is to buy Secret Fates, the gacha currency.
- Hope Luxites can be earned in-game.
- Secret Fates cost 150 Hope Luxites. These are used to pull on any banner. Secret Fates are used in every banner, so there’s no chance of accidentally buying the wrong type of pull.
- There are five banners in Sword of Convallaria:
- The Beginner banner is for new players.Debut banners feature the current rate-up character.Destined banners feature some rate-up characters that completed their Debut banner run. Use these if you missed a character you wanted.Standard – Fateful Summon is the standard character banner.
- Standard – Mighty Weapons is for getting equipment (not just weapons).
- The Beginner banner is very generous as it always gives you Maitha and another Legendary character within 30 Pulls. Note that this banner will vanish after 30 days since your first login.
- Pity in the Beginner banner does not count towards other banners.
- The Debut banner works as such:
- Hard pity is at 180 pulls. If you didn’t get the rate-up character after 179 pulls, the 180th is guaranteed to be that character.
- There is a guaranteed Legendary character at 100 pulls. This resets if you get a Legendary character.
- Triggering hard pity does not reset the 100-pull Legendary character guarantee.
- When getting a Legendary character, there’s a 50% chance it will be the rate-up character. However…
- There is no 50/50. If you get an off-banner Legendary character, there is no guarantee that the next Legendary will be the rate-up character.
- The base chance of getting a Legendary character is 2%.
- There is no guaranteed SR (Epic) per 10-pull.
- Pity (guaranteed Legendary at 100) carries over to all character banners. Pity is reset when you get a Legendary character.
- Hard pity carries over to banners of the same type.
- The Destined banner works in the same way, except:
- Hard pity is at 180 pulls; at 180, you get one of the featured characters.
- At 180 pulls, you’ll get a rate-up character you haven’t pulled yet from the current banner, meaning 360 pulls will guarantee both of the characters if you have neither of them. This system only tracks characters while that Destined banner is up.
- For example, if the Destined banner features characters A and B, and you have neither, 180 pulls gets you either A or B, and 360 gets you the one you didn’t get the first time.
- If, however, you already own a copy of A but didn’t get them during the Destined banner, there’s a chance that the 180-pull guarantee will give you A.
- When getting a Legendary character, there’s a 75% chance it will be one of the featured characters.
- The Standard banner is even more boiled down:
- There’s no hard pity, ever. You’re guaranteed a Legendary at 100 pulls, and that’s it.
- This system means that, as you approach 100 pulls, you can gamble on a Destined or Debut banner on the off chance that the 50/75% rate-up boost will nab you a featured character.
- The Weapon banner has no pity system in place, but the base rate of Legendaries is boosted to 5%.
Currencies
Let’s go over the different currencies in the game. There are two premium currencies you should be aware of: Astral Gems and Hope Luxite, as well as the gacha currency, Secret Fates.

Let’s start with Astral Gems. Astral Gems are “hard” premium currency. When you top up in Sword of Convallaria, you’ll get Astral Gems. These can be used to pay for item bundles (like the Legendary Hero Selector) and can be converted to Hope Luxites at a 1:1 ratio in the shop. Note that, unlike other games, you need to do this in the shop, though Astral Gem to Hope Luxite bundles exist for every tier of purchase.

However, this also means that leftover Astral Gems from buying item packages can’t be directly converted to Hope Luxites without buying a bundle. Hopefully this changes down the line.
Note that since Astral Gems can be used to purchase premium bundles, there is no way of earning them in-game. You also cannot convert Hope Luxites into Astral Gems. The devs have to make money somehow.
Next up are Hope Luxites.

Hope Luxite is primarily used to buy Secret Fates, the game’s gacha currency. It costs 150 Hope Luxites to buy a Secret Fate. You can also use Hope Luxites to pay for QOL services (such as Endurance refills), buy Event Tickets for ongoing events (which is another layer of gacha), or just buy valuable resources from the shop. As we discussed earlier, there are many ways – some renewable – to earn Hope Luxites in-game.
Last are Secret Fates.
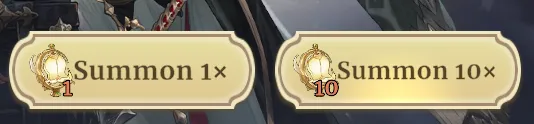
Secret Fates are used to pull in every banner – there’s no distinction between standard and limited banner currency. Each Secret Fate costs 150 Hope Luxites. You can buy Secret Fates from either the shop or directly when attempting to pull in the gacha.
The Different Banners
Sword of Convallaria has five different banners to pull from. They are:
- The Beginner banner. Gives you Maitha in your first 10-pull and another Legendary character within 30 pulls.
- The Debut banner. This one features the current rate-up character.
- The Destined banner. This one has two previously featured rate-up characters – great if you just joined the game and missed out on a good unit. There can be multiple Destined banners up at the same time.
- The Standard – Fateful Summons banner. If you hate yourself or don’t care for either the Debut or Destined banners, you could pull here. Any Legendary character you get will be pulled from the pool of all Legendaries.
- The Standard – Mighty Weapons banner. Roll for gear, if you want.
The Beginner Banner
Let’s start with the beginner banner. Sword of Convallaria’s beginner banner is very generous as not only do you always start with Maitha, who is a decent unit, but you’re also guaranteed at least one other Legendary hero within 30 pulls.

Do note that:
- The Beginner Banner only accepts 10-pulls.
- The Beginner Banner only lasts 30 days from when you first logged in. As getting fates in the early game isn’t a problem (you can clear this banner on your first day easily), this shouldn’t really be a concern.
- Pity from this banner does not carry over. If you thought you’d be smart by using the 30-pull Legendary guarantee on another banner, think again.
Debut Banners
Next are the debut banners. As these feature the hot new character, most people will be spending their fates here.

The important thing to note in debut banners is the pity system:
- You are guaranteed the rate-up character within 180 pulls. If you didn’t get them by your 180th pull, that pull will give you the rate-up character. This guarantee extends to the next Debut banner if you didn’t trigger it. This hard pity carries over across the same banner type (Debut, Destined).
- You are guaranteed a Legendary character within 100 pulls. This isn’t necessarily going to be the rate-up character. This is reset when you do get a Legendary character.
- The above two pity systems are mutually exclusive; triggering the 180 guarantee doesn’t affect the 100 Legendary guarantee.
- The base rate of getting a Legendary character is 2%. That’s actually pretty decent.
- When getting a Legendary character, there’s a 50% chance that it will be the rate-up character.
- There is no 50/50 here. For example, if you get an off-banner Legendary, there’s no guarantee that the next Legendary will be the rate-up character.
- Pulling builds pity for all character banners.
Destined Banners
Now, for Destined banners. These are similar to Debut banners (no SSR, pity counts across all banners and subsequent Destined banners, 2% base Legendary rate), but with the following differences:
- At the 180 hard pity, you get one of the featured characters.
- When getting a Legendary character, there’s a 75% chance it will be one of the featured characters.
Lastly, the 180 hard pity will give you a character you have not yet pulled from the current banner. To illustrate, let’s look at this Destined banner:
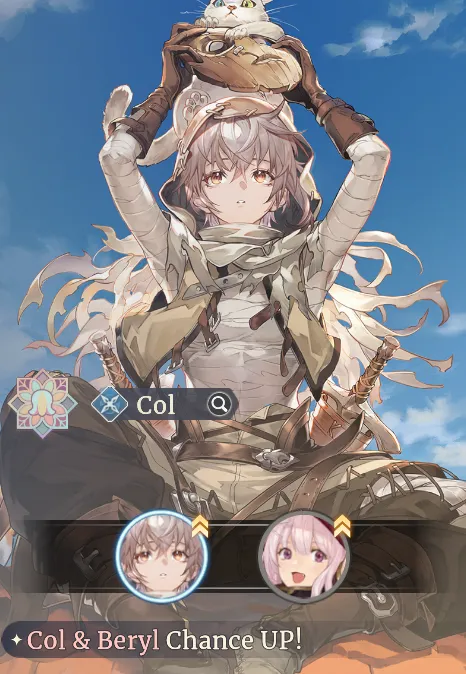
There are three scenarios here:
- Let’s say you roll on this banner and do not get either Col or Beryl at all until the 180th pull. At 180, let’s say you get Col. Great. If you roll to 360, you’ll get Beryl.
- Now, let’s say you rolled to 180 but managed to get Beryl along the way. The 180th pull will therefore be Col. At the next 180, you’ll get one of them randomly.
- If, however, you had Col before you rolled on this banner and hit 180, there’s a chance that you’ll still get Col as the game only tracks who you got in the current Destined banner.

Standard Character Banner
The standard character banner is, thankfully, easier to understand.

In the standard banner:
- You’re guaranteed a legendary character (with no weighting towards anyone) at 100 pulls.
Standard Weapon Banner
The standard weapon banner is the easiest of them all to understand.
In this banner:
- There’s no pity system in place.
- The base chance to get a Legendary item is 5%.
Building Pity
Now, the main takeaway from these systems is this: since soft pity(guaranteed Legendary at 100) carries over between banners, you can switch to the banner you want at 100 on the off-chance you’ll get the rate-up character.
Let’s say, for instance, that you 99 times on the standard banner without getting a Legendary, meaning your next pull is guaranteed. Instead of spending it on the wide pool of the standard banner, you might want to use it on the Debut or Destined banner, where the rate-up characters’ drop rates are weighted.
Spiral Mode
We’re almost done! The last thing you need to know about is the basics of running the Sword of Convallaria in the Spiral of Destinies. As I mentioned at the start of this guide, the Spiral of Destinies is the game’s“story” mode, and virtually nothing from the gacha carries over, sans optional companions.
Quick Tips:
- There are a lot of differences between Elysium and the Spiral of Destinies, in terms of character growth, resource allocation, and getting new characters. While the basics are almost the same, keep in mind that there’s no gacha element in Spiral of Destinies – everything is earned through quests, time, and dedication.
- Spiral mode is finite. At the end of your story path, your progress will be wiped. This means that mastering the basic resource loop as well as how to run the mercenary company will be of great help to you in your future runs.
- Each chapter in Spiral mode has an objective you must complete. The objective and how much time you have left can be seen in the upper left.
- Every week, there are some tasks that you can perform – take a quest, dispatch mercs on a commission, have units take a break, train units, and forge gear.
- Quests will have your mercs enter combat. Each quest has a different difficulty rating as well as a different reward, so be sure to choose quests that give you the resources you need.
- Guild certification quests are very important. Do these ASAP when they appear as they often gate useful upgrades.
- Mercenaries that are deployed on a quest cannot take any other action that week.
- Dispatches are commissions. During a dispatch, you’ll send your mercs to take care of business. Note that dispatches can take multiple weeks to complete.
- Performing quests and dispatches consumes stamina. Units with no stamina can’t do anything until they have positive stamina.
- Occasionally, there will be a Critical Quest – a battle that you must face. Exhausted and dispatched units can take part in these.
- You can ignore pending tasks by tapping “Ignore” in the lower right.
- Using town facilities is key to getting ahead in Spiral of Destinies.
- The training grounds let you train units for experience, skills, or tailored training.
- Experience can also be earned by fighting and doing dispatches.
- Skills can also be acquired by getting Inspiration items. Skill training at the training grounds is, however, better for focusing on just one unit.
- Tailored training attaches passives to a character. A character can benefit from 3 tailored training programs at once.
- The haven allows you to passively and actively rest your mercenaries.
- Idle units (not dispatched, not sent into combat, not training) gain stamina based on the Basic resting rate.
- Units can be placed in rest slots, in which case they’ll gain a lot more stamina, based on the Resting rate.
- The tavern allows you to hire new mercenaries. The roster refreshes every few weeks. The better your tavern, the more people show up.
- The forge lets you manufacture equipment for your mercenaries.
- Blueprint forging requires materials, funds, and a blueprint. This is how you get higher-quality gear.
- Common smithing yields a random common weapon or trinket at the cost of materials and funds.
- Material production generates materials for crafting and building. This costs nothing but funds.
- Make sure your forge is running at all times. If you can’t craft anything that week, generate resources.
- Blessings provide buffs to characters. These buffs last for 2 weeks on average.
- The higher the level of the sanctuary, the more rituals you can choose from. This will allow you to avert the randomness of low level rituals and get the buffs you actually want.
- Blessing a character depletes the sanctuary’s Luxite energy. This regenerates every week.
- Beryl’s workshop is the hub for talents in Spiral of Destinies.
- Beryl will assign you research tasks, which involve using powerful, free temporary talents, giving her materials, or dispatching units.
- Completing these tasks nets you Luxite extract.
- Luxite extract can then be spent at the desk to buy and upgrade talents. As with Elysium, you need to keep buying and upgrading talents to unlock more of them.
- upgrades
The Main Differences
Let’s start this section by talking about the similarities and differences between Elysium and the Spiral. First, the similarities. The following things are the same:
- Character development is still a thing, though the methods are different this time.
- The combat system is the same. Talents, positioning, deployment, obstacles, etcetera. Good thing you’ve been getting a ton of practice in Elysium, eh?
…and that’s about it. As I mentioned at the start, Spiral of Destinies is a whole beast altogether.
On to the differences, beginning with character growth:
- Characters can only gain experience through combat, commissions, or training in town.
- Characters gain skills by using Inspiration items or through training.
- Characters have a stamina bar and need to rest lest they become unavailable.
- There are no ranks or bond bonuses.
- Equipment must be forged in town.
- Even common units are useful. You’ll need all the manpower you can get.
Acquiring characters is different, too:
- Instead of pulling for characters in the gacha, you’ll need to recruit new mercenaries, either by taking certain quests or wooing them with money.
As for resources:
- Money is referred to as funds. Virtually everything needs funds.
- Developing the town of Convallaria is core to the game mode, and to do so, you’ll need to acquire materials such as timber, stone, and metal.
Spiral mode is finite. There are several endings to the story, depending on who you side with and how things play out. Each chapter has an objective that you need to complete to progress. This objective – as well as how many weeks are left to complete it – can be seen in the upper left of town.

When you reach the end of your story path, your progress will reset – including your town upgrades, materials, unit development, and so on. Because of this wipe, it’s important to learn how to run your mercenary company well, as that will make your future runs much easier.
The Weekly Grind
Unlike in Elysium, time is one of your concerns in Spiral of Destinies. Each week is another opportunity to grow, train, build, and develop your mercenary company, and a good assistant leader will ensure that the Sword of Convallaria is never idle.
Each week, you can do four tasks: do quests/dispatches, rest units, train units, and forge items. Let’s talk about quests and dispatches first.
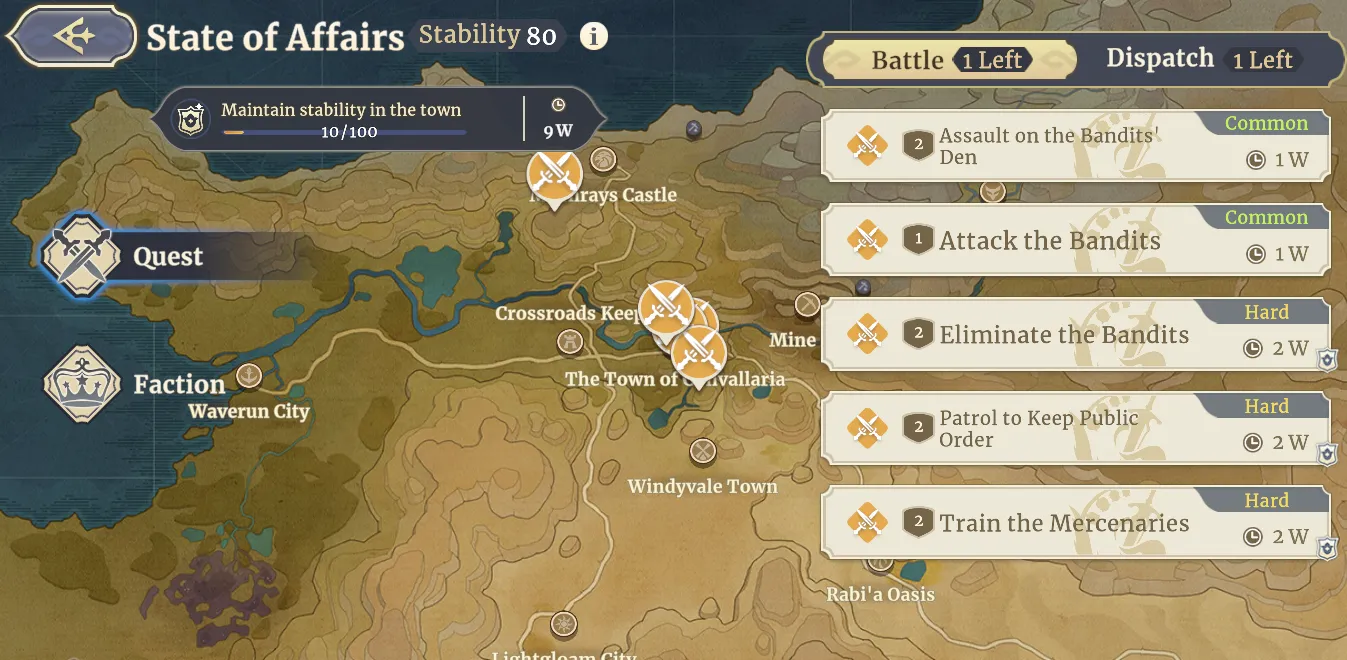
Each week, you can take on a number of quests and dispatch units to do commissions. You can see how many of each you can do at the top of the screen. Different battles have different objectives and difficulties, as well as a limited time in which they’ll be available, all of which you can see on the side. Each contract also has a different reward – some offer more coin for your coffers, while others give you training materials or even construction materials.

Be sure to check the reward and difficulty of a contract before accepting it as time is arguably your most valuable resource in Spiral of Destinies.
One last thing about quests – whenever a guild certification quest appears, be sure to do it as completing these is key to upgrading your town.
Aside from quests, you’ll also receive dispatches – essentially commissions. To do these, simply dispatch a unit(s) that meet the requirements. Note that commissions will go on indefinitely until you cancel them, meaning that they give infinite resources, so long as you have someone who can pay the stamina cost. To view your available commissions, tap on “Dispatch” in the quests menu.
Since teleportation is impossible in the mortal world, units that have battled or taken a commission will be unavailable for any other activities in that week. Performing these tasks also drains some of their stamina; run out of stamina and a hero will become unavailable until they have positive stamina. Note that getting downed in battle will incur an even bigger stamina penalty!

An exception to this rule is Critical Quests. These are important story events that must be completed. As such, you can deploy dispatched and exhausted characters to these missions – this way, you’ll never be in a game over situation.
To help you keep track of things, a weekly summary will be shown to you once you’ve concluded your week.

If you really don’t want to do anything in a week, you can always choose to ignore a pending task by tapping the “Ignore” button on the lower right. Once you’re out of pending tasks, the option to skip the week will appear. Just remember – you’re not going to get that time back!
The Training Grounds
The training grounds are perhaps the most important facility in Convallaria. Here, you’ll be able to train mercenaries, allowing them to gain experience, new skills, and even specialized training to help them excel.

The training options in the training grounds are:
- Experience training. This just gives the unit experience points without seeing active combat – great for getting new hires up to snuff.
- Note that units also get experience from active combat and completing dispatches.
- Skill training. At the end of training, a unit will be able to choose from three random skills.
- Note that you can also gain skills from getting Inspiration items in combat. However, since Inspiration selects random heroes, skill training is more reliable for targeted development.
- Tailored training. This allows you to use tailored training scrolls to imbue mercenaries with potent passives. You can get these scrolls from battle. A unit can only have three tailored training boosts attached at once.

The Haven
The haven is where your mercenaries go to rest and recover their stamina. The haven provides two stamina bonuses: one for heroes who are actively resting and another for heroes who are passively resting.

The passive rest bonus applies to everyone who isn’t doing anything that week. Active resting, on the other hand, gives heroes a huge amount of stamina back. Use this to quickly get key units back in the fight.
The Tavern
The tavern is where you recruit new mercenaries.

Every few weeks, new mercenaries will appear in the tavern, and you can spend coin to hire them. As the Sword of Convallaria grows in prestige (especially through passing guild certification tests), you’ll be able to hire a wider variety of units.
The Forge
The forge is where you go when you want to create gear for your mercenaries. There are three options in the forge: blueprint forging, common gear smithing, and material production.

- Blueprint forging allows you to create high-quality gear, provided you have the blueprint, the raw materials, and funds.
- Common gear smithing churns out mass-produced stuff. You’ll get either a common weapon or trinket at random. Each attempt consumes timber, ingot iron (yes, that’s the name), and Luxite dust, as well as a tiny amount of funds.
- Material production generates raw resources (mostly ingot iron). This costs nothing but time and funds.
You can cancel orders that are currently in progress. While you’ll get 100% of the resources back (somehow), the time spent on that order will be gone.
If your forge isn’t making gear, I’d suggest leaving it on resource generation.
Blessings
The sanctuary in town can bestow blessings on your characters.

When a unit is blessed, you’ll be able to select one of three random buffs for it. These buffs only last for a short amount of time (roughly 2 weeks). In the beginning, blessings are a mixed bag as sometimes, the buffs you’ll be able to pick aren’t very useful for the unit. Still, a buff is a buff. But as you level up the sanctuary and build more facilities for it, you’ll be able to select more potent and targeted rituals that will help you land the buffs you need.
Each blessing consumes a certain amount of Luxite energy. The sanctuary regenerates energy each week.
Unlike most town facilities which can only be upgraded past a certain point in the story, you can immediately start upgrading the sanctuary’s Luxite reserves and energy regeneration rate.

To do this, tap on “Relic” in the lower left while in the sanctuary.
Beryl’s Research
Beryl’s workshop is where you gain and improve talents in the Spiral of Destinies.

There are two parts to the workshop:
- Talk to Beryl to see the research requirements, as well as turn in or dispatch units for research tasks. Each completed task nets you some Luxite extract.
- Beryl also assigns you to use specific temporary talents that she’ll provide. Make use of these as they don’t cost TP nor have a cooldown, and are very powerful!
- Head to the desk to spend your Luxite extract. Here, you can buy new talents and passive boosts as well as upgrade them. To unlock more options at the desk, keep upgrading and buying new nodes!
For This World of Peace!
As your cat companion says, you’re still a speck in the grand cosmos of the Sea of Chaos. But with determination, cunning, and planning, you can retrace your steps throughout history and maybe this time, things will be different.

That concludes this beginner’s guide to Sword of Convallaria, and with this knowledge, you’re now armed with the basic knowledge to square off against bigger Calamities and shape the history of the world as you see fit. If you have any corrections to make or suggestions on how to improve this guide, let us know in the comment area!