Most of us have probably had a dream of taking to the high seas, living a life on the water as a pirate. Indeed, the corsair’s wild, untethered, and romanticized existence appeals to many because of the sheer freedom that comes with the wind and waves. Now, that opportunity has finally arrived for mobile game players via Sea of Conquest.
In Sea of Conquest, you’ll initially step into the shoes of Henry Hell, a former UMC seaman (and yes, most pirates during the golden age of piracy came from the royal navy or were disgruntled merchants) who lost his crew during a struggle with his former employers. As you wash up at a distant port, you’ll need to not only reclaim your ship and crew but also establish dominance of the Devil’s Sea against both terrible sea monsters and other pirates. Sea of Conquest is available on both the Google Play Store and the App Store.
Gameplay-wise, Sea of Conquest is essentially an empire-building game similar to games like Evony: The King’s Return, War and Order, or Age of Origins, with the caveat that your base (your ship) is now a mobile entity. Because of this, you’ll need to proactively sail around, picking key targets and ensuring that you stay away from threats both AI and player-controlled. This leads to a tight, engaging game experience where there’s plenty of fun to be had.
In this beginner’s guide to Sea of Conquest, we’ll be discussing a number of topics:
- Managing your flagships. Your flagship is your “capital” in Sea of Conquest and to ensure that you have the best chance possible when out on the seas, you’ll need to know how to keep your capital vessel in tip-top shape.
- Combat, which is divided into naval, hero, and automatic combat. A good captain should be able to effectively command their crew no matter what kind of violence the situation calls for.
- The many ways of getting stronger, so you can stop getting your butt kicked by other players and/or monsters – or stop them from trying in the first place.
- Resources and loot. You might be able to do what you want as a pirate because of your free life, but upgrades are not, and we’ll need to know where and how to procure booty.
- Gangs, and why you really should join one.
Bosun 101
What, did you think that just because you were the captain of the ship, you didn’t have to do any logistics work? You thought wrong. In this section, we’ll go over managing your flagship, the core of your fleet.
Quick Tips:
- Your flagship’s level is crucial to your success as it determines what facilities you can build and what actions you can take. Essentially, it’s your tech level.
- Upgrading your flagship costs coins and improves its stats.
- While upgrading your flagship is always a good idea, take note that once you hit level 8 on your flagship, you’ll lose your beginner’s protection and can be attacked by other players. Thus, ensure you have a good grasp on the basics and enough resources before heading to the high seas.
- The beginner’s protection will also expire 3 days after you start playing.
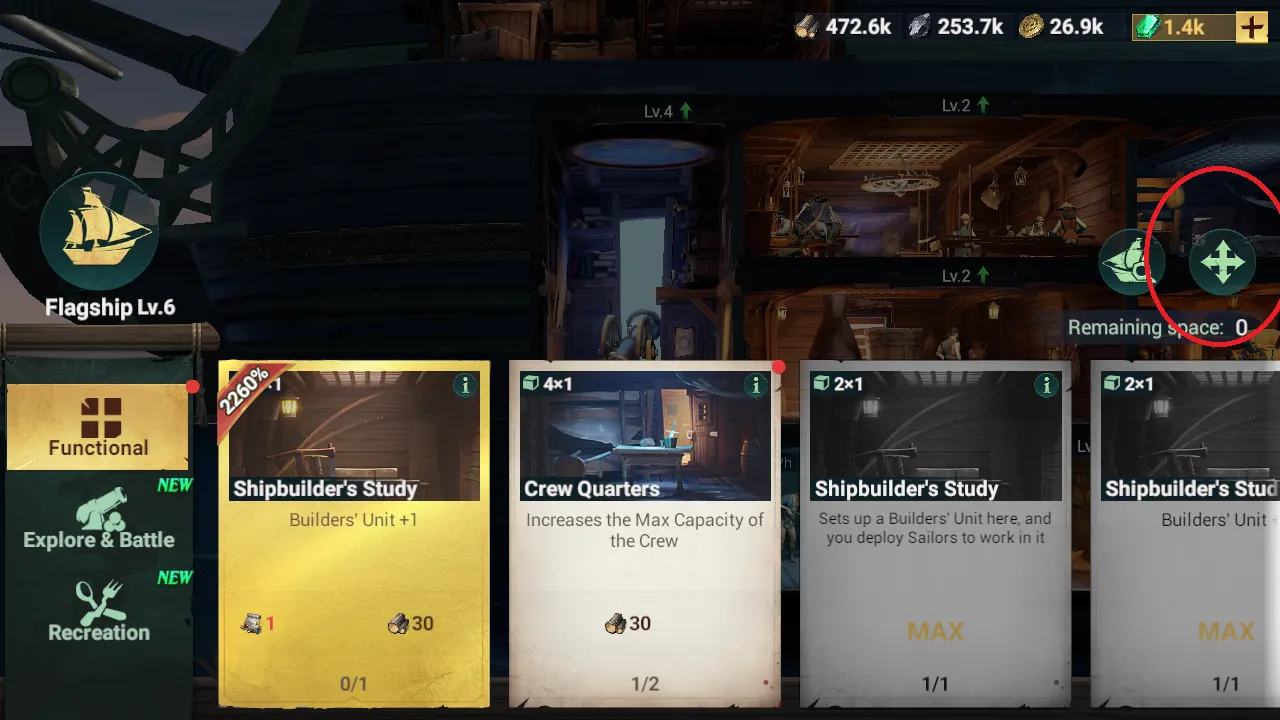
- You can build facilities on your flagship. Each facility has a specific purpose and is sorted into one of three rough categories.
- Bear in mind that you have limited space on your ship. While your flagship does grow as you progress through the game, don’t place rooms without thinking. Think about which facilities you absolutely must have more of at each point in the game.
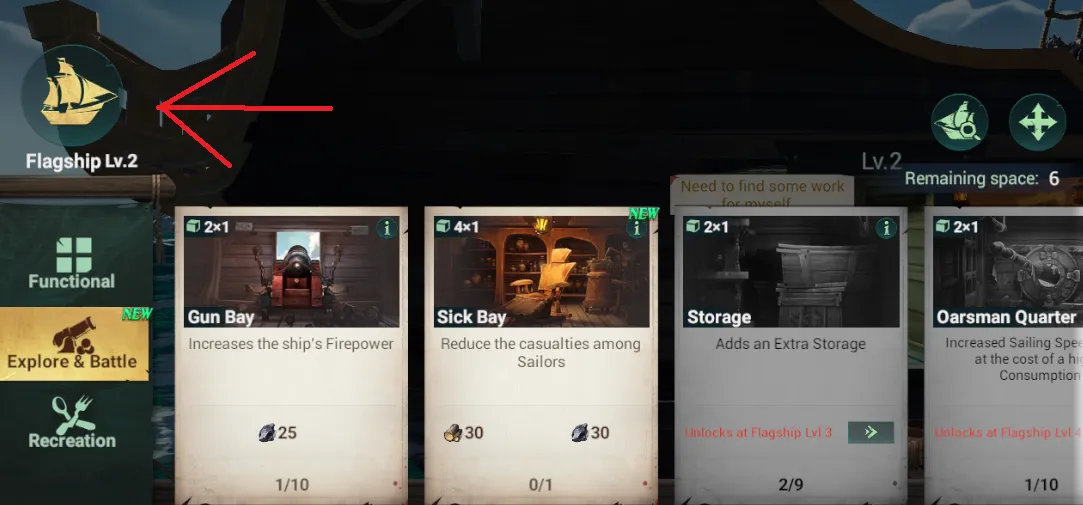
- Note that Gun Bays and Oarsman Quarters must be built above the draught line (anything below the draught line is underwater).
- You can move your facilities by tap-holding on them and dragging them around. You can also select the move option while in build mode by tapping the four-way arrow (move icon) on the right side of the screen.
- Be sure to upgrade your facilities. A green arrow beside a facility’s level indicates that it can be upgraded.
- Both available facilities and maximum upgrade level are dictated by your flagship’s level.
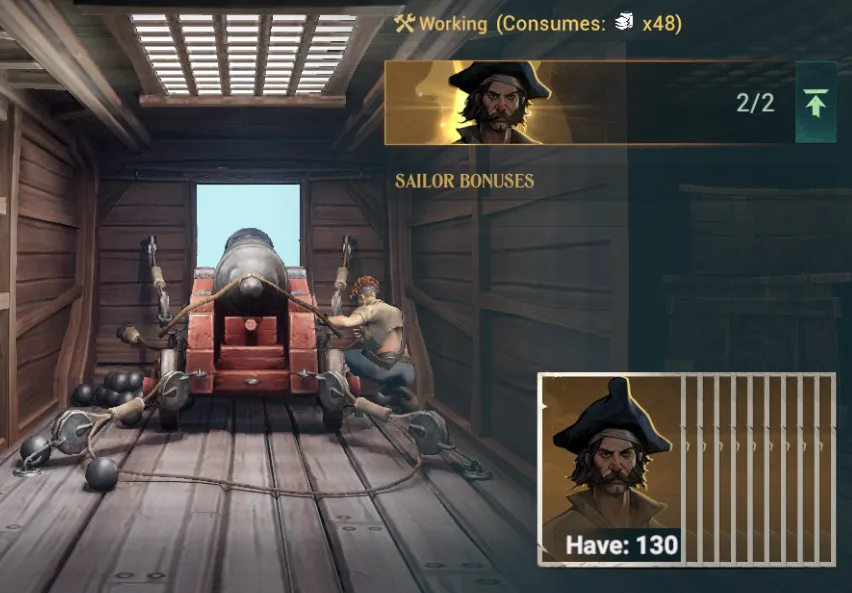
- Some rooms require sailors to operate. Assign sailors by tapping the room in question and then tapping the “jobs” button.
- While working (ex: oarsmen only “work” while you’re moving), sailors assigned to rooms will consume supplies.
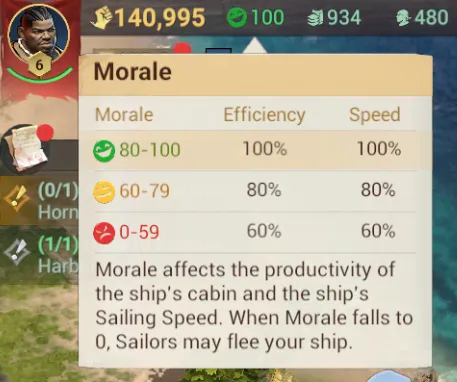
- Once you run out of supplies, morale will start dropping, which will decrease your ship’s speed and efficiency to a minimum of 60%. At 0 morale, sailors will begin deserting your ship, leaving you easy prey for both monsters and other players.
- You can replenish supplies at any port. I suggest turning on the auto-replenish button to make sure you always leave port with a full store of both sailors and supplies.
- The galley and distillery facilities allow you to convert certain items into supplies, allowing you to stay at sea longer.
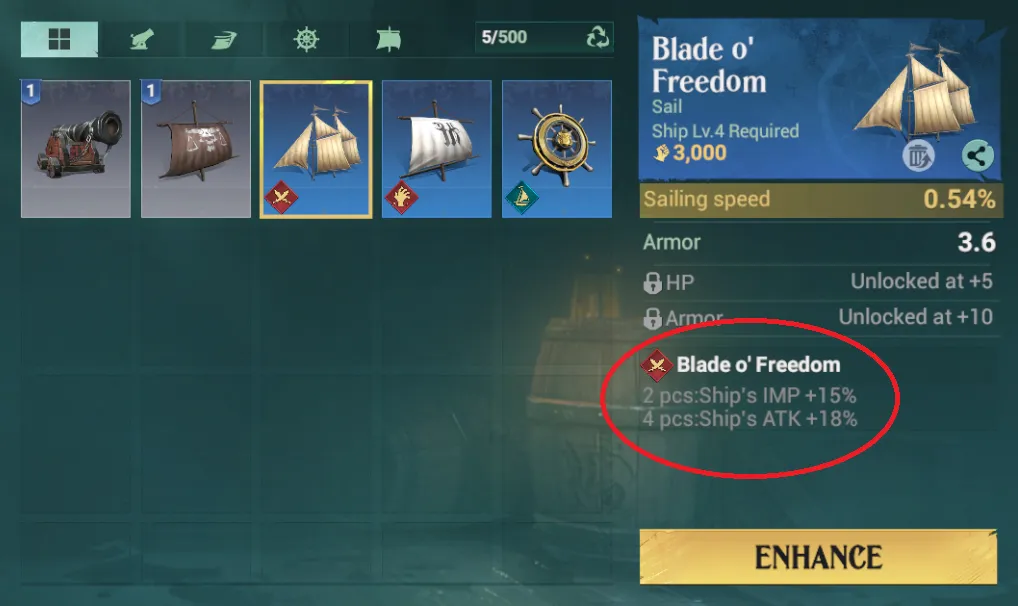
- Your flagship can equip up to four pieces of gear – a helm, a cannon, a sail, and a figurehead.
The Flagship
Your flagship is the most important part of your entire fleet.
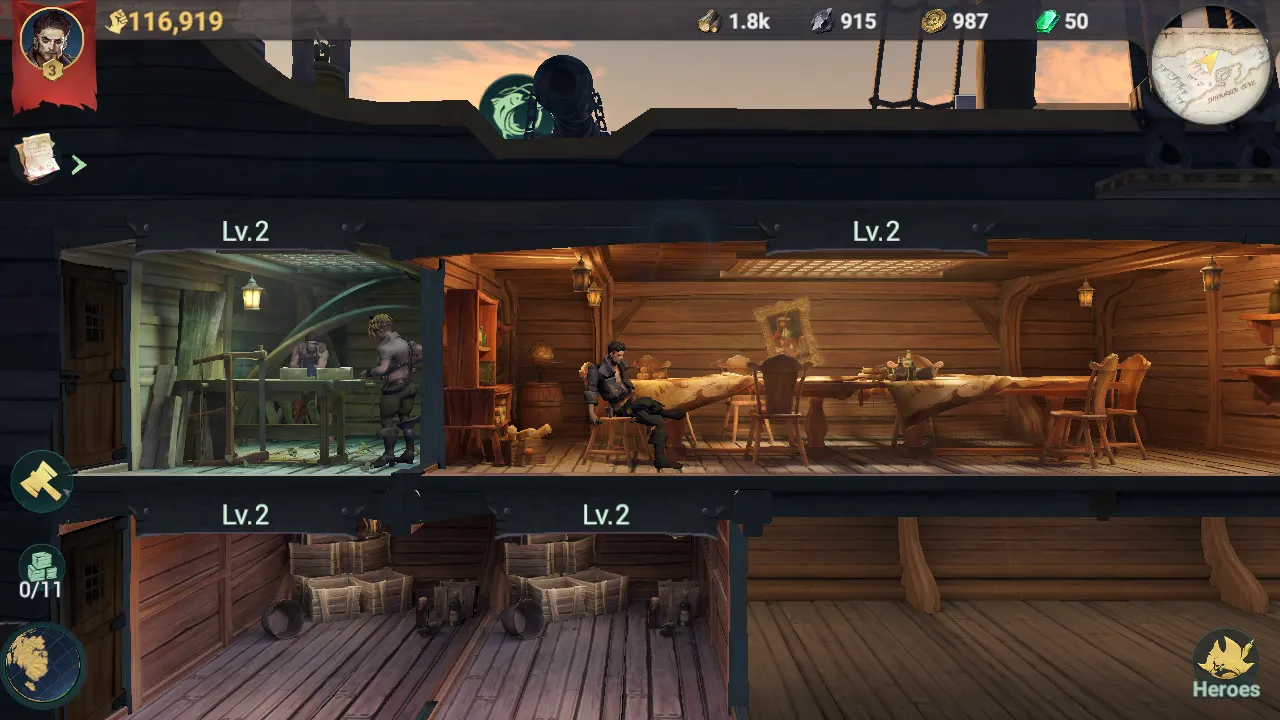
The flagship effectively serves as your “capital city” and its level is your “town center” level. Most, if not all operations revolve around the flagship.
As such, it’s imperative to always upgrade your flagship’s level as that unlocks more tech for you. To do that, go to your ship, tap the hammer icon, and then tap “Ships” above the selection of room categories.
Once you enter that menu, you’ll see all the ships that you have, ships you can build, and the stats of each. More importantly, you can upgrade each ship here by shelling out some coins.We’ll get into building ships later.
While upgrading your flagship’s level is always a worthwhile way to spend your resources, there’s one caveat you should be aware of – as soon as you hit flagship level 8 or if 72 hours (3 days) have passed since starting Sea of Conquest, you’ll lose your beginner’s protection and can be attacked by other players. Make sure you have a solid grasp of the game’s basics and ideally nab a second ship before you hit that important level!
Flagship Facilities
The reason why flagship levels are important is that they dictate what types of rooms you can build on each flagship. The tutorial will pretty much railroad you into building some facilities for the Golden Compass quest so you’ll no doubt have a barebones functional ship. Once you’re free from the tutorial though, let’s examine this section in greater detail.
Ship facilities can be split into three categories, as can be seen on the left side:
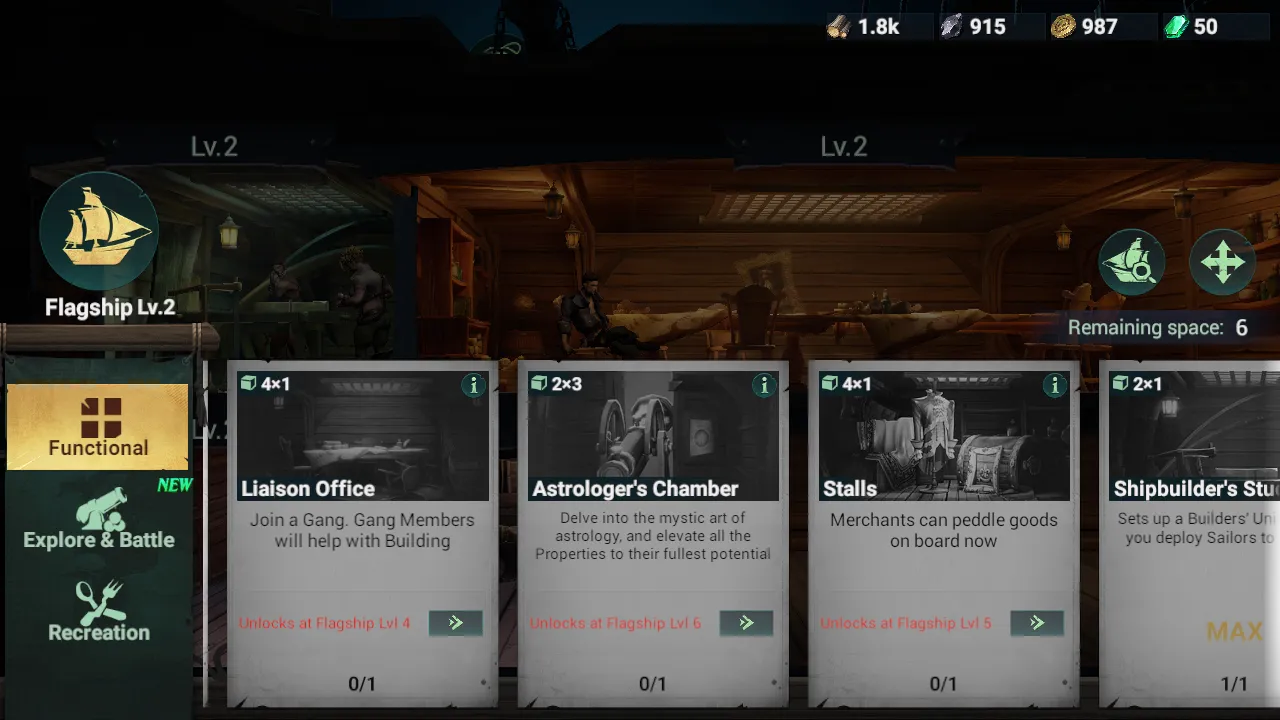
- Functional buildings either unlock or streamline the game’s core mechanics. This tab is where you set up your builders, help them work faster, increase your crew size, join a gang (guild), sell goods, establish the captain’s quarters, and so on. You may want to build an extra Shipbuilder’s Study in the early game so you’ll have two builders, allowing you to upgrade or build two rooms simultaneously.
- Explore and Battle rooms help you, well, explore and battle together. These facilities include extra storage rooms for carrying more loot before you need to head back to port, more gun bays for that extra oomph in battle, oars for more movement speed, and so on.
- Recreation is a weird tab. The rooms here are supposed to be for your crew to kick back and relax, but most of them are resource generators, with rooms that generate wood, iron, fresh water, eggs, aquatic products, milk, and gold. I guess when you’re 7 months at sea, even fishing up driftwood is seen as entertainment. The tab also has the distillery and the galley for processing your items into usable, helpful supplies.
Now, one important thing you need to keep in mind is that your flagship only has so much room. While it will grow as you progress through the game, you’ll still need to carefully pick which facilities you want. For example, while you have your beginner’s protection, you can avoid making resource generators since you’re still “safe”. On the other hand, more gun bays are good at any point in the game, whether for offense or to deter attackers. You might also be tempted to put down a ton of Oarsmen’s Quarters. Before placing a room down, evaluate your current situation and build the rooms you really need for your ship.
Finally, there’s something known as the draught line.
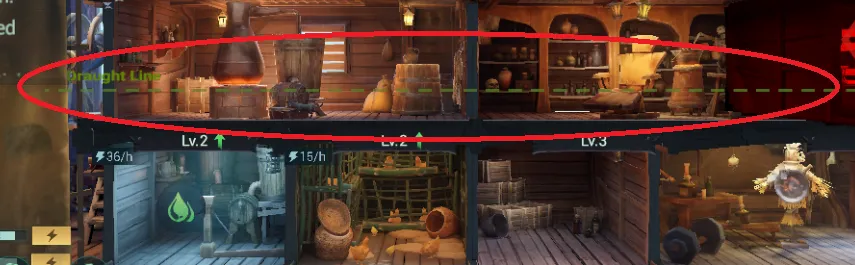
To keep it simple, the draught line shows how much of the ship is usually submerged. This means that certain facilities that require access to the outside of the ship to function – such as Gun Bays and Oarsman Quarters – must be built above the draught line. The draught line is on the second floor of your ship by default.
To alleviate the problem of the draught line, especially later on when you get more space and can place facilities more freely, you can move facilities. To move facilities, tap-hold on them, or tap on the move button in the build menu:
Upgrades, People!
It’s one thing to build more facilities on your flagship, and it’s another thing entirely to upgrade them. Thanks to the limited amount of space on your flagship, it’s imperative that you maximize each and every facility – and choose the ones that would count the most. But even after carefully budgeting your limited room, you’ll still need to upgrade your facilities to squeeze the most performance out of them.
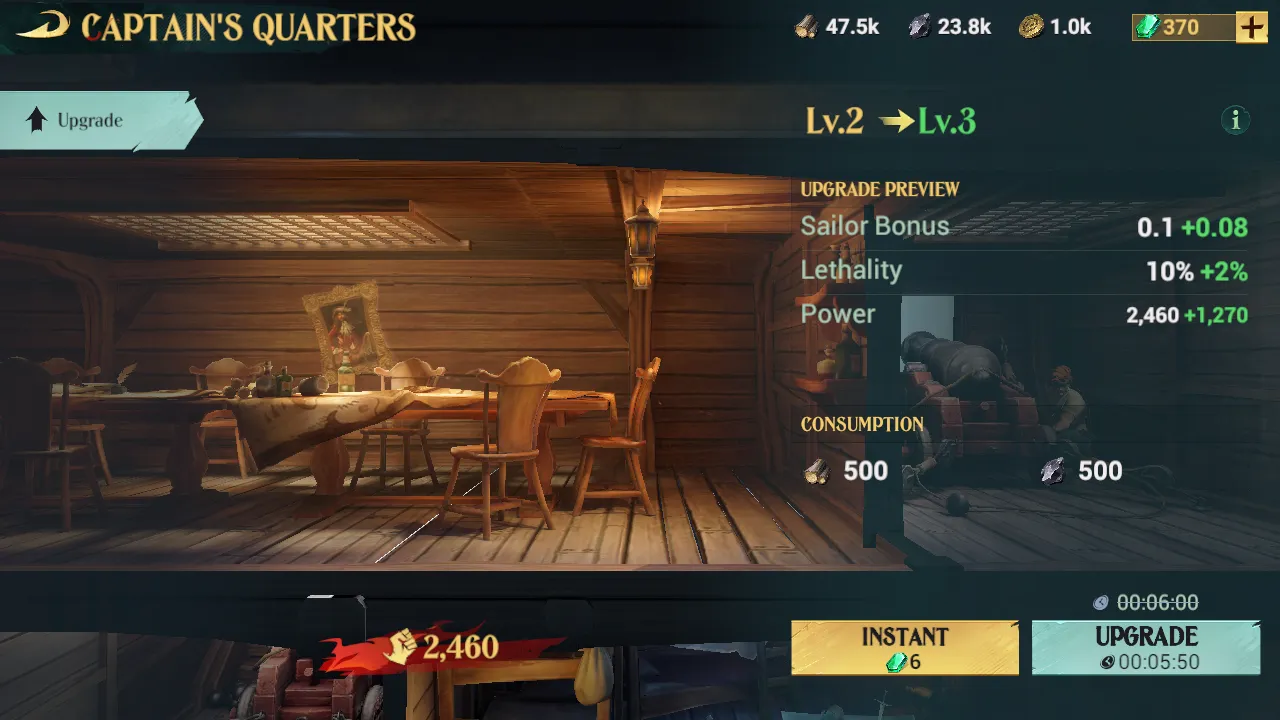
Upgrading a room is simple – just tap on the room in question, tap the upgrade button, pay the materials, and wait out the timer. You can also spend speed-ups here to accelerate the construction process though as with all empire-type games, I strongly recommend saving these for later. Note, too, that if a building can be upgraded, it’ll have a green upward arrow beside its level.
Each upgrade level bumps up a room’s stats and efficiency by a fair bit. You can preview what later levels will do by pressing this button…
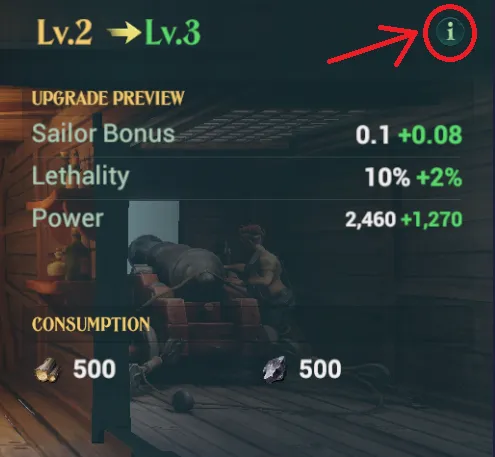
…which can help you determine where to spend your resources more effectively.
Finally, as with constructing rooms, your upgrade level is gated by your flagship level.
Crew, Supplies, and Morale
As you build and upgrade rooms, you may have noticed that some of them have a “jobs” tab. This means that you’ll need to delegate some of your generic sailors to that room to maximize or activate that room’s effects.
Naturally, your sailors can’t work for free. Each sailor assigned to a room consumes a certain amount of supplies when working, meaning that as long as you’re on the high seas, any sailor assigned to a room that is currently functioning (if you’re moving, oarsmen are rowing; if you’re building, carpenters are working, etc.) will consume resources, as indicated in their room’s details. In essence, supplies serve as your ship’s fuel for performing certain accelerated actions.
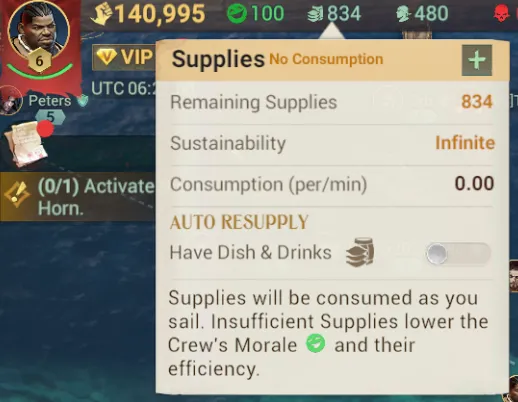
You can tap on your supplies button on the upper left (refer to the image above) to see how long in real-time your supplies will last, based on the current level of consumption. Now, if your supplies run out, your men will not only stop working (forcing you to rely on baseline stats) but your morale will also take a hefty hit based on how long you’ve been without supplies, which drastically affects the speed and efficiency of your ship to a minimum of 60%. Even worse, if your morale hits 0, sailors may abandon ship, leaving you at the mercy of any other players or monsters that may be in the area.
To make sure this doesn’t happen to you, there are some things you should keep in mind. First off, it’s almost always a good idea to fully replenish your ship’s supplies and sailors whenever you make port. You can do this manually by dragging the sliders, or better yet, just tick the “auto replenish” button on the right side of the screen – this makes the game automatically spend gold to fill up your supplies and sailors.

Second, it pays to explore. Look for new ports of call in your region – especially important when you’re starting out – so that you’ll know where the (relatively) safe spaces are to rest and resupply. While we’re at it, keep an eye out on your supply consumption rate especially when venturing into unknown territory, and don’t hesitate to turn back if your food is dwindling.
Finally, you can build a galley and/or distillery if your flagship level allows it and you have space. These facilities will convert certain resources into food and drink, meaning you’ll be able to stay at sea for longer.
Gear
Lastly, you can equip four pieces of equipment on your flagship to vastly improve its performance.

Each flagship can have one cannon, one figurehead, one helm, and one sail. Naturally, the rarity (in ascending order: blue, purple, orange) of these parts directly influences their performance, and they can be upgraded to squeeze even more numbers out of them – though you won’t be able to do this with your starter equipment.
You’ll unlock the figurehead and helm slots as you raise your flagship’s level.
High Seas Combat
Now let’s talk about fighting. There are three general combat modes in Sea of Conquest: naval combat, hero combat, and automatic combat, and learning the ins and outs of each mode is vital to your success.
Quick Tips:
- Naval combat is usually seen in major PVE fights.
- In naval combat, swipe to use your cannons and tap on your heroes to use their skills. Cannons can be automated via auto-fire, while hero skills consume Rage, which builds up over time.
- Auto-combat is a boiled-down version of naval combat. Most fights on the seas, whether PVE or PVP, are auto-combat.
- Heroes will still use skills in auto-combat.
- Auto-combat requires combatants to stay within range of each other, thus, it’s possible to disengage a stronger foe by fleeing. Movement speed is important!
- Close combat happens whenever your heroes have to fight without the ship. Close combat is automatic and turn-based, where each character moves once per turn and attacks the closest (in general) foe.
- During close combat, normal attacks generate Rage points, which can be spent by tapping on a hero’s portrait in the lower right.
Naval Combat
Naval combat is the domain of story battles, whether it’s against the major UMC fleet at the end of the prologue or against massive sea monsters. It’s also the first type of combat you’ll enjoy in Sea of Conquest.

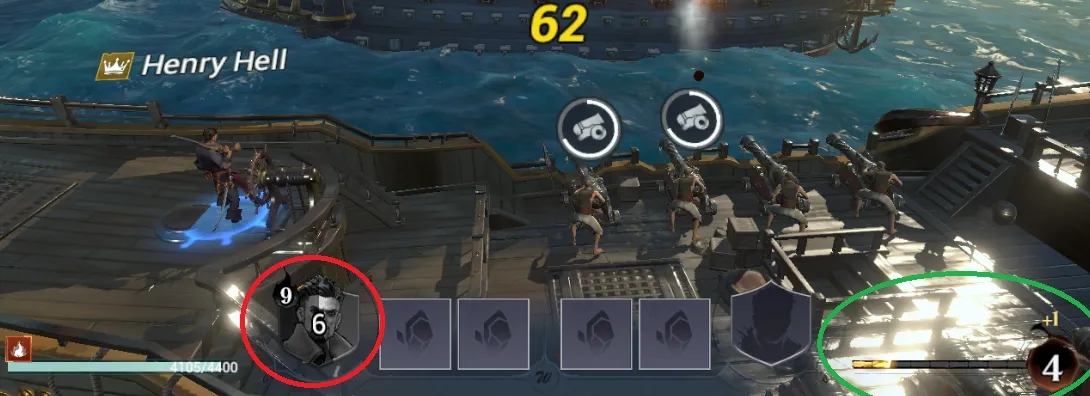
During naval combat, you can swipe on your cannons to fire any time they’re off cooldown. You can automate this process by tapping on the auto-fire icon on the lower part of the screen, once you’ve unlocked it.
Cannon fire is nice and all, but it’s your hero skills that will make the most impact during this time. Hero skills are activated by tapping on that hero’s portrait in the lower area of the screen. The heroes available in combat will depend on who you’ve assigned to your ship, so try to keep your aces on your flagship!
Hero skills have a Rage cost and a cooldown. Rage accumulates on its own over time, and can be seen in the meter:
It’s important to have an array of heroes with different skills. Betty, for example, is a valuable hero because her skill has an interruption effect. Keep a hero’s skill attributes, Rage cost, and cooldown in mind when deciding when to best use their skills!
Auto-Combat
While naval combat is nice and all, most battles in naval combat are done in the overworld, automatically.

Auto-combat forms the bulk of the game’s battles. During auto-combat, the same rules as naval combat generally apply – cannons will fire, heroes will automatically use their skills, and so on – except you only get to see the battle on the overworld. This allows you to continue going about your business and planning while combat resolves.
NPC ships will never disengage from combat, so it might surprise you to know that speed is an important factor in auto-combat as PVP fights can be avoided by disengaging or outrunning your foe. To attack a ship, you’ll need to keep it within range of your cannons, so it’s generally pointless to attack a player – even an auto-trading one – whose speed far outranges your own.
Since you’ll be doing a lot of auto-combat, be sure to replenish your sailors frequently (read: heal) to replace casualties and keep fighting. To heal yourself, tap on this button when it appears:
Tapping that button will pull sailors out of your reserves to fill up the empty spaces. You can refill your reserves by docking at port, the same way you’d replenish your supplies.
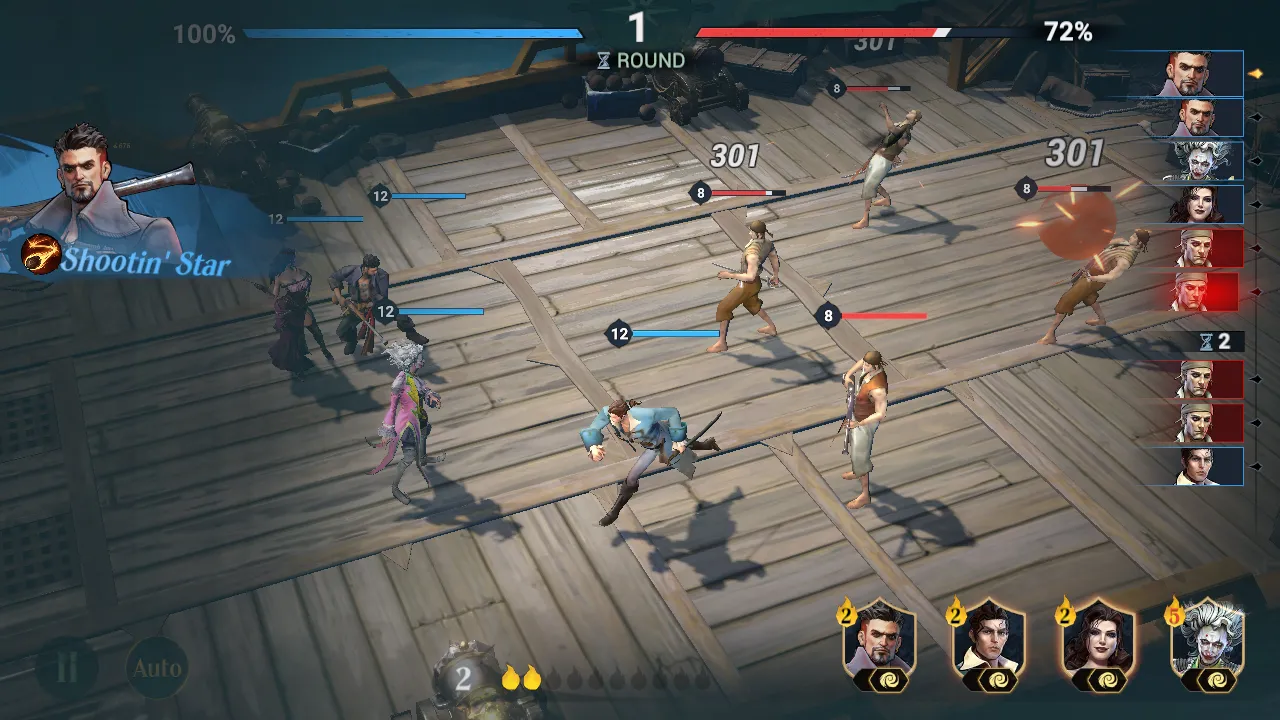
Close Combat
The last type of combat in the game is close combat. This is where your heroes duke it out in turn-based battle. This type of scuffle occurs in pretty much any situation where your heroes aren’t on their ship – whether that’s a story brawl in a tavern, taking over a gathering node, or the game’s different trial modes.

Close combat has the following rules:
- You can deploy a different number of heroes depending on the combat situation. Check the “HEROES” fraction below the big red start button in a fight to see how many you can bring versus how many you’ve already deployed.
- Each character has one action in a round. Turn order is determined by a hero’s Speed.
- Characters will automatically target enemies with their normal attack on their turn. Targeting seems to prioritize the foe closest to them. Note that heroes whose normal attack doesn’t damage will have different targeting AI.
- Each normal attack restores 1 Rage Point for your party. Your party can have up to 10 Rage points tucked away.
- By tapping on a hero’s portrait in the lower right, you activate their Rage skill, a powerful ultimate. Rage skills have different cooldowns and Rage costs, so keep that in mind!
Getting Stronger
And now let’s talk about getting stronger. You won’t always have the upper hand in a fight, so it behooves you to always seek strength. High combat power doesn’t just make it so you can attack other players, but it also serves as a deterrent against attacking you.
Quick Tips:
- Upgrading your heroes is always a good idea. Hero stats improve the ship they’re on and their skills make a huge difference no matter the form of combat.
- Heroes are level capped at your adventure level. Sinking NPC ships is the fastest way to earn more adventure exp, but you can also do the story, commissions, and other quests.
- Heroes require specific items to improve their skill levels. These items can be bought from the Stalls facility. You’ll also need to hit certain levels before skill levels can be raised – the first skill upgrade, for example, is at level 15.
- Duplicates of heroes in the gacha are converted into badges. Badges can be used to promote a hero, which sometimes gives them new skills or a stat boost, depending on the promotion level.
- Heroes can only be acquired from the gacha. Uniquely, you can’t directly spend emeralds to get heroes – you’ll instead have to visit the shops to see if there are any conches up for grabs.
- You’ll also get a fair amount of conches for the beginner banner just by doing the main story.
- Upgrade every facility in your ship. Any upgrade gives a minor power boost.
- Gun Bays give a lot of power, Oarsman Quarters give speed (useful for engaging and disengaging), the Captain’s Quarters gives an overall buff, Crew Quarters let you keep more reserves aboard (lets you heal in the field more often), and the Drill Hall improves sailor stats.
- The Astrologer’s Chamber is your “academy” where you can light up constellations for passive boosts. Always be researching something!
- Fight sea monsters for new, better ship parts as well as upgrade materials for said parts. You can only gain rewards from sea monsters five times per day.
- Gear belongs to a set – equip enough items from one set to trigger a set bonus.
- Gear of at least blue rarity can be upgraded to enhance its stats. To upgrade gear, you’ll need to feed it either Starlight Shards or other pieces of equipment, as well as gold.
- Certain upgrade levels unlock affixes. You can see what affixes will be unlocked and at what level by referring to a piece of gear’s info panel.
- The more ships you have, the bigger your fleet becomes. Extra ships will sail alongside your flagship, providing a large boost in extra firepower.
- Heroes must be assigned to your other ships to add them to your fleet. Each ship has a captain, first mate, and gunner slot. Assigning a suitable hero (check their roles in their info panel) grants a 20% stat boost.
- Each ship in your fleet has its own reserve of sailors.
- You only need to build facilities on your flagship.
Heroes
Let’s start by talking about heroes since they’re important no matter the type of combat you engage in. Let’s break down a hero’s basics.

First off, each hero has five core stats, which assist in both naval and close combat, with the exception of Speed.
- Strength boosts a ship’s ATK by 0.2% per point in naval combat and grants 2 damage per point in close combat.
- Constitution boosts sailor HP by 0.2% per point in naval combat and grants 10 HP per point in close combat.
- Agility boosts ship Armor by 0.2% per point in naval combat and improves a hero’s chance to block hits and mitigate damage in close combat.
- Dexterity boosts ship Impact by 0.2% per point in naval combat and improves a hero’s damage and crit rate in close combat. As of writing, nobody seems to know what Impact is, but it seems to be another type of damage number.
- Speed only matters in close combat where it determines turn order. The higher a hero’s speed, the earlier it will go in the turn order.
Next, heroes have up to 4 skills depending on their rarity, with SSR heroes (orange) having 4 unlockable skills and both SR (purple) and R (blue) heroes having 3. These skills function differently in both naval and close combat, and you can read the numbers for each mode by tapping on this tab here:

To improve a hero’s stats, you can level them up. While this can easily be done by feeding them exp items (by tapping the plus button in the hero menu), note that a hero’s level is capped by your adventure level. Get to sinking those freighters!
Hero skills, on the other hand, require a hero to reach a specific level and use certain items. These items can be bought from the Stalls facility on your ship, but you can also join a gang and use gang seals to buy them.
A hero can also be promoted by spending badges on them. Each time you pull a duplicate of a hero, you earn some of their badges. Get enough badges and you can promote that hero. Have fun promoting your rarest heroes!

Each promotion level offers a unique bonus to a hero, such as unlocking their other skills or raising certain stats.
Each hero has a few tags to help you determine their role on a ship, their damage type (note: damage types don’t have elemental strengths/weaknesses yet though some equipment sets do provide a bonus to specific damage types), and expected role in combat. These can be seen here:

The most important of these is their role, which we’ll talk about in a little bit.
Getting More Heroes
The only way to get heroes is via the gacha, so I strongly suggest you save your emeralds for this.

Each pull in the gacha costs a different kind of conch, depending on which banner you want to pull on. Uniquely, it seems that you can’t directly spend emeralds to buy conches whenever you please – you need to go to the Stalls on your ship (or access the shop interface in any other way) to buy a limited number of conches every so often.
Fortunately, there’s pity for each banner, and your pity amount is displayed on the banner itself. The beginner banners are also guaranteed to give you some SSR heroes, such as either Lester or Sharky and either Luna or Ahab. Just progress through the main story and you’ll find a wealth of Echo Conches for the beginner banner.
Finally, note that the standard banner – United Front – can be pulled on for free once per day. The chance of getting an SSR in a single pull is slim, but you never know. And hey, you can always use the badges!
Improving Your Ship
The next thing you can do to become stronger is to improve your ships. Each facility – combat or not – does influence your overall combat power (the stat), so it’s important to continuously upgrade each and every one of your ships.
The simplest way to improve your ship’s power is to construct more rooms. As I mentioned, each room does contribute combat power, with Gun Bays contributing the most to this stat. Be sure to not only upgrade your Gun Bays but also ensure that they’re properly staffed.

On the heels of that, you may also wish to build more Oarsman Quarters, though of course not more than you need. Speed is war, and as I mentioned earlier, disengaging from fights you can’t win is important. And yes, you also get some bonus power from the facility itself.
Other facilities you should prioritize upgrading for a power boost are:
- Crew Quarters, for more sailor space. The more men you have, the more you can heal, and the longer you can fight before needing to retreat and resupply.
- Drill Hall, for better sailor stats.
- Captain’s Quarter, for some all-around stat boosts.
Last but not least is the Astrologist’s Chamber, for passive boosts.
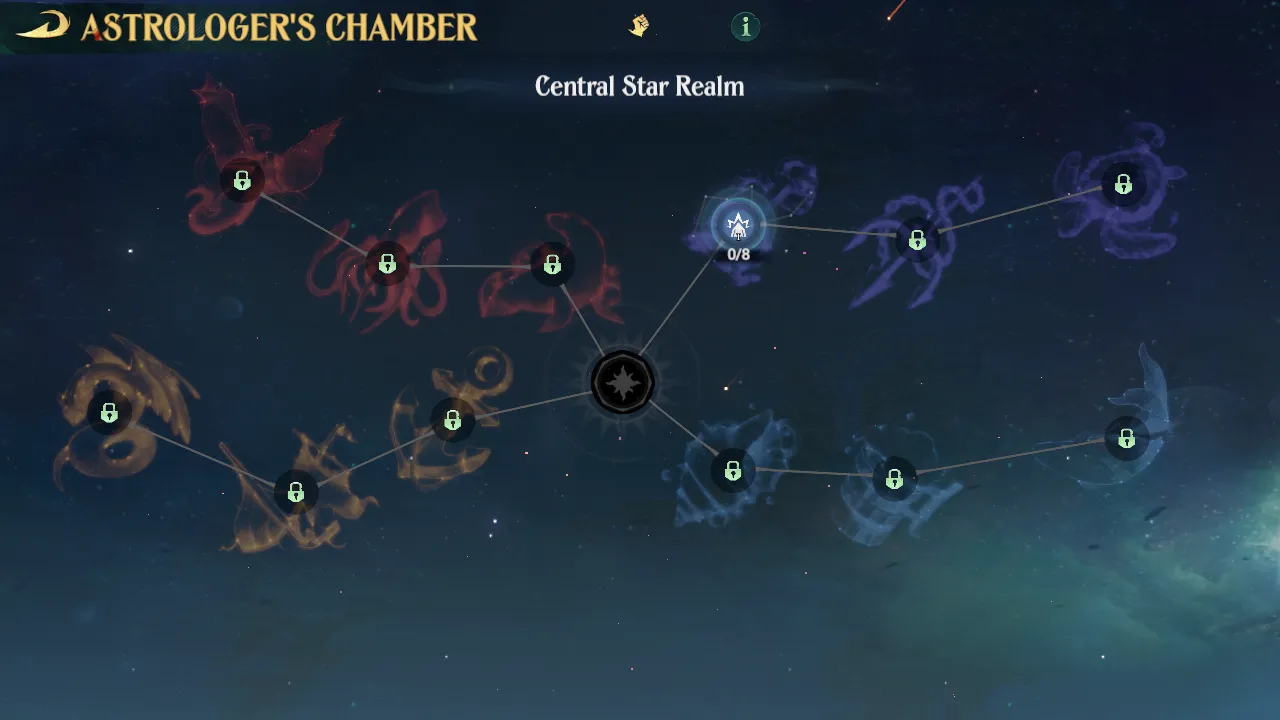
The Astrologist’s Chamber is essentially your “academy” in Sea of Conquest, where you can research passive boosts that will always apply to your ship. Always be researching something!
Get Better Ship Gear
Next is ship gear. Right now, you’re still likely running on the crappy free cannon and sails that you got from doing the story. Fortunately, ship gear is not tied to a gacha – you’ll “only” need to fight sea monsters to get better parts.
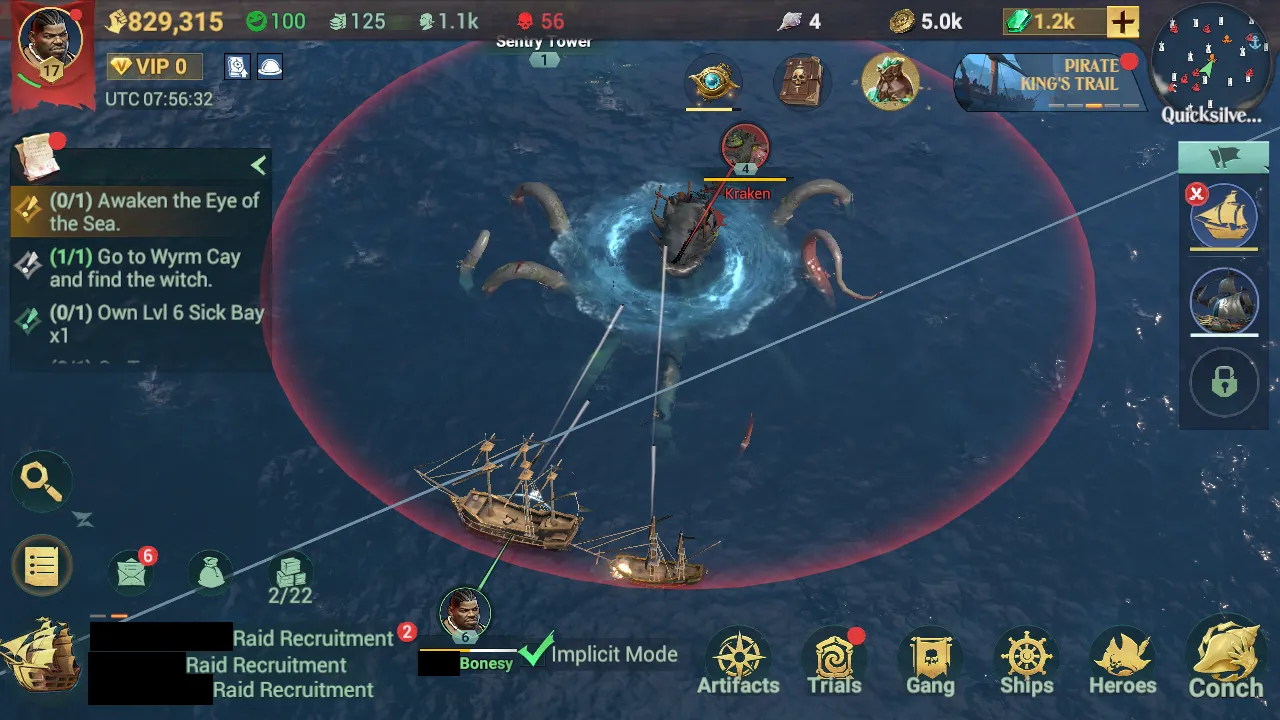
You can fight monsters up to five times per day to get ship parts and the stuff you’ll need to upgrade them. I strongly suggest powering up though, as monsters are a completely different beast (pun intended) from other ships and generally require more firepower to bring down than NPC ships.
Once you’ve picked on a few monsters, take some time to look at your loot. You’ll notice that as with most games, ship equipment comes in a set, and using enough gear from a certain set triggers its set bonus.
Now that you also have some blue gear, you can enhance it to take it to the next level. Enhancing gear requires you to feed that item with other pieces of gear or Starlight Shards, both of which you get from beating up monsters, as well as a hefty amount of gold.

You’ll also notice that upgraded gear unlocks new affixes at certain enhancement thresholds; +5 and +10 to be precise. Note that you can see what affix stats the item will gain – they just show up as locked on the item’s info panel.
One last thing: certain sets improve specific damage types. Remember those, from the hero section? Be sure that if you’re using those sets, you’ve also assigned heroes that use that specific damage type.
Fleets
Once you get a second ship, you’ll be able to assemble a fleet with your flagship at the helm. Fleets are much more powerful in combat due to having more than one ship – not only do the other ships provide extra firepower, but heroes aboard them will also use their skills and contribute their stats to their respective ships.
You’ll unlock your first new ship by progressing through the story. It unlocks relatively early and gives you a considerable power boost, so do try and get it before your beginner’s protection expires. And yes, this also means that the more ships you unlock, the bigger your fleet becomes.

Now, each ship requires its own crew of heroes to be deployed. This is where a hero’s role comes into play. Each ship has three officer positions: captain, first mate, and gunner (from left to right), with those slots unlocking as the ship levels up. By assigning heroes to appropriate positions, you grant them an additional 20% stat boost, further boosting the ship’s stats.

Each ship also has its own store of reserve sailors, so you don’t need to worry about budgeting your heals while asea. Don’t worry about facilities either – you only need to build those on your flagship.
The Pirate Economy
We’re done with the core functions of the flagship, as well as how to fight, but we haven’t tackled one important question just yet – where do we get the materials to source all these upgrades? In this section, let’s talk about the many ways to earn resources and score loot in Sea of Conquest.
Quick Tips:
- The four core resources in Sea of Conquest are wood, iron, gold, and emeralds.
- Wood and iron are used for building and upgrading rooms; gold is used to pay for upgrades and heroes; emeralds are premium currency and are ideally only spent on the gacha.
- You can build wood, iron, and gold generators on your flagship. You can also build generators for intermediate products that can be utilized by the galley and/or distillery.
- Remember to manually claim your resources from your generators!
- You can gather from resource nodes found on land. Note that you’ll have to fight a garrison of NPCs to take over a node.
- You can contest nodes being used by other players by fighting them. Be wary that they can do the same to you!
- Try to save resource packs until you really need them. “Liquid” resources can be lost, while “solid” resources in an item pack stay safe until used.
- Speed-ups are powerful but expensive. Try to save these until you really can’t wait as games like Sea of Conquest usually have wait timers in the hundreds of hours, if not days, later on.
- There are both universal and scenario-specific speedups, like Stargazing or Gathering Speed-Ups. Try to use the scenario-specific ones first as universal speedups can be used in any situation.
- You can buy and sell trade goods to make gold. Buying can only be done from a port with a Trading Venue while selling can only be done in a port with a Vendor. You can use the minimap and tap on a port (anchor icon) to see what facilities they have to offer, though only for ports you’ve already visited.
- In general, the further away you carry trade goods, the bigger of a profit you’ll turn.
- The first 100 trade goods purchases you make each day are discounted. Use these to reliably earn gold.
- You can only trade 120 times per day.
- Auto-trading becomes available once you raise your reputation with a faction enough. You’ll need to visit a governor’s house and make contributions (read: pay gold) to raise your relationship with them. Once that’s high enough, you can auto-trade from that port.
- You can also steal and loot NPCs and other players – though I find that it’s generally better to attack NPCs for this. Use the search function on the main menu to find suitable targets.
- Attacking consumes stamina. You can see your stamina by tapping on your portrait on the upper left of the main menu or by checking the green bar below your portrait. Stamina regenerates by itself over time.
- Continuously attacking merchant ships (not armed freighters) or sinking other players raises your infamy. Infamy gives players a bonus for killing you, and the higher your infamy, the bigger your bounty. Infamy resets when the day rolls over.
- Prioritize making story progress as the story gates most meta content, such as daily quests, commissions, and the gacha. Some artifacts you get via the story also give you nifty buffs, such as the Storm Horn.
- I’ve also added a list, along with images, of where to get free stuff.
Resource Types
There are four key resources in Sea of Conquest. These are wood, iron, gold, and emeralds.

Their respective uses are:
- Wood and iron are mostly used for building and upgrading rooms on your flagship.
- Gold is used to pay for services that your crew can’t provide, such as upgrading your flagship’s level or improving your heroes’ abilities.
- Emeralds are Sea of Conquest’s premium currency. Don’t spend these lightly – I strongly urge you to save these exclusively for the gacha (when conches appear) or other cash shop purchases.
Resource Generators
The simplest and perhaps least efficient way of generating the four core resources is to build resource generators on your flagship.

Resource generators can be found under the recreation tab, for some reason. The following generators are available:
- The Construction Materials Room produces wood.
- The Smithing Table makes iron (out of magic).
- The Mess Hall provides gold – but only if you sell cooked dishes via the galley and distillery there.
Note that you’ll need to staff these rooms with sailors, and they have a large capacity, so keep an eye out for your supplies.
Since we’re already on the topic, let’s talk about other material generators:
- The Water Cabin produces fresh water.
- The Chicken Coop makes eggs.
- The Salvage Bay yields “aquatic resources”, which means fish.
- The Cattle Shed gives you milk.
These resource rooms are pretty much used for galley and distillery crafting.
Don’t forget to manually claim your resources!
Gathering Nodes
Making your own stuff is nice, but there are so many resources on land that are ripe for the taking. That’s where resource nodes come in.

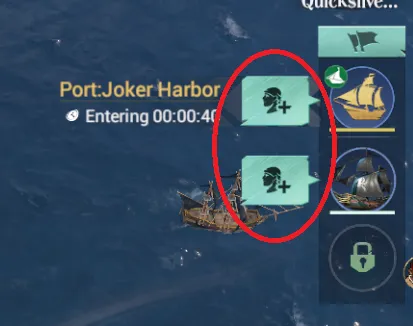
When you make port, you can dispatch heroes to gather resources from any resource nodes in the area. These are usually garrisoned with some NPC heroes, so be ready for a fight. Only one player can gather from a resource node at once, meaning that if your level is high enough, you can challenge and be challenged by other pirates for control of a resource node.
Once you’ve taken over a node, you can withdraw your units and claim your goodies at any time. You also only have a limited amount of time on a node, and once that expires, your pirates will return to your ship with all the resources they’ve gathered.
Gathering from nodes is unlocked at flagship level 5. Note that once you’ve taken over a node, you’re free to leave it gathering – you can sail away and do other stuff!
Resource Packages
As a beginner, you’ll be awash in a sea of resource packs.

Temperance is your friend here. There’s no point popping more packs than you need, and once you lose your beginner’s protection, your resources will quickly be flushed away if you get attacked by stronger players. Instead, be patient and pop resource packs only when you need them. Remember – “solid” resource packs (in item form) can’t be stolen, while “liquid” resources (already added to your stockpile) can!
Speed-Ups
Apart from resource packs, there’s also the question of when and where to use speed-ups.

Unlike other empire builders, Sea of Conquest doesn’t require you to continuously train new units to keep up, instead relying on port visits to replenish your men. However, long timers are still a problem here especially when you get to the end of the early game. Thus, I strongly suggest saving your speed-ups until you absolutely cannot wait. Even a couple of hours isn’t that long of a wait, and you’ll be glad you held on to your stash of speed-ups when the wait timer suddenly shows a couple of days.
One important caveat to using speed-ups is that you should try to spend activity-specific speed-ups first, i.e., use Stargazing Speed-Ups first to boost your stargazing projects if you have them. Universal speed-ups, I find, are better as an emergency tool since they can be applied to any timer.
Trading
Unlike wood and iron, gold must be earned. One of the more stable ways of earning the glittering stuff is by trading.

You can acquire trade goods from any port with a Trading Venue. Simply tap on the trading venue when at a port, then select what item to buy as well as how many of it. Note that your cargo space for trade goods is determined by how many storage rooms you have on your flagship, as well as their levels. Each player also has a limited daily discount on the first 100 trade goods they buy – it’s always a good idea to burn all of these discounts and translate them into gold.
To sell your goods, go to any port with another Trading Venue or a Vendor.In general, the further away the port you sell your goods to, the bigger of a profit you’ll turn. Note that these merchants will buy anytrade good, even ones that you acquired by…let’s say less than legal means. You can only trade 120 times per day, so no infinite gold.

While you can simply memorize the ports of your preferred trade route, you can also plan routes in advance by using the map to see which ports offer which facilities. To do that, tap on the minimap on the upper right, then tap on the port in question to see what facilities it offers. Note that this information is only available for ports that you’ve already visited!

Remember – Trading Venues are for buying and selling, Vendors are for selling only.
Be wary that trading players are juicy PVP targets. Keep that in mind, especially once you lose your beginner’s protection!
Auto-Trading, Factions, and Reputation
Now, there is such a thing as auto-trading in the game. Auto-trading allows you to easily make money (barring attacks from other players, of course) while AFK as the game will take care of all the business of buying, transporting, and selling. Before you unlock auto-trading for a port though, you’ll need to be at least friendly with the faction that owns that port. This is where Sea of Conquest’s reputation system comes in.
Earning reputation points for a faction mostly boils down to discovering new ports owned by that faction, trading with them, doing commissions, or just giving them gold. Let’s start with bribery. To give a faction gold, visit any port that they own with a Governor’s House facility. Once in port, visit the Governor’s House and vomit gold on them. The more times you donate in a day, the more expensive this becomes – the first 9 donations cost around 1000 – 1500 gold, but past 10, you’ll be incurring costs of at least 5000 per donation!

Since you’ll already be trading and discovering new ports while making money, let’s talk about commissions instead. Commissions are mini-quests that can pop up while you’re docked in a port. If you see an icon like this…

…that’s a commission. Tap on it to receive the quest. Each commission generally gives you not only a boost to relations with the relevant faction but also nets you some resources.
Once you’ve gotten faction relations up to friendly, you can auto-trade. To start auto-trading, visit a friendly faction’s port with a Trading Venue, then select auto-trade from the upper right when speaking to the trader. That will bring up this interface:

In the auto-trade menu, simply select which port you want to visit and exchange goods with, as well as how many times you want the game to process your trades. You can also turn on a tick box to stop auto-trading if you get sunk, which is fantastic for avoiding PVP hounds and mitigating your losses. Finally, you can also see the estimated profit and faction relation changes that your trades will net you. You might think that raising faction relations ends at enabling auto-trade, but keep in mind that higher relations will make them more open to selling you better goods, vastly improving your trade profit margins!
Finally, no, auto-trading is only between two ports.
Plundering
If you’re of a more belligerent temperament, you might decide that you’d rather take the goods from someone else than buy them yourself. Cost-profit analysis is for squares!
To initiate an attack, simply tap on what you want to beat up on the world map and tap the sword icon. Battle resolves by itself but do note that heroes aboard both ships will still use their skills during auto-combat resolution!

You can attack both NPCs and other players in this manner, though it’s generally a better idea to attack NPCs if you’re just chasing profit. Once you sink their ship, tap on the chest item to grab your booty, which usually consists of some trade goods, adventuring experience (necessary for increasing your adventure level, which unlocks more game features and is required for the story), and resource packages. As with legitimate trade goods, feel free to dump your stolen booty at any vendor – they won’t care how you got your hands on it.
Be sure to use the search button, pictured here…

…to easily find NPC ships within a given level range. Less time searching, more time looting!
Now, you’re going to wonder if there’s a cap to this. And unfortunately, yes there is. Every attack on an NPC consumes some stamina, which is the green bar under your portrait in the upper left. You can also tap on the portrait to get a numerical readout of your current stamina.

You can have up to 1500 stamina stored at once, and it’s replenished at the rate of 1 stamina per minute. Make sure to spend your stamina – unspent stamina is unrealized exp, resources, and gold!
Infamy
All actions have consequences, and this is manifested in the game’s infamy system.

The more you attack players or attack merchant ships (yes, you can attack armed freighters without consequence), the higher your infamy will grow. Once your infamy hits certain thresholds, you’ll have a bounty placed on your head, incentivizing your fellow pirates to take you down. Get your infamy high enough, and you’ll also get big debuffs on you. Lastly, attacking a merchant ship does tank your relationship with a faction, for obvious reasons. Be kind to your friends!

To stop your infamy from ballooning to uncontrollable levels, it’s a good idea to temper your skullduggery and let the heat die down after doing something particularly naughty as infamy resets when the day rolls over for the server. Alternatively, you could buy and use Hearts of Atonement to immediately lower your infamy, though I wouldn’t suggest that unless you’re committed to paying for the game as said hearts cost emeralds and require you to have a Stalls facility aboard.
Rush The Story!
Sea of Conquest is unique among empire-builder games in that it has a cohesive, encompassing story. But as nice as the story is, it’s also imperative to go through it as quickly as possible as a lot of core mechanics, such as dailies, commissions, and the gacha, are locked behind it. In particular, I’d suggest (at the very least) rushing until you unlock the skull notebook icon on top of the main menu, which unlocks daily tasks and commissions, which in turn gives you a lot of opportunities for earning resources.

Apart from this, the artifacts you unlock via story mode are also nifty tools in their own right. The Storm Horn, for example, gives you a massive boost of speed with a cooldown of 20 seconds, while the Eye of The Sea allows you to teleport into your gang’s territory or beside a gang member on a 5-hour cooldown.
“Free” Stuff
And finally, here’s a list of “free” stuff – some of it you have to earn – in the game:
- Daily quests and tasks are, as I mentioned earlier, unlocked by going through the story. Tap on the notebook above once you’ve unlocked it to show the menu. Here, you can see how many trade attempts you have left, how many sea monster kills you still have, how many commission seals are available, and so on.

- Once you open the tasks menu, you can check your dailies and weeklies by tapping on the two buttons in the image below. Daily quests also fill up your activity bar, and each threshold you reach allows you to claim a chest; both the bar and chests are visible at the top part of the dailies menu. Filling it all the way to the end also contributes a resource chest to your gang if you have one.

- Seasonal content can be accessed after making some story progress. To see seasonal quests and claim your rewards, either go to your flagship’s Captain Quarters, then tap “Odyssey”, or tap on your portrait in the upper left and select “Season”.

- Always join events. They can easily be accessed in almost the same spot as your dailies.

- Each port has events that, when completed, give you a hefty infusion of one-time goodies: emeralds, faction relation points, resources, and speed-ups. To easily clear these encounters, tap on the red flag with a percentage while in a port, then tap the arrows to go to the events.

- Both the cash shop and the VIP store have freebies even if you haven’t spent anything. Tap on the buttons below to visit each and claim your free stuff – the VIP shop is in red, while the cash shop is in green. Note that it’s very important to claim your VIP points each day as the amount you get per consecutive login increases.

- Lastly, do your quests. Whether they’re for the main story or just general progression, completing your quests on the left side of the screen leads to more and more free stuff!

Join A Gang
If you’re only going to have two takeaways from this beginner’s guide, let it be these two: maximize your beginner’s protection and join a gang (guild). Even the toughest sea dogs need friends, and by joining a gang, you’ll be much, much stronger than you were alone.
Quick Tips:
- Seriously. Join a gang ASAP.
- Gang members can assist each other with construction projects, and this costs nothing outside of a button tap. The number of times you can receive assistance on a single project, as well as how much time each assistance attempt shaves off can be upgraded via your Liaison Office facility.
- Savviness is a shared passive skill tree among all gang members. Projects here are both expensive and take a long time to research, so it’s a good idea to ask your senior members or leader what project everyone should focus on. Speeding up a savviness project costs you nothing.
- You can donate wood, iron, or gold up to 20 times per day to fill your gang’s coffers. Each donation also nets you 10 gang seals.
- You can also donate emeralds an unlimited number of times per day.
- Gangs can take and hold territory, which is as close to “safe waters” as you’ll get in Sea of Conquest.
- Gang seals can be spent on the gang store; notable items here include gacha pulls, skill leveling materials, and speed-ups.
Joining A Gang
If you haven’t joined a gang yet, finding one is easy – just tap the gang button in the main menu. There’s no shortage of people looking for new members, including total neophytes, as gangs need as much manpower as possible. You’ll also get a nifty one-time bonus of 100 emeralds in your mail after joining a gang.

Gangs not only offer you a myriad of benefits but also make you a much more dangerous target for random raiders and looters. Insert the analogy about a bundle of twigs being hard to snap but the single twig breaks easily.
Join. A. Gang.
Gang Speed-Ups
One of the most immediate benefits you have when you join a gang is access to speed-ups.
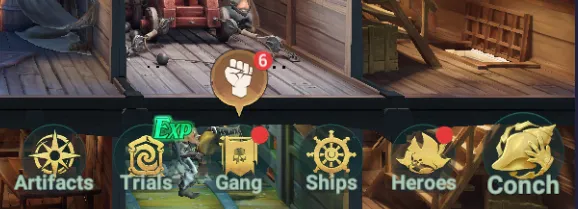
Gang members can help each other out in construction by lending a hand to anyone in their crew who needs help. Each gang member who chips in takes away a small chunk of build time, with the number of assists and the amount of time each assistance removes influenced by the level of your Liaison Office. The best part? It costs nothing but a button press to help your gang mates.
To help your gang mates, tap the raised fist icon above the “Gang” button when it pops up.
Savviness
Gangs also have access to a savviness skill tree, which is very similar to the passive bonuses granted by the Astrologer’s Chamber.

The savviness tree offers bonuses to every gang member, though its research is very long and very expensive. It’s always a good idea to collaborate and chat with your gang members so you know what project everyone is sinking their speed-ups into.
You can speed up a savviness project 20 times a day at no cost to you.
Donation
I did mention that savviness projects are expensive, yes? This is where gang donations come in.

A gang’s treasury is built on donations from its members. Each day, you can donate some wood, iron, or gold up to 20 times. Your contributions will be added to your gang’s coffers, which will be used to pay for whatever projects your senior members or gang leader decide. It’s not without benefit to you though, as you get gang seals per donation.
You can also opt to donate emeralds an unlimited number of times per day.
Territory
Gangs can fight for territory, which extends a gang’s reach and influence. This is done by challenging neutral or gang-owned ports or facilities and is usually the exclusive domain of your senior members or gang leader.
Your gang’s waters are as close to a safe haven as you’ll get in Sea of Conquest. It takes a special kind of fool to wade into a gang’s territory and pick fights with its individual members. Friendly gang territory is also a viable target for the Eye of the Storm, which will allow you to teleport back to safety.
The Gang Store
Any contributions you make to your gang are recognized with gang seals, which can be spent in the gang store.

At the gang store, you’ll be able to buy both cosmetic items as well as useful resources. You might be particularly interested in the different types of skill upgrade materials, gacha pulls (expensive but renewable!) as well as the various speed-ups available here.
Salaries
Finally, you also get a daily income depending on how well your gang is doing. This is measured in several metrics: unlocked savvy nodes, how much territory you occupy, your gang’s power, and any weekly trophies you may have earned.
The Endless Blue
With that, you’re well-equipped with the basics of success in Sea of Conquest. Adventure awaits over the horizon, and what we’ve covered here just barely scratches the surface of what the game has to offer. Hopefully, your appetite has been whetted.

That concludes my beginner’s guide to Sea of Conquest, and with it, you and your crew are hopefully more seaworthy. If you have any suggestions on how to improve this guide or feel like sharing some of your personal tips and tricks, let us hear your voice in the comment area!