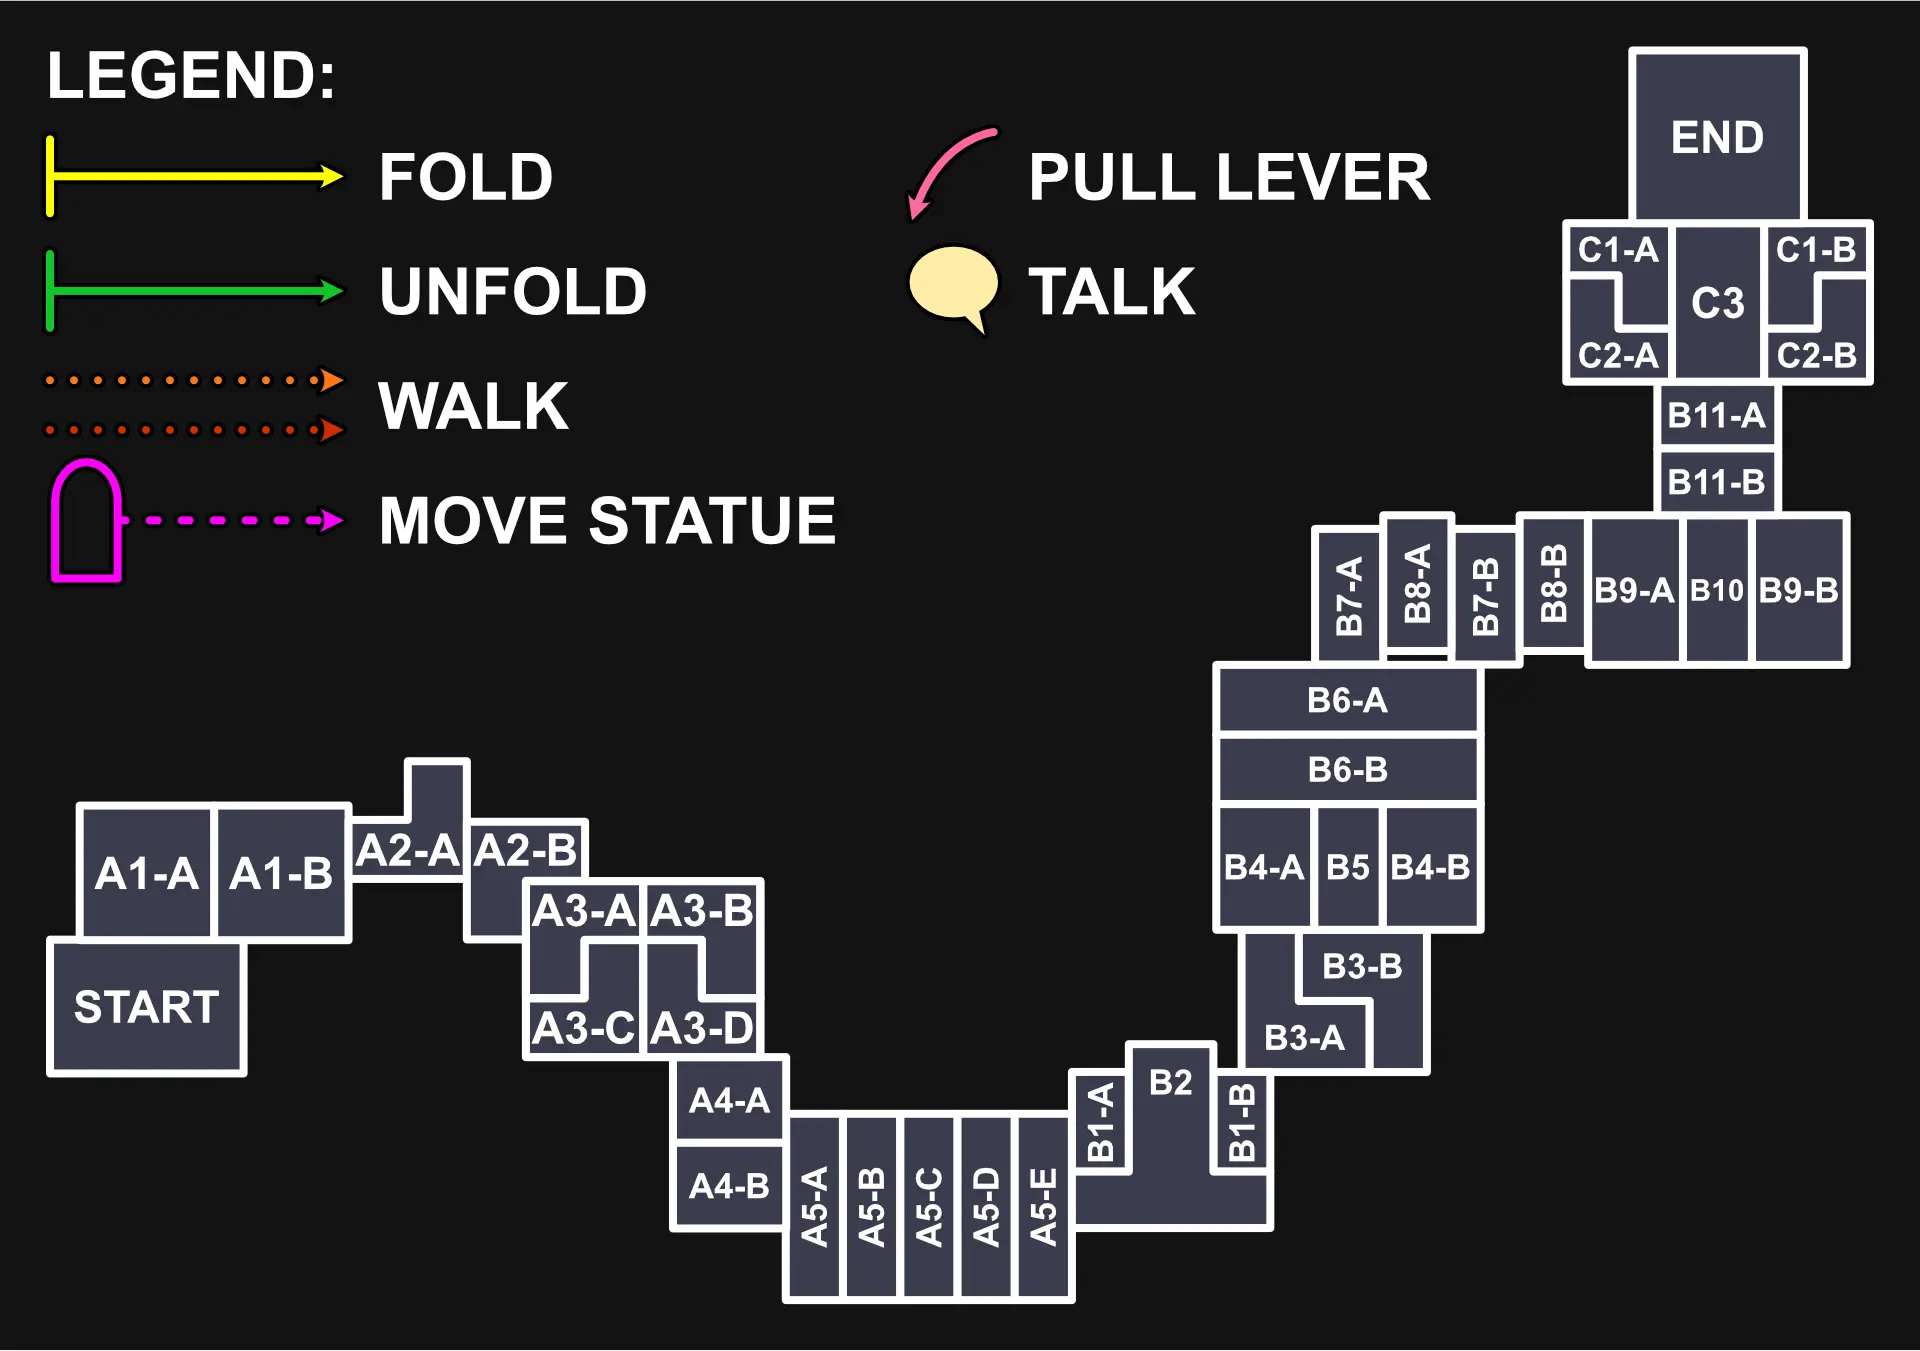
Paper Trail is a beautiful and intricately unique puzzle game created by Newfangled Games, the same team who worked on IPs such as Fortnite, Lego, Angry Birds, and BBC’s Doctor Who. Composed of creators who have worked individually on games such as Hue, Mortar Meon, Mush, and Qube, the team featuring Henry Hoffman, Frederick Hoffman, and Claudie Mackula banded together to create this wonderful gem.
Over the last few years since its creation, Paper Trail has accumulated various awards from 2021 to 2023 and has since been published on Steam, Nintendo Switch, Xbox One, Series X and Series S, Playstation 4 and 5, Windows, Mac, Android, and iOS.

The game features Paige, a young woman living in the forgotten seaside town of Southfold who longs to study at a university. The problem is that her parents don’t want her to go. But this doesn’t stop young Paige from bending the space time continuum just to have the university life of her dreams! The game brings you to various gorgeously drawn locations as Paige travels from her hometown to the university.
While the game itself has a very simple game mechanic which is easy to understand, figuring out how to move to the next map can sometimes be tricky. This is why we at Level Winner picked up this game and wrote a step-by-step walkthrough to get past each and every level and chapter. From the easiest puzzles to the hardest ones, along with the achievements that can be unlocked, we have it covered in this article!
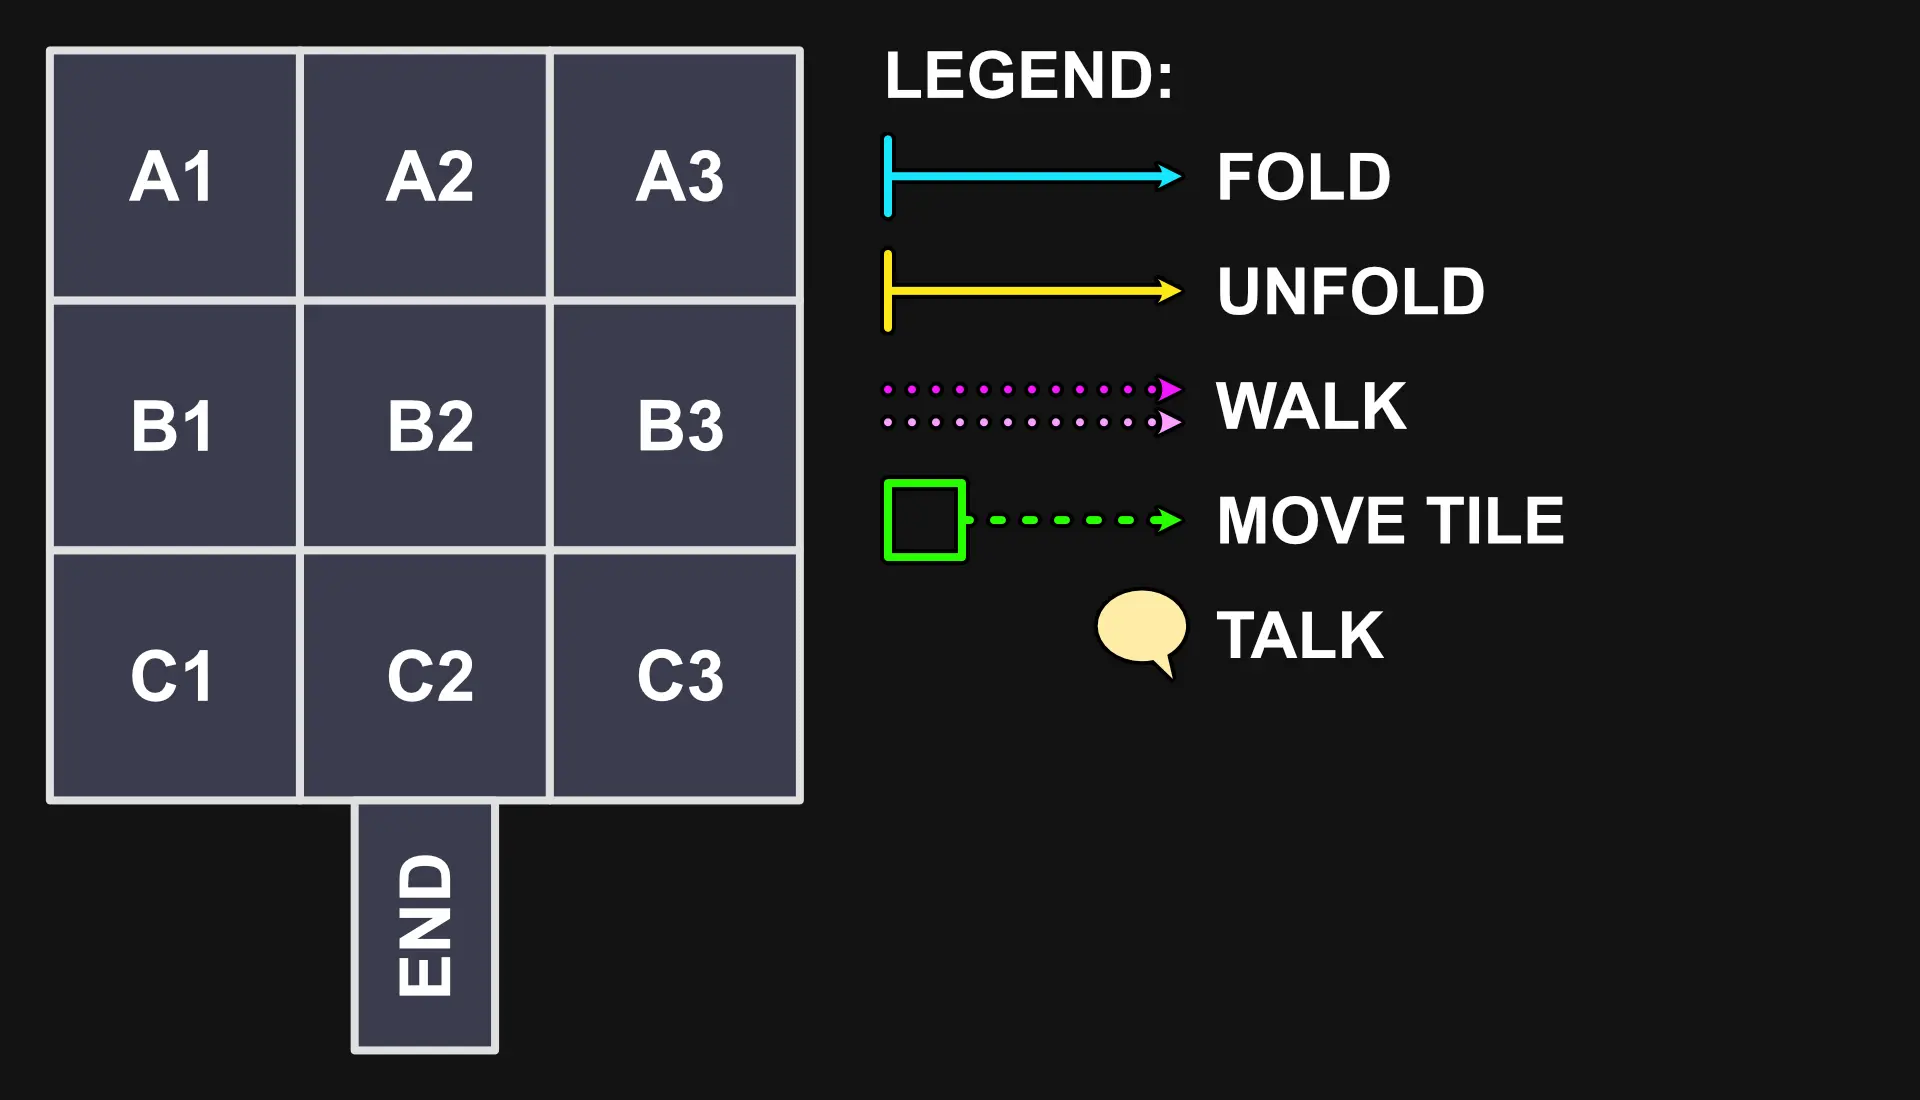
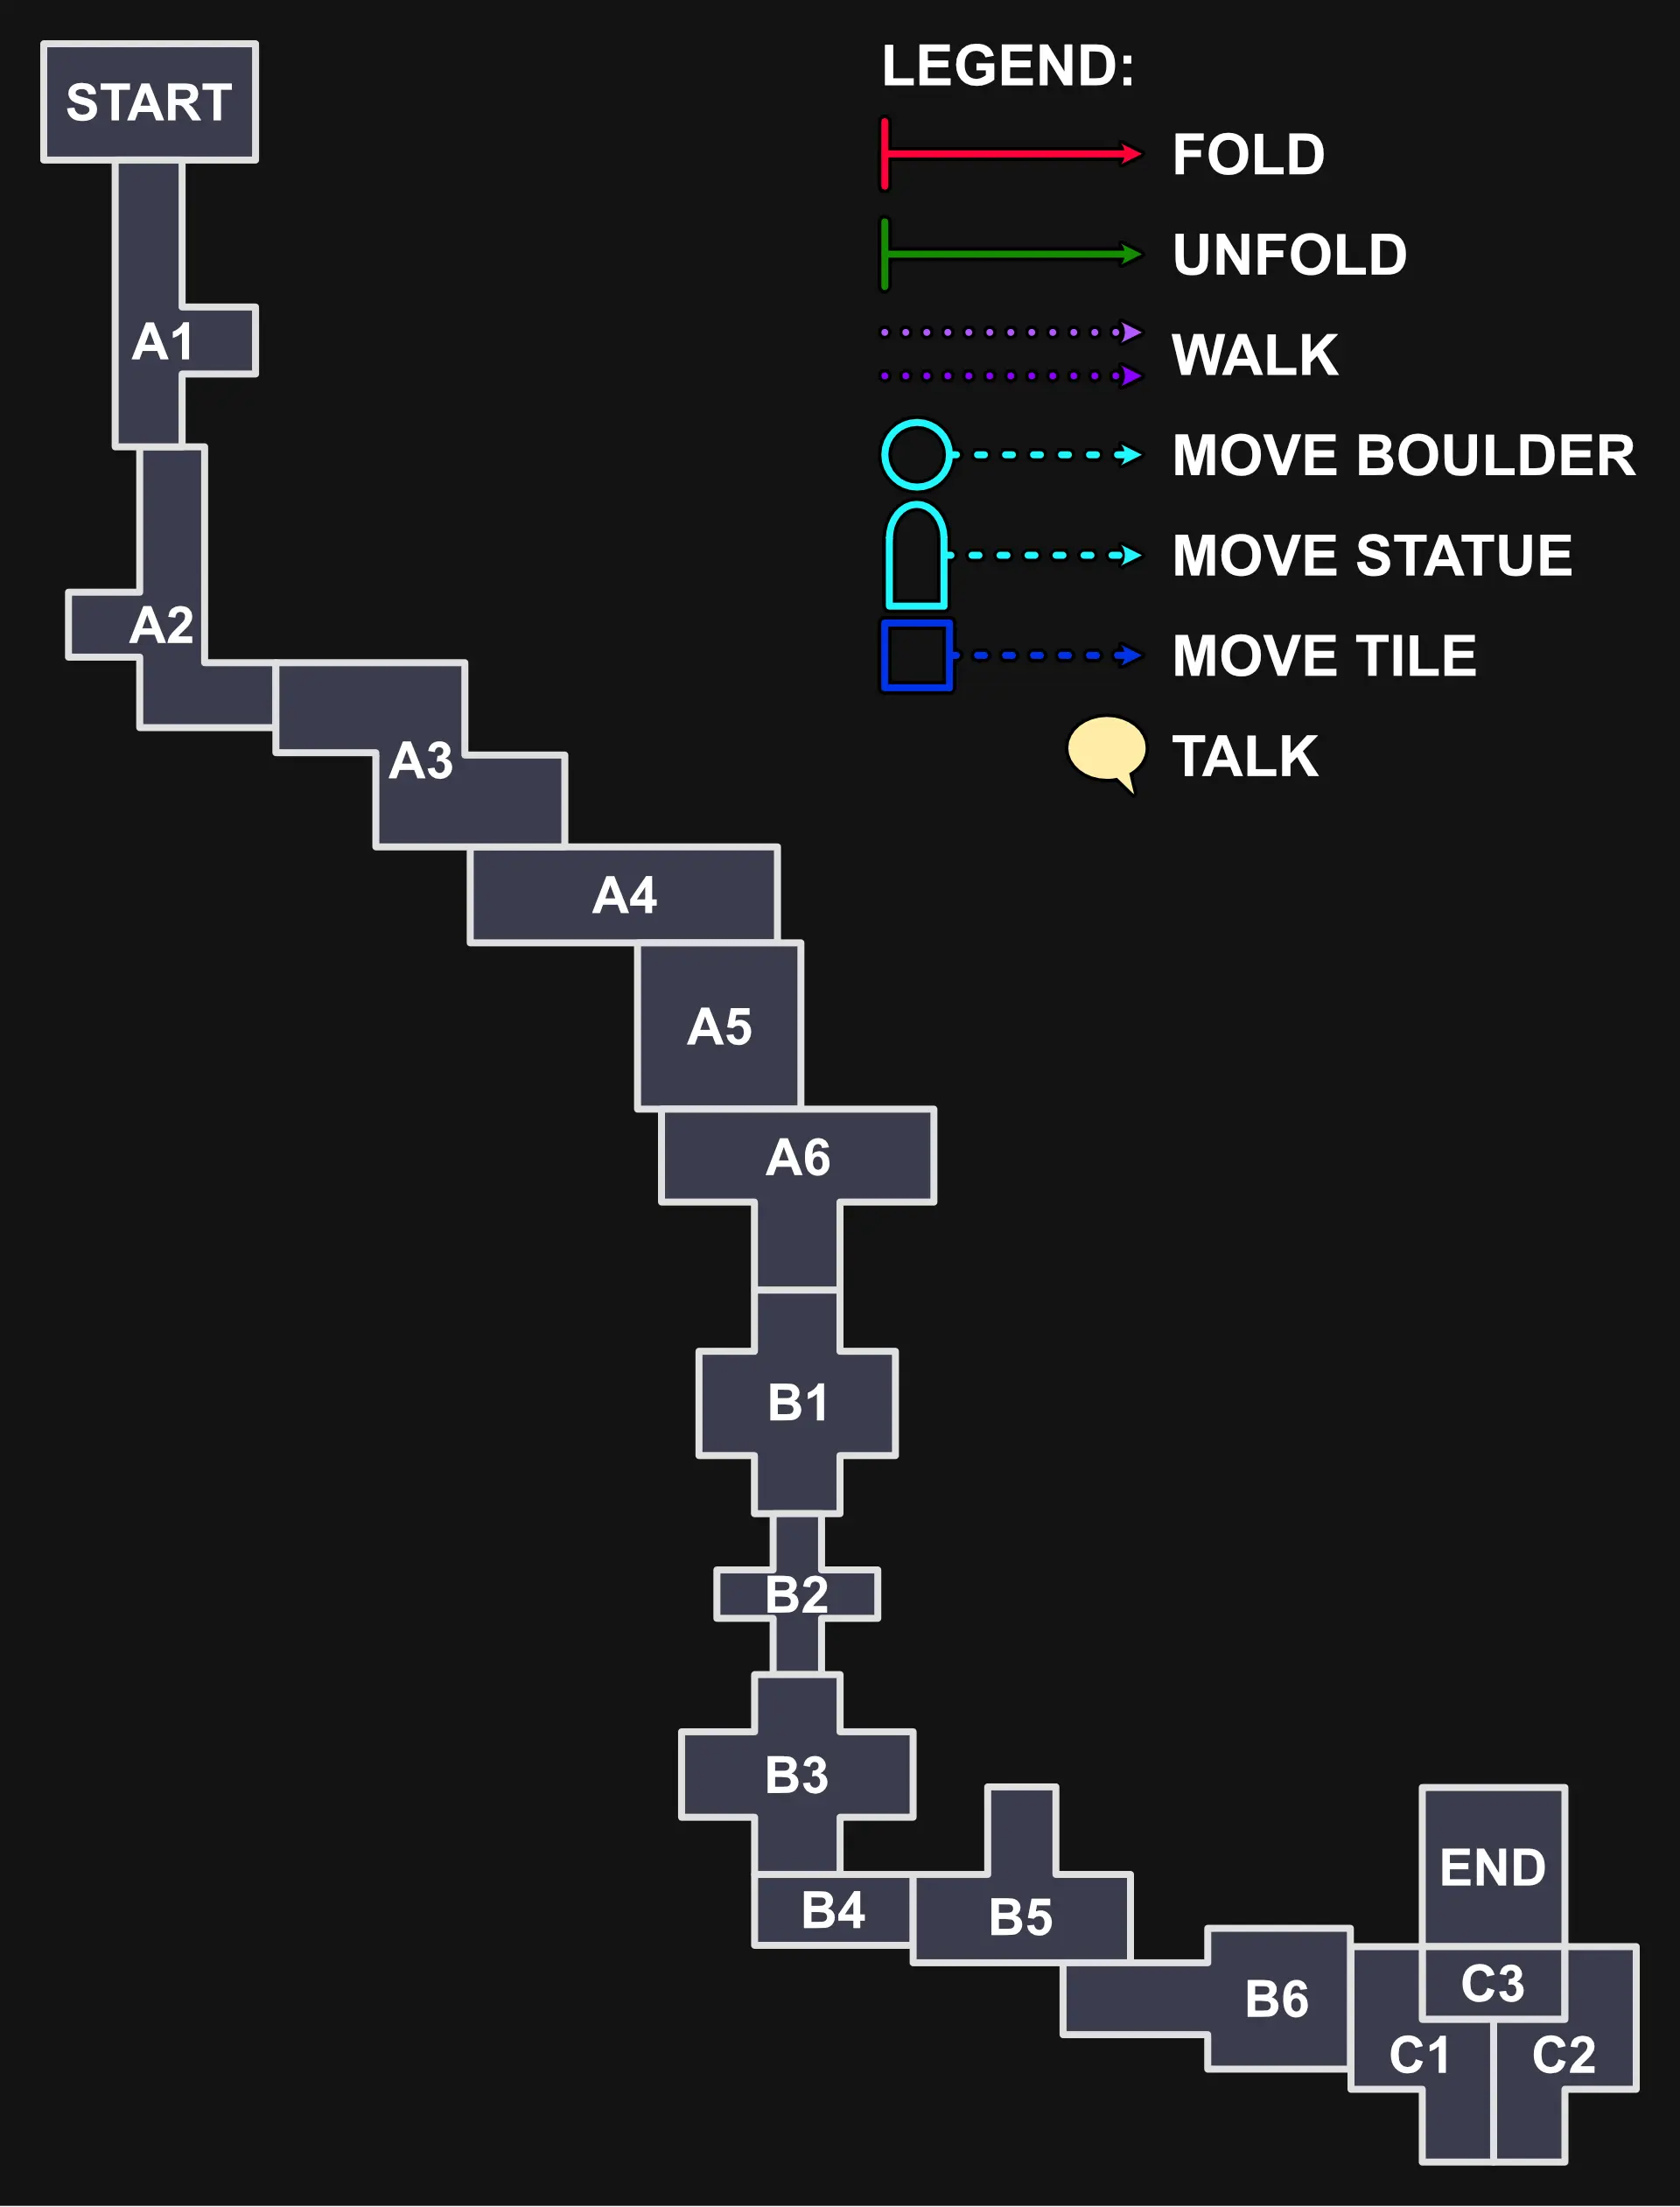
- Chapter 1: Home
- Chapter 2: Cave
- Chapter 3: Swamp
- Chapter 4: Forest
- Chapter 5: Autumn
- Chapter 6: Ruins
- Chapter 7: Temple
- Chapter 8: Ocean
- Chapter 9: City
- Epilogue
- Achievements
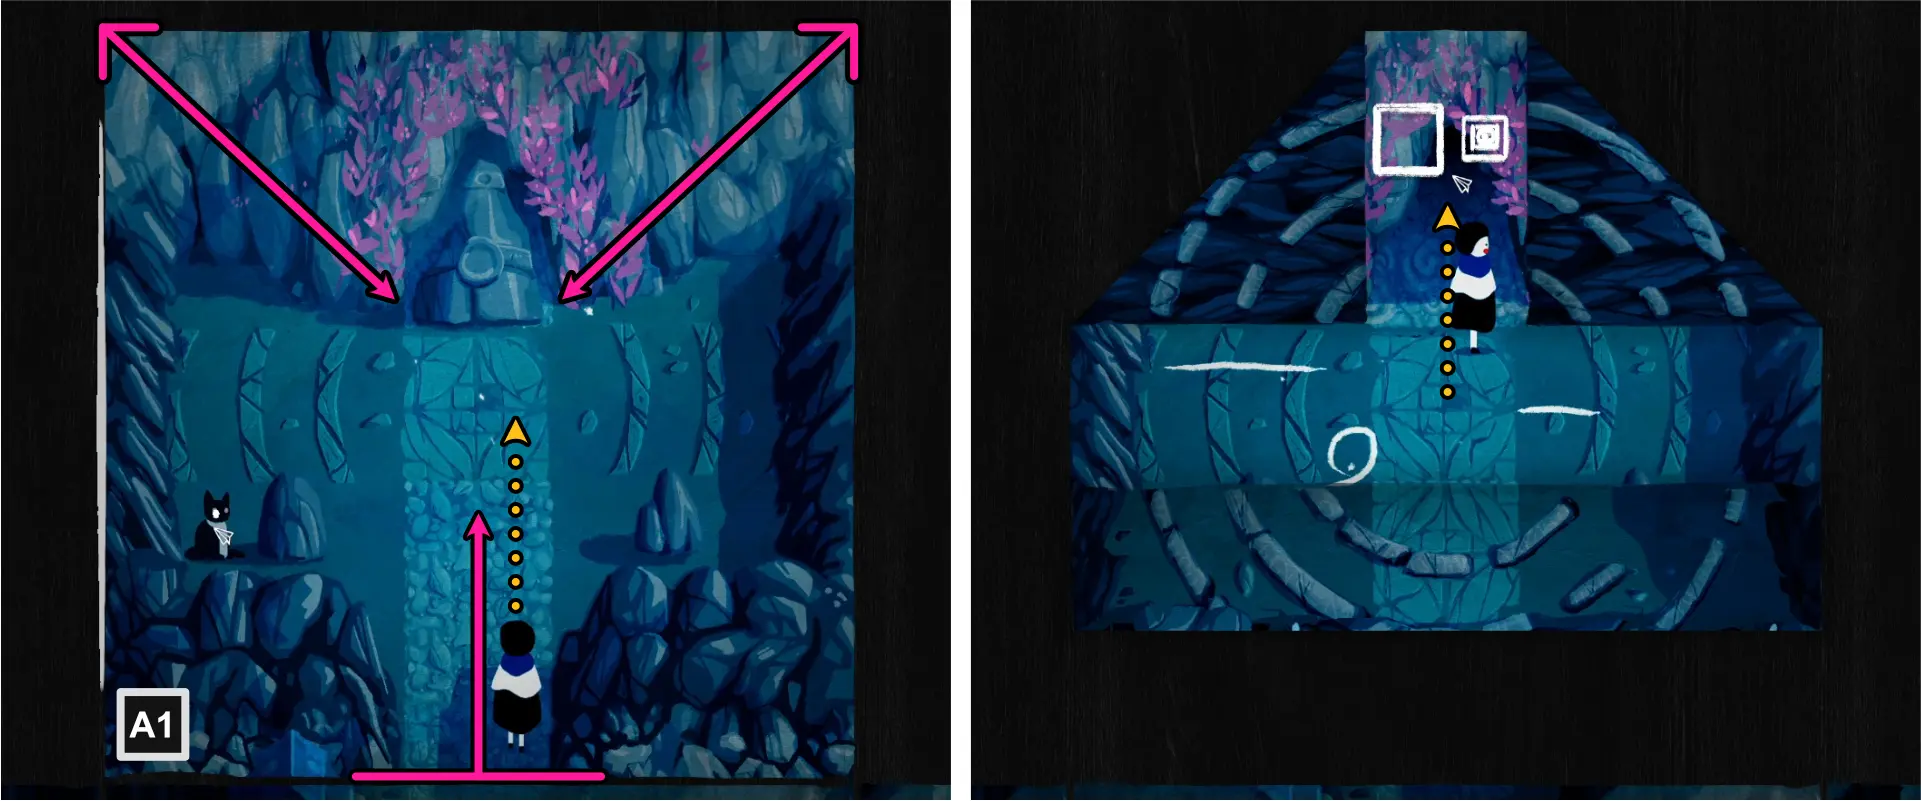
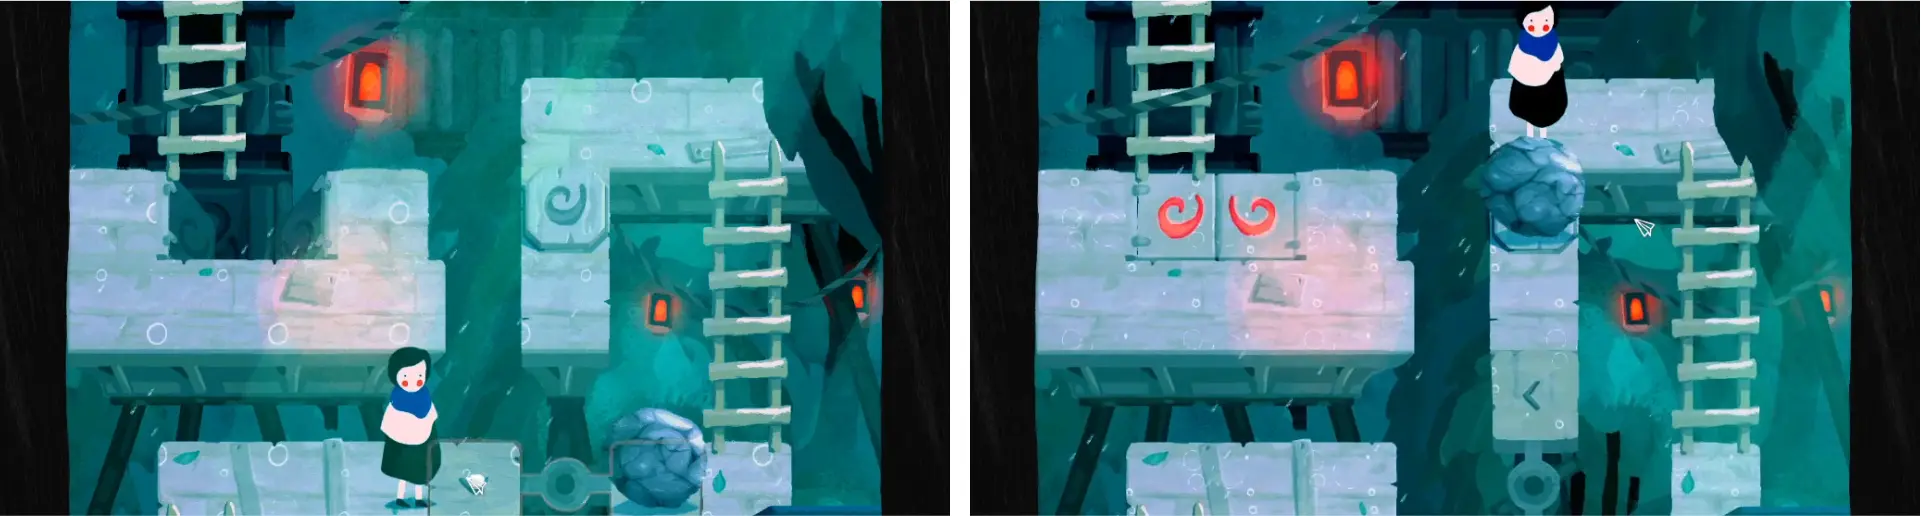
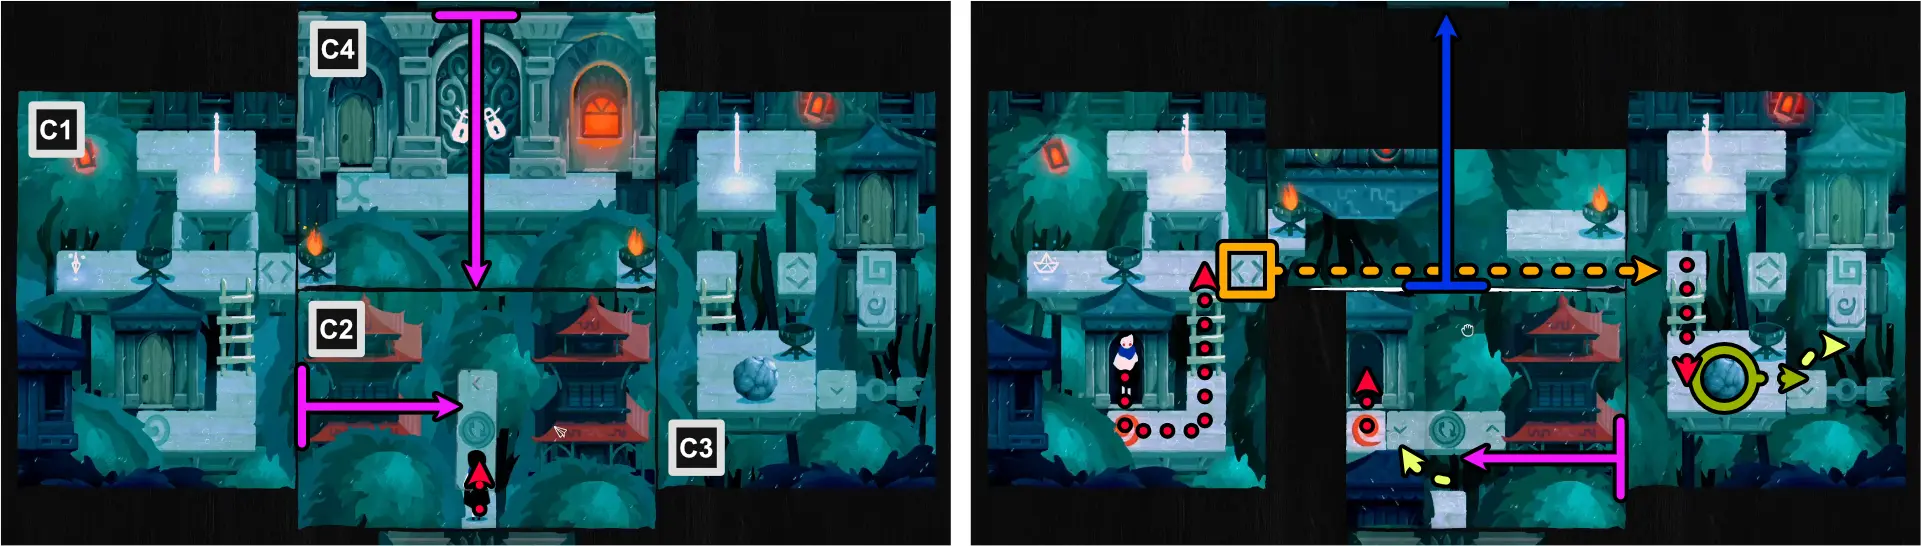
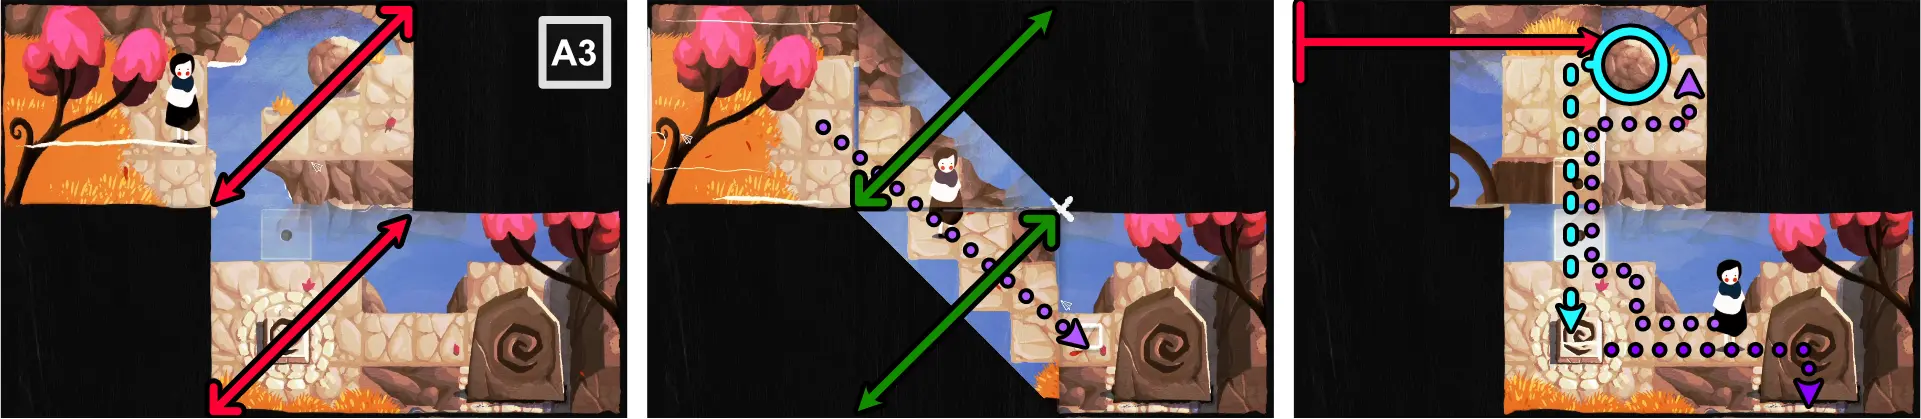
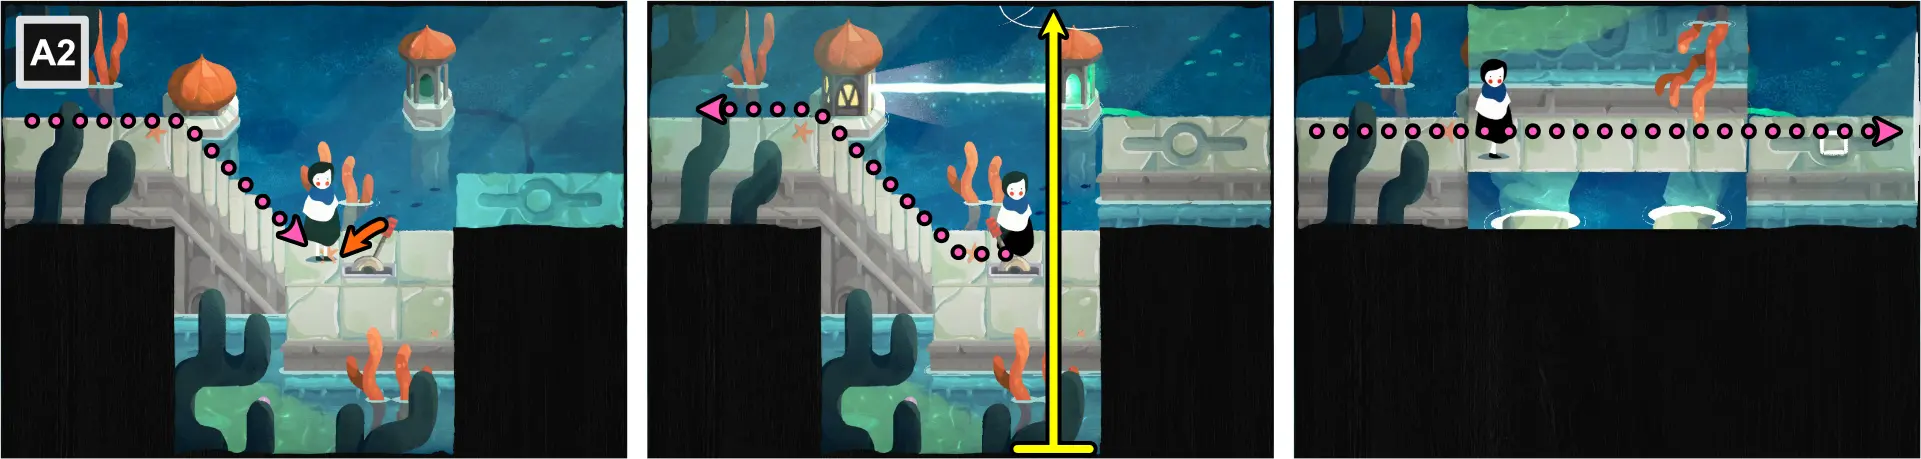
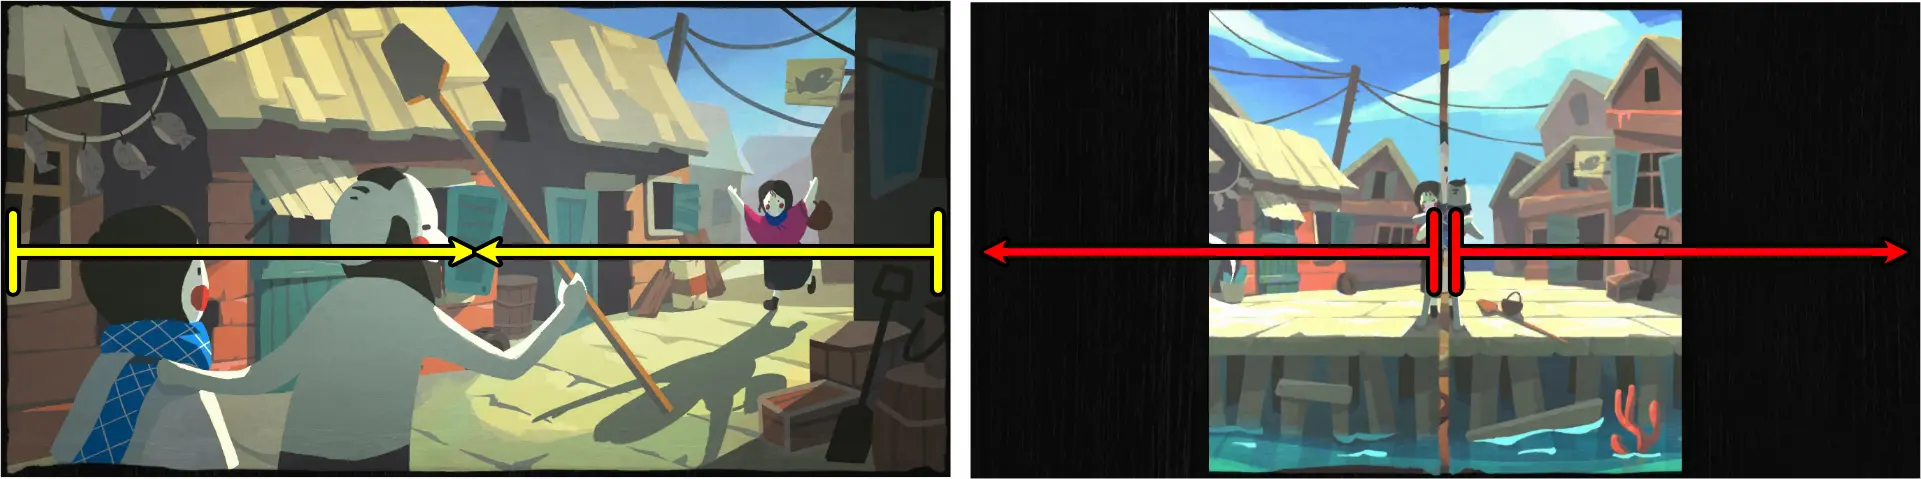
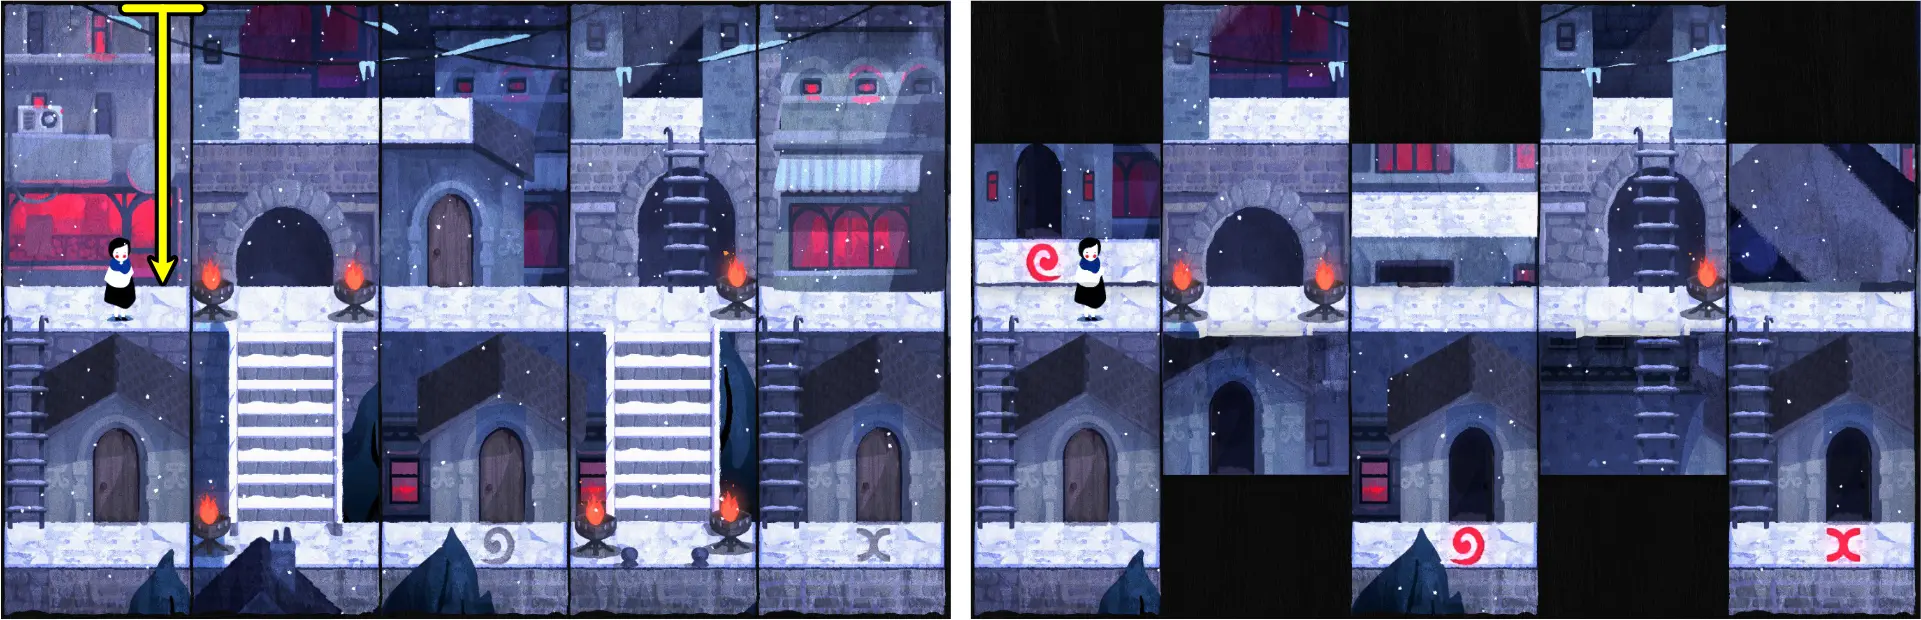
Chapter 1: Home
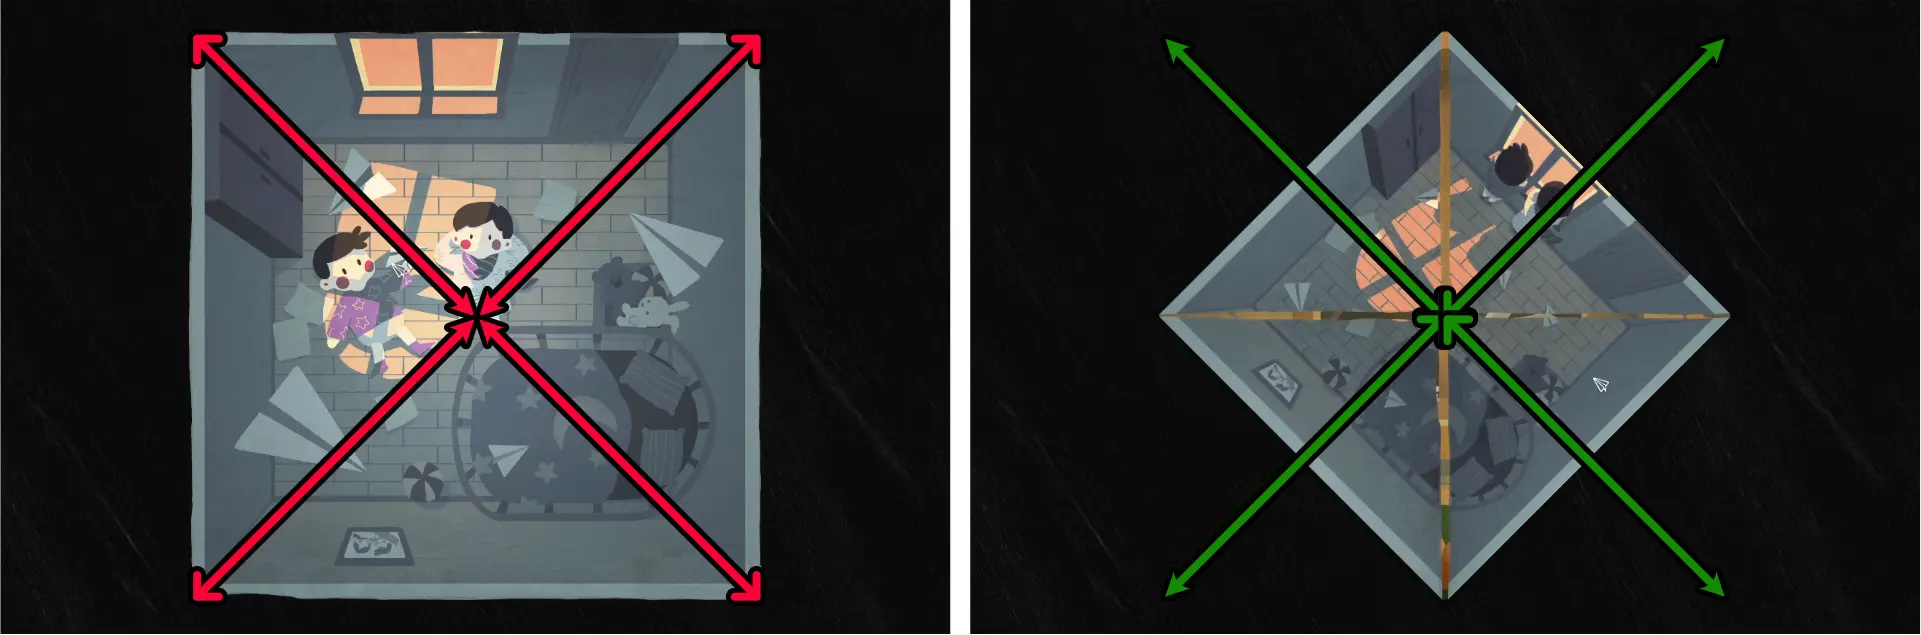
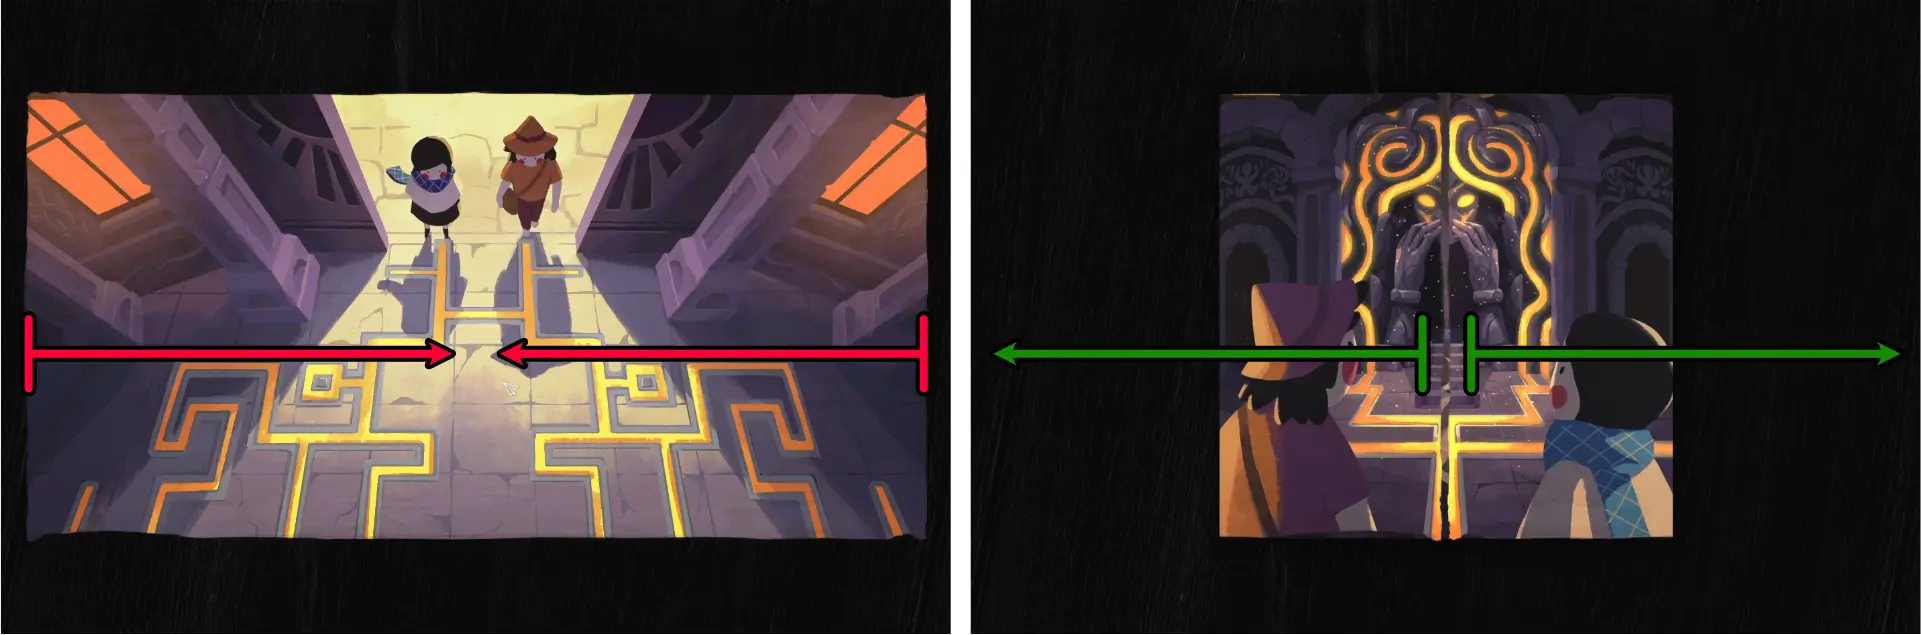
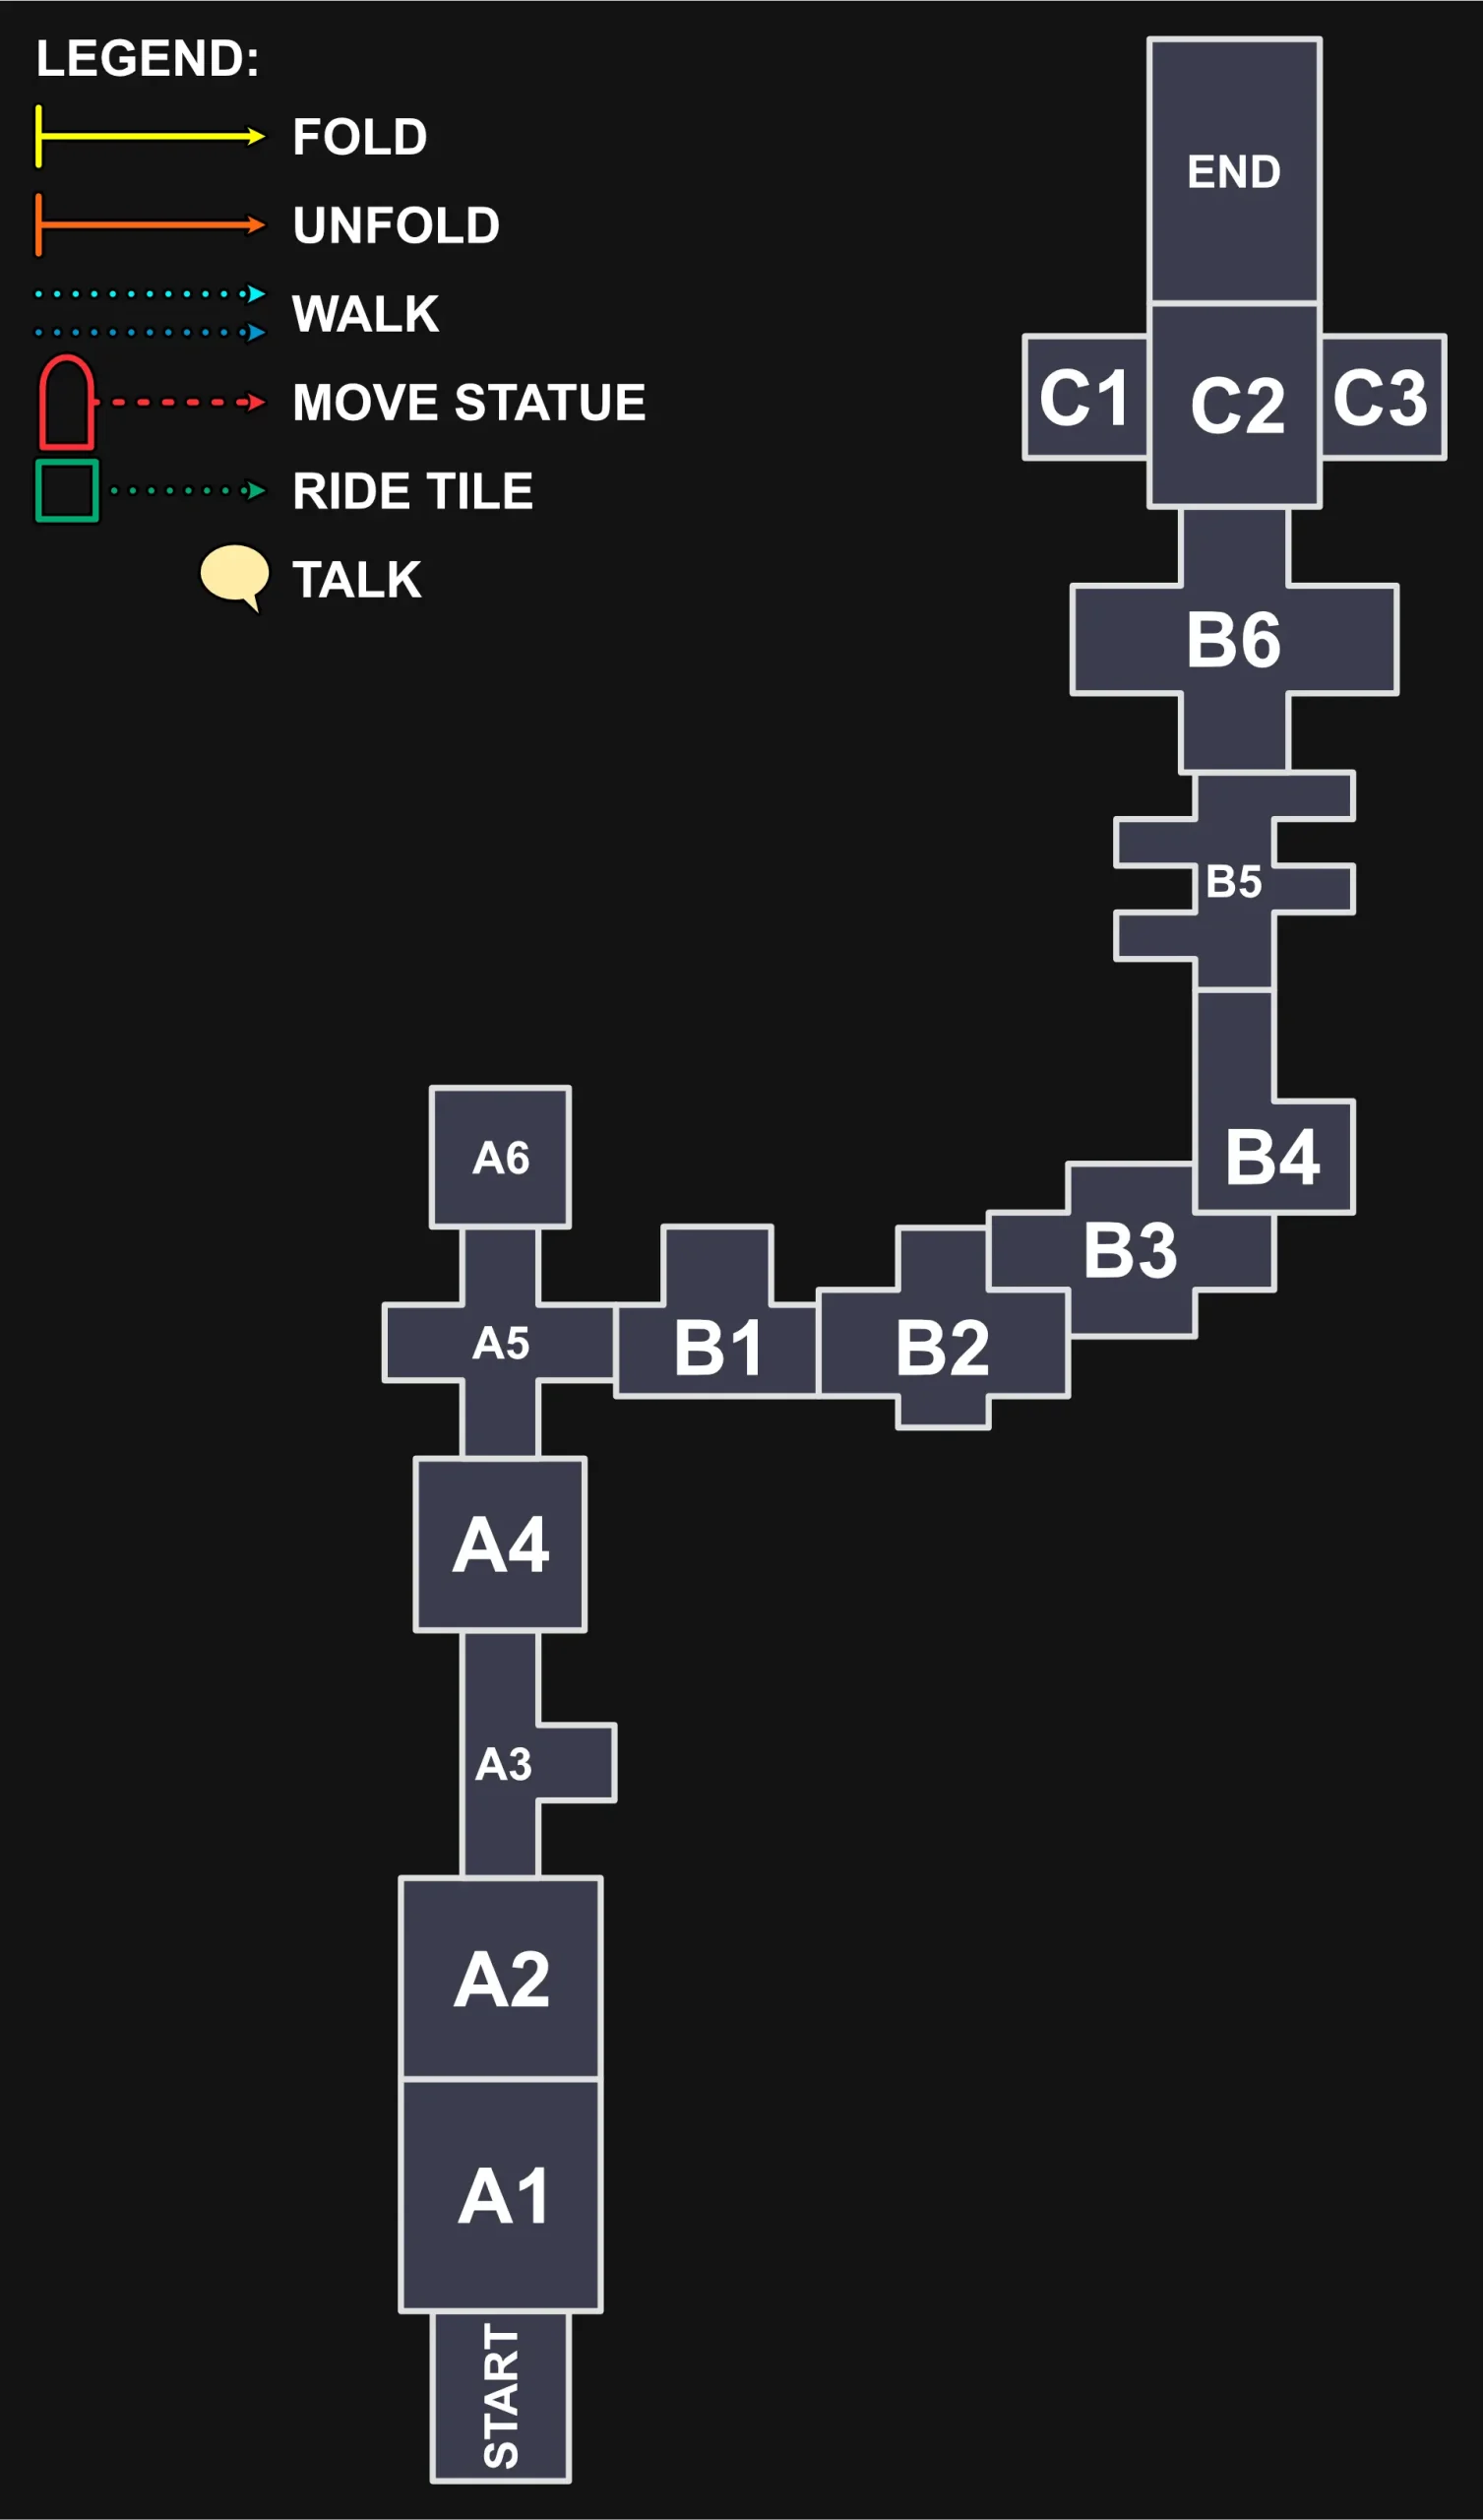
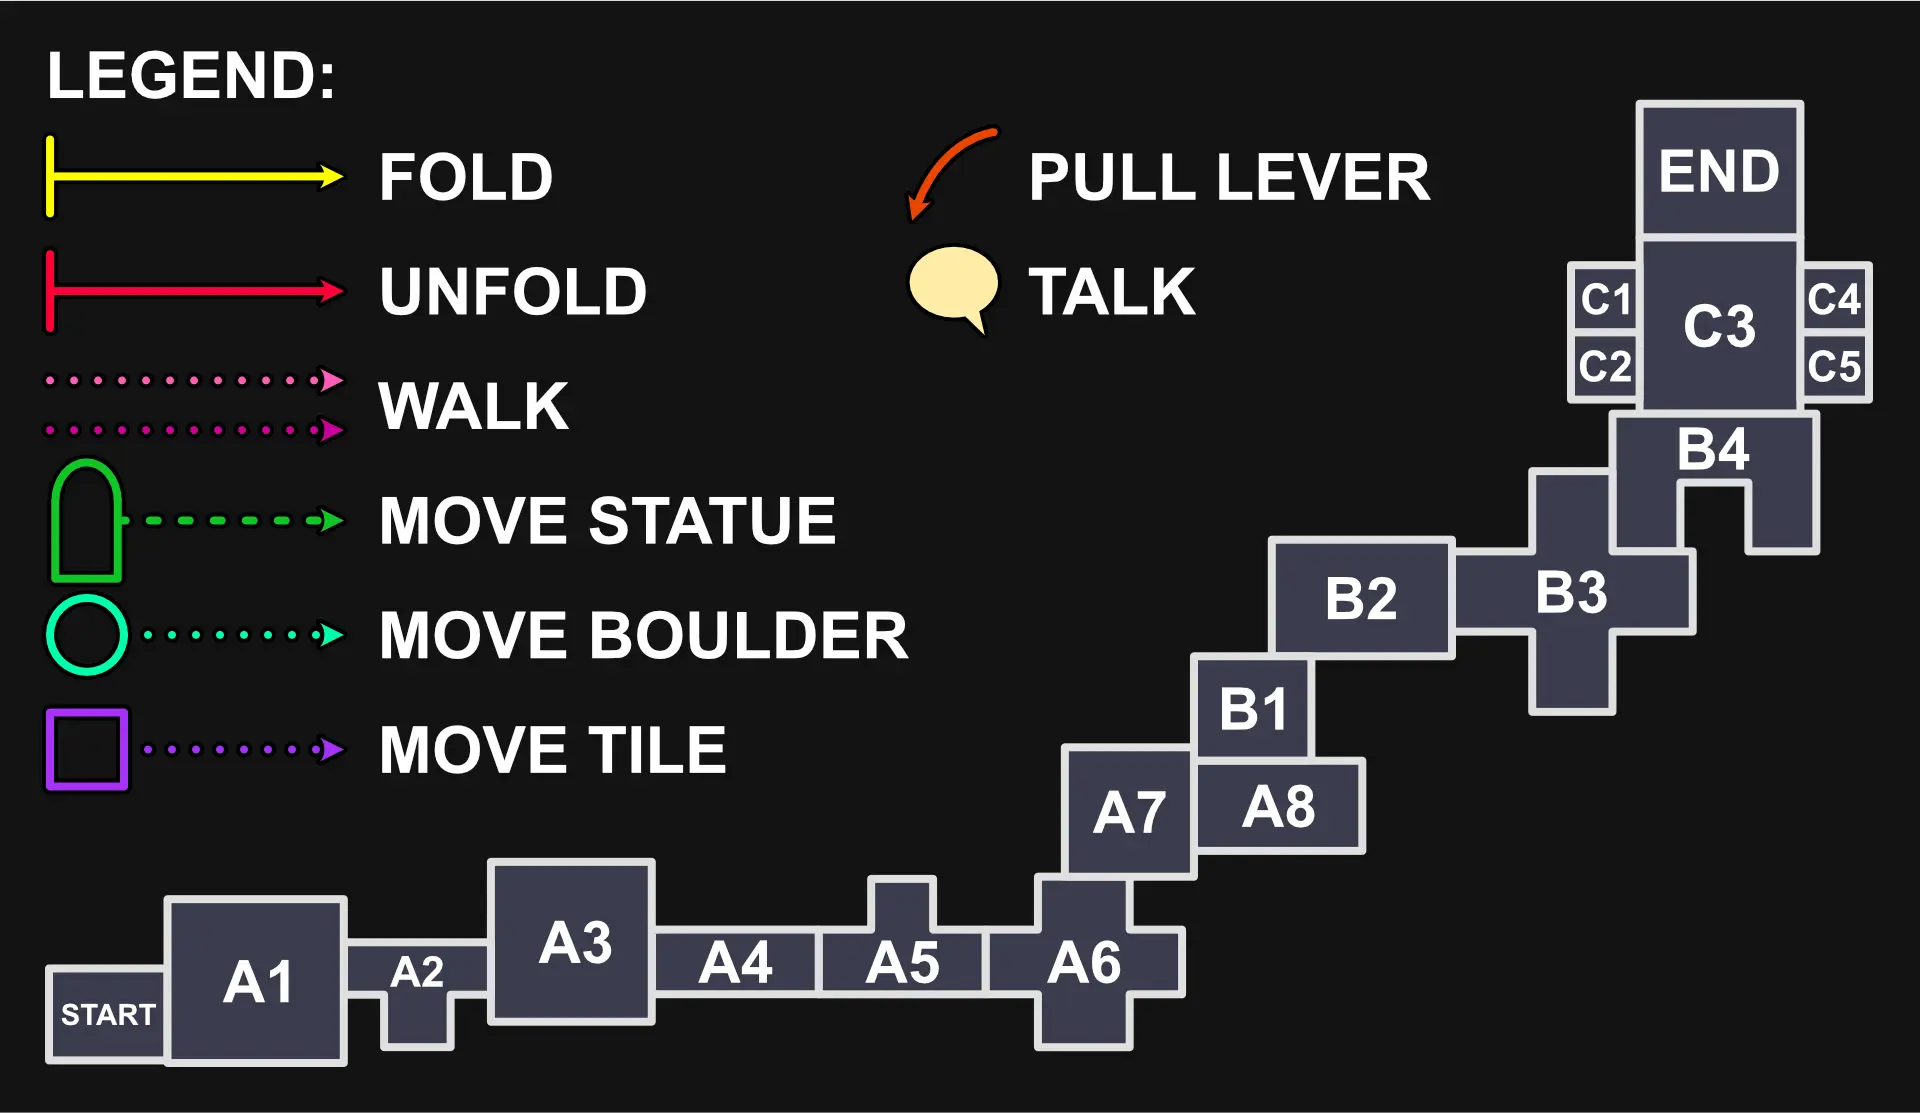
For this chapter, refer to the image below for the map of the scene and the legend of the symbols and lines that appear.

In this level, the basic mechanics are introduced and explained. Each area of the map can be folded to create new paths and reveal secrets.
- Top and Bottom edges can be folded horizontally.
- Left and Right edges can be folded vertically.
- Corners can be folded diagonally.
- A folded area cannot be folded again, but it is possible to make more than one fold on an area or map.
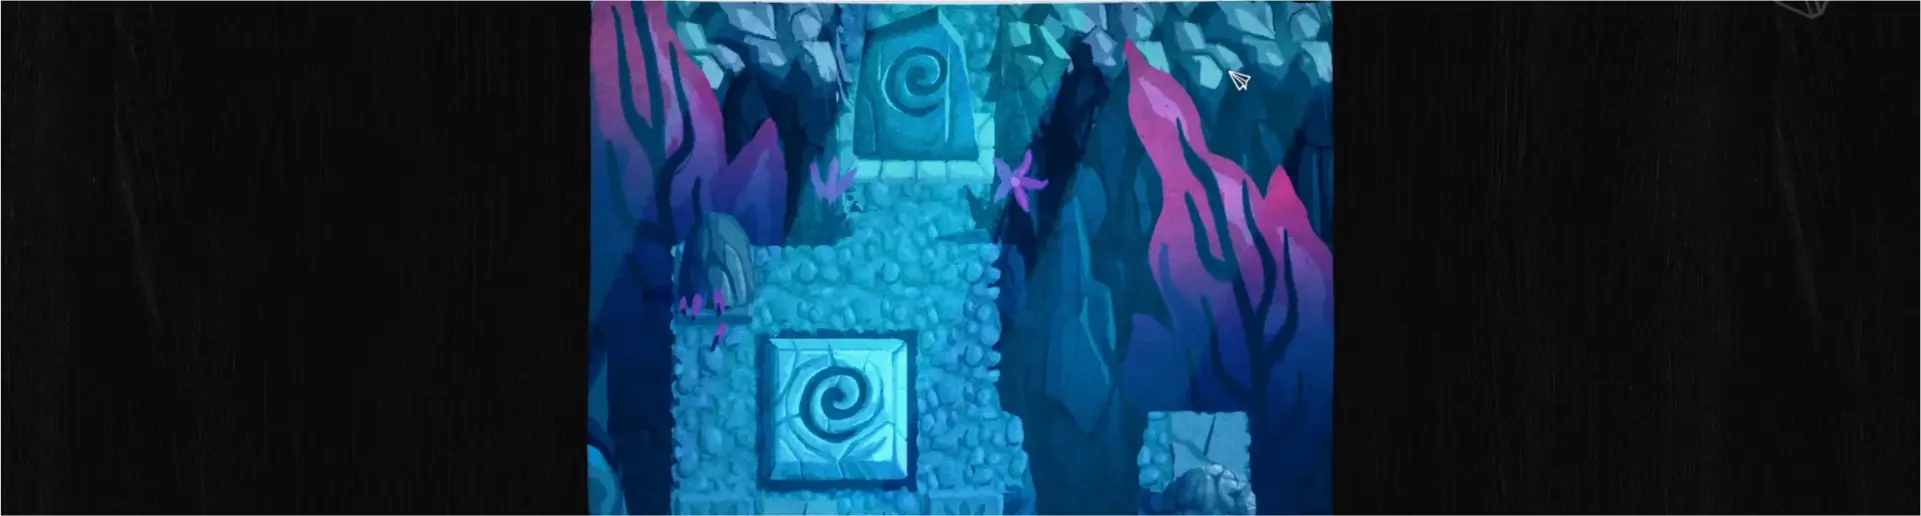
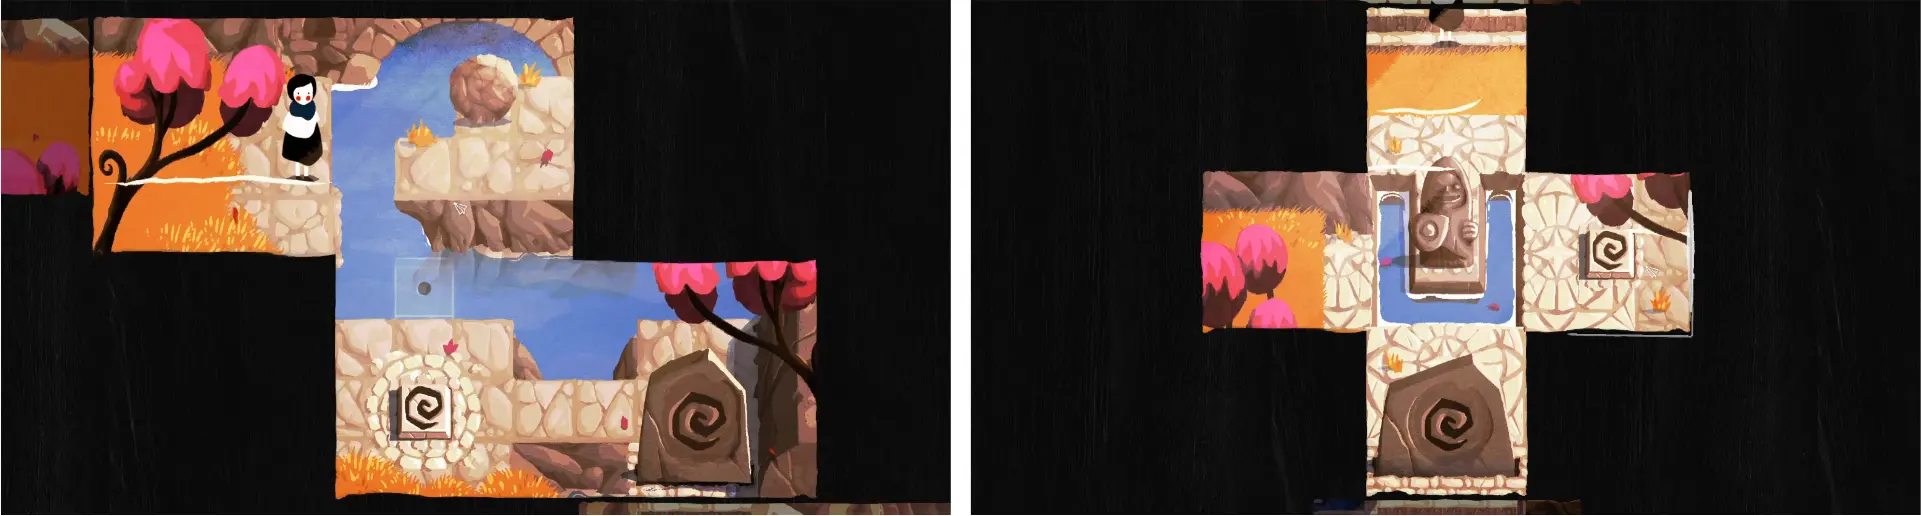
Some areas also have carvings that can be connected by folding to open a passageway.
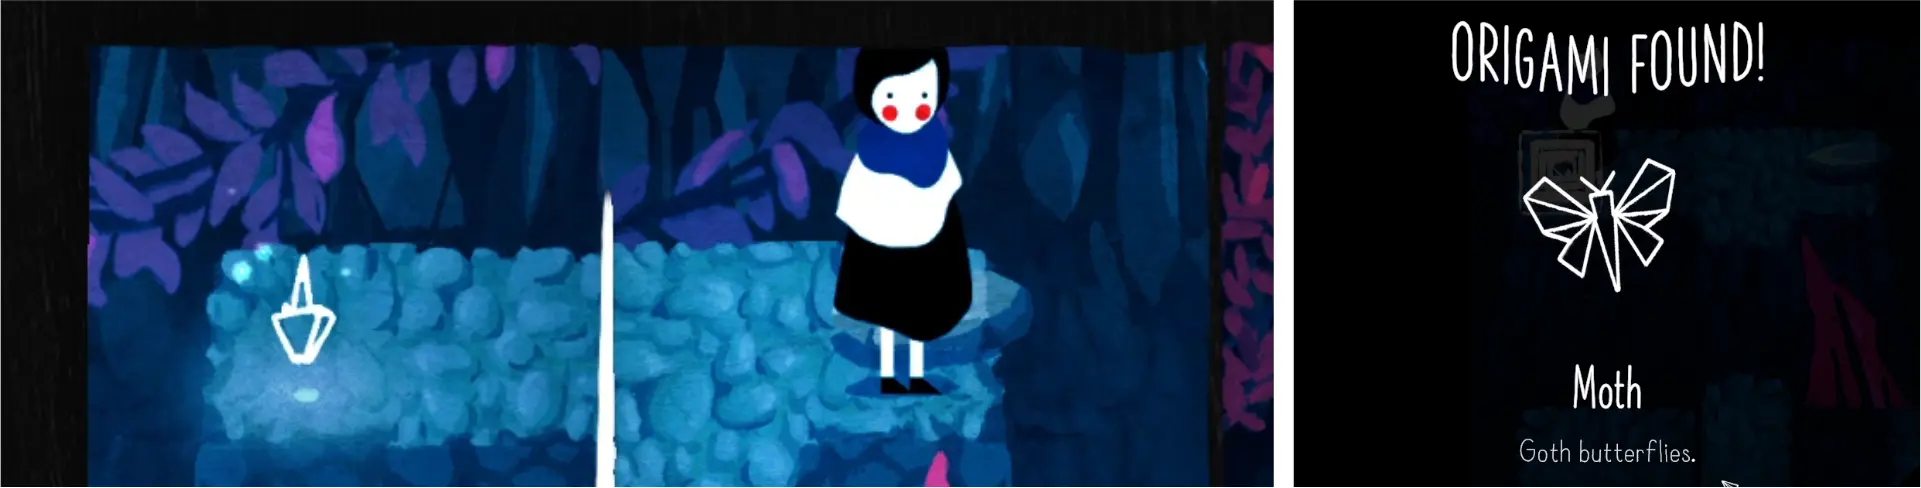
Origami can be found in certain areas but are completely optional and not necessary to progress the story. Collecting all of them is an extra challenge that can earn you achievements. To find the origami for each chapter and other achievements, check the “Achievement” section of this guide.
For extra achievements you can unlock for this chapter, go to the section “Achievements, Chapter 1: Home.”
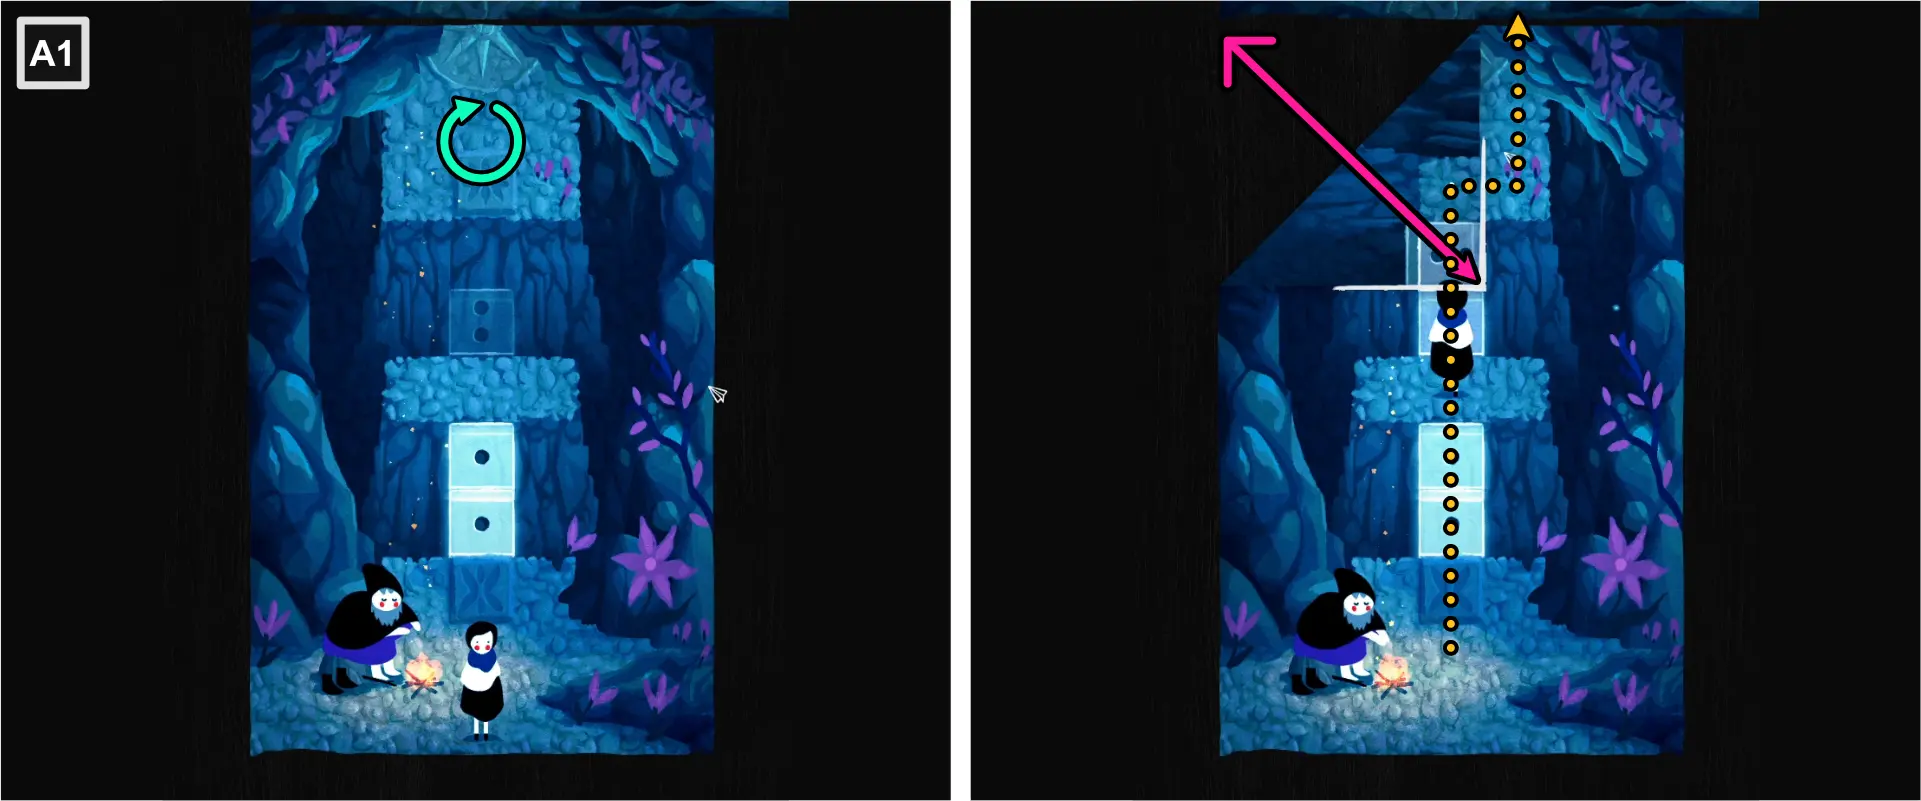
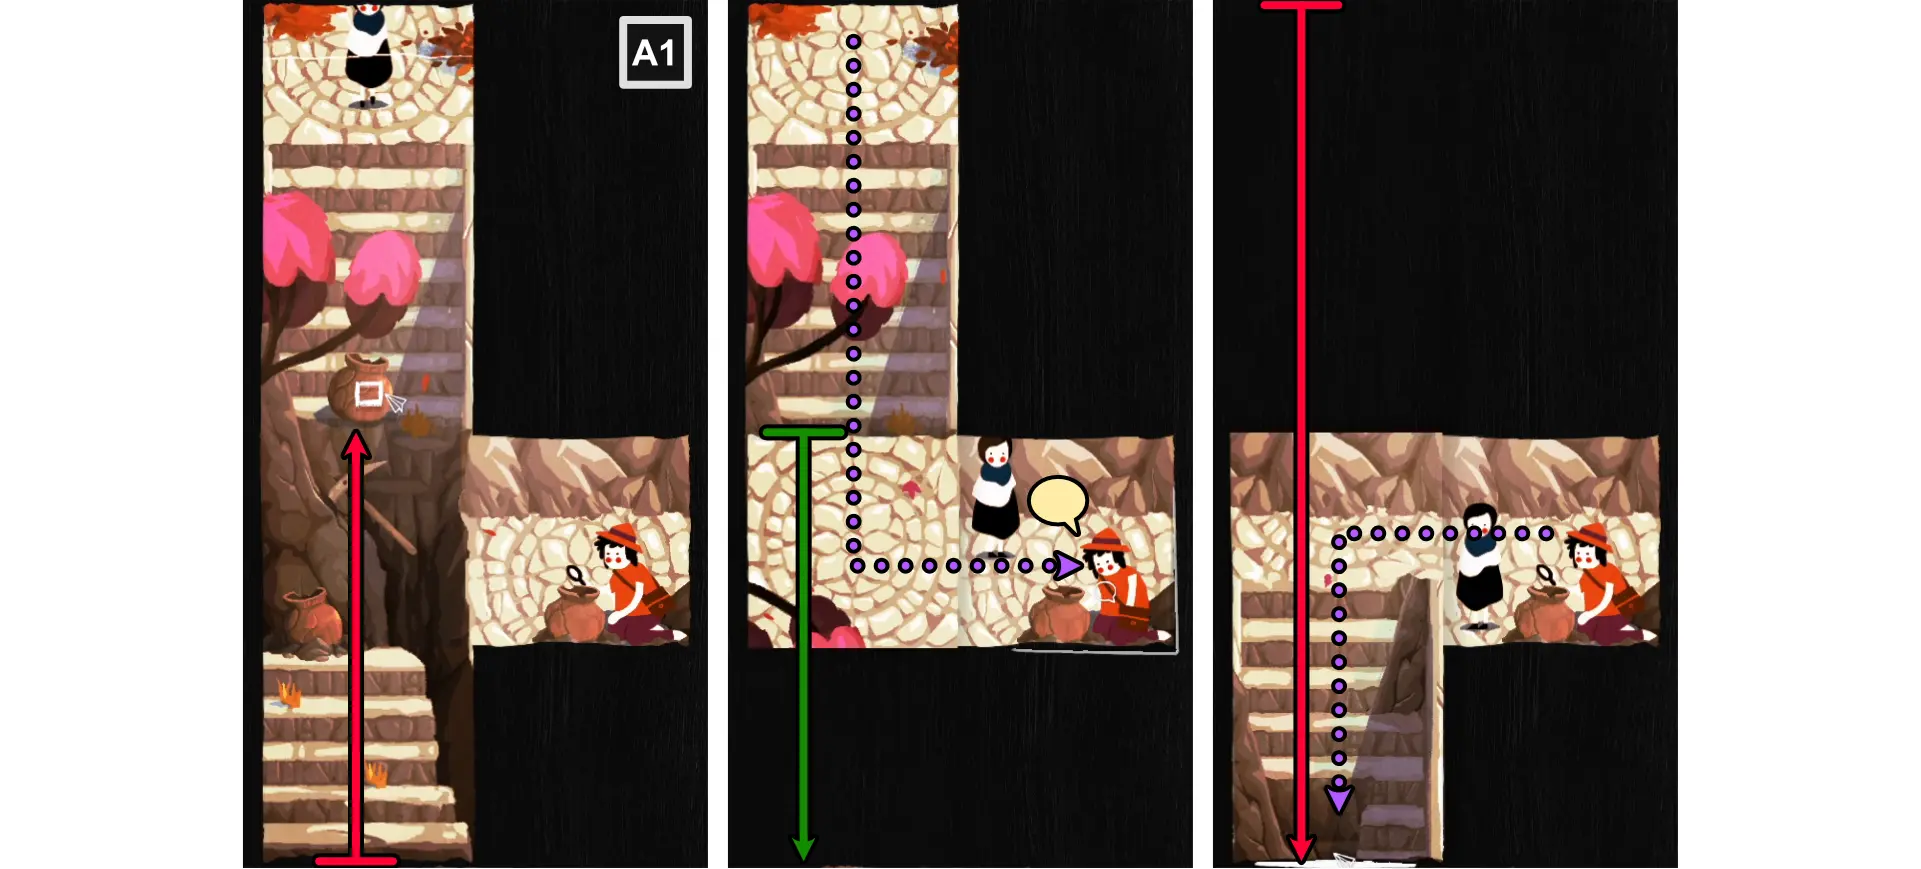
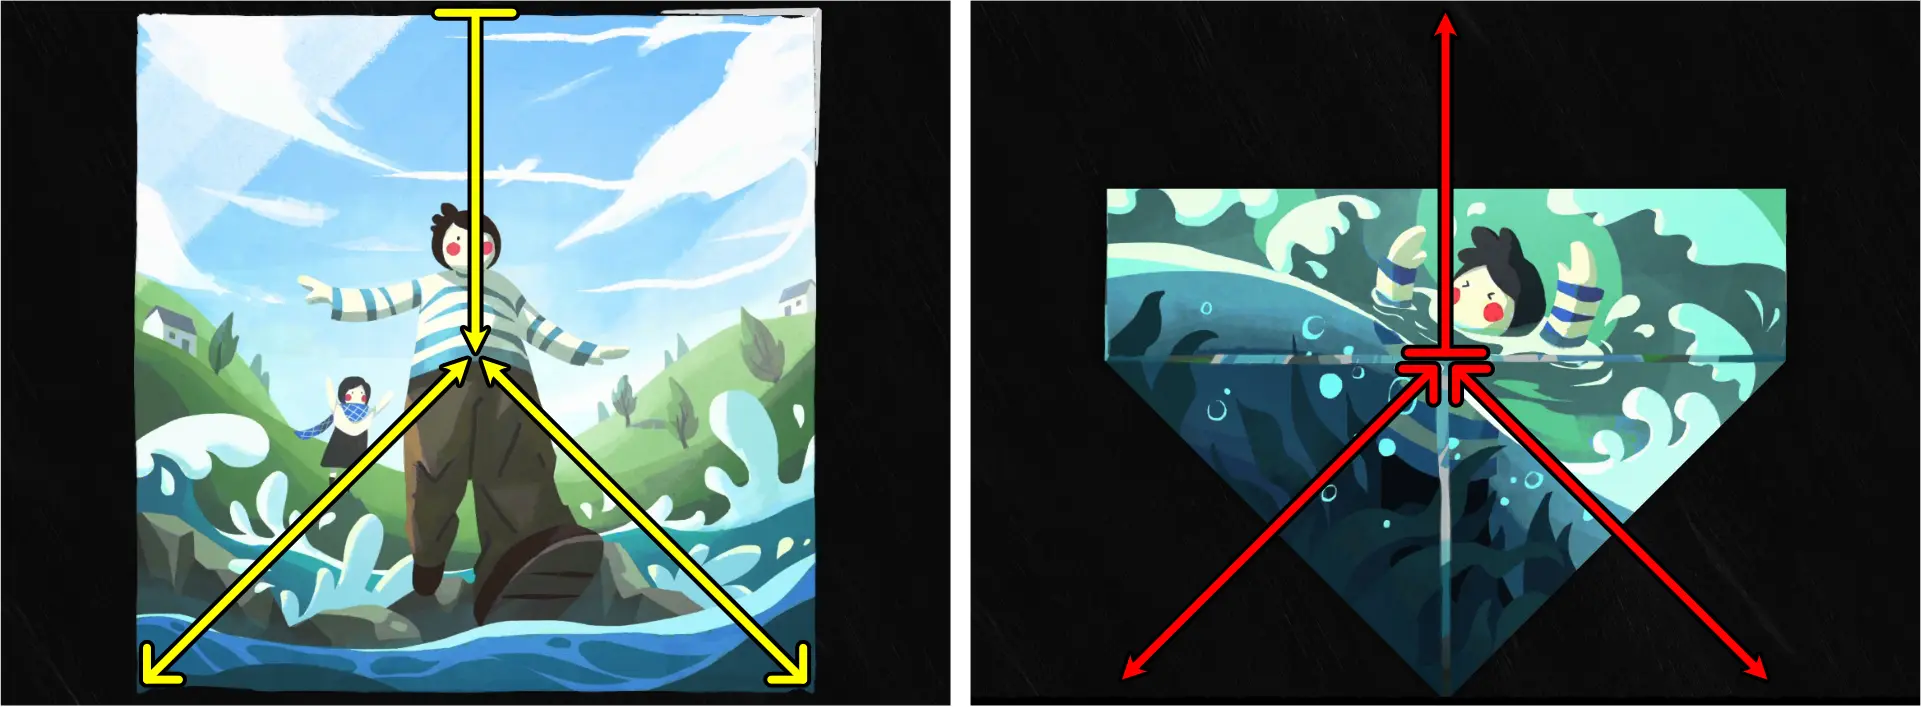
Cutscene: Introduction
- Unfold the image.
- Using the side edges, fold the map vertically to the center.

- Using the side edges, fold vertically to the center.
- Unfold the image.

- Using the upper right corner, fold diagonally and align it to the left side.
- Unfold the image.
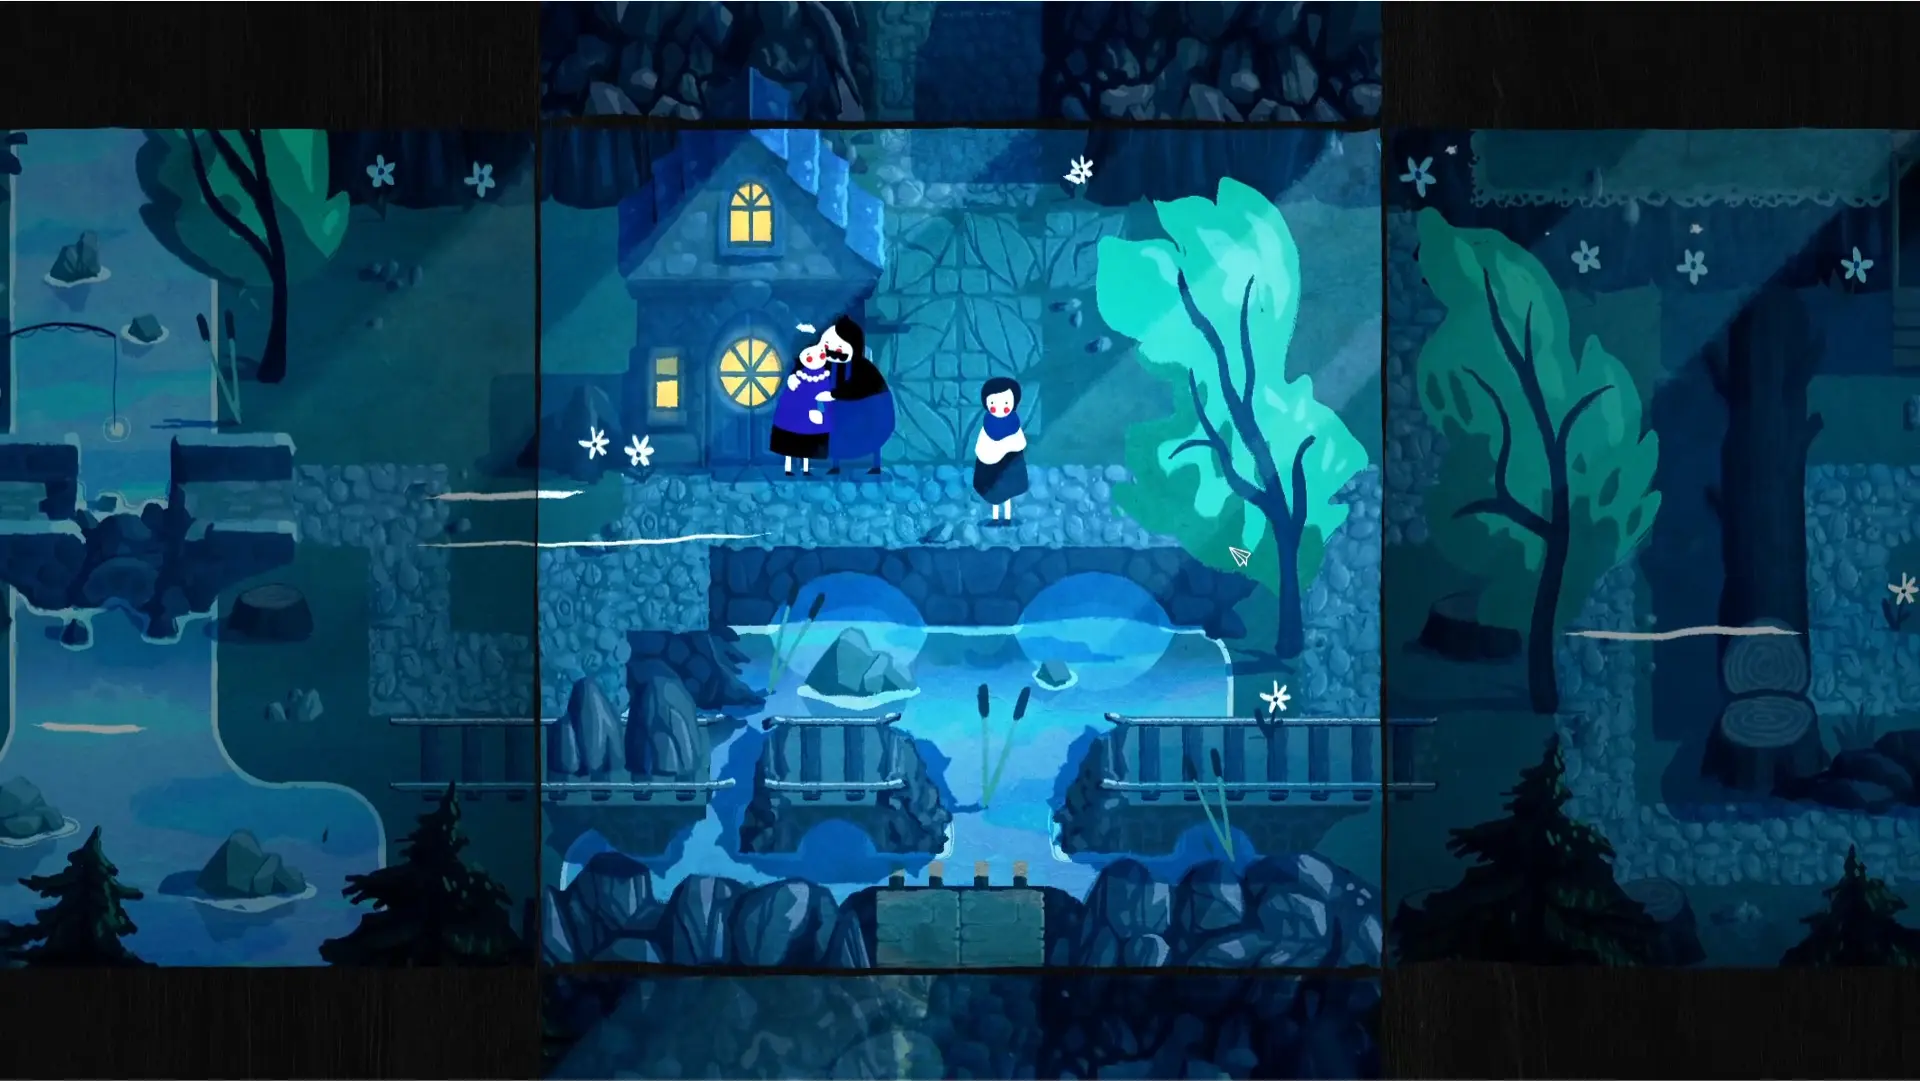
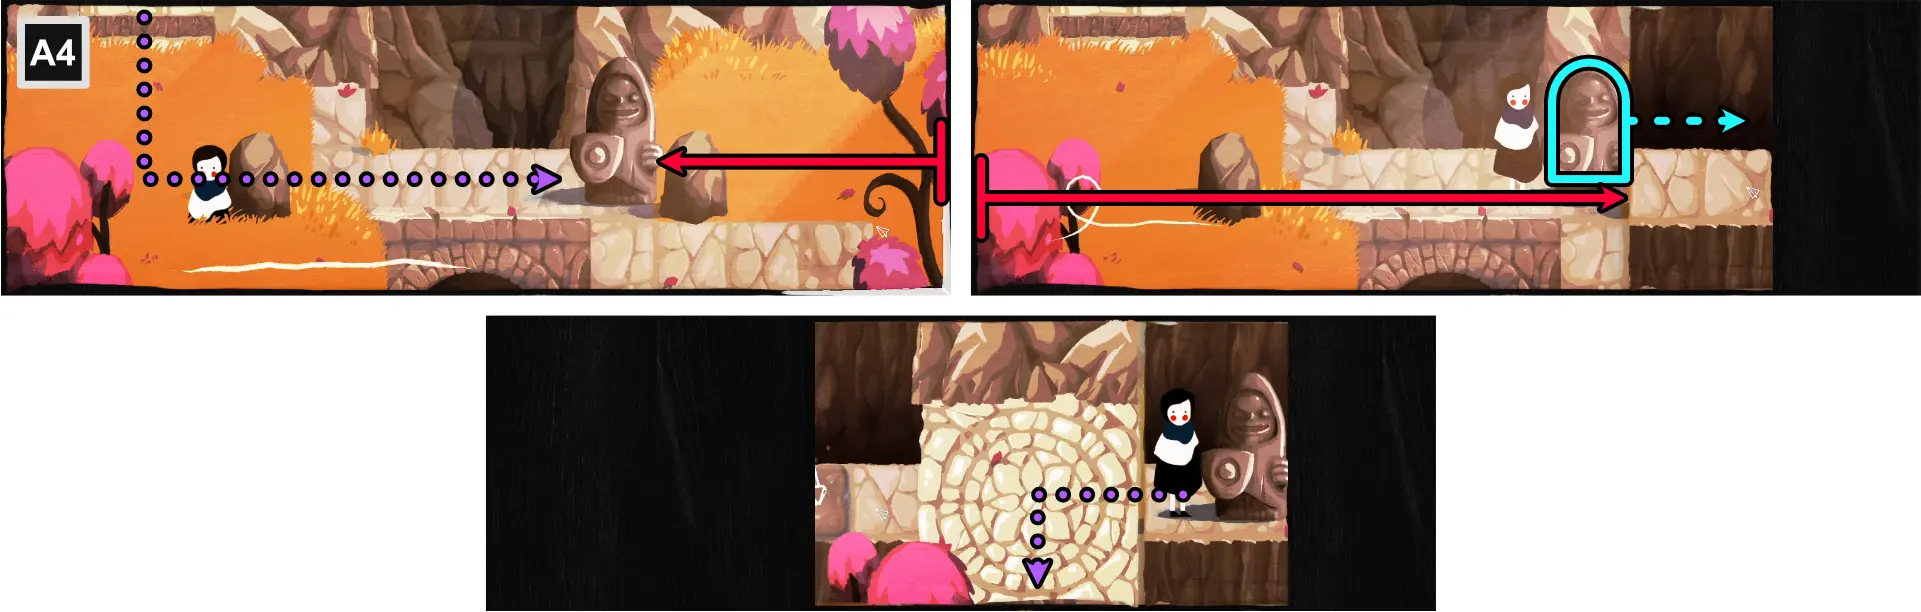
Checking on Friends and Relatives
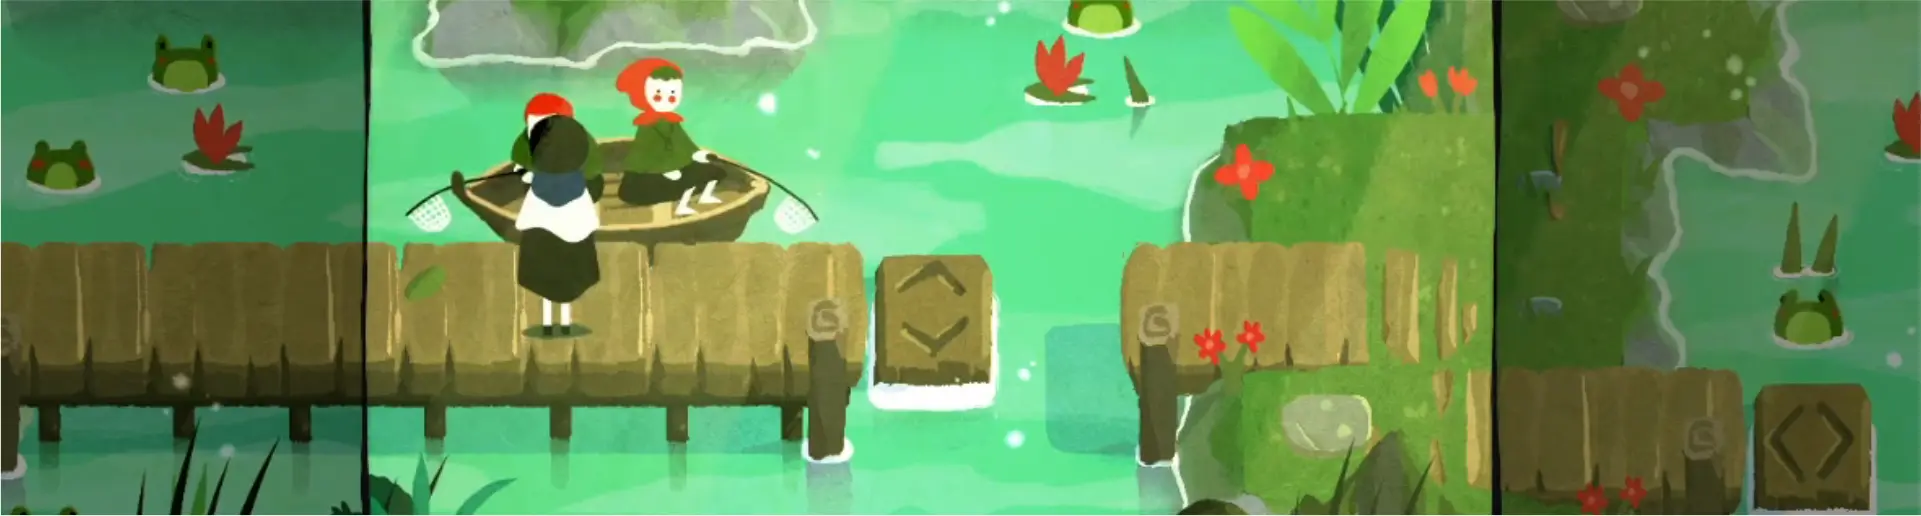
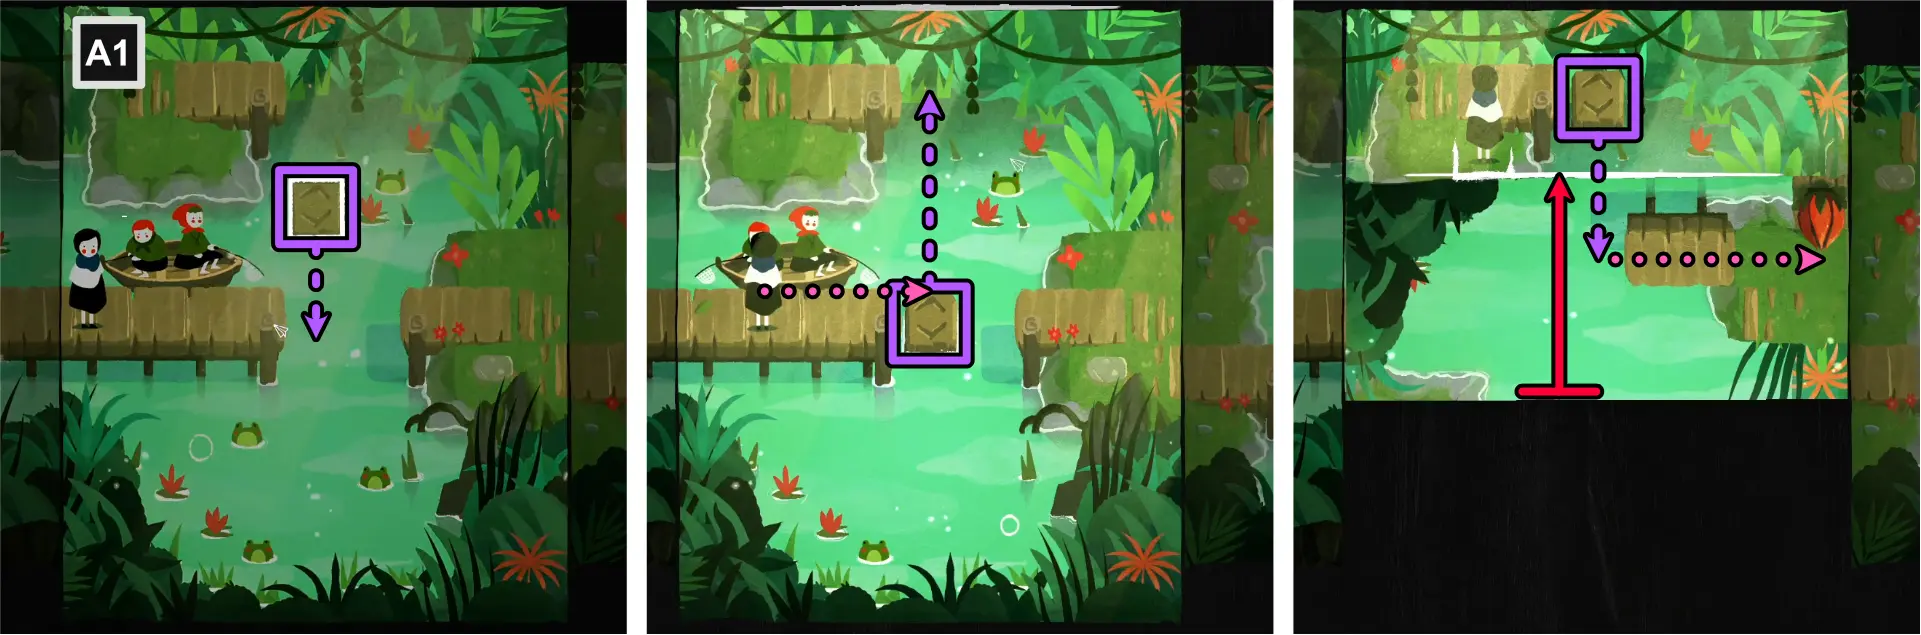
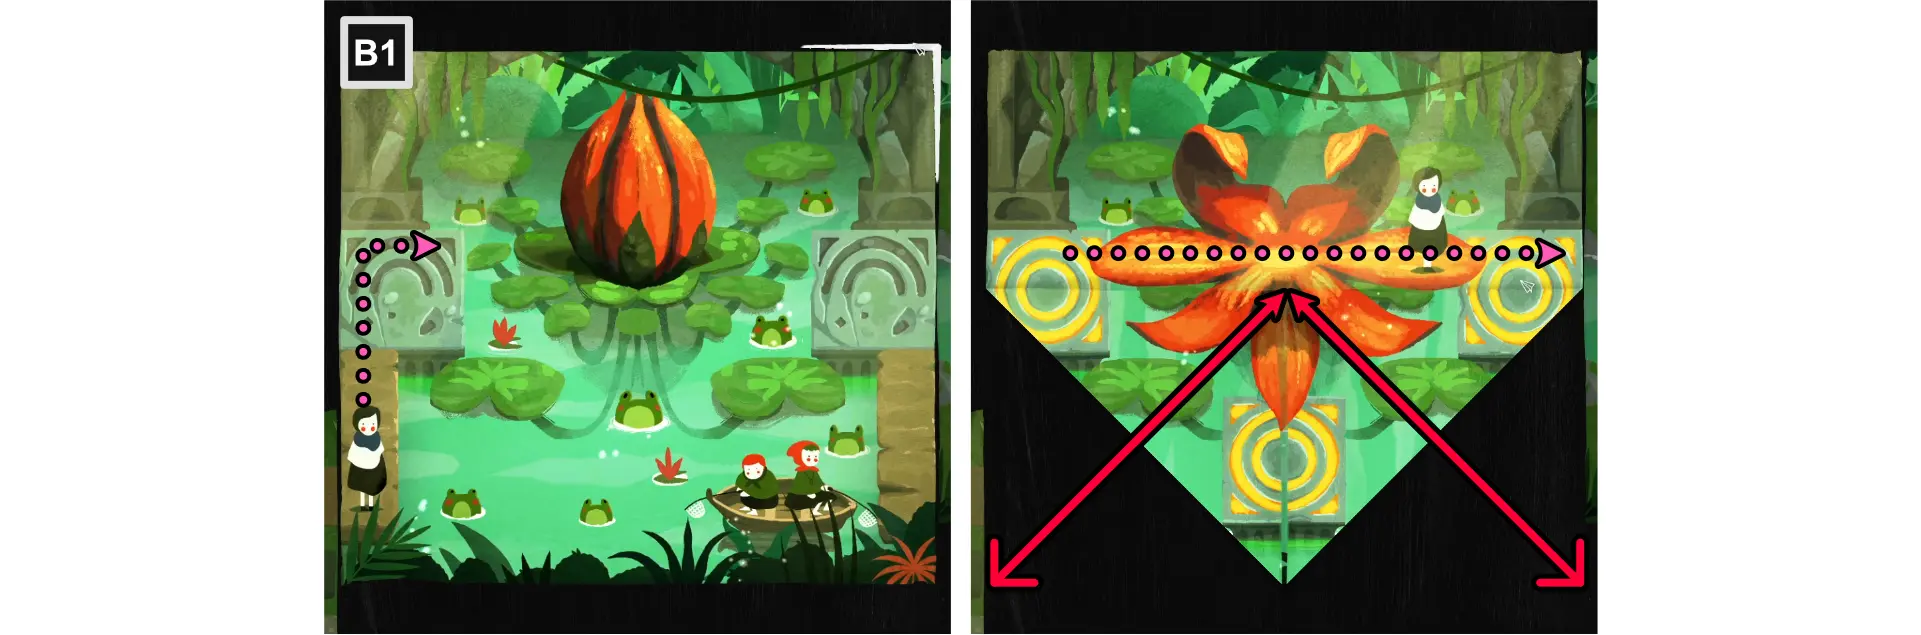
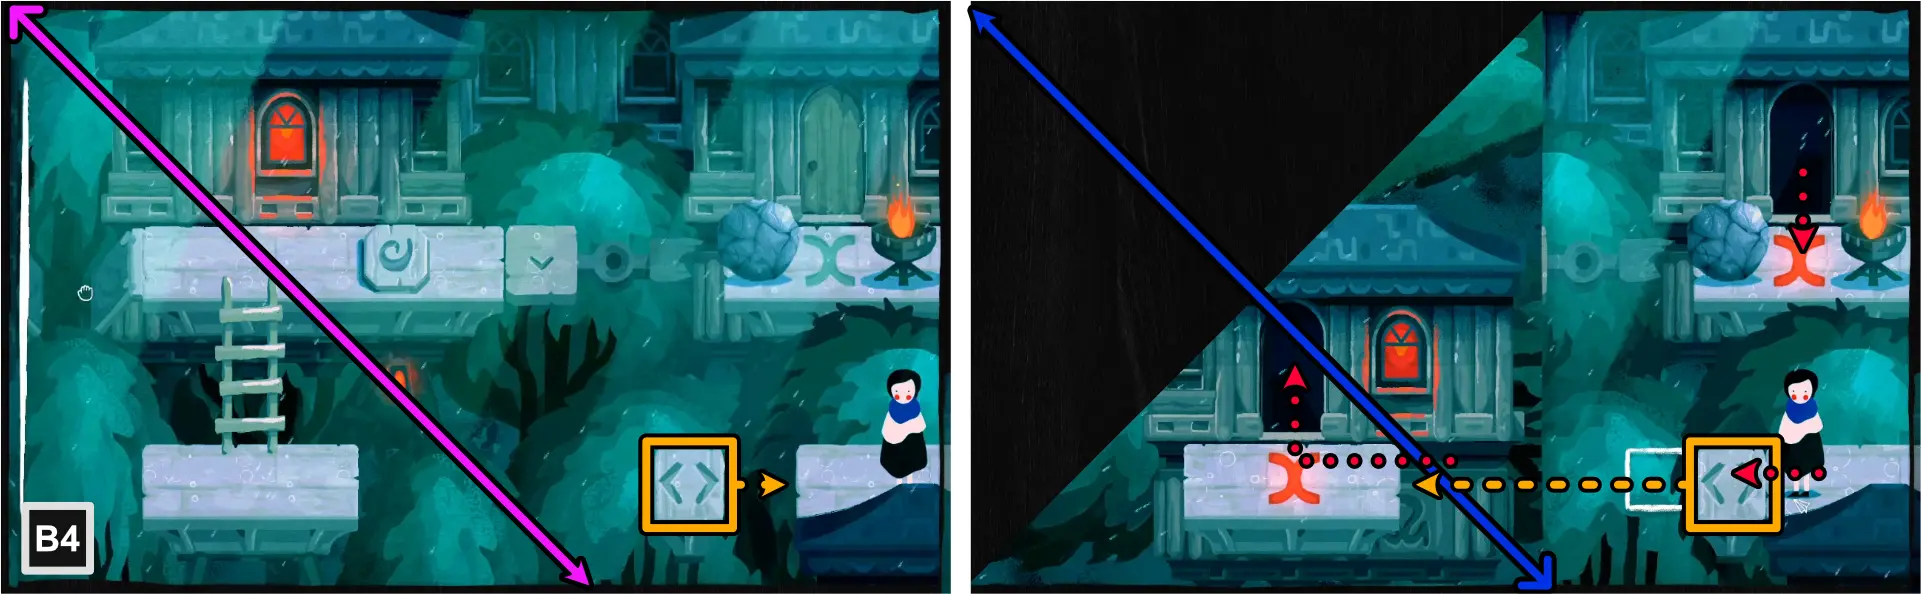
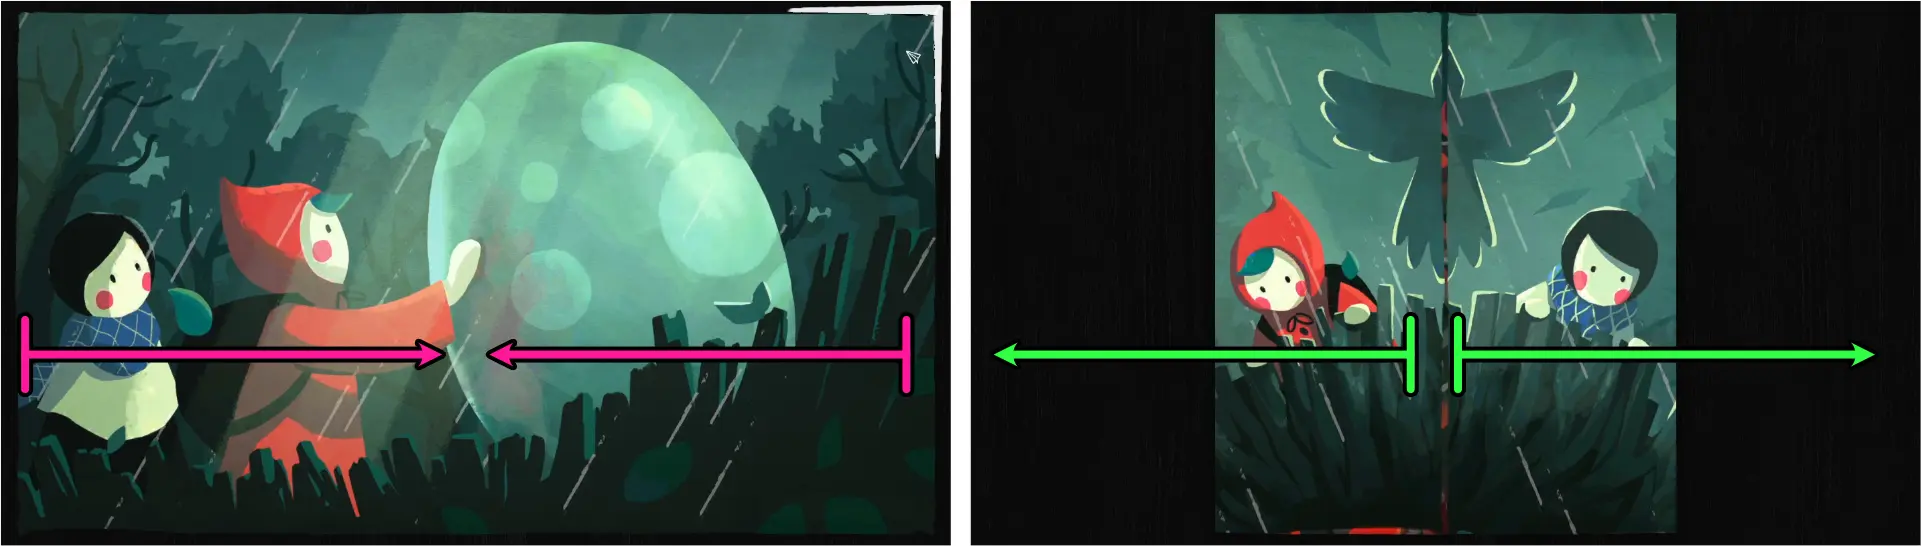
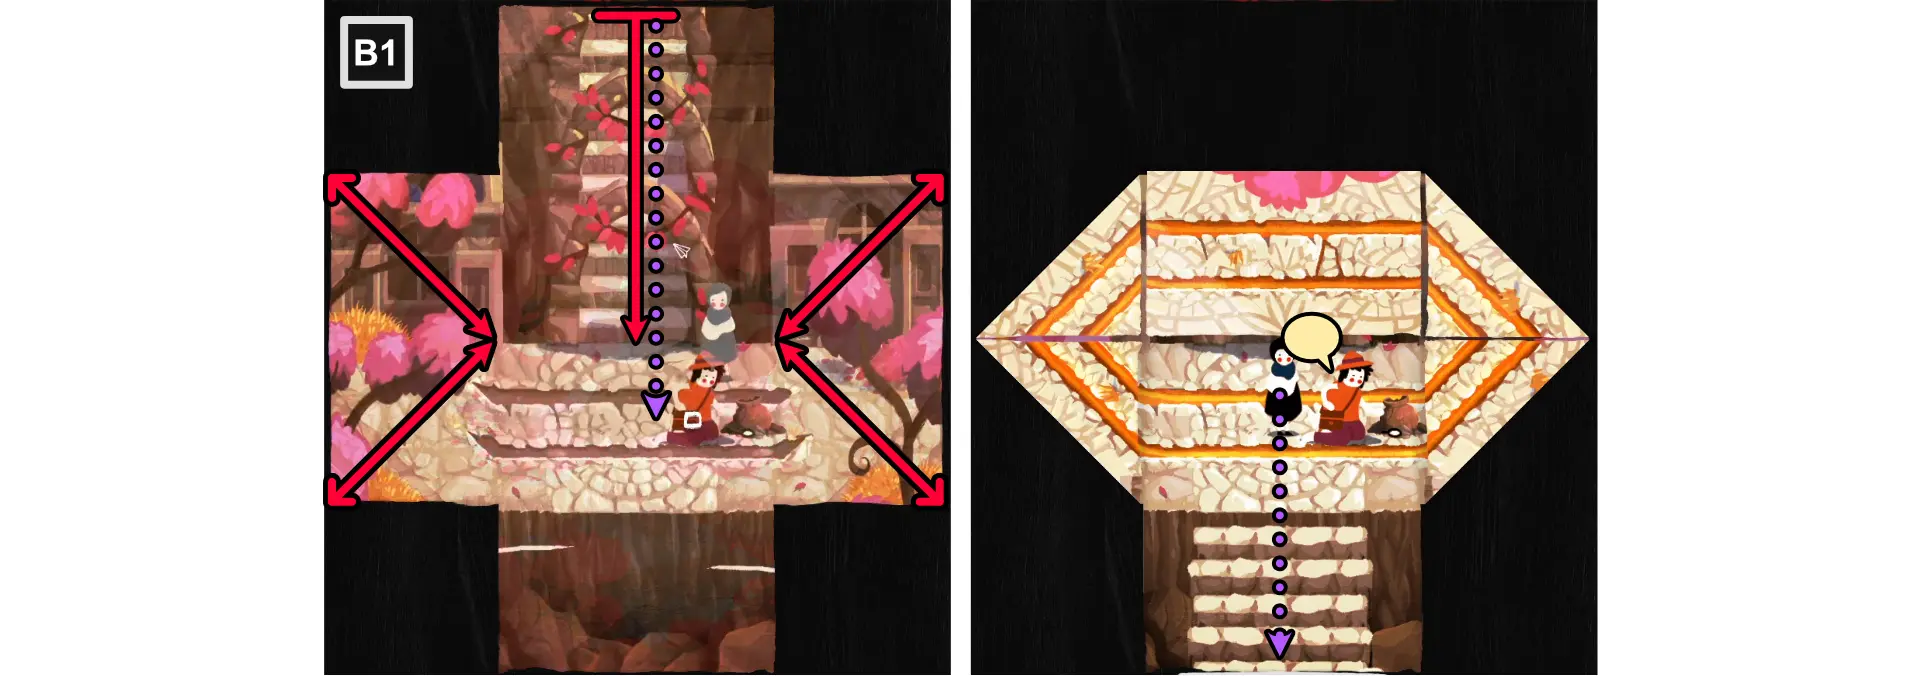
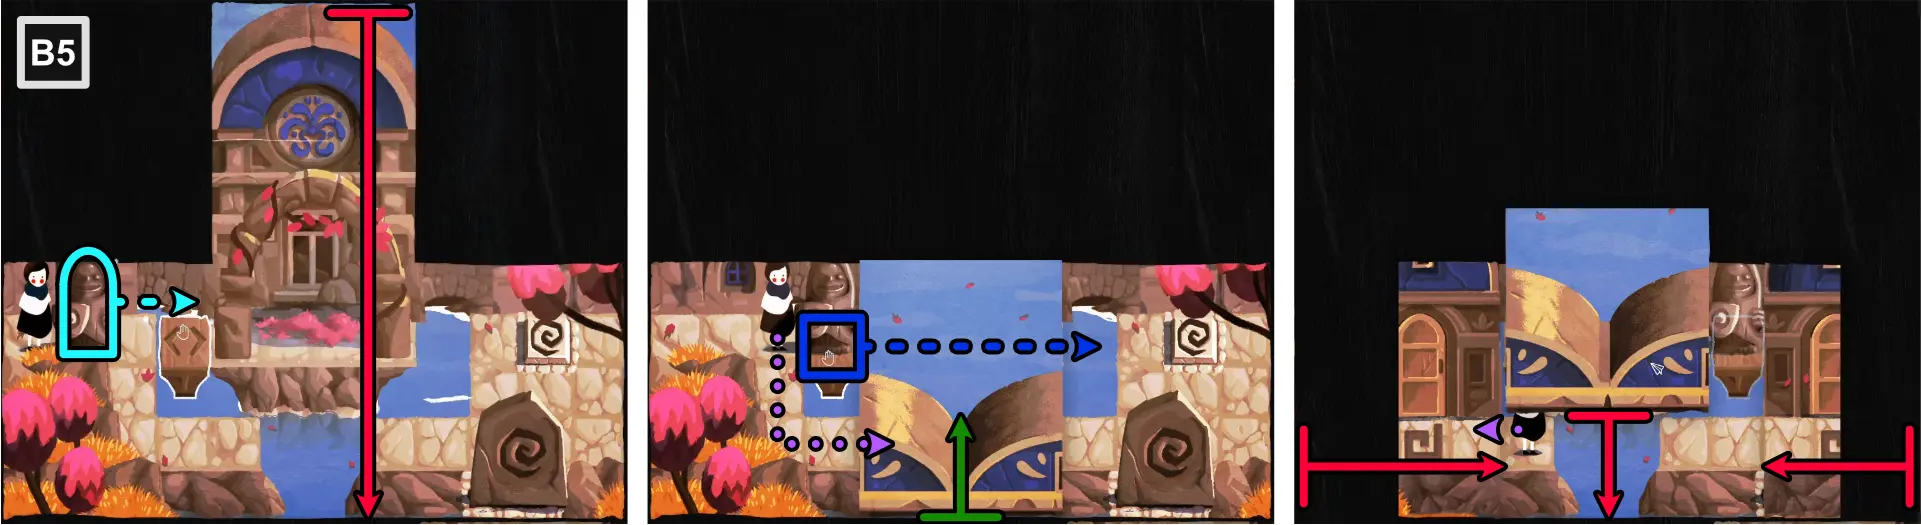
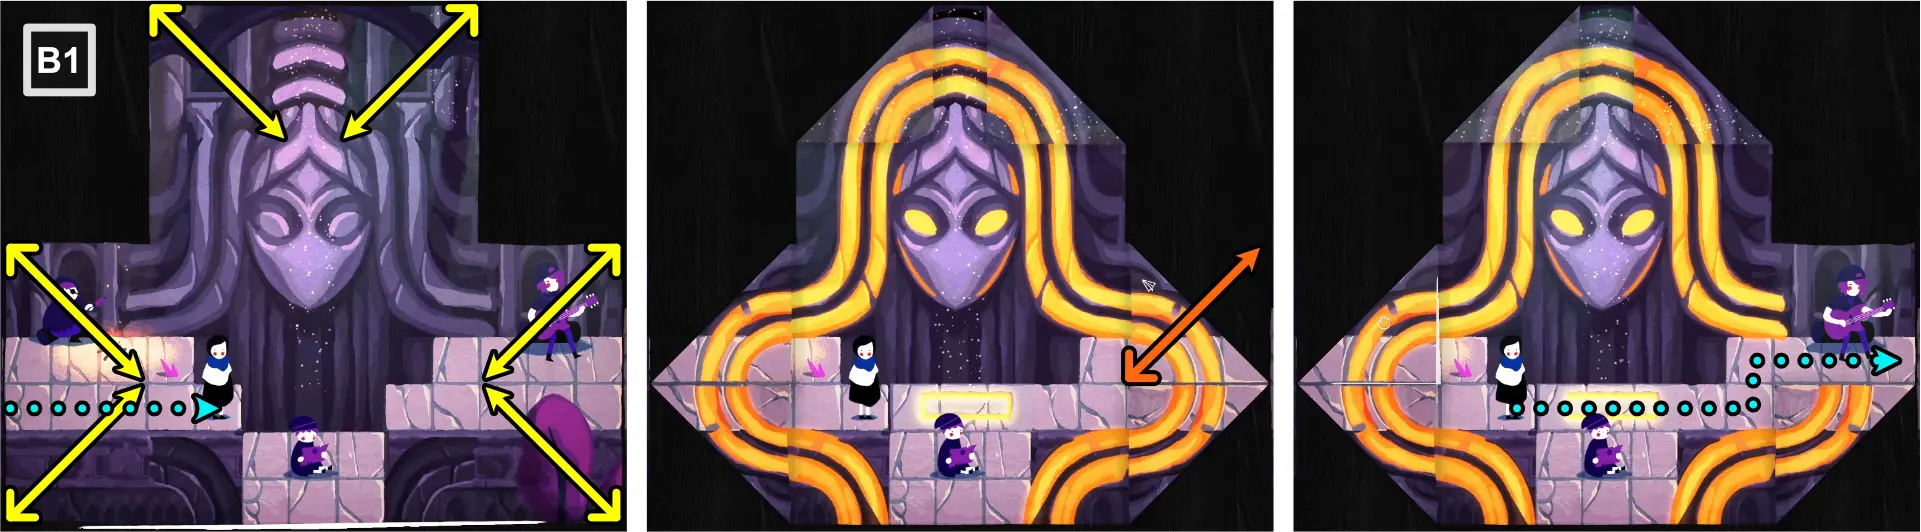
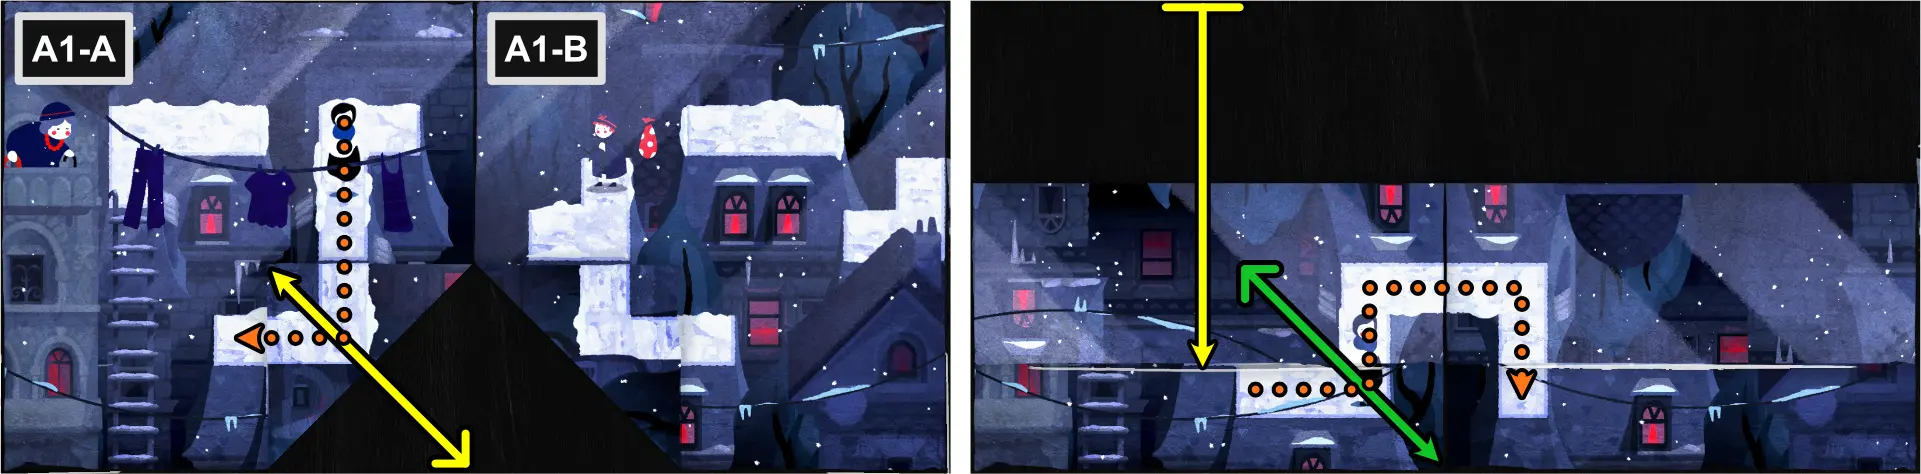
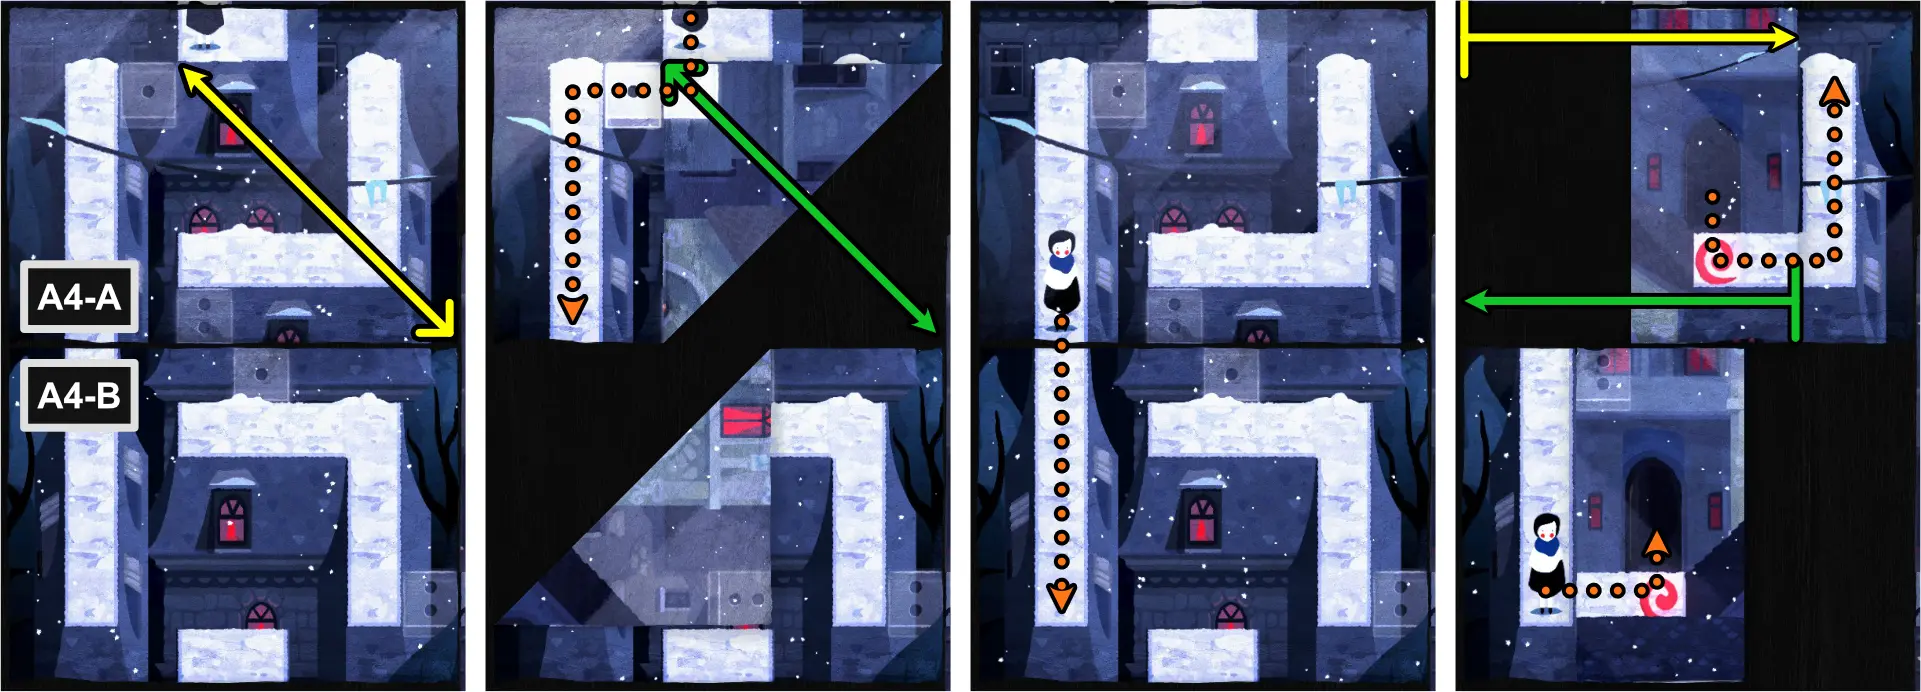
Paige’s parents will ask her to check on Jimmy who’s fishing for eels by the river to the west, across the bridge.
- Move Paige to the left map (B1) to find Jimmy.
Jimmy will tell Paige that he got stranded after the bridge collapsed.
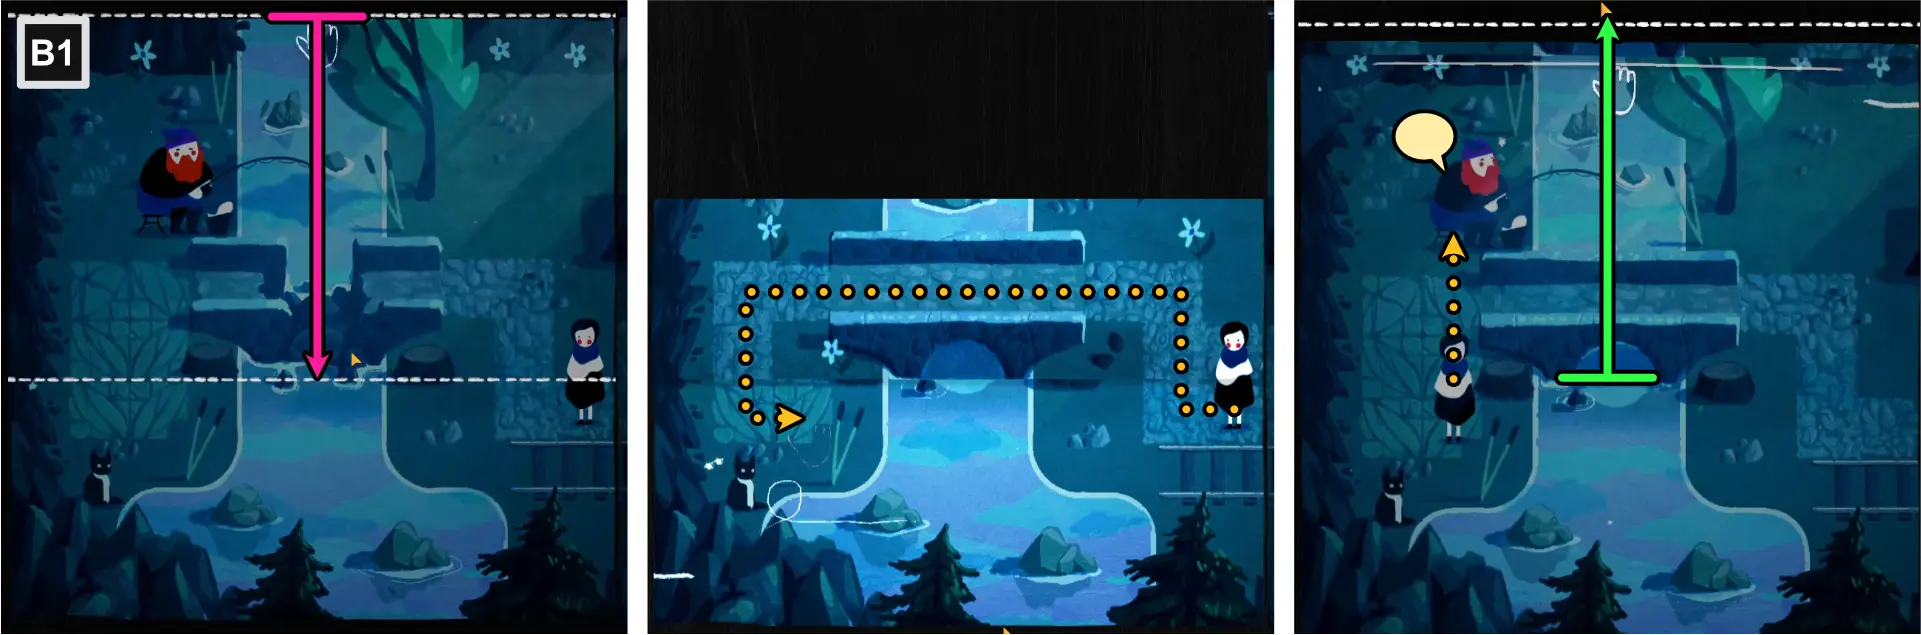
- Using the top edge, fold horizontally to fix the bridge.
- Cross the bridge and walk below the edge of the fold.
- Unfold the map to reveal Jimmy.
- Talk to Jimmy.
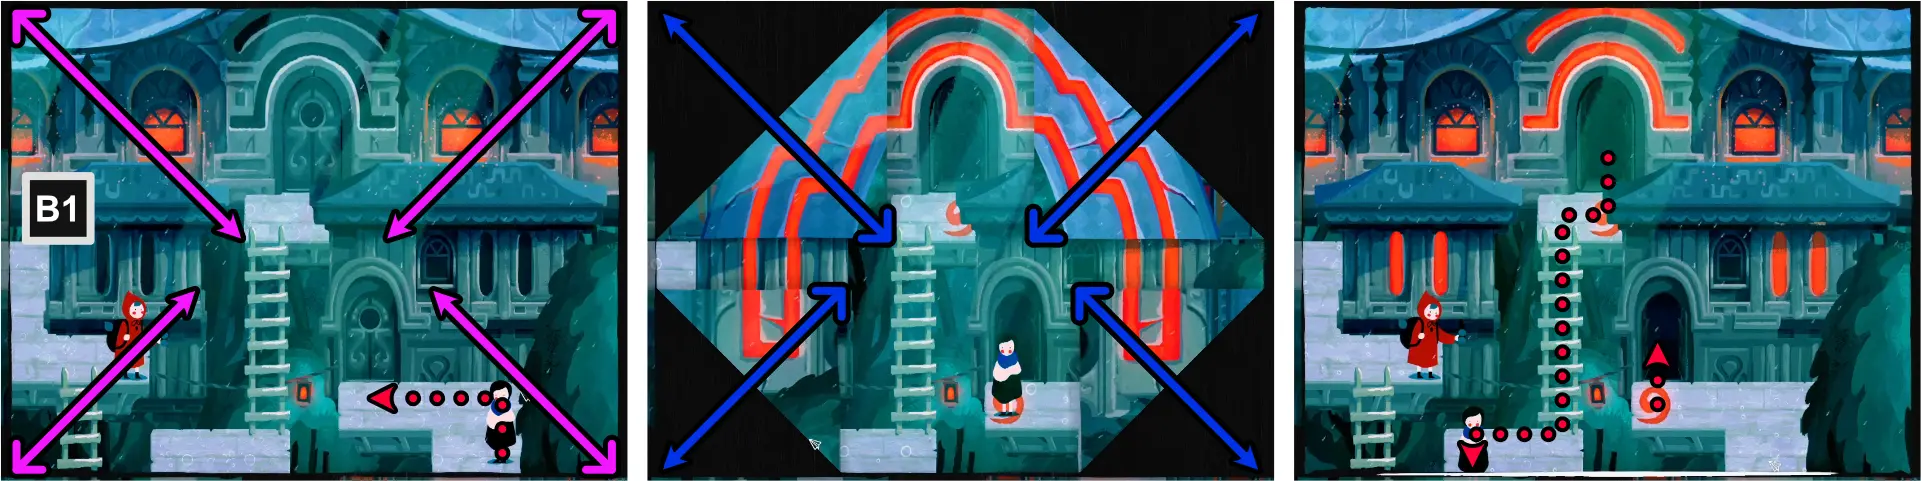
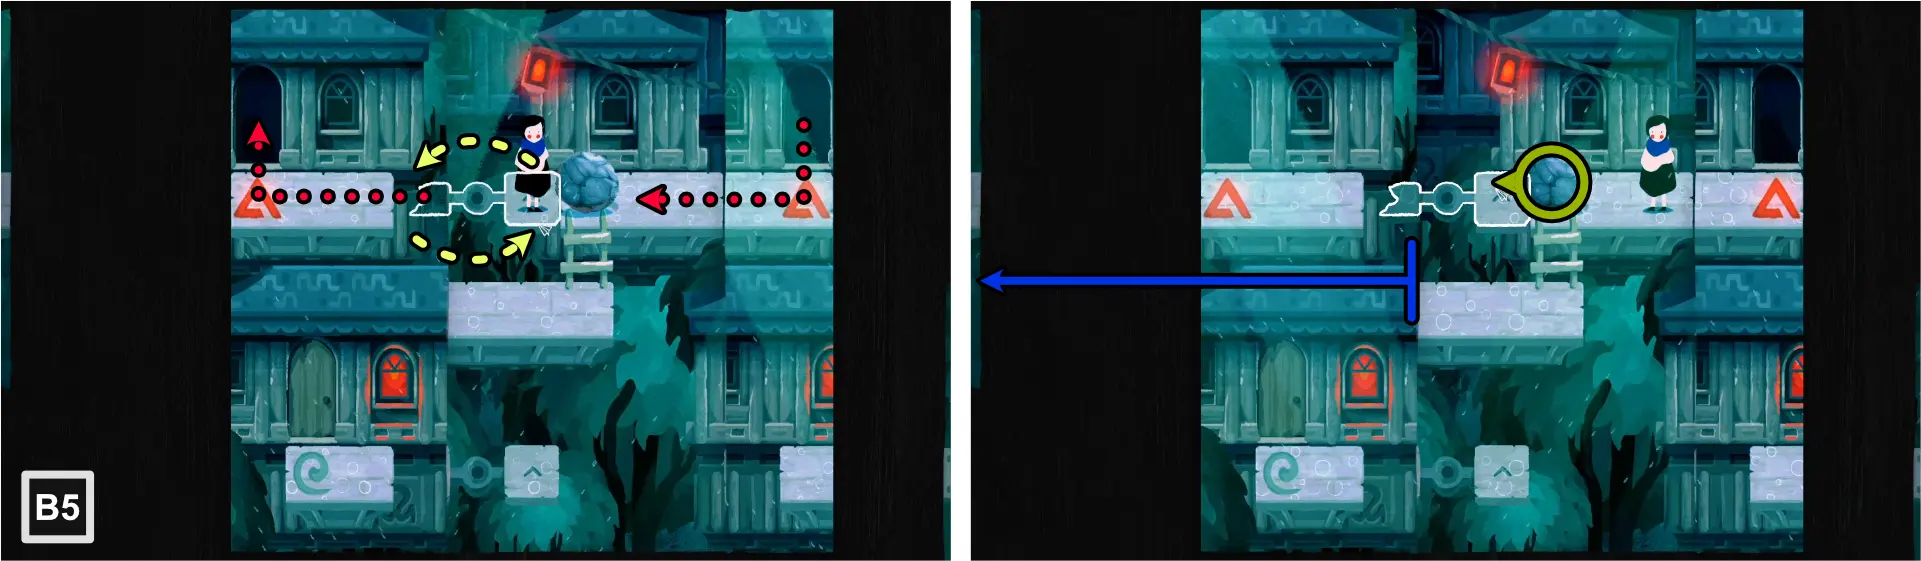
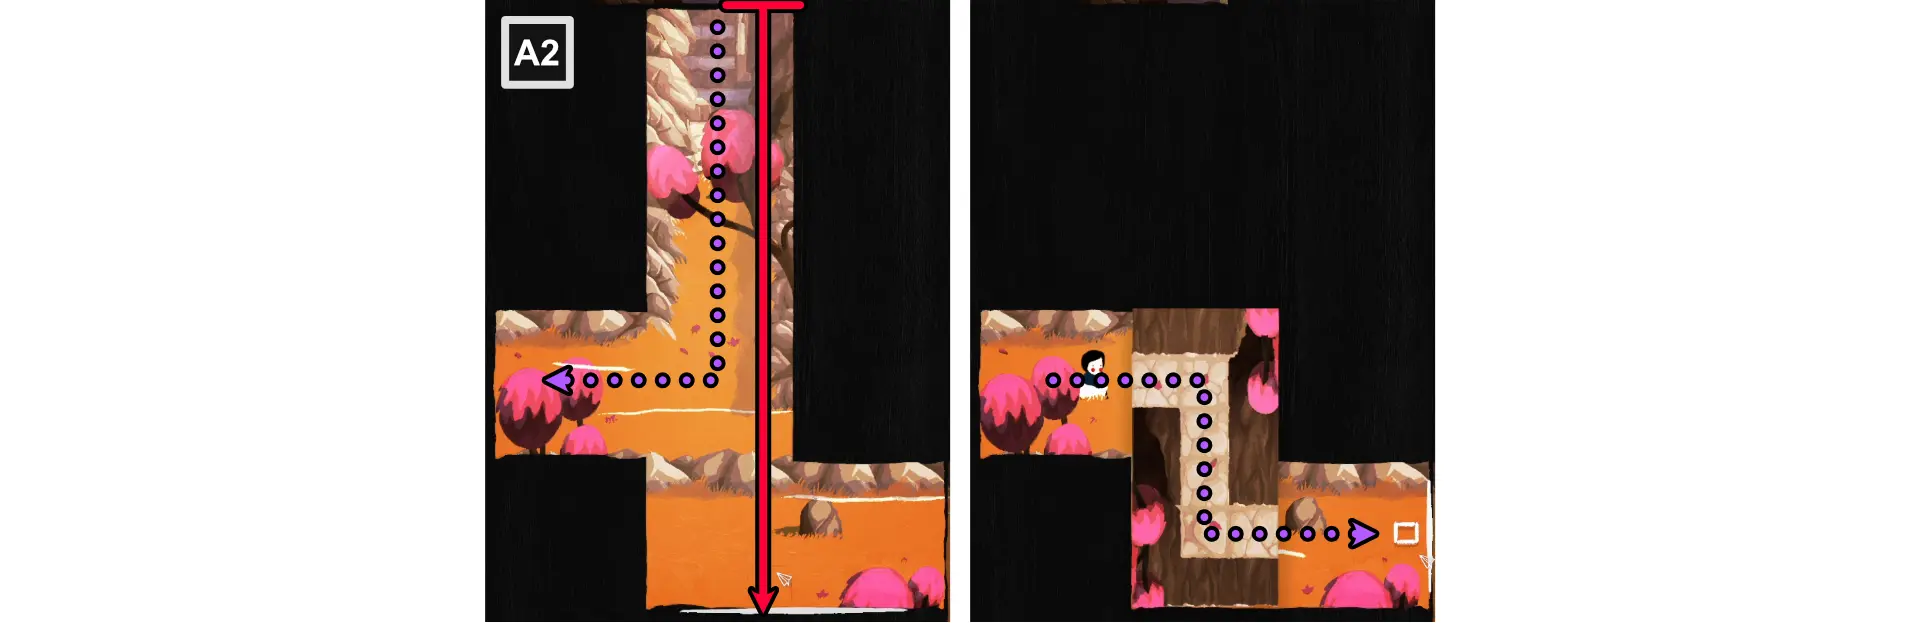
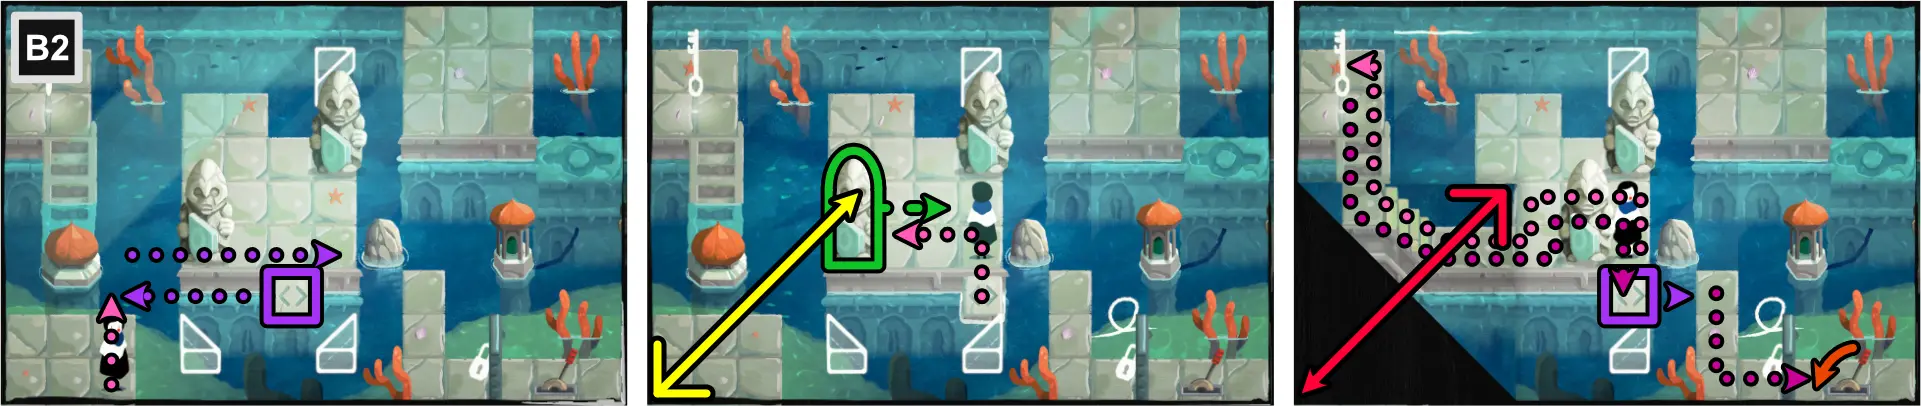
Jimmy will ask Paige to check on Aunt Maude to the east.
- Move Paige to B2, then B3.
You’ll find Aunt Maude trapped because of a landslide.
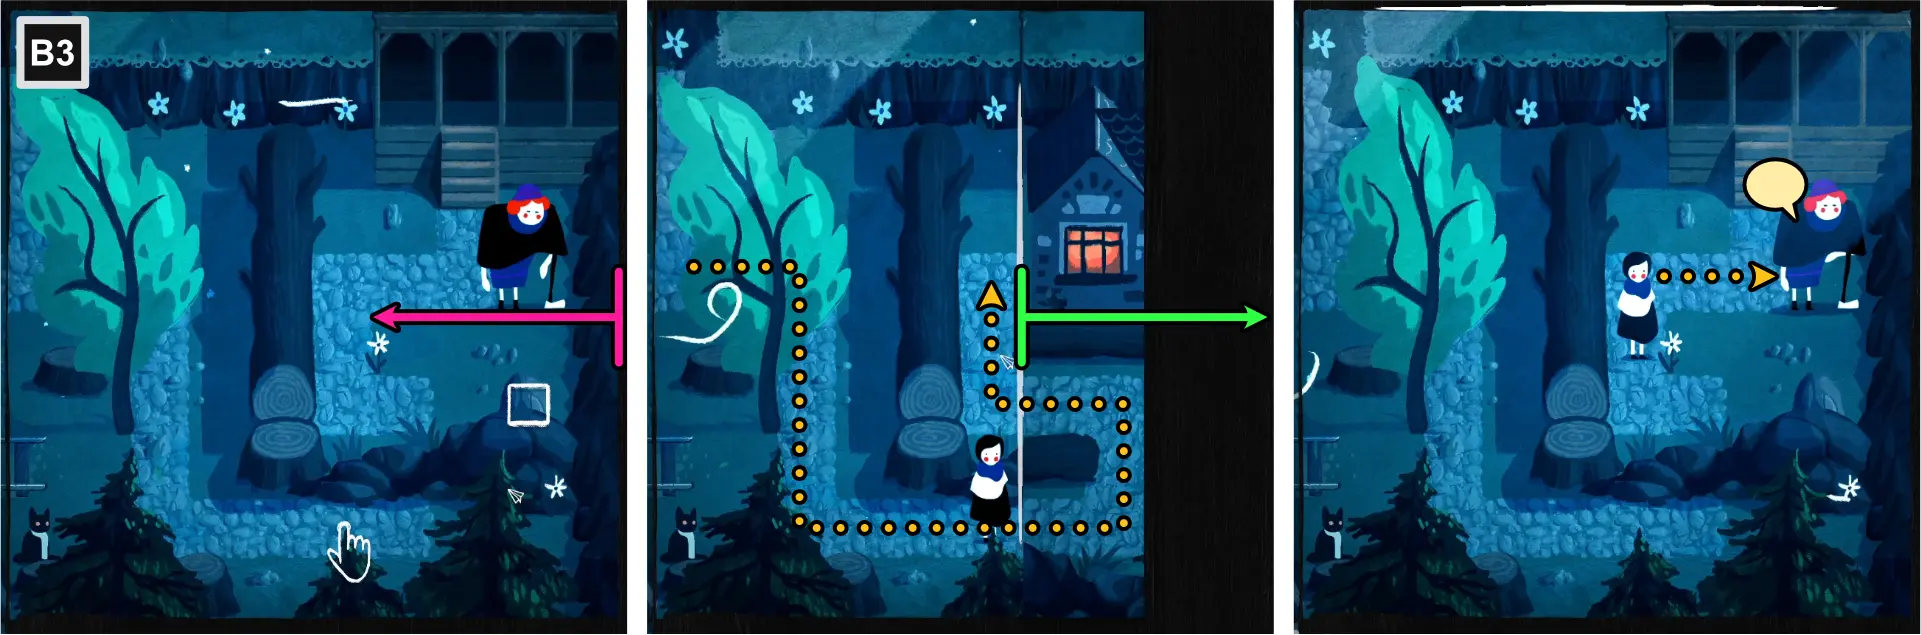
- Using the right edge, fold vertically, aligned to the cobblestone path, to create a path to Aunt Maude.
- Follow the path and stop to the left of the edge of the fold.
- Unfold the map to reveal Aunt Maude.
- Talk to Aunt Maude.
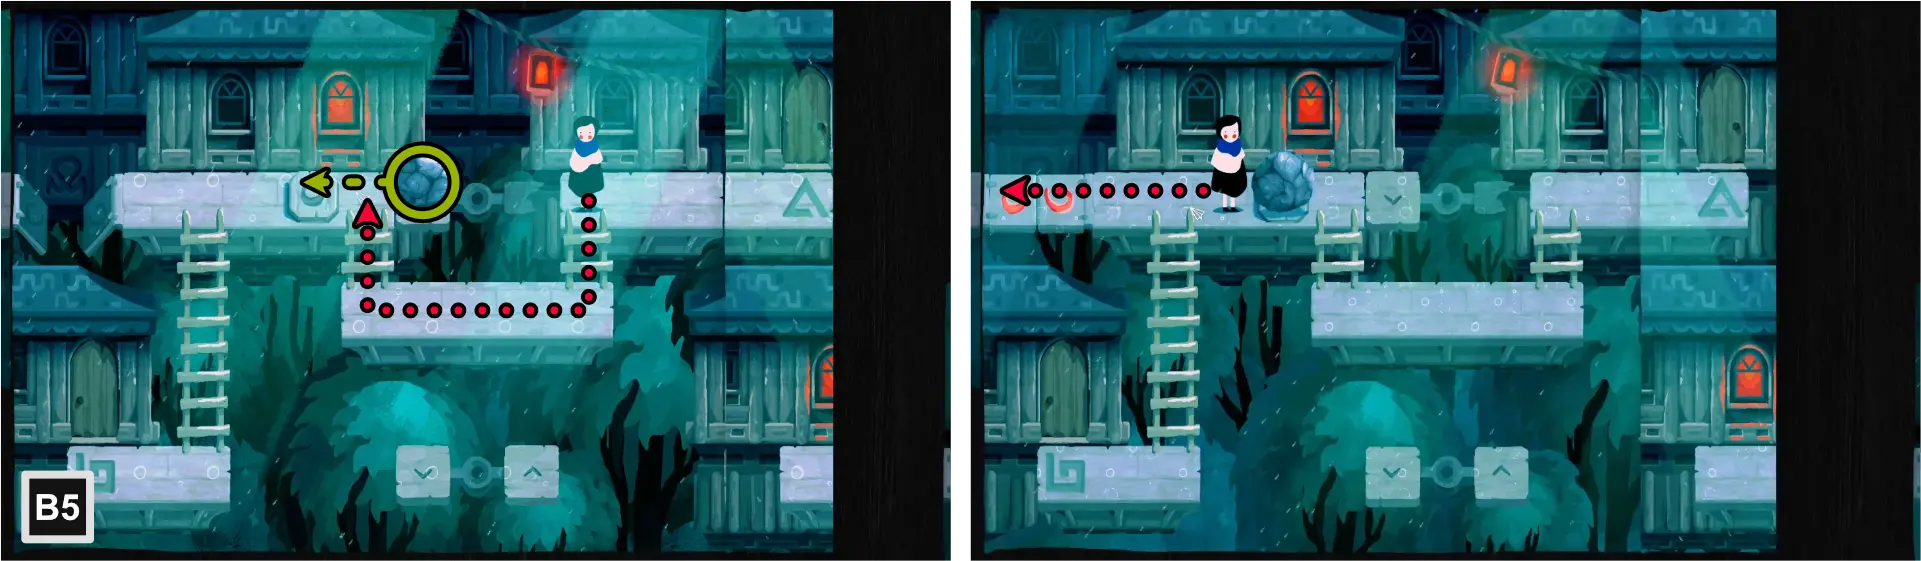
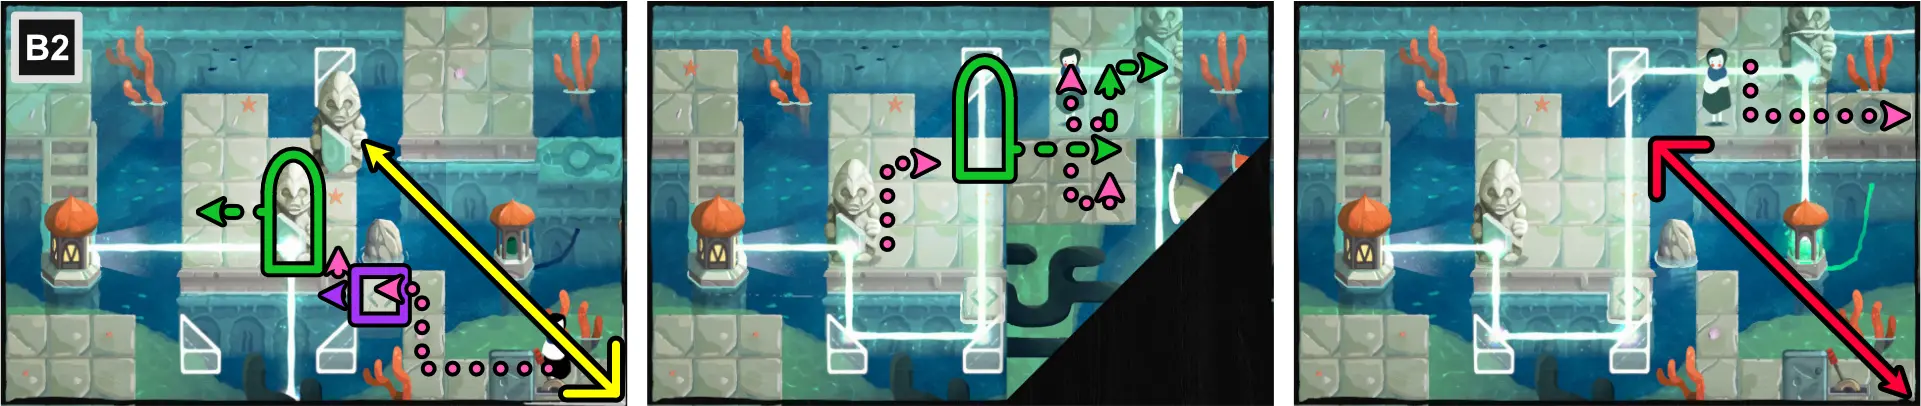
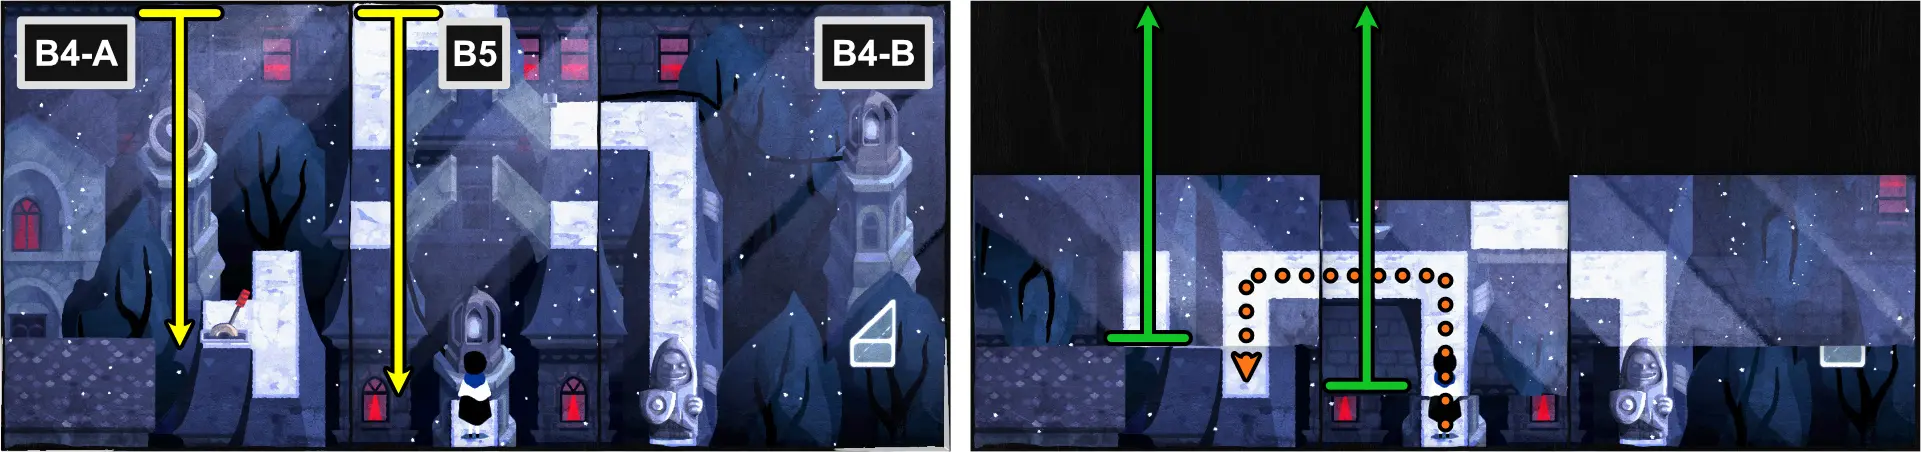
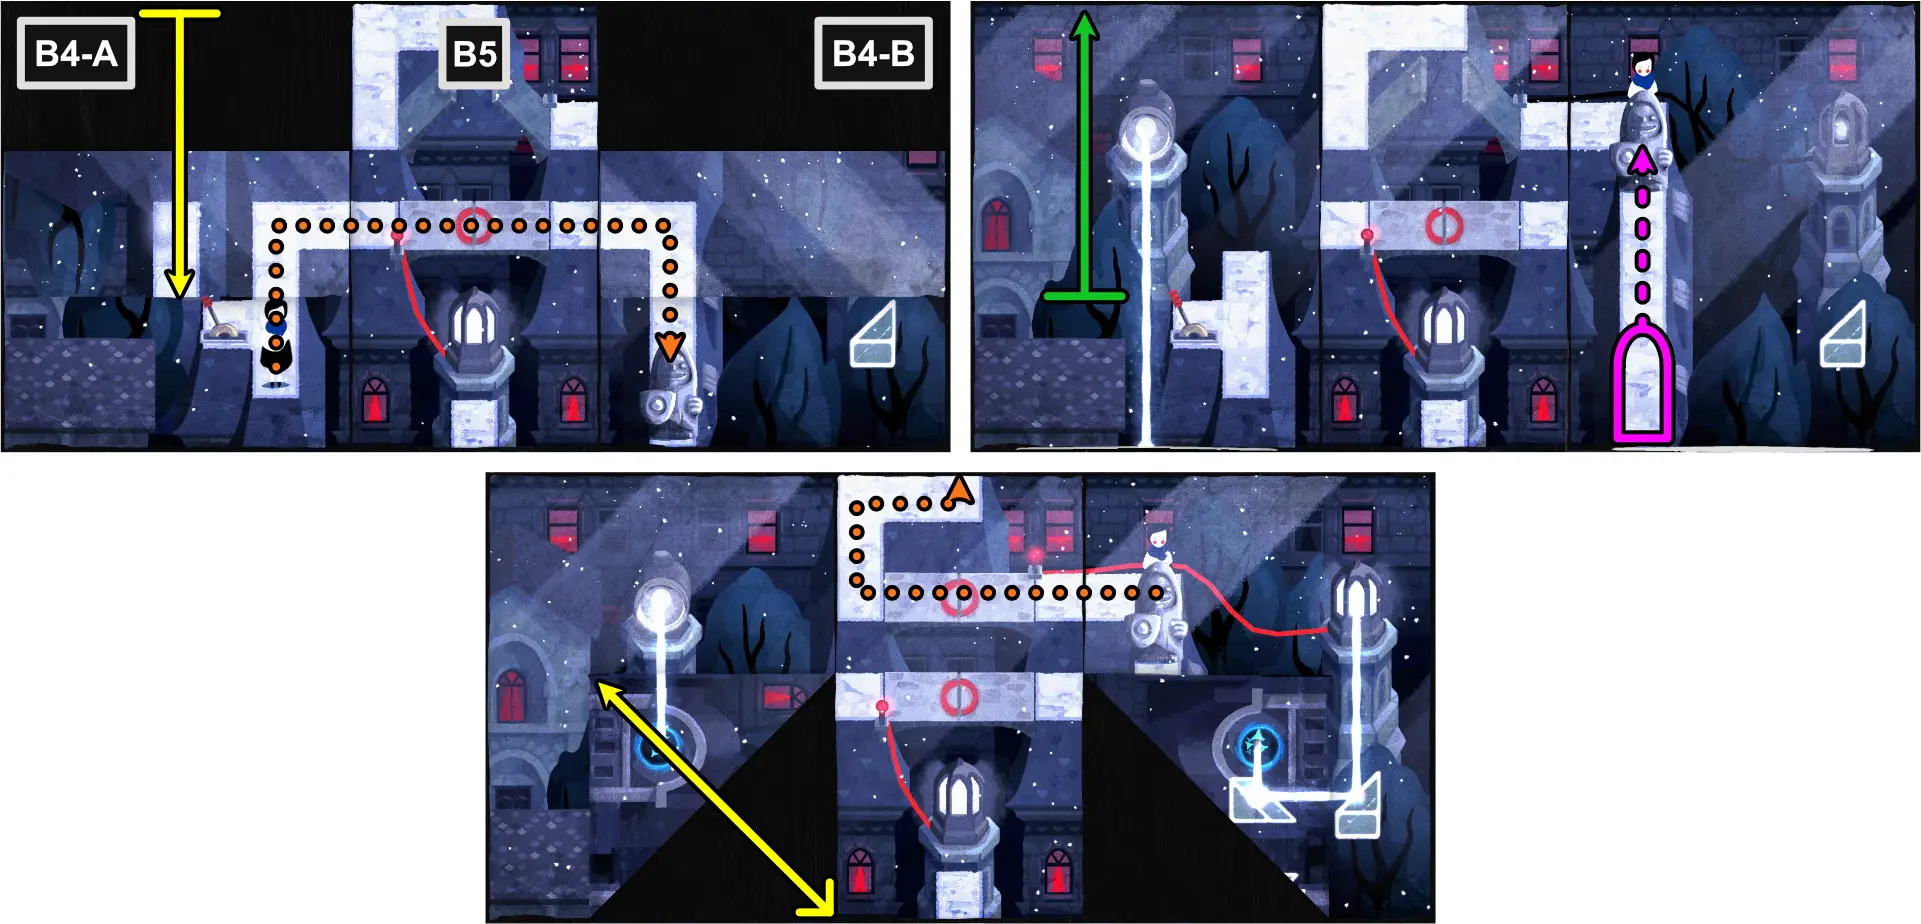
Aunt Maude will ask Paige to check up on Winslow the Keeper to the south.
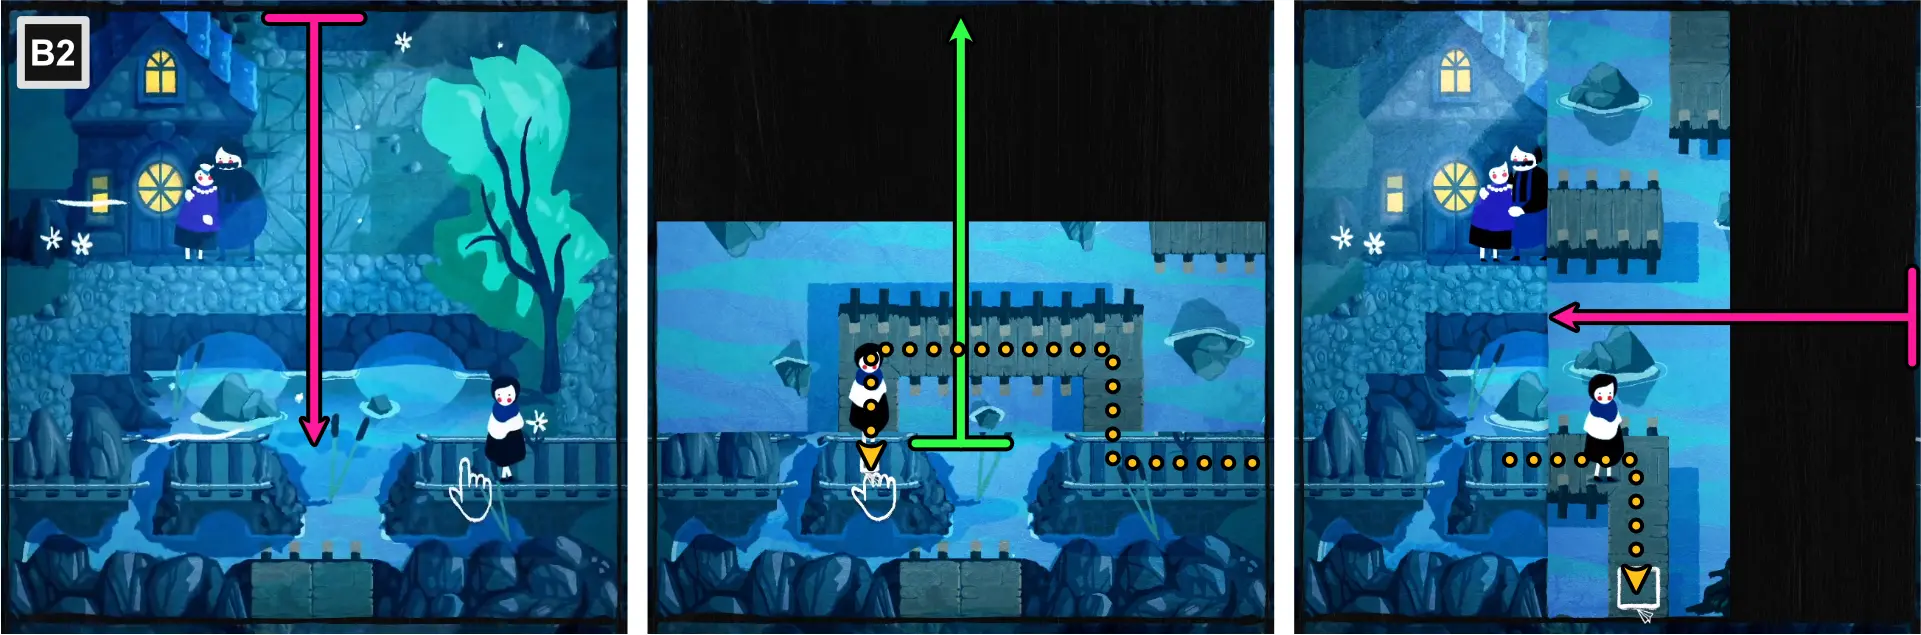
- Leave B3 the way you got in and go to B2.
- Using the top edge, fold horizontally, aligned to the rails, to reveal a bridge.
- Cross the bridge and stop below the edge of the map.
- Unfold the map.
- Using the right edge, fold vertically, aligned to the rails, to reveal another bridge leading to the south.
- Follow the path to C1.
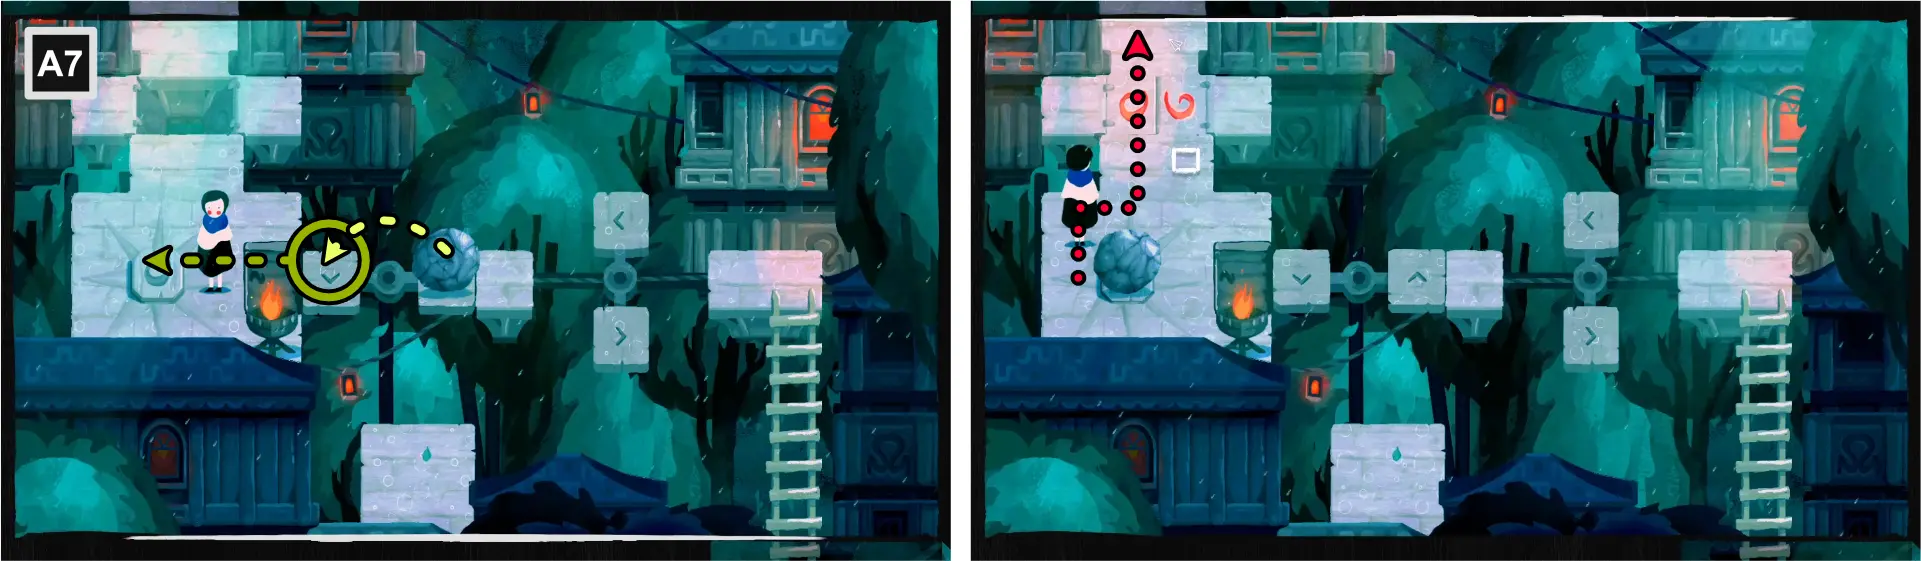
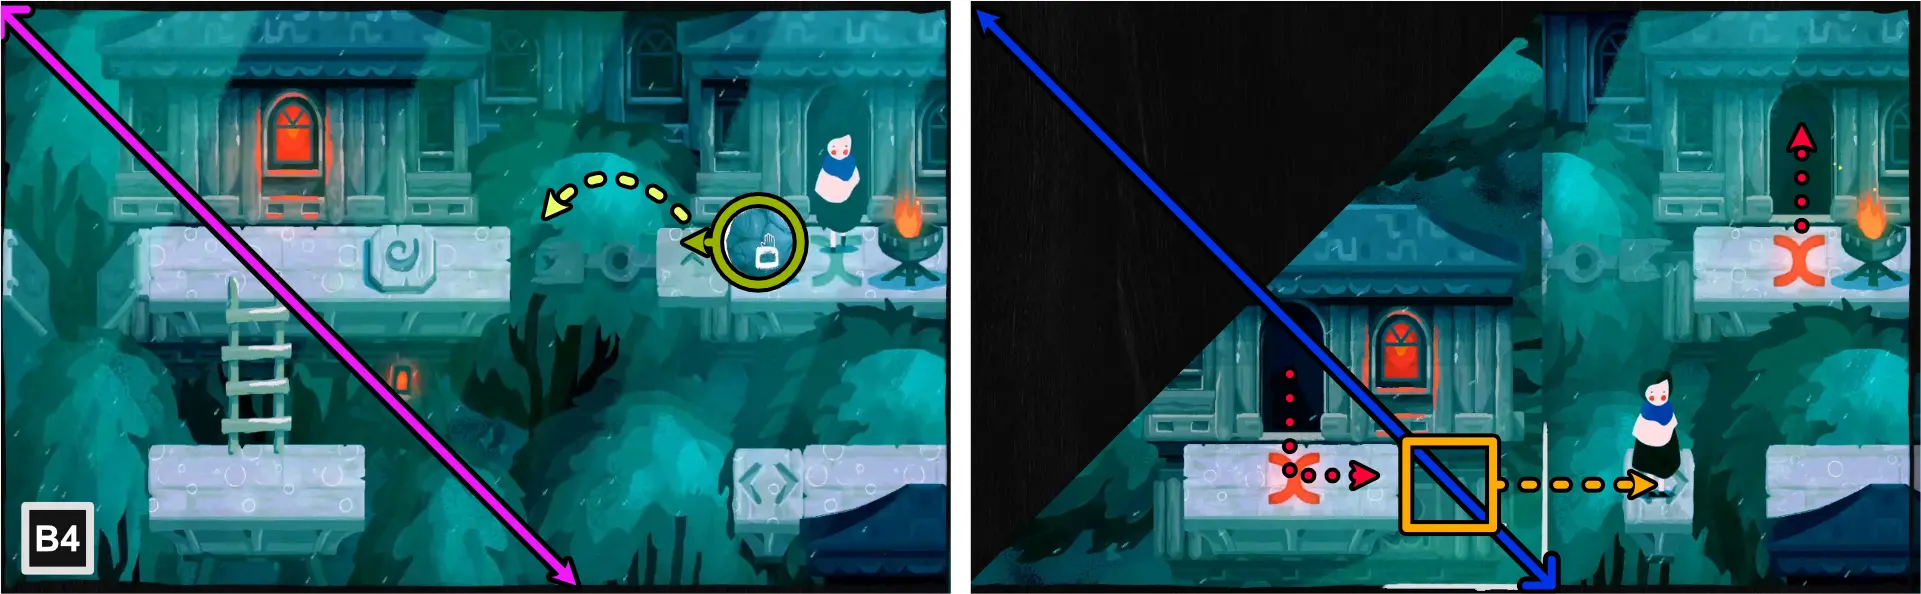
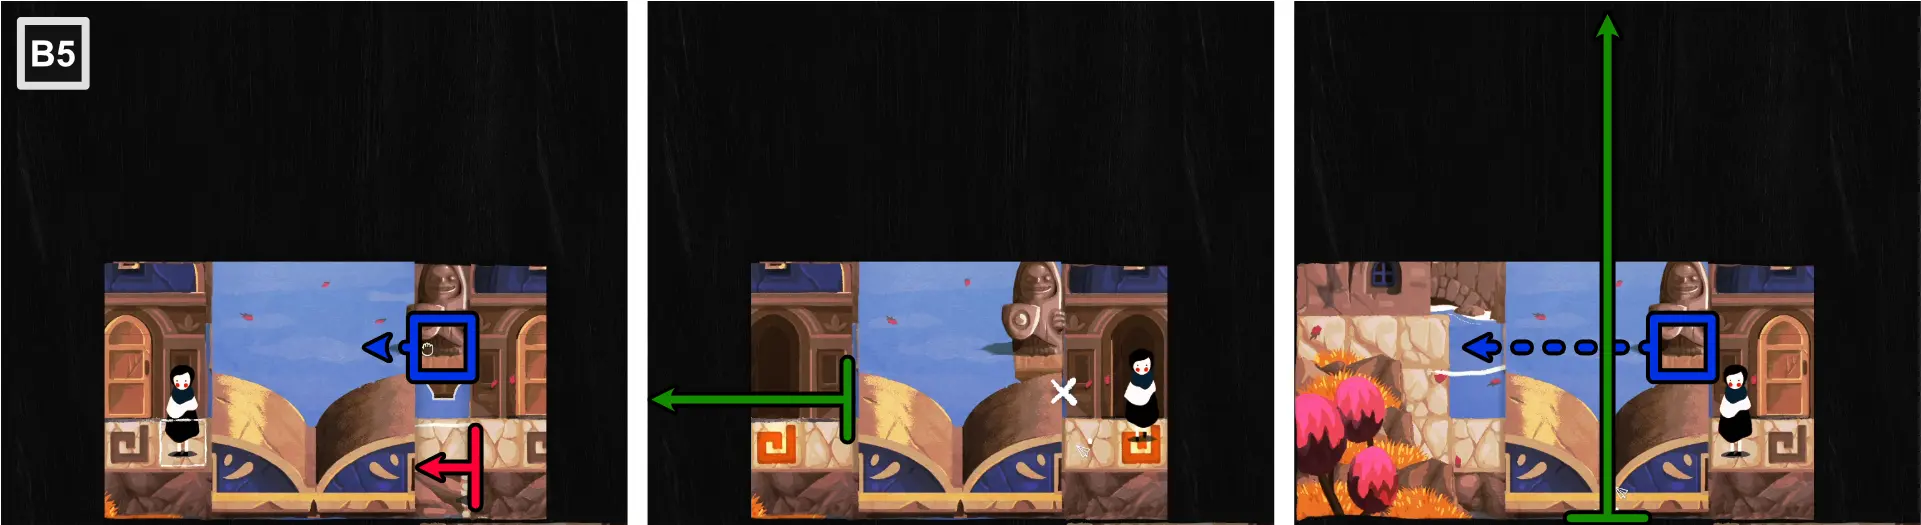
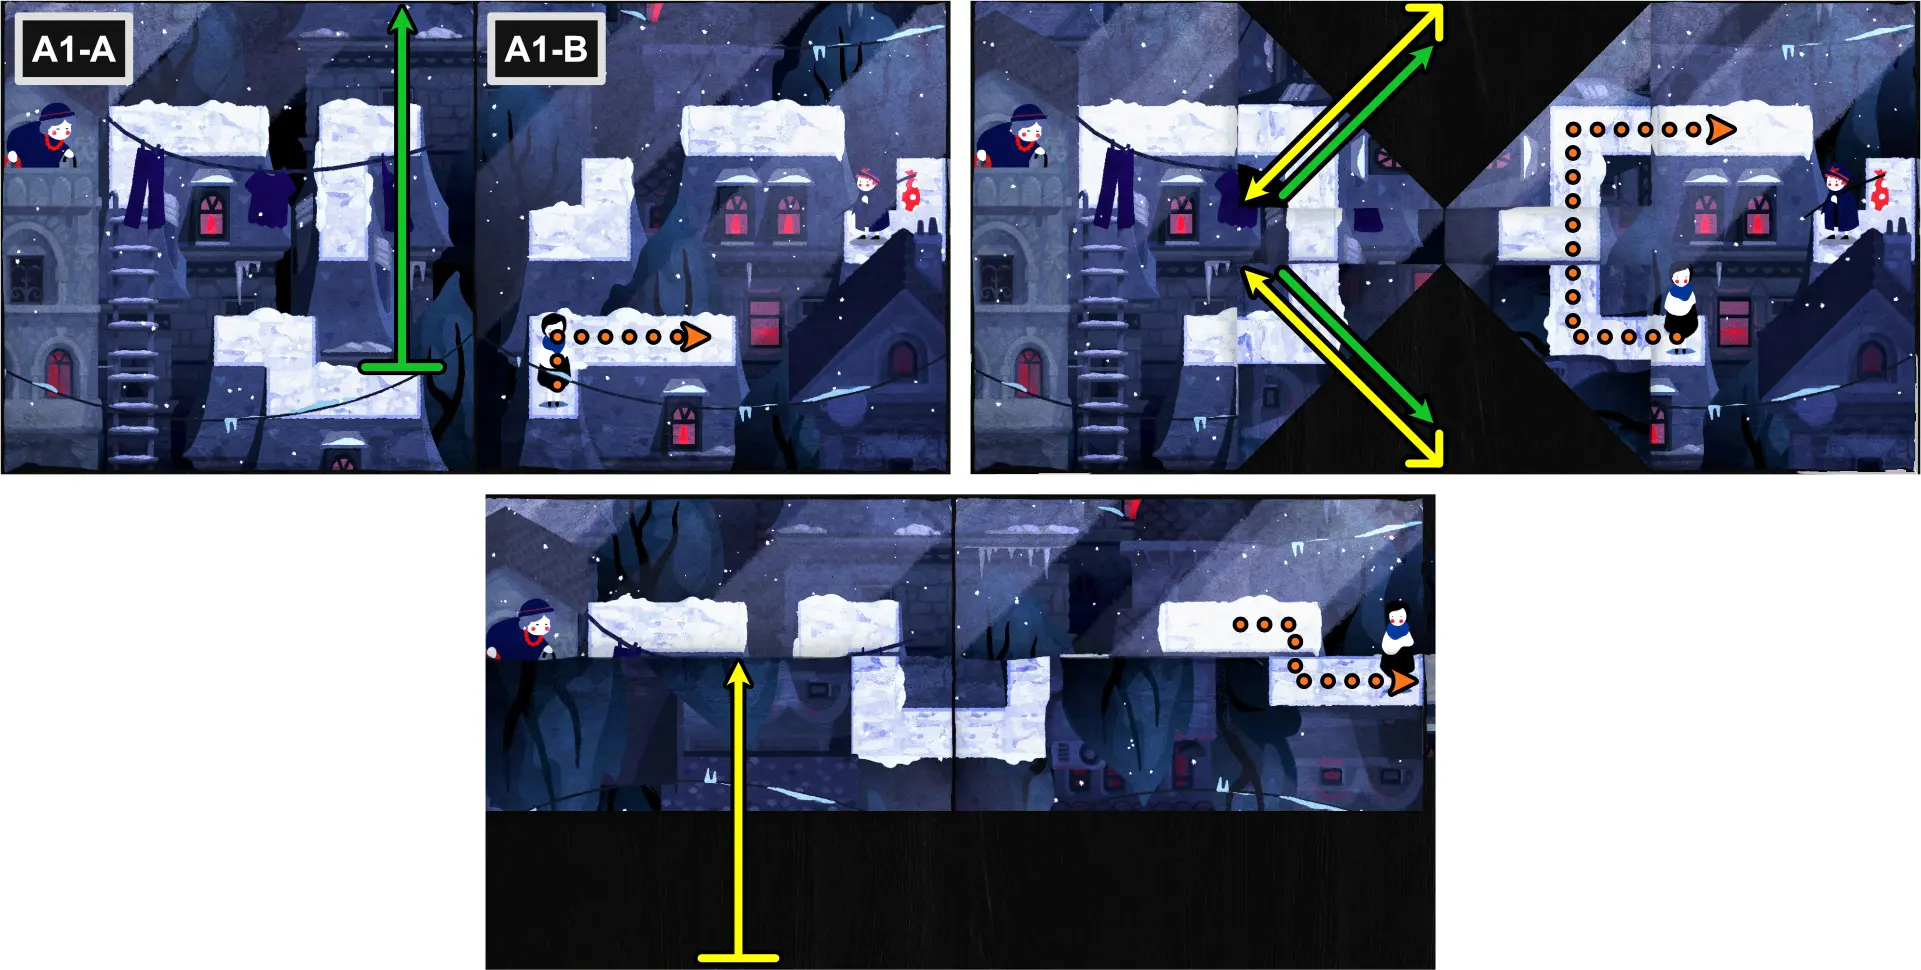
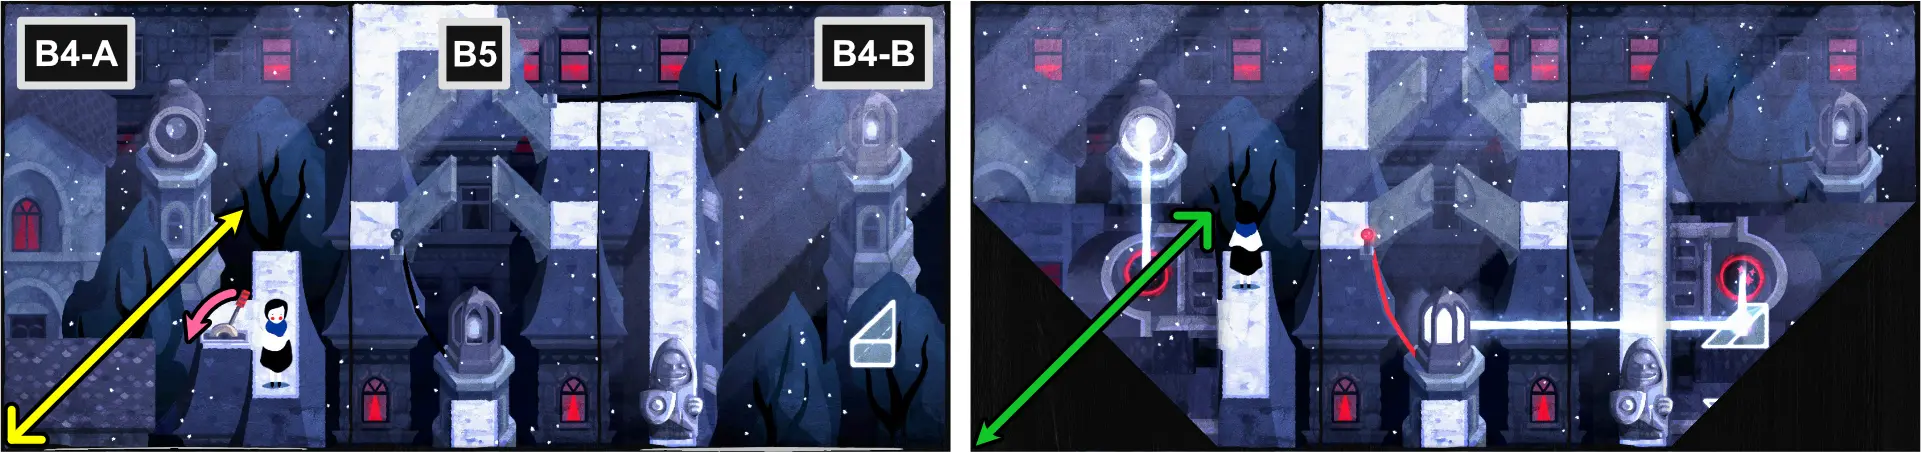
You’ll find that Winslow the Keeper is also stranded by the lighthouse. [01c-4]
- Move Paige to the leftmost side of the map.
- Using the upper right corner, fold diagonally, aligned to the right of Paige, to reveal a path.
- Follow the path to the bottom of the map, next to the lighthouse.
- Unfold the map to reveal Winslow the Keeper.
- Talk to Winslow the Keeper.
Winslow will tell you about the cave up north and the rocks that seem to have a secret meaning to them.
- Following the previous steps in reverse, go back to B2.
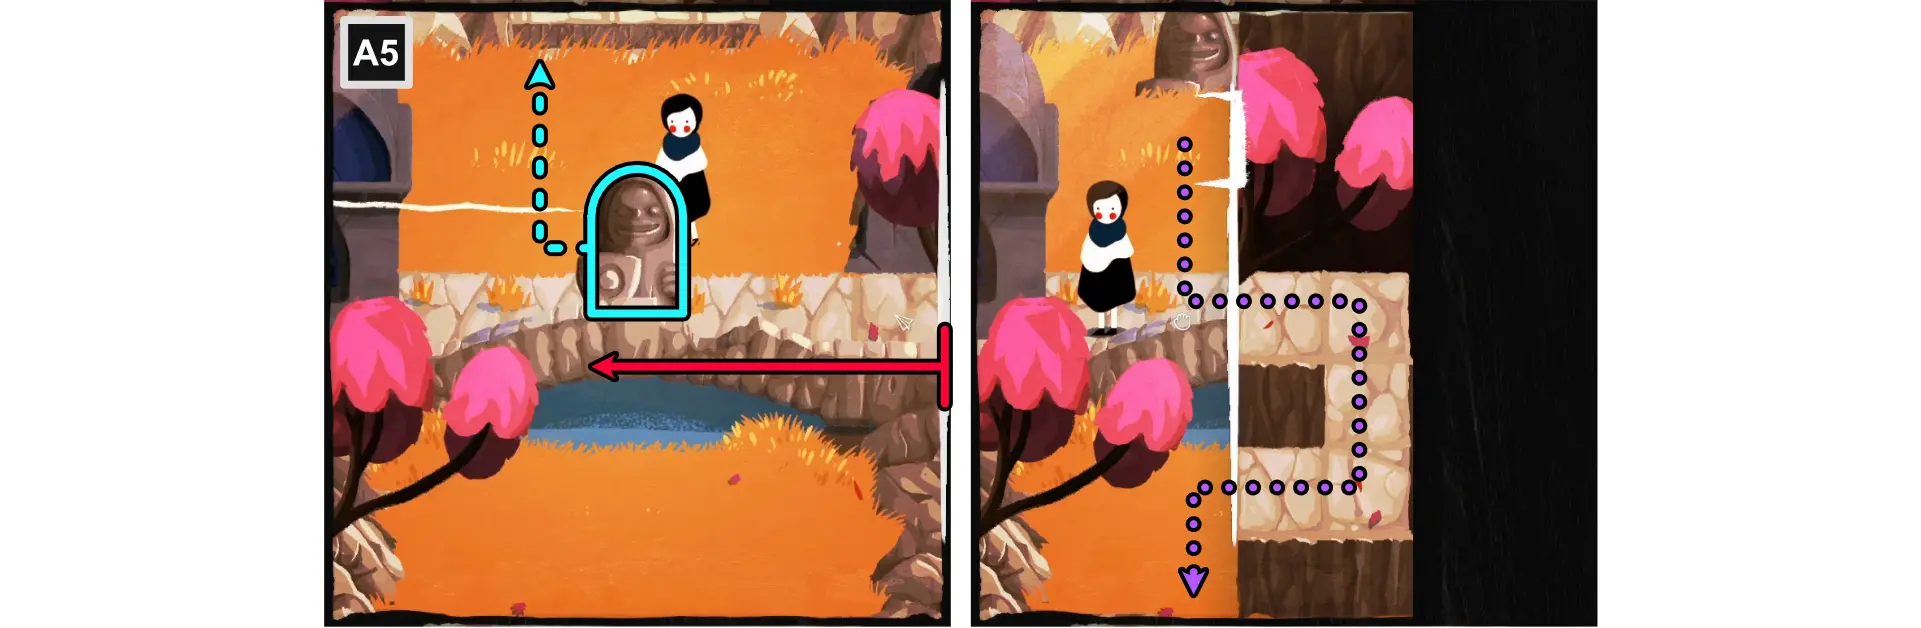
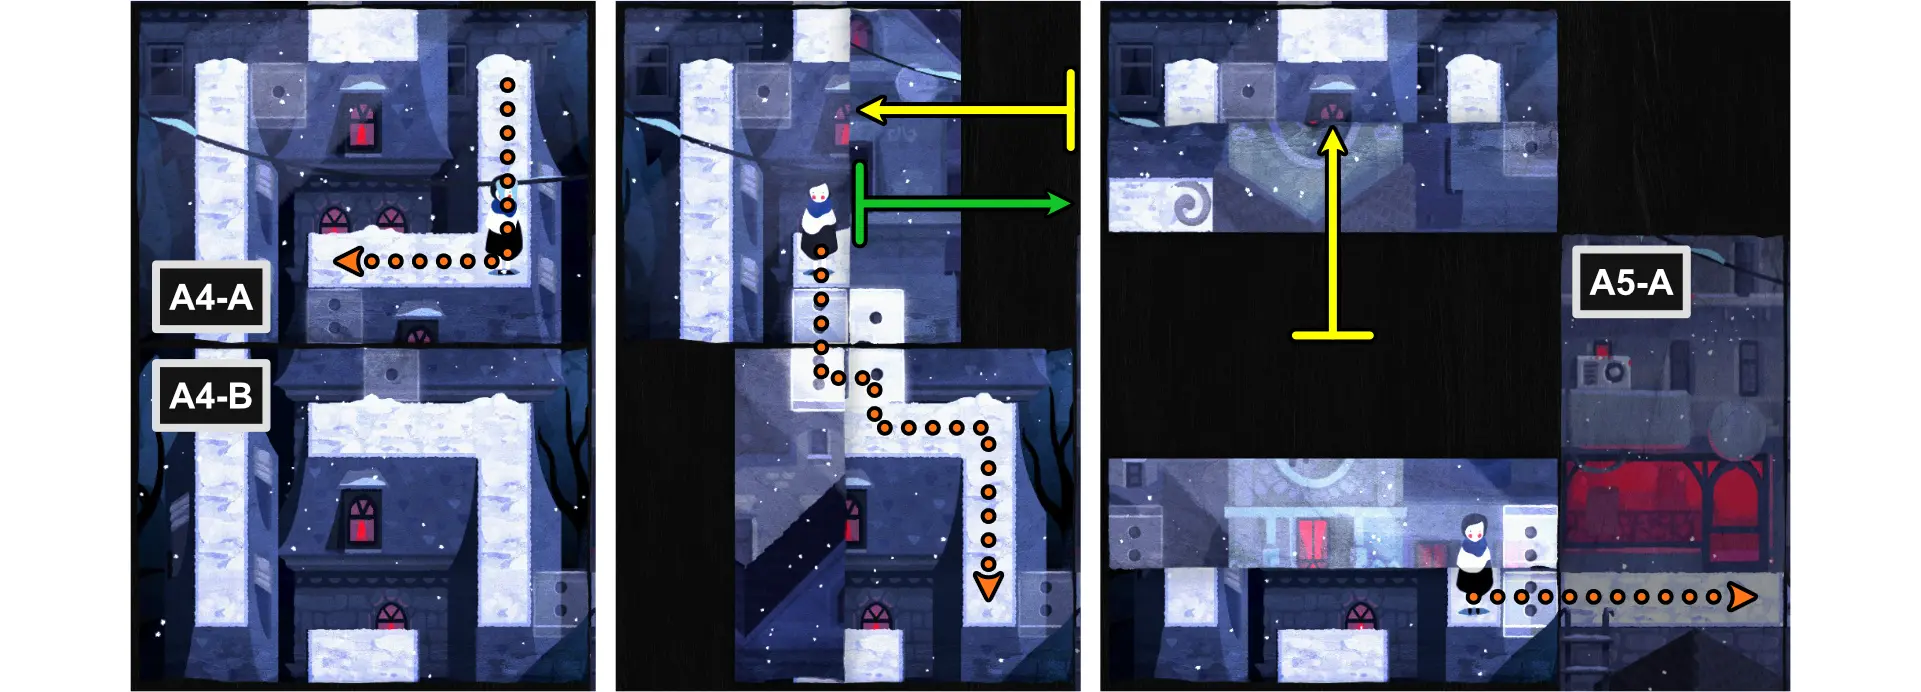
Paige’s parents will call for Paige to come back inside the house to eat and go to sleep afterwards.
Cutscene: Packing Up
- Using the left edge, fold horizontally, just behind Paige.
- Using the right edge, fold horizontally, just in front of Paige.
- Unfold the image.
- Using the side edges, fold vertically to the center.
- Unfold the image.
- Using the top edge, fold vertically, aligned to the edge of the suitcase, to close it.
- Unfold the image.
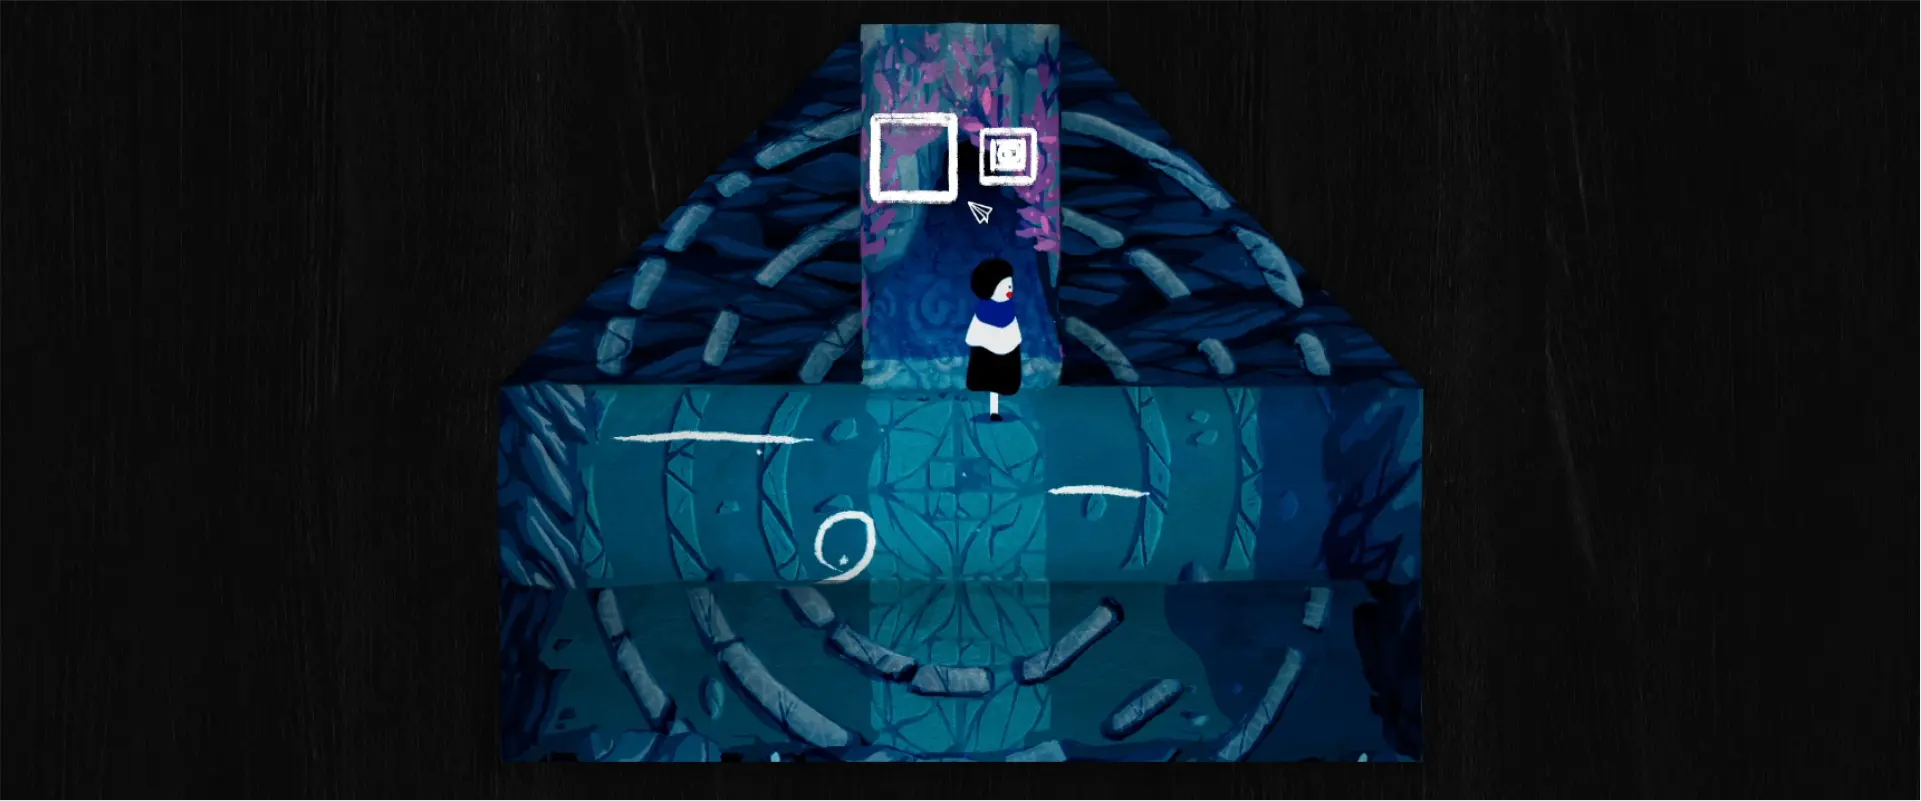
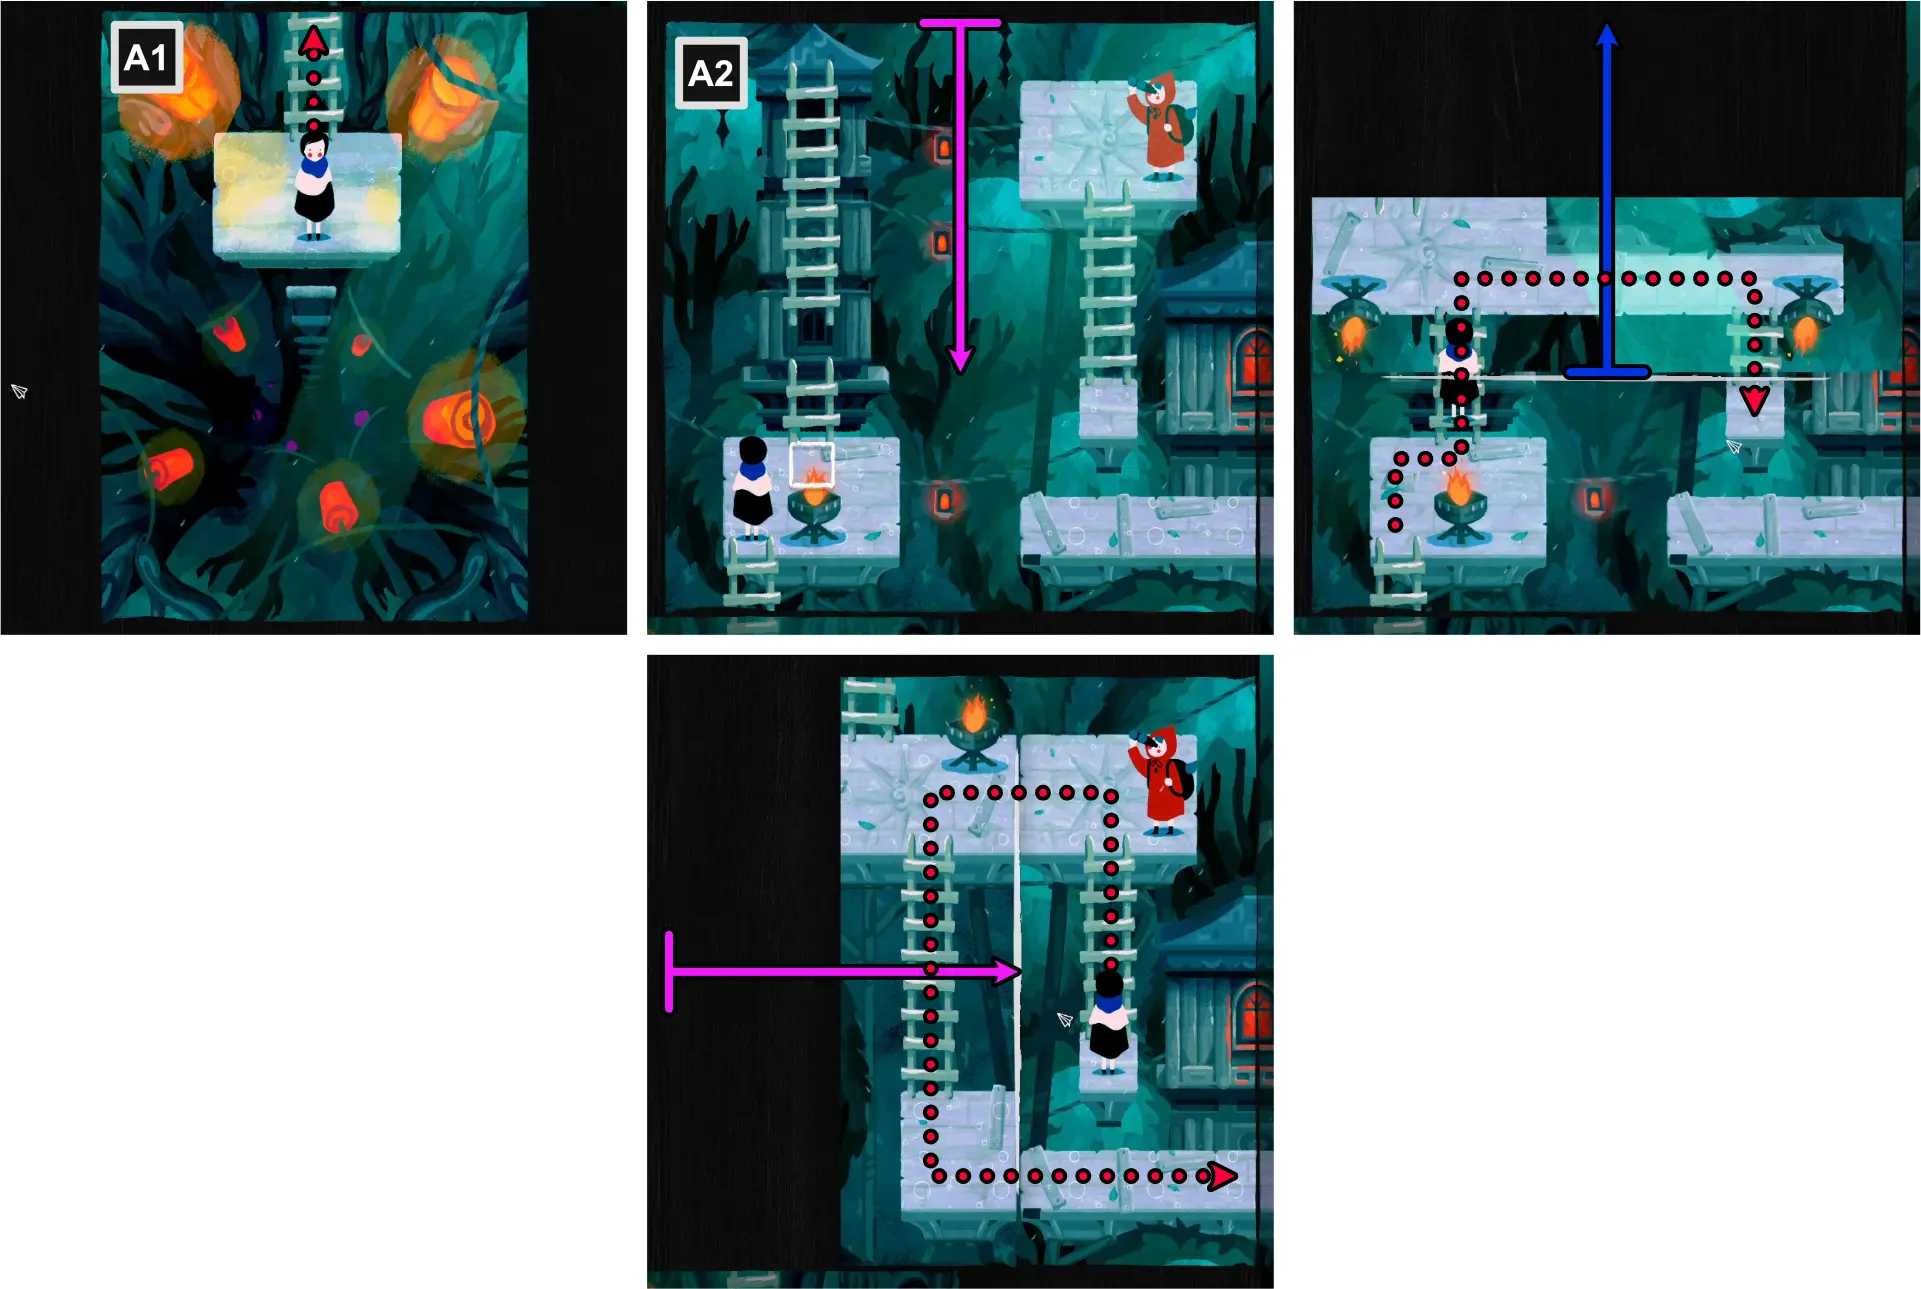
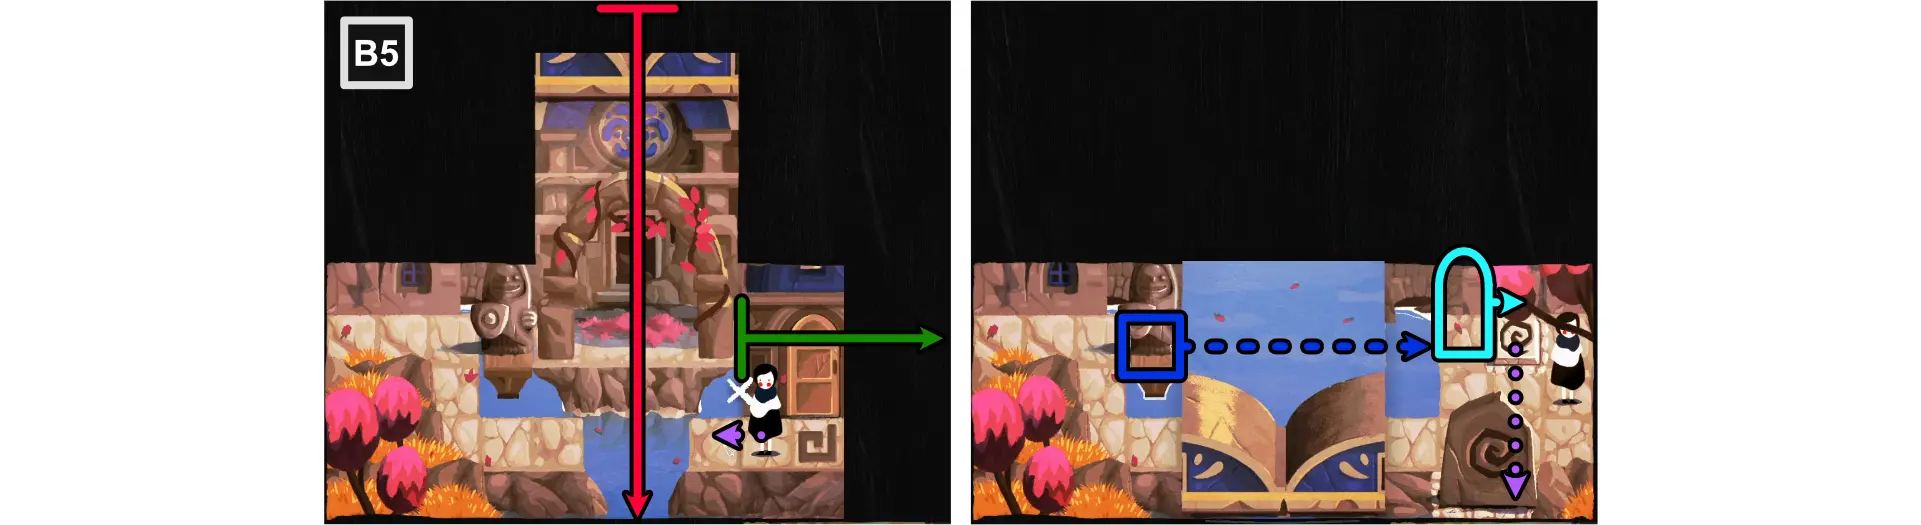
Leaving Southfold
- Go to A1.
You’ll see an outline of a deer in the middle of the map. The game will urge you to tap the Hint icon to show you how hints work in the game.
- Move Paige to the center of the map.
- Using the upper left and right edges, fold diagonally to align it with the embossed stones on the ground.
- Using the bottom edge, fold horizontally to align it with the embossed stones on the ground.
- Once all carvings are aligned, the door will open.
- Enter the cave to end Chapter 1.
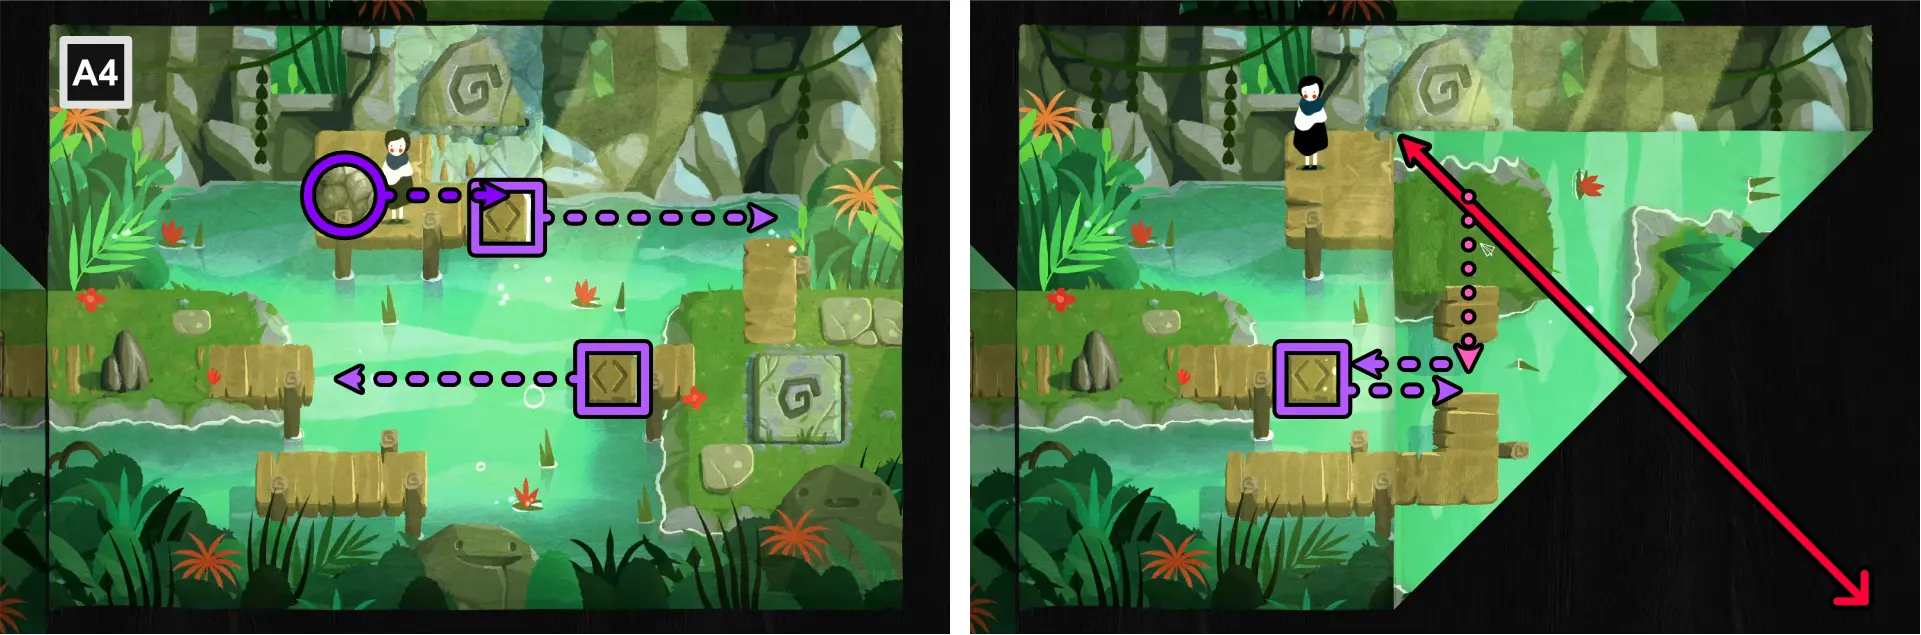
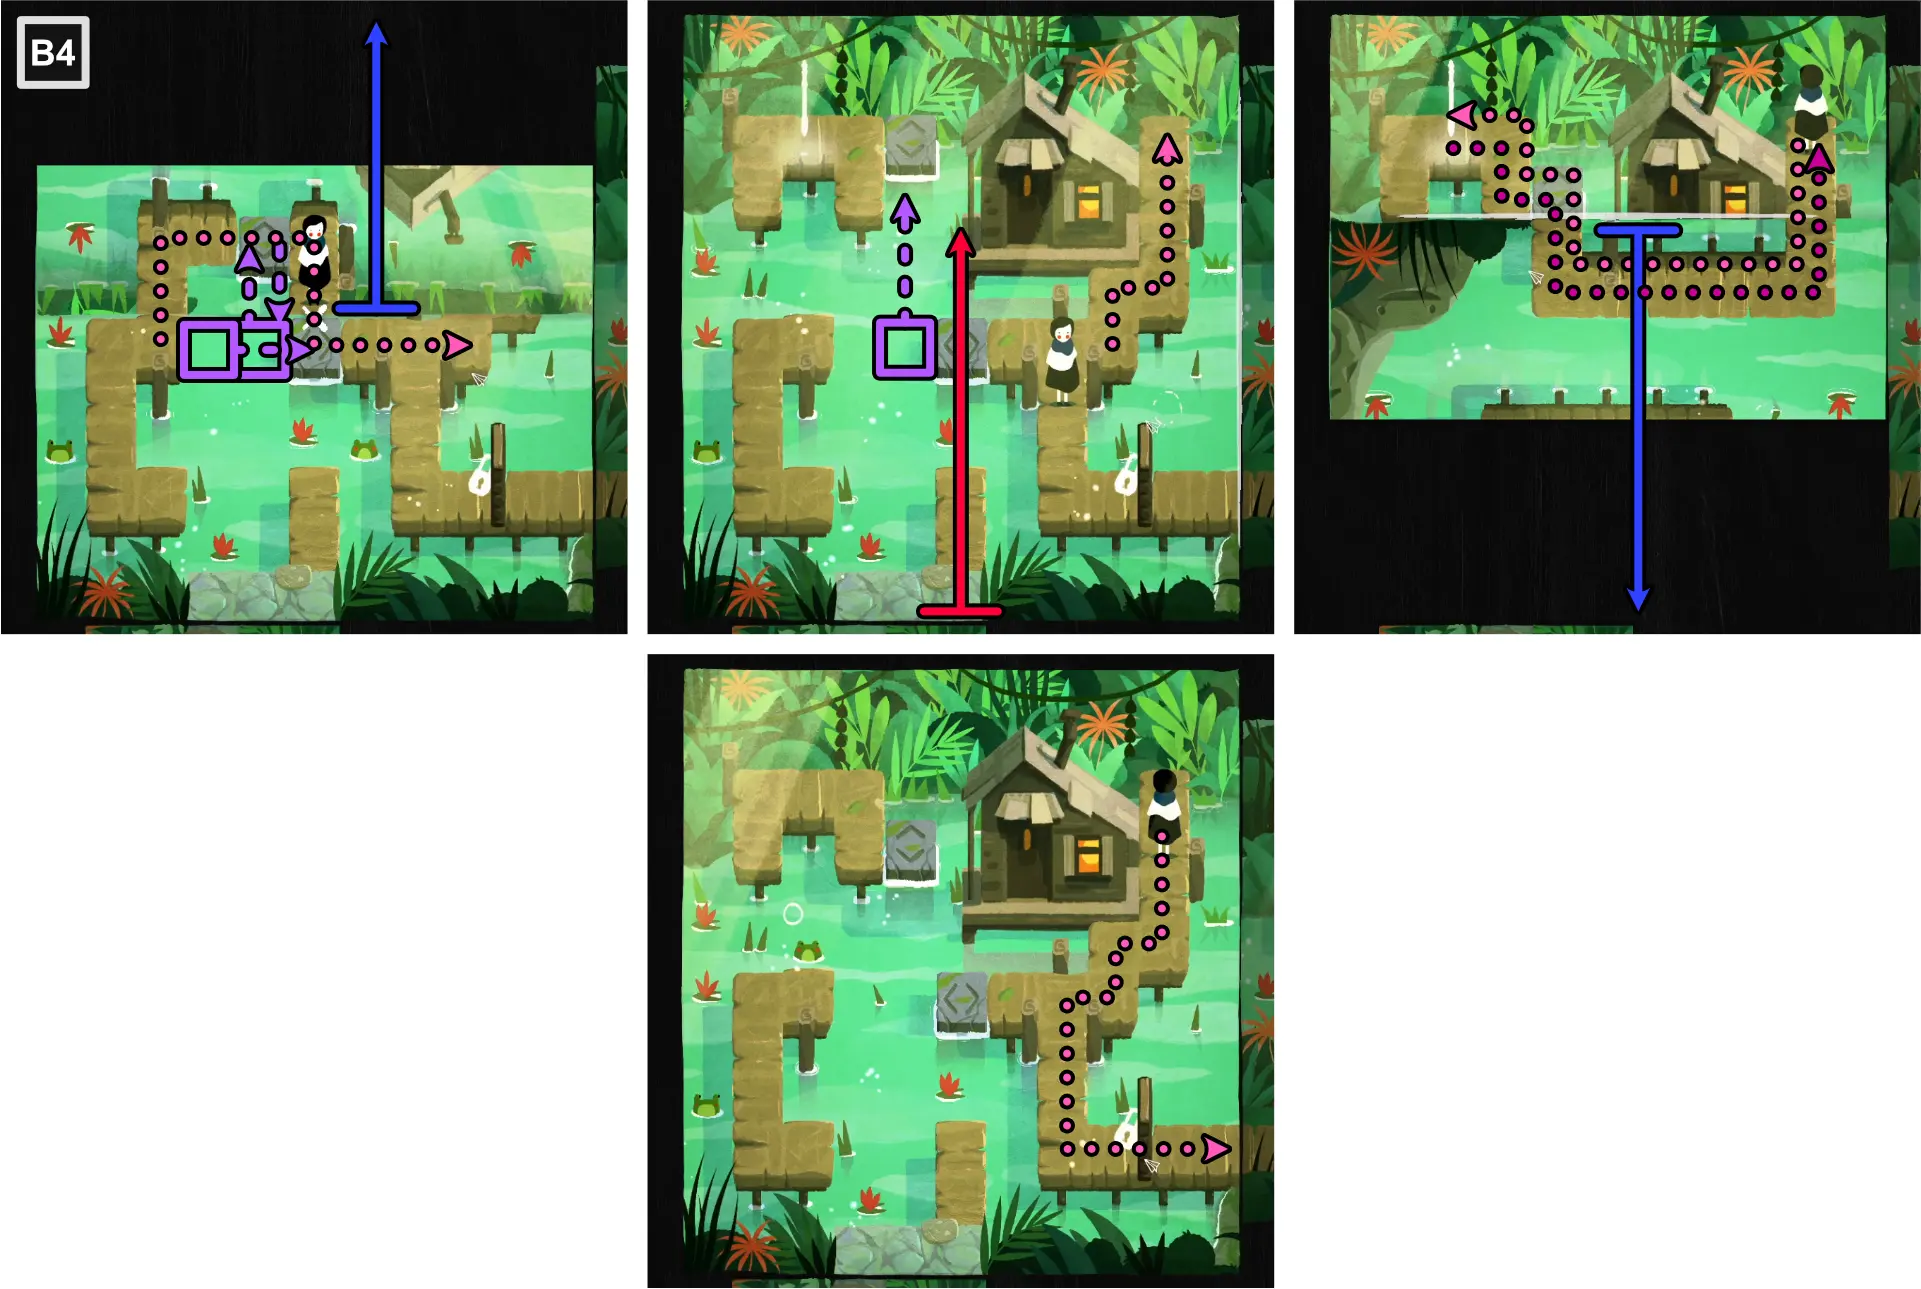
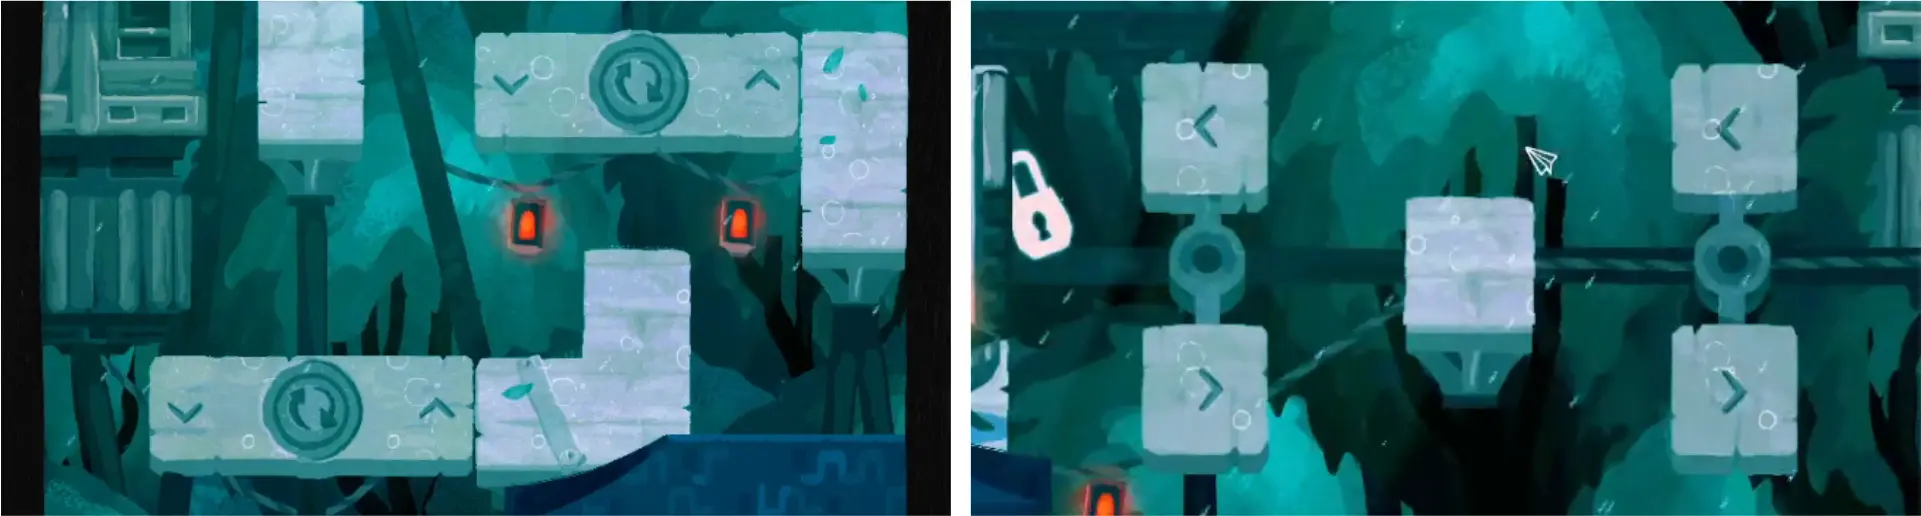
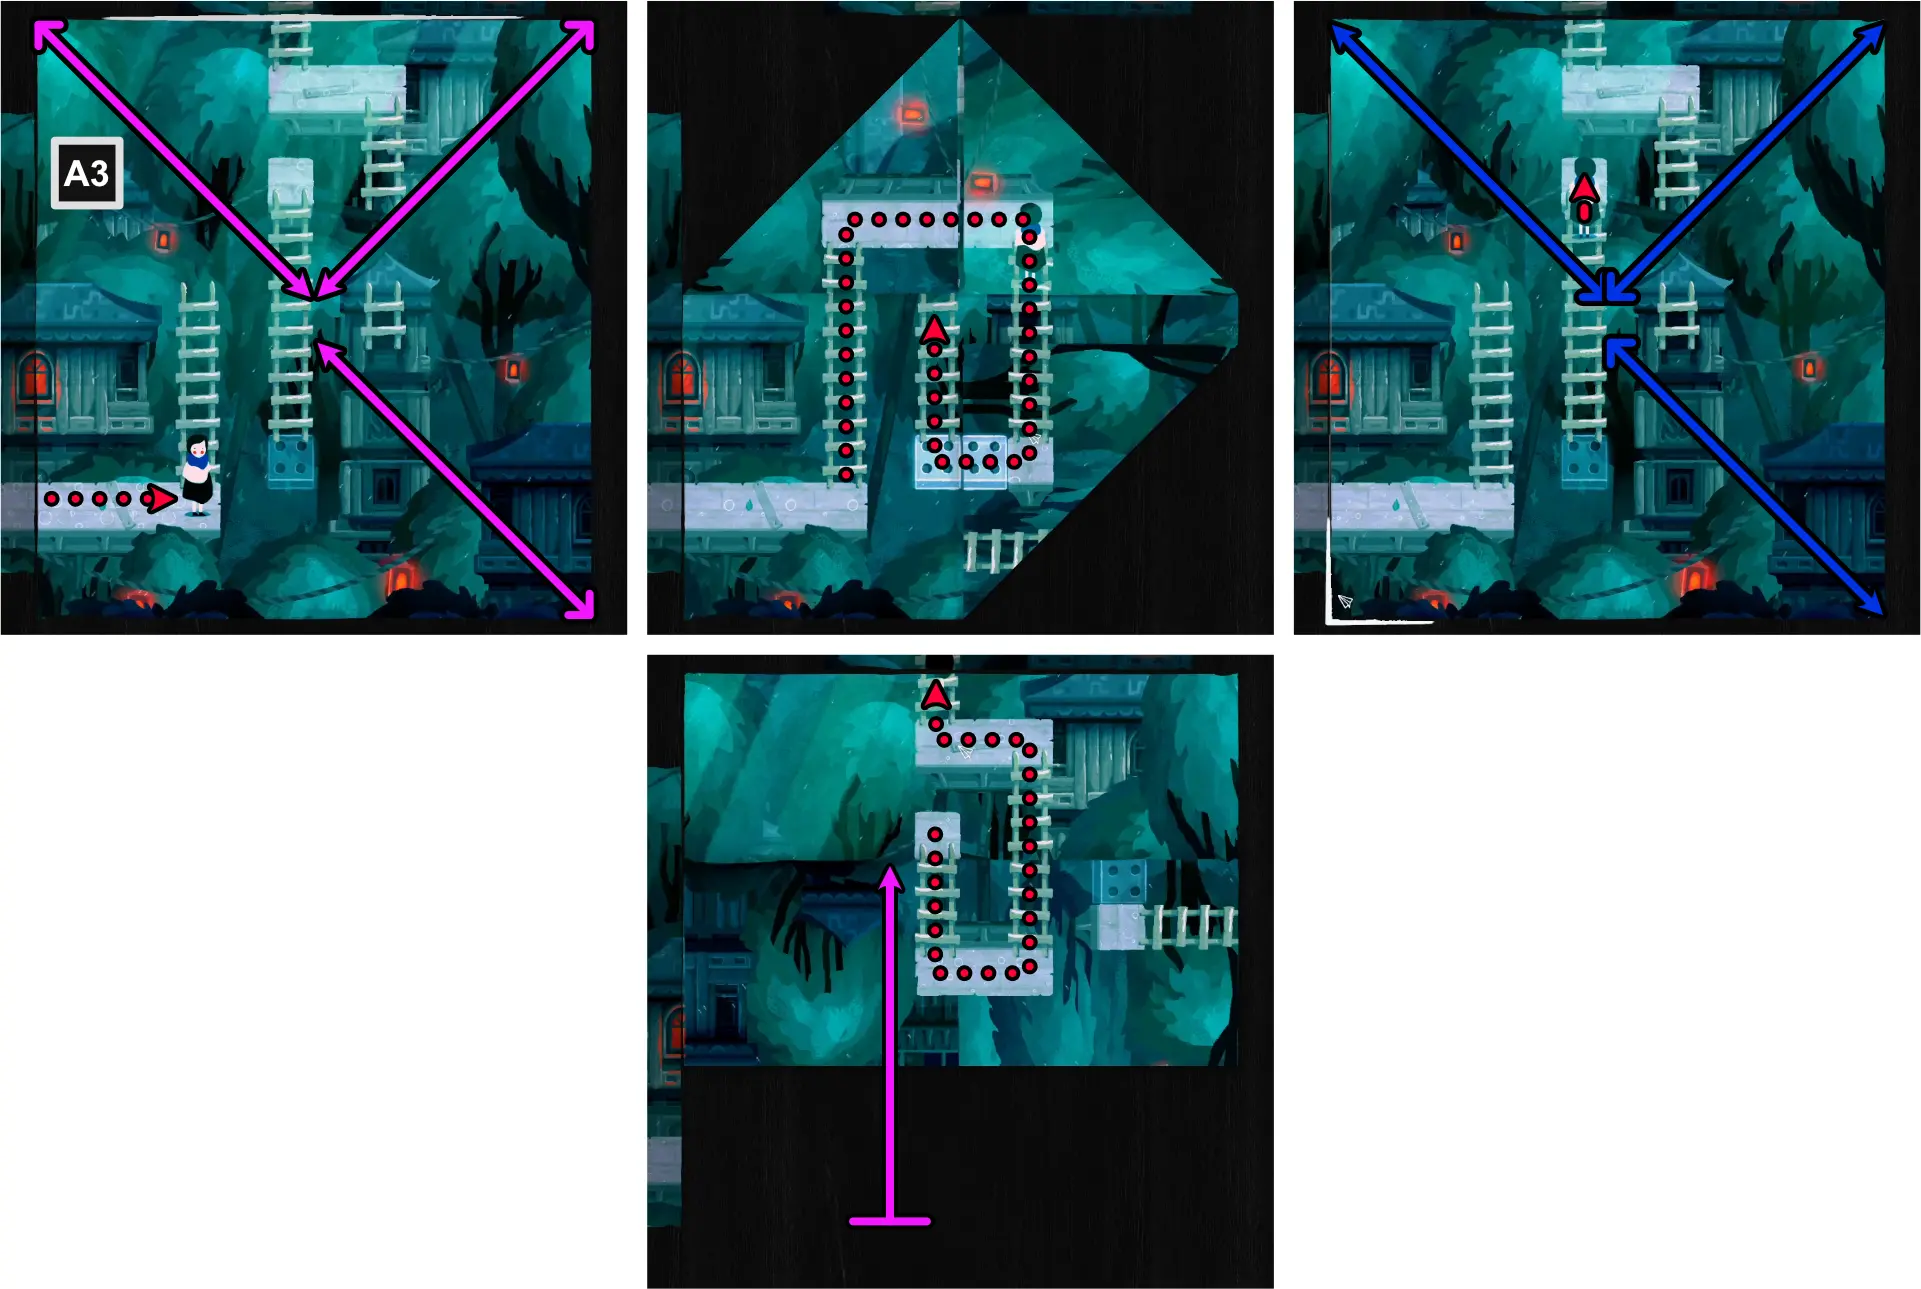
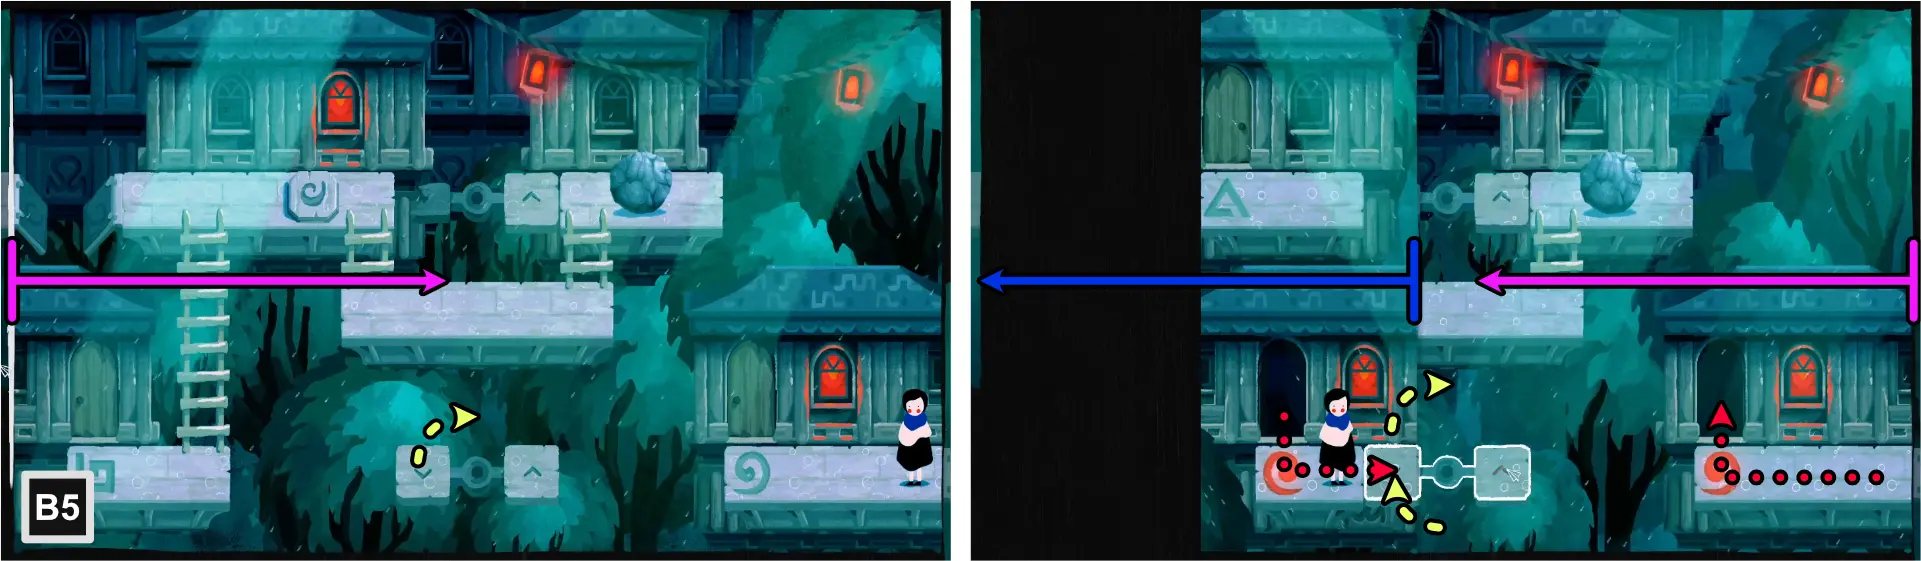
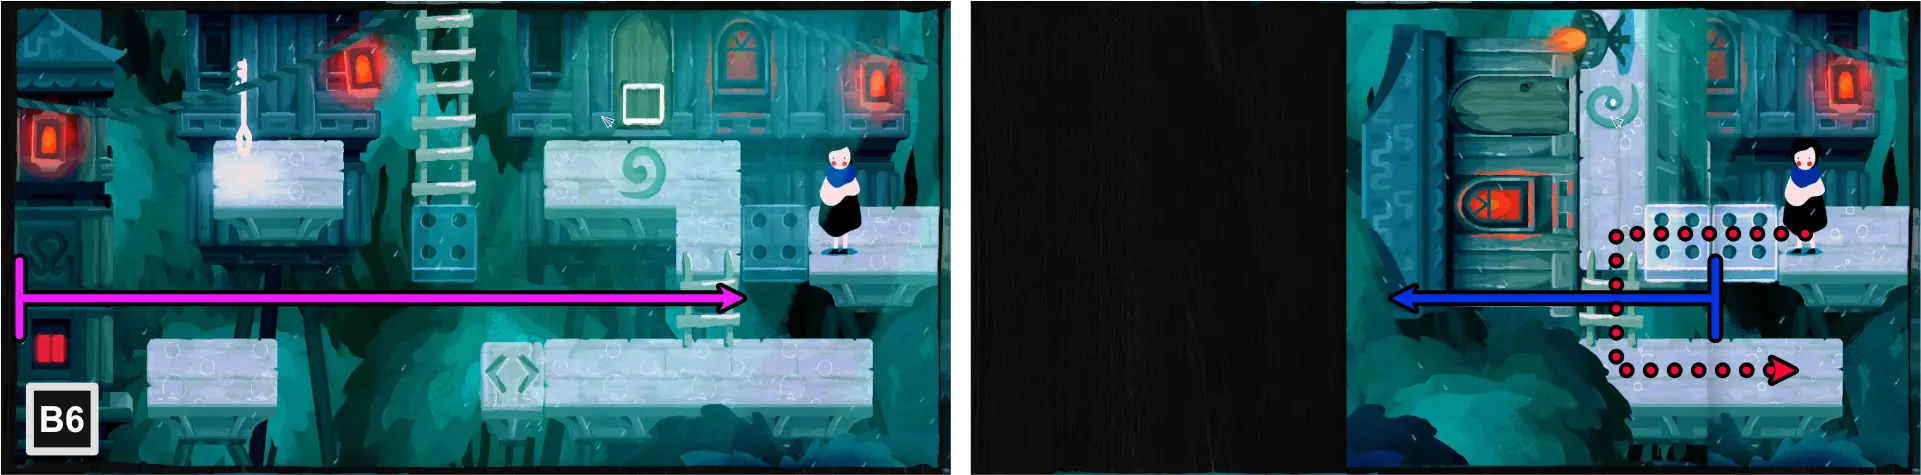
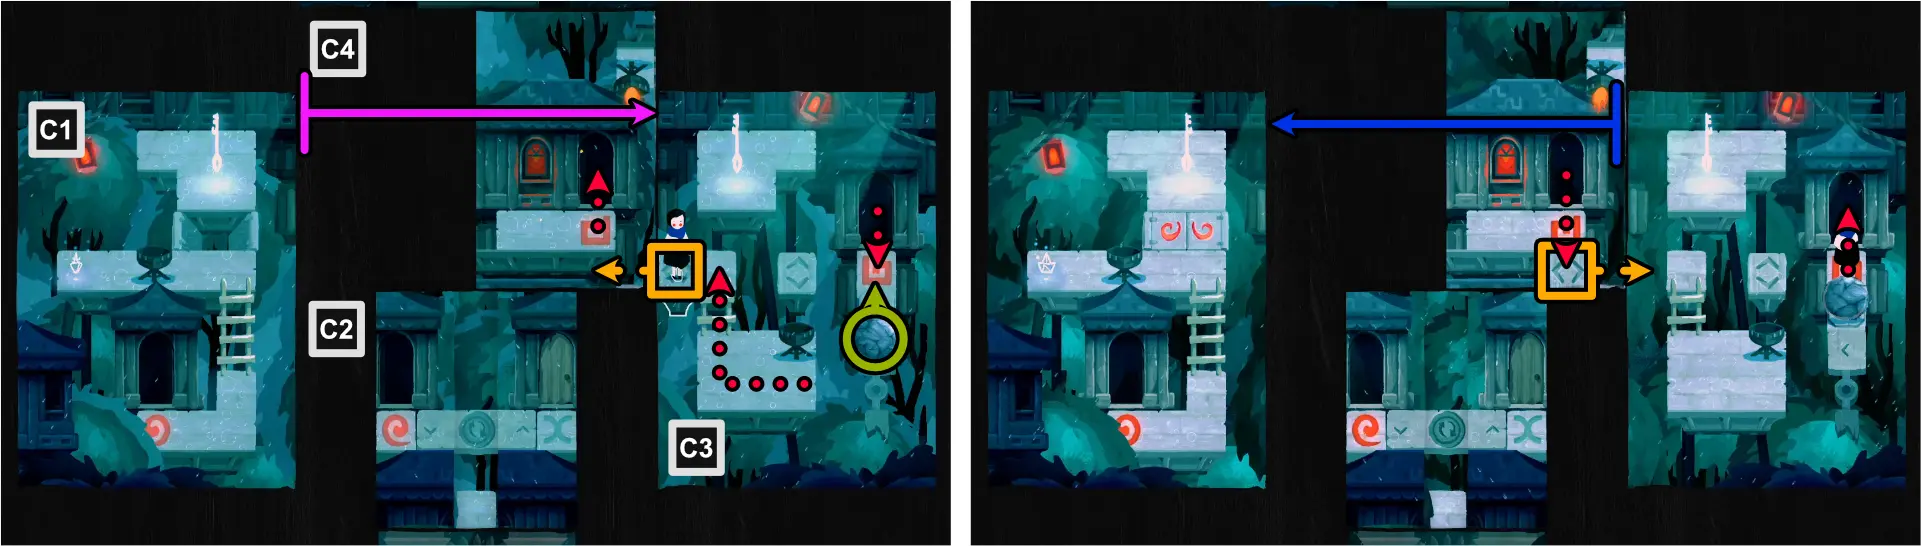
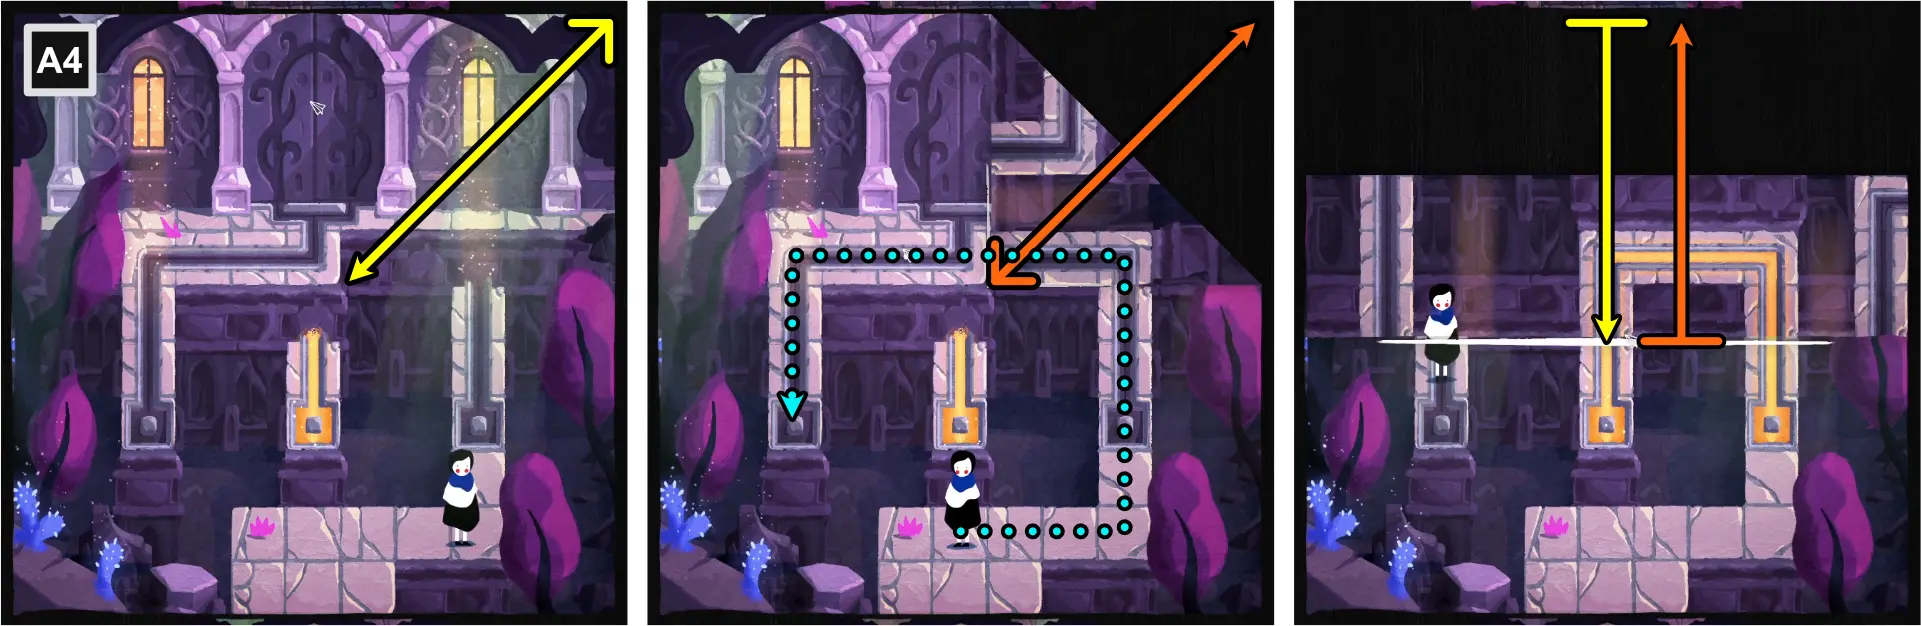
Chapter 2: Cave
For this chapter, refer to the image below for the map of the scene and the legend of the symbols and lines that appear.
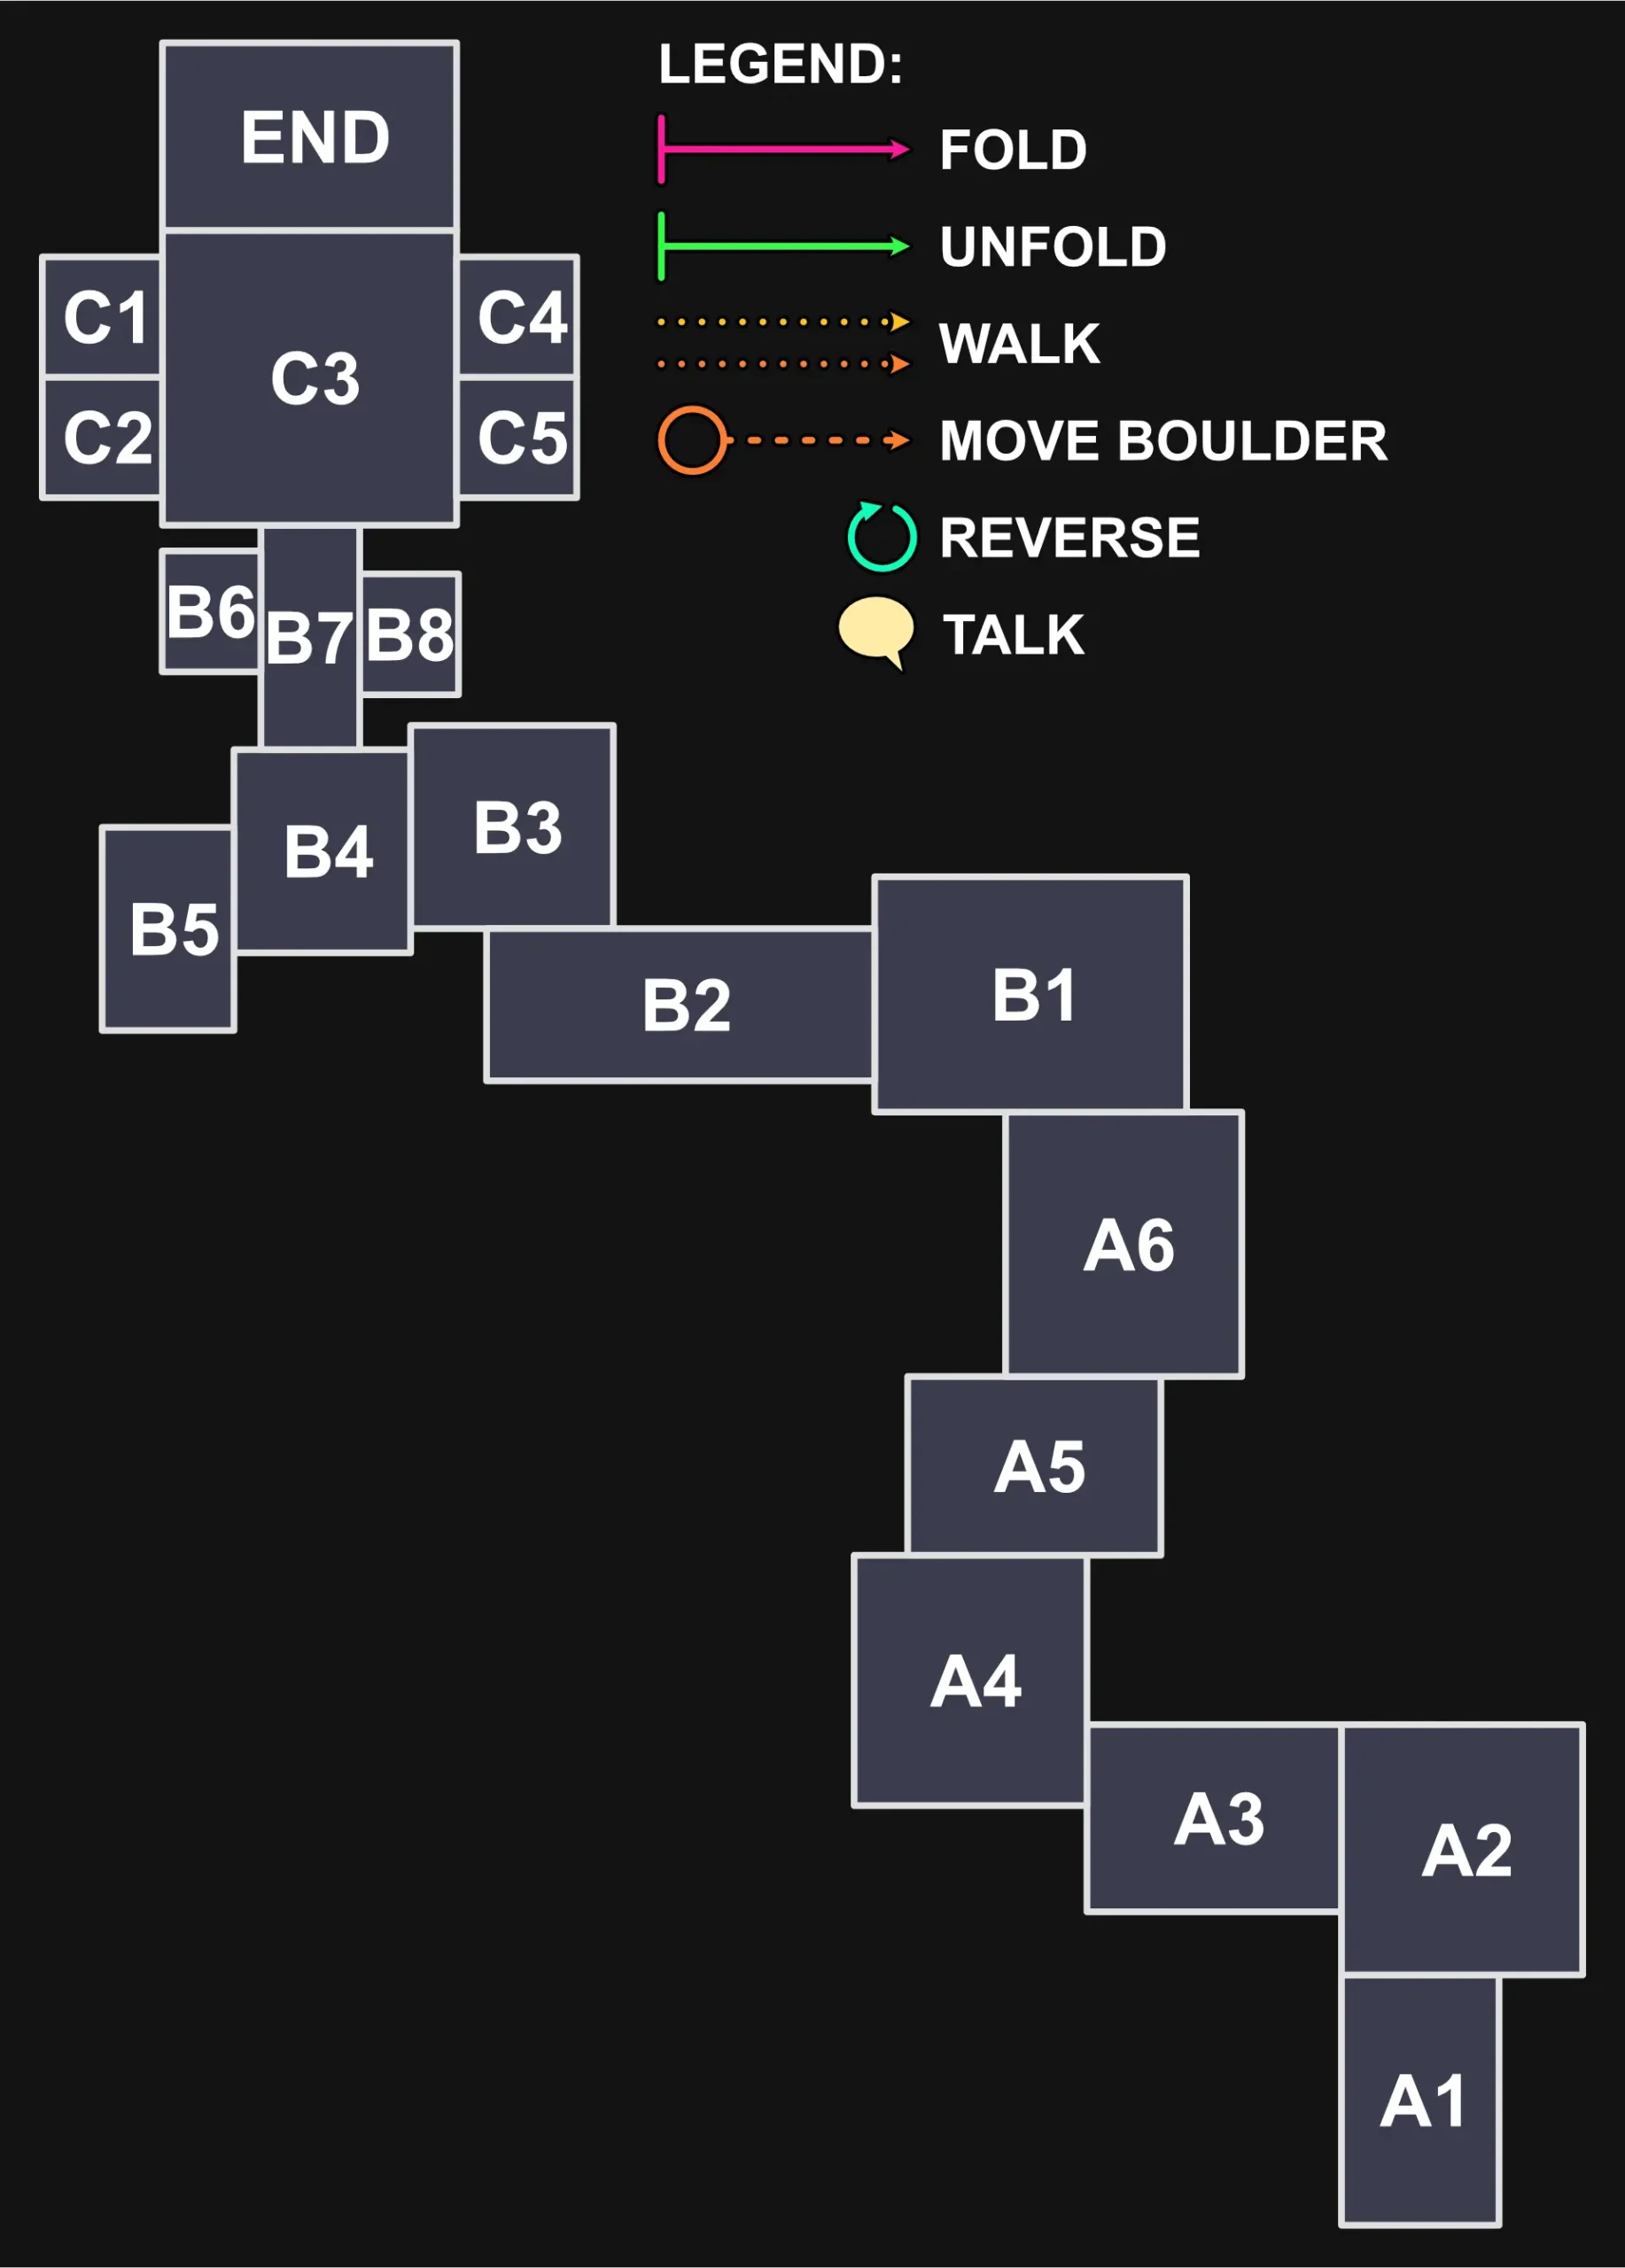
In this level, a few new mechanics are introduced:
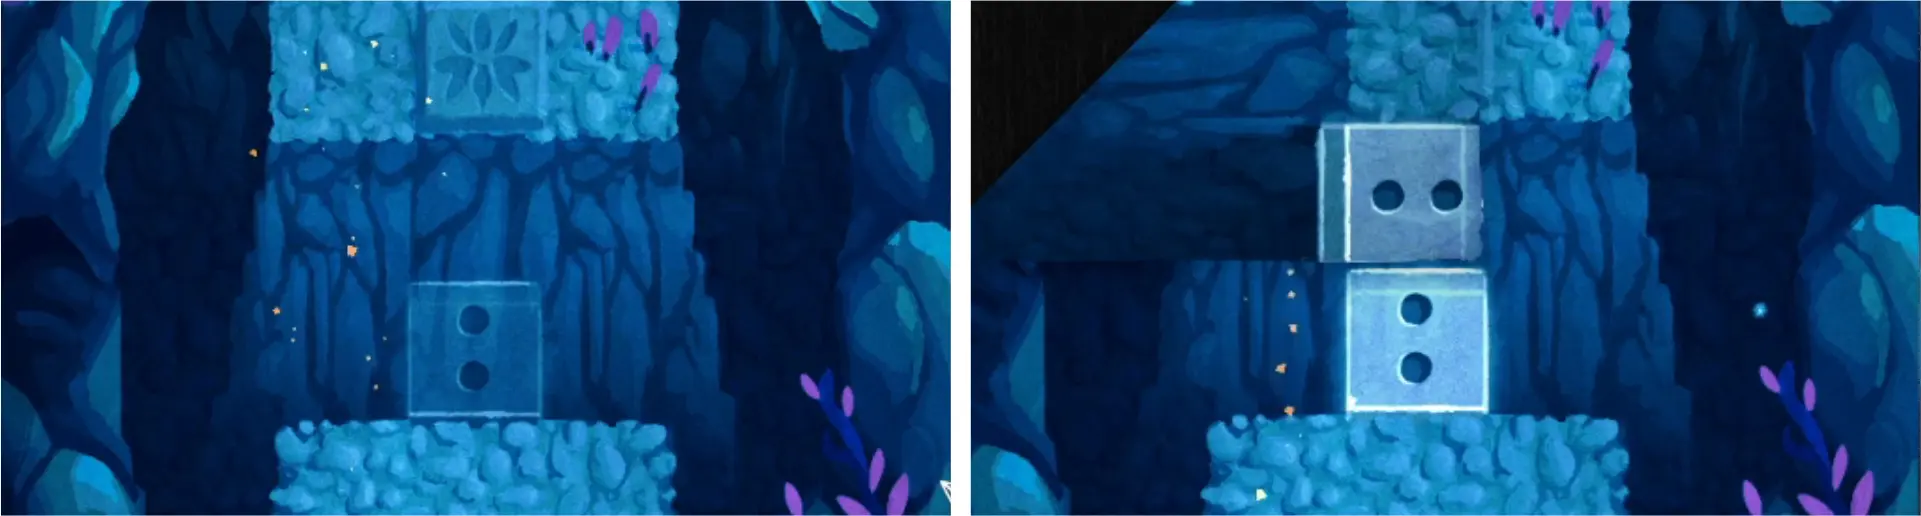
- Numbered Tiles – these tiles, alone, are translucent and cannot be crossed. When connected with other tiles of the same number, they become opaque and can be stepped on.

- Boulders – these objects can be pushed or dragged. In many cases, you may need to fold the map to make paths that will allow you to push or drag the boulder in a specific position to clear a path.
- Pressure Plates – these large tiles need to have weight on top of them in order to open a door. Boulders and other heavy objects need to be placed on it to keep the door open.
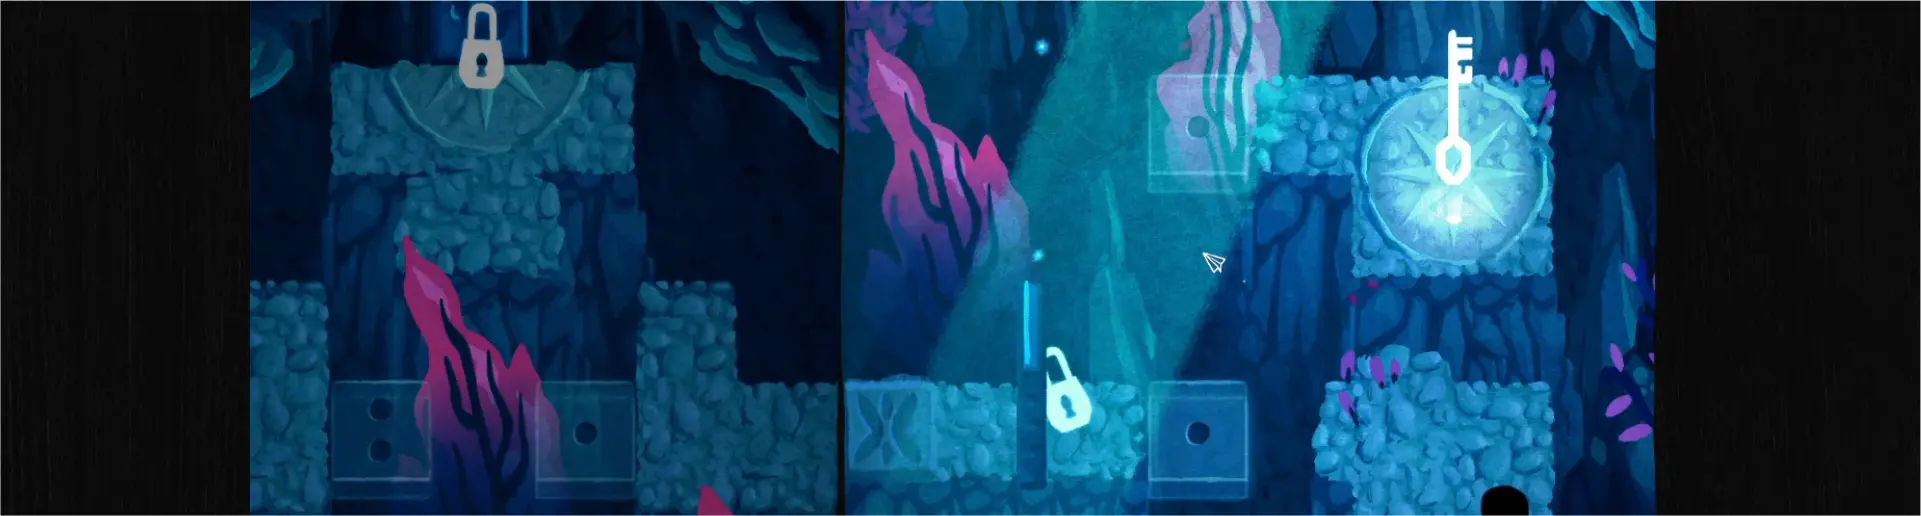
- Lock and Key – to unlock certain areas, you’ll need to collect a key for them first.
For extra achievements you can unlock for this chapter, go to the section “Achievements, Chapter 2: Cave.”
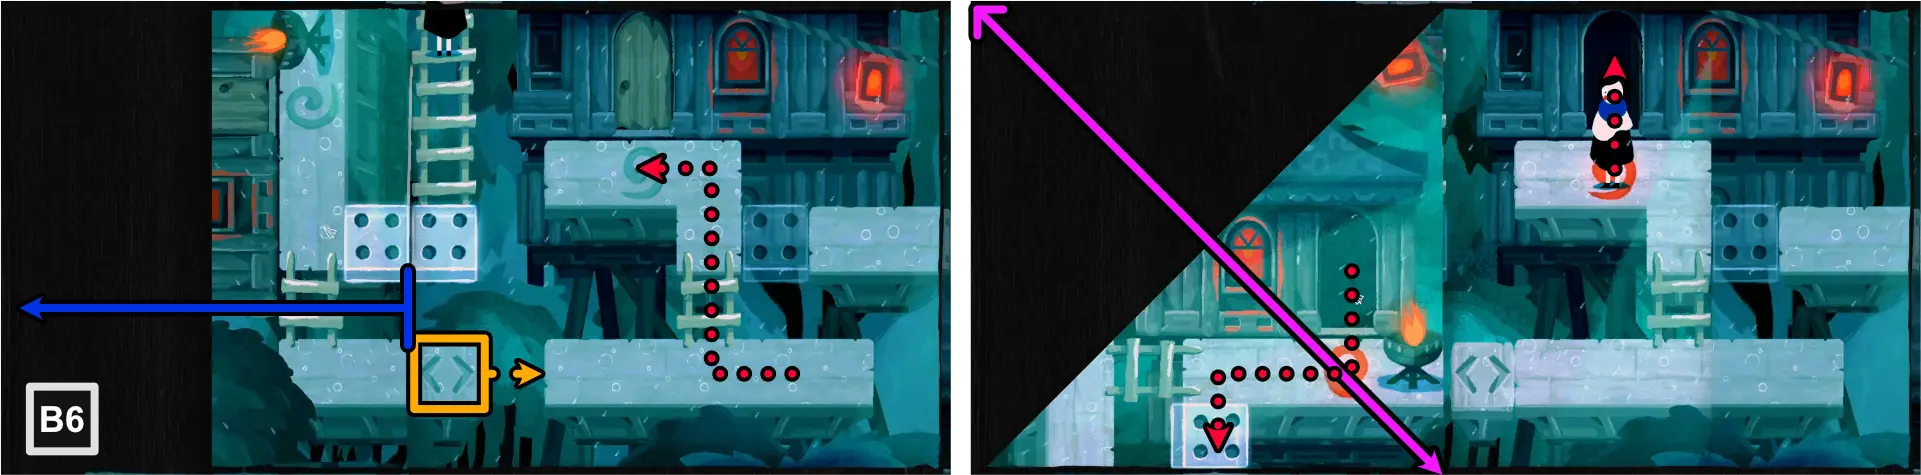
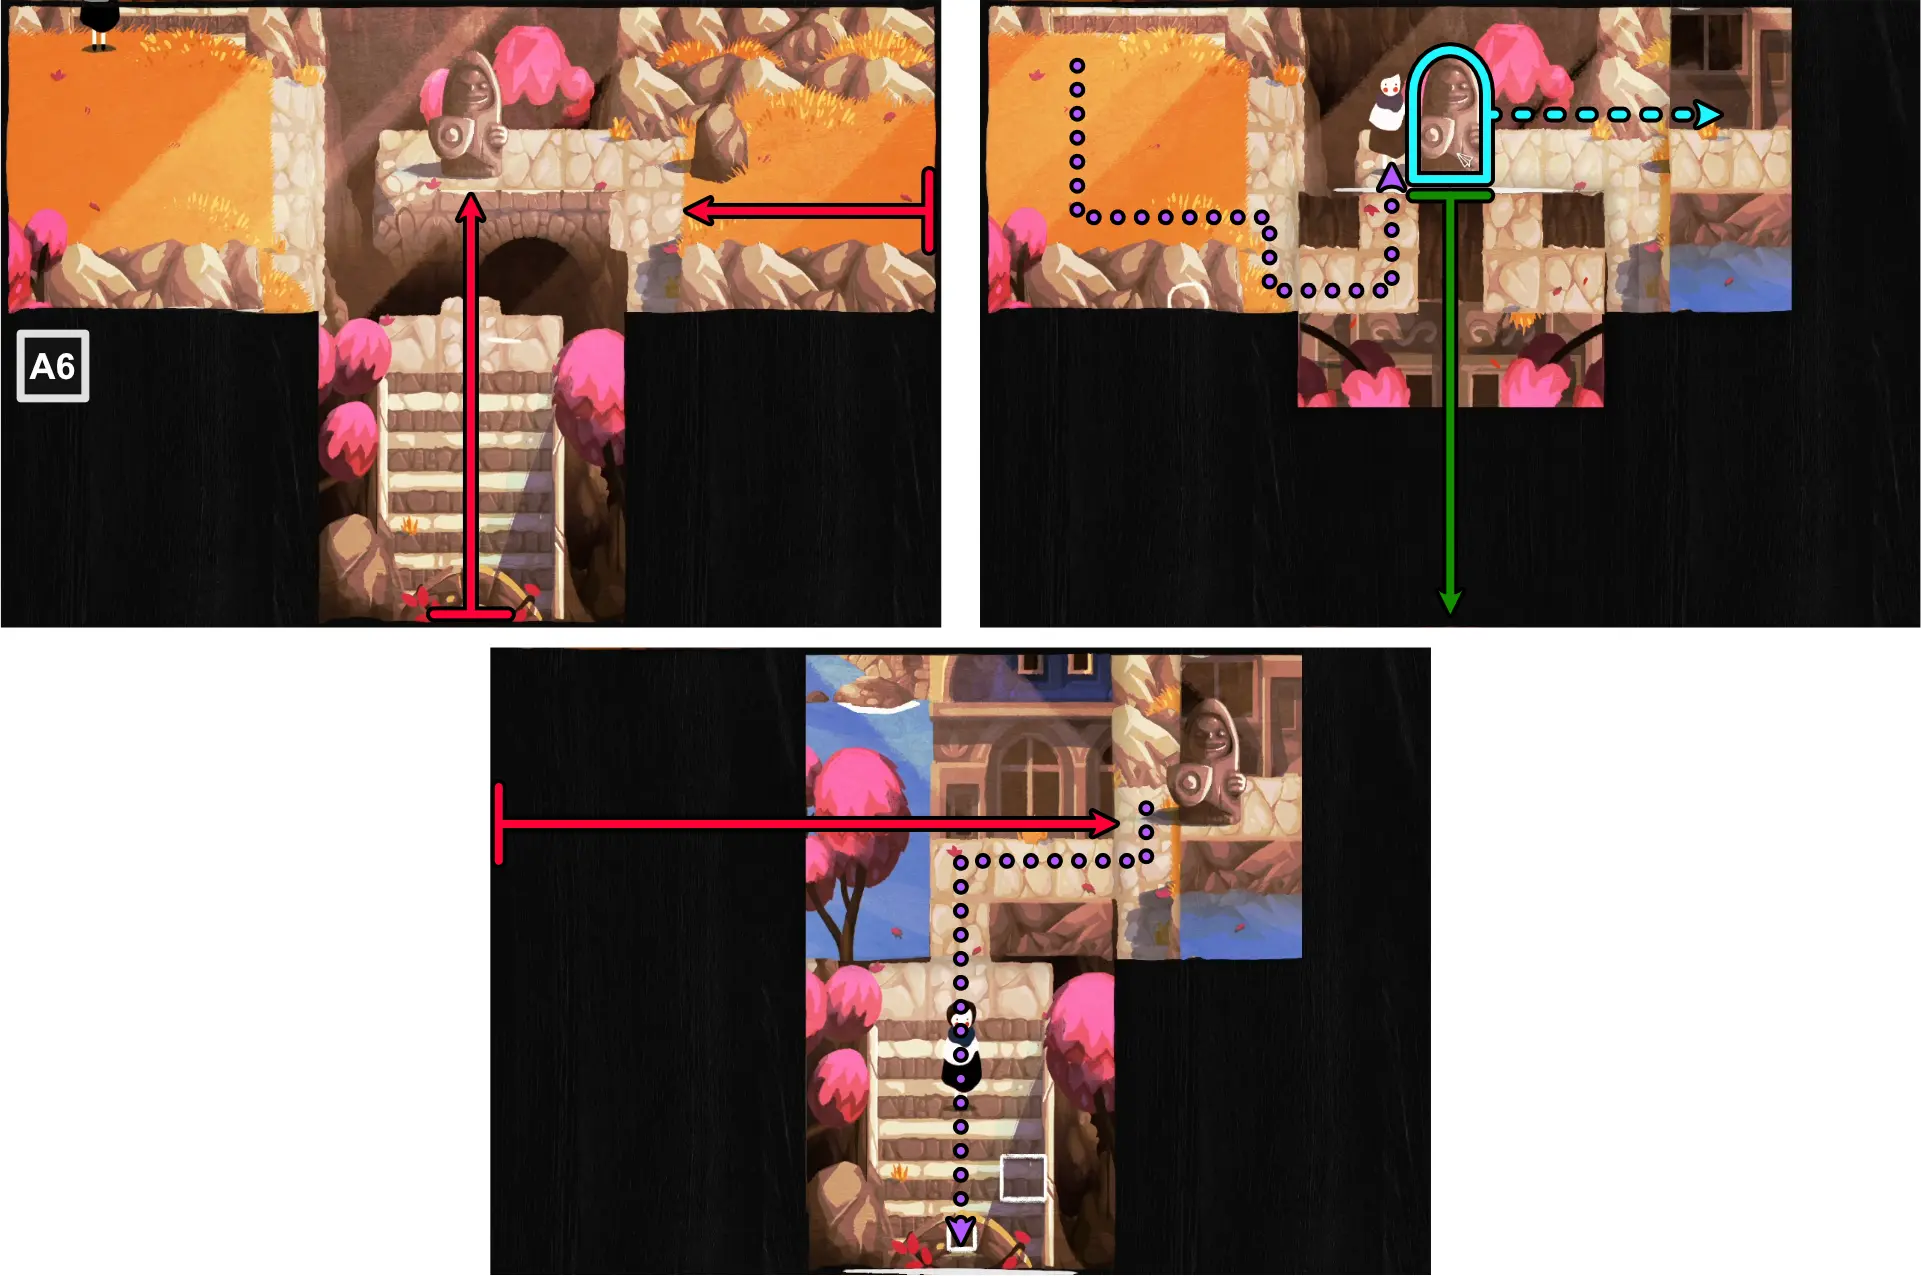
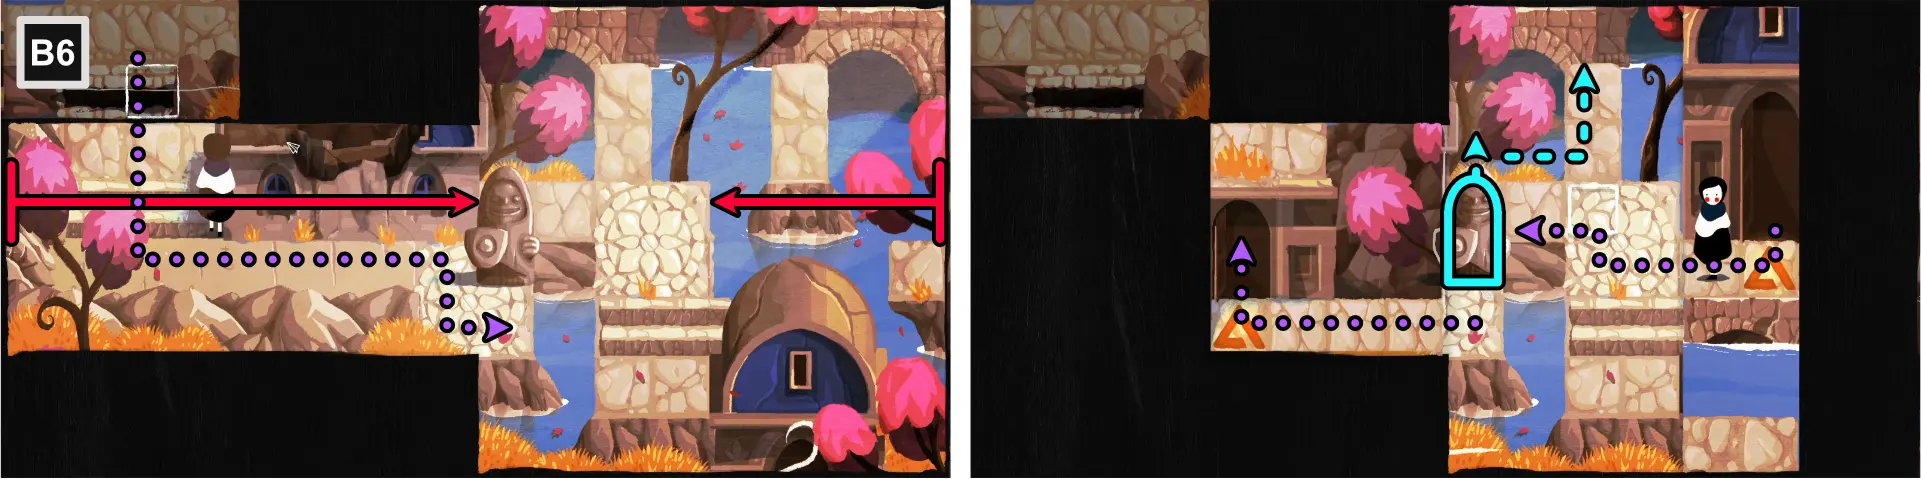
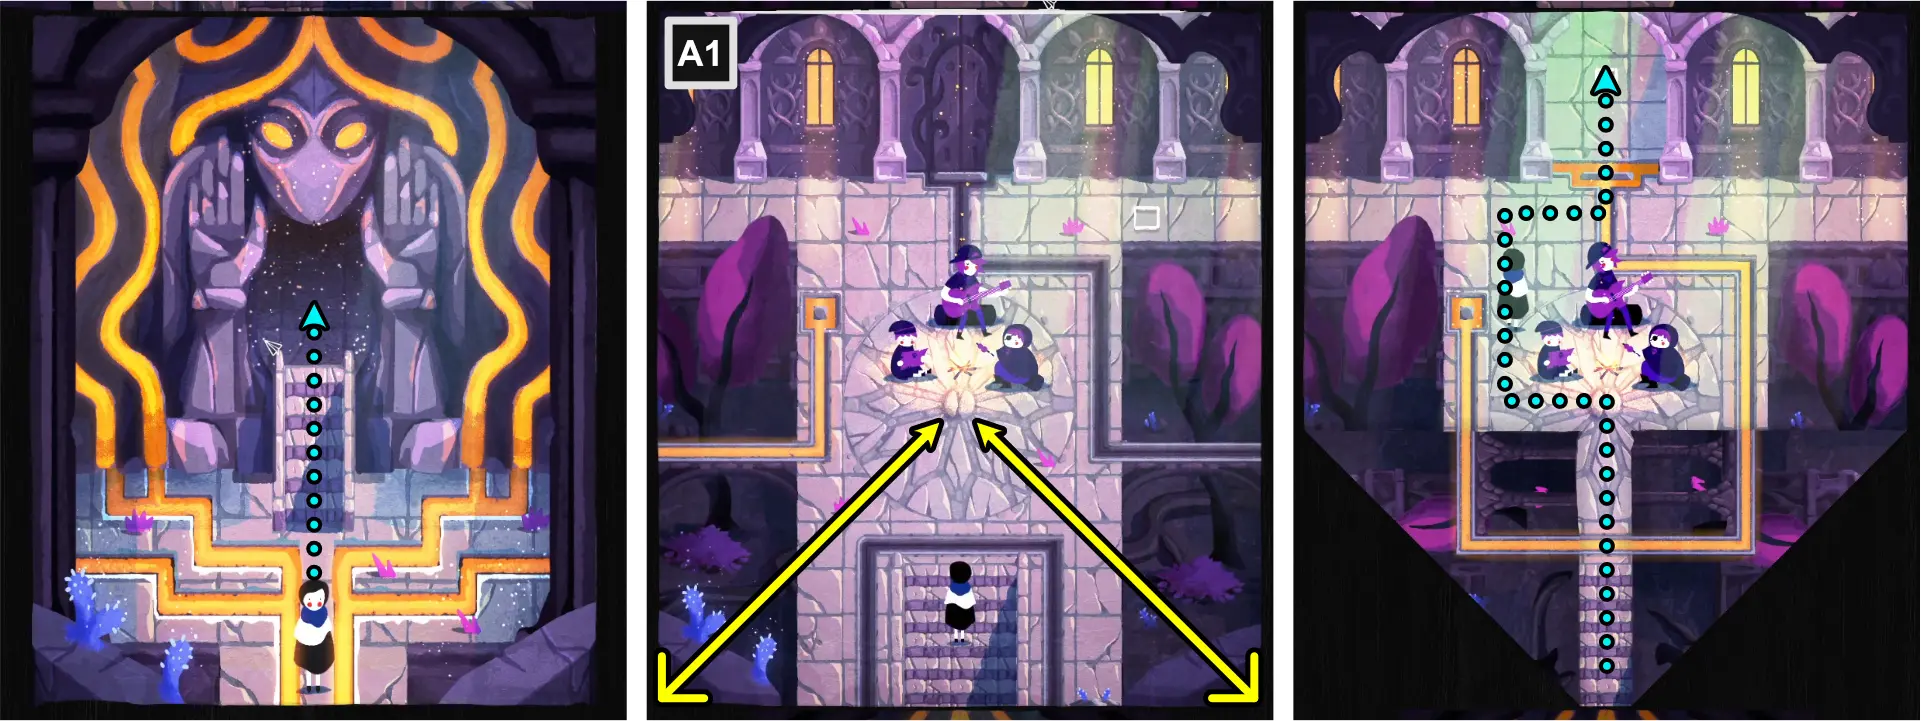
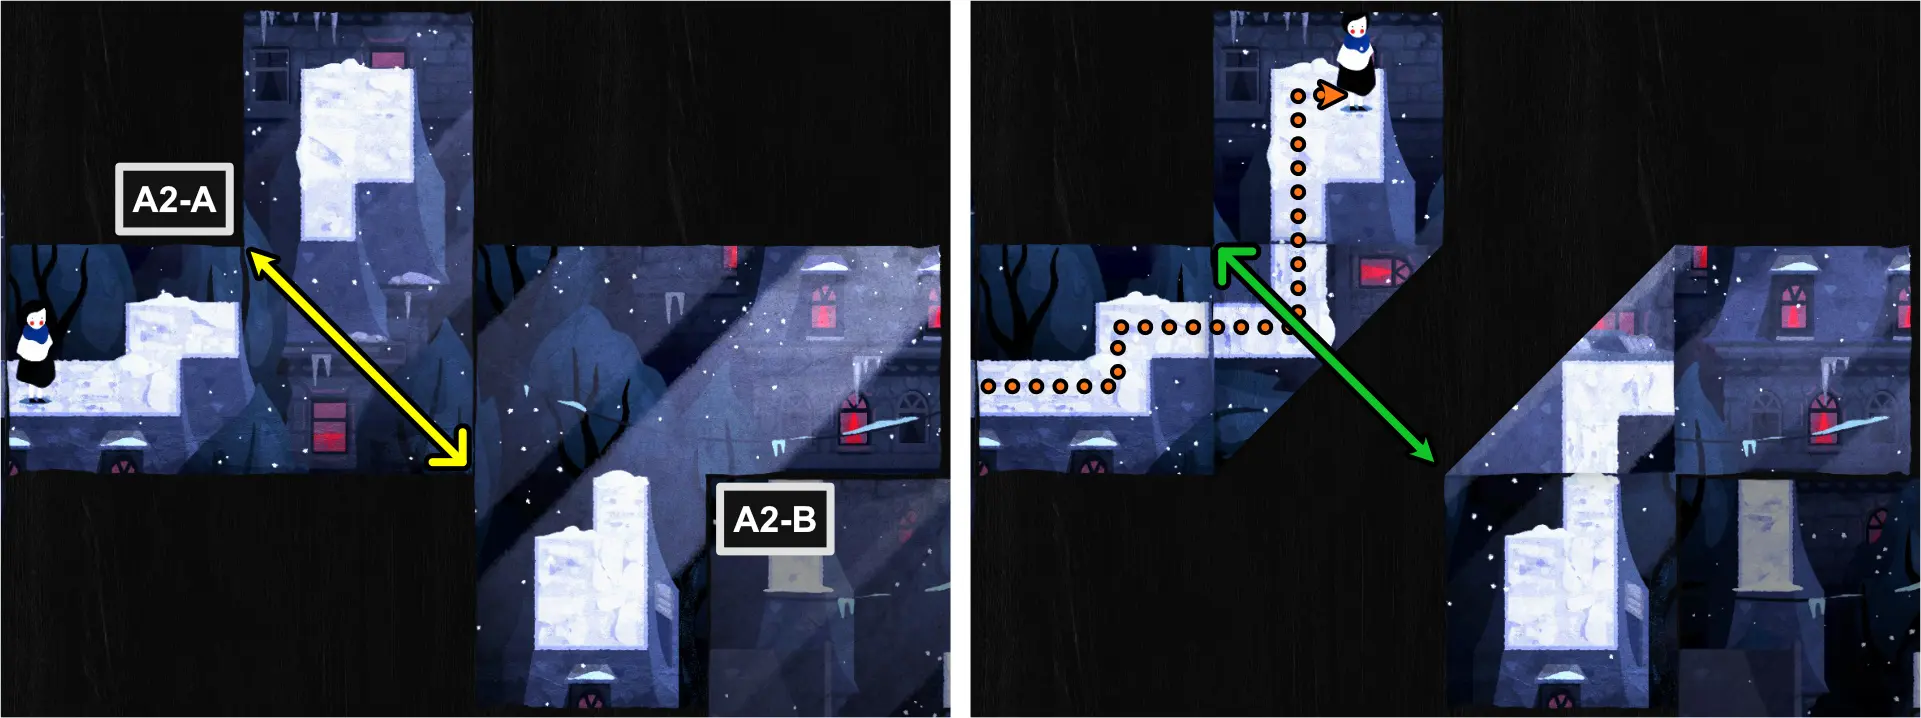
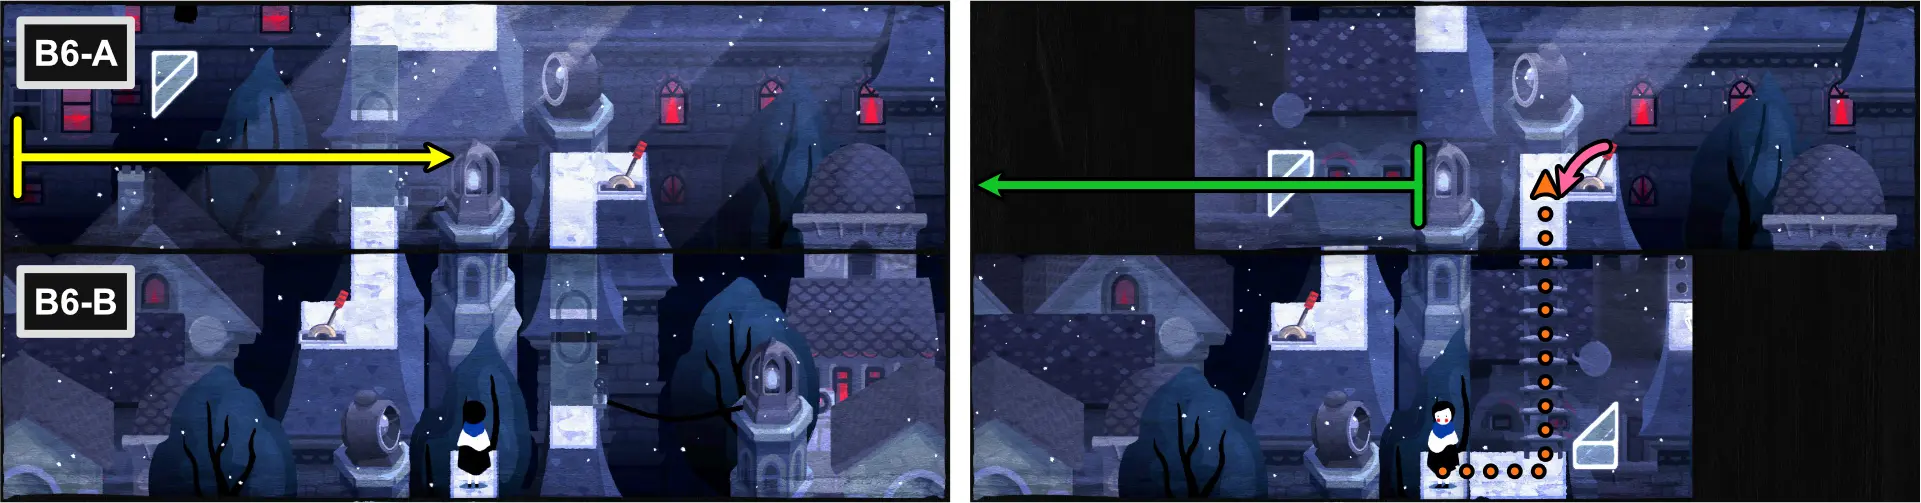
Entering the Cave (A1-A6)
Paige meets an old man warming himself up by the fire. He tells her he’s been stuck in the cave for years. Afterwards, the game will tell you to tap the screen with two fingers to show you how to see the back side of a map.
- Using the upper left corner, fold diagonally to connect the two-dotted tiles together.
- Cross the path formed and move to A2.
- Using the left edge, fold vertically to connect the two-dotted tiles and the three-dotted tiles.
- Follow the path until you reach the upper right corner of the map.
- Unfold the map.
- Using the bottom edge, fold horizontally to connect the four-dotted tiles and the two-dotted tiles.
- Follow the path until you reach the upper left corner of the map.
- Unfold the map.
- Using the bottom right corner, fold diagonally to connect the two-dotted tiles and the five-dotted tiles.
- Follow the path and move to A3.
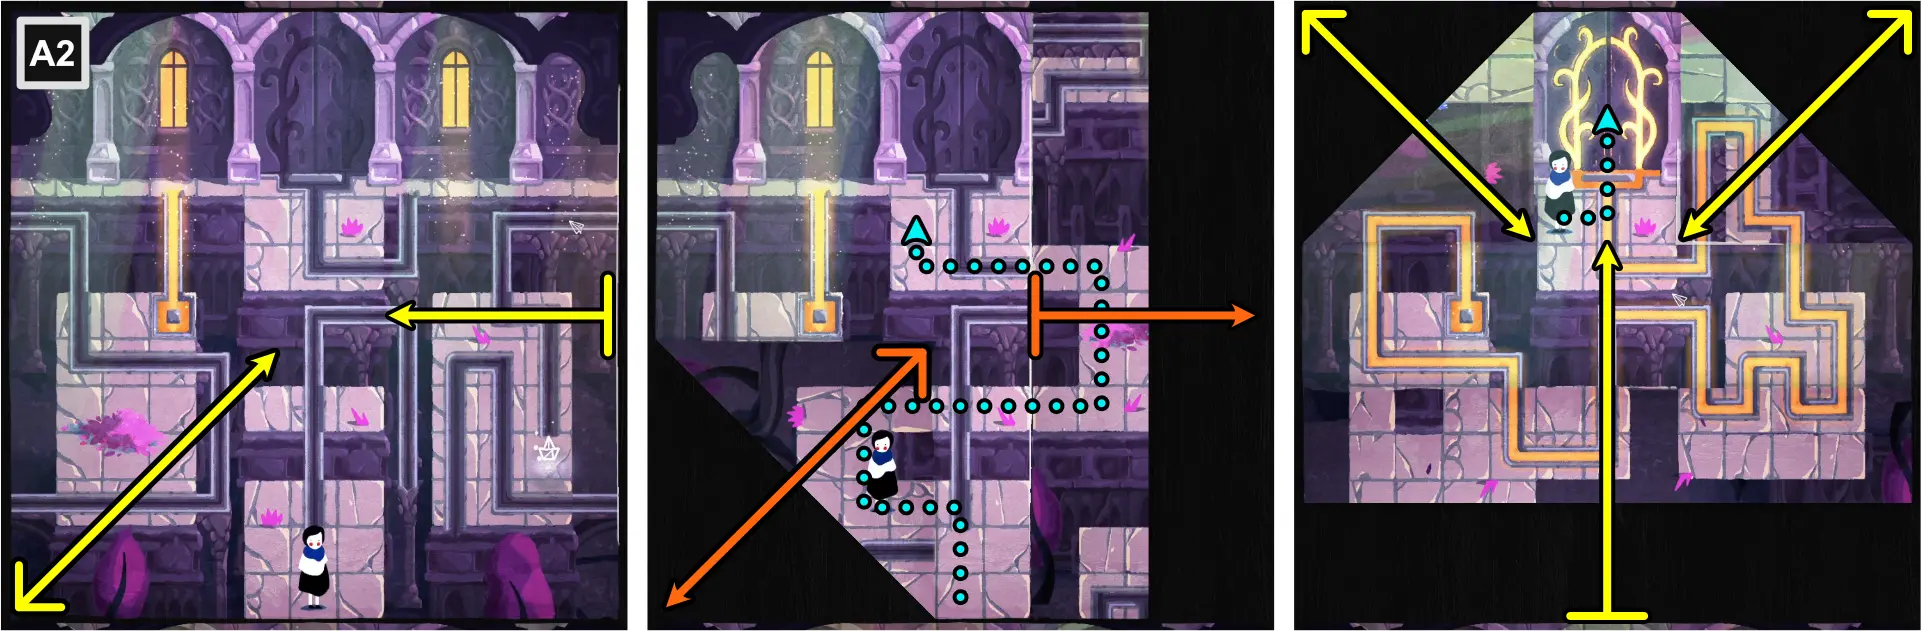
- Using the bottom left corner and top right corner, fold diagonally to connect the four-dotted tiles.
- Follow the path and move to A4.
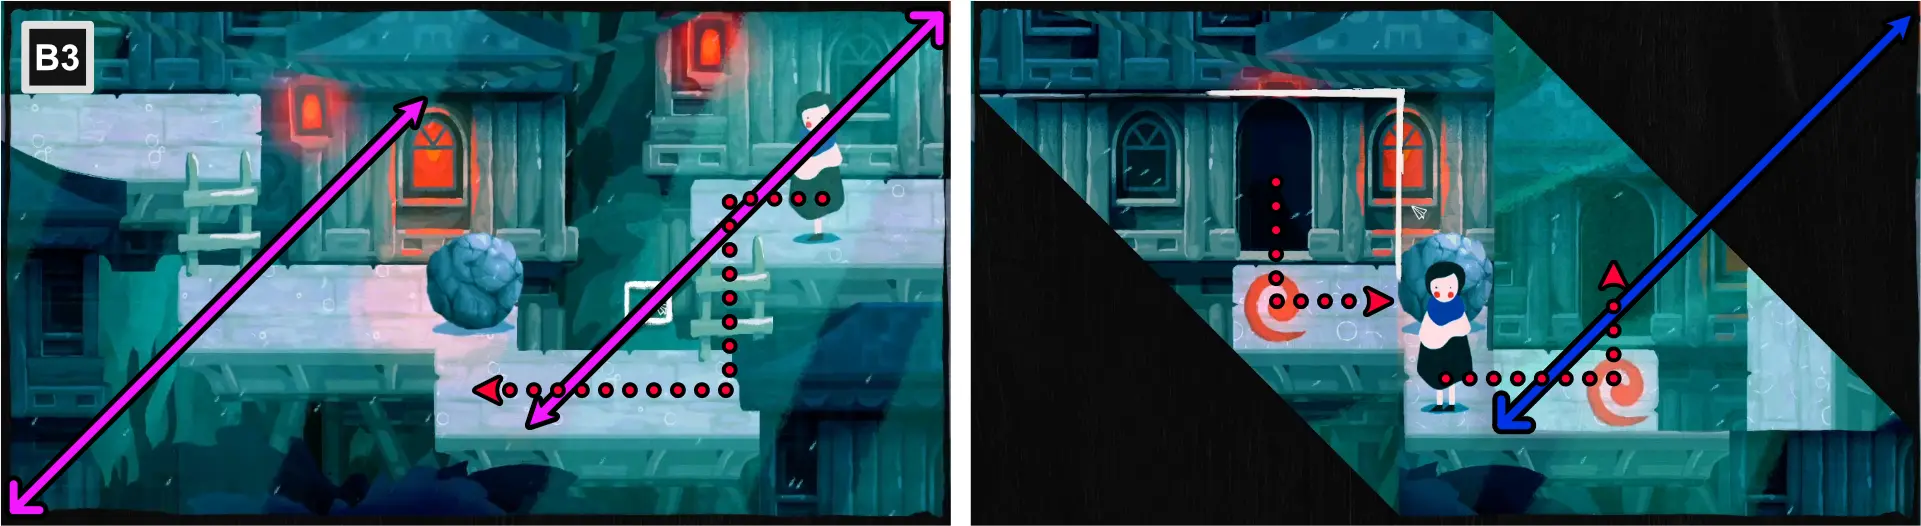
- Push the boulder upwards until it reaches the rock.
- Using the bottom edge, fold horizontally, just below Paige.
- Drag the boulder downwards, up to the bottom of the folded map.
- Move Paige above the boulder and drag it upwards, just above the edge of the fold.
- Move Paige upward to A5.
- Using the top right corner, fold diagonally to connect the four-dotted tiles.
- Push the boulder to the left.
- Unfold the map.
- Using the bottom right corner, fold diagonally and align just to the right of Paige.
- Move Paige to the right, on the folded part of the map.
- Using the left edge, fold vertically and align to the previous fold.
- Move Paige to the left, on the part of the map you just folded.
- Unfold the right part of the map.
- Move Paige to the right, just to the left of the boulder.
- Using the left edge of the currently folded map, align the fold just to the left of Paige.
- Using the bottom right corner, fold diagonally and align to the previous fold.
- Drag the boulder to the left to clear the path.
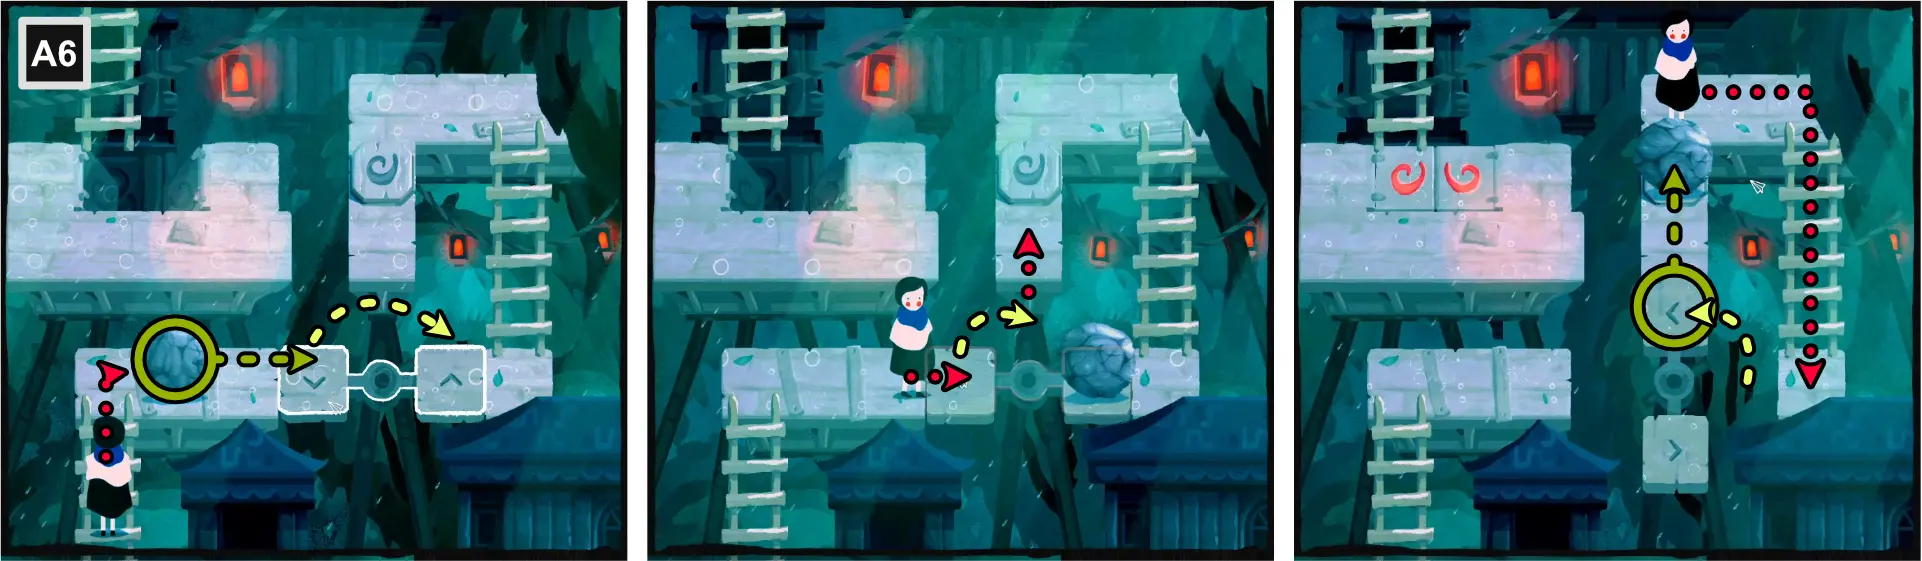
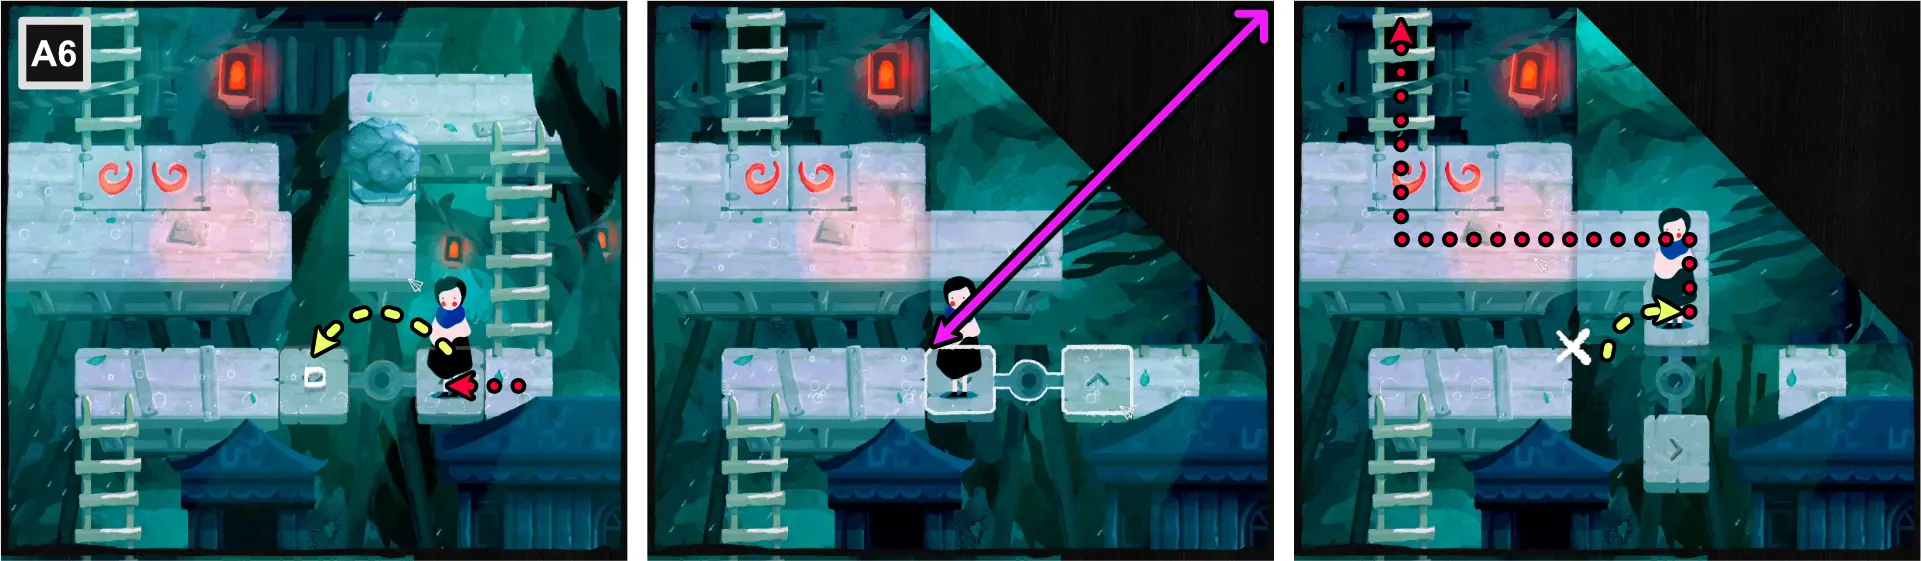
- Move Paige upward to A6.
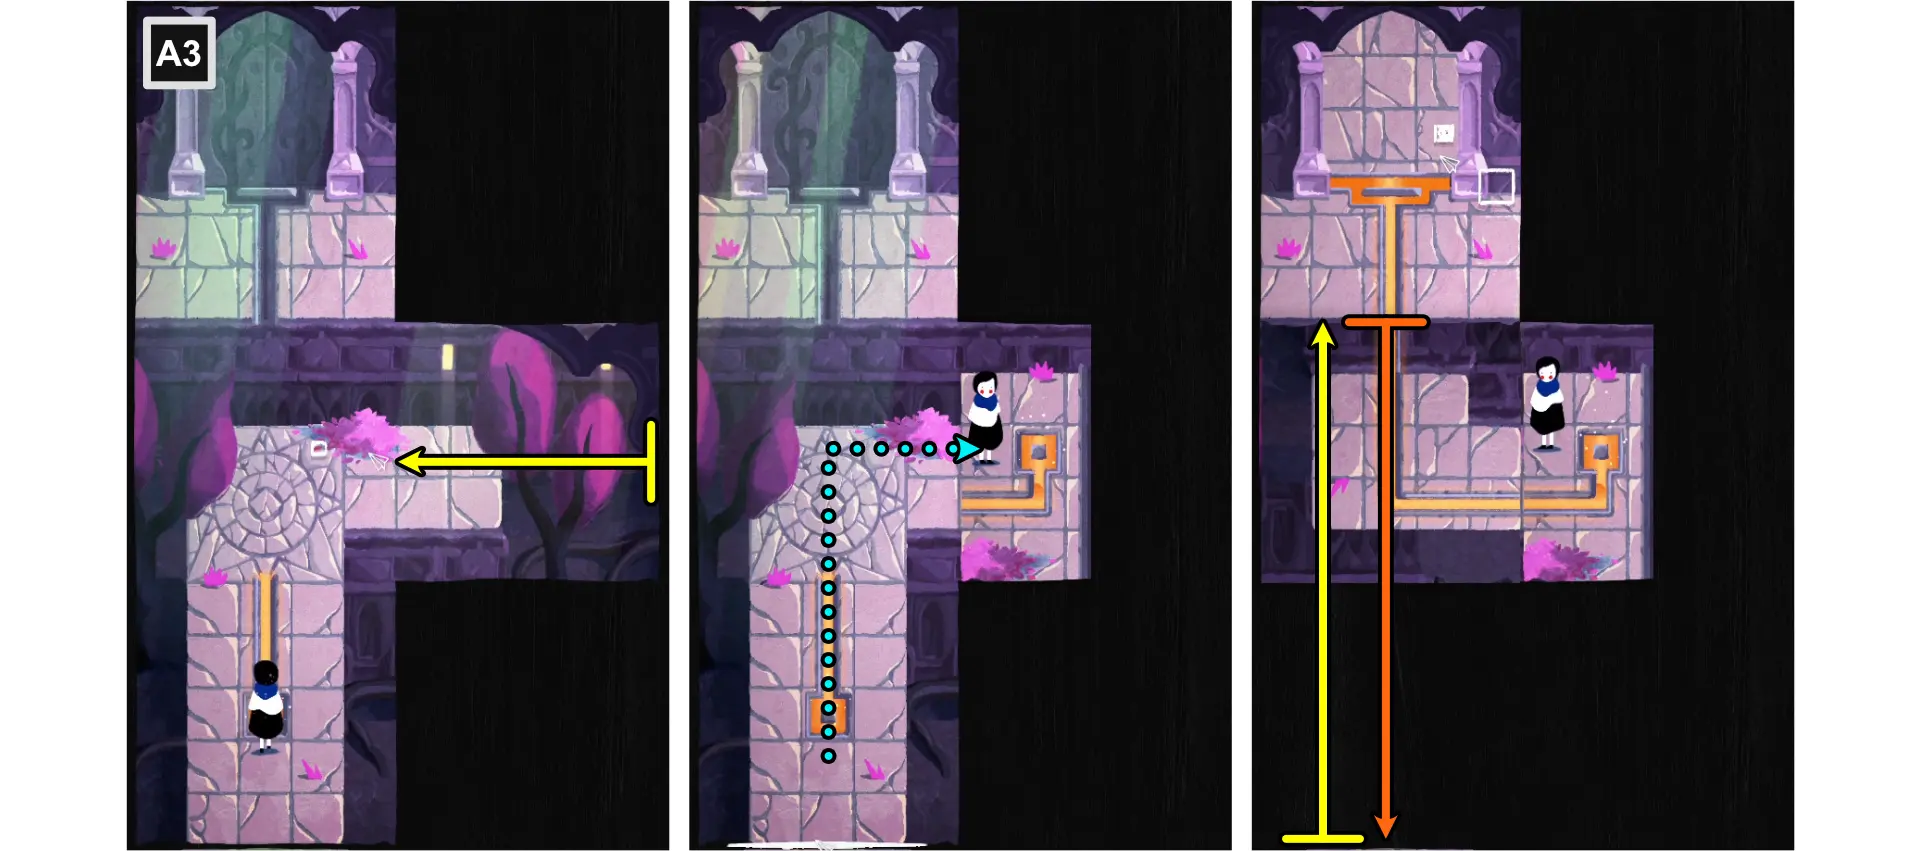
- Move Paige upward, to the tile a few steps in front of her.
- Using the bottom edge, fold horizontally.
- Move Paige below the boulder.
- Push the boulder upward.
- Using the top left corner, fold diagonally and align to the previous fold.
- Push and drag the boulder to the path at the lower part of the map.
- Unfold the upper left part of the map.
- Push the boulder to the top of the pressure plate to open the door.
- Move Paige upward to B1.
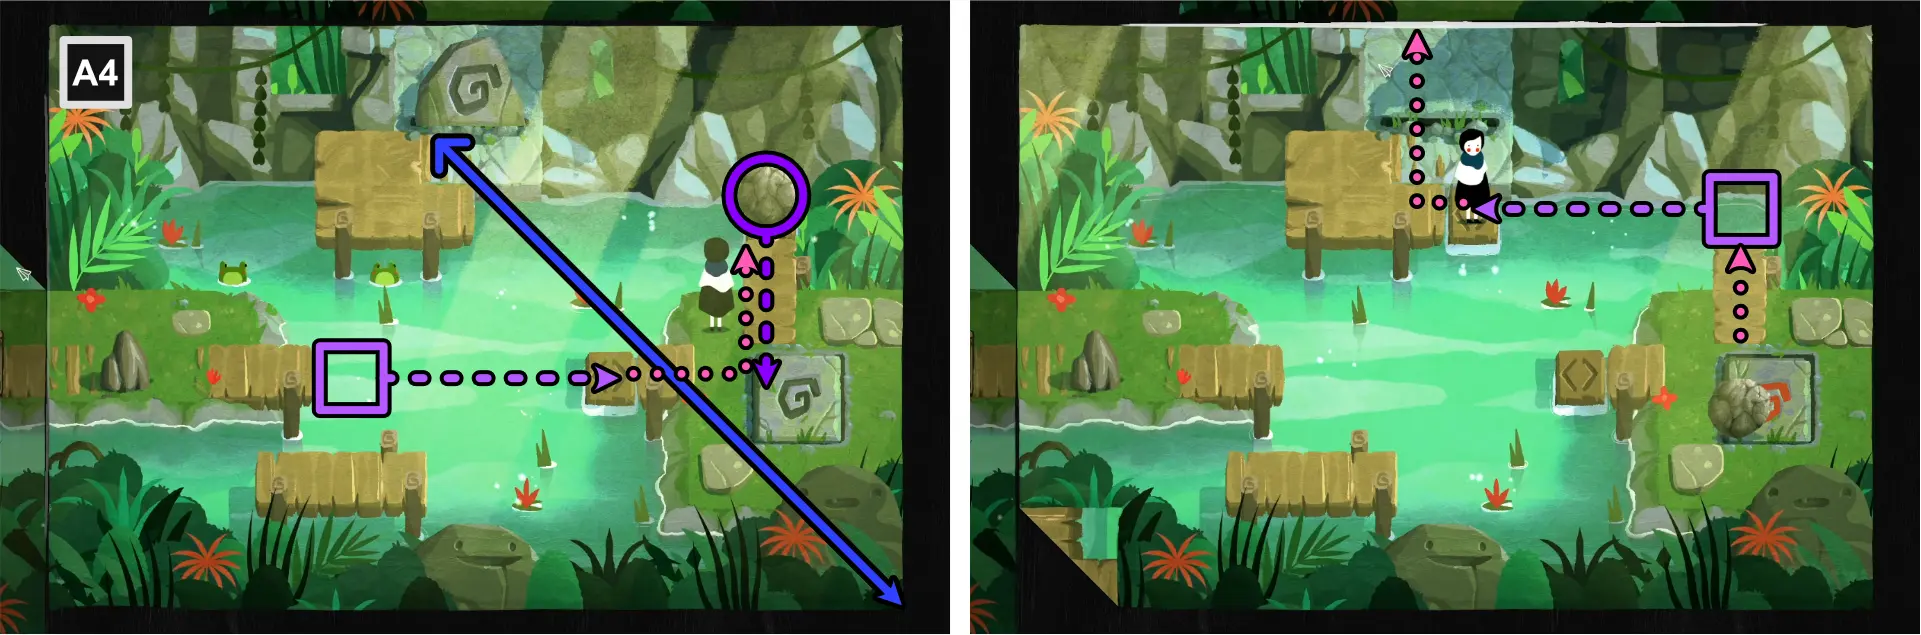
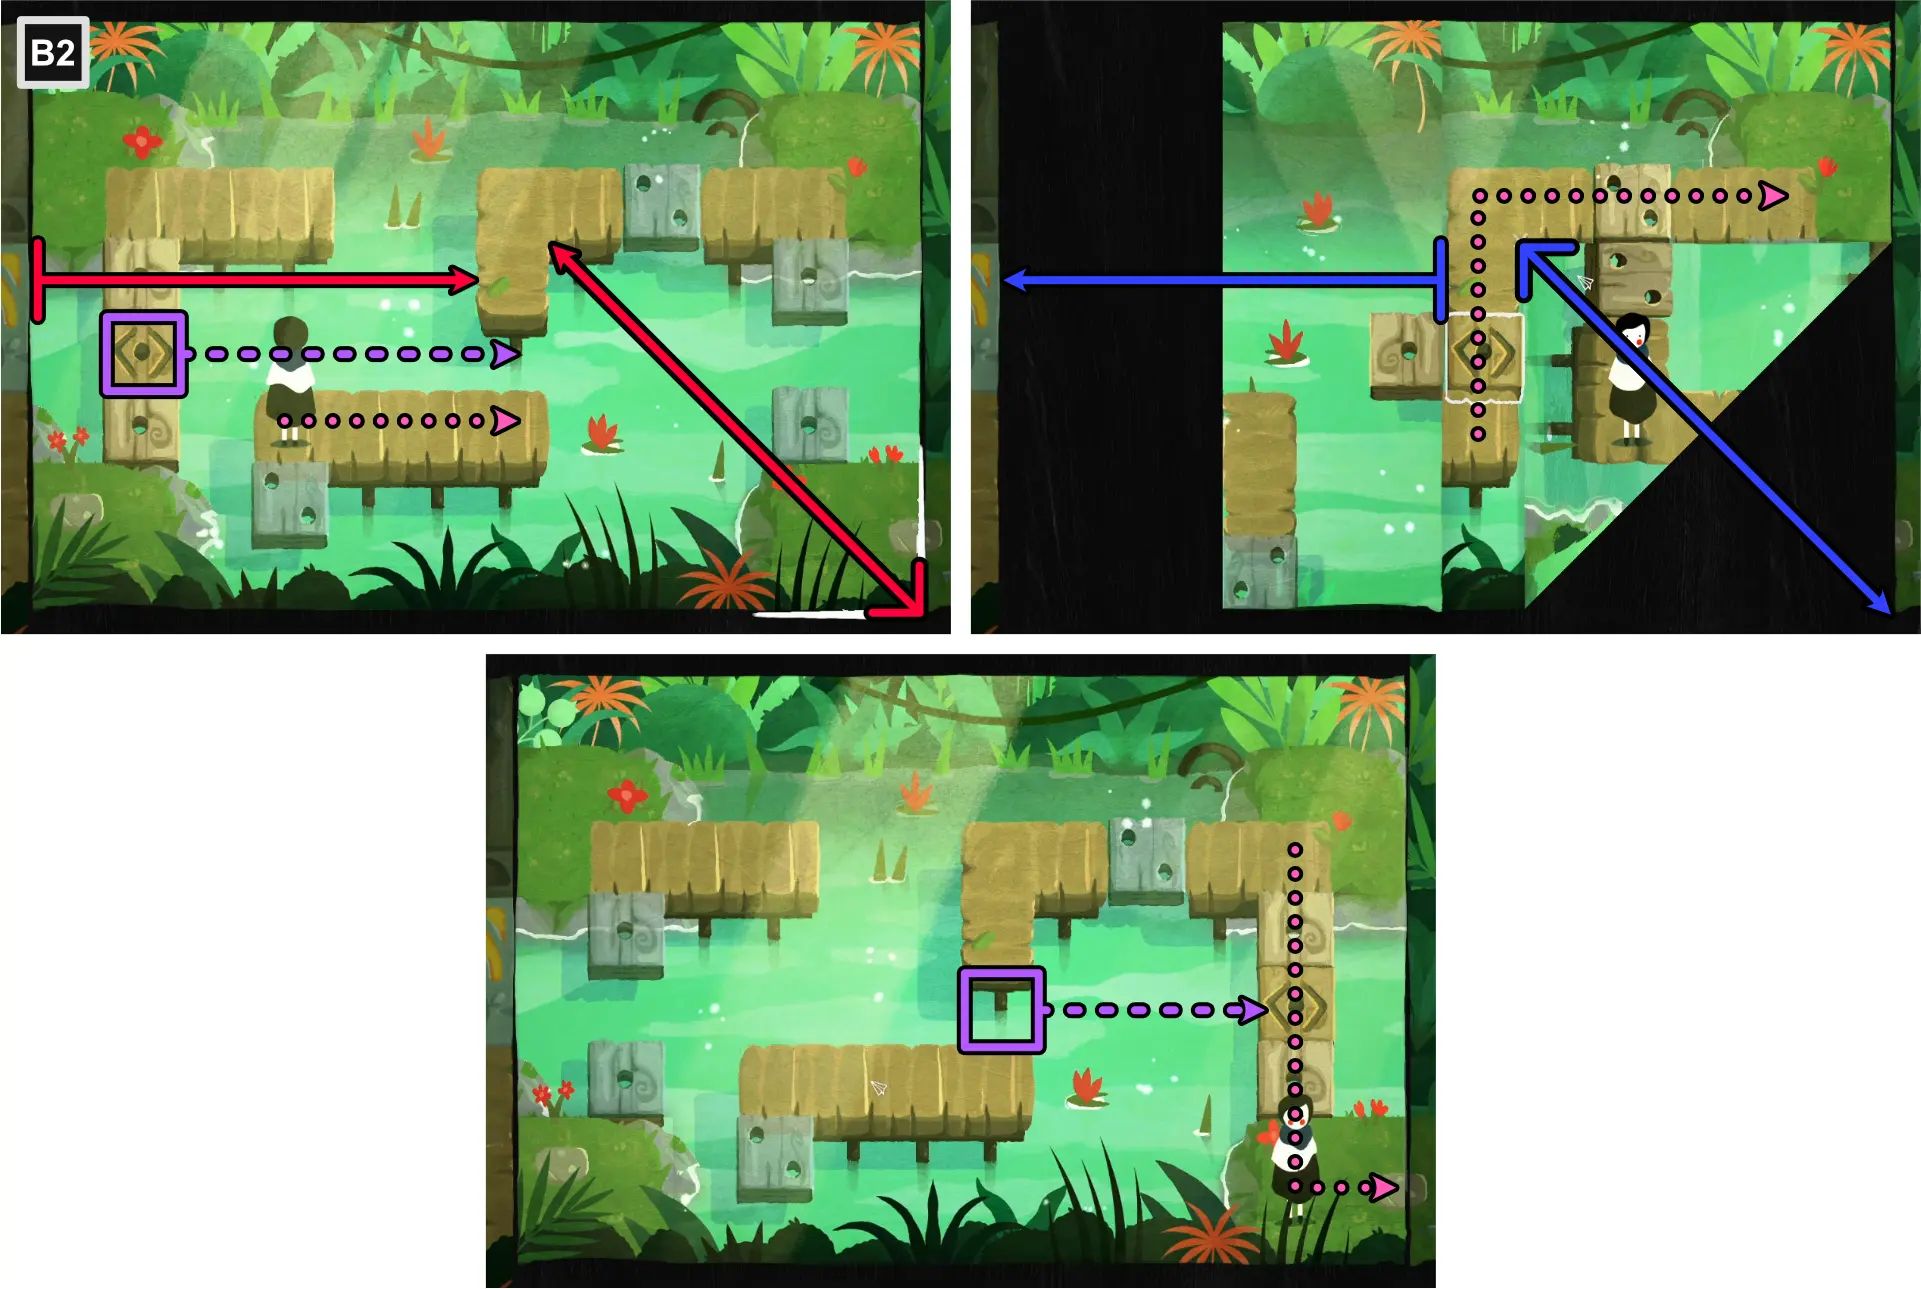
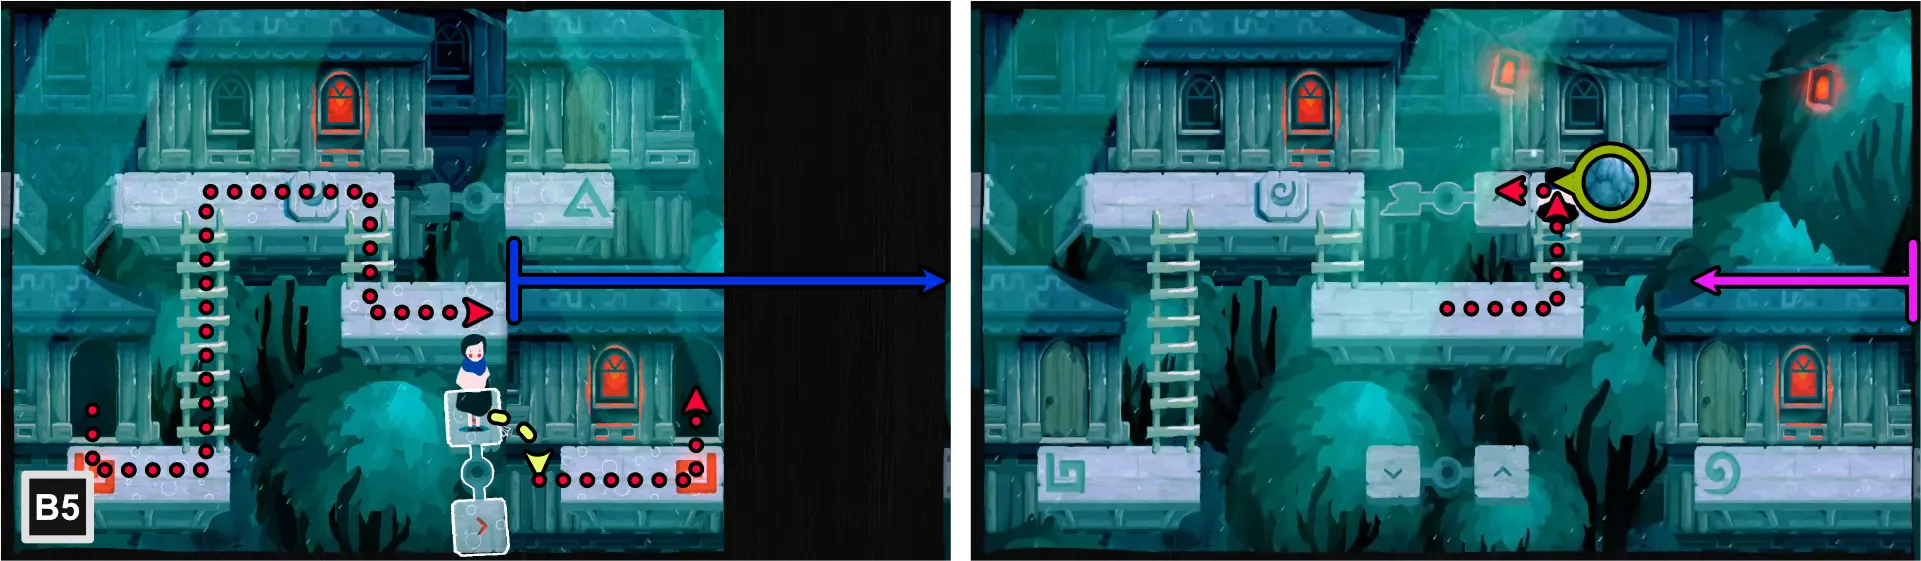
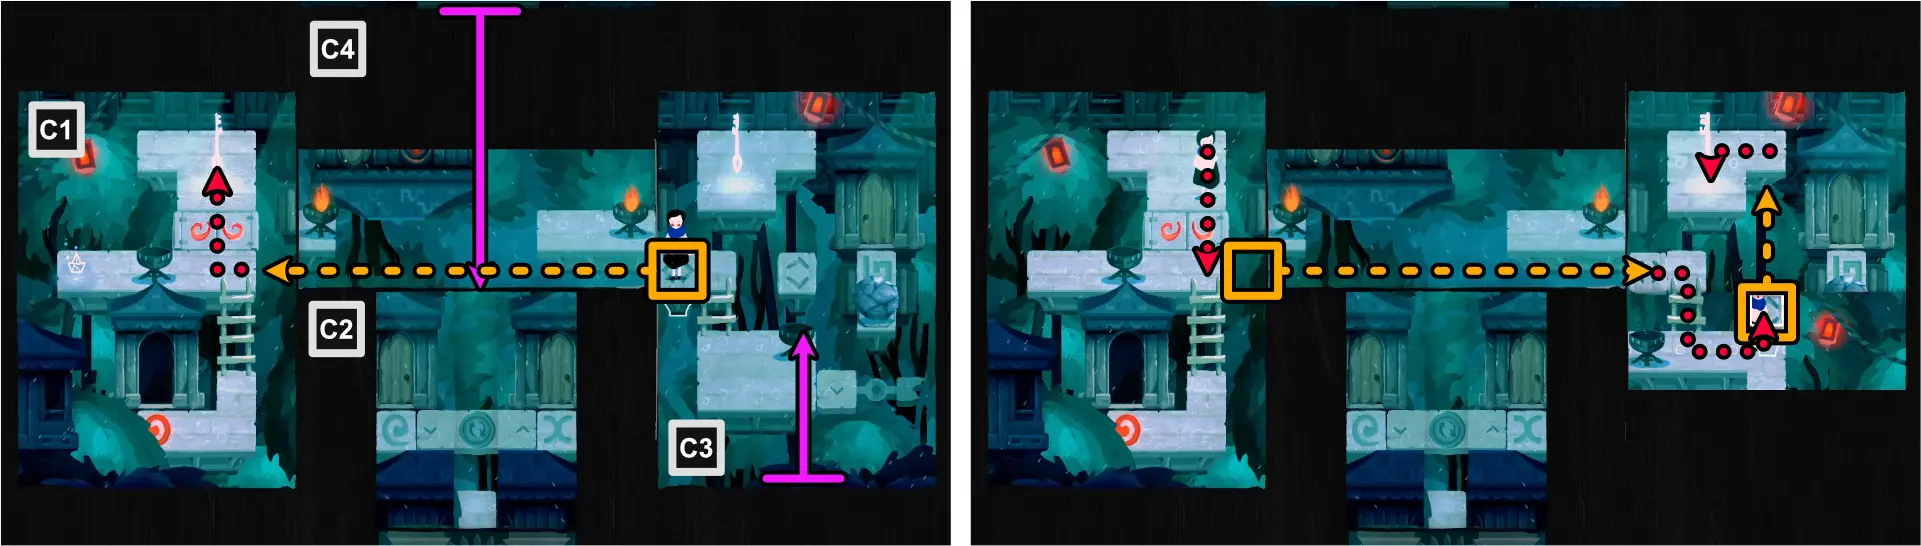
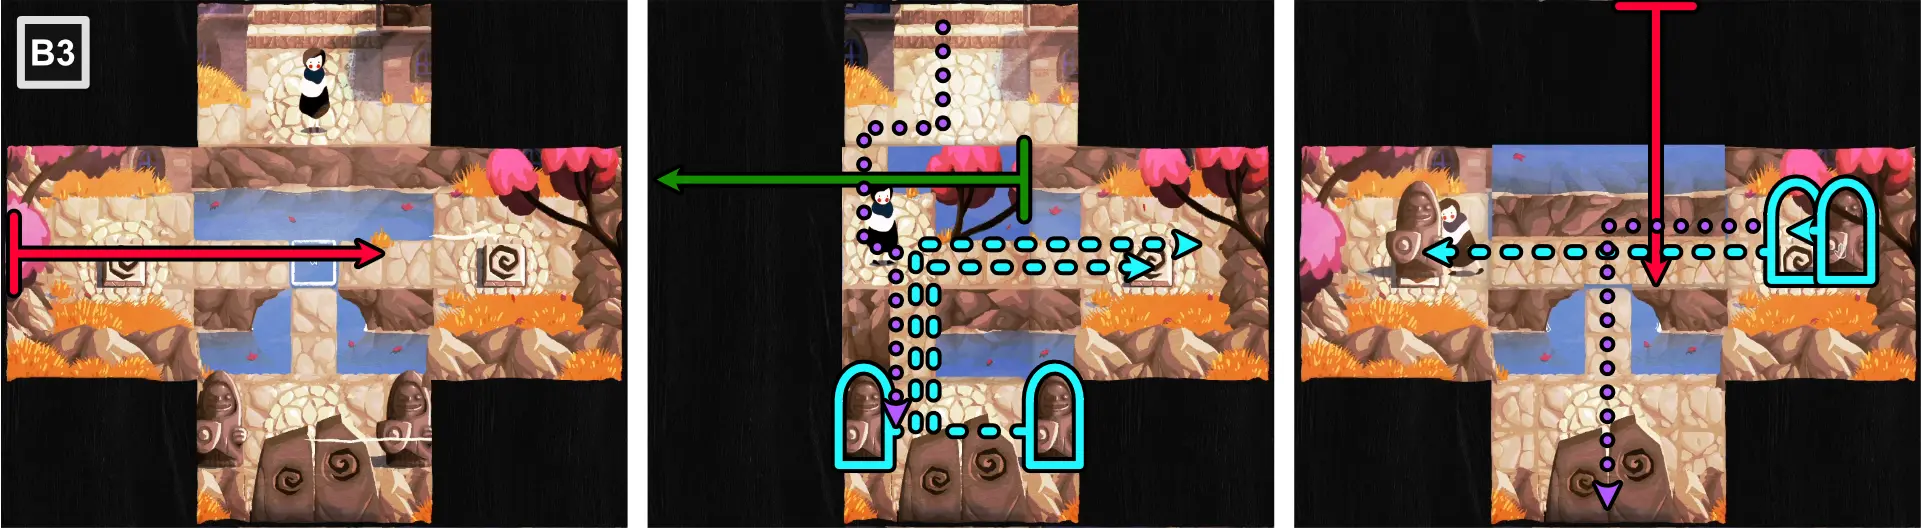
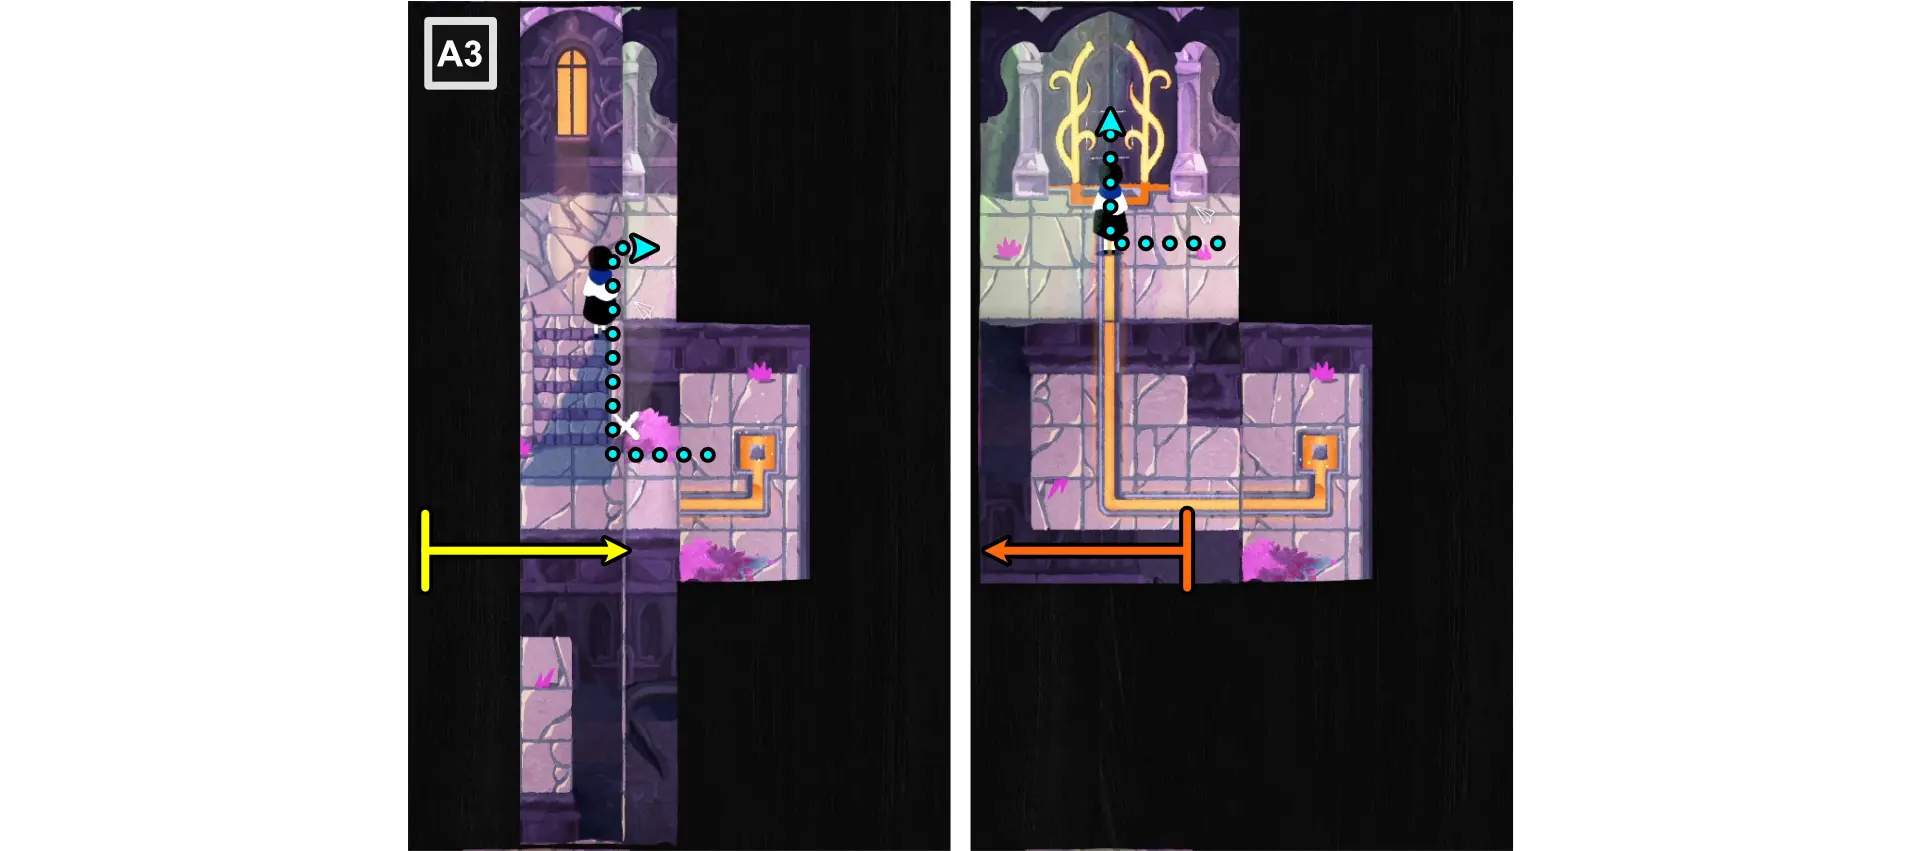
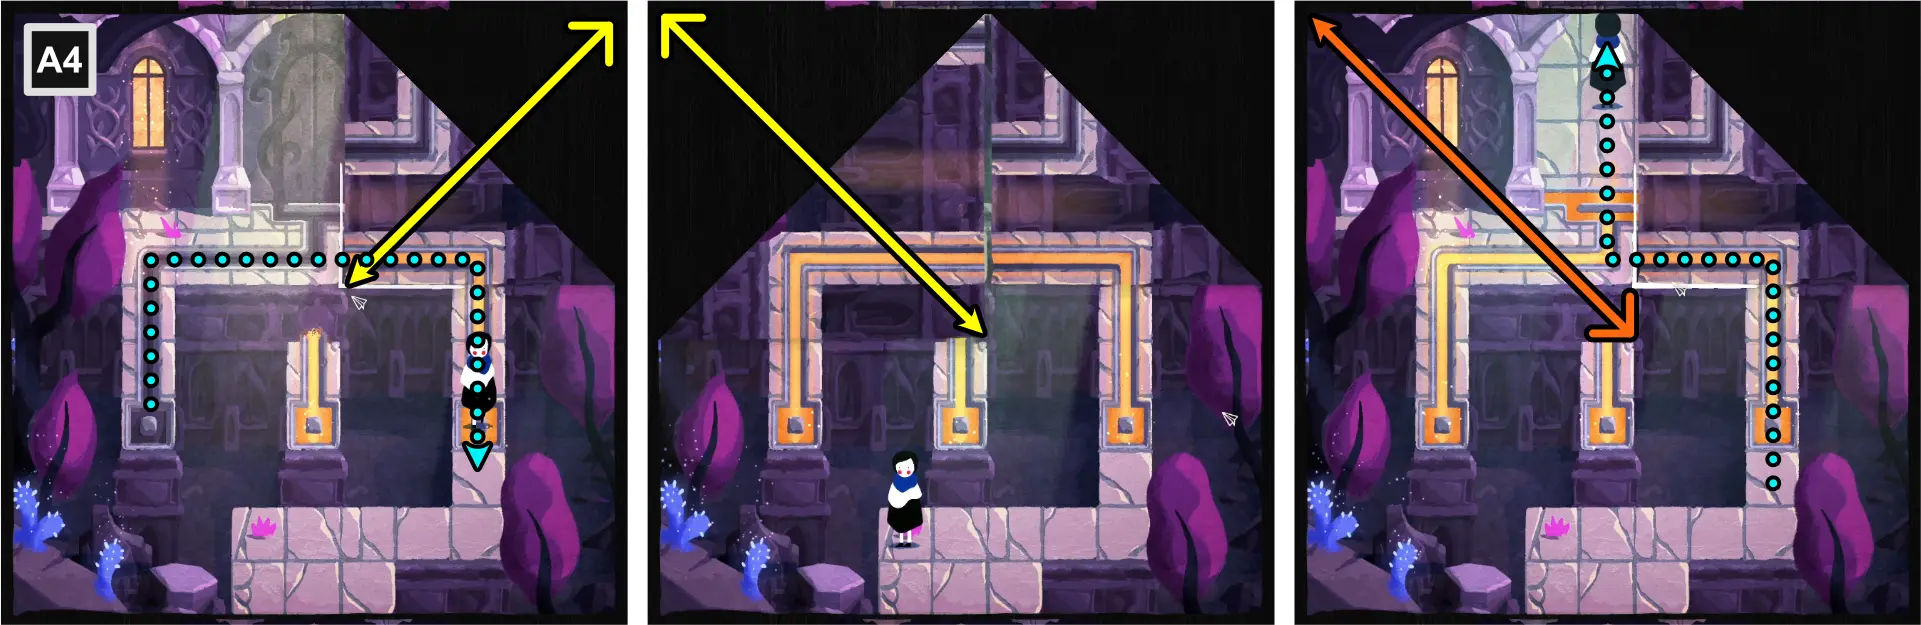
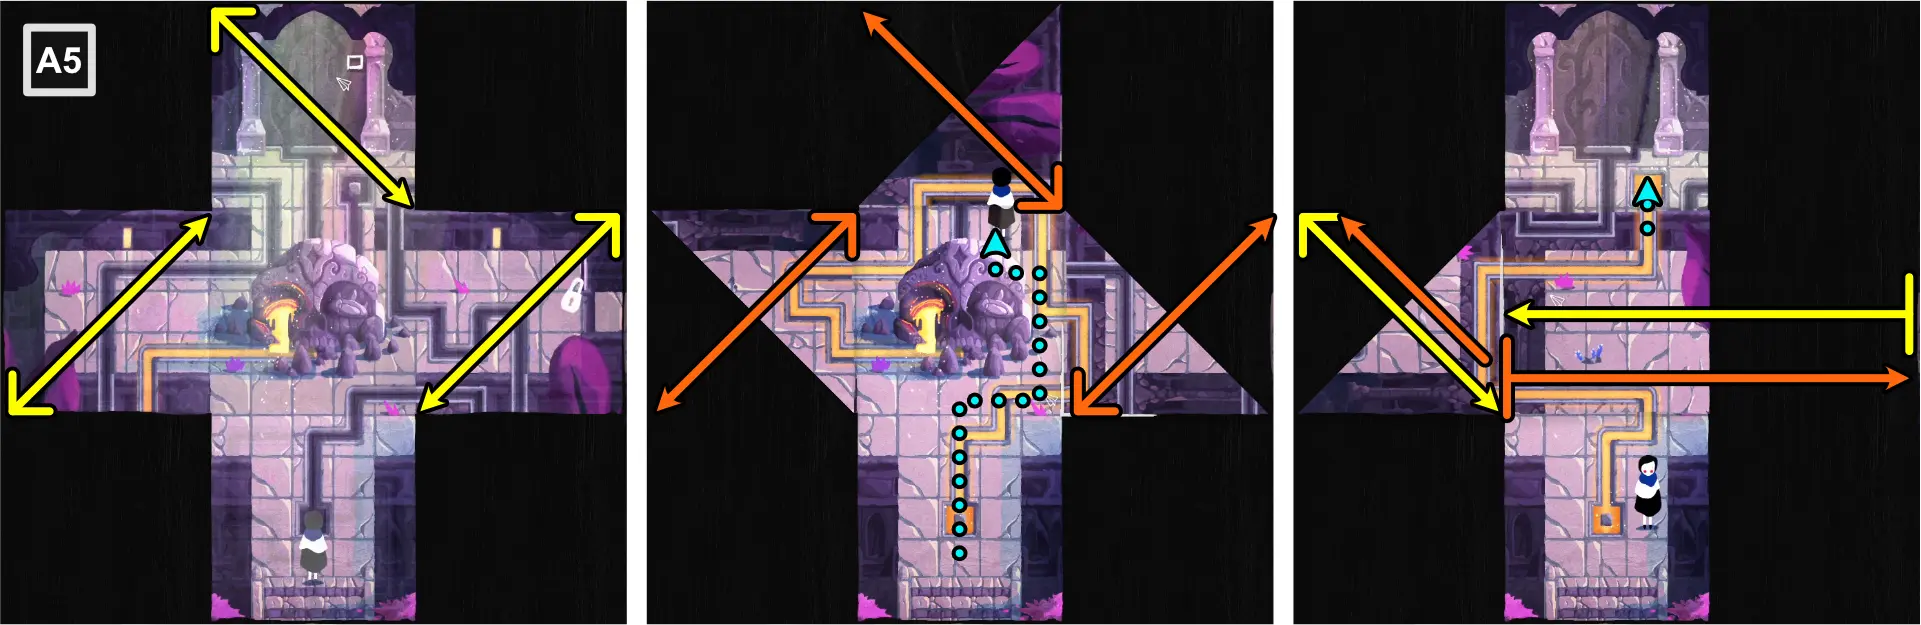
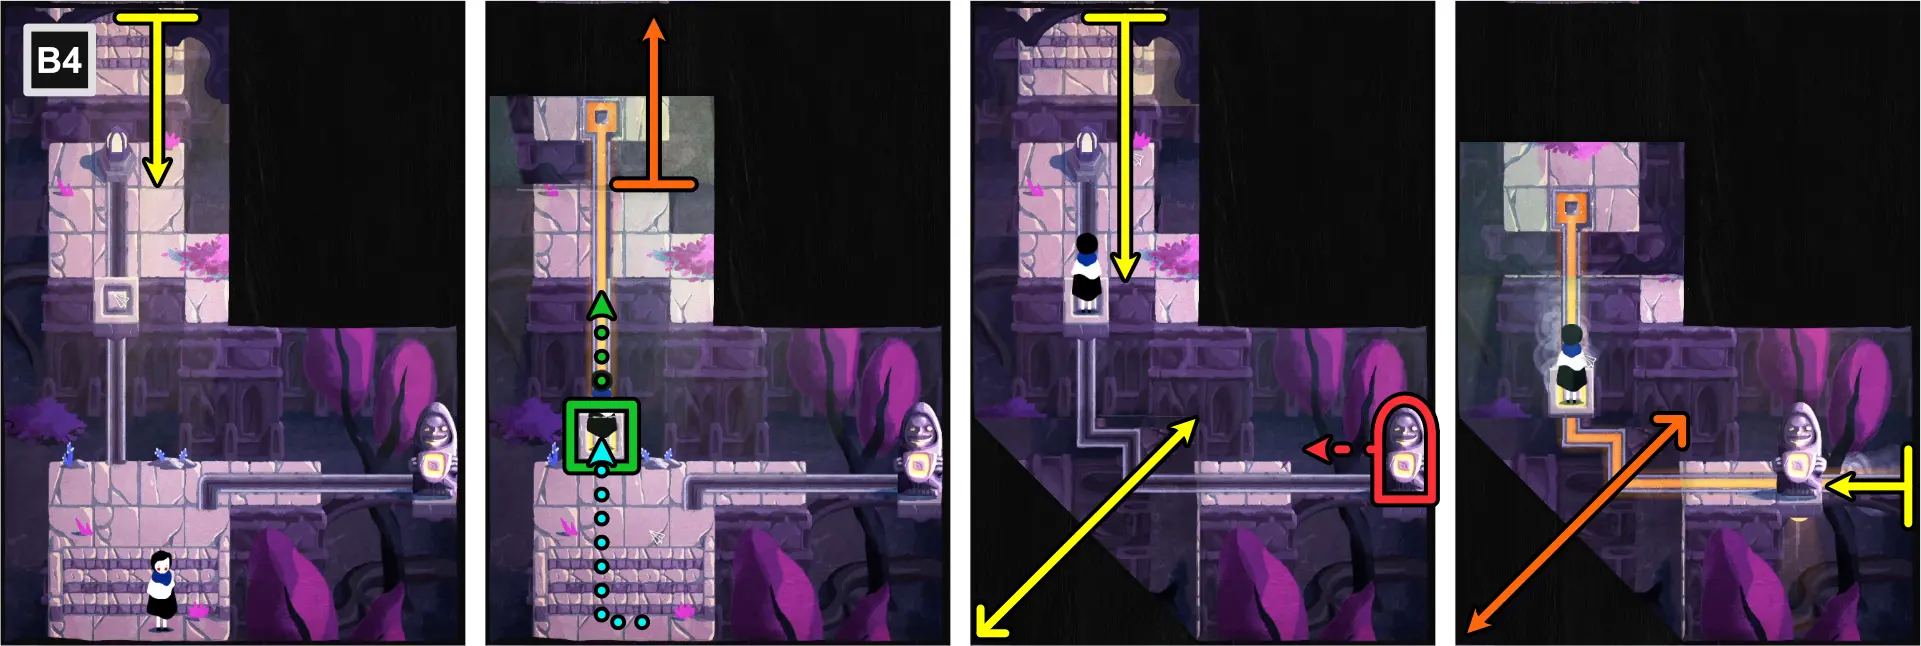
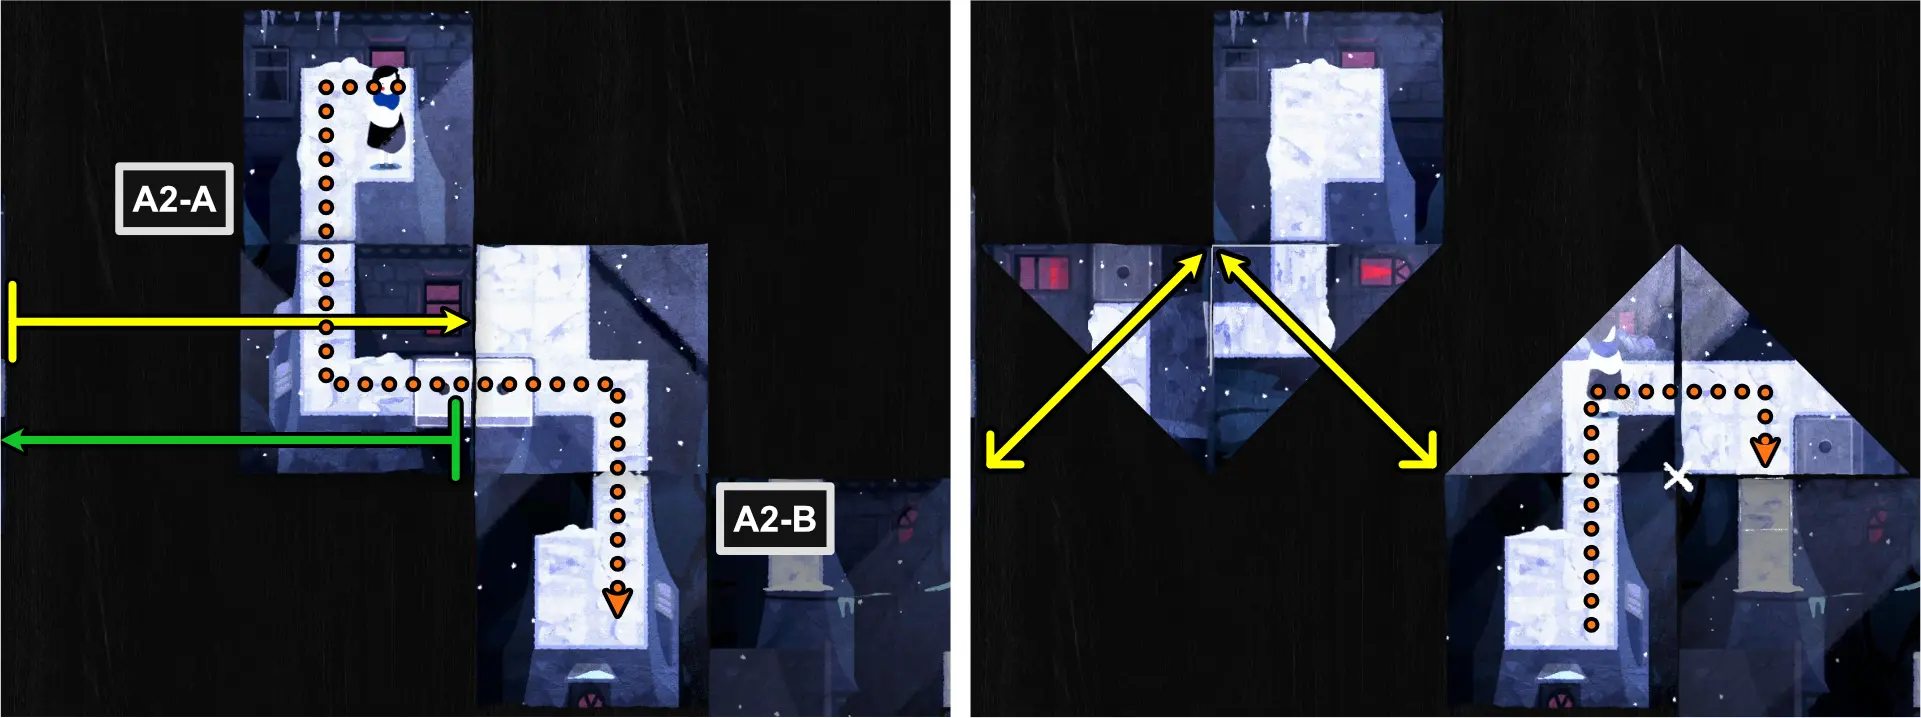
The Bridge Circle (B1-B8)
- Move Paige to the edge of the hole.
- Using the upper corners, fold diagonally and align with the curve at the top center of the map.
- Using the lower corners, fold diagonally and align with the curve at the bottom center of the map.
- Cross the bridge that appears to reach the old man and talk to him.
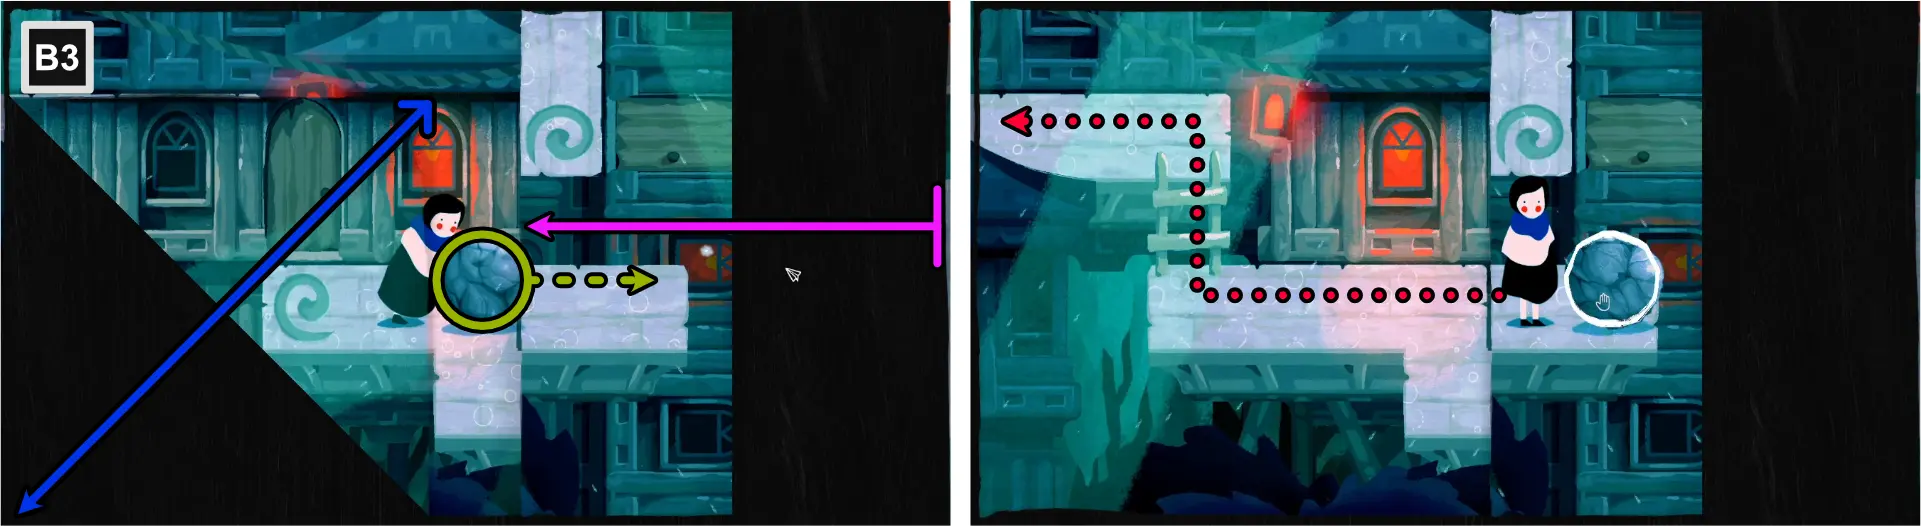
- Go to the left to B2.
- Move Paige to the right of the boulder.
- Using the left edge, fold vertically to connect the two-dotted tiles.
- Push the boulder to the left, on the folded part of the map, across the two-dotted tiles..
- Using the right edge, fold vertically to connect the three-dotted tiles.
- Push the boulder to the right, on the folded part of the map, across the three-dotted tiles.
- Unfold the left side of the map to connect the four-dotted tiles and the other three-dotted tiles.
- Drag and push the boulder to the left, on top of the pressure plate, across the four-dotted tiles, to open the door.
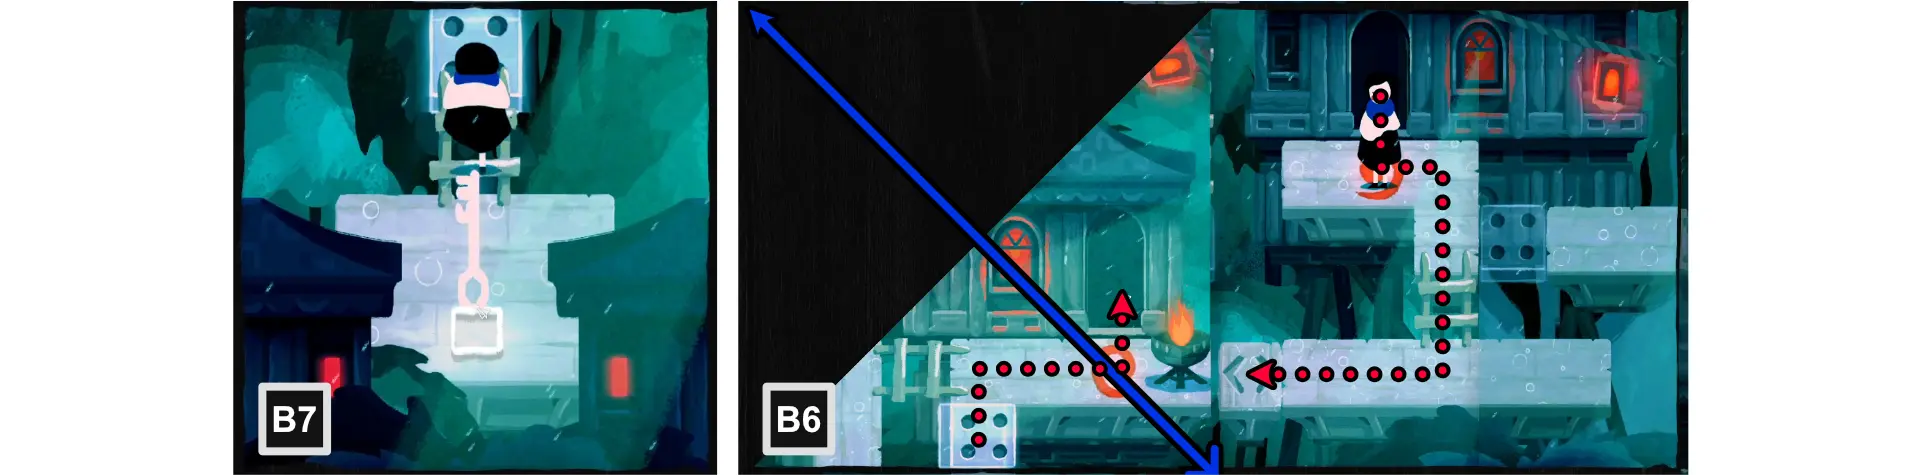
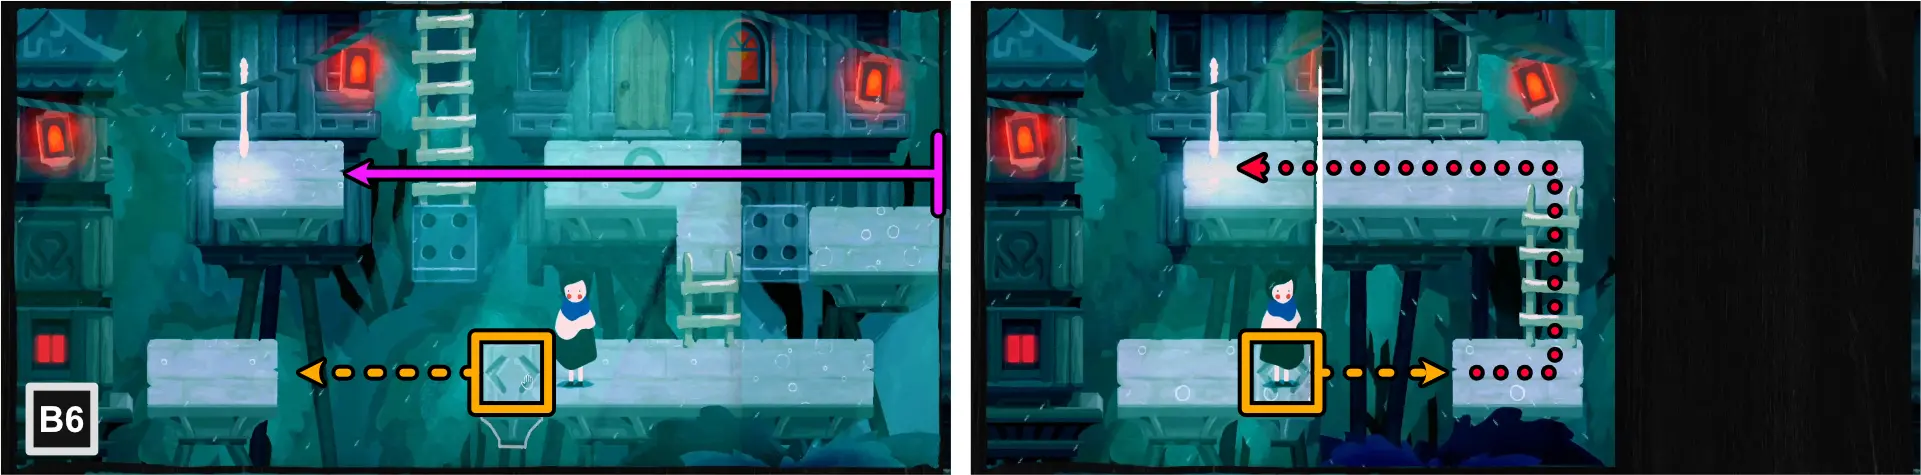
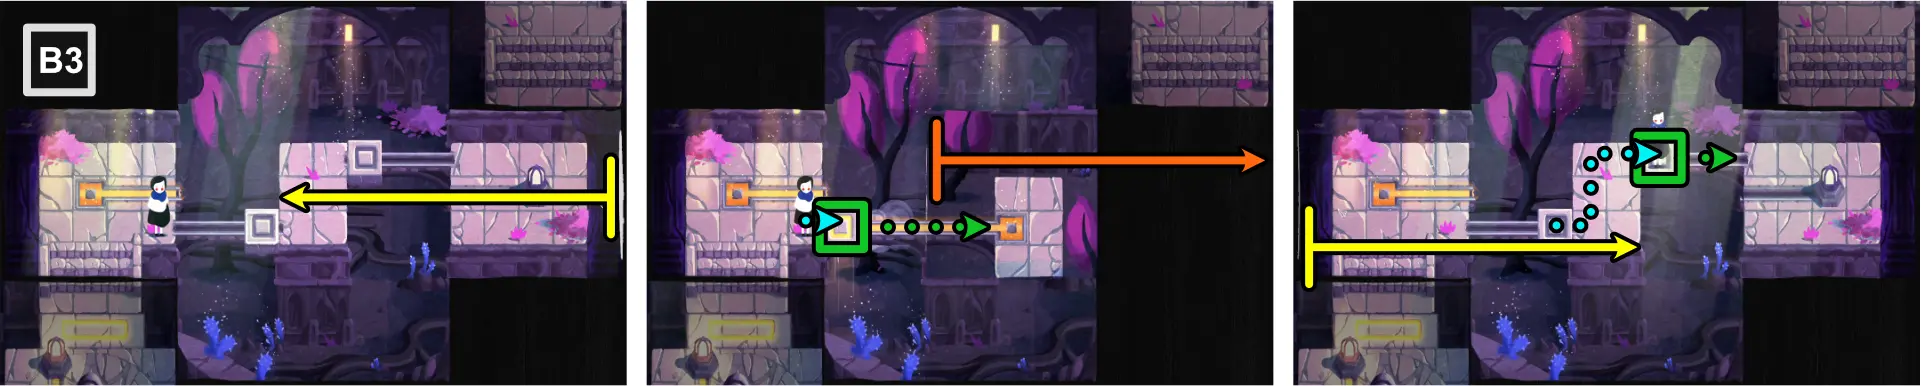
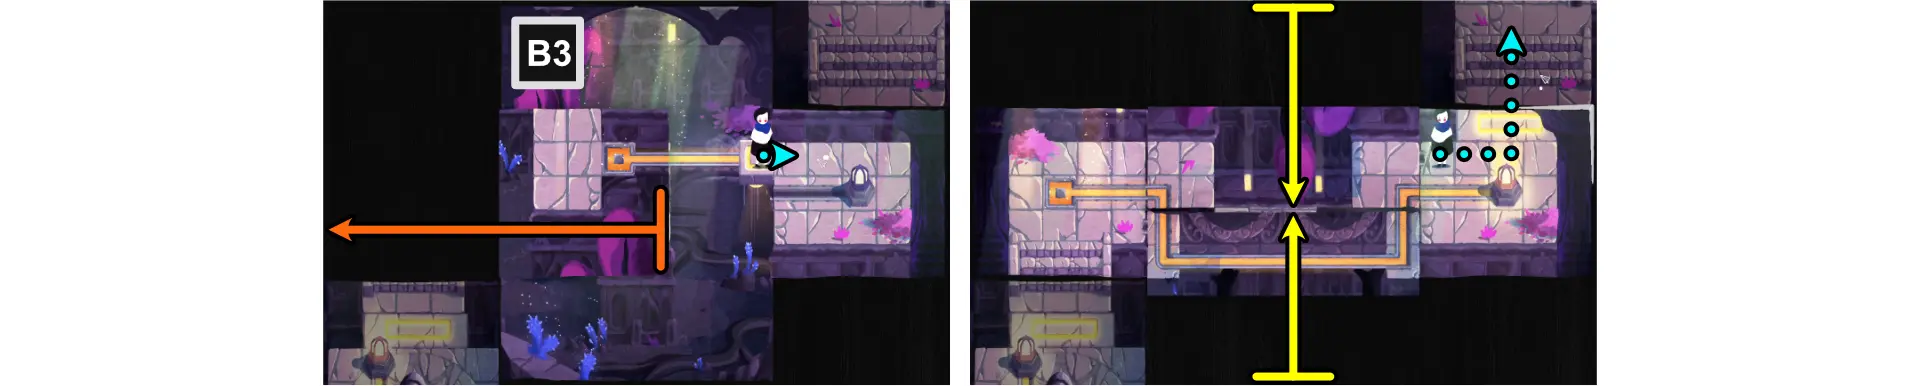
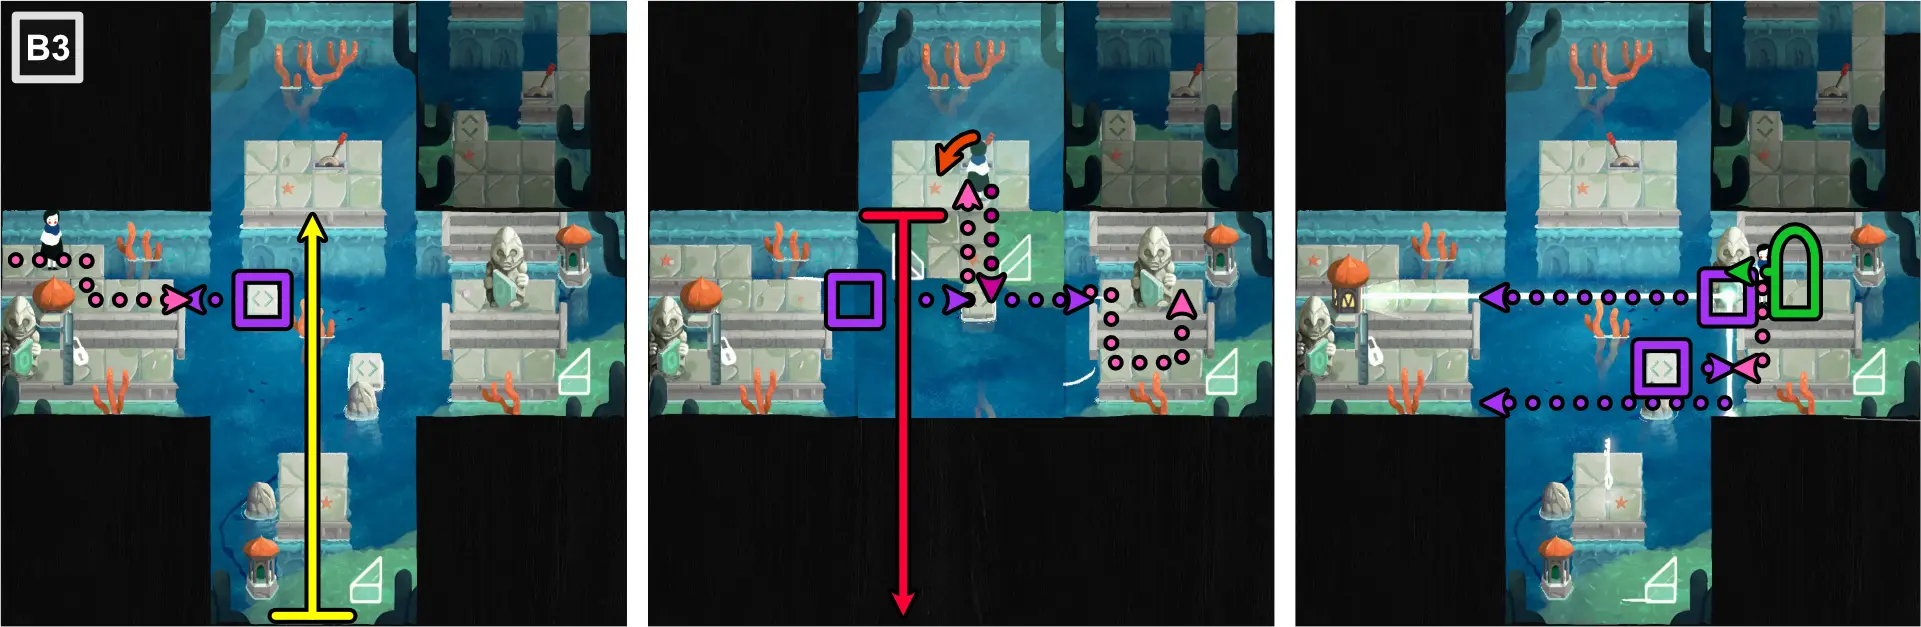
- Move Paige upwards to B3.
- Using the bottom left corner, fold diagonally to connect the one-dotted tiles.
- Take the key then go back to the lower right part of the map.
- Unfold the map.
- Using the top right corner, fold diagonally to connect the one-dotted tiles.
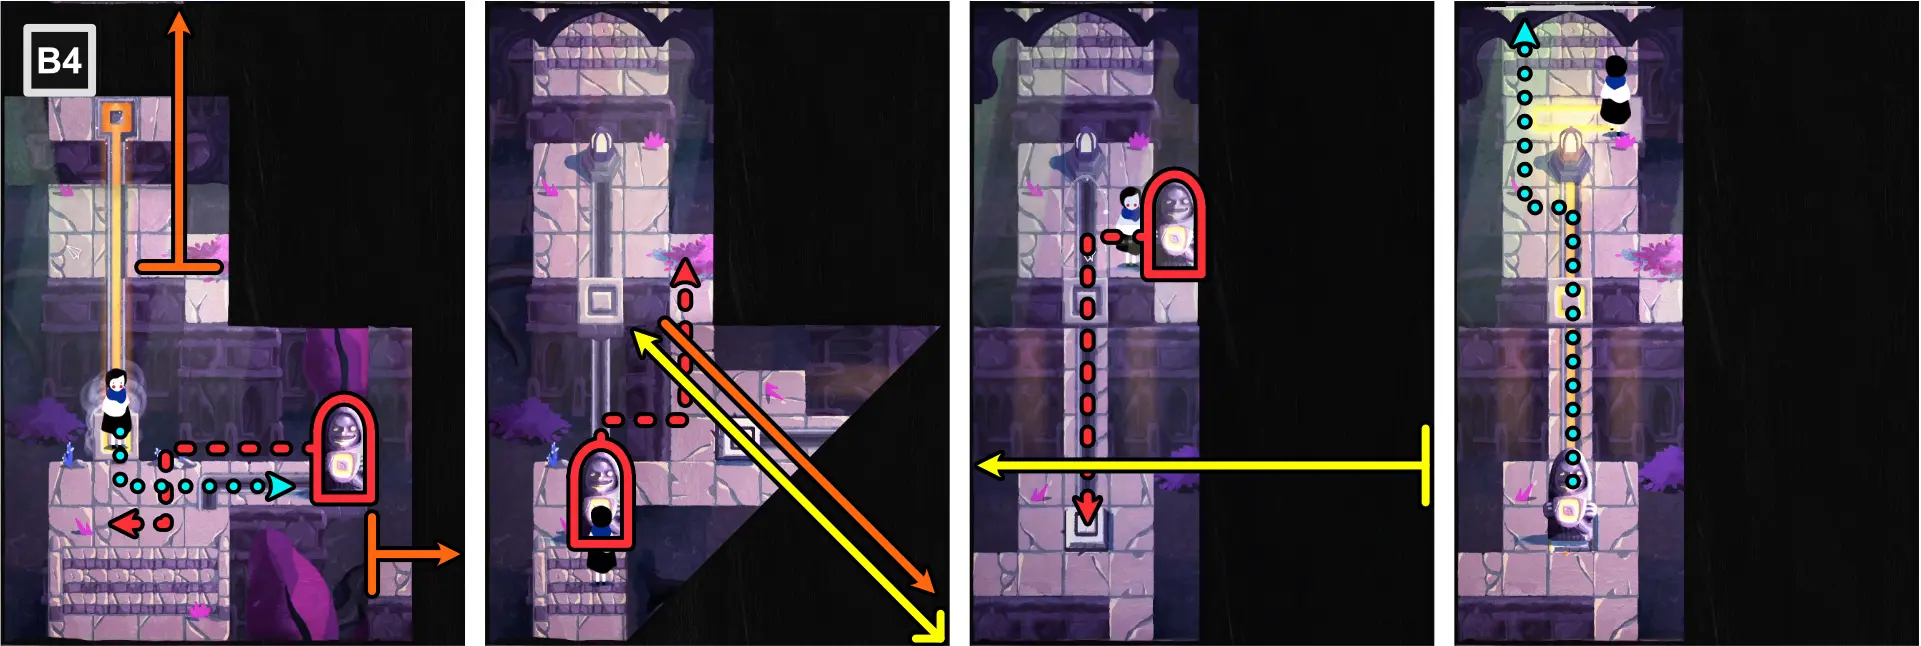
- Pass through the locked door with the key and move Paige to B4.
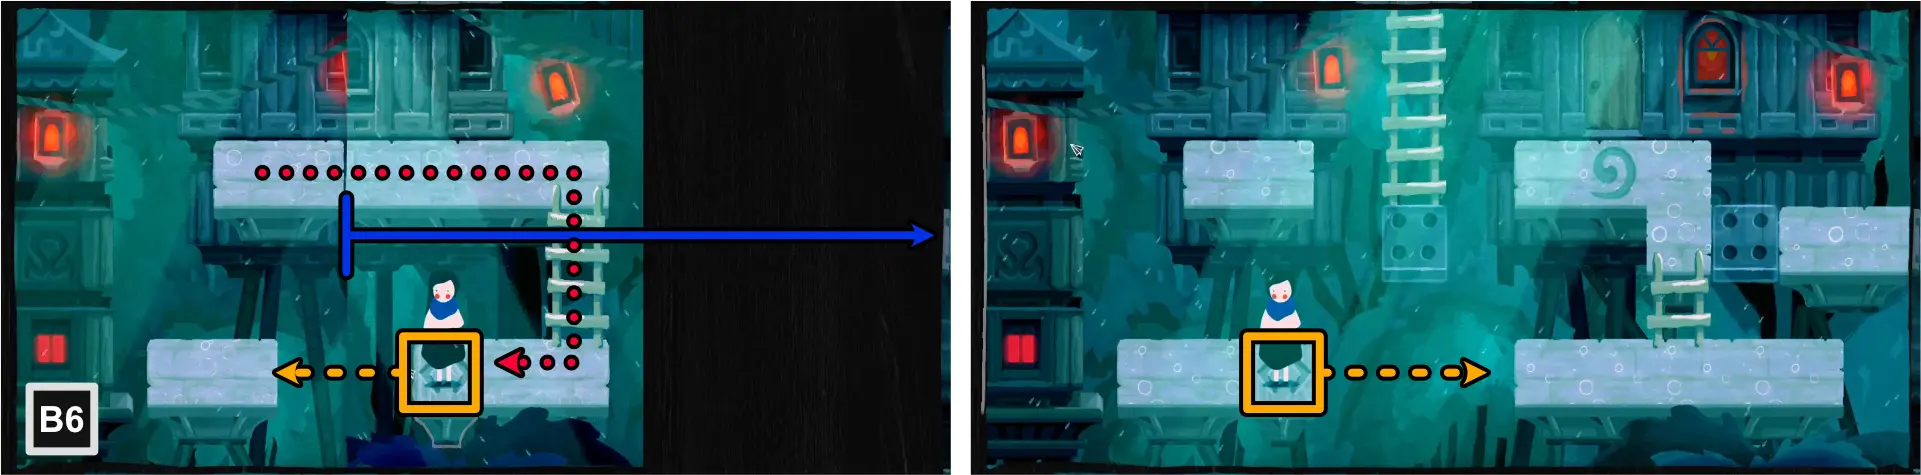
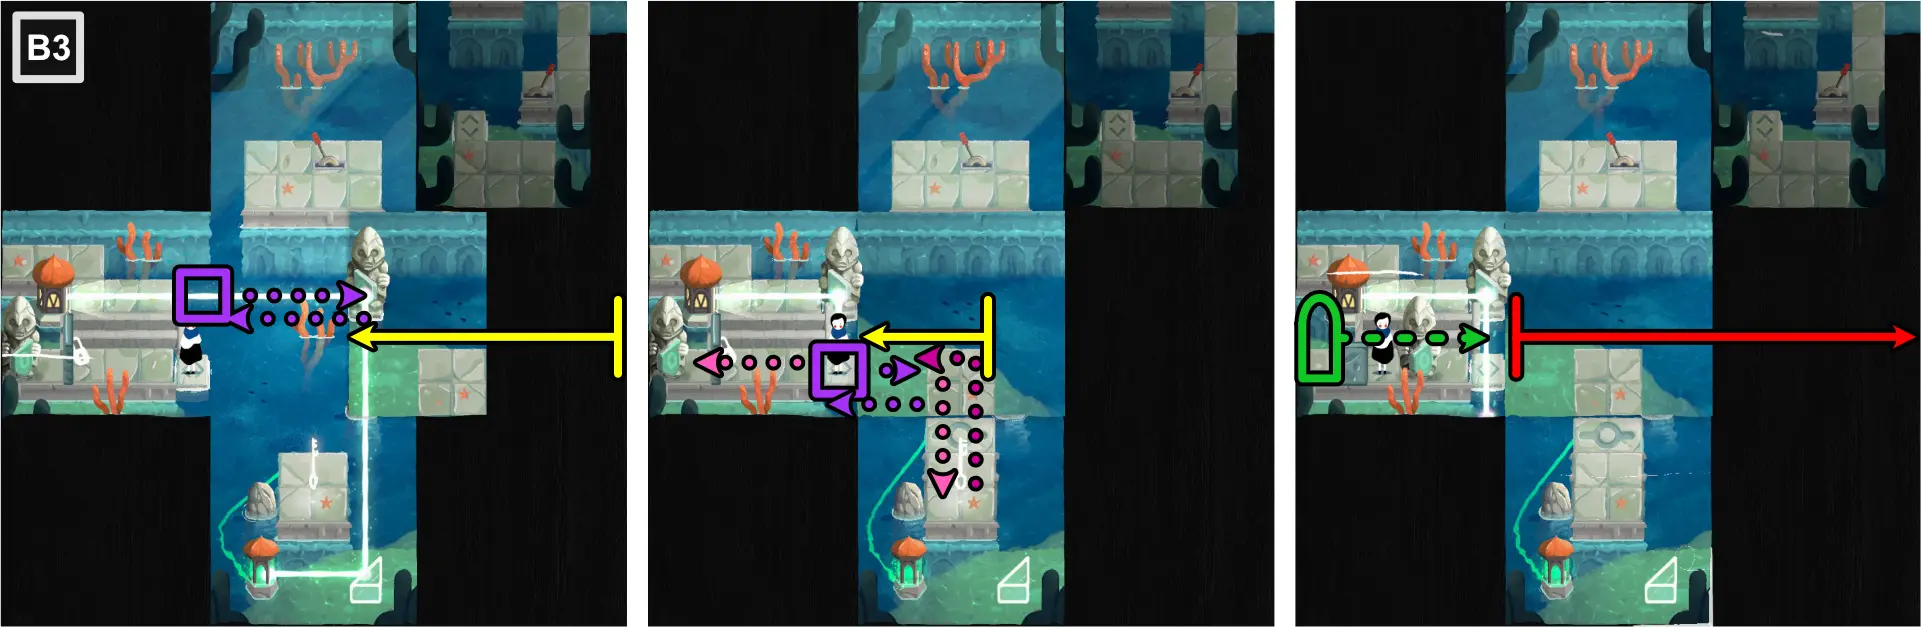
- Using the two bottom corners, fold diagonally to connect with the two-dotted tiles and one-dotted tiles.
- Follow the path to the left to B5.
- Using the right edge, fold vertically to connect the one-dotted tiles.
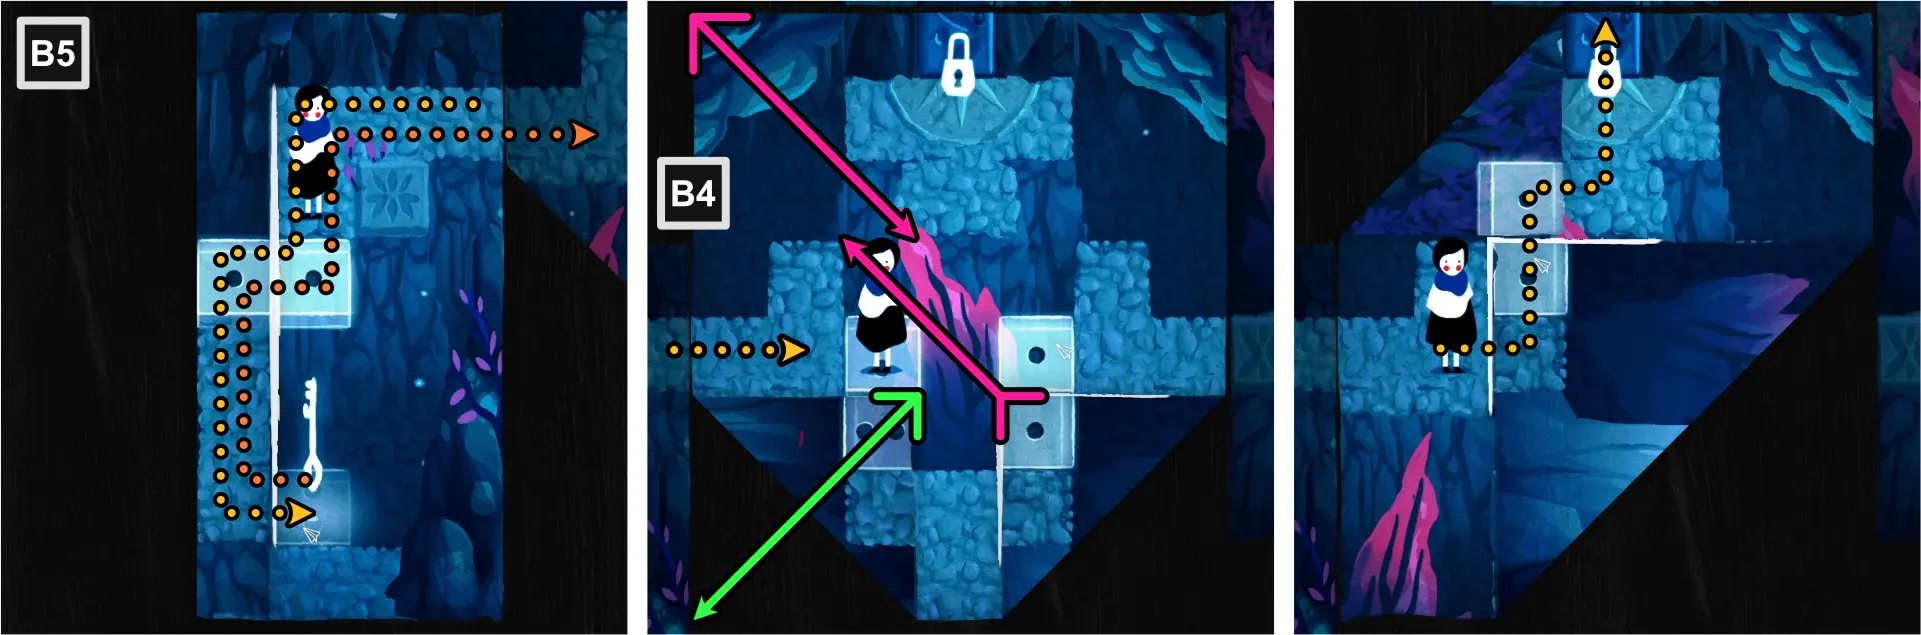
- Take the key and go back to B4.
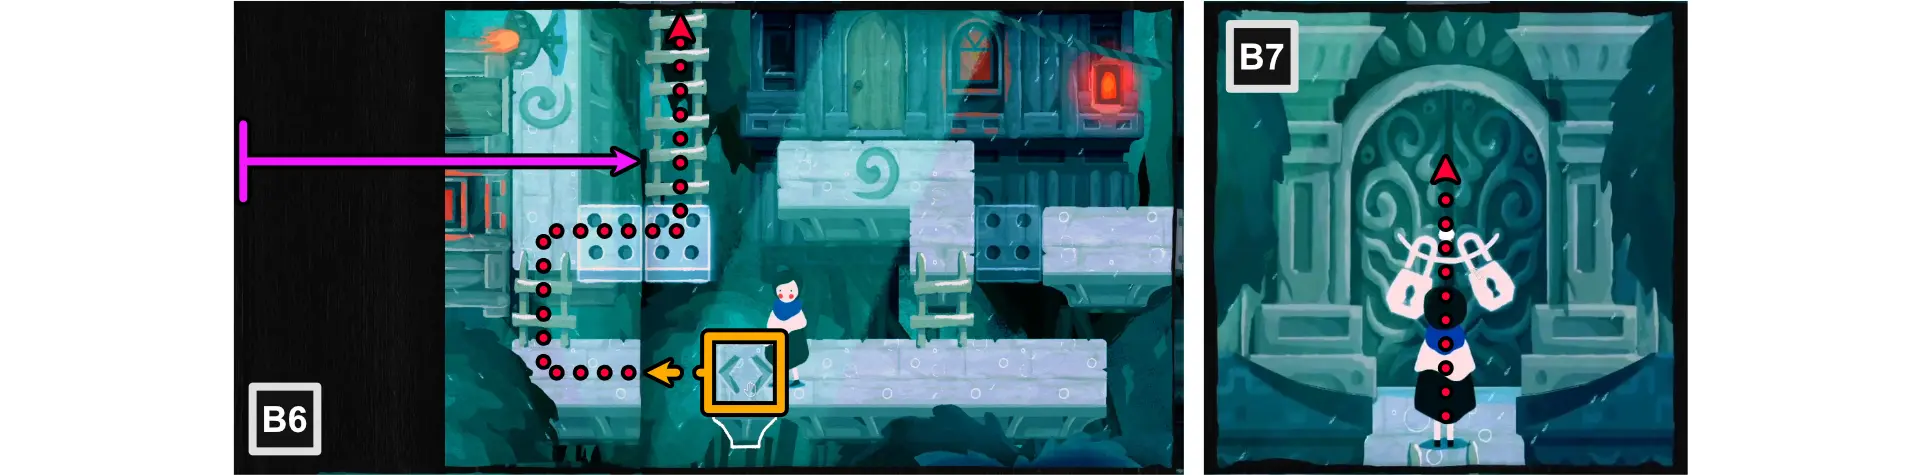
- Position Paige to the tile just to the left of the two-dotted tile.
- Unfold the bottom left corner.
- Align the folded bottom right corner to Paige’s position.
- Using the top left corner, fold diagonally to connect the one-dotted tiles.
- Cross the path and unlock the door at the top of the map to go to B7.
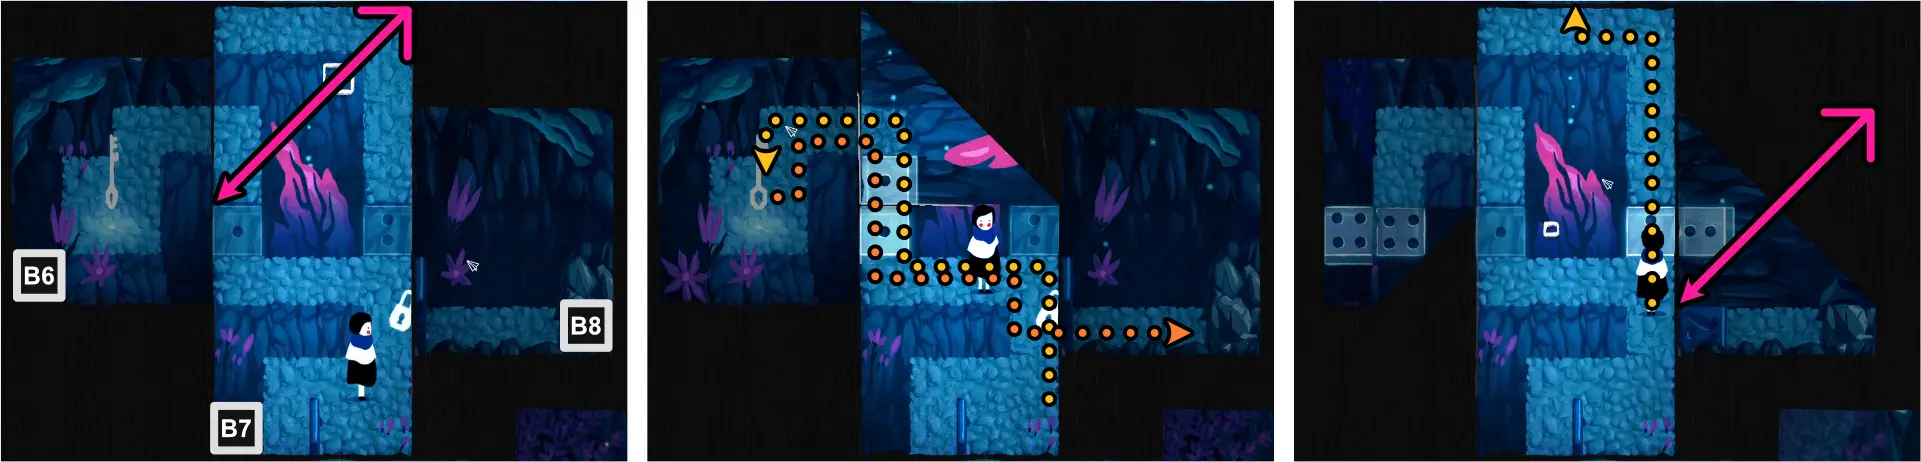
- Using the top right corner, fold diagonally to connect the one-dotted tiles.
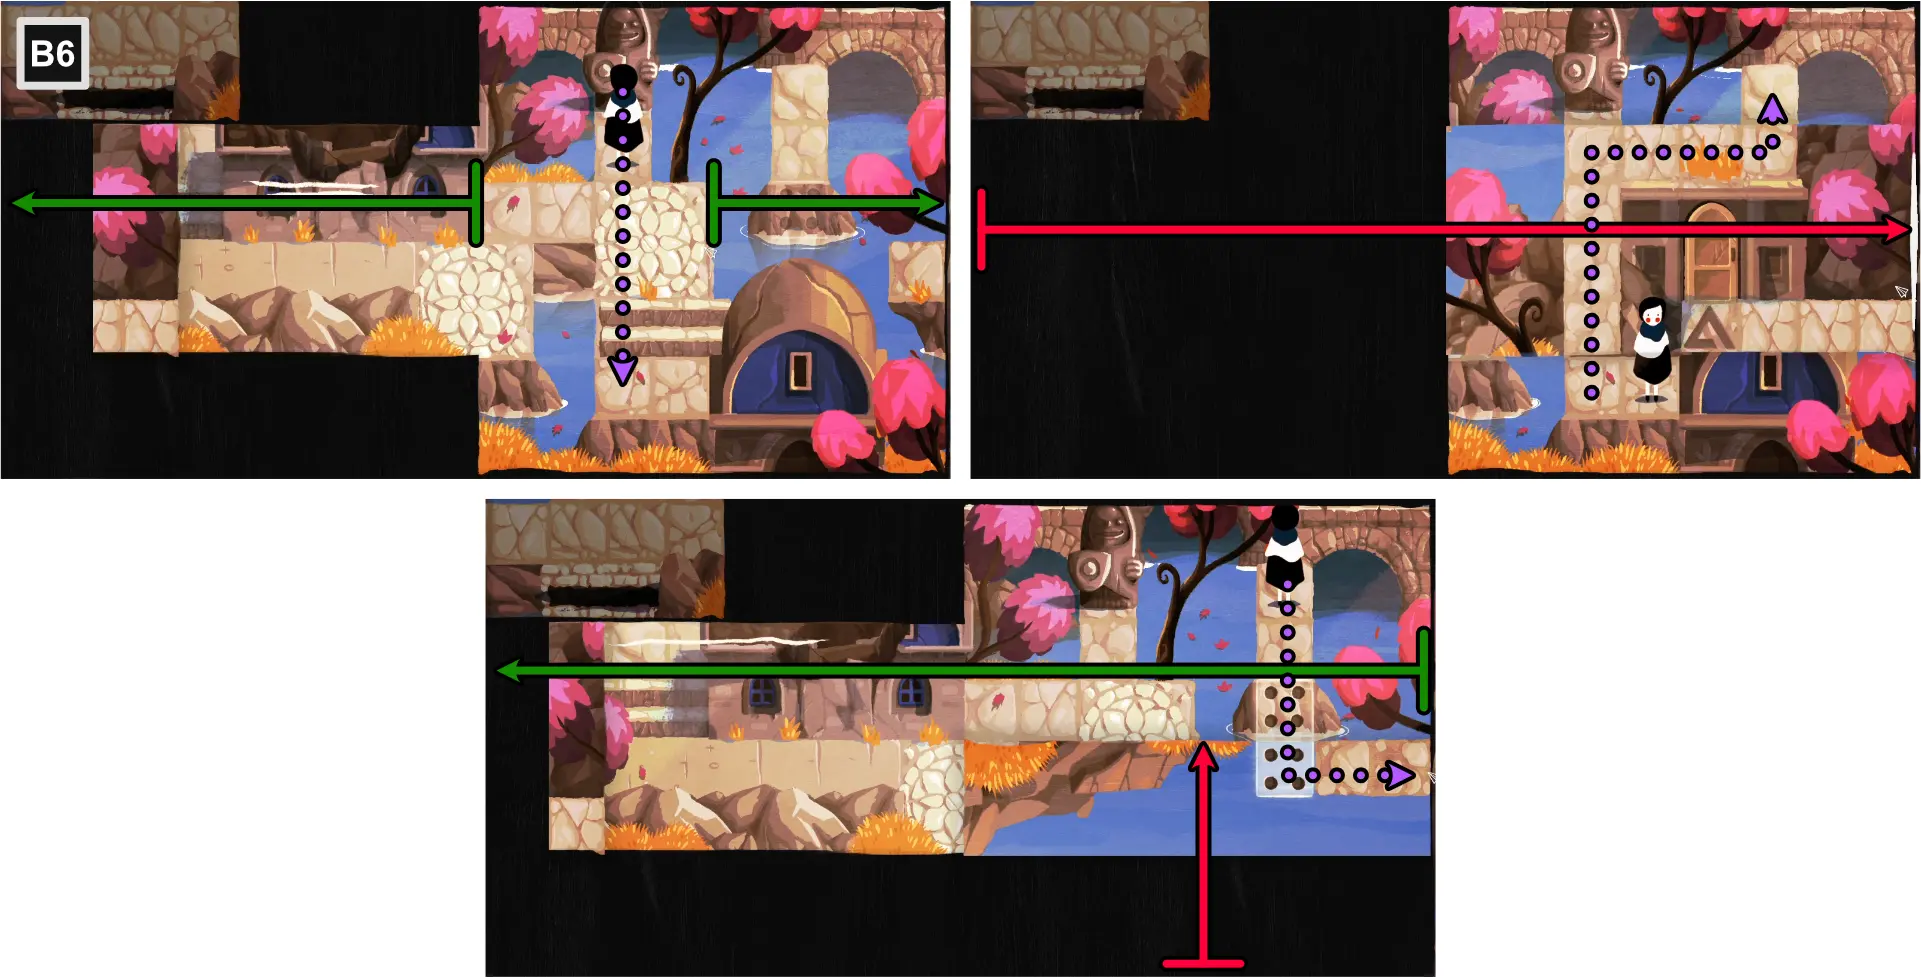
- Follow the path to the left and pick up the key in B6.
- Go back to B7 and follow the path to the right to go to B8.
- Using the top right corner, fold diagonally to connect the two-dotted tiles.
- Follow the path upwards to go to C3.
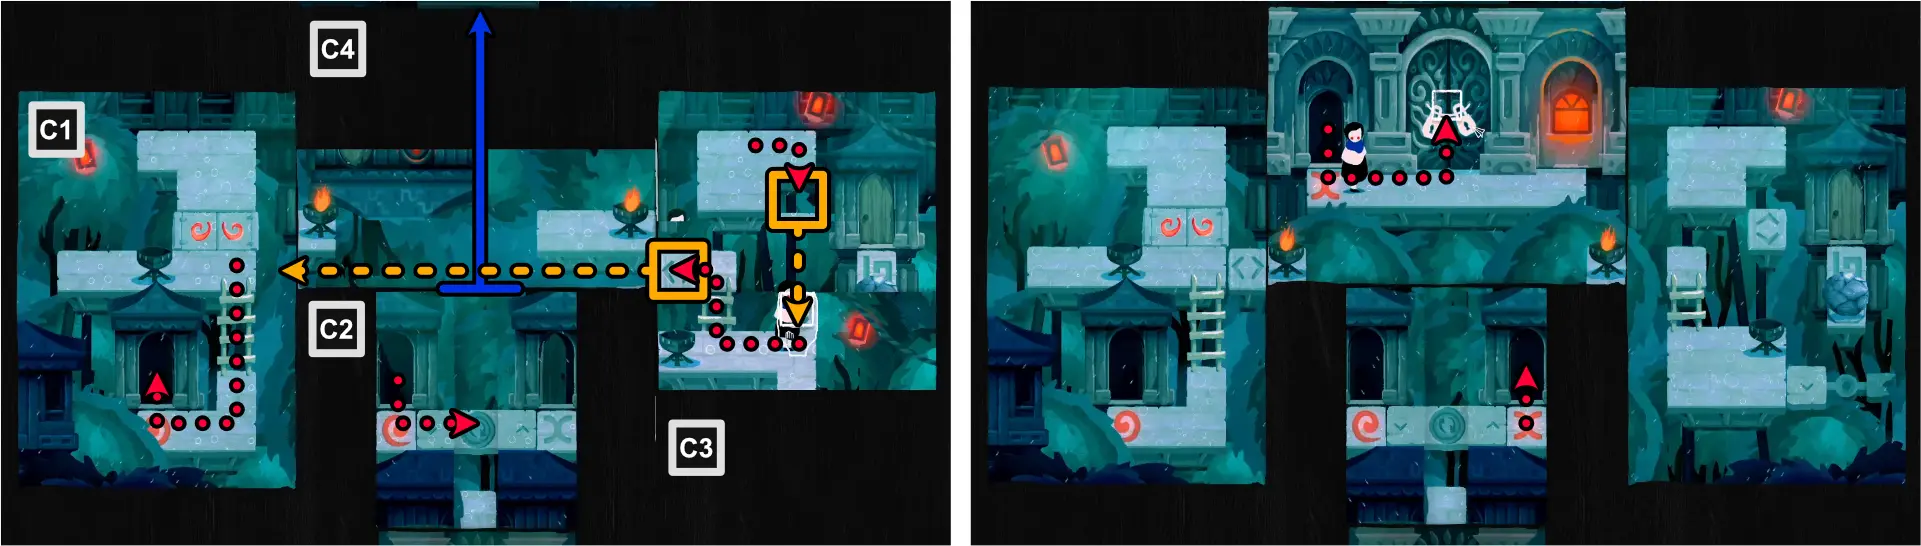
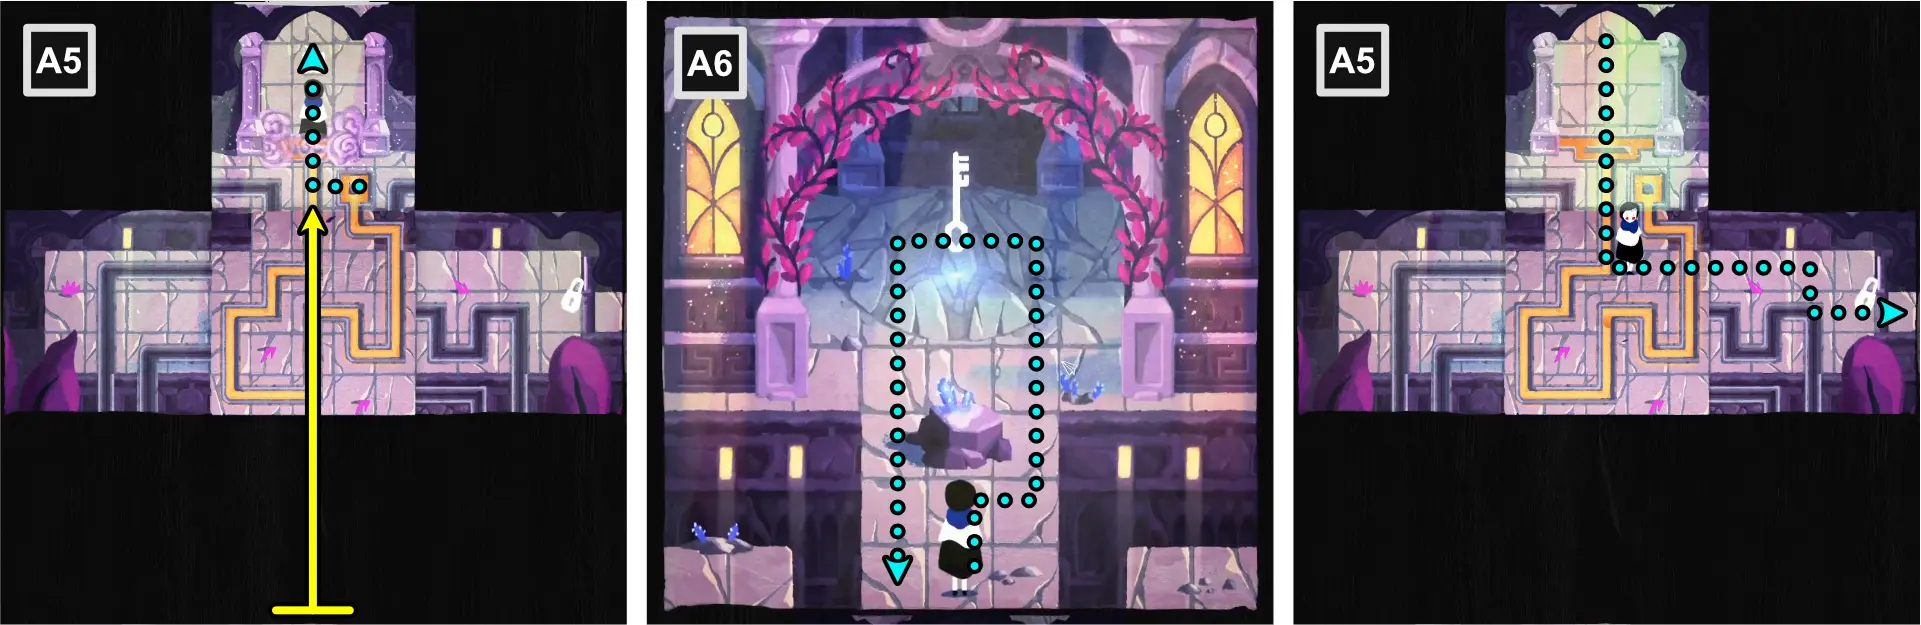
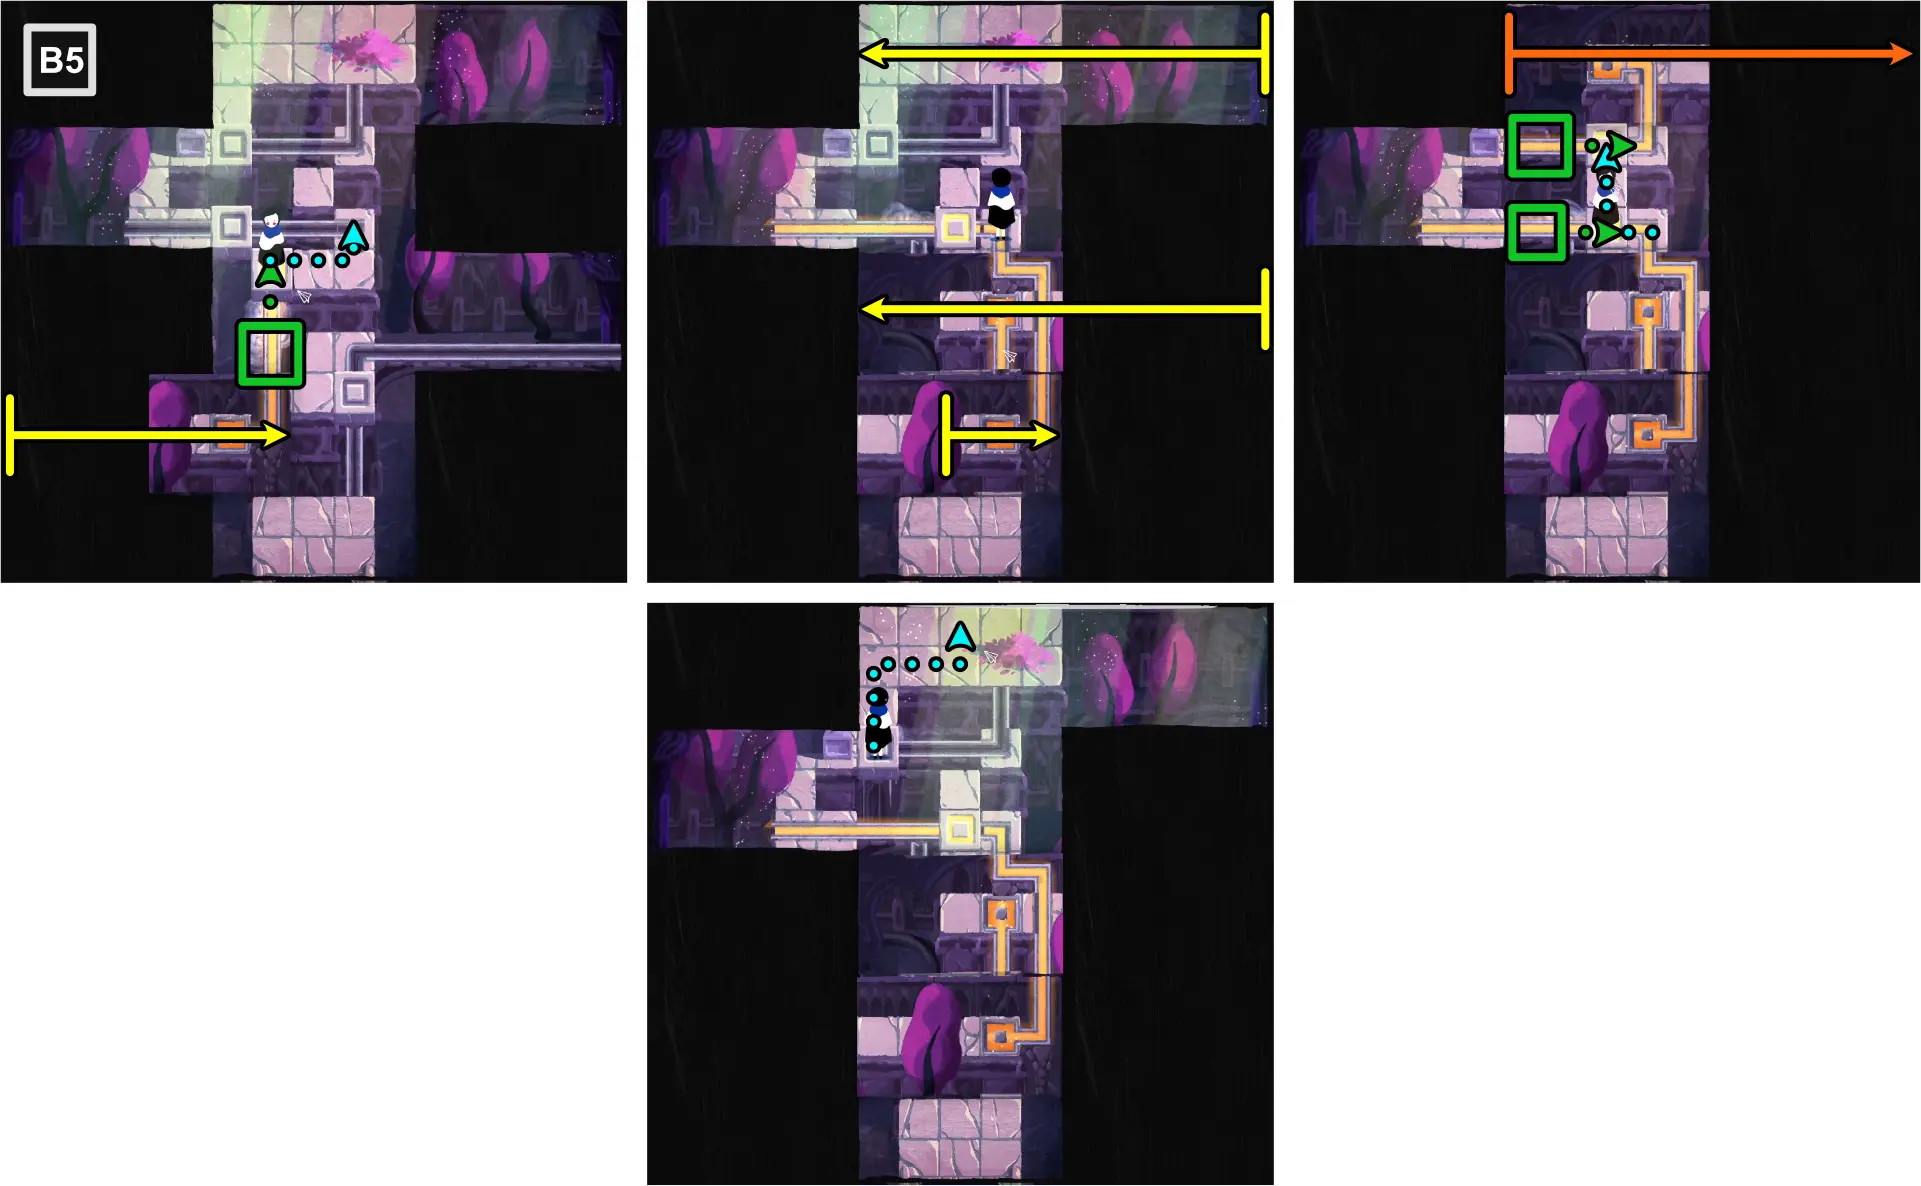
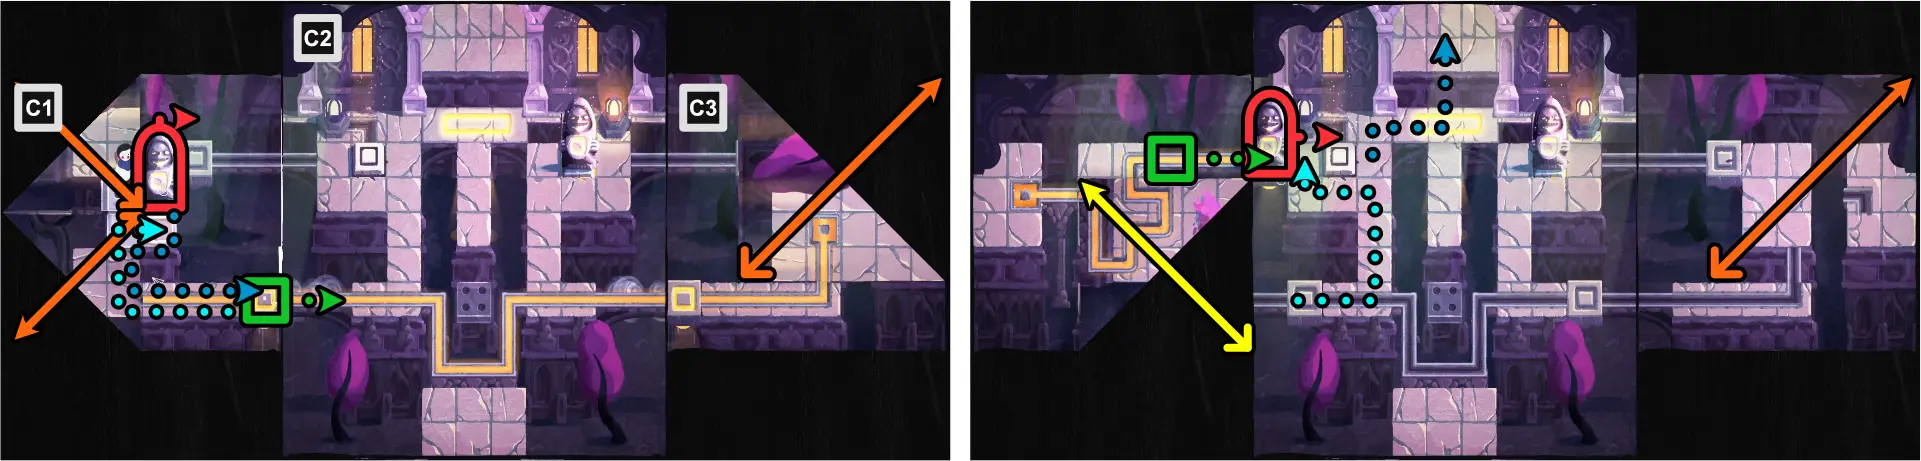
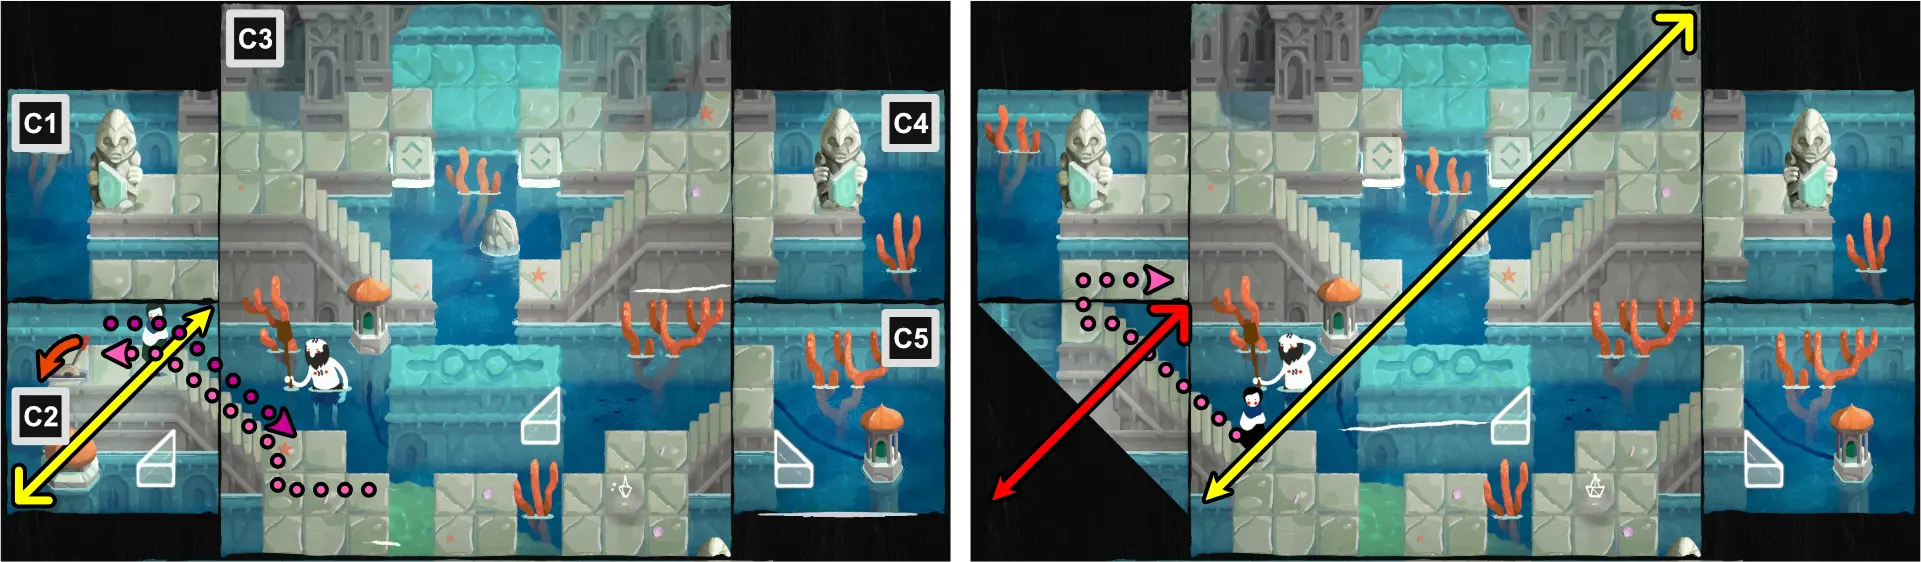
Cave Exit (C1-C5)
For this section of the level, all five areas can be folded even if Paige is not inside it.
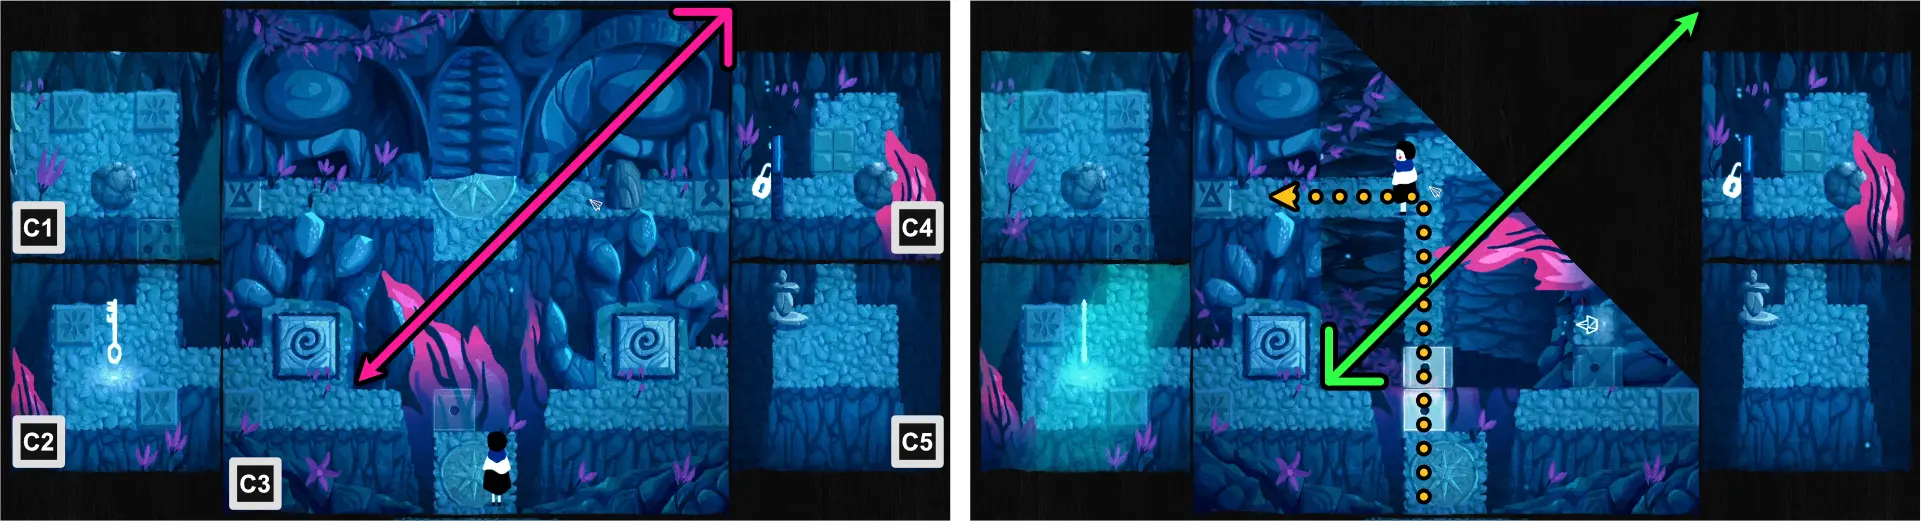
- Using C3’s top right corner, fold diagonally to connect the one-dotted tiles.
- Follow the path to the upper left and stop just above the left pressure plate.
- Unfold C3.
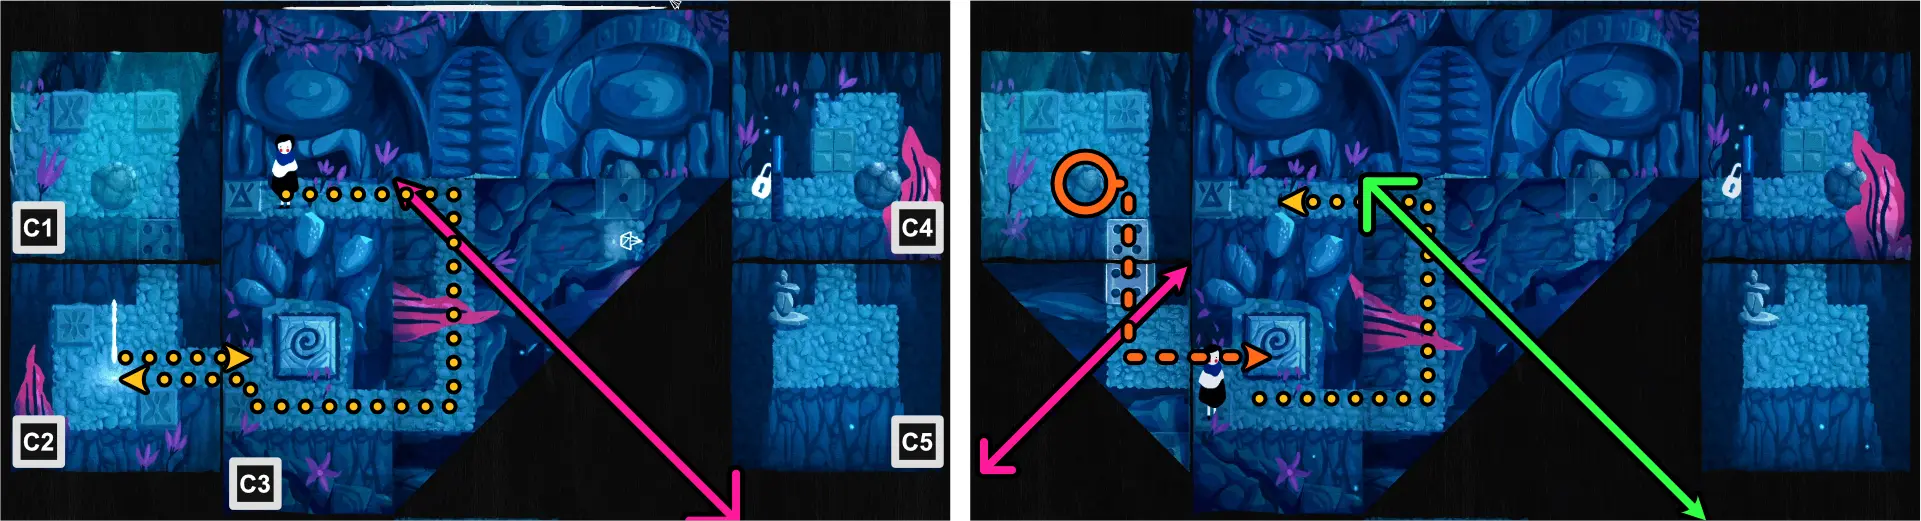
- Using C3’s bottom right corner, fold diagonally to create a path from where Paige is positioned to the bottom where the left pressure plate is.
- Go to C2 and collect the key.
- Go back to C3.
- Using C2’s bottom left corner, fold diagonally to connect this map’s four-dotted tile to the one in C1.
- Drag the boulder in C1 down to C2, and then to C3, on top of the pressure plate.
- Move Paige to the upper path of C3 and position her just above the pressure plate.
- Unfold C3.
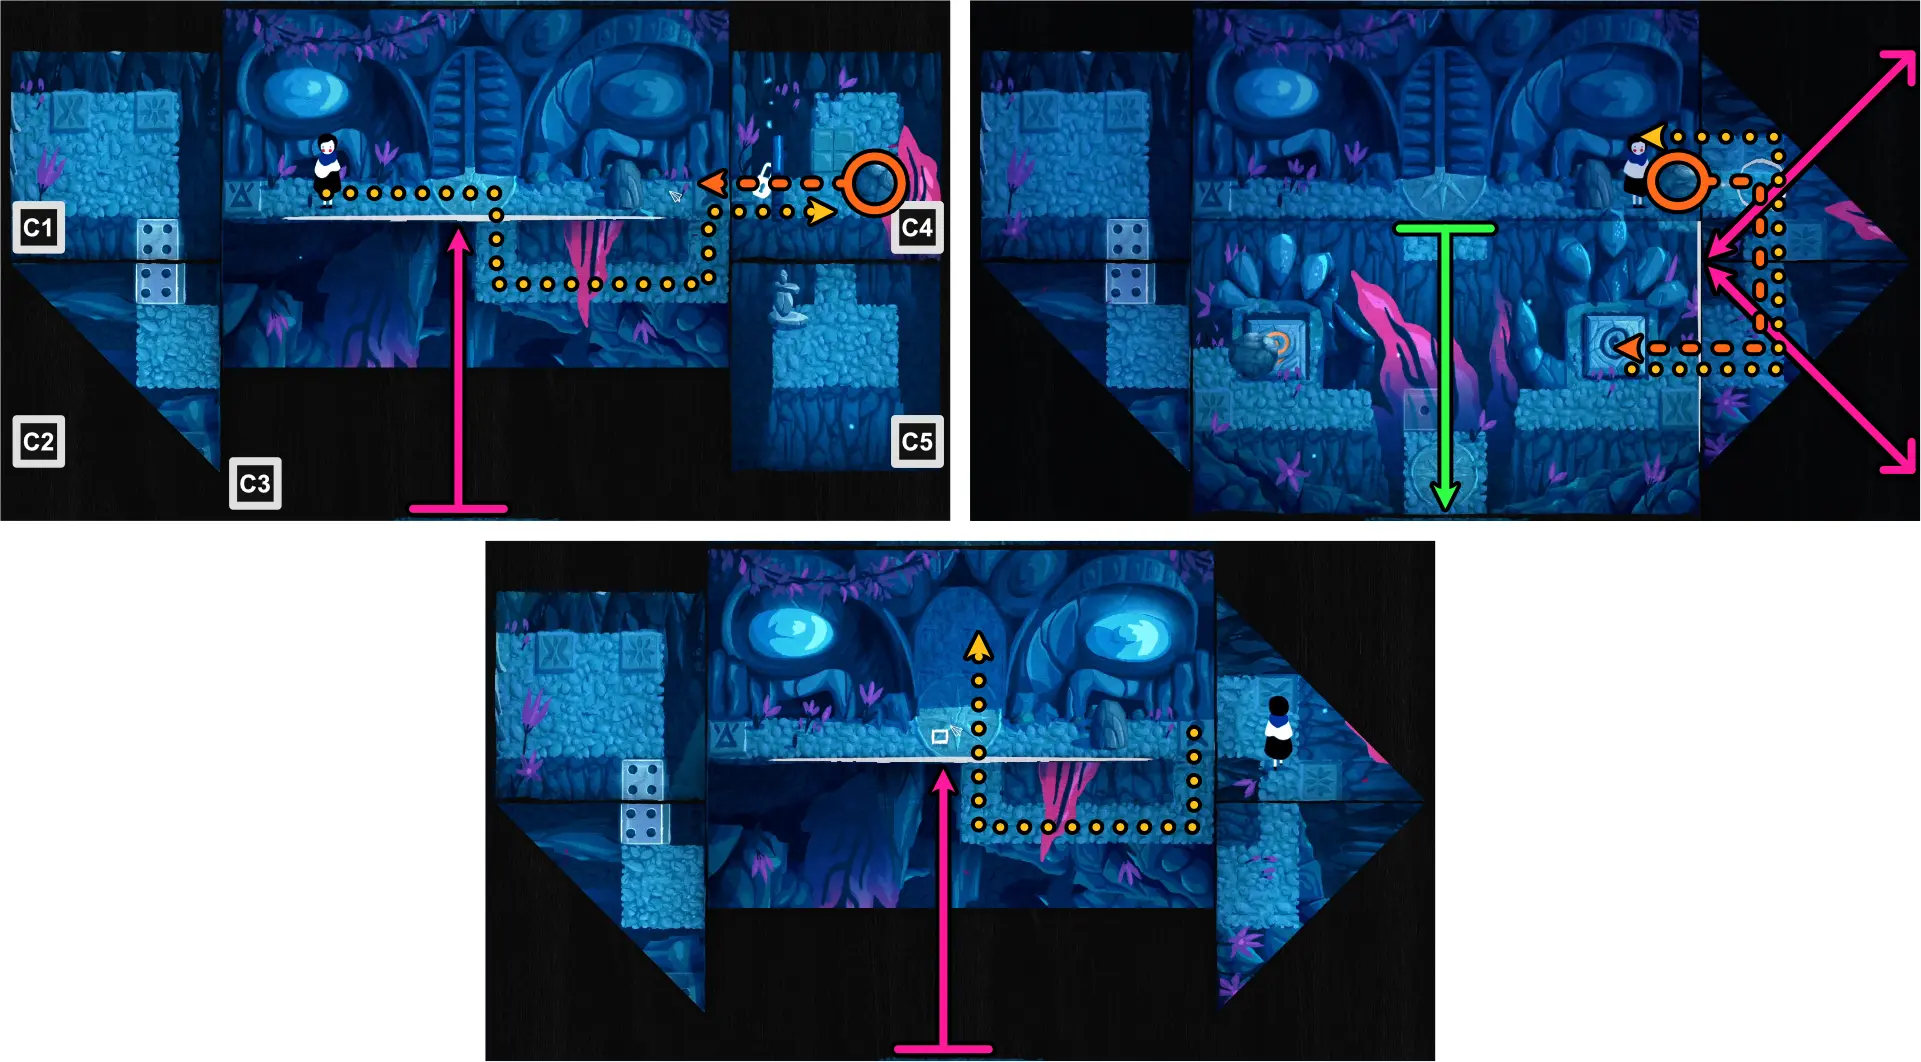
- Using C3’s bottom edge, fold horizontally to align with the upper path where Paige is positioned.
- Follow the path to the right and unlock the door to reach the boulder in C4.
- Drag the boulder from C4 to C3, just by the edge.
- Using C4’s upper right corner, fold diagonally, meeting the bottom left corner.
- Using C5’s bottom right corner, fold diagonally, meeting the upper left corner.
- Unfold C3.
- Use the path created by C4 and C5 to bring the boulder to the right pressure plate in C3.
- Use the same path to go back to the upper path of C3, just next to the rock.
- Using C3’s bottom edge, fold horizontally and align it with the upper path.
- Use the path created by the fold to enter the doorway.
Cutscene: Night at the Cave
- Using the side edges, fold vertically to the center.
- Unfold the map.
- Using the top corners, fold diagonally to the center.
- Using the bottom edge, fold horizontally to align with the two previous folds.
- Unfold the map.
- Using the side edges, fold vertically, meeting together by the bottom half of Paige’s sleeping bag.
- Unfold the map.
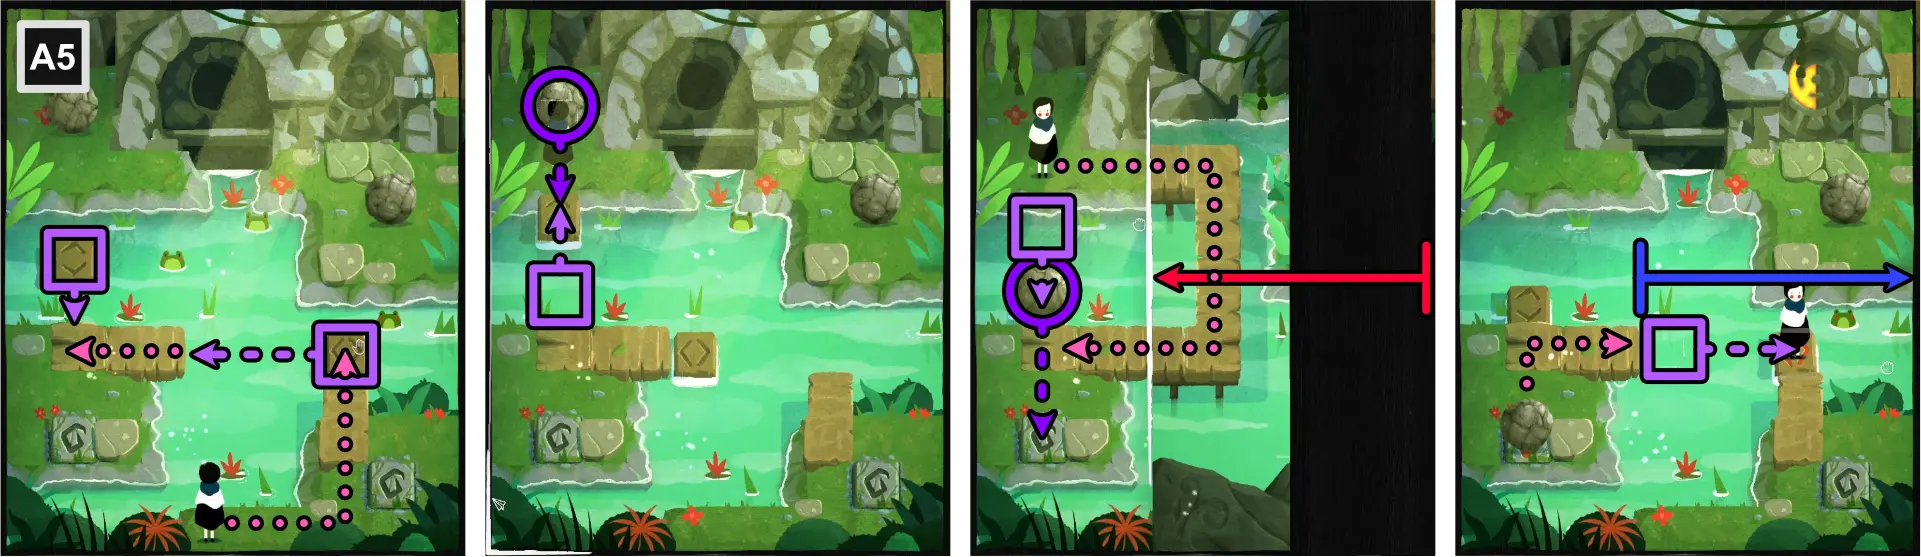
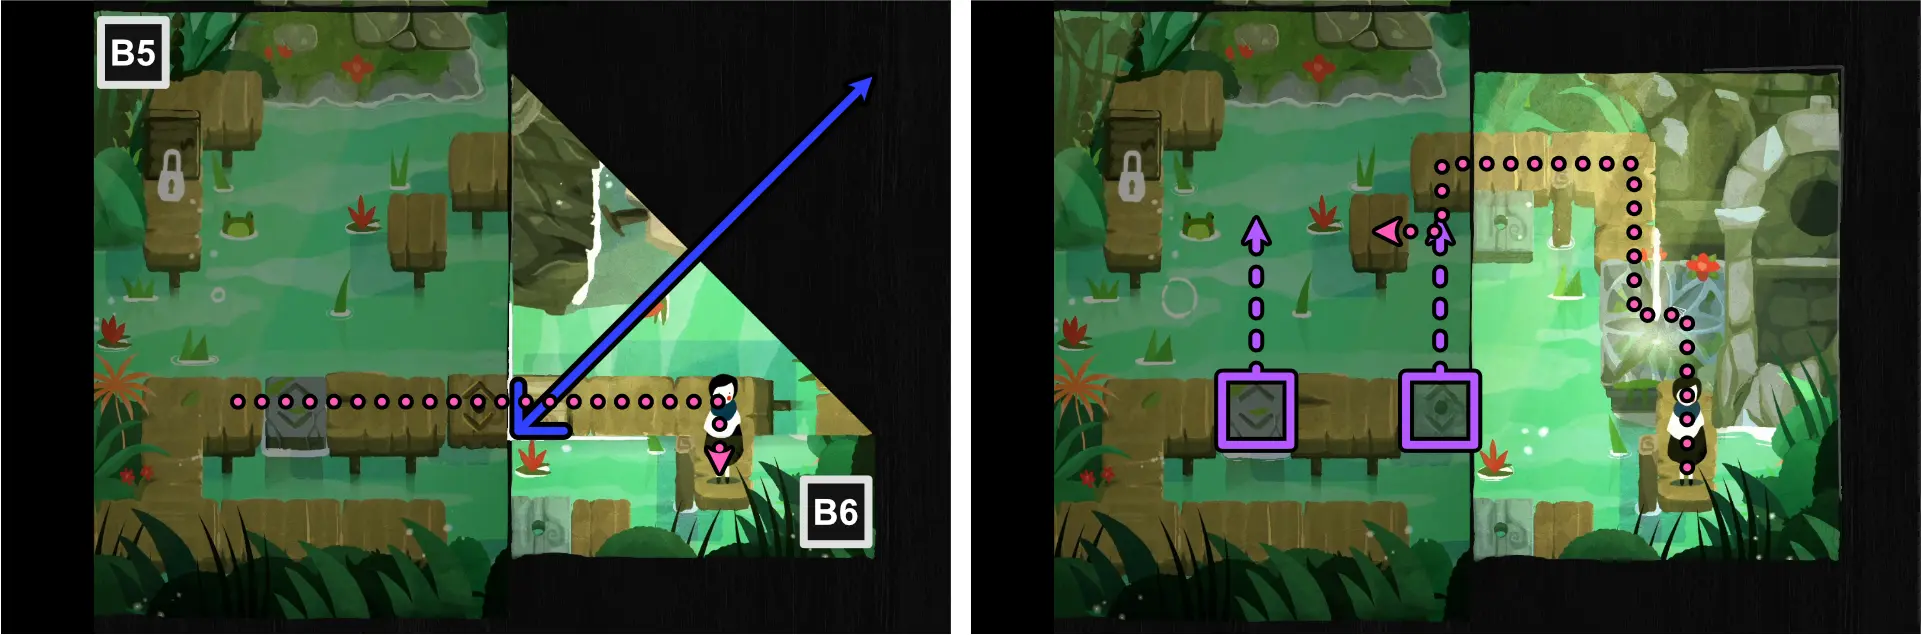
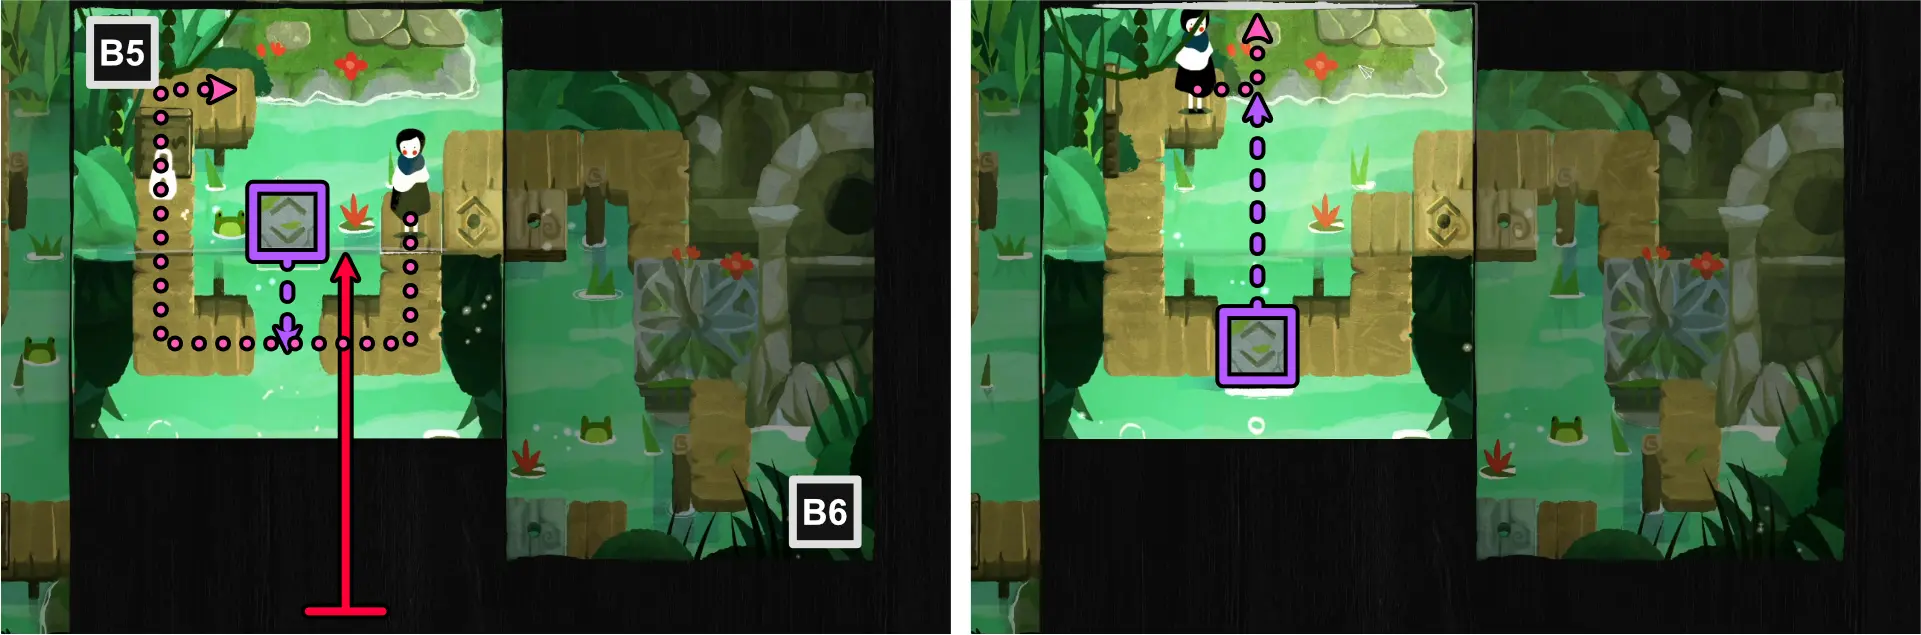
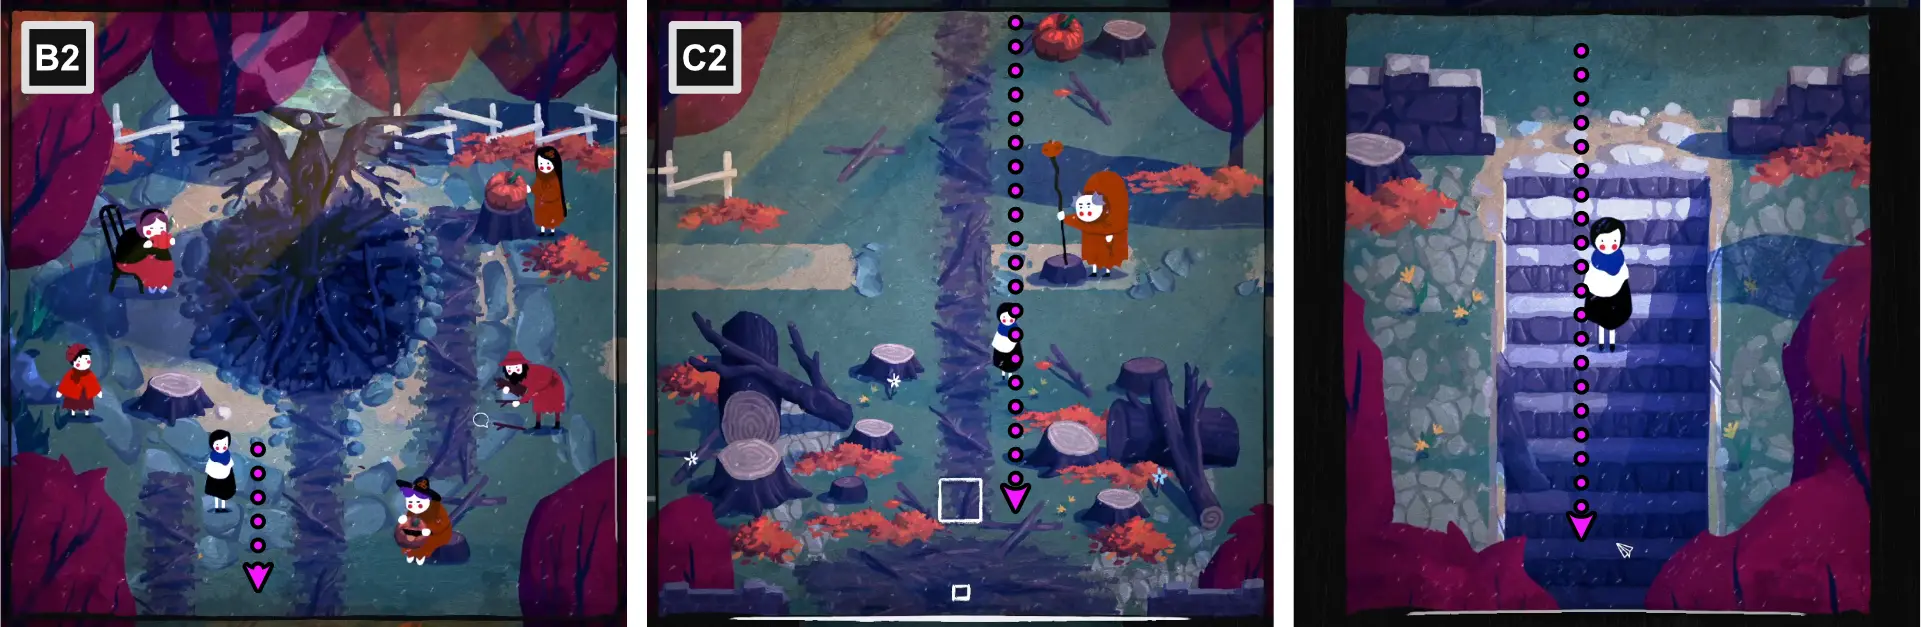
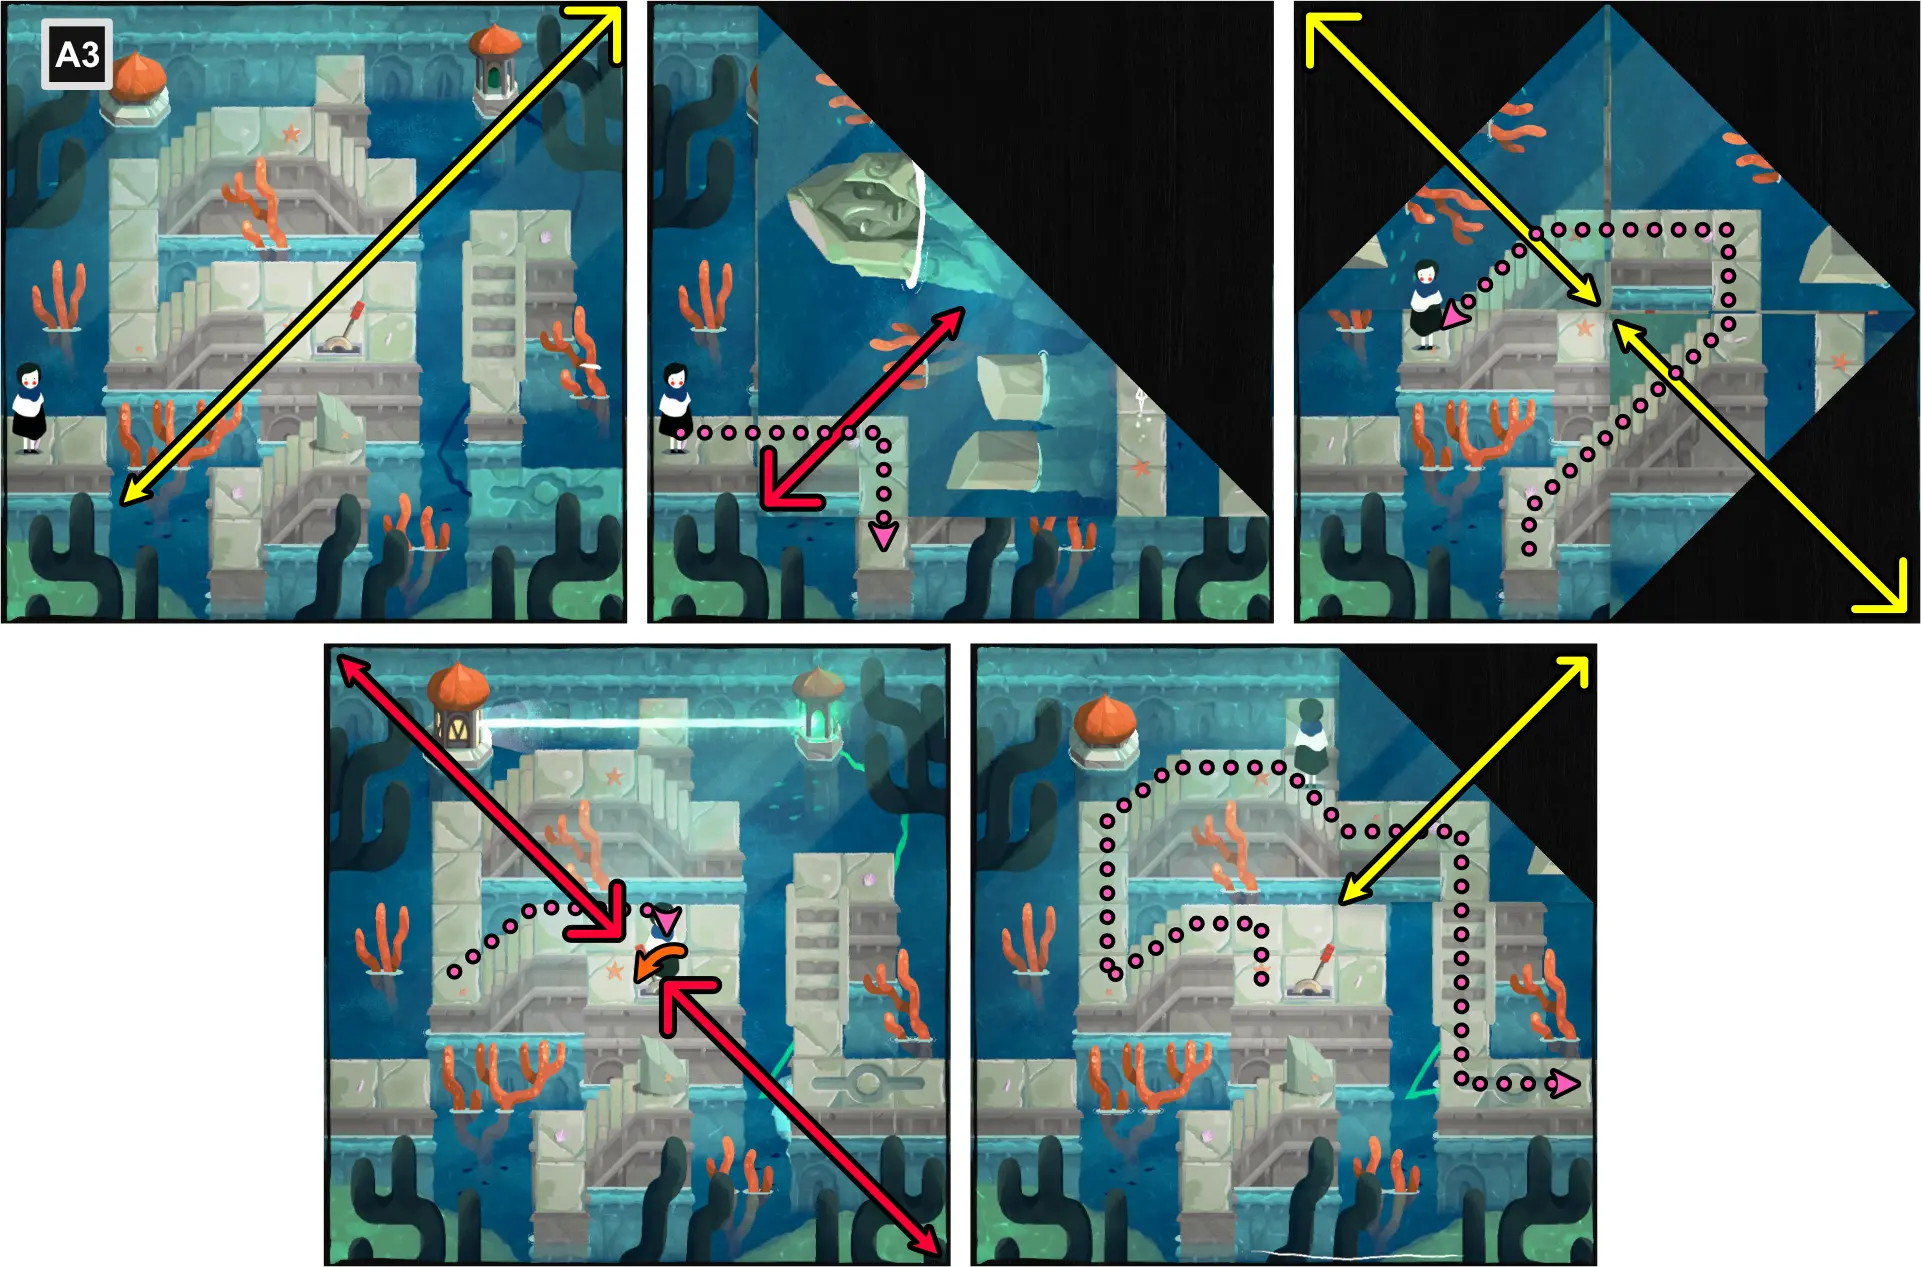
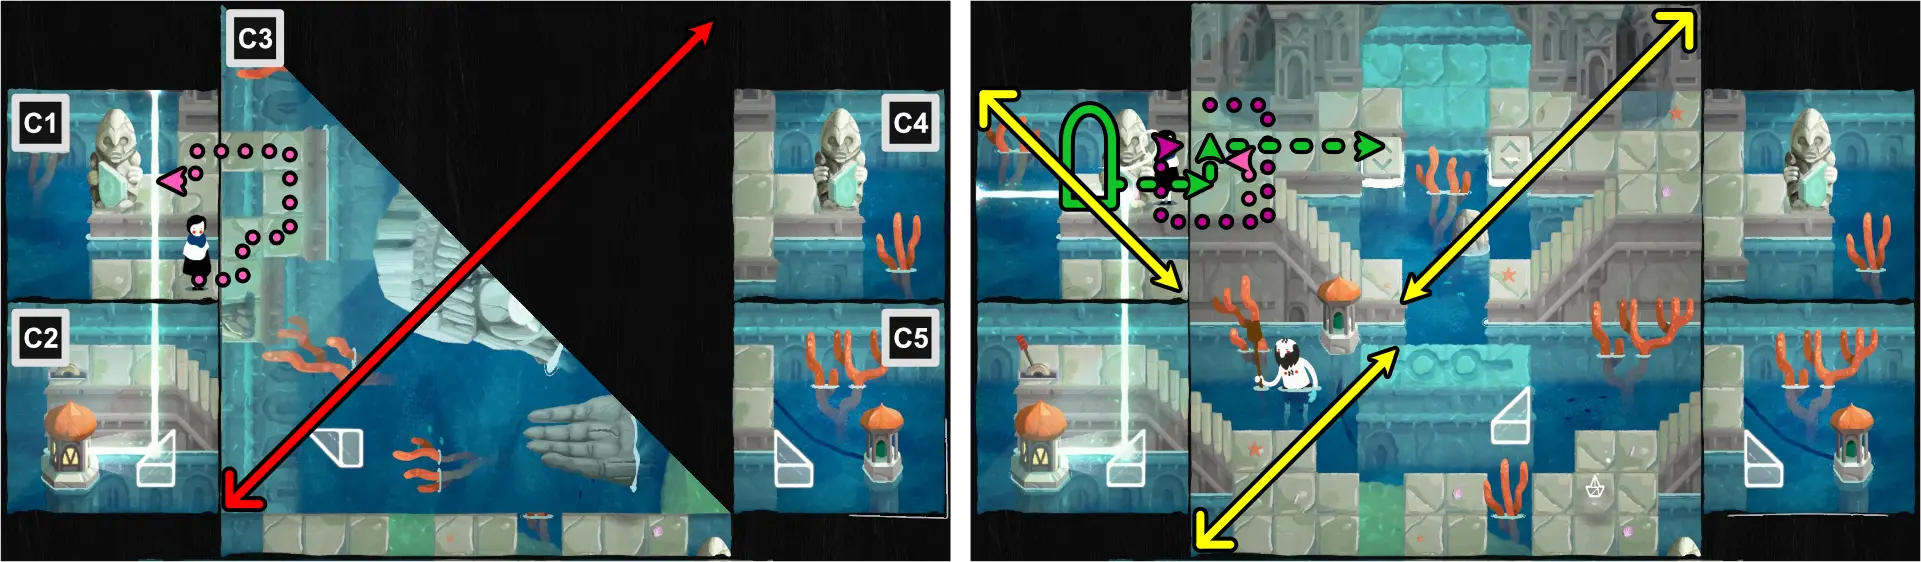
Chapter 3: Swamp
For this chapter, refer to the image below for the map of the scene and the legend of the symbols and lines that appear.

In this level, a few new mechanics are introduced:
- Floating Tiles – These tiles on the water can be moved according to the arrows marked on top of it. These can only move either horizontally or vertically. Can be moved even when Paige or an item is on top of it.
- Floating Rock Tiles – Works the same as regular floating tiles but cannot be moved when Paige or an item is on top of it.
- Floating Numbered Tiles – These tiles can be moved and will solidify similarly numbered tiles.
For extra achievements you can unlock for this chapter, go to the section “Achievements, Chapter 3: Swamp.”
Start of the Swamp (A1-A5)
Upon arriving at the Swamp, Paige will meet two siblings who are trying to catch frogs.
- Move the tile downward, aligning it to the pier where Paige is.
- Place Paige on the floating tile.
- Move the tile upward, aligning it to the pier at the top.
- Using the bottom edge, fold horizontally, aligning it one space below the pier at the top.
- Move the tile downward, aligning it to the pier to the right.
- Move Paige to A2.
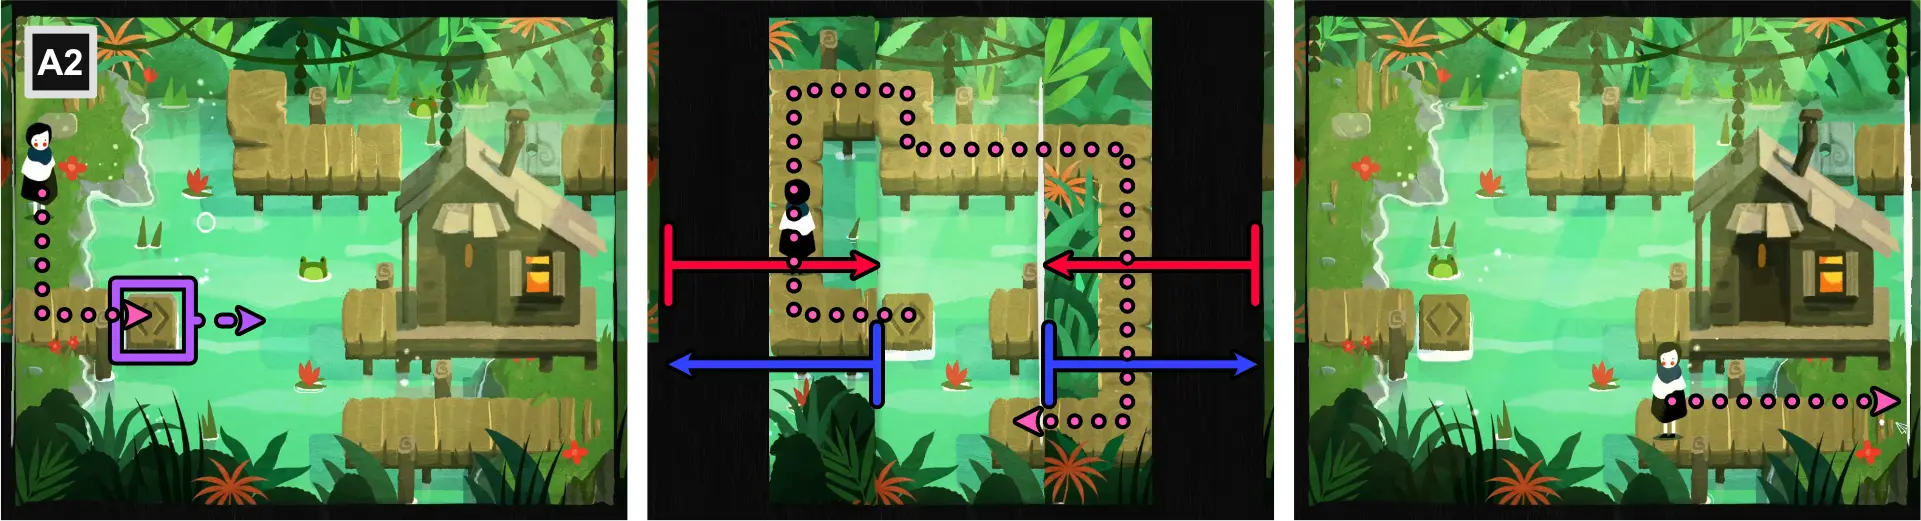
- Place Paige on the floating tile.
- Move the tile 1 space to the right.
- Using the left and right edges, fold vertically towards the center.
- Follow the path until Paige reaches the end.
- Unfold the map.
- Move Paige to A3.
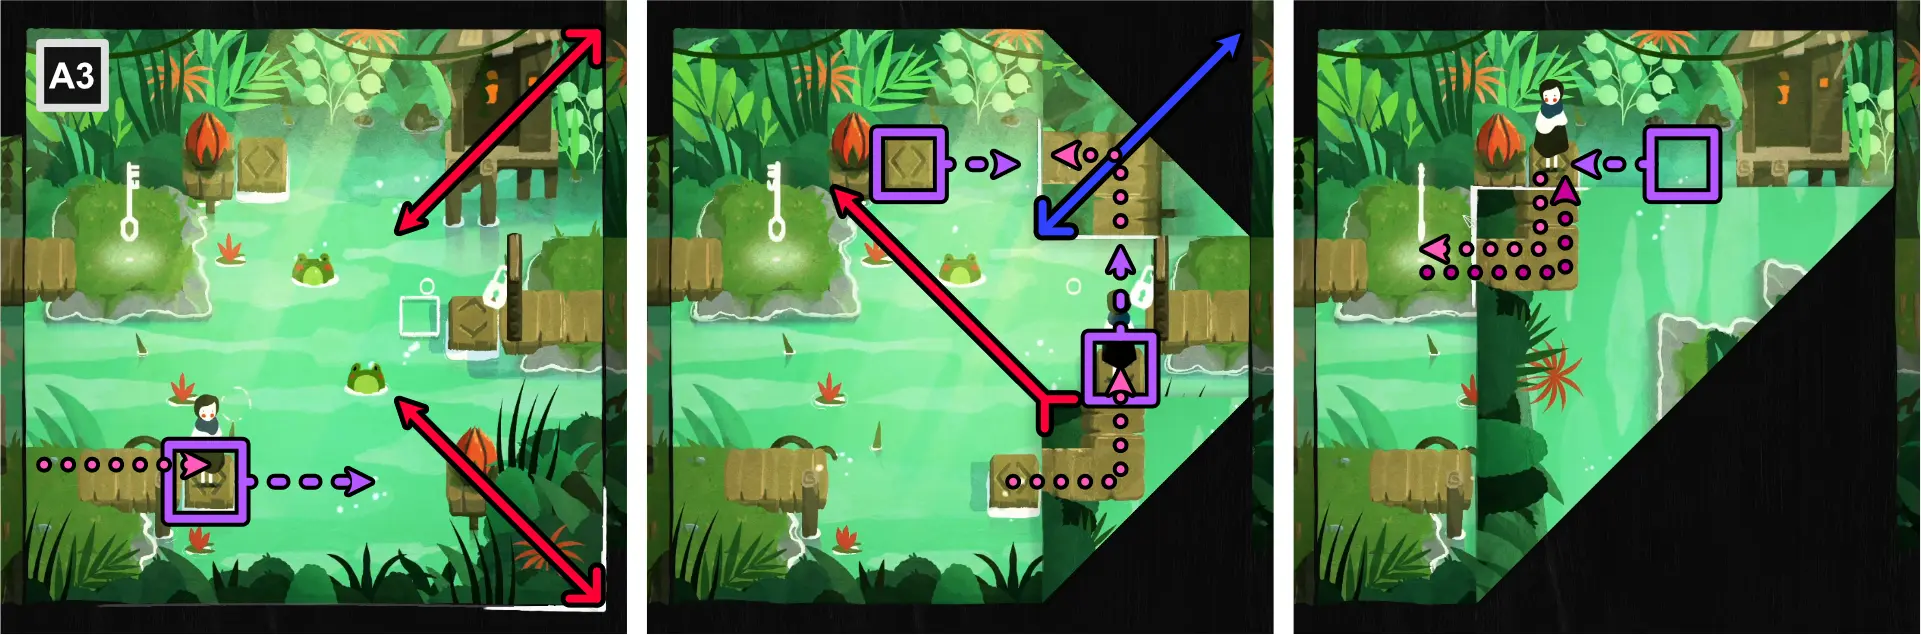
- Place Paige on the horizontal floating tile.
- Move the tile 2 spaces to the right.
- Using the top right and bottom right corners, fold diagonally, positioning it two spaces to the left of the locked door.
- Move Paige to the pier at the bottom right fold and onto the vertical floating tile.
- Move the top horizontal floating tile to the right, aligned to the top right pier.
- Move Paige to the pier at the top right fold and onto the horizontal floating tile.
- Unfold the top right fold.
- Align the bottom right fold to the rock where the key is located.
- Move the tile Paige is on to the left, aligning with the pier.
- Take the key and go back to the tile.
- Unfold the map.
- Using the top right corner, fold diagonally, aligning with the vertical floating tile.
- Move the tile Paige is on to the right, then to the pier and onto the vertical floating tile.
- Align the vertical floating tile to the locked door.
- Using the key, unlock the door.
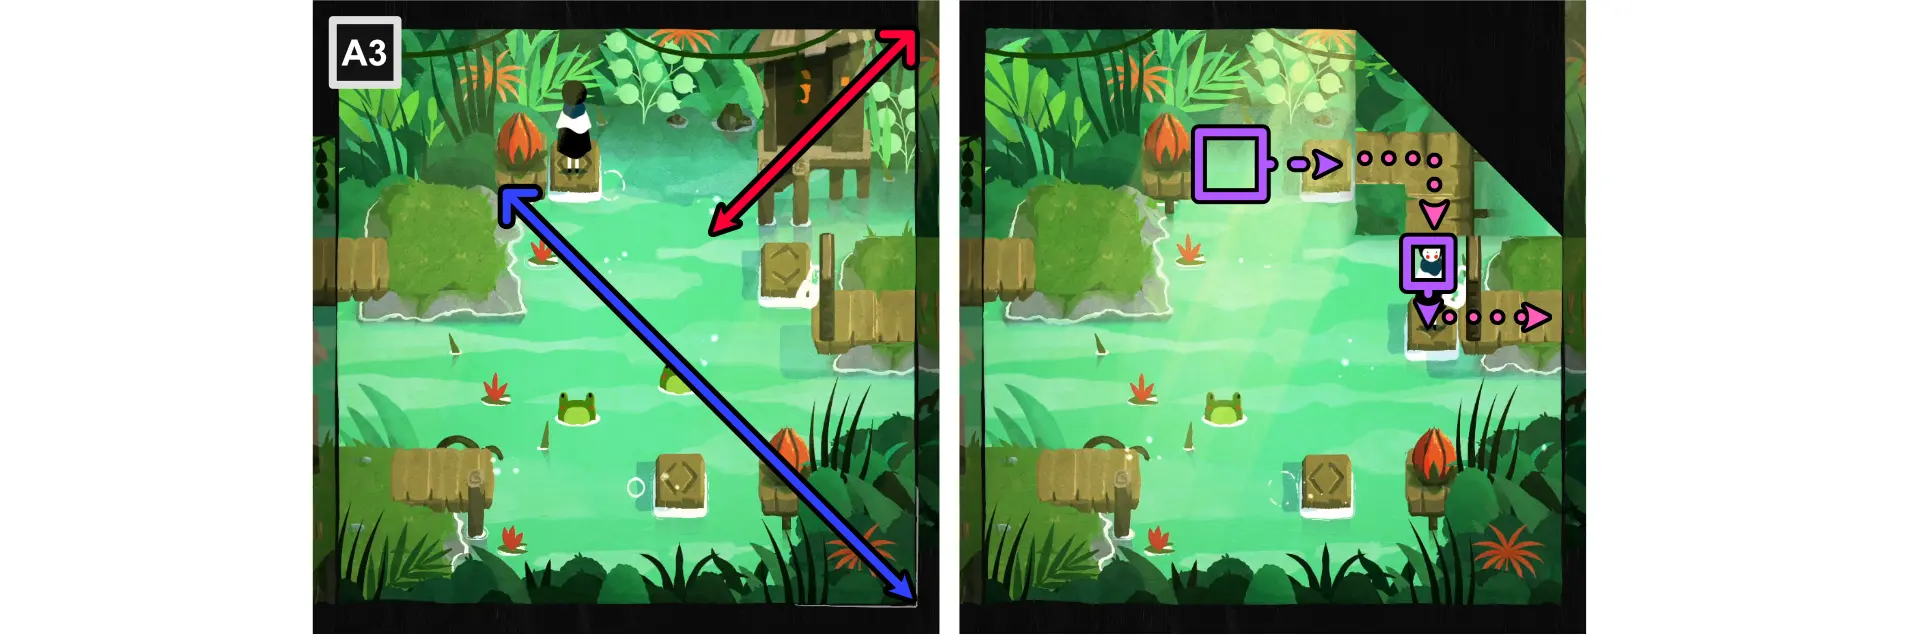
- Move Paige to A4.

- Push the boulder onto the floating tile.
- Using the bottom left corner, fold diagonally, aligning with the pier where the boulder is.
- Using the bottom right corner, fold diagonally, aligning with the stone door.
- While on top of the tile, move the boulder to the gap of the pier path.
- Push the boulder upward, then to the left at the edge of the pier near the stone door.
- Move Paige to the floating tile and move her to the left.
- Unfold the map.
- Move Paige to the right.
- Using the horizontal floating tile at the upper right part of the map, move to the location of the boulder.
- Move the boulder to the horizontal floating tile.
- Move the tile to the right, aligned to the pier.
- Move the horizontal floating tile at the center to the left.
- Using the bottom right corner, fold diagonally, aligning with the stone door.
- Move the tile to the gap of the pier.
- Move Paige to the floating tile then move to the left.
- Unfold the map.
- Move Paige to the right side of the map.
- Drag the boulder to the pressure plate to open the stone door.
- Use the horizontal floating tile at the top to bring Paige to the entrance to A5.
- Use the horizontal floating tile to bring Paige to the left side of the map.
- Use the vertical floating tile to bring Paige to the boulder to the upper left side of the map.
- Move the boulder to the vertical floating tile then move it downwards.
- Using the right edge, fold vertically, aligning it with the pier at the center.
- Use the path and drag the boulder to the pressure plate to partially open the stone door.
- Unfold the map.
- Use the horizontal floating tile to bring Paige to the right pier.
- Using the left edge, fold vertically, aligning with the pier.
- Move Paige to the pier’s gap.
- Move the boulder to the bottom of the pier.
- Use the horizontal floating tile to bring Paige to the pier to the right.
- Move the boulder on top of the pressure plate to fully open the door.
- Move the horizontal floating tile between the pier gap and use the path to go to B1.
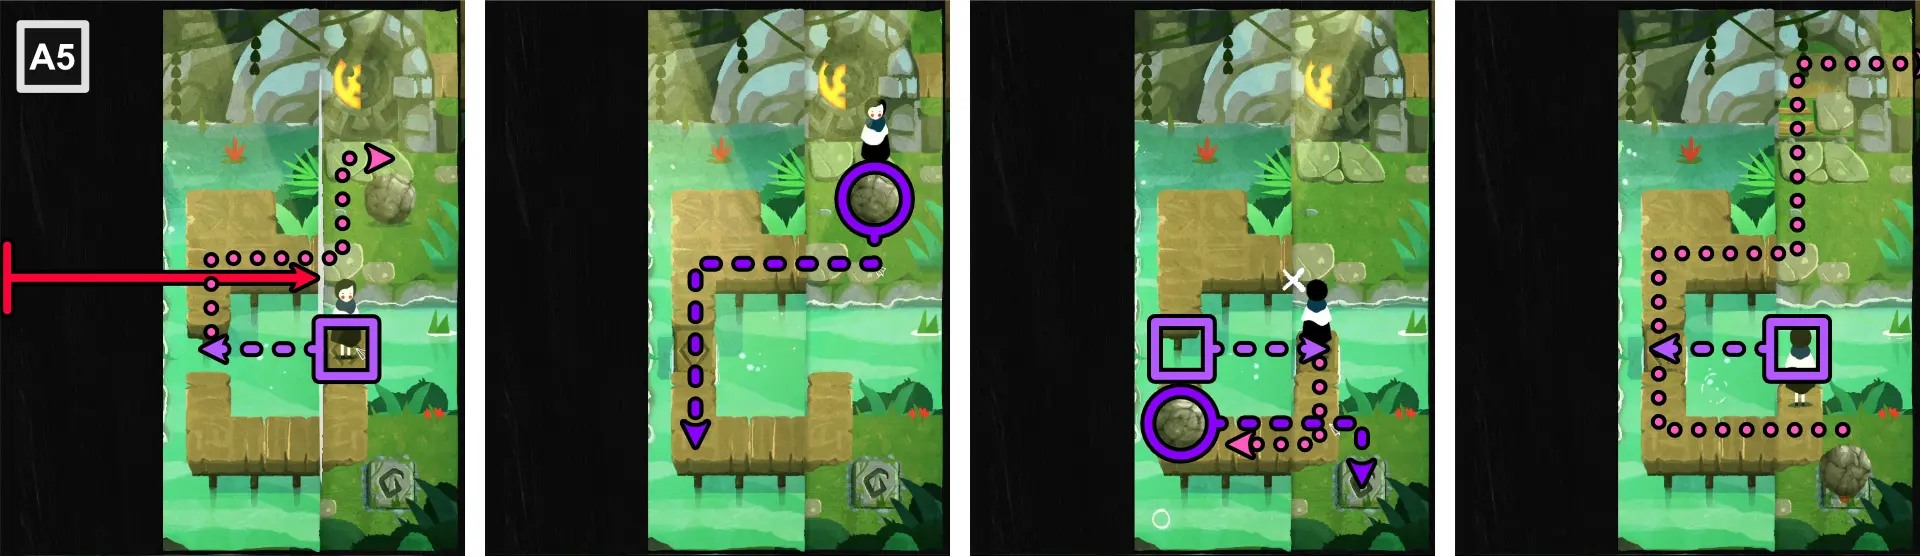
The Triffid (B1-B7)
Paige will see the two siblings once more, trying to catch frogs for their grandmother.
- Move Paige to the top right corner of the square platform to the left of the flower bulb.
- Using the bottom left and bottom right corners of the map, fold diagonally towards the center to complete the markings and open up the flower.
- Move Paige to B2.

- Connect the one-dotted floating tile to the ones to the left so Paige can cross and move to the pier above.
- Using the right edge, fold vertically and align to the edge of the pier where Paige is.
- Connect the one-dotted floating tile to the one to the right.
- Move Paige to the tile above the two-dotted tiles.
- Move the one-dotted floating tile back to the left.
- Unfold the map.
- Move the one-dotted floating tile to the gap of the pier.
- Move Paige just below the floating tile.
- Using the left edge, fold vertically, aligning the one-dotted tiles.
- Using the bottom right corner, fold diagonally, aligning the two-dotted tiles.
- Move to the upper right corner of the map.
- Unfold the map.
- Connect the one-dotted floating tile to the ones at the right side of the map.
- Move Paige to B3.
- Align the stone tile to the pier.
- Using the right edge, fold vertically, aligning with the stone tile.
- Move Paige to the pier on the right fold.
- Align the stone tile to the upper part of the pier.
- Move Paige to the stone tile.
- Using the left edge, fold vertically, aligning with the stone tile.
- Move Paige to the pier on the left fold.
- Align the stone tile to the upper part of the left fold’s pier.
- Move Paige to the stone tile, then to B4.
- Move Paige to the edge of the pier.
- Align the vertical stone tile to the edge of the pier.
- Using the top edge, fold horizontally, aligning with the edge of the pier where Paige is.
- Using the stone tile, bridge the gap between piers and move to the bottom left of the pier.
- Move the stone tile to the bottom.
- Unfold the map.
- Move Paige next to the horizontal stone tile.
- Align the vertical stone tile to the horizontal one.
- Using the top edge, fold horizontally, aligning with the line of stone tiles.
- Use the vertical stone tile to bridge the gap between piers and move Paige to the pier to the right.
- Move the vertical stone tile downward, off the fold.
- Unfold the map.
- Move Paige to the top of the pier.
- Move the vertical stone tile upward, aligned to the edge of the pier at the top of the map.
- Using the bottom edge, fold horizontally, aligning it to the window of the house.
- Using the path, take the key and move Paige back to the upper right corner of the map.
- Unfold the map.
- Unlock the door and move Paige to B5.

- Align the one-dotted floating tile to the one at the bottom.
- Cross the path to B6.
- Using the top right corner, fold diagonally, aligning to the left edge.
- Cross the path to B5 and position Paige by the gap of the pier.
- Move the stone tile to the gap of the pier.
- Cross the path to B6 and position Paige at the pier off the fold.
- Unfold the sheet.
- Move both the stone tile and one-dotted floating tile upward, aligning with the row of the other one-dotted tile.
- Take the key and move Paige to B5.
- Use the stone tile to bridge the gap between piers.
- Unlock the door and move to the top of the pier.
- Use the stone tile to bridge the gap between the pier and land.
- Move Paige to B7.
- Align all floating tiles to the one-dotted tiles at the center.
- Cross the pier and move to the left.
- Align all floating tiles to the one-dotted tile at the top.
- Cross the pier and move Paige to C2
Swamp Exit (C1-C3)
Paige will find the siblings once again in the area. For this section of the level, all three areas can be folded even if Paige is not inside it.
- Using the top left corner, fold diagonally, aligning with the right edge.
- Connect the one-dotted floating tile in C3 to the one in C2.
- Cross the path and move Paige to C3.
- Connect the one-dotted floating tile to the ones in C3 while moving Paige until she reaches the key.
- Unfold C2.
- Connect the one-dotted floating tile to the ones in C3 while moving Paige until she reaches C2.
- Using the right edge, fold vertically, aligning with the frog at the upper left part of the map.
- Connect the one-dotted floating tile to the one in C3.
- Move the boulder from C2 to C3 until it reaches the upper left part of the map.
- Unfold the map.
- Connect the one-dotted floating tile to the ones in C3 while moving Paige until she reaches the boulder.
- Move the boulder on top of the pressure plate to partially unlock the stone door.
- Connect the one-dotted floating tile to the ones in C3 while moving Paige until she reaches C2.
- Use the floating tile to bring Paige to the locked door.
- Unlock the door and move Paige to C1.
- Use the stone tile to bridge the gap between piers and bring Paige to the second boulder.
- Move the boulder to the pier below and all the way to the left.
- Move the stone tile all the way to the left.
- Using the right edge, fold vertically, covering the pressure plate.
- Move the stone tile all the way to the right.
- Using the path formed, move the boulder to the upper left part of the map.
- Unfold the map.
- Push the boulder on top of the pressure plate, fully unlocking the stone door.
- Using the floating tiles in C1 and C2, bridge the gaps between piers to bring Paige to the exit.
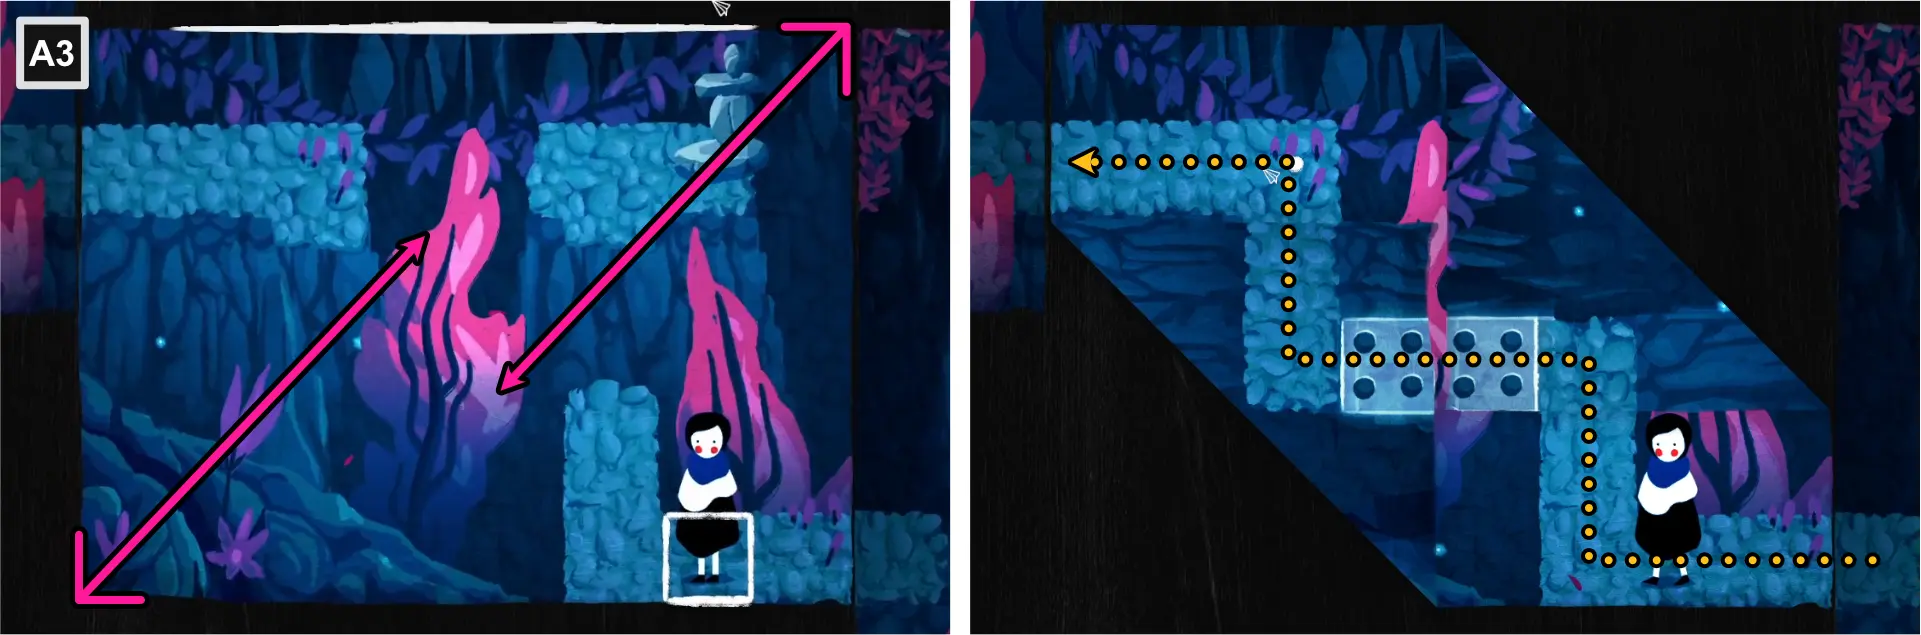
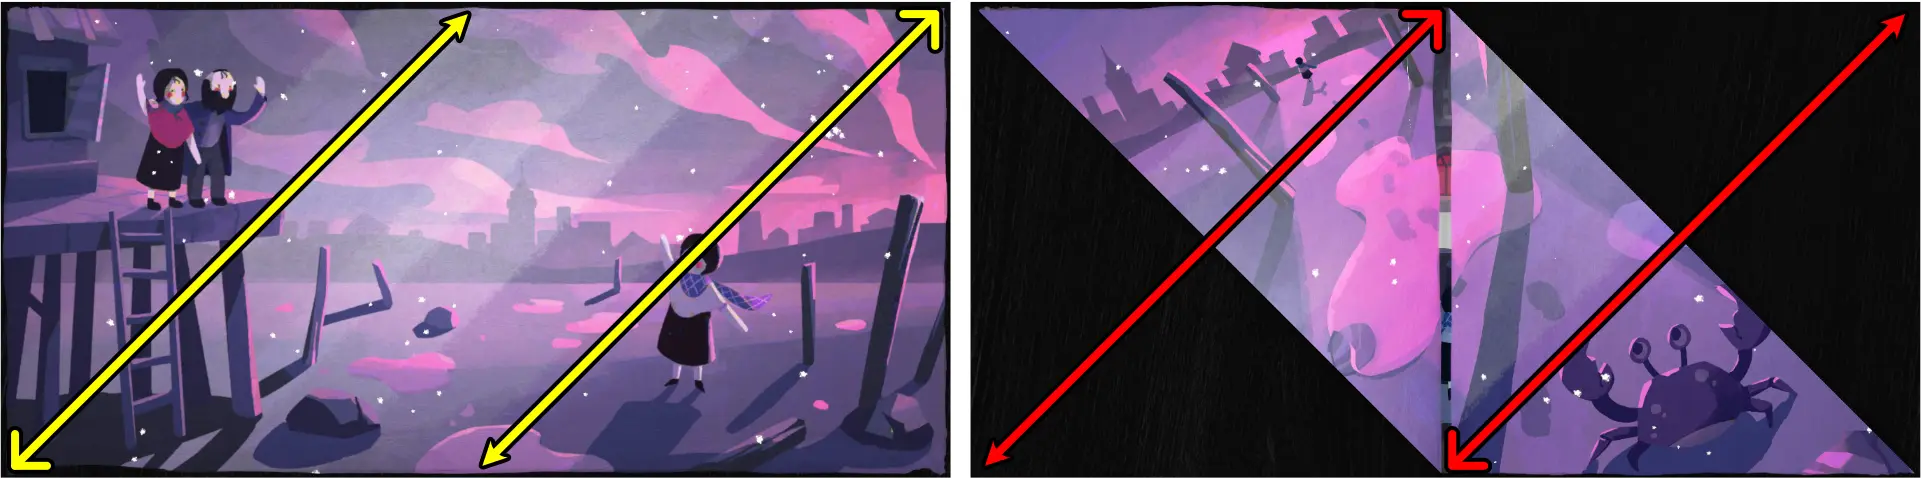
Cutscene: Traveling to the Forest
- Using the side edges, fold vertically towards the center.
- Unfold the image.
- Using the corners, fold diagonally towards the center.
- Unfold the image.
- Using the side edges, fold vertically towards the center.
- Unfold the image.
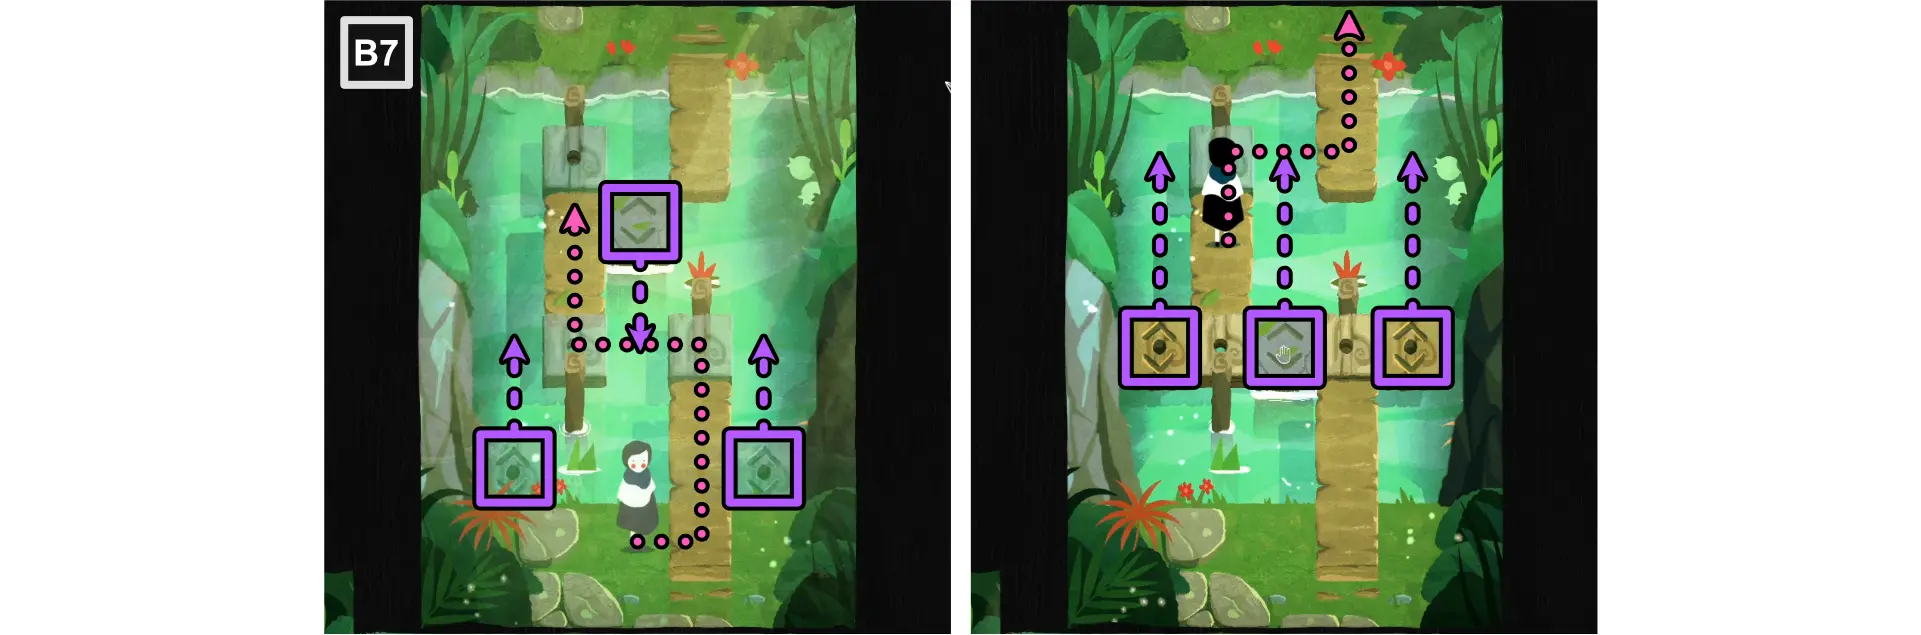
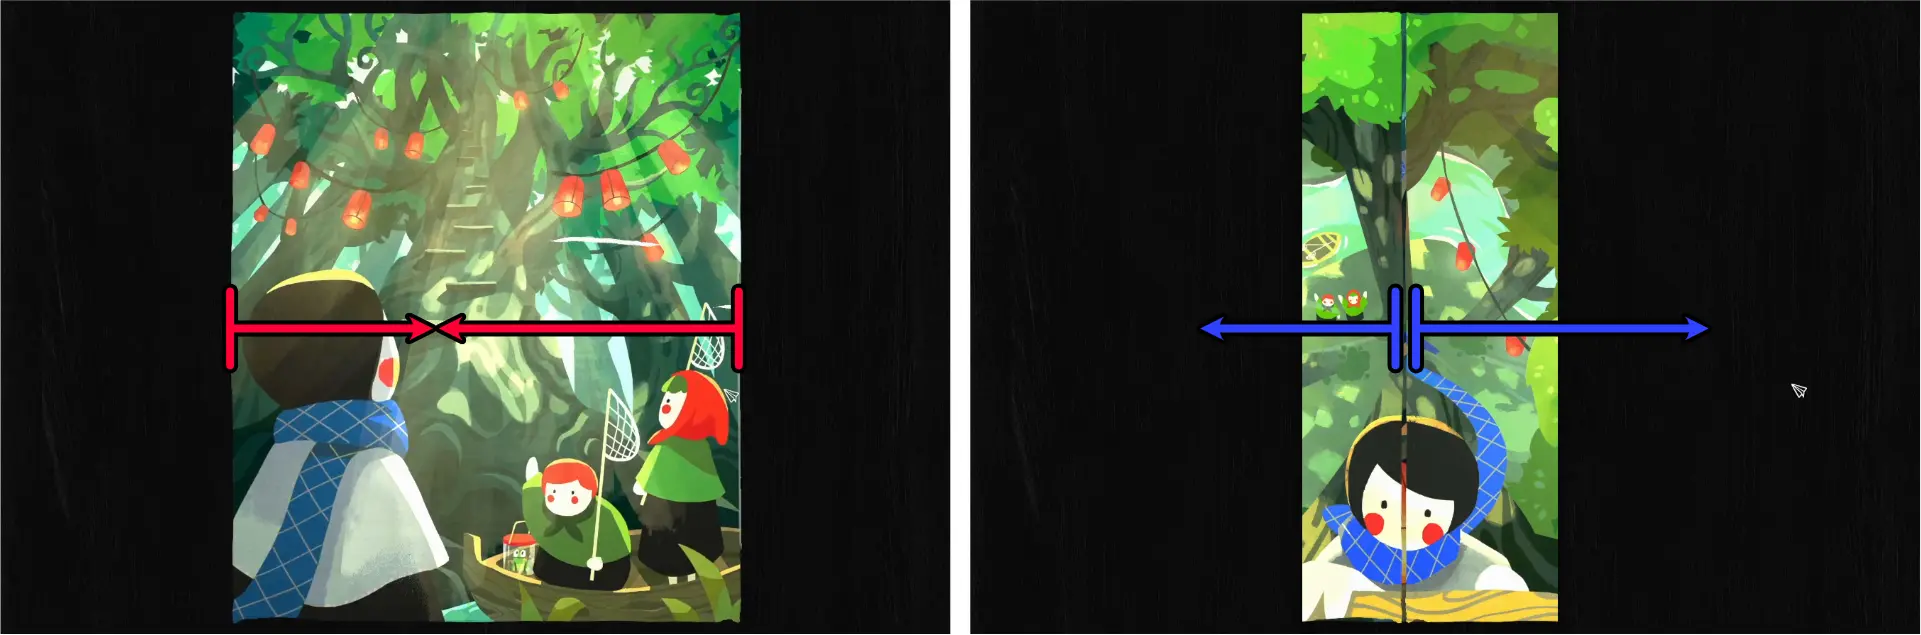
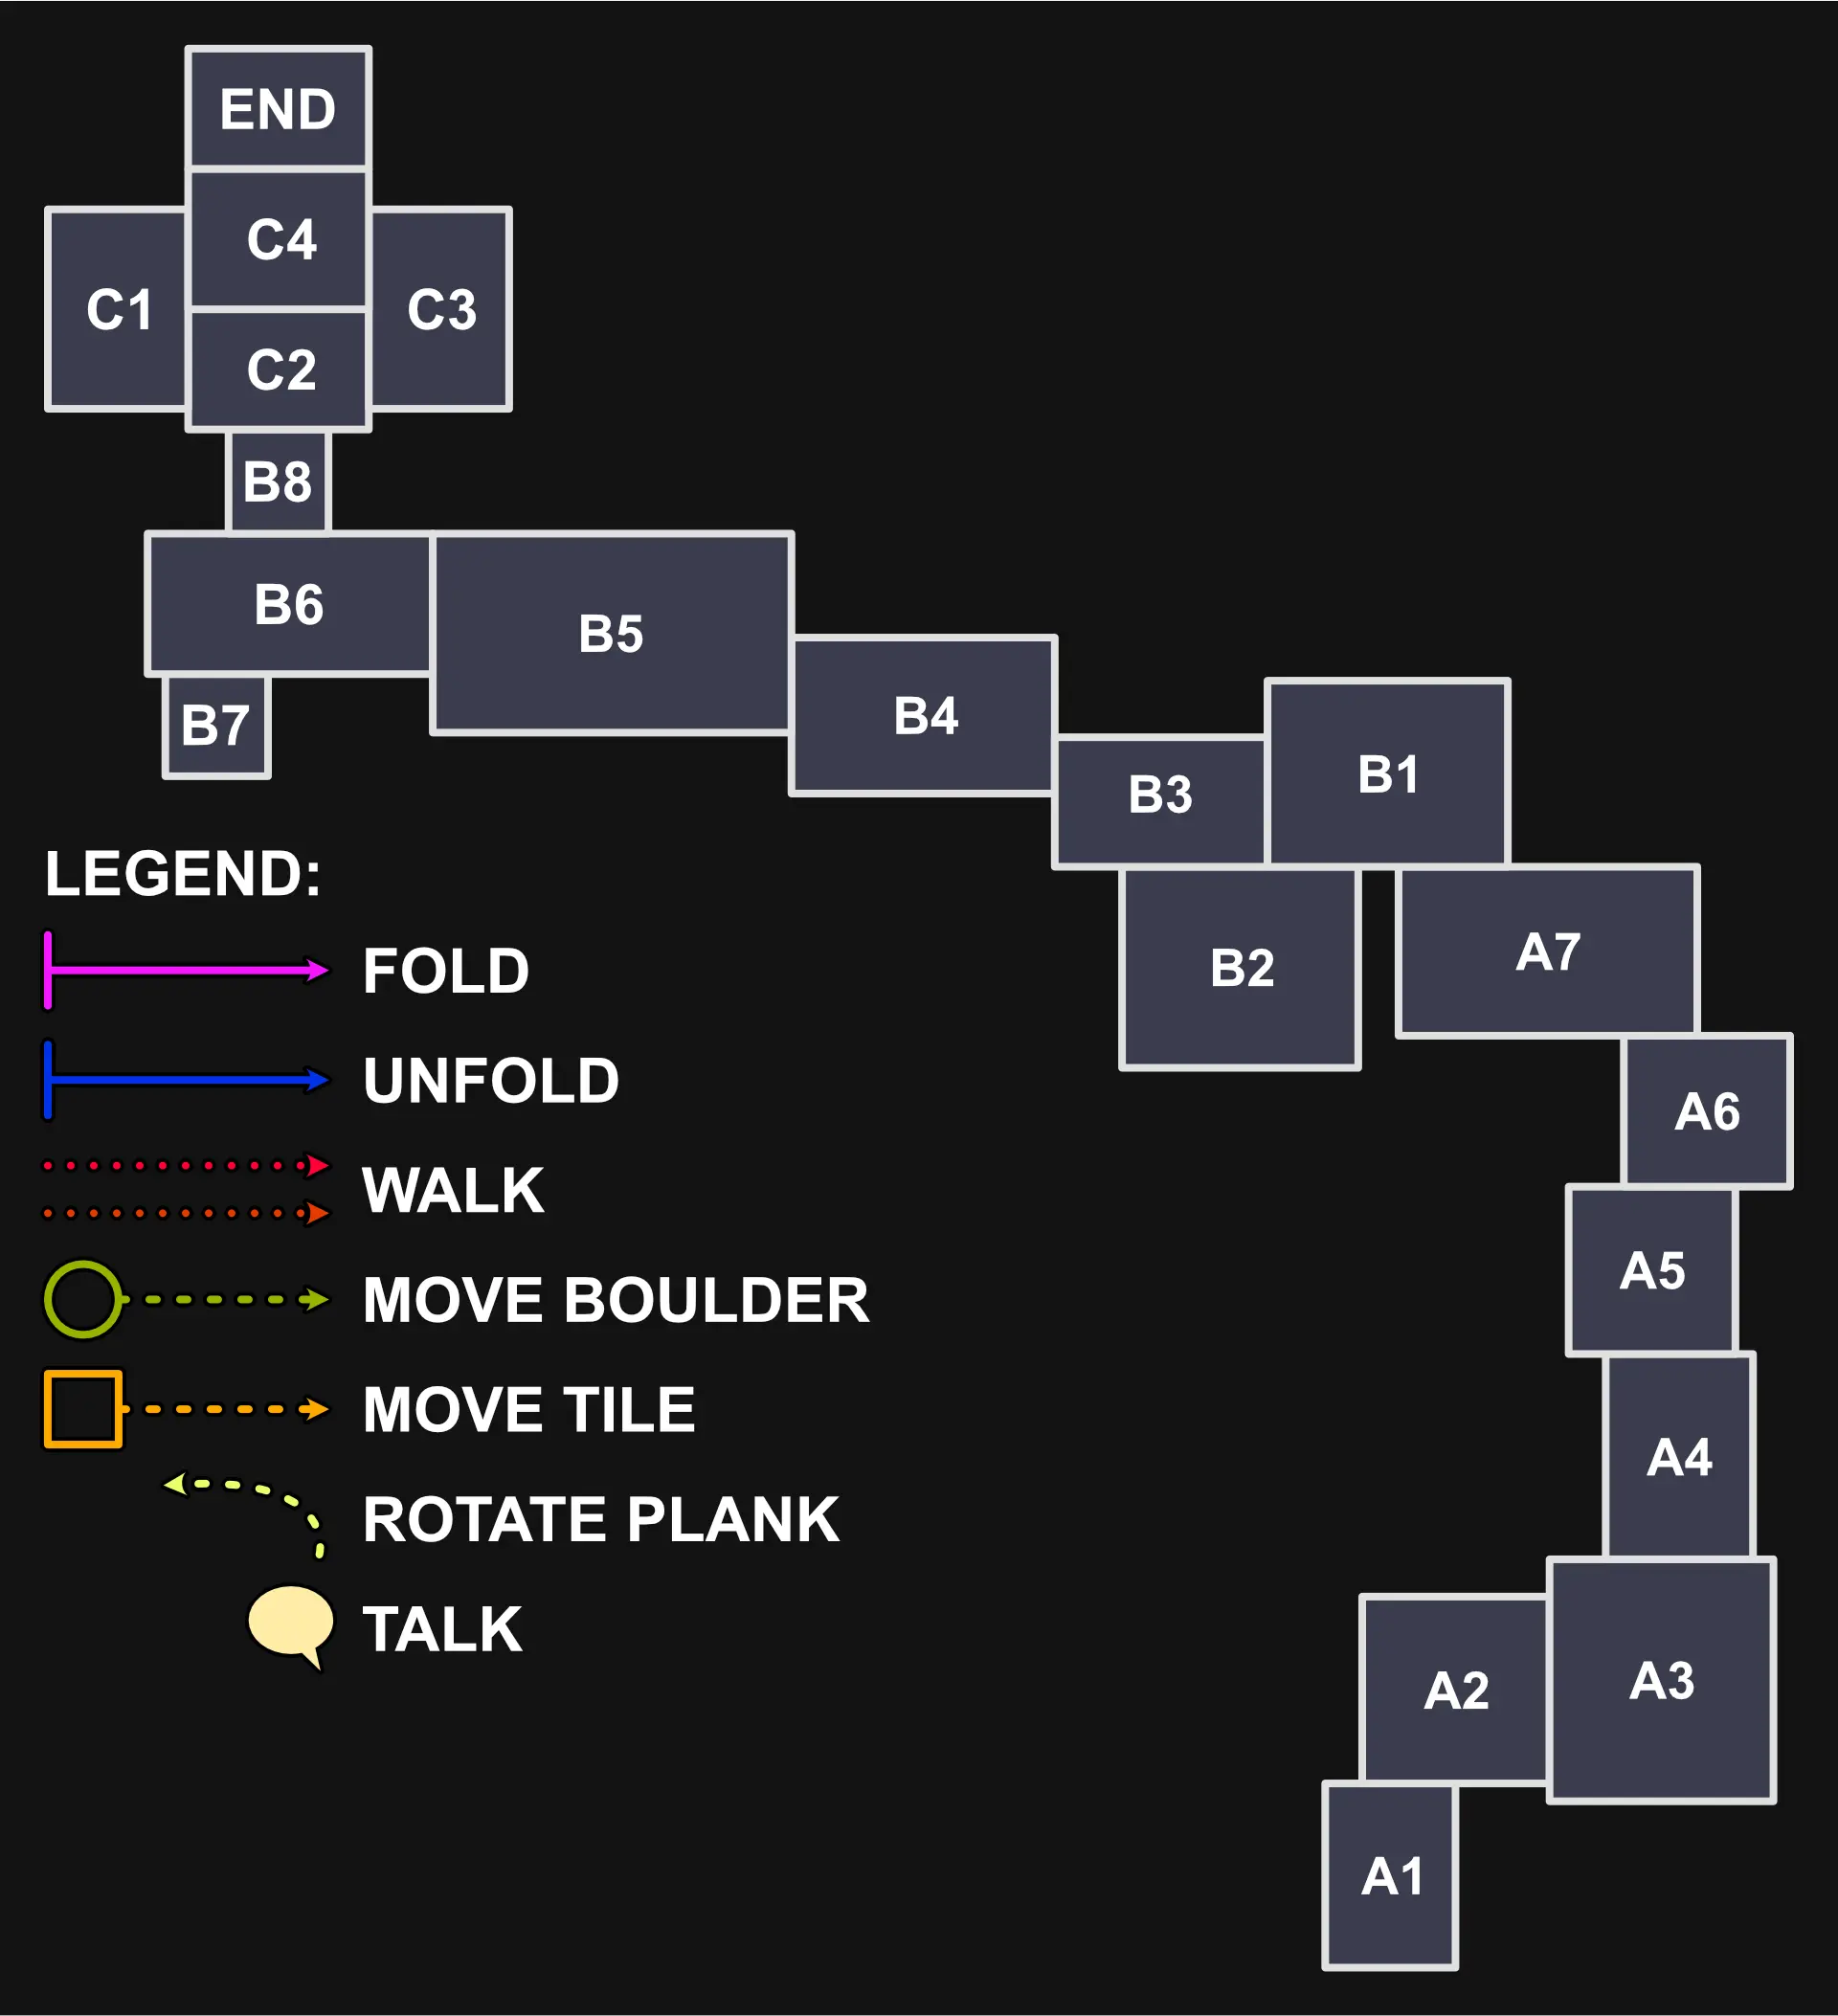
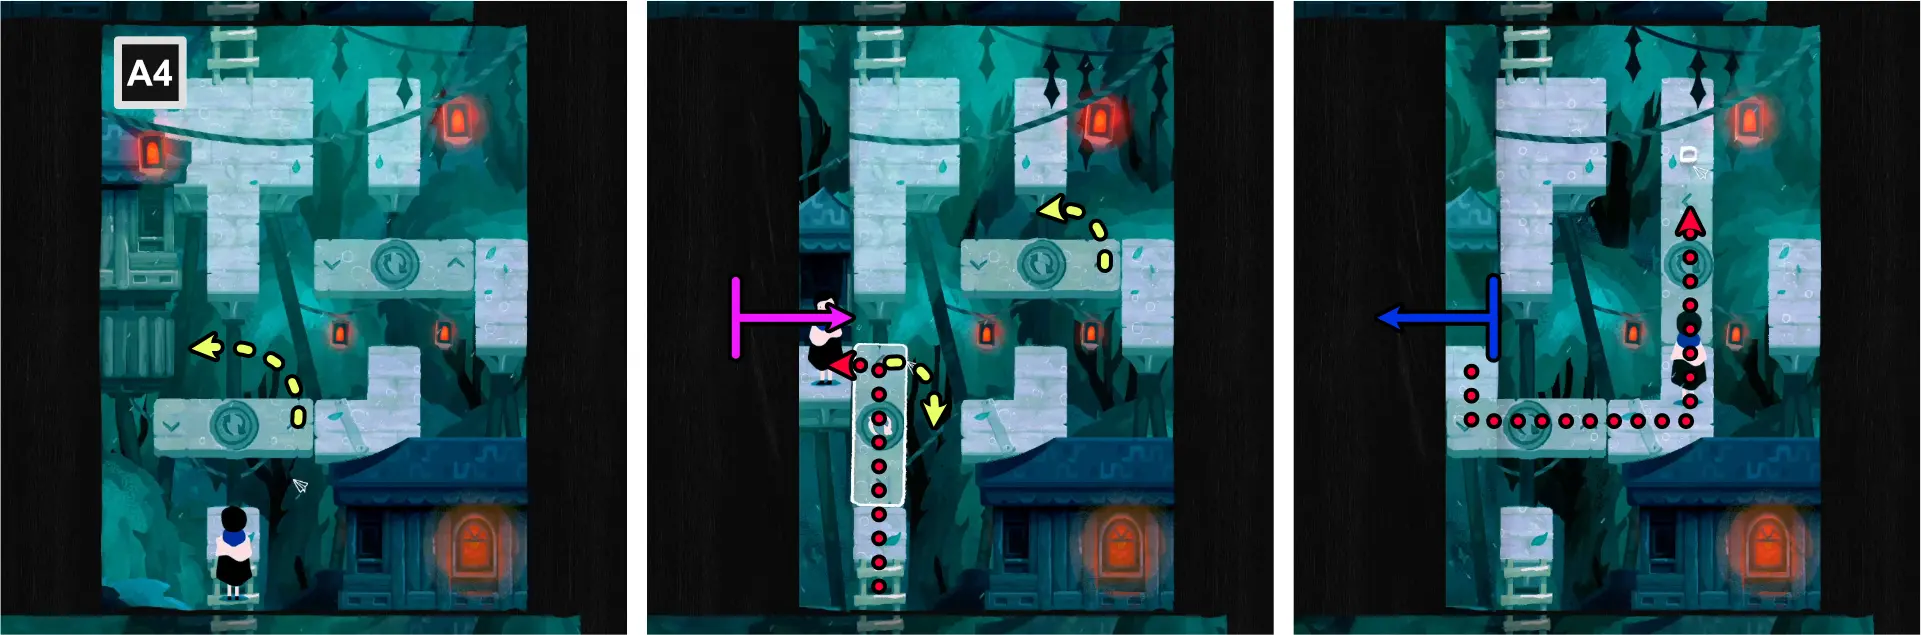
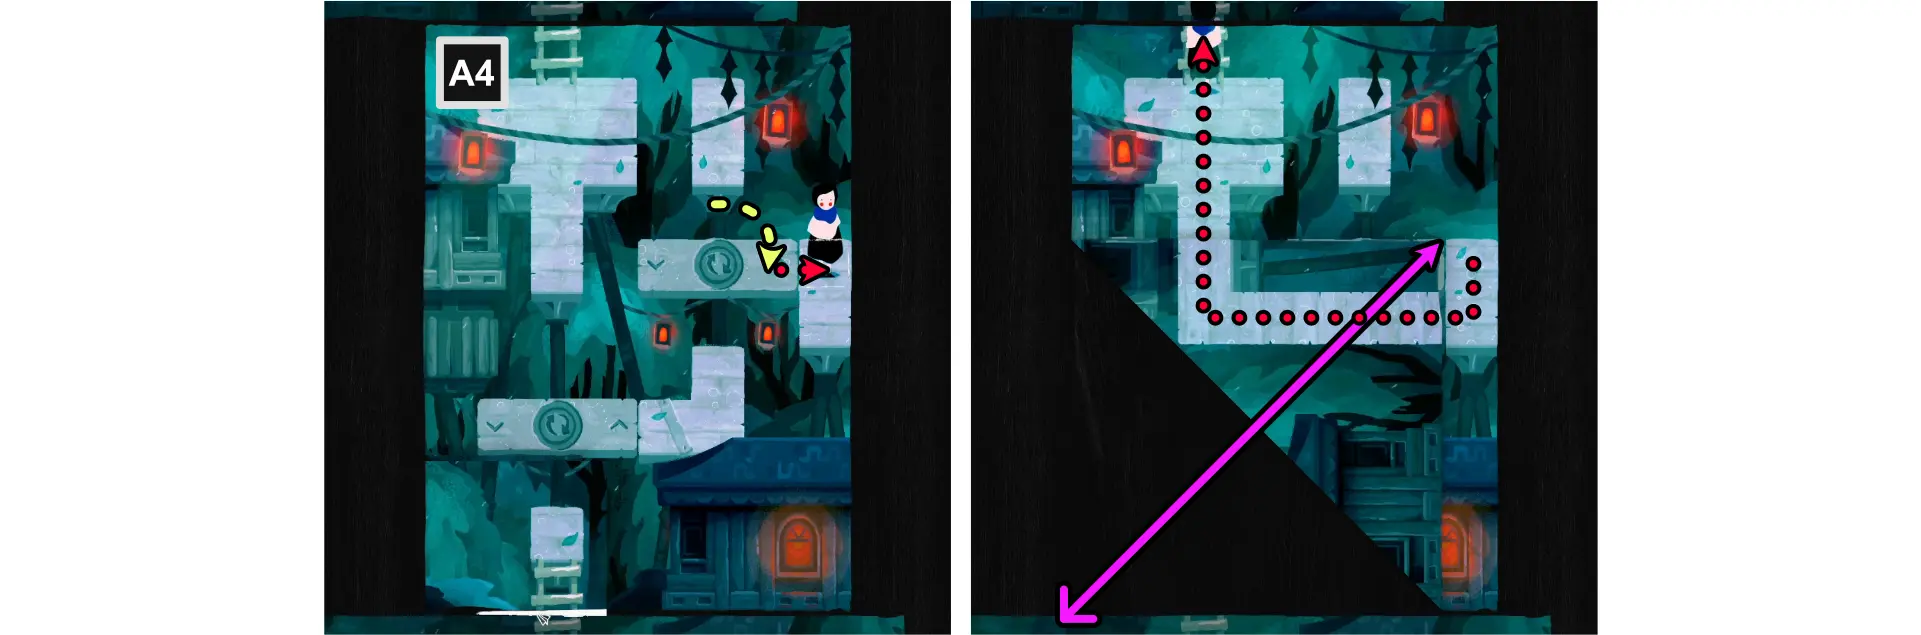
Chapter 4: Forest
For this chapter, refer to the image below for the map of the scene and the legend of the symbols and lines that appear.
In this level, 3 new mechanics are introduced:
- Rotating Planks and Tiles – These can be rotated to connect platforms and are used to move Paige or boulders from one point to another. Rotating planks can be crossed while rotating tiles cannot.
- Trap Door Bridges – These work similarly to stone doors from previous levels where they need to be activated by placing a boulder on a pressure plate in order to move forward.
- Connecting Doors – These can bring Paige from one part of the map to the other. The symbols below the doors show which doors are connected to each other. Both doors need to be present on the map for them to be used.
For extra achievements you can unlock for this chapter, go to the section “Achievements, Chapter 4: Forest.”
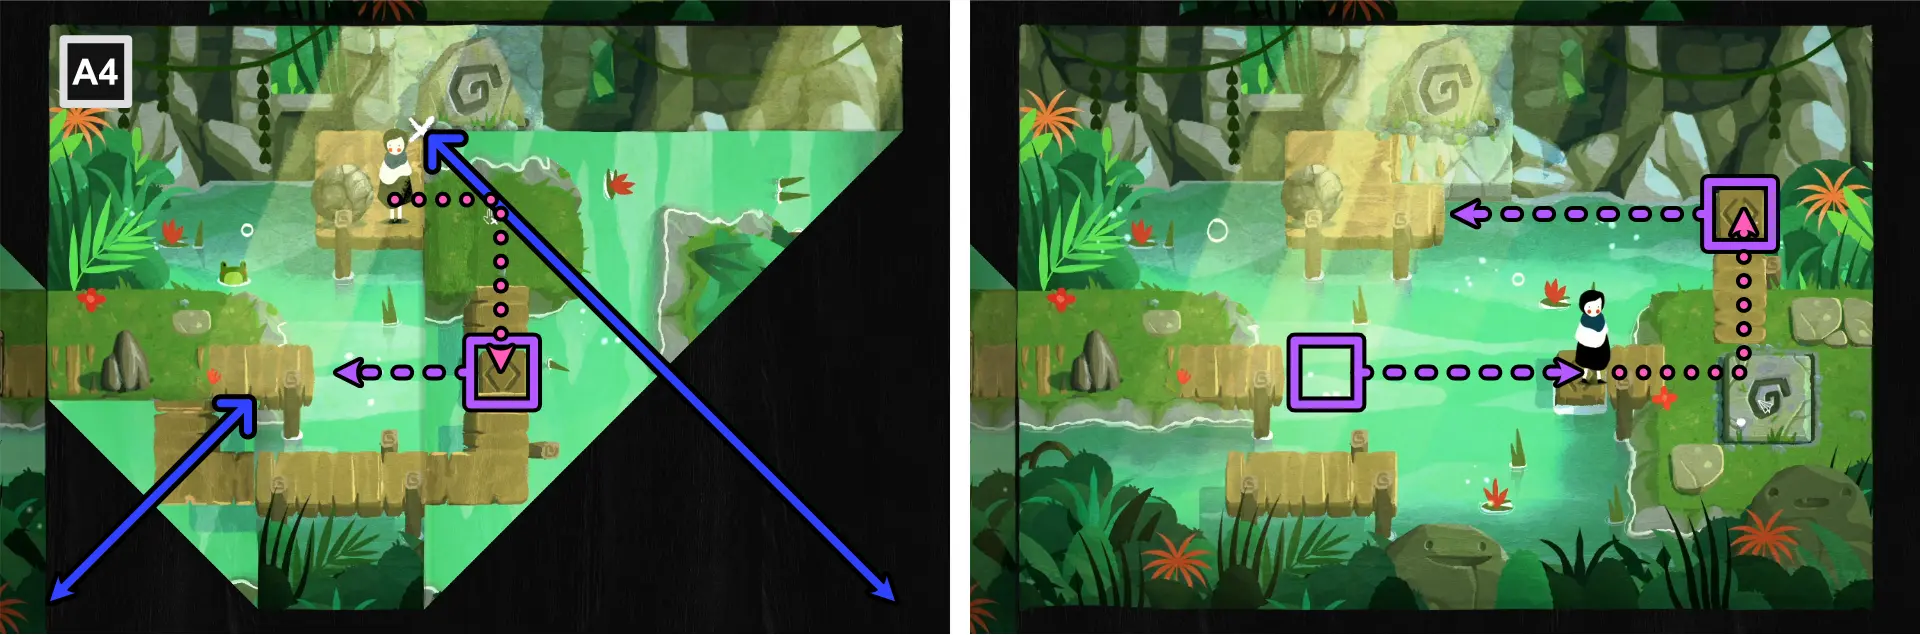
Start of the Forest (A1-A6)
Paige finds herself in the forest where she meets a birdwatcher.
- Climb up the ladder to A2.
- Using the top edge, fold horizontally, aligned to the short ladder below.
- Cross the path and bring Paige to the right platform just below the fold.
- Unfold the map.
- Using the left edge, fold vertically, 1 space away from Paige.
- Move Paige to A3.
- Using the top left, top right, and bottom right corners, fold diagonally towards the center.
- Use the path formed to bring Paige to the ladder at the center.
- Unfold the map.
- Bring Paige to the platform at the top of the ladder.
- Using the bottom edge, fold horizontally, aligning with the platform.
- Use the path formed to bring Paige to A4.
- Rotate the plank at the bottom to bridge the gap between platforms.
- Using the left edge, fold vertically, aligning with the plank.
- Bring Paige to the platform on the fold, to the left of the plank.
- Rotate both the top and bottom planks to bridge gaps.
- Use the path formed to bring Paige to the upper part of the top plank.
- Unfold the map.
- Rotate the plank.
- Move Paige to the platform to the right of the plank.
- Using the bottom left corner, fold diagonally, aligning with the rightmost platform.
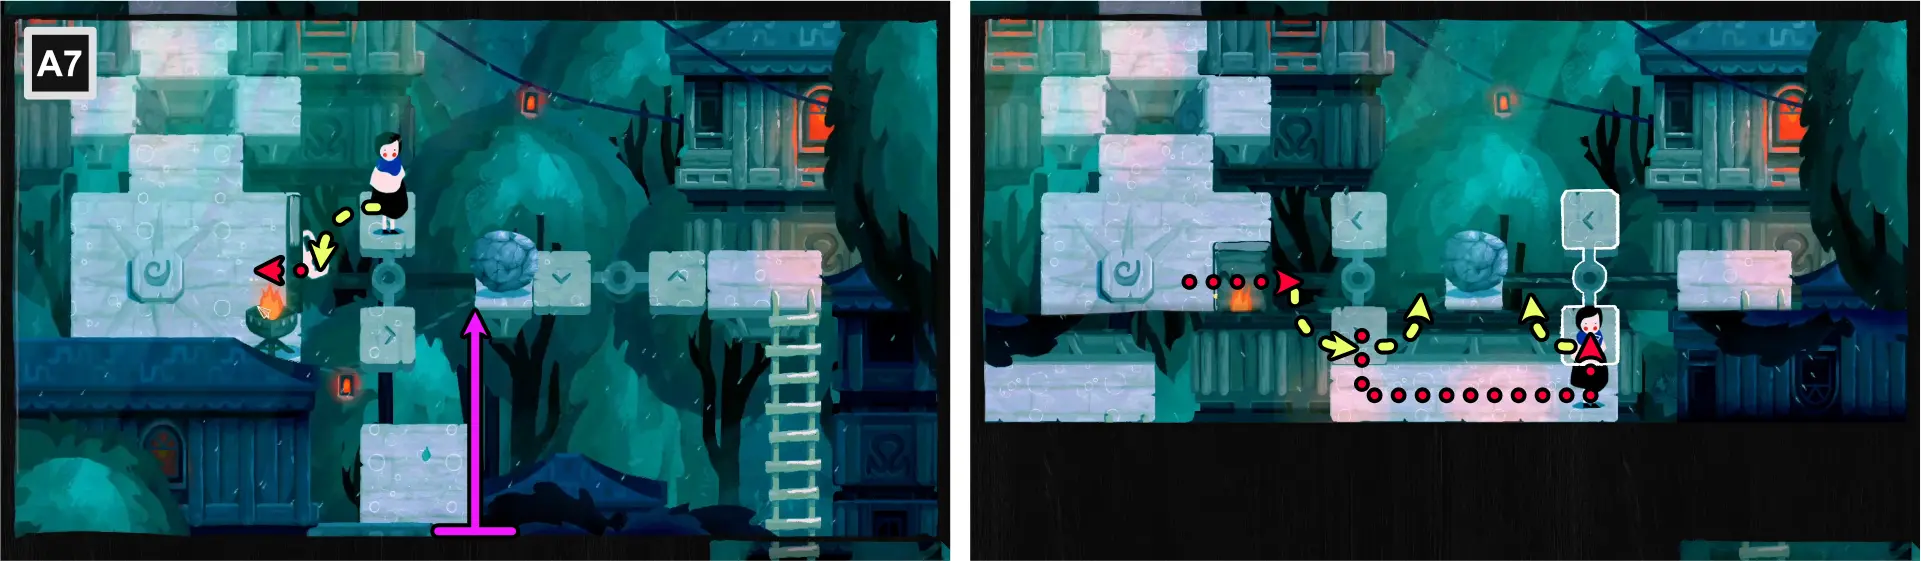
- Use the path formed to bring Paige to A5.
- Move Paige to the plank.
- Rotate the plank and align it to the ladder.
- Using the right edge, fold vertically, aligning with the plank.
- Rotate the plank to connect to the platform on the fold.
- Push the boulder all the way to the right.
- Go up the ladder and move Paige to A6.
- Push the boulder on the rotating tiles.
- Rotate the tiles to bring the boulder to the other side.
- Move Paige on the other side of the rotating tile.
- Rotate the tiles to bring Paige to the platform above.
- Rotate the tiles to bring the boulder in front of Paige.
- Move the boulder on top of the pressure plate to activate the trap doors.
- Move Paige down the ladder.
- Place Paige on the rotating tiles.
- Using the top right corner, fold diagonally, aligning with the platform below.
- Rotate the tiles to bring Paige to the top platform.
- Go up the ladder and move Paige to A7.

- Climb up the ladder.
- Rotate the tiles.
- Push the boulder on the rotating tiles.
- Rotate the tiles and put Paige on the other side.
- Bring Paige to the second rotating tiles.
- Rotate the tiles in a vertical position.
- Using the left edge, fold vertically, aligned to the rotating tiles.
- Rotate the tiles to reach the left platform and take the key.
- Go back to the rotating tiles and rotate it to a vertical position.
- Unfold the map.
- Rotate the tile to bring Paige in front of the locked door and open it.
- Using the bottom edge, fold horizontally, aligned to the rotating tiles.
- Bring Paige to the rotating tiles again and use it to bring her to the bottom platform.
- Position the rotating tiles to the right vertically.
- Place Paige on the right rotating tiles.
- Rotate both rotating tiles to a horizontal position.

- Push the boulder to the rotating tiles on the left.
- Rotate the left rotating tile to a vertical position with the boulder at the top.
- Rotate the right rotating tile to bring Paige to the bottom platform.
- Move Paige to the bottom of the rotating tile at the left.
- Rotate the left rotating tile to bring Paige to the left platform.
- Unfold the map.
- Rotate the rotating tiles to bring the boulder to the left side.
- Move the boulder on top of the pressure plate to activate the trap doors.
- Move Paige to B1.
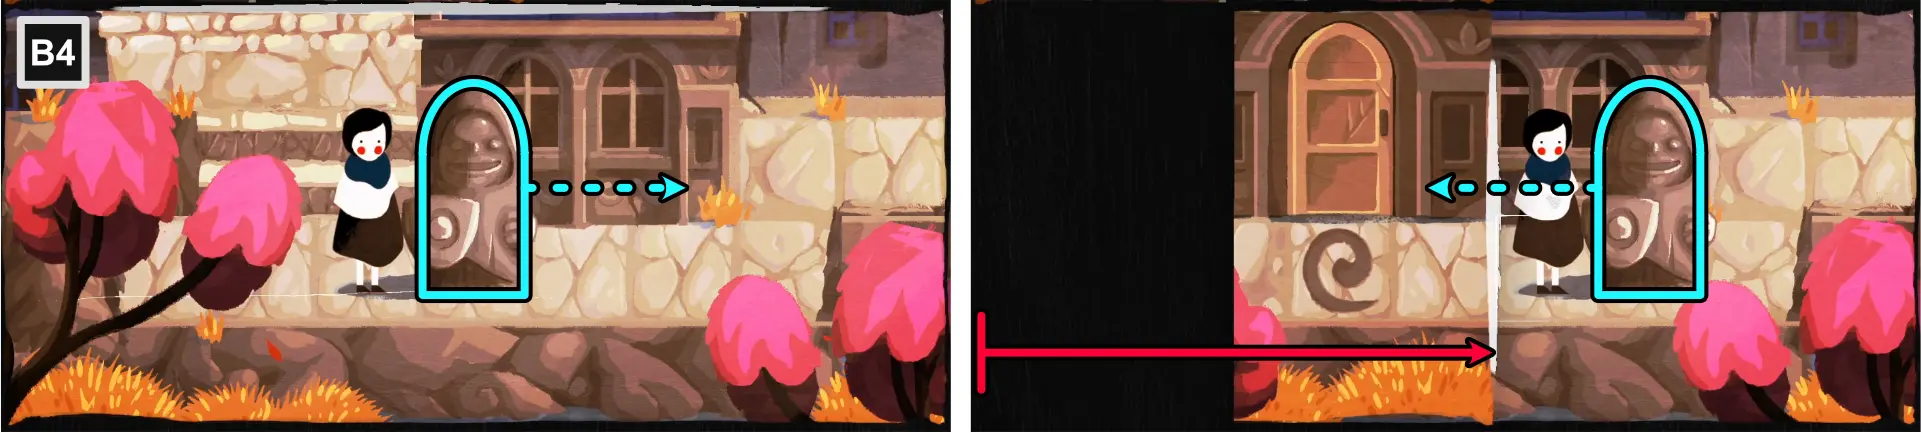
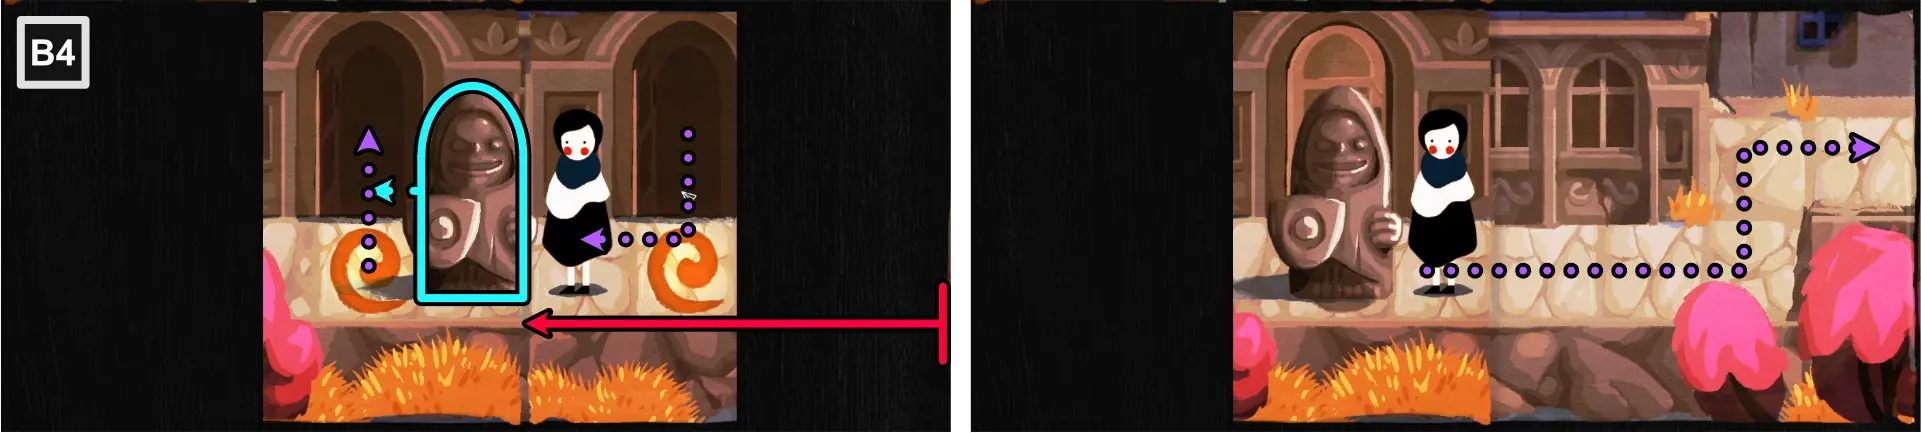
Abandoned House (B1-B7)
Paige sees the birdwatcher again who tells her about the abandoned house.
- Using all corners, fold diagonally towards the center, aligning them with the lines carved into the house to unlock the door.
- Unfold the map.
- Enter the spiral door to exit out of the spiral door at the top center.
- Go downward to go to B2.

- Go down the ladder and enter the spiral door to exit out of the spiral door at the upper left side.
- Go down the ladder.
- Using the right edge, fold vertically to reveal the other square spiral door.
- Enter the square spiral door to exit out of the one on the fold.
- Go up the ladder to go to another section of B1.
- Take the left exit to move Paige to B3.
- Position Paige below the boulder.
- Using the bottom left and top right corners, fold diagonally, aligning with the column where Paige and the boulder is.
- Enter the spiral door to the right to exit out of the spiral door to the left.
- Unfold the top right corner.
- Using the right edge, fold vertically, aligning with the boulder.
- Push the boulder to the right.
- Unfold the bottom left corner.
- Exit to the left and move Paige to B4.
- Using the top left corner, fold diagonally, meeting the bottom edge.
- Move the tile towards the platform to the right.
- Move Paige onto the tile.
- Move the tile towards the platform to the left.
- Enter the curved X door to exit out of the one at the upper right side.
- Unfold the map.
- Push the boulder to the left, onto the rotating tile.
- Rotate the tile to move the boulder to the opposite side.
- Using the top left corner, fold diagonally, meeting the bottom edge.
- Enter the curved X door to exit out of the one at the lower right fold.
- Move Paige onto the tile.
- Move the tile to the right.
- Unfold the map.

- Move the tile to the left platform.
- Go up the ladder.
- Pull the boulder to the left and position it on top of the pressure plate.
- Exit to the left to go to B5.
- Rotate the rotating tile at the bottom, positioning it vertically.
- Using the left edge, fold vertically, covering the left part of the rotating tile at the top.
- Enter the spiral door to exit out of the one at the left fold.
- Rotate the bottom rotating tile to a horizontal position.
- Move Paige onto the rotating tile.
- Rotate the tile to a vertical position.
- Unfold the left fold.
- Using the right edge, fold vertically, covering the right part of the rotating tile at the bottom.
- Rotate the bottom rotating tile, positioning it horizontally.
- Enter the square spiral door to exit out of the one at the left side.
- Follow the path to go to the right.
- Unfold the right fold.
- Move up the ladder and pull the boulder one space to the left, positioning Paige onto the rotating tile.
- Using the right edge, fold vertically, aligning with the edge of the right platform.
- Rotate the rotating tile at the top to bring Paige to the opposite platform.
- Enter the triangle door to exit out of the one at the right fold.
- Move Paige behind the boulder.
- Push the boulder towards the rotating tile.
- Unfold the right side.
- Move Paige to the left of the boulder.
- Pull the boulder to the left and position it on top of the pressure plate.
- Exit to the left to move Paige to B6.
- Using the left edge, fold vertically to connect the four-dotted tiles.
- Move Paige to the lower platform.
- Move the left fold to the left until it connects to the other four-dotted tile.
- Move Paige in front of the spiral door to the right.
- Move the floating tile to the right.
- Unfold the map.
- Using the top left corner, fold diagonally, meeting the bottom edge.
- Enter the spiral door to exit out of the one at the left fold.
- Move Paige downward to B7.
- Take the key.
- Move Paige up the ladder and back to B6.
- Enter the spiral door to exit out of the one at the upper right side.
- Move Paige onto the floating tile.
- Unfold the map.
- Move the tile to the left.
- Using the right edge, fold vertically, aligning with the right edge of the platform with the key.
- Move the tile to the right.
- Follow the path to take the key.
- Move Paige back to the floating tile.
- Move the tile to the left.
- Unfold the map.
- Move the tile to the right.
- Using the left edge, fold vertically to connect the four-dotted tile to the one with the ladder.
- Move the tile to the left.
- Follow the path to move Paige to B7.
- Unlock the door and enter to go to C2.
Bird’s Nest (C1-C4)
You’ll see the birdwatched once more inside a nest behind a locked door.
- Move Paige onto the rotating plank.
- Using the left edge of C2, fold vertically, aligning with the rotating plank.
- Using the top edge of C4, fold horizontally, meeting with the opposite edge.
- Using the right edge of C2, fold vertically, aligning with the rotating plank.
- Rotate the plank to a horizontal position.
- Enter the spiral door to exit out of the one at C1.
- Go up the ladder and move Paige onto the floating tile.
- Move the tile all the way to C3.
- Go down the ladder.
- Push the boulder towards the rotating tile.
- Rotate the tile to a vertical position with the boulder facing the square spiral door.
- Using the right edge of C4, fold vertically, meeting with the opposite edge.
- Move Paige onto the floating tile.
- Move the tile in 2 spaces to the left, into C4.
- Enter the square spiral door to exit out of the one in C3.
- Pull the boulder 1 space upward.
- Enter the square spiral door to exit out of the one in C4.
- Move Paige onto the floating tile.
- Move the tile in 2 spaces to the right, into C3.
- Unfold C4.
- Using the top edge of C4, fold horizontally, meeting the opposite edge.
- Move the floating tile to the left, all the way to C1.
- Move Paige upward and take the key.
- Using the bottom edge of C3, fold horizontally, aligning with the bottom of the ladder.
- Move Paige back onto the floating tile and move back to C3.
- Move Paige onto the vertical floating tile.
- Move the tile upward.
- Take the key.
- Move Paige back to the horizontal floating tile.
- Move the tile all the way to C1.
- Enter the spiral door to exit to the one in C2.
- Unfold C4.
- Enter the curved X door to exit to the one in C4.
- Unlock the locked door and enter to get to the bird’s nest.
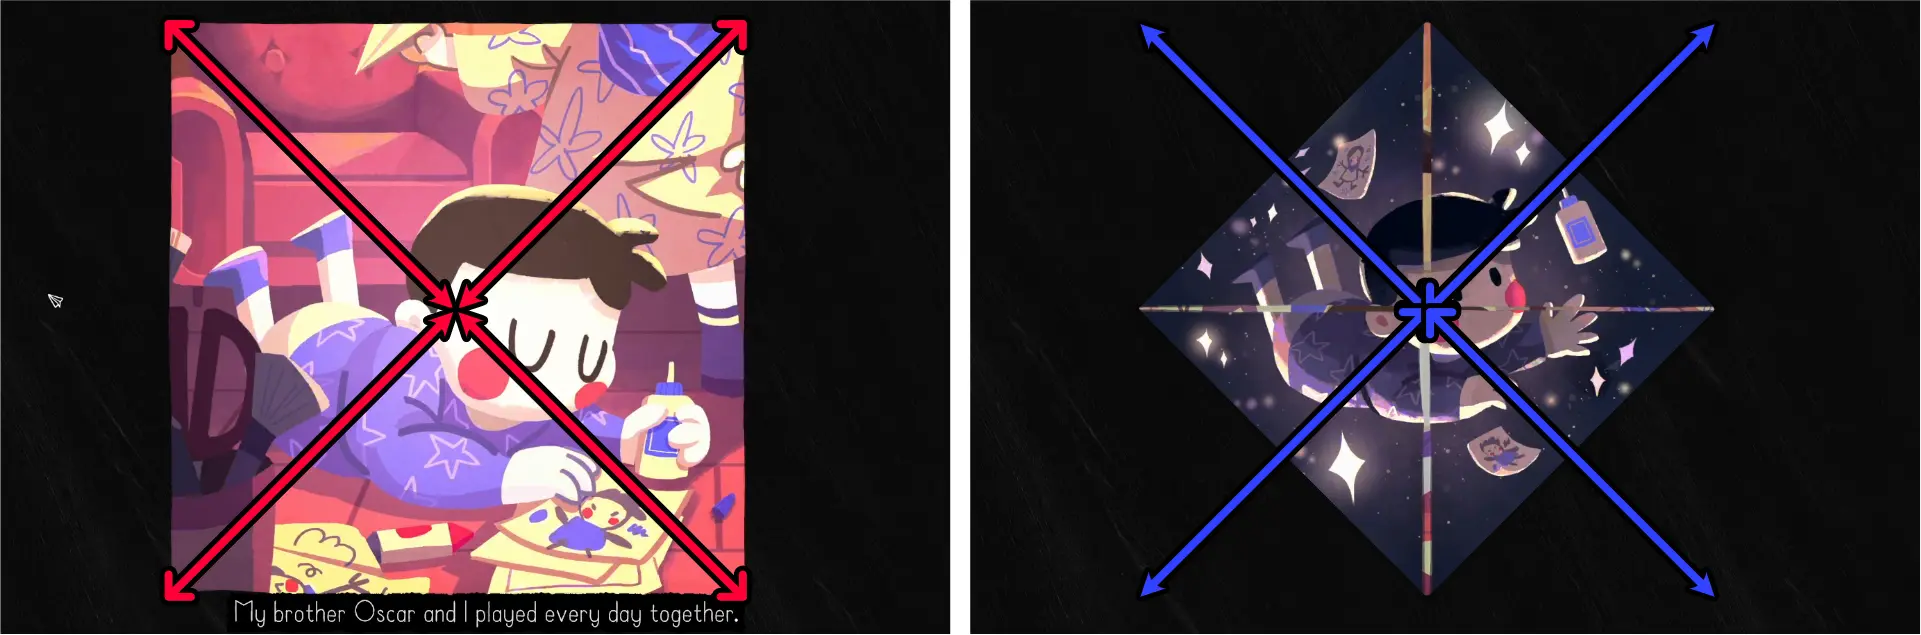
Cutscene: Remembering Oscar
- Using the side edges, fold the image towards the center.
- Unfold the image.
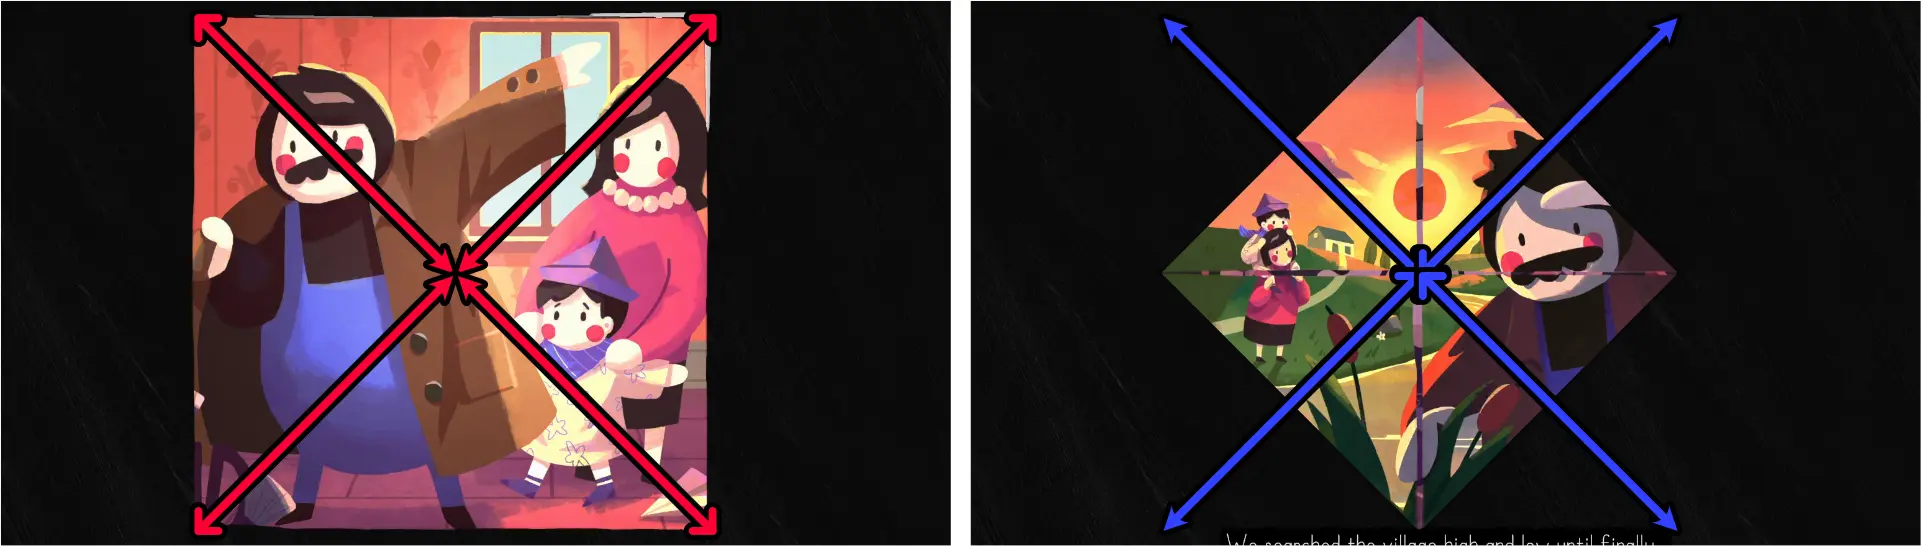
- Using the corners, fold the image towards the center.
- Unfold the image.
- Using the corners, fold the image towards the center.
- Unfold the image.
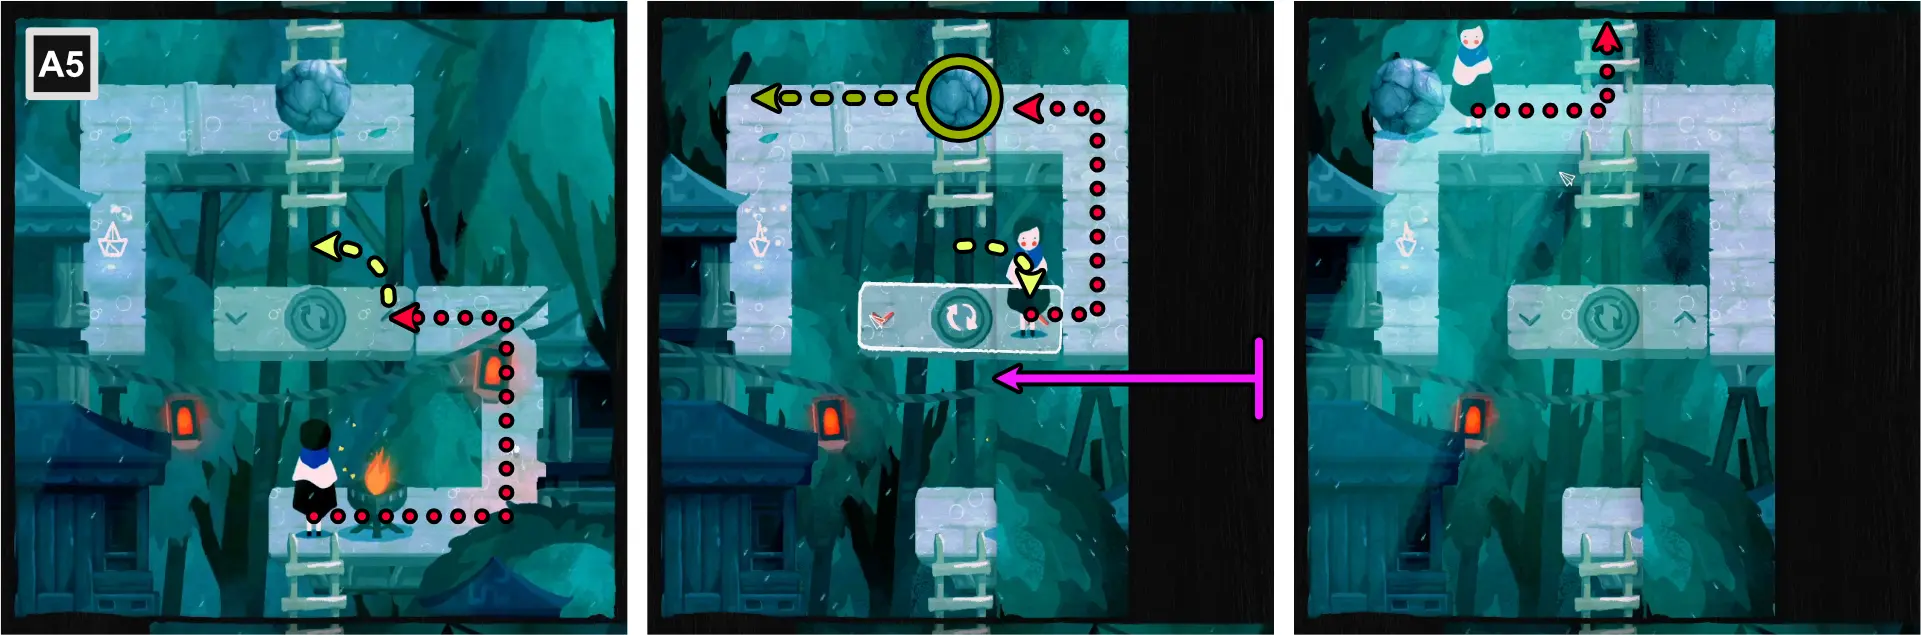
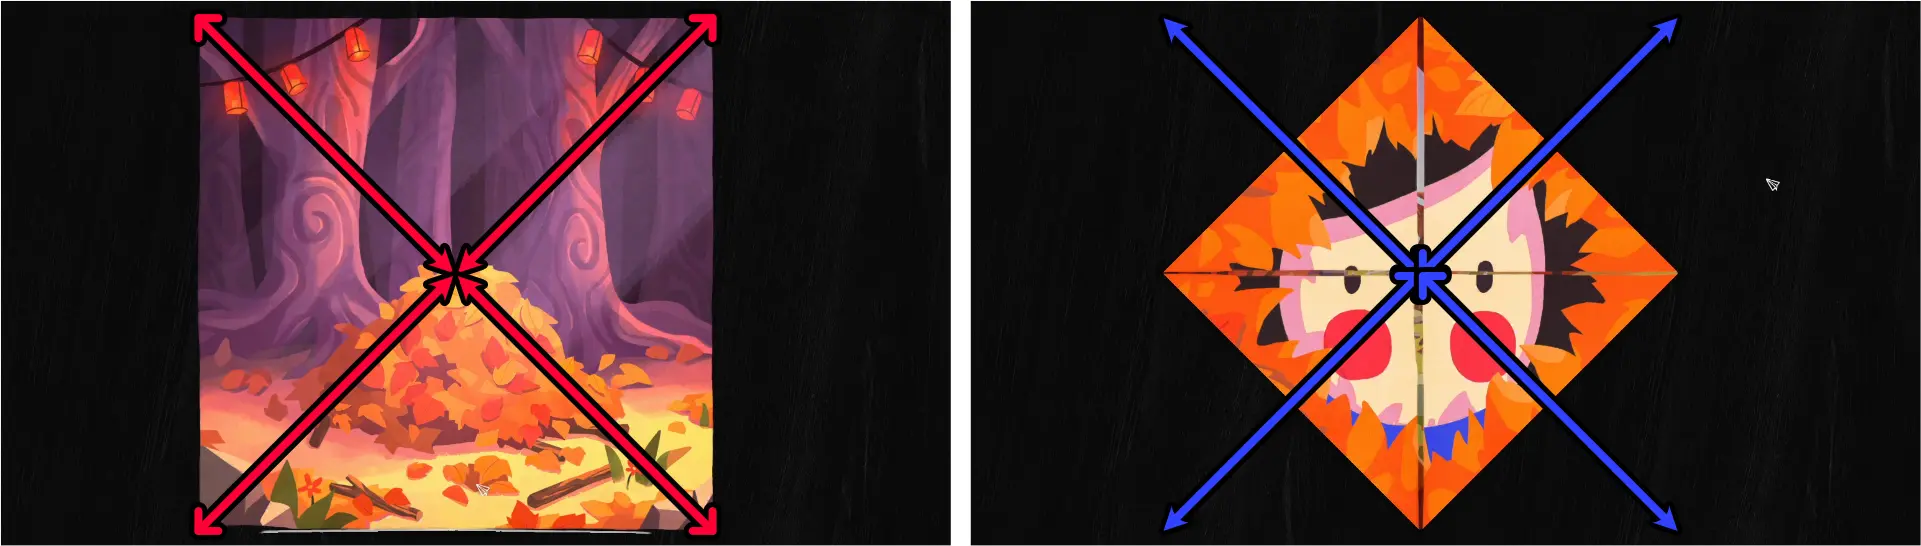
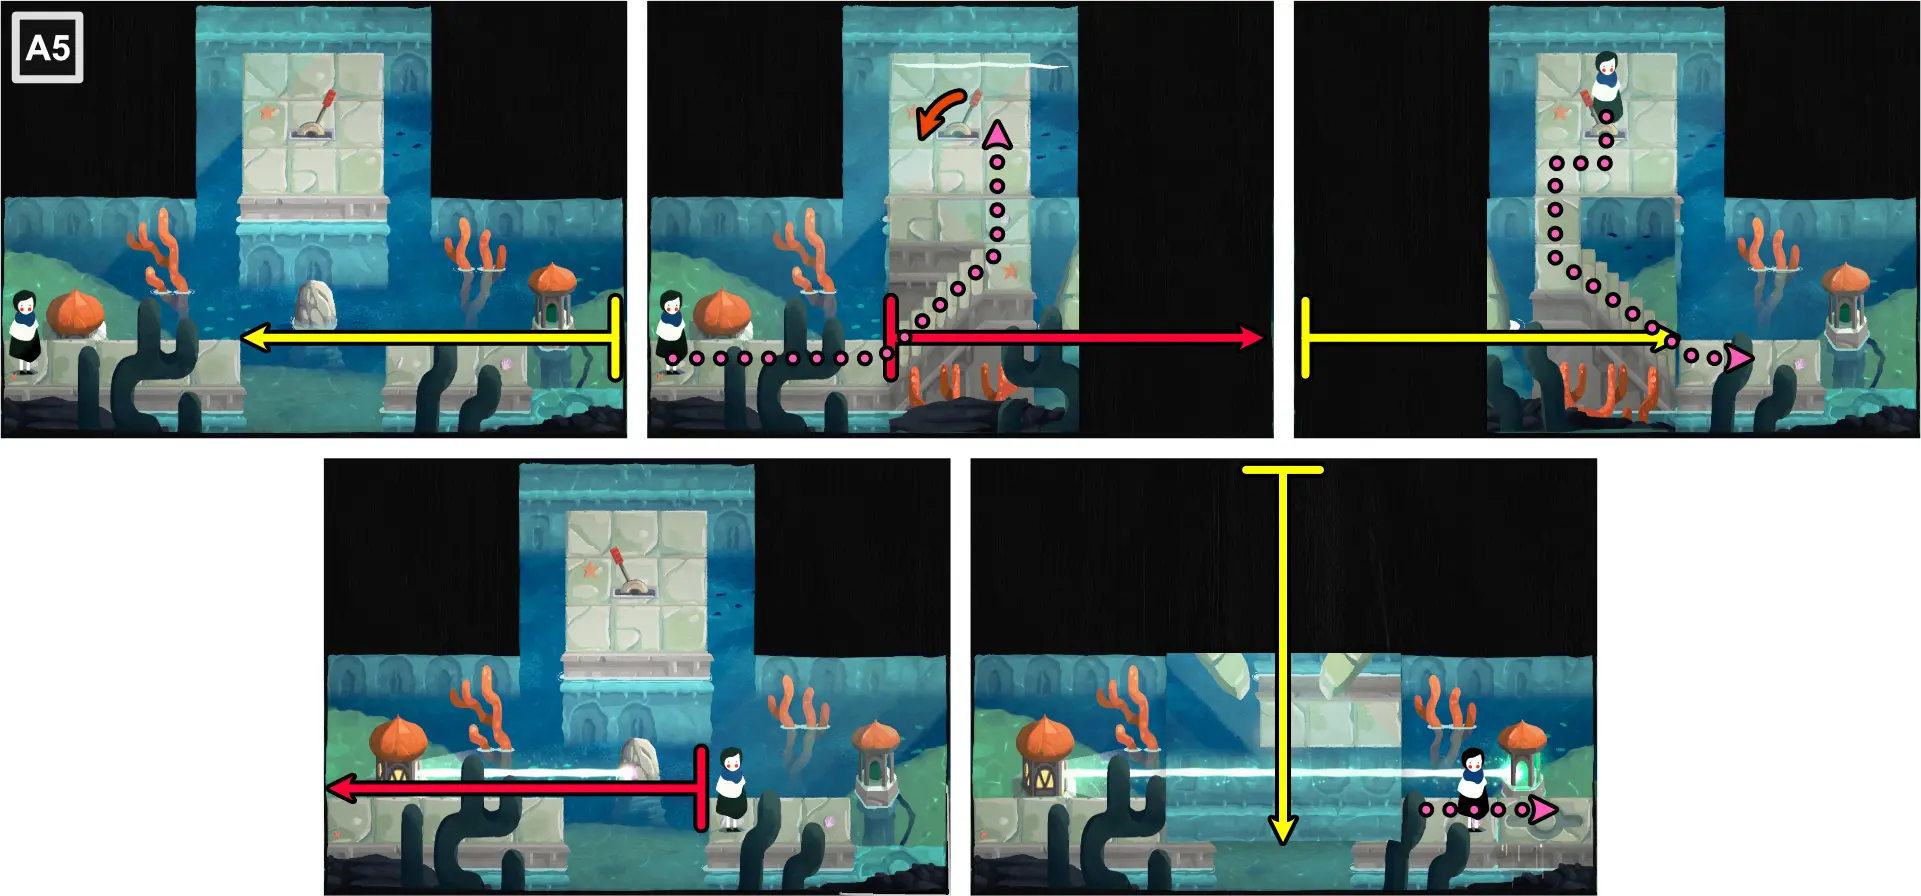
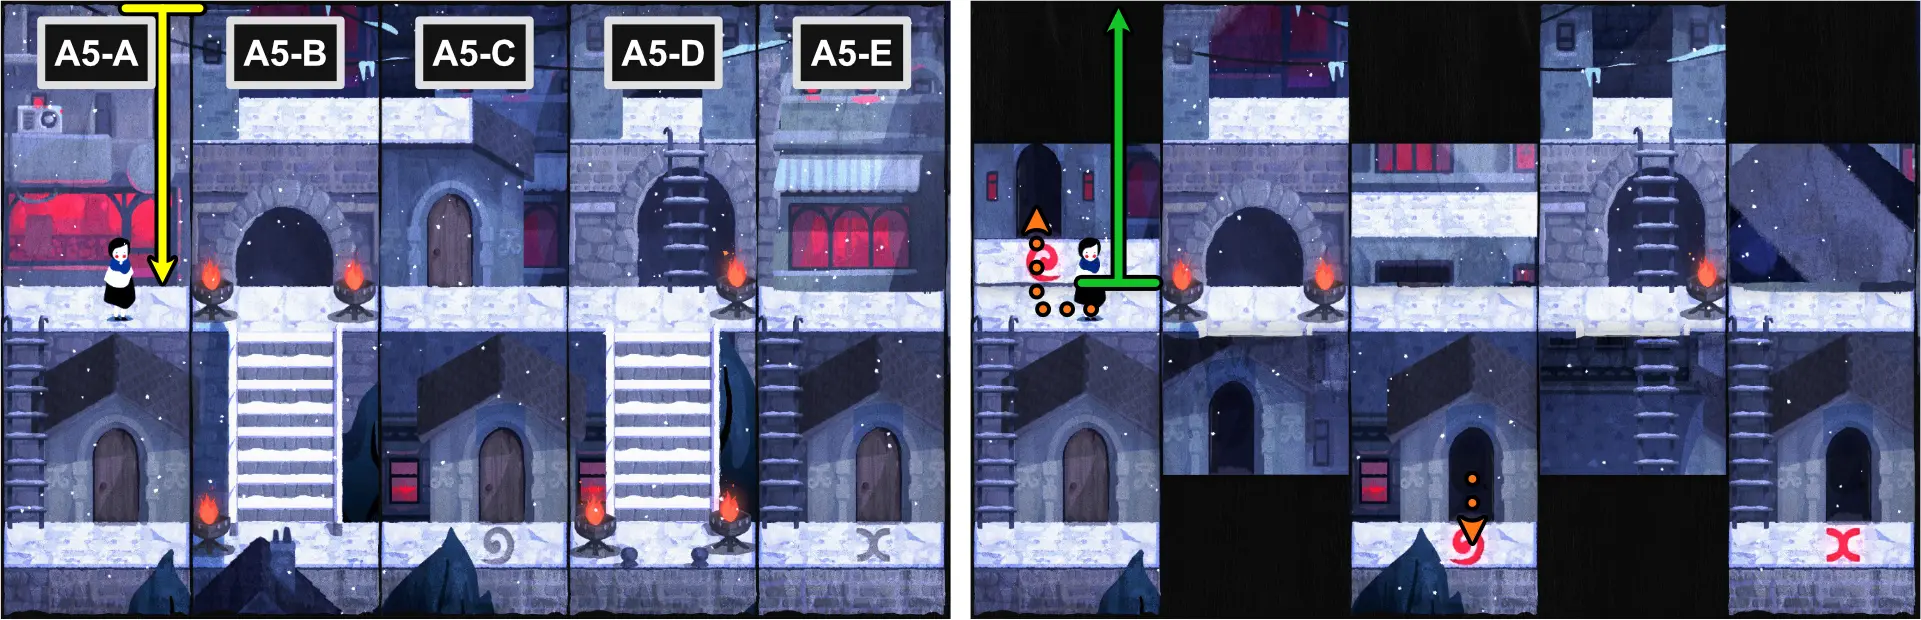
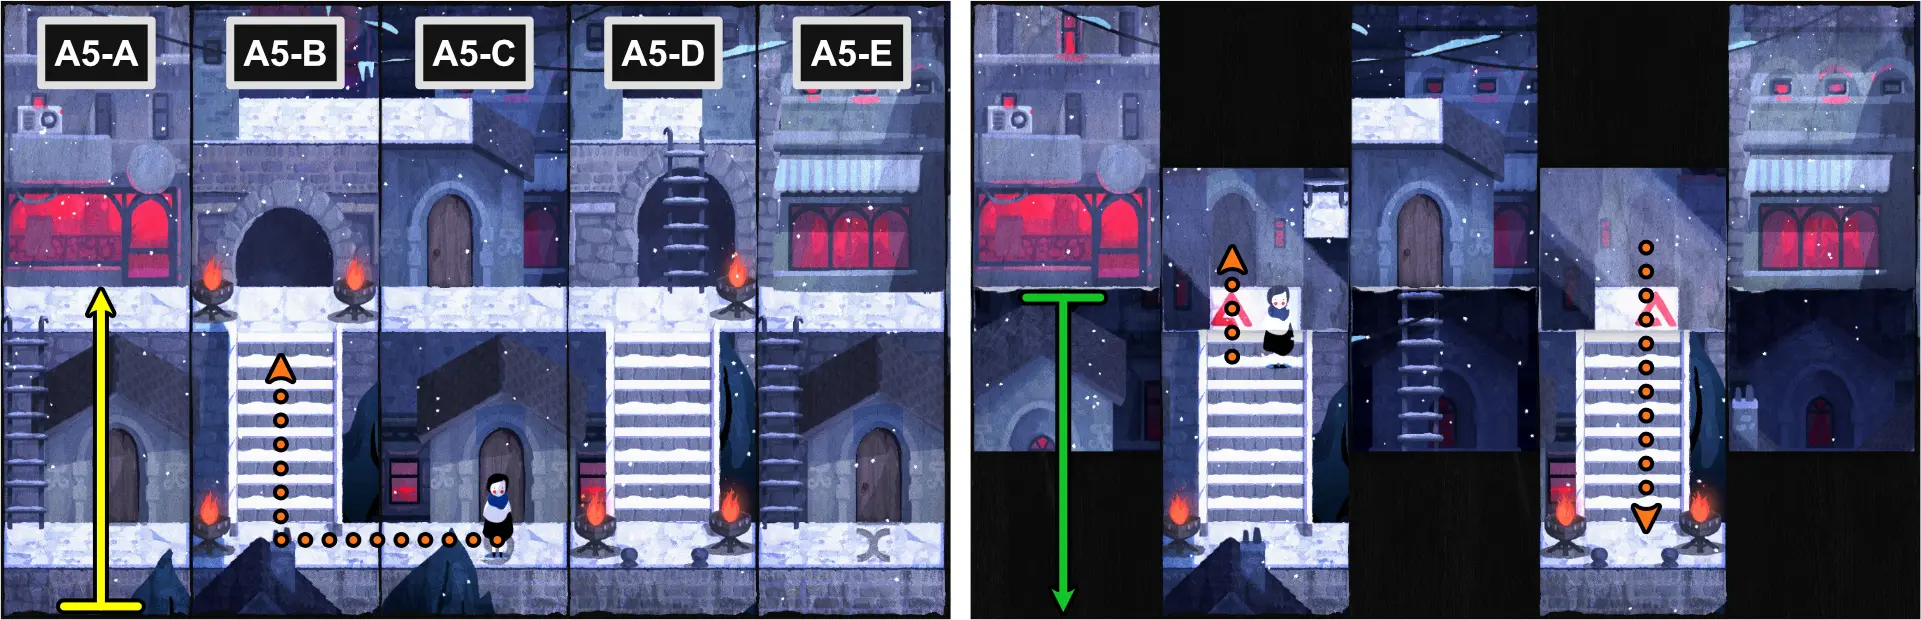
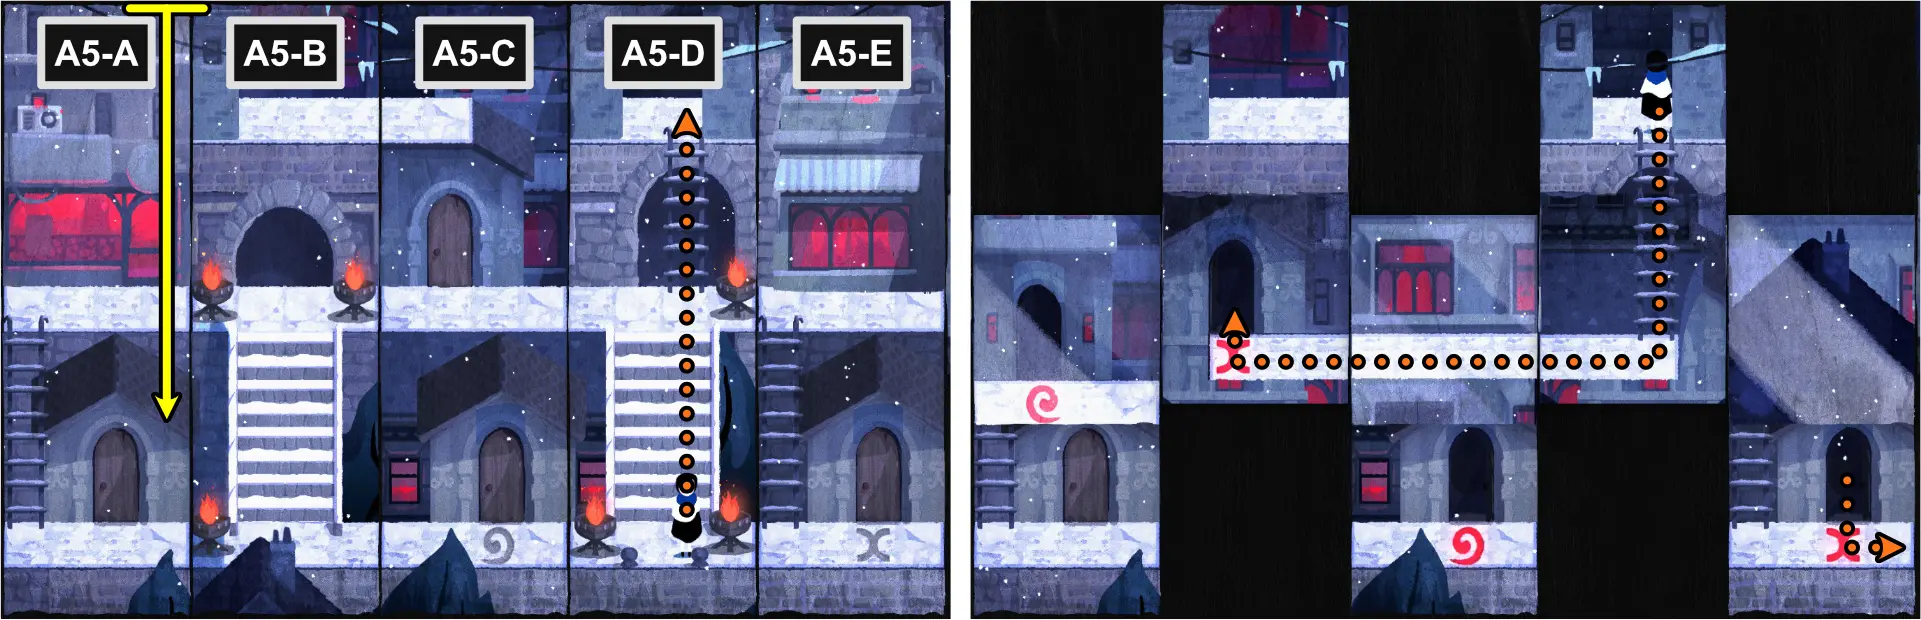
Chapter 5: Autumn
For this chapter, refer to the image below for the map of the scene and the legend of the symbols and lines that appear.
This chapter is a short one and does not introduce any new mechanics.
For extra achievements you can unlock for this chapter, go to the section “Achievements, Chapter 5: Autumn.”
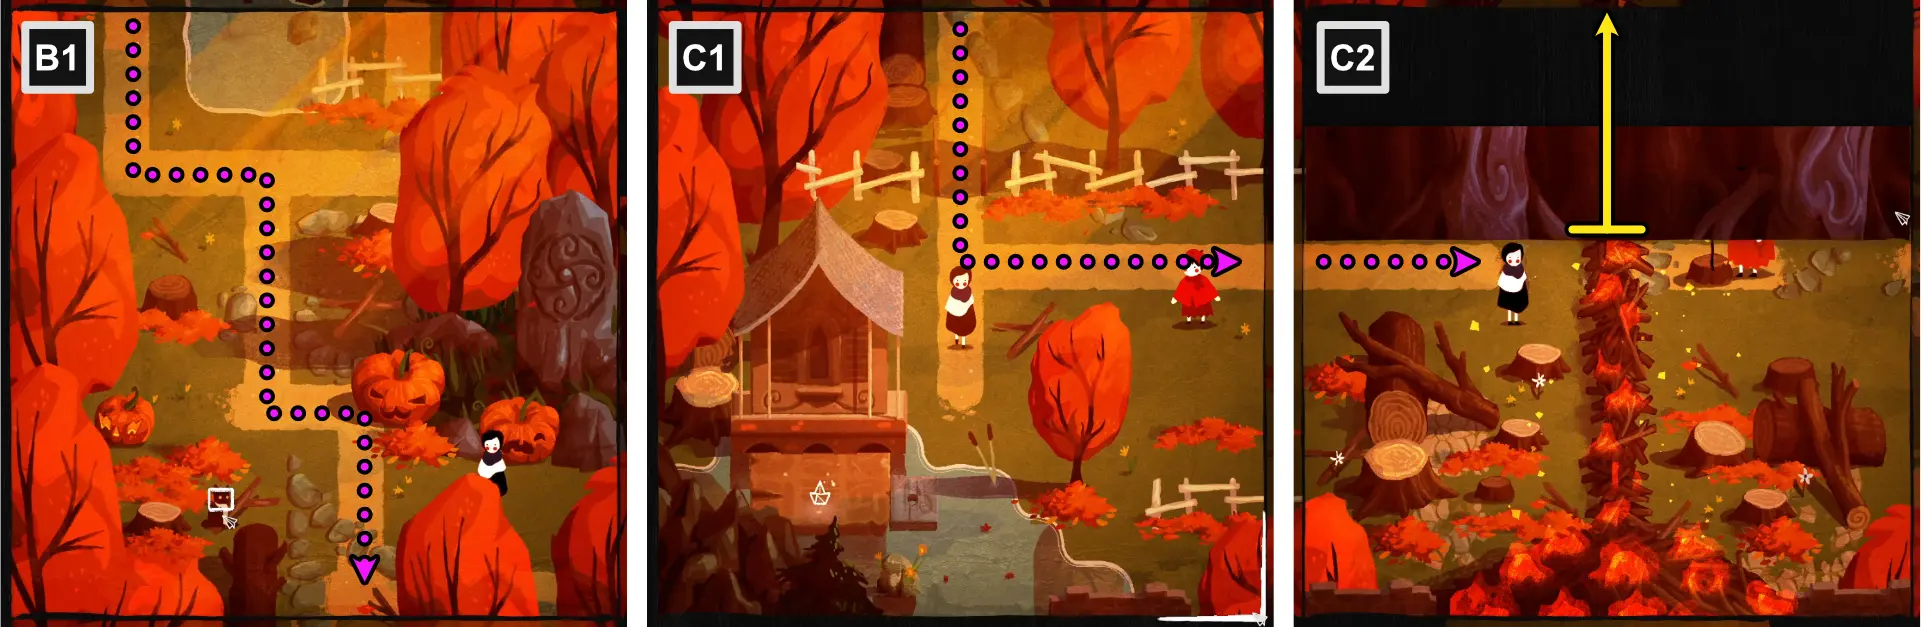
Finding the Elder

- For A2, A3, and B3, just follow the path and talk to the villagers.
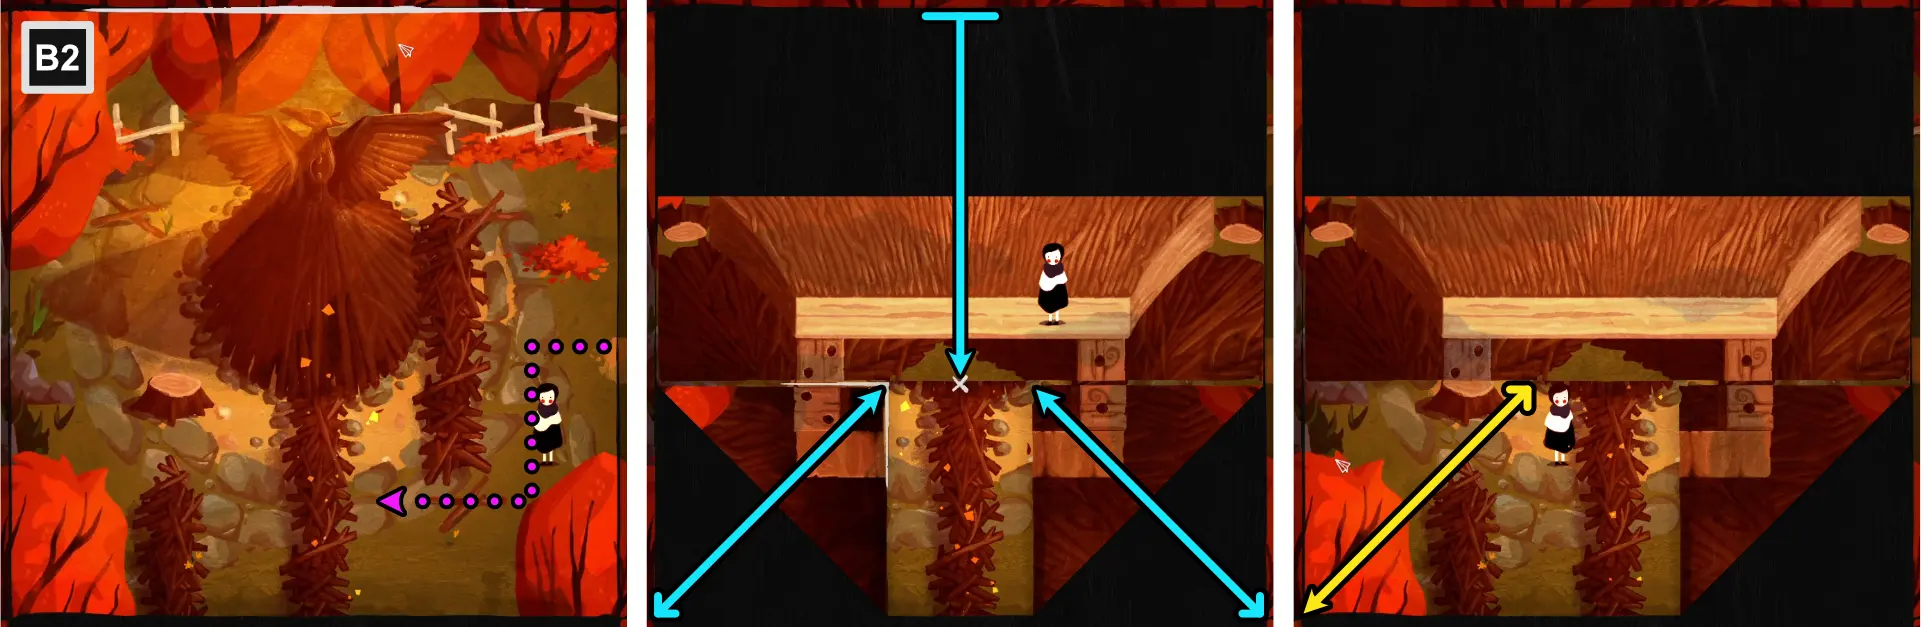
- Upon reaching B2, position Paige at the center of the map.
- Using the top edge, fold horizontally, fully covering the wooden bird.
- Using the bottom corners, fold diagonally to meet with the top fold.
- Use the path formed to move Paige to the left side of the map.
- Unfold the bottom left corner.
- Exit to the left to B1.
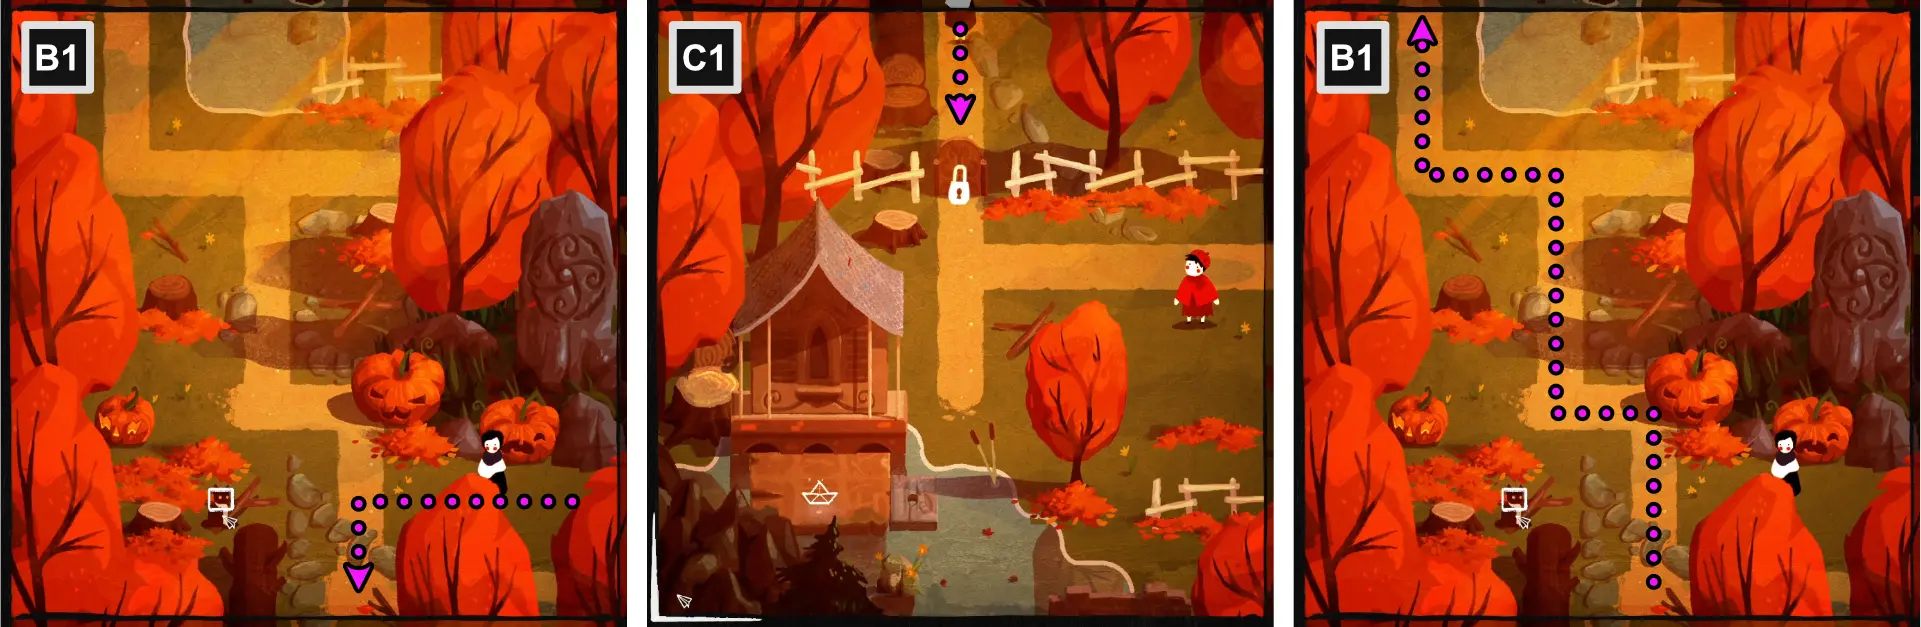
- Move Paige to the path below to go to C1.
Paige will meet a boy that seemed to be hiding something in the path to the right. However, the gate to reach the path is locked.
- Move back to B1 and go upward to A1.
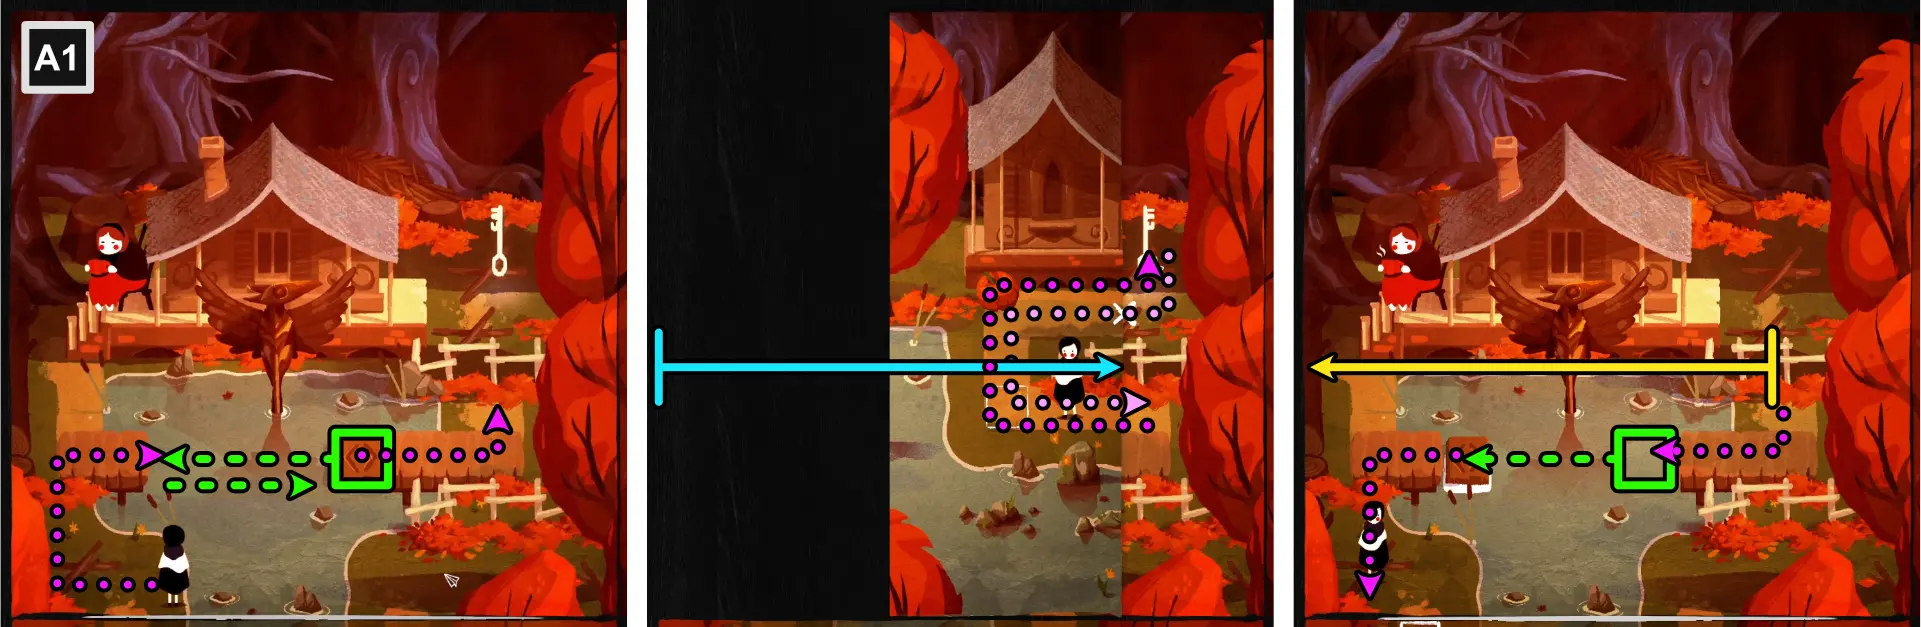
Paige will meet a woman who says that she has a key for the gate in C1.
- Move Paige to the pier and use the floating tile to get to the rightmost side of the map.
- Using the left edge, fold vertically, just to the left of Paige.
- Follow the path and take the key before going back to Paige’s original spot.
- Unfold the map.
- Use the floating tile to cross the lake and go back to B1.
- Go down to C1 and unlock the gate.
- Move to the right to C2.
- Unfold C2.
This will reveal the missing elder but will also light up the wooden bird.
Cutscene: The Festival
- Using the top right and bottom left corners, fold diagonally, meeting with the bottom and top edges.
- Unfold the image.
- Using the side edges, fold vertically, meeting at the center.
- Unfold the image.
- Using the bottom corners, fold diagonally, meeting at the center.
- Using the top edge, fold horizontally, meeting at the center.
- Unfold the image.
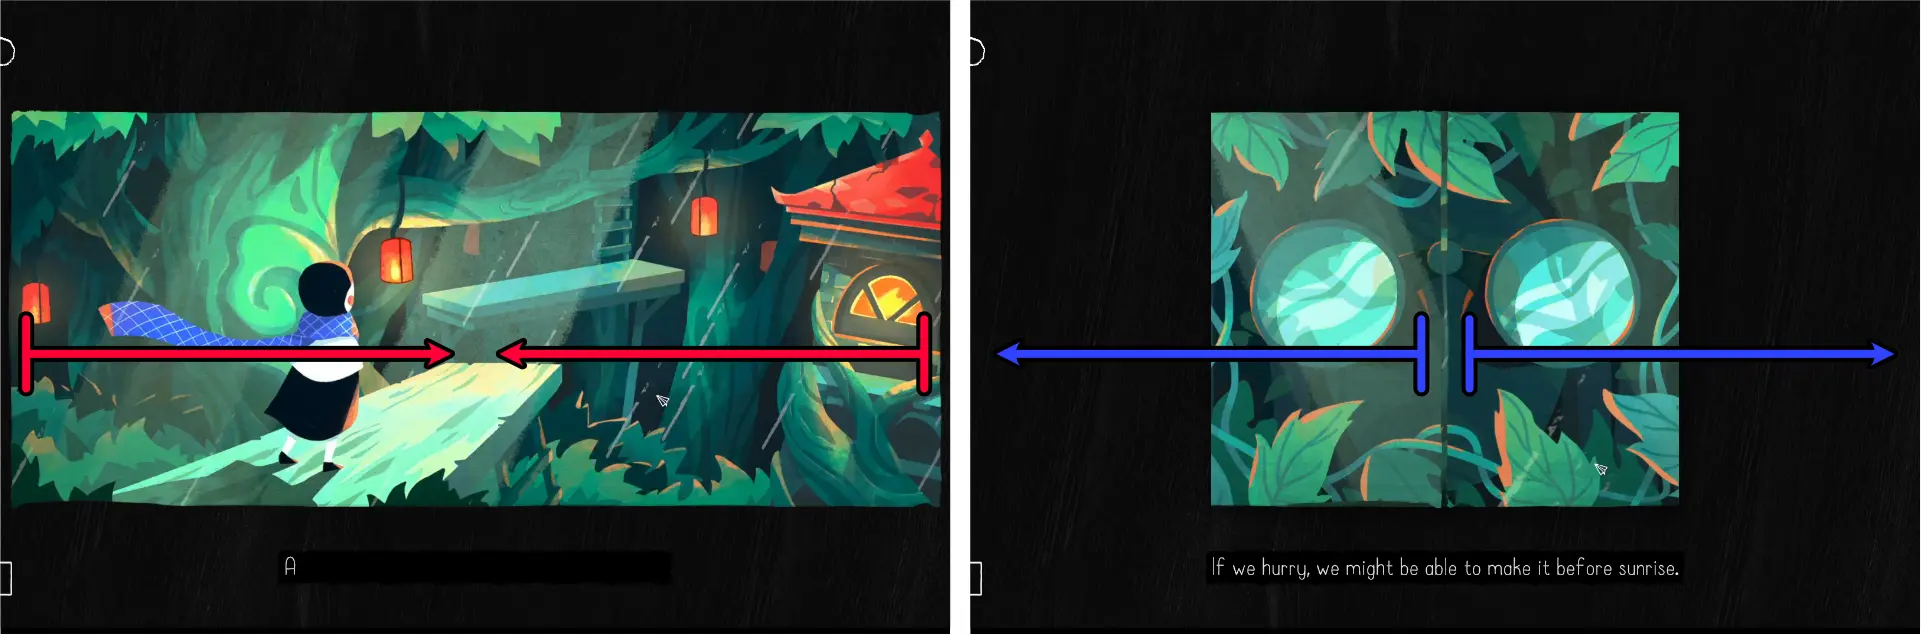
Leaving the Village
- Move downwards until you reach the next level to end the chapter. You can talk to the villagers before leaving if you like.
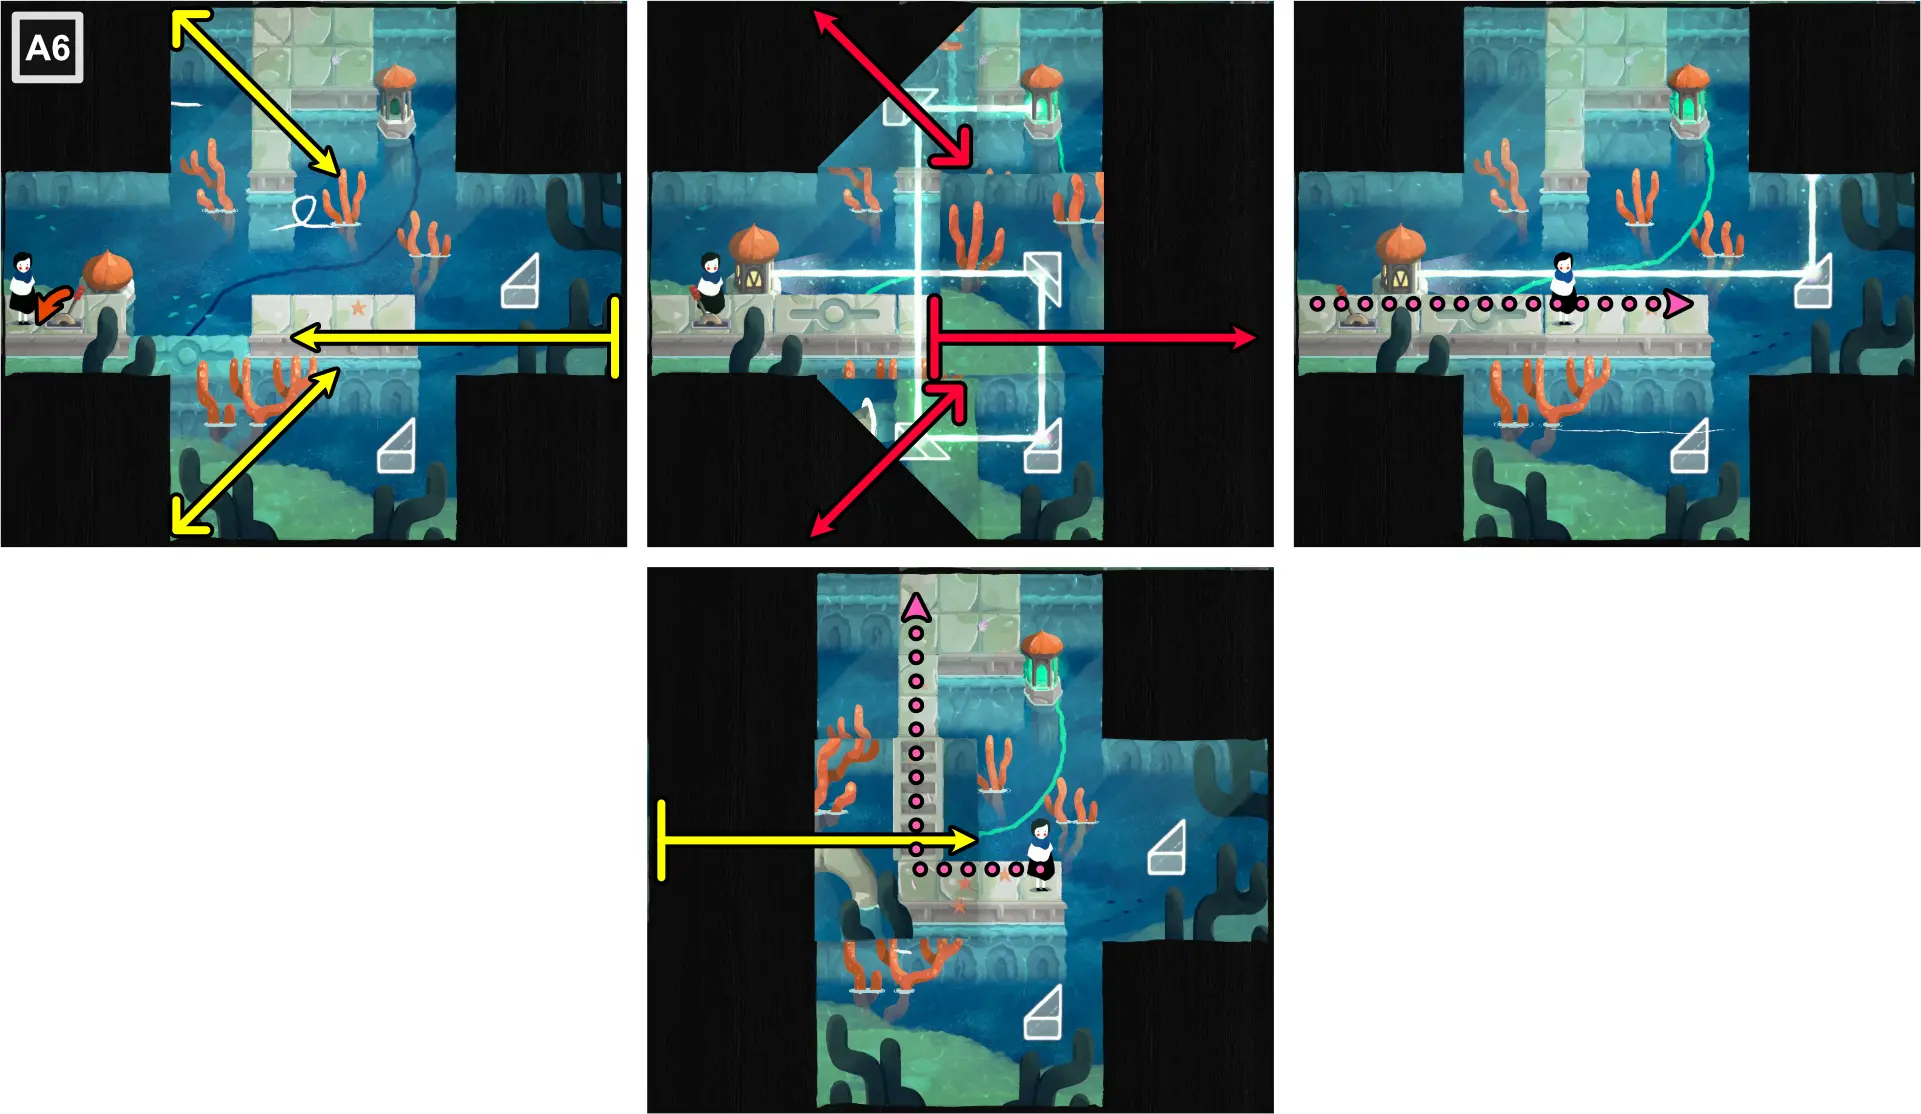
Chapter 6: Ruins
For this chapter, refer to the image below for the map of the scene and the legend of the symbols and lines that appear.
In this level, 2 new mechanics are introduced:
- Irregular Map Shapes – You’ll sometimes encounter maps with different shapes, challenging you to think outside the box.

- Statues – Statues work like boulders. They’re there as an obstacle to block paths and can also be moved on top of pressure plates to unlock paths. However, unlike boulders, you cannot cover it when folding the map.
For extra achievements you can unlock for this chapter, go to the section “Achievements, Chapter 6: Ruins.”
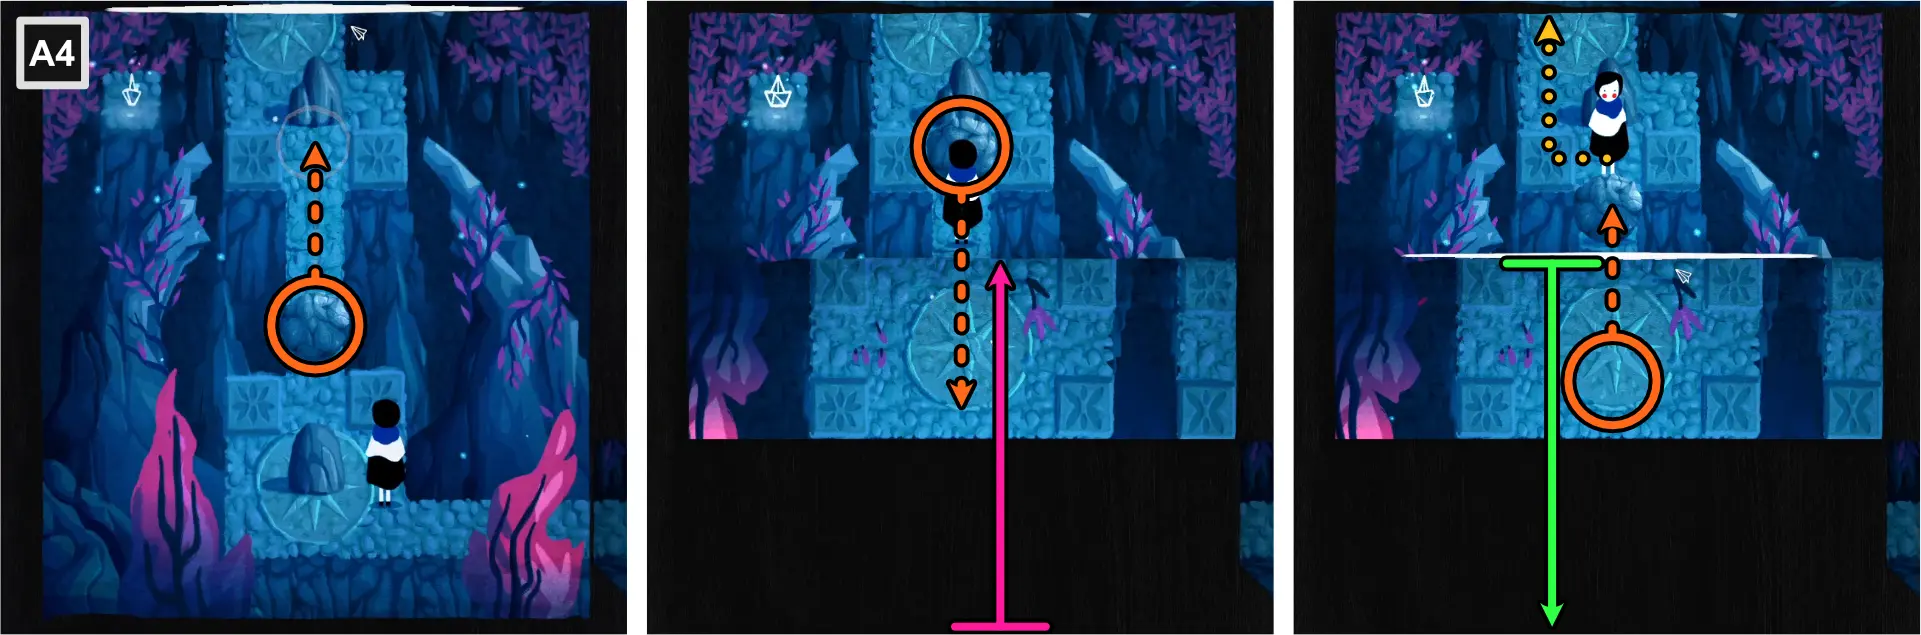
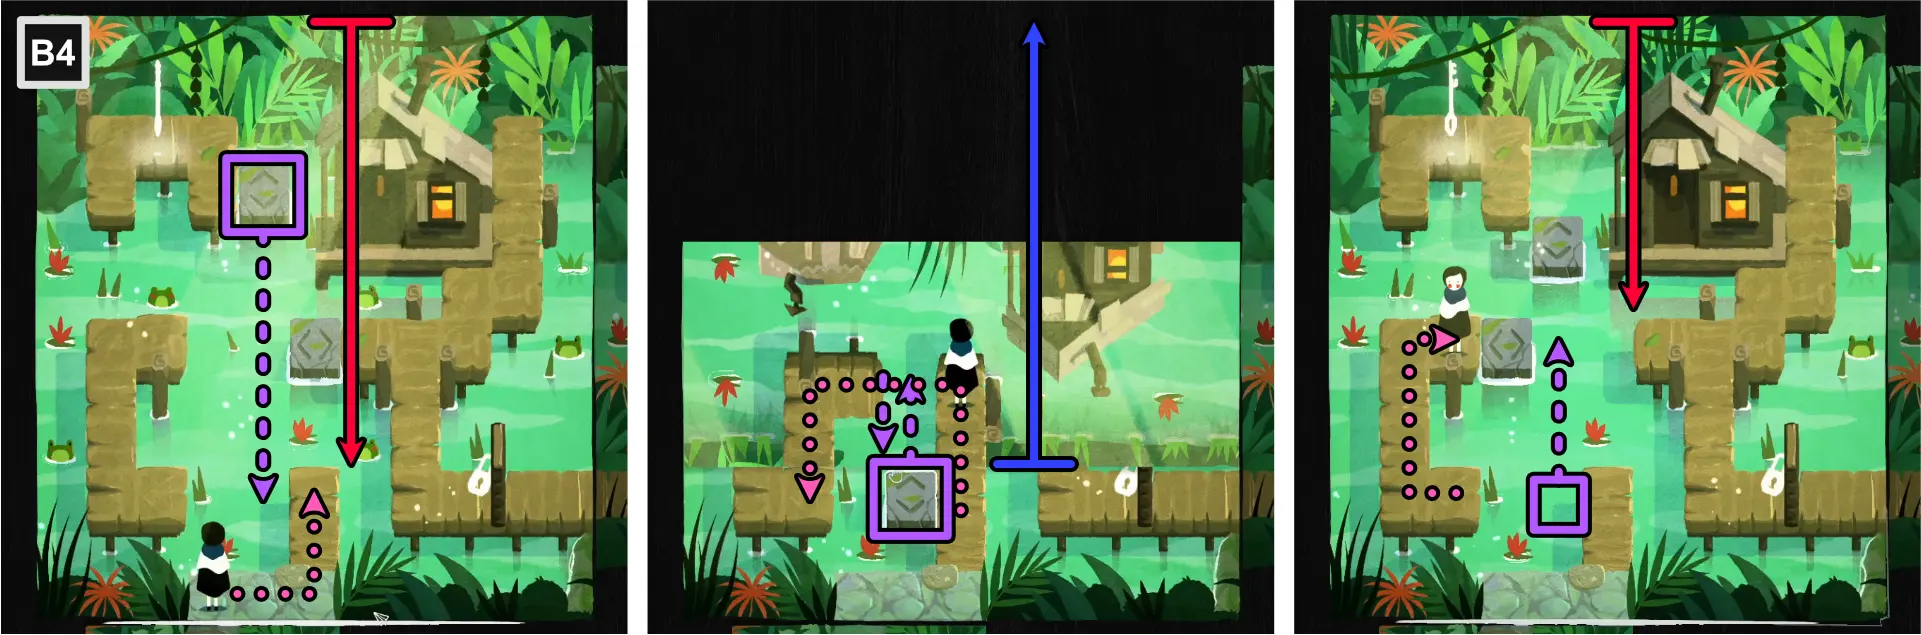
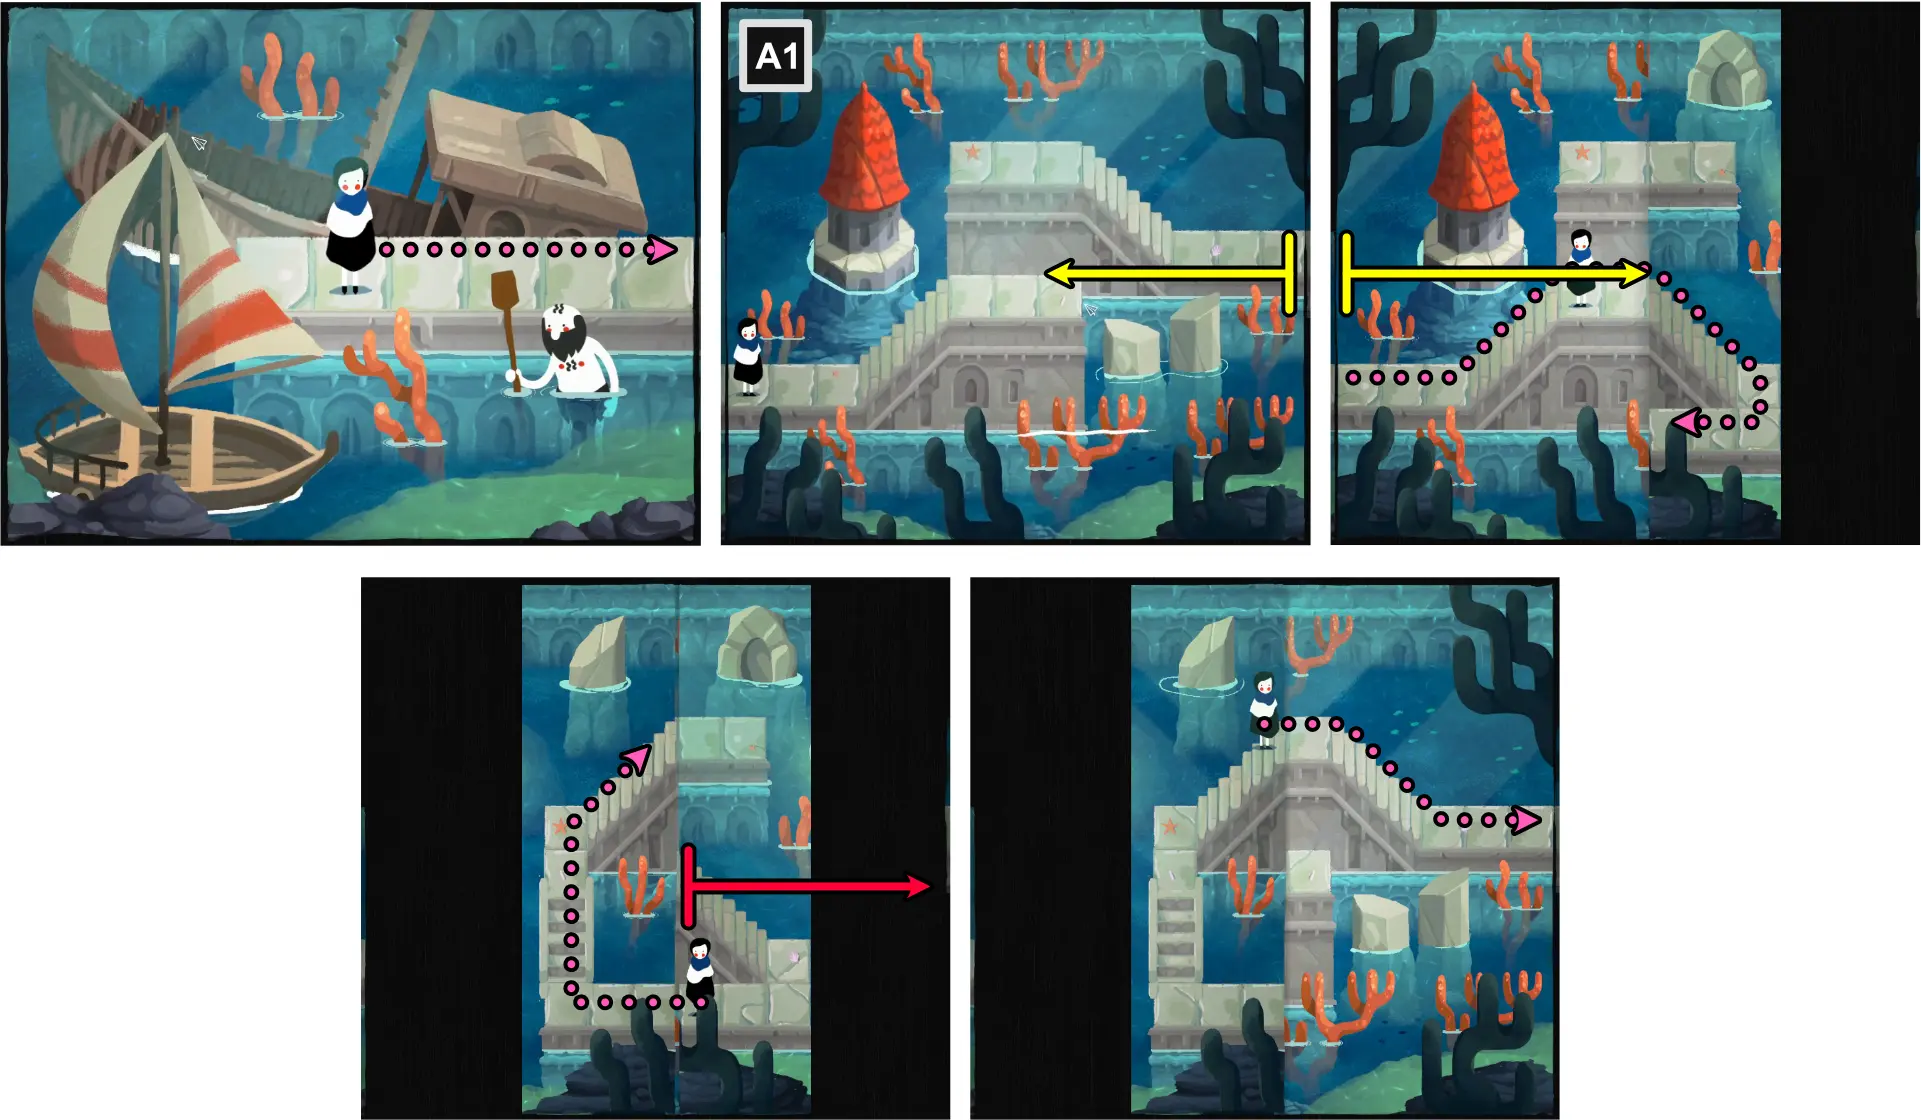
Entering the Ruins (A1-A6)
Paige will find an archeologist looking at relics.
- Move downward to A1.
- Using the bottom edge, fold horizontally, aligning with the top edge of the square portion of the map at the right.
- Use the path to reach the archeologist and talk to him.
- Unfold the map.
- Using the top edge, fold horizontally, meeting the opposite edge.
- Move downward to A2.
- Move Paige to the right square.
- Using the top edge, fold horizontally, meeting the opposite edge.
- Use the path formed to go to the right to A3.
- Using the top right and bottom left corner of the middle of the map, fold diagonally towards the center.
- Follow the path to go to the bottom right square.
- Unfold the map.
- Using the left edge of the left square, fold vertically, just before the boulder.
- Move the boulder on top of the pressure plate to unlock the path.
- Move downward to A4.
- Position Paige to the left of the statue.
- Using the right edge, fold vertically, just to the right of the statue.
- Push the statue to the end of the right fold.
- Using the left edge, fold vertically, meeting the right fold.
- Use the path to move to A5.
- Move the statue one space to the left and all the way to the top of the map.
- Using the right edge, fold vertically, just to the right of the statue.
- Use the path to move to A6.
- Using the bottom edge, fold horizontally, just below the statue.
- Using the right edge, fold vertically, aligning with the right edge of the middle rectangle of the map.
- Use the path formed and push the statue all the way to the right end.
- Unfold the middle rectangle of the map.
- Using the right edge of the right square, fold all the way to the right fold’s edge.
- Use the path to move to B1.
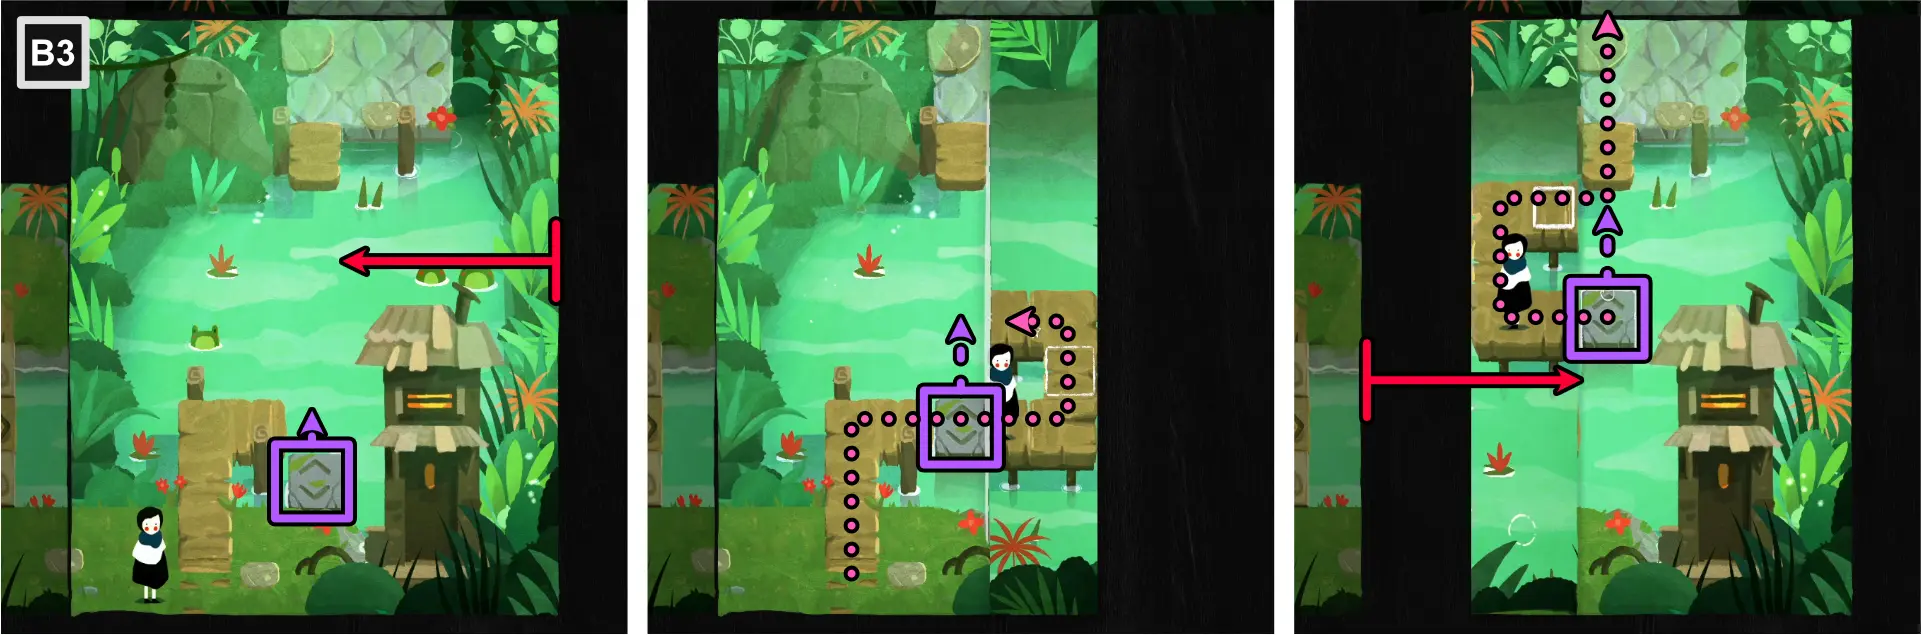
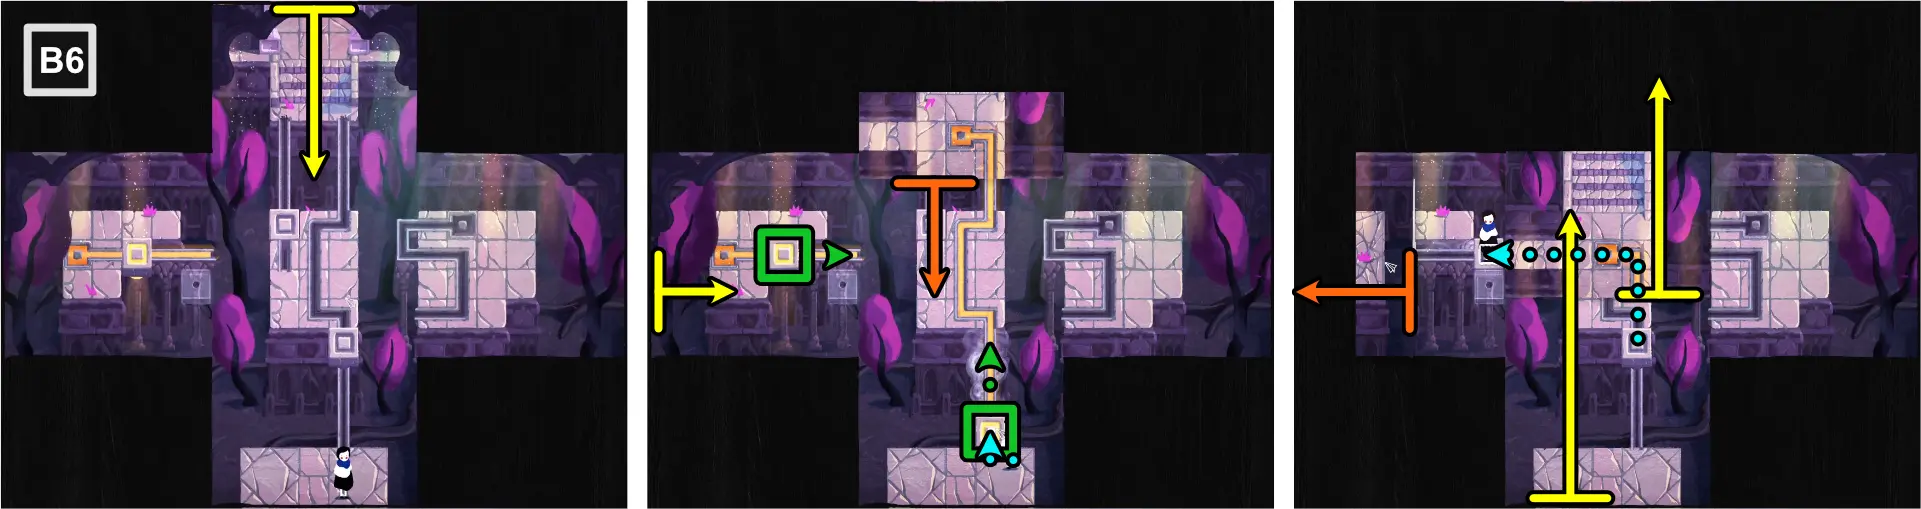
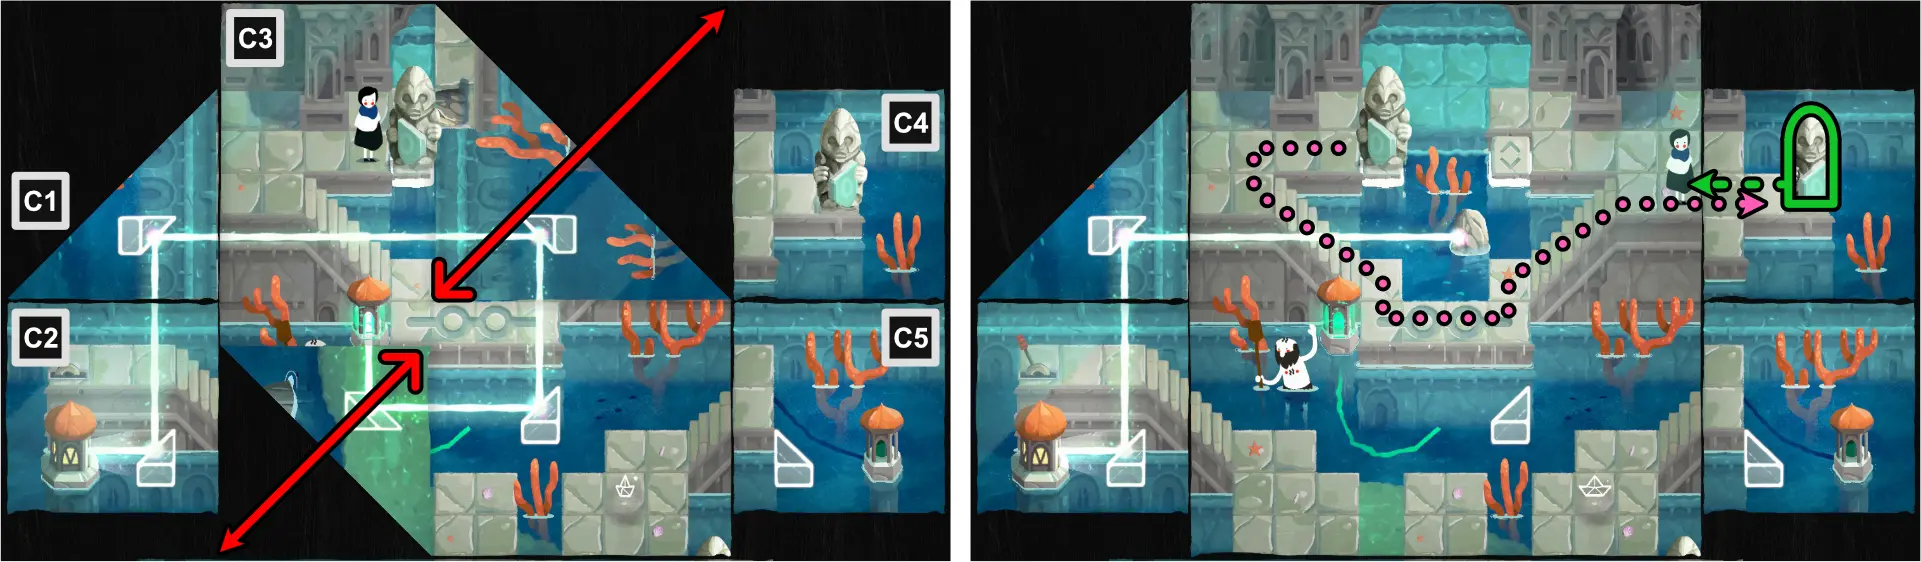
Mysterious Carvings (B1-B7)
The archeologist will tell you that he found mysterious carvings.
- Move Paige in between the horizontal carvings.
- Using the left corners of the left square, fold diagonally, meeting at the center.
- Using the right corners of the right square, fold diagonally, meeting at the center.
- Using the top edge, fold horizontally, meeting at the center.
- Use the staircase that appears to move to B2.

- Move the statue all the way to the edge of the stairs at the top.
- Using the left edge of the left square and the right edge of the right square, fold vertically, meeting at the center with the left side taking more space than the right.
- Move the statue to the bottom of the rectangle.
- Unfold the right fold.
- Move the left fold one space to the right.
- Move the statue on top of the pressure plate to unlock the path.
- Move downward to B3.
- Using the right edge, fold vertically, just to the left of the right statue at the bottom.
- Move the left statue to the right of the pressure plate.
- Move the right statue on top of the pressure plate.
- Unfold the map.
- Using the top edge of the rectangle, fold horizontally to replace the bridge with a fixed one.
- Move the statue on the pressure plate to the other pressure plate on the left square.
- Move the statue at the right on top of the pressure plate on the right square, unlocking the path.
- Move downward to go to B4.
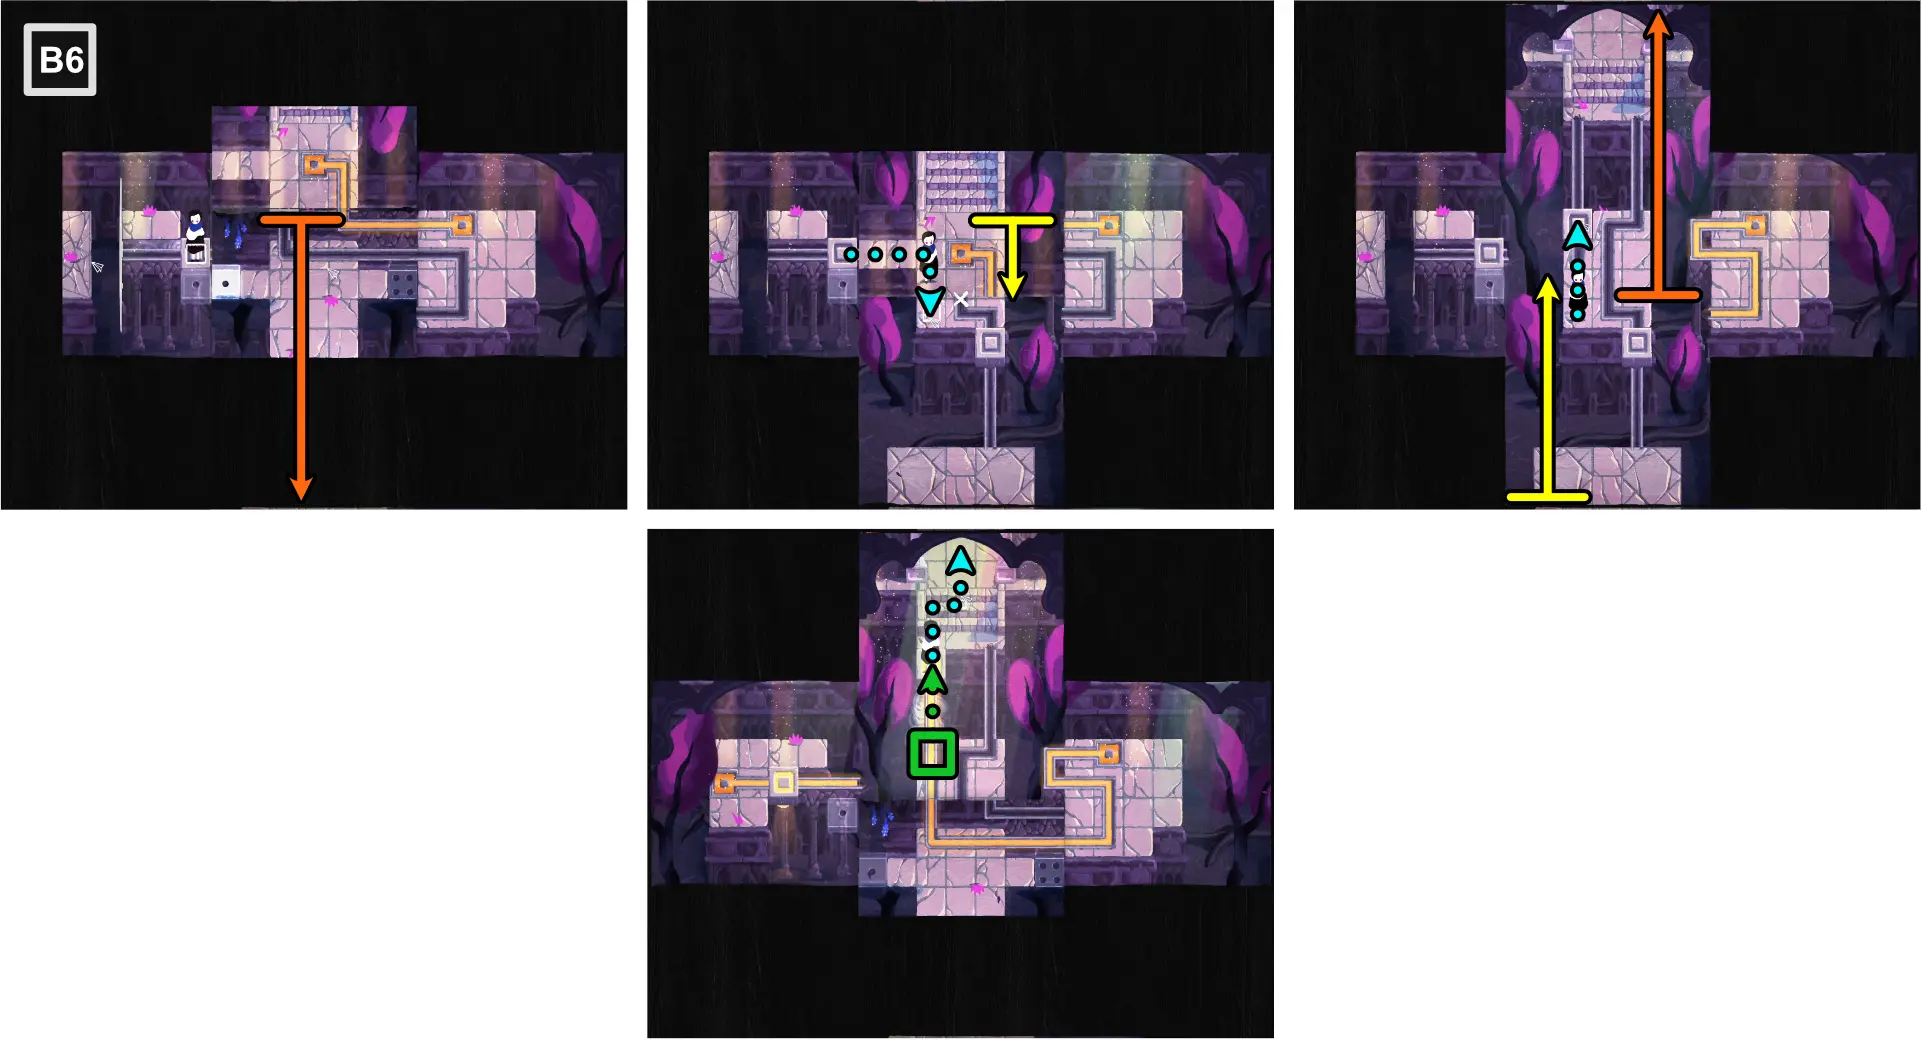
- Push the statue to the right, at the edge of the windowed structure.
- Using the left edge, fold vertically, just to the left of Paige.
- Move the statue just to the right of the spiral door.
- Using the right edge, fold vertically, meeting the left fold.
- Enter the spiral door to exit out of the other side.
- Push the statue one space to the left.
- Unfold the right fold.
- Move to the right to go to B5.
- Push the statue on top of the floating tile.
- Using the top edge, fold horizontally, meeting with the opposite edge.
- Move the floating tile to the right rectangle.
- Move Paige just to the left edge of the middle fold.
- Move the middle fold upward, aligning with the path.
- Move Paige below the middle fold.
- Using the right and left edges of the right and left rectangles, fold vertically, just before Paige and the statue.
- Move Paige to the left fold.
- Move the middle fold to meet with the bottom edge.
- Move the floating tile one space to the left.
- Move the right fold one space to the left.
- Enter the square spiral door to exit to the opposite side.
- Unfold the right fold.
- Move the floating tile to the left rectangle.
- Unfold the middle rectangle.
- Move Paige to the left, off the fold.
- Unfold the right rectangle.
- Using the top edge of the middle rectangle, fold horizontally to meet the opposite edge.
- Move the floating tile to the right rectangle.
- Move the statue on top of the pressure plate, unlocking the path.
- Move downward to B6.
- Position Paige below the statue.
- Using the left edge, fold vertically, just to the left of the statue.
- Using the right edge, fold vertically, just to the right of the large square platform.
- Push the statue one space upward.
- Enter the triangle door to exit out of the opposite side.
- Move the statue to the top center.
- Unfold the map.
- Move Paige downward.
- Using the left edge, fold vertically all the way to the right edge.
- Move Paige upward, on the upper right square platform.
- Unfold the map.
- Using the bottom edge, fold horizontally, connecting the four-dotted tiles.
- Use the path to move to C1.
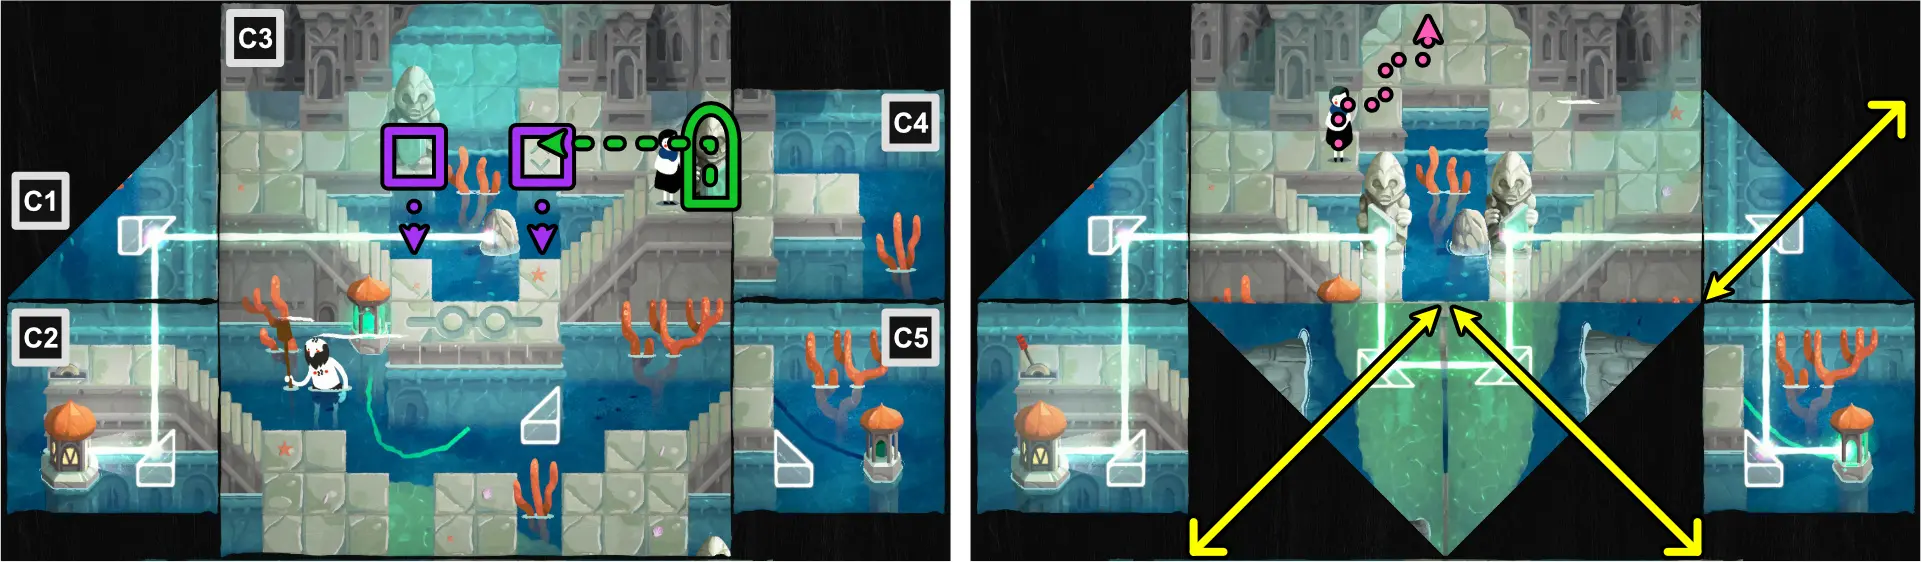
Door to the Temple (C1-C3)
- Move the floating tile all the way to the right to C2.
- Using the bottom left and top right corners of the middle rectangle of C1, fold diagonally, meeting the opposite corners.
- Using the bottom left corner of the bottom rectangle of C1, fold diagonally, meeting the right edge.
- Using the bottom right corner of the bottom rectangle of C2, fold diagonally, meeting the left edge.
- Follow the path to go to C2.
- Unfold C2.
- Take the key below and go back up to Paige’s original position.
- Unfold the middle rectangle folds of C1.
- Using the bottom right corner of the bottom rectangle of C2, fold diagonally, meeting the left edge.
- Use the path to move to C1.
- Unfold C1.
- Move downward and unlock the door.
- Enter the curved X door to exit out of the one in C2.
- Pull the statue one space to the right, onto the platform.
- Unfold C2.
- Move the floating tile all the way to the right, to C1.
- Move the statue at the upper right to the pressure plate in C3.
- Using the bottom edges of C1 and C2, fold horizontally, meeting with the opposite edge.
- Follow the path to enter the entrance to the temple.
Cutscene: Investigating the Entrance
- Using the side edges, fold vertically towards the center.
- Unfold the image.
- Using the corners, fold diagonally towards the center.
- Unfold the image.
- Using the side edges, fold vertically towards the center.
- Unfold the image.
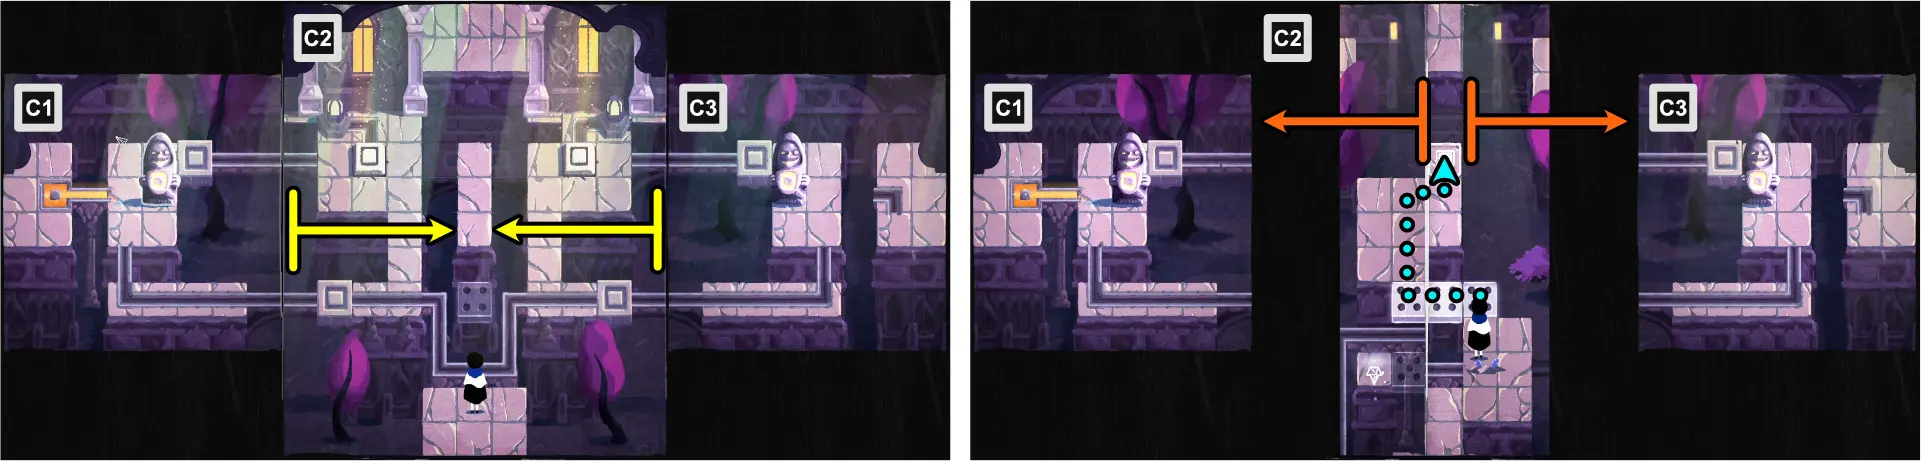
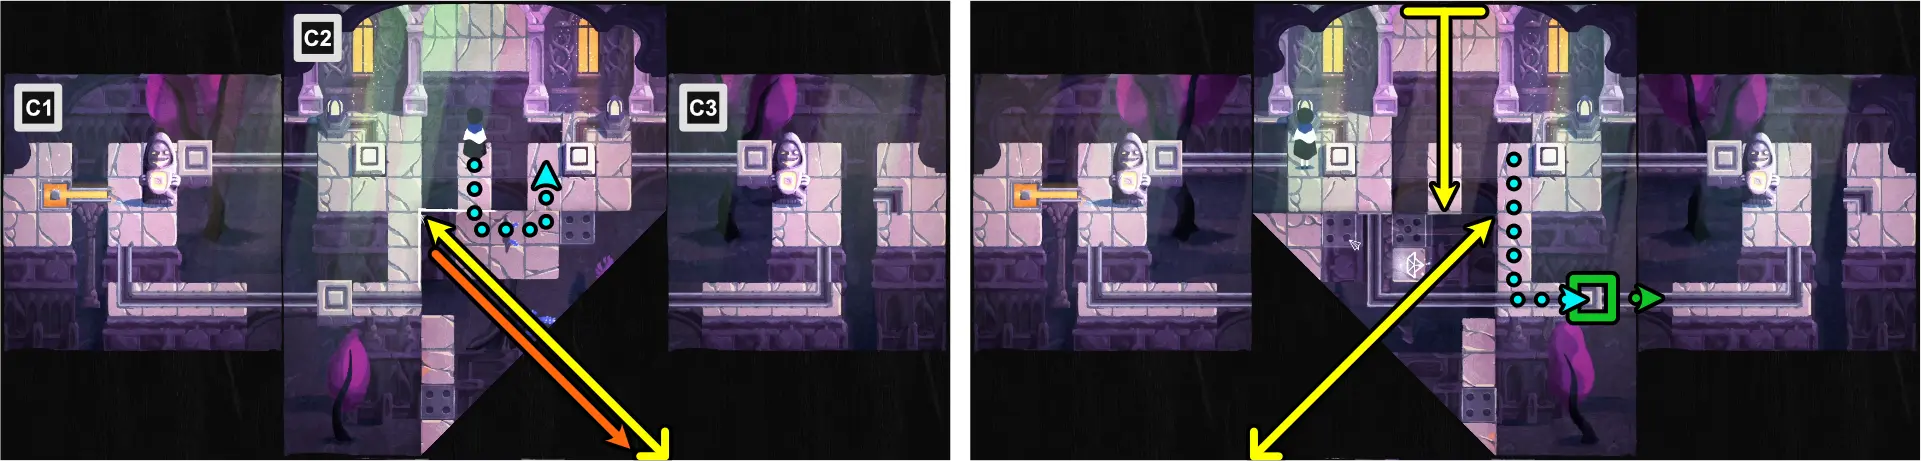
Chapter 7: Temple
For this chapter, refer to the image below for the map of the scene and the legend of the symbols and lines that appear.
In this level, a new mechanic is introduced:
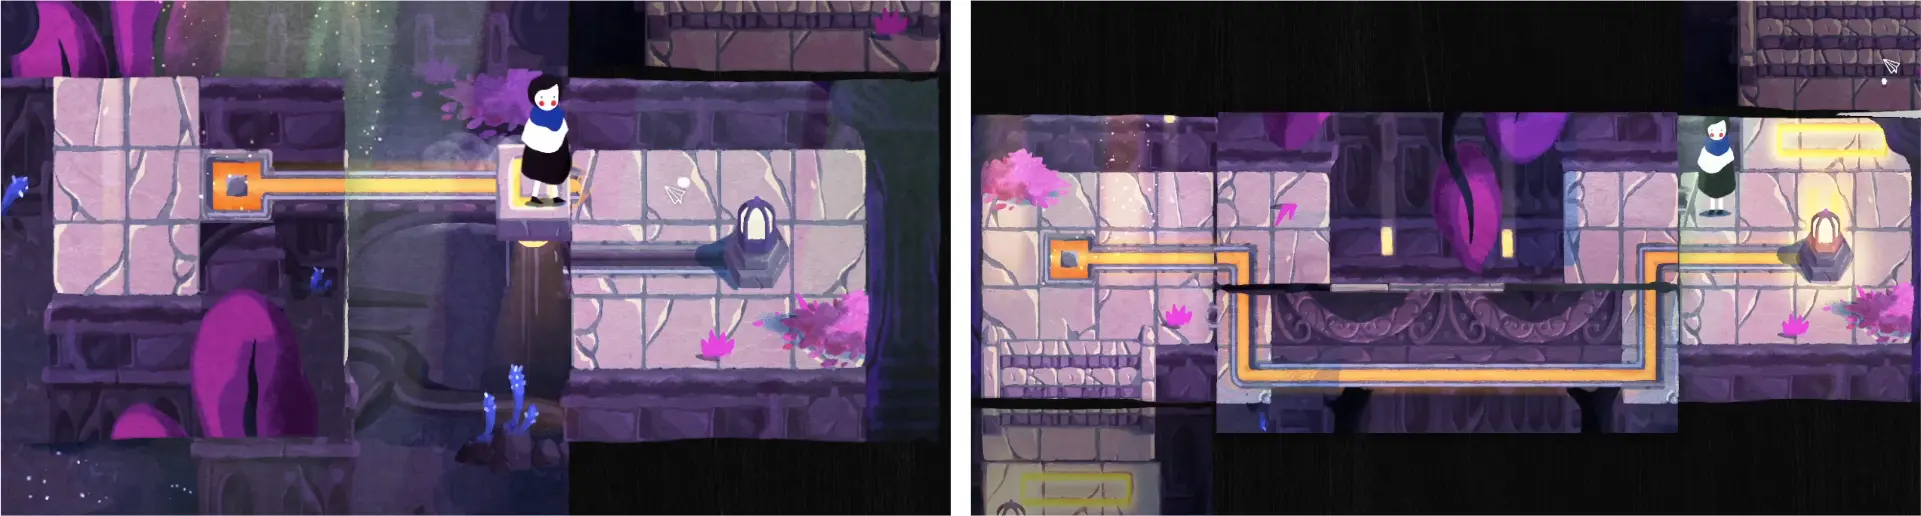
- Energy Tiles- The game never gave it a name so we’ll just call the yellow tiles energy tiles and the lines as energy lines. These can power up light bulbs that can reveal tiles or doors to unlock them. They are also needed to power up automated tiles to make them move to a certain direction.
For extra achievements you can unlock for this chapter, go to the section “Achievements, Chapter 7: Temple.”
Entering the Temple (A1-A6)
- Enter the Temple to move to A1.
- Using the bottom corners, fold diagonally towards the center, leaving a column at the middle.
- Move Paige to A2.
- Using the bottom left corner, fold diagonally, aligning with the bottom edge of the energy tile.
- Using the right edge, fold vertically, aligning with the middle platform.
- Follow the path to the front of the entrance to A3.
- Unfold the map.
- Using the top corners, fold diagonally towards the center, aligning with the middle platform.
- Using the bottom edge, fold horizontally, aligning with the upper folds.
- Enter the door to A3.
- Using the right edge of the square part, fold vertically, meeting the right edge of the rectangle.
- Move Paige to the left of the energy tile.
- Using the left edge, fold vertically, leaving 1 space between the left and right folds.
- Use the path to go to the upper right part of the map.
- Unfold the left fold.
- Enter the door to A4.
- Using the top right corner, fold diagonally, aligning with the column of the middle energy tile.
- Use the path to move Paige to the empty left energy tile.
- Unfold the map.
- Using the top edge, fold horizontally, connecting the middle and right energy lines together.
- Once the energy is transferred to the other energy tile, unfold the map.
- Using the top right corner, fold diagonally, aligning with the column of the middle energy tile.
- Use the path to move Paige to the empty right energy tile.
- Using the top left corner, fold diagonally, meeting with the right fold.
- Once the energy is transferred to the other energy tile, unfold the left fold.
- Enter the door to A5.
- Using the bottom left corner of the left square, fold diagonally, aligning with the opposite corner.
- Using the top right corner of the right square, fold diagonally, aligning with the opposite corner.
- Using the top left corner of the top middle square, fold diagonally, aligning with the opposite corner.
- Move Paige just below the edge of the top middle square.
- Unfold the map.
- Move Paige 1 space upward (Paige should be near the door, not at the energy tile like in the image).
- Using the top left corner of the left square, fold diagonally, aligning with the opposite corner.
- Using the right edge of the right square, fold vertically, meeting with the left fold.
- Once the energy is transferred to the other energy tile, unfold the map.
- Using the bottom edge, fold horizontally, just below the energy tile.
- Enter the door to A6.
- Take the key and go back to A5.
- Unlock the door to the right and go to B1.
Woman’s Statue (B1-B6)
- Using all corners of the map, fold diagonally to align the carvings.
- Unfold the top right corner of the left rectangle.
- Move Paige to the right to go to B2.

- Move Paige to the right until she reaches the end of the platform.
- Using the top left corner of the left square, fold diagonally, meeting the statue.
- Move Paige downward and push the statue to the right, moving it on top of the pressure plate.
- Unfold the map.
- Using the top edge of the middle rectangle, fold horizontally, aligning with the bottom platform strip.
- Using the right edge, fold vertically until the energy lines meet.
- Using the bottom edge of the middle rectangle, fold horizontally to connect the energy lines.
- Move Paige upward to B3.
- Using the right edge, fold vertically until the energy lines meet.
- Once the automated tile moves to the left, move Paige on top of it.
- Unfold the map to make the automated tile move back to the right.
- Move Paige on top of the other automated tile.
- Using the left edge, fold vertically until the energy lines meet, moving Paige to the right.
- Move Paige to the right platform.
- Unfold the sheet.
- Using the top and bottom edges of the middle rectangle, fold horizontally to the center to make the energy lines meet.
- Move Paige upward to B4.
- Using the top edge, fold horizontally, covering the light bulb and transferring energy to move the automated tile.
- Move Paige on top of the automated tile.
- Unfold the map to move the automated tile upward.
- Using the bottom left corner, fold diagonally to connect the energy lines.
- Using the top edge, fold horizontally to connect the energy lines and move the automated tile downward and the statue to the left.
- Once the statue is next to the strip of platform, use the right edge to fold vertically and hold the statue’s position in place.
- Unfold the left fold and let the automated tile bring Paige to the bottom platform.
- Move Paige in front of the statue.
- Move the statue to the lower left part of the map.
- Unfold the map.
- Using the bottom right corner, fold diagonally, meeting the top edge of the right rectangle.
- Move the statue upward, across the fold.
- Unfold the map.
- Using the right edge, fold vertically, meeting the opposite edge.
- Move the statue downward, and on top of the pressure plate.
- Move upward to B5.

- Using the right edge of the lower right rectangle, fold vertically, meeting the opposite edge.
- Once the automated tile reaches the bottom, move Paige on top of it.
- Unfold the map to move the automated tile upward.
- Move Paige to the next automated tile to the left.
- Using the left edge of the lower left rectangle, fold vertically to connect the energy lines.
- Once the automated tile reaches the platform above it, move Paige to the upper right part where the next automated platform is aligned to.
- Move the lower left rectangle fold further to the right to meet the opposite edge.
- Using the right edges of the right rectangles, fold vertically to meet the opposite edge, moving the automated tiles to the right.
- Move Paige to the automated tile at the very top.
- Unfold the upper right rectangle, moving the automated tile to the left.
- Move Paige upward to B6.
- Using the top edge, fold horizontally to connect the energy lines and bring the automated tile downwards.
- Move Paige on top of the automated tile.
- Move the top edge downward, leaving 1 space on the middle platform, disconnecting the lines and making the automated tile move upward.
- Using the left edge, fold vertically to cover the energy tile at the left side of the map, bringing the automated tile to the right.
- Move Paige on top of the automated tile on the left.
- Move the top upward, aligning with the energy line on the right part of the map.
- Using the bottom edge, fold horizontally, aligning with the platform at the right part of the map to activate the energy tile.
- Unfold the bottom fold.
- Move the top fold downwards, leaving 1 row of the middle platform.
- Move Paige to the bottom part of the middle platform.
- Unfold the top fold.
- Move Paige to the automated tile at the upper left part of the middle platform.
- Using the bottom edge of the map, fold horizontally, connecting the energy lines and moving the automated tile upwards.
- Move Paige upward to C1.
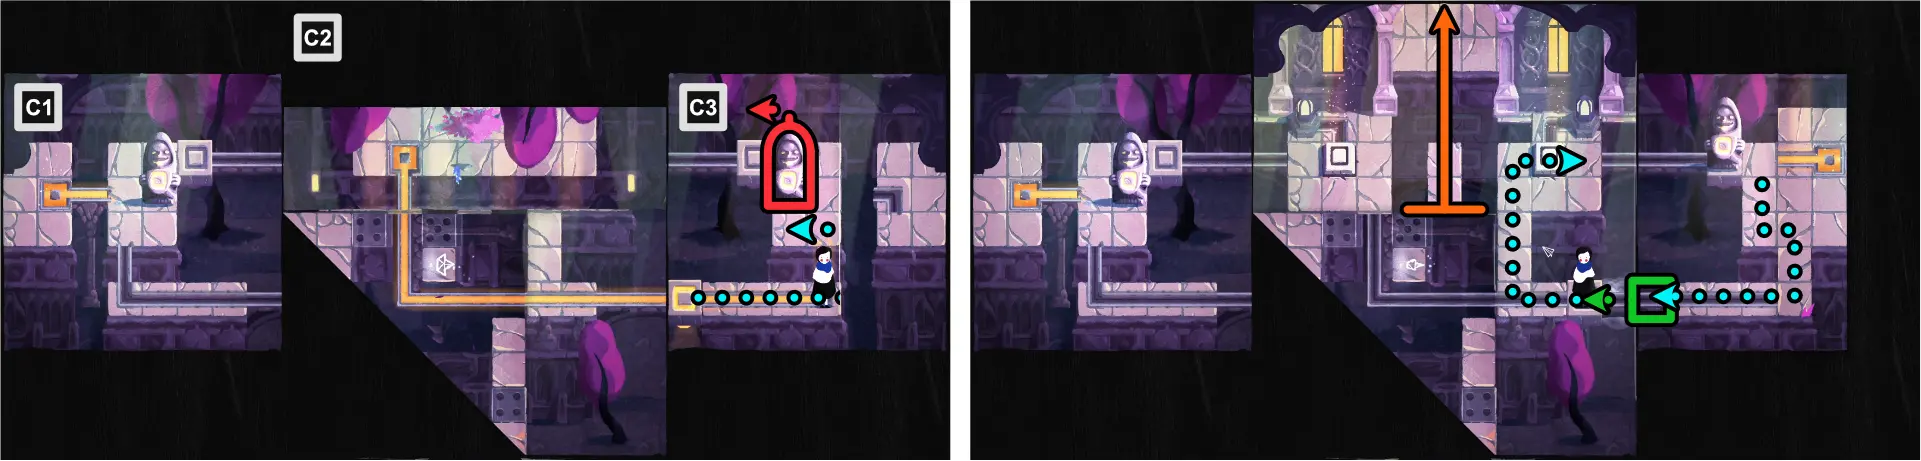
Temple Exit (C1-C3)
- Using the side edges of C2, fold vertically to meet with the platform strip at the center and connect the four-dotted tiles.
- Follow the path to bring Paige at the very top of the middle platform.
- Unfold C2.
- Using the bottom right corner of C2, fold diagonally, aligning with the 2nd square of the center platform.
- Move Paige to the right platform.
- Unfold C2.
- Using the bottom edge of C2, fold horizontally, aligning with the edge of the left and right platforms.
- Move Paige to the left platform.
- Unfold C2.
- Using the bottom left corner of C2, fold diagonally, aligning with the 2nd square of the center platform.
- Move Paige onto the automated tile.
- Using the top edge of C2, fold horizontally, meeting with the bottom left fold to connect the energy lines, moving the automated tile to the right to C3.
- Move Paige below the statue.
- Move the statue onto the automated tile to the upper left.
- Move Paige back to the automated tile at the lower left of C3.
- Unfold the top fold of C2 to disconnect the energy lines and bring Paige back to C2.
- Move Paige to the right of the pressure plate.
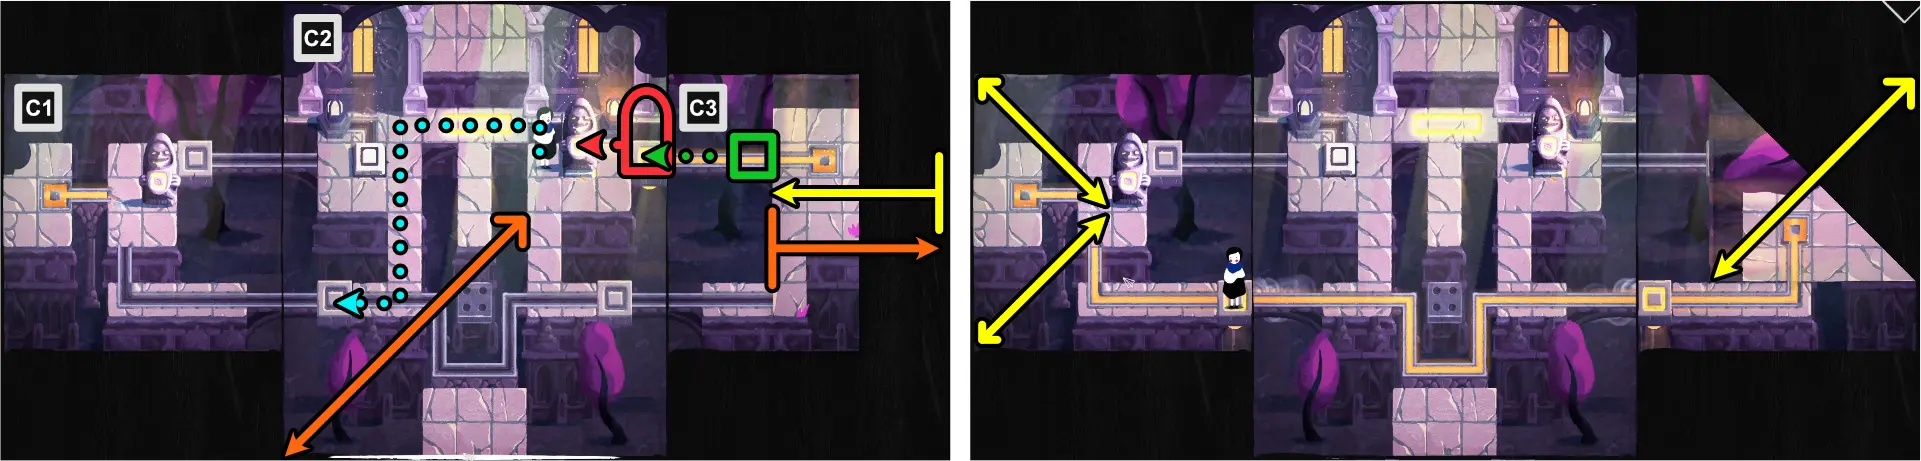
- Using the right edge of C3, fold vertically to connect the energy lines and move the automated tile to the left to C2.
- Move the statue from the automated tile onto the pressure plate.
- Unfold C3 and C2.
- Move Paige onto the automated tile on the left.
- Using the upper right corner of C3, fold diagonally to connect the energy lines and move Paige from C2 to C1.
- Using the left corners of C1, fold diagonally, meeting at the center.
- Use the path formed to bring Paige below the statue.
- Move the statue onto the automated tile at the upper right.
- Move Paige back to the automated tile at the lower right.
- Unfold C1 and C3, moving Paige back to C2.
- Move Paige to the left of the pressure plate
- Using the bottom right corner of C1, fold diagonally to connect the energy lines and move the automated tile to the right to C2.
- Move the statue onto the pressure plate.
- Move Paige upward to exit the temple.
Cutscene: Leaving Through the Window
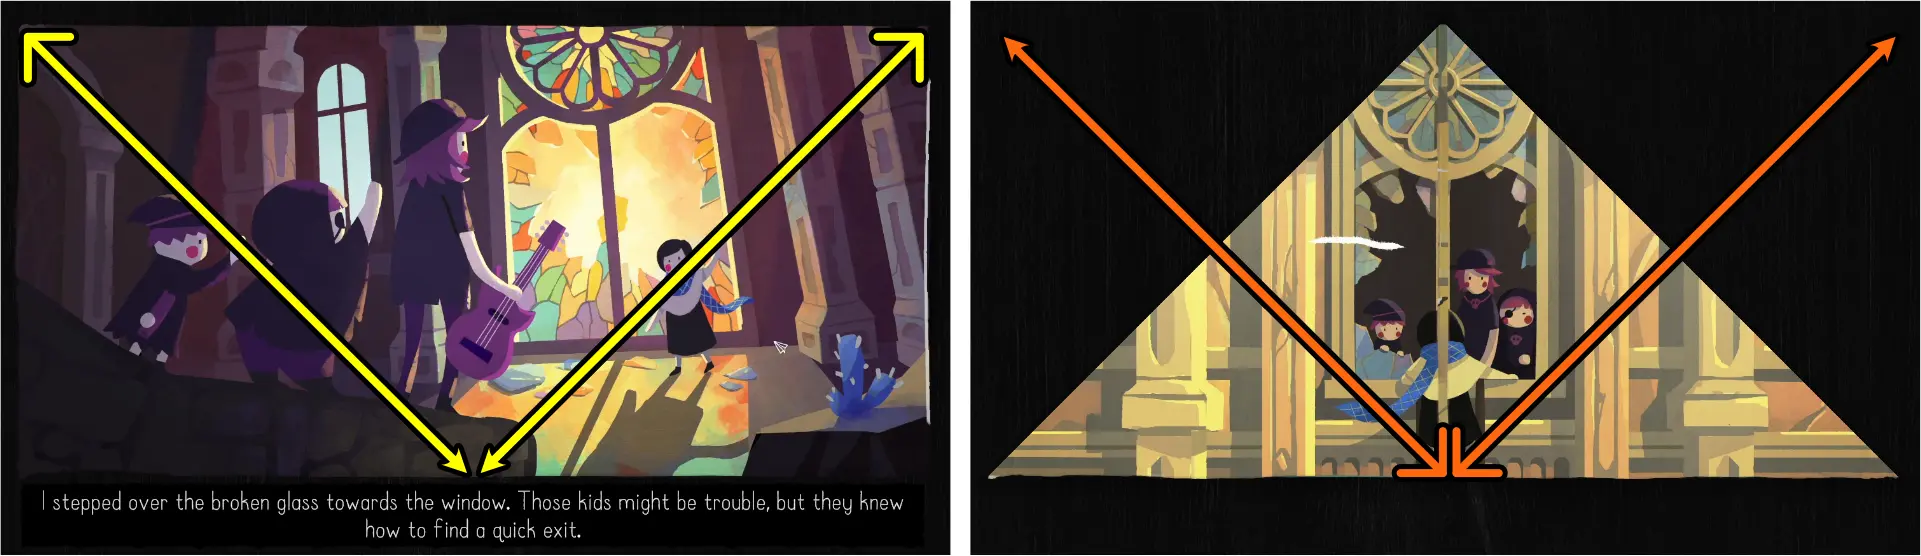
- Using the corners, fold diagonally towards the center.
- Unfold the image.

- Using the side edges, fold vertically towards the center, aligning to the sides of the door.
- Unfold the image.

- Using the top left and bottom right edges, fold diagonally towards the center.
- Unfold the image.
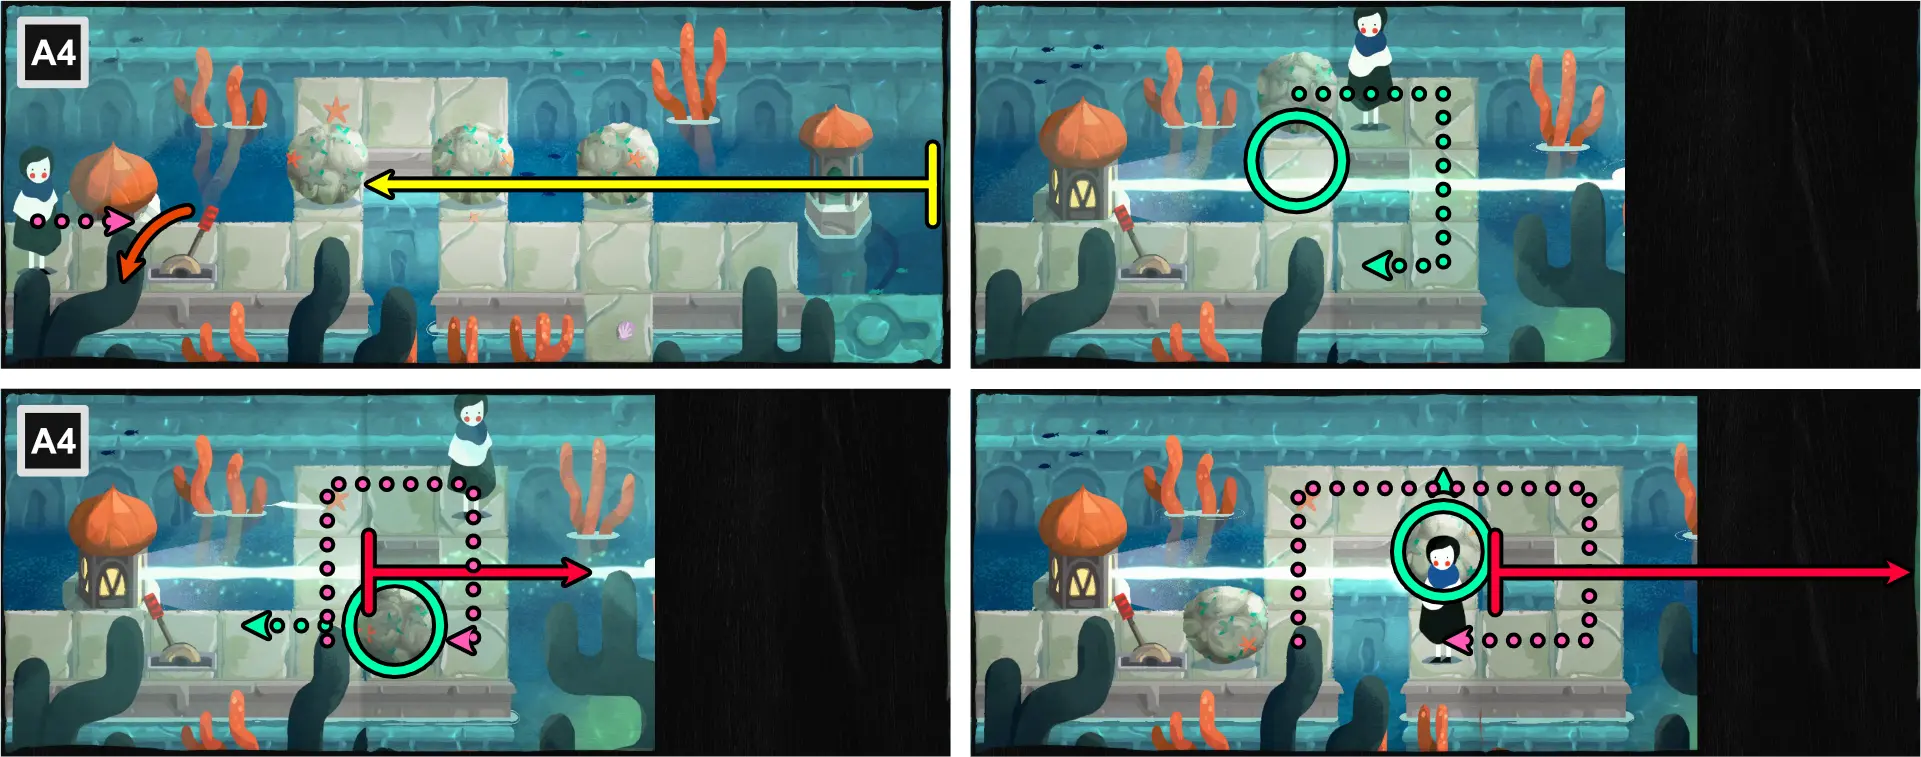
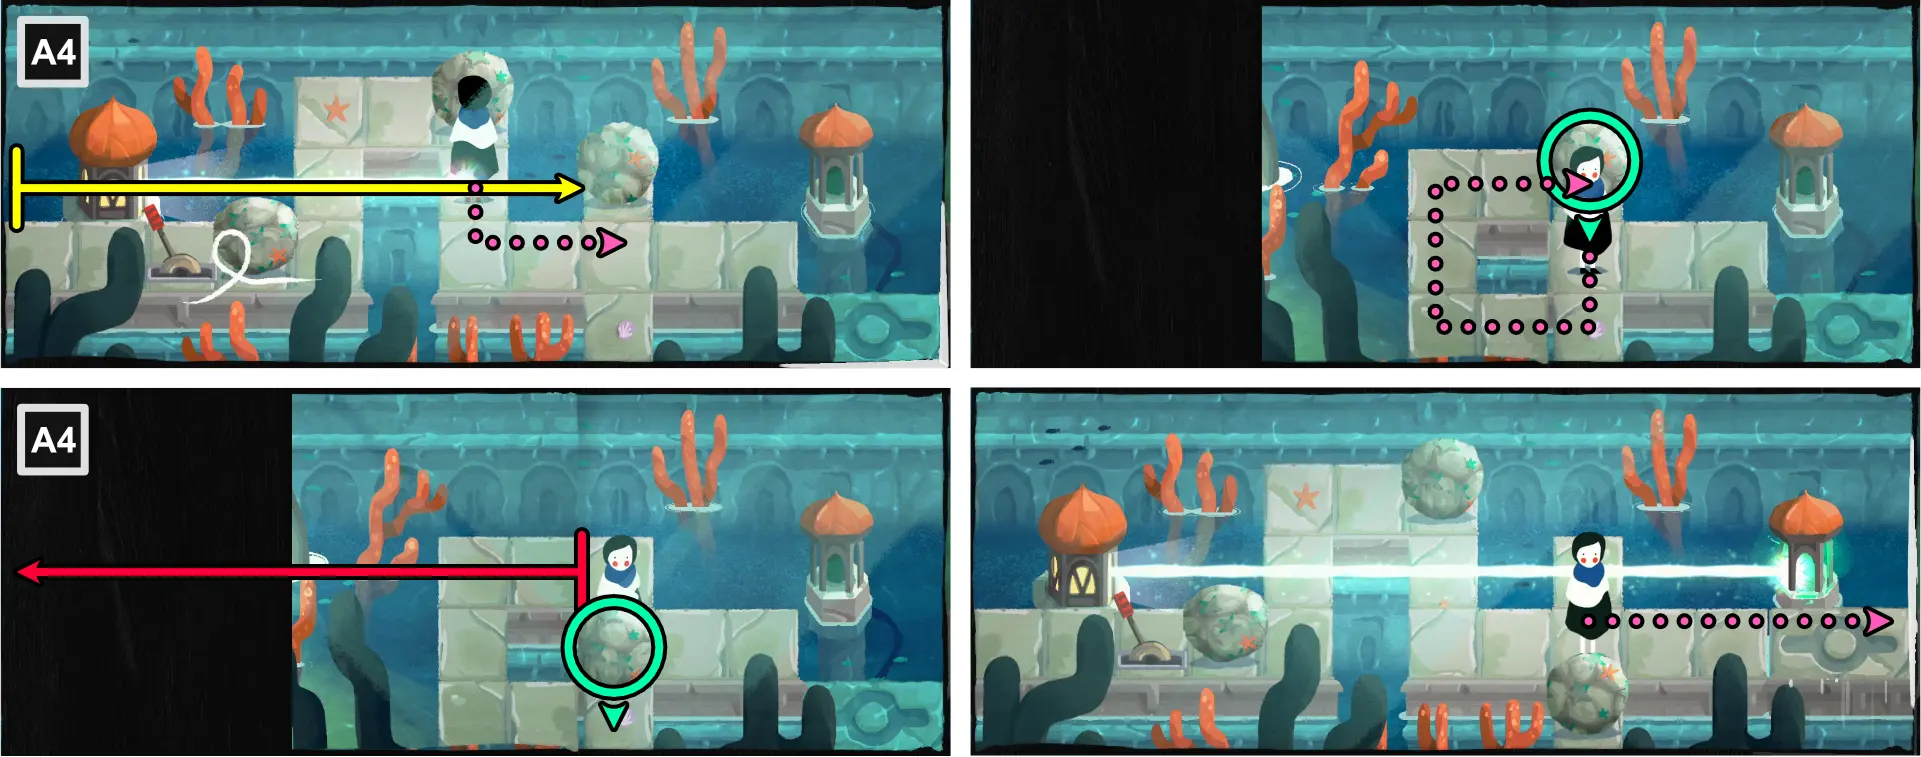
Chapter 8: Ocean
For this chapter, refer to the image below for the map of the scene and the legend of the symbols and lines that appear.
In this level, 2 new mechanics are introduced:
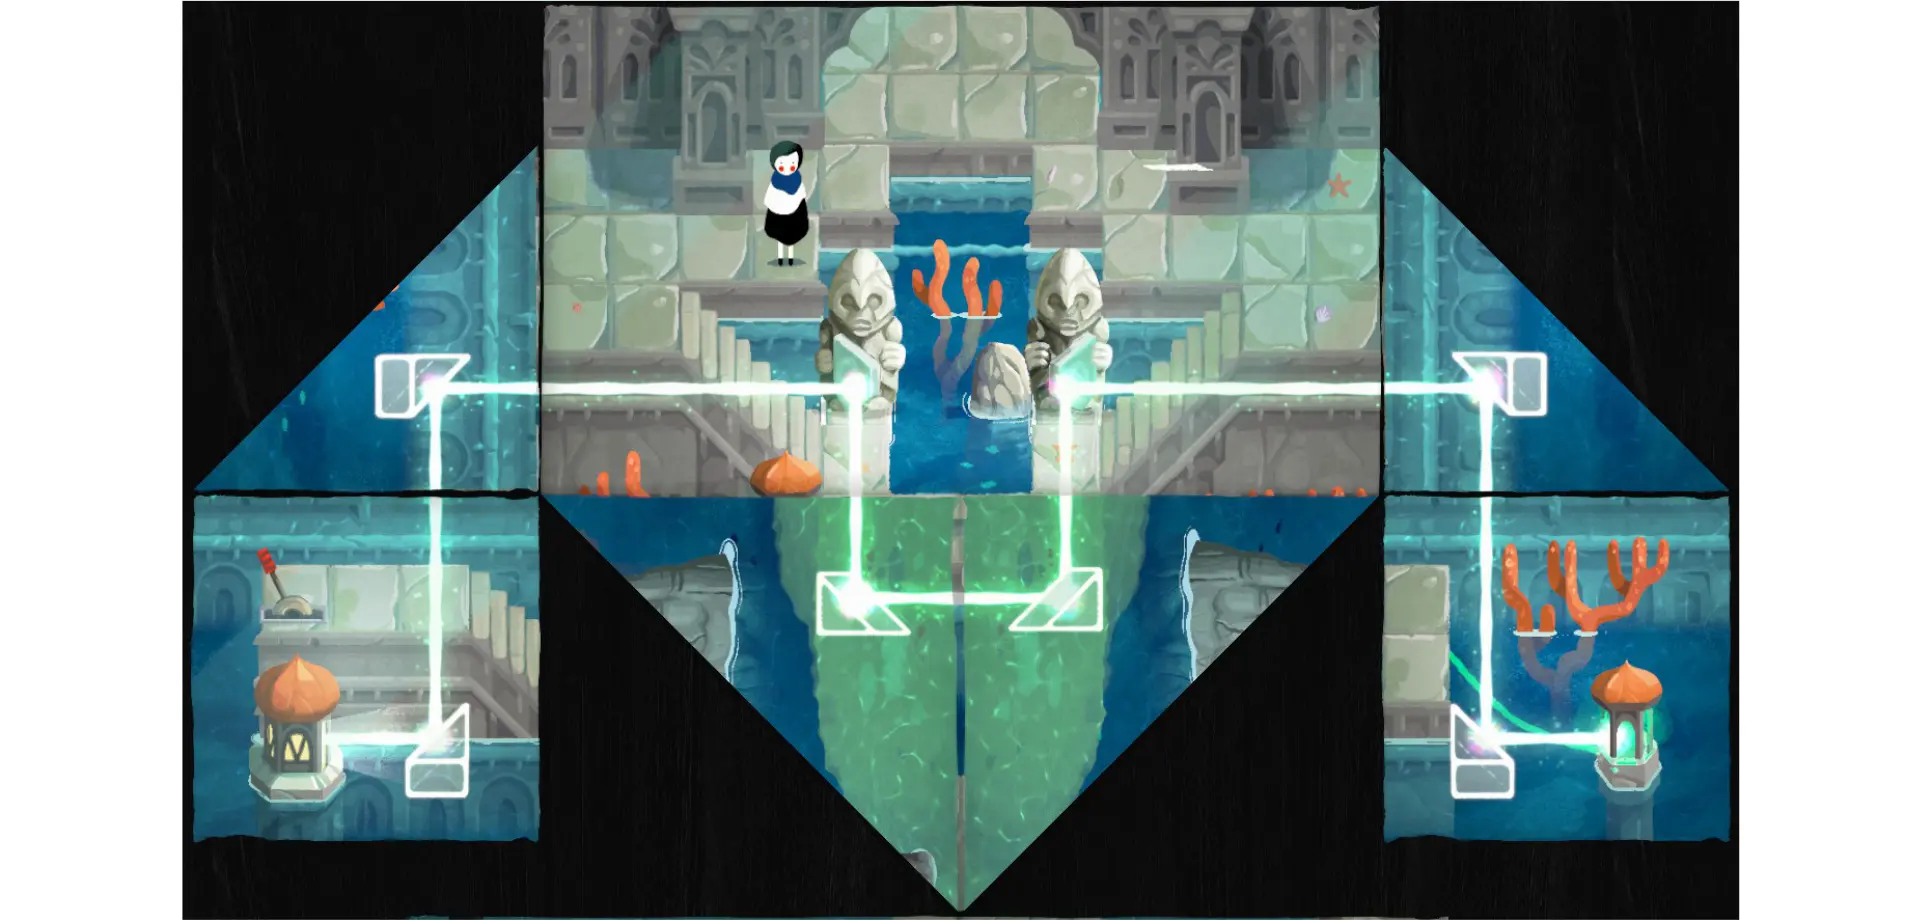
- Lighthouses, Lanterns, and Holographic Triangles – Lighthouses will release a beam of light after pulling a lever. This beam must be redirected using holographic triangles and statues with angled shields to reach the lanterns to unlock the path to the next map.
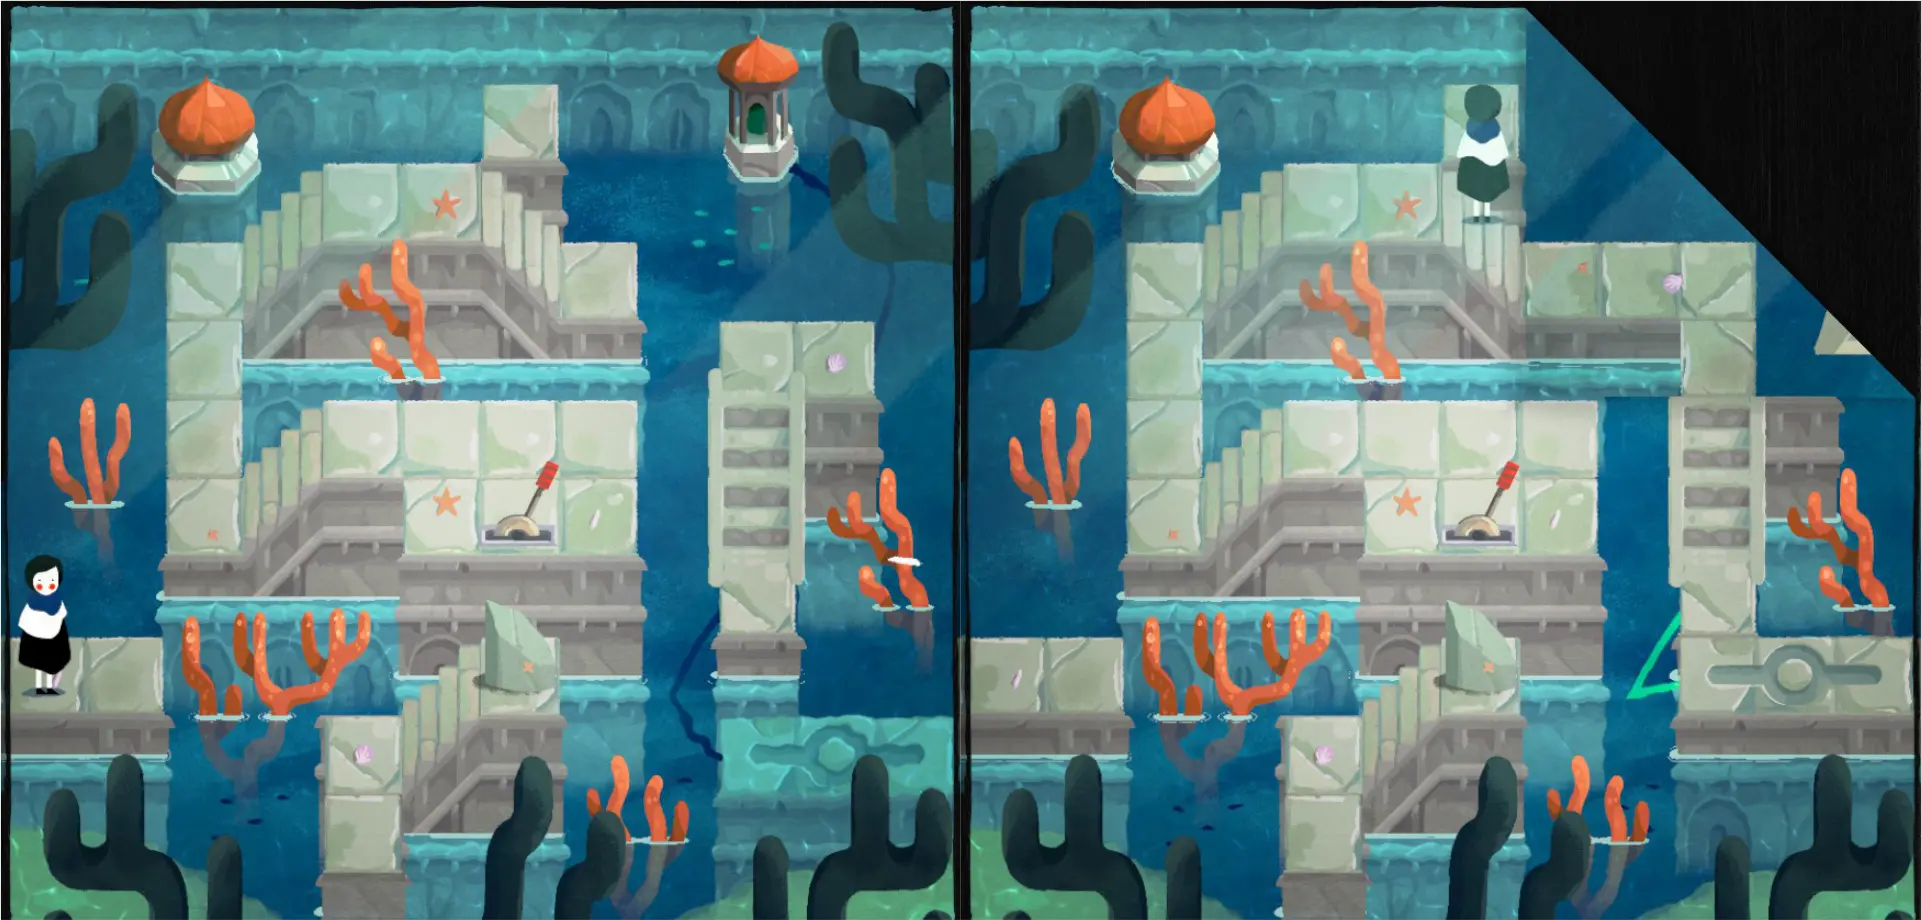
- Submerged Platforms – These platforms can only be uplifted once the light beam from the lighthouse reaches a certain lantern or all the lanterns on the map.
For extra achievements you can unlock for this chapter, go to the section “Achievements, Chapter 8: Ocean.”
The Stranded Man (A1-A8)
Upon disembarking, Paige will meet a man who has been stranded for years and needs your help.
- Move to the right to A1.
- Using the right edge, fold vertically, covering 1 tile of the lower platform.
- Follow the path until Paige enters the left fold.
- Using the left edge, fold vertically, meeting with the right fold.
- Follow the path until Paige enters the right fold.
- Unfold the left fold.
- Move to the right to A2.
- Move down the stairs and pull the lever.
- Move back up the stairs.
- Using the bottom edge, fold horizontally, meeting with the opposite edge.
- Move to the right to A3.
- Using the top right corner, fold diagonally, aligning with the platform Paige is on.
- Follow the path to move to the lower platform.
- Move the top right corner backward until it reaches the center.
- Using the bottom right and top left corners, fold diagonally, meeting at the center.
- Follow the path to bring Paige to the unfolded part of the map.
- Unfold the bottom right and top left corners.
- Move Paige up the stairs and pull the lever.
- Using the top right corner, fold diagonally to form a path.
- Follow the path to move to the right to A4.
- Pull the lever by the entrance.
- Using the right edge, fold vertically, aligning with the leftmost boulder.
- Move Paige below the boulder and then move the boulder up to the bottom of the right fold.
- Move Paige to the right of the boulder then push the boulder off the fold.
- Move the right edge to the right until it reveals the 2nd boulder.
- Move Paige below the 2nd boulder and push it 1 space upward.
- Unfold the map.
- Move Paige below the 3rd boulder.
- Using the left fold, fold vertically, just before the 3rd boulder.
- Move the 3rd boulder 1 space downward.
- Move Paige above the 3rd boulder.
- Move the 3rd boulder 1 more space downward.
- Unfold the map.
- Move to the right to A5.
- Using the right edge, fold vertically, aligning with the platform at the top.
- Follow the path to reach the lever and pull it.
- Unfold the map.
- Using the left edge, fold vertically, aligning with the platform at the top.
- Follow the path to get to the platform at the right.
- Unfold the map.
- Using the top edge, fold horizontally, allowing space for the lighthouse’s light beam to reach the lantern and raise the bridge.
- Move to the right to A6.
- Pull the lever by the entrance.
- Using the right edge, fold vertically, leaving just 1 space of the middle platform.
- Using the bottom left corner of the middle rectangle, fold diagonally, meeting with the middle fold.
- Using the top left corner of the middle rectangle, fold diagonally, meeting with the middle fold. The holographic triangles will bring the beam to the lantern.
- Unfold the map.
- Move all the way to the right end of the middle platform.
- Using the left edge, fold vertically, aligning with the top platform.
- Follow the path up to A7.
- Pull the lever by the entrance.
- Move Paige upward.
- Using the bottom right, bottom left, and top right corners, fold diagonally to redirect the beam towards the 1st lantern.
- Unfold the map.
- Move to the right and pull the 2nd lever.
- Using the top left corner, fold diagonally, aligning with the edge of the platform Paige is on.
- Using the bottom left corner, fold diagonally, meeting with the top fold to redirect the beam towards the 2nd lantern.
- Move to the right to A8.
- Pull the lever by the entrance.
- Move Paige to the right end of the platform.
- Using the right edge, fold vertically to meet with the one-dotted tile.
- Using the left edge, fold vertically, aligning with the submerged platform.
- Move the statue to the right of the lantern.
- Unfold the map.

- Using the bottom right corner, fold diagonally, just below the statue.
- Move the statue to the middle platform, placing Paige at the left of the statue.
- Unfold the map.
- Using the left edge, fold vertically to meet with the middle platform.
- Use the path to move to the bottom platform.
- Move the left edge 1 space to the left.
- Follow the path upward to go to B1.
The Circle (B1-B4)
- Using all corners, fold diagonally, aligning with the center platform.
- Unfold the top right fold.
- Follow the path to move to B2.
- Move the floating tile by the left platform where Paige is.
- Move Paige onto the floating tile.
- Move the floating tile to the right, by the middle platform.
- Move the lower left statue 2 spaces to the right.
- Using the bottom left corner, fold diagonally, aligning the stairs to the middle and upper left platforms.
- Use the path to get the key.
- Move Paige onto the floating tile and bring her to the lower right platform.
- Unlock the door and pull the lever.
- Unfold the map.
- Using the floating tile, move Paige back to the middle platform.
- Move the lower left statue 2 spaces to the left.
- Using the bottom right corner, fold diagonally, aligning with the upper right statue.
- Move the upper right statue to the upper right platform, aligning it with the beam of light.
- Unfold the sheet and let the beam reach the lantern to uplift the submerged platform.
- Move to the right to B3.
- Move the upper floating tile to the left and move Paige onto it.
- Using the bottom edge, fold horizontally, meeting with the platform at the top.
- Move the upper floating tile by the middle platform.
- Move Paige upward and pull the lever.
- Move Paige back onto the upper floating tile and bring her to the right platform.
- Move Paige to the right of the statue.
- Unfold the map.
- Push the statue onto the upper floating tile and bring it to the left side.
- Use the lower floating tile to bring Paige to the left side.
- Using the right edge, fold vertically, aligning with the right edge of the bottom platform.
- Move the upper floating tile onto the fold to make the statue redirect the beam to the lantern.
- Move the statue back to the left.
- Move the right edge to the left, just to the right of the statue.
- Use the lower floating tile to bring Paige to the bottom platform to collect the key.
- Move back to the left platform and unlock the door.
- Move the statue from the locked door onto the lower floating platform.
- Unfold the map.
- Using the bottom edge, fold horizontally, meeting with the bottom statue.
- Align the top and bottom statues to redirect the beam of light to the lantern.
- Unfold the map.
- Move the bottom floating tile to the right platform.
- Move the top floating tile to the left platform.
- Move the statue on the top floating tile 2 spaces to the left.
- Move Paige onto the top floating tile and use it to bring her to the right platform.
- Go upstairs to B4.
- Move Paige onto the floating tile and up to the upper platform.
- Move the upper horizontal floating tile to the left.
- Move the statue onto the floating tile to the right.
- Using both the bottom edges, fold horizontally, meeting the opposite edge.
- Enter the spiral door to the left to exit out of the one to the right.
- Move the floating tile to the right.
- Move the left fold 2 spaces downward.
- Move the statue 1 space to the right.
- Enter the right spiral door to exit out of the one to the left.
- Move Paige onto the lower floating horizontal tile.
- Unfold the map.
- Pull the lever then go back to the lower floating horizontal tile.
- Using the bottom right edge, fold horizontally, meeting the opposite edge.
- Using the bottom left edge, fold horizontally, 2 spaces away from the opposite edge.
- Enter the left spiral door to exit out of the one to the right.
- Move the statue onto the upper floating tile.
- Unfold the map.
- Move the statue to the right to redirect the beam to the lantern.
- Move Paige upward to C3.
Back to the Village (C1-C5)
- Using the top edge of C3, fold horizontally, meeting with the top edge of the platform where Paige is.
- Move Paige to the left bottom platform.
- Unfold C3.
- Move Paige to C2 and pull the lever.
- Go back to C3.
- Using the bottom left corner of C2, fold diagonally, meeting with the opposite corner.
- Move Paige from C3, to C2, then C1.
- Unfold C2.
- Using the top right corner of C3, fold diagonally, meeting with the left edge.
- Move Paige to the upper platform of C1 using C3 as a bridge.
- Unfold C3.
- Move the statue in C1 to C2, and onto the vertical floating tile.
- Using the top left corner of C1, fold diagonally, meeting with the opposite corner.
- Using the top right corner of C3, fold diagonally, aligning with the left floating tile.
- Using the bottom left corner of C3, fold diagonally, hiding the stranded man and redirecting the beam of light to the lantern.
- Unfold C3.
- Move Paige to C4.
- Move the statue to C3.
- Move the statue onto the floating tile at the right.
- Move both floating tiles to the bottom.
- Using the top right corner of C4, fold diagonally, meeting with the opposite corner.
- Using the bottom corners of C3, fold diagonally, meeting at the center to redirect the beam of light to the lantern.
- Move upward to the end of the stage.
Cutscene: Reuniting a Couple
- Using the side edges, fold vertically towards the center.
- Unfold the image.
- Using the top edge and bottom corners, fold towards the center.
- Unfold the image.
- Using the bottom left and top right corners, fold diagonally, meeting the top and bottom edges.
- Unfold the image.
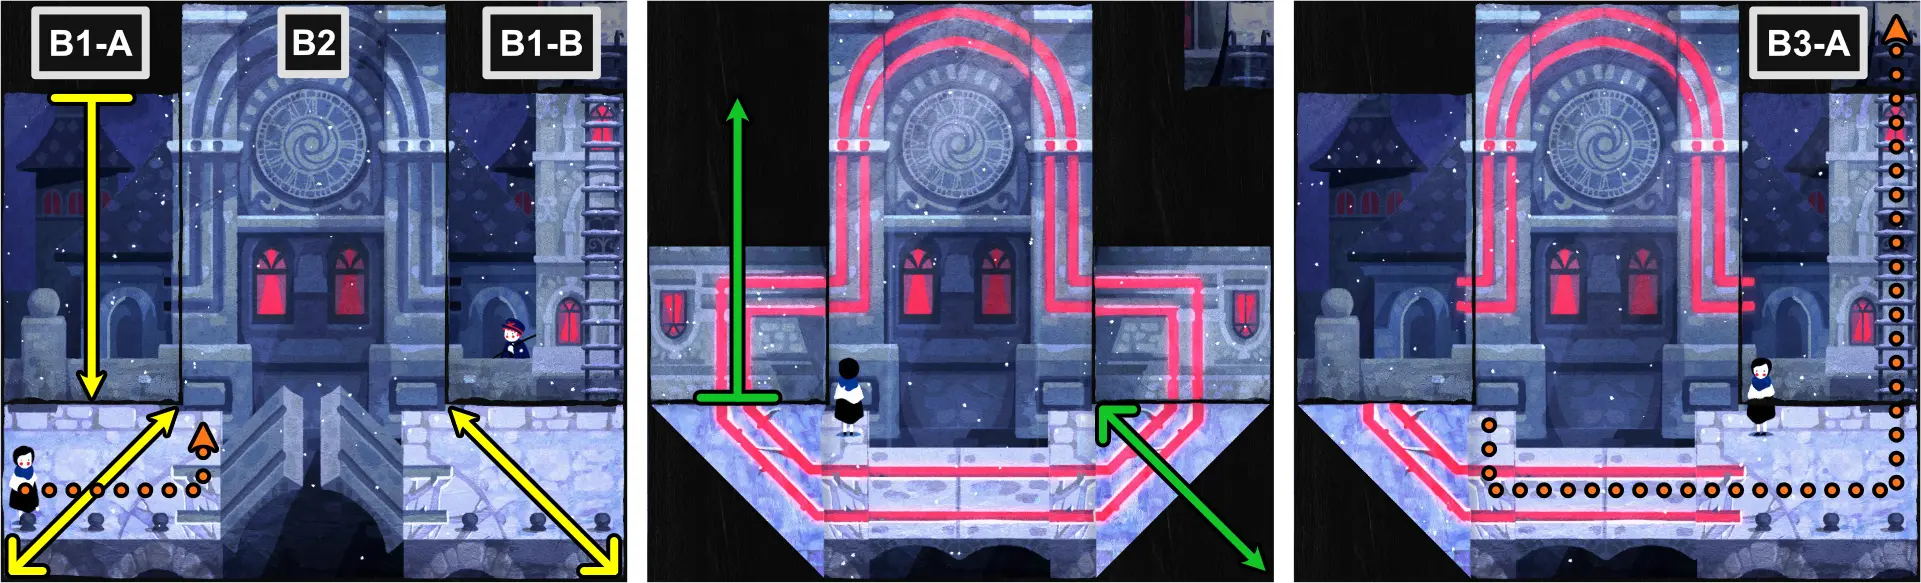
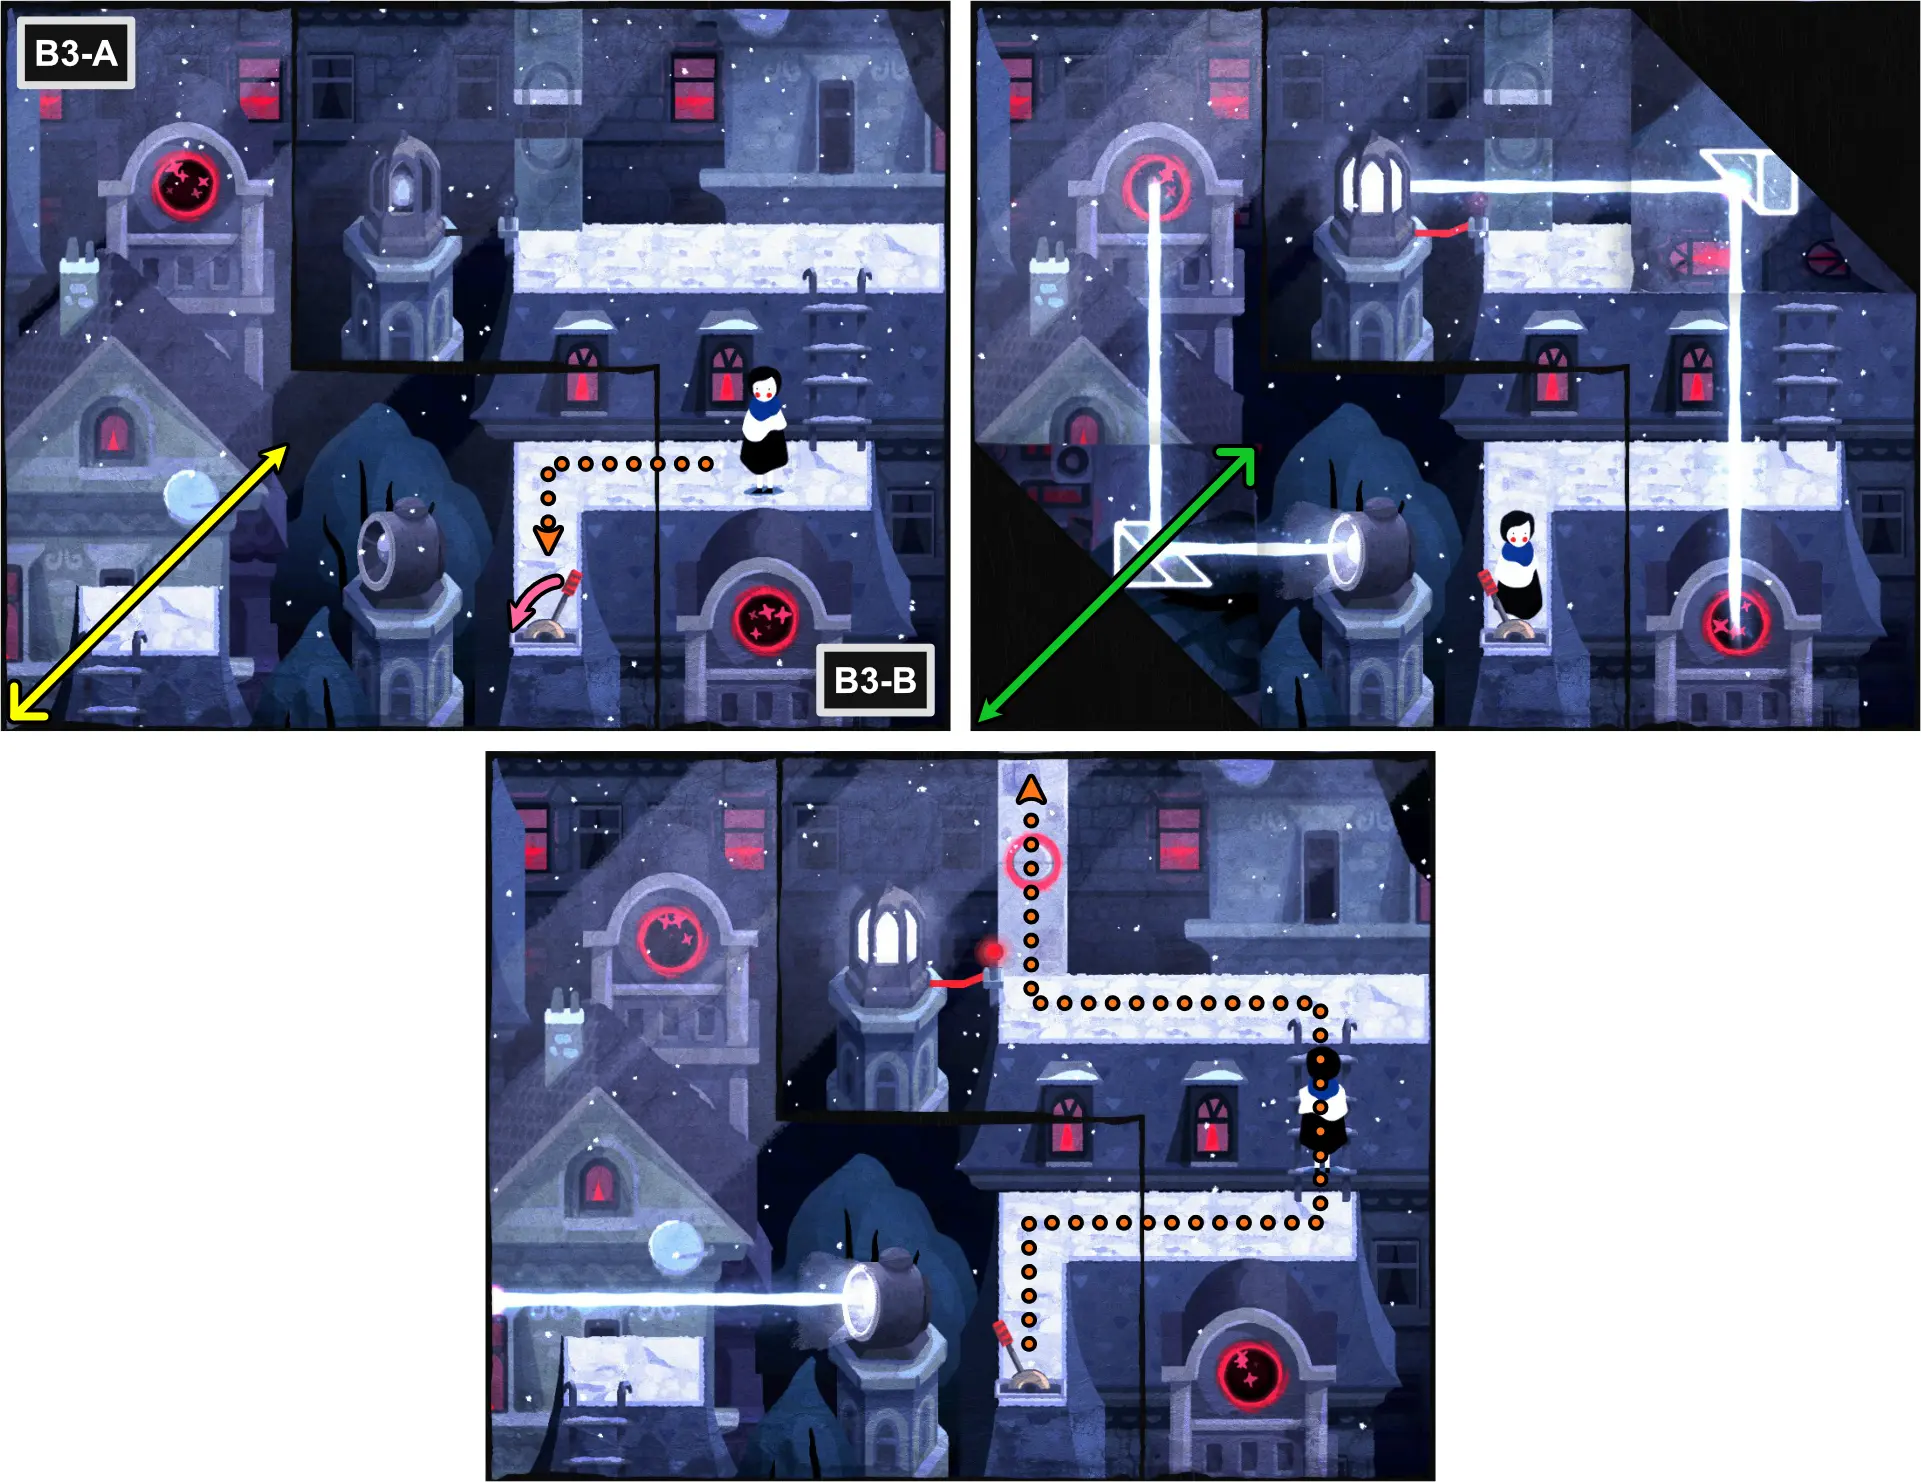
Chapter 9: City
For this chapter, refer to the image below for the map of the scene and the legend of the symbols and lines that appear.
In this level, lighthouses are replaced with spotlights and lanterns are replaced with light towers. 3 new mechanics are also introduced:
- Mirrored Maps – Most maps in this chapter are connected to one or more maps. Any changes to one map can affect the other map. Note that there will still be some maps in the group that stand alone which are often located in the middle.
- Portals – These can absorb light beams and release it to another portal of the same color. It is possible for light beams to travel through more than one portal.
- Split Bridges – These work like the trap doors in Chapter 4 and can only be connected after a light tower or all light towers have been activated with the light beam from the spotlight.
For extra achievements you can unlock for this chapter, go to the section “Achievements, Chapter 9: City.”
The Thief (A1-A5)
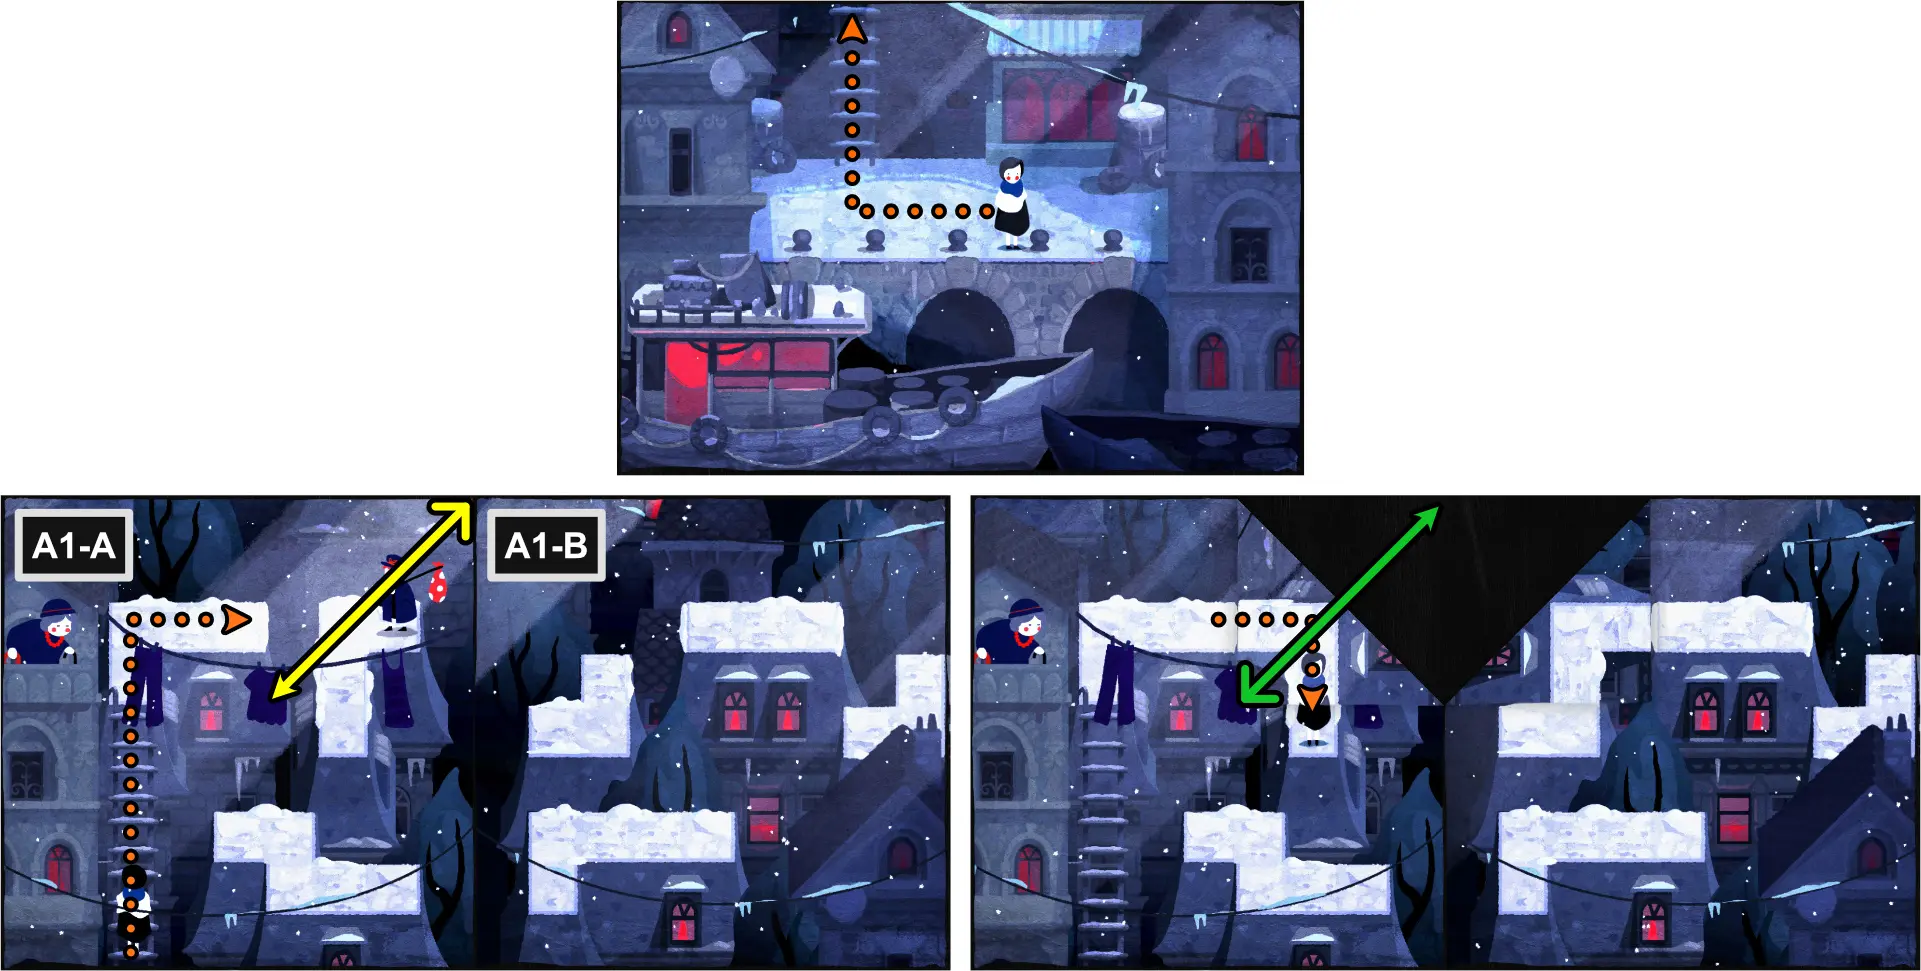
- At the start, move Paige up the ladder to A1-A.
Paige will find an old woman and a boy fighting over the woman’s briefs.
For this section, all map fold directions will apply to A1-A.
- Move Paige up the ladder and to the right end of the platform.
- Using the top right corner, fold diagonally, aligning with the platform Paige is on.
- Move Paige along the path to the bottom end.
- Unfold the map.
The thief has moved to A1-B.
- Using the bottom right corner, fold diagonally, aligned with the platform.
- Move Paige to the bottom left end.
- Unfold the map.
- Using the top edge, fold horizontally, aligned with the platform at the bottom.
- Move Paige to A1-B.
The thief has moved again.
- Move Paige to the right end of the platform.
- Using the top right and bottom right corners, fold diagonally, leaving 1 space at the middle.
- Move Paige to the upper right platform.
- Unfold the map.
- Using the bottom edge, fold horizontally, aligning with the upper right platform.
- Move to the right to A2-A.
For this section, all map fold directions will apply to A2-A.
- Using the bottom right corner, fold diagonally, meeting the opposite corner.
- Move Paige to the top platform.
- Unfold the map.
- Using the left edge, fold vertically, connecting the one-dotted tiles together.
- Move Paige to the bottom platform at A2-B.
- Unfold the map.
- Using the bottom right and bottom left corners, fold diagonally towards the center.
- Follow the path to go to A3-A.
For this section, all map fold directions will apply to A3-A.
- Using the bottom edge, fold horizontally, aligning with the platform Paige is on.
- Follow the path to move to the lower right end of the platform.
- Unfold the map.
- Move Paige to the lower end of the platform.
- Using the top left and top right corners, fold diagonally towards the center.
- Move Paige to the bottom right fold of A3-C.
- Unfold the upper right fold.
- Move Paige to the bottom left part of A3-C.
- Unfold the map.
- Using the bottom edge, fold horizontally, meeting the opposite end.
- Move Paige to the right, all the way to A3-D.
- Unfold the map.
- Using the top left corner, fold diagonally towards the center.
- Move Paige up the ladder and onto the upper right platform.
- Using the top right corner, fold diagonally towards the center.
- Move Paige to the left and down the ladder.
- Unfold the top right fold.
- Using the bottom right corner, fold diagonally towards the center.
- Move Paige down to A4-A.
For this section, all map fold directions will apply to A4-A.
- Using the bottom right corner, fold diagonally, connecting the one-dotted tiles together.
- Move Paige down the path.
- Unfold the map.
- Move Paige further down the path to A4-B.
- Using the left edge, fold vertically, aligning with the right platform.
- Enter the bottom spiral door to exit out of the one at the top to to A4-A.
- Move Paige to the top end of the platform.
- Unfold the map.
- Move Paige above the two-dotted tile.
- Using the right edge, fold vertically, connecting the one-dotted and two-dotted tiles together.
- Move Paige downward to A4-B.
- Unfold the map.
- Using the bottom edge, fold horizontally to connect the two dotted tiles together in A4-B.
- Move Paige to the right to A5-A.
For this section, all map fold directions will apply to A5-A.
- Using the top edge, fold horizontally, just above the platform where Paige is.
- Enter the spiral door to exit out of the one in A5-C.
- Unfold the map.
- Move Paige to the stairs in A5-B
- Using the bottom edge, fold horizontally, covering the middle platform.
- Enter the triangle door to exit out of the one in A5-D.
- Unfold the map.
- Move Paige up the stairs and up the ladder to the top platform.
- Using the top edge, fold horizontally, until the maps create a path from the top platform to the curved X door.
- Enter the curved X door in A5-B to exit out of the one in A5-E.
- Move to the right to go to B2.
Crossing the Bridge (B1-B11)
For this section, map fold directions will only apply to B1-A and B2.
- Move Paige by the middle section of B2, next to the bridge.
- Using the top edge of B1-A, fold horizontally, meeting with the opposite edge.
- Using the bottom corners of B2, fold diagonally, meeting with the edge of B1-A and B1-B.
- Once the carvings are connected, unfold B1-A and the bottom right corner of B2.
- Move Paige up the ladder to B3-A.
For this section, map fold directions will only apply to B3-A.
- Using the right edge, fold vertically, connecting the platforms together.
- Enter the triangle door to exit out of the one at the upper left of B3-B then move to the lower platform.
- Unfold the map.
- Move Paige down to B3-A and pull the lever.
- Using the bottom left corner of B3-A, fold diagonally to redirect the light beam to the red portal and to the light tower.
- Unfold the map.
- Move upward to B5.
For this section, map fold directions will only apply to B4-A and B5.
- Using the top edge of B5, fold horizontally, meeting with the platform Paige is on.
- Using the top edge of B4-A, fold horizontally until it covers the lever.
- Move Paige to B4-A.
- Unfold B4-A and B5.
- Pull the lever then keep Paige at the right side of the platform.
- Using the bottom left corner of B4-A, fold diagonally to redirect the light beam to the red portal and then to the light tower.
- Unfold the B4-A.
- Using the top edge of B4-A, fold horizontally, just above the lever.
- Move Paige to B4-B.
- Unfold B4-A.
- Move the statue upward.
- Using the bottom right corner of B4-A, fold diagonally to redirect the light beam to the blue portal and then to the light tower.
- Move Paige upward to B6-B.
For this section, map fold directions will only apply to B6-A.
- Using the left edge, fold vertically, just to the left of the light tower.
- Move Paige upward and pull the lever.
- Unfold the map.
- Using the right edge, fold vertically to redirect the light beam to the red portal and then to the light tower.
- Move Paige downward to B6-B.
- Move the right fold to the left, just to the right of the split bridge.
- Move Paige up the ladder, by the split bridge in B6-A.
- Unfold the map.
- Move Paige down to B6-B and pull the lever.
- Using the left edge, fold vertically, just to the left of the split bridge.
- Using the right edge, fold vertically, just to the right of the lever, to redirect the light beam to the red portal and then to the light tower to activate the bridge.
- Move Paige upward to B7-A.
For this section, map fold directions will only apply to B7-A and B8-A.
- Using the right edge of B8-A, fold vertically, meeting the opposite edge.
- Move Paige to the top platform and pull the lever.
- Move Paige down to the middle platform.
- Unfold B8-A.
- Move Paige to B8-A.
- Using the bottom left corner of B7-A, fold diagonally, meeting with the right edge to redirect the light beam to the red portal, and then to the light tower.
- Move Paige to the right end of B8-A.

- Using the top edge of B8-A, fold horizontally, just above the top platform.
- Using the right edge of B7-A, fold vertically, meeting the left edge and redirecting the light beam to the yellow portal, and then to the light tower.
- Unfold all maps.
- Move Paige to B7-A.
- Using the bottom edge of B8-A, fold horizontally, just below the top platform.
- Using the top left corner of B8-A, fold diagonally, meeting the right edge to redirect the light beam to the blue portal, and then to the light tower.
- Unfold B8-A.

- Move Paige to B8-A.
- Using the right edge of B7-A, fold vertically, meeting the opposite edge.
- Move Paige to the top platform of B8-A.
- Unfold B7-A.
- Move Paige to B7-B.
- Using the right edge of B8-A, fold vertically, meeting the opposite edge.
- Move Paige to the middle platform of B7-B.
- Unfold B8-A.
- Move Paige to B8-B and then to B9-A.
For this section, map fold directions will only apply to B9-A and B10.
- Pull the lever by the entrance.
- Using the top right edge of B9-A, fold diagonally, just to the right of the spotlight, redirecting the light beam to the red portal, and then to the light tower.
- Unfold B9-A.
- Using the bottom right corner of B9-A, fold diagonally, just to the right of the lever.
- Move Paige up the ladder and onto the top platform.
- Unfold B9-A.
- Using the right edge of B9-A, fold vertically to redirect the light beam to the green portal, and then to the light tower.
- Unfold B9-A.
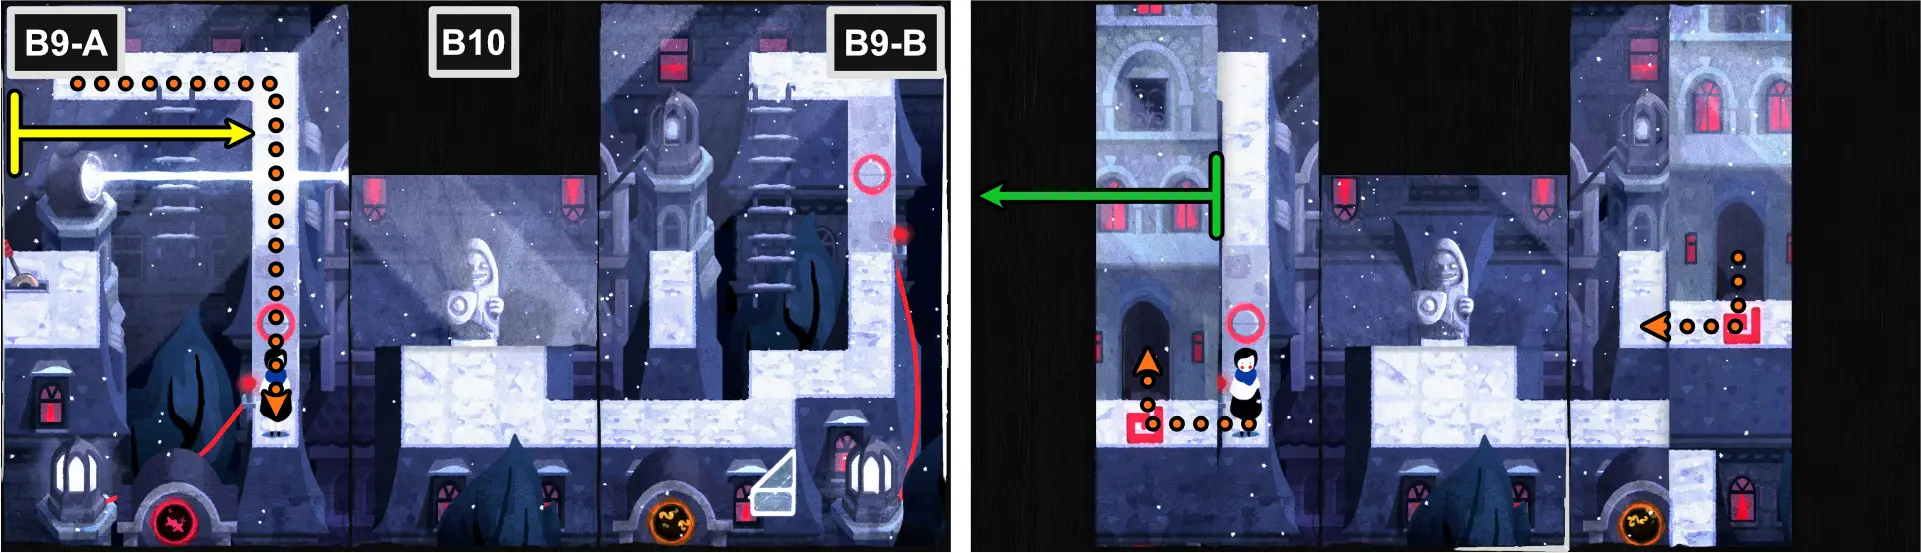
- Move Paige to the bottom end of B9-A.
- Using the left edge of B9-A, fold vertically, just to the left of the vertical path.
- Enter the square spiral door to exit out of the one in B9-B.
- Unfold B9-A.
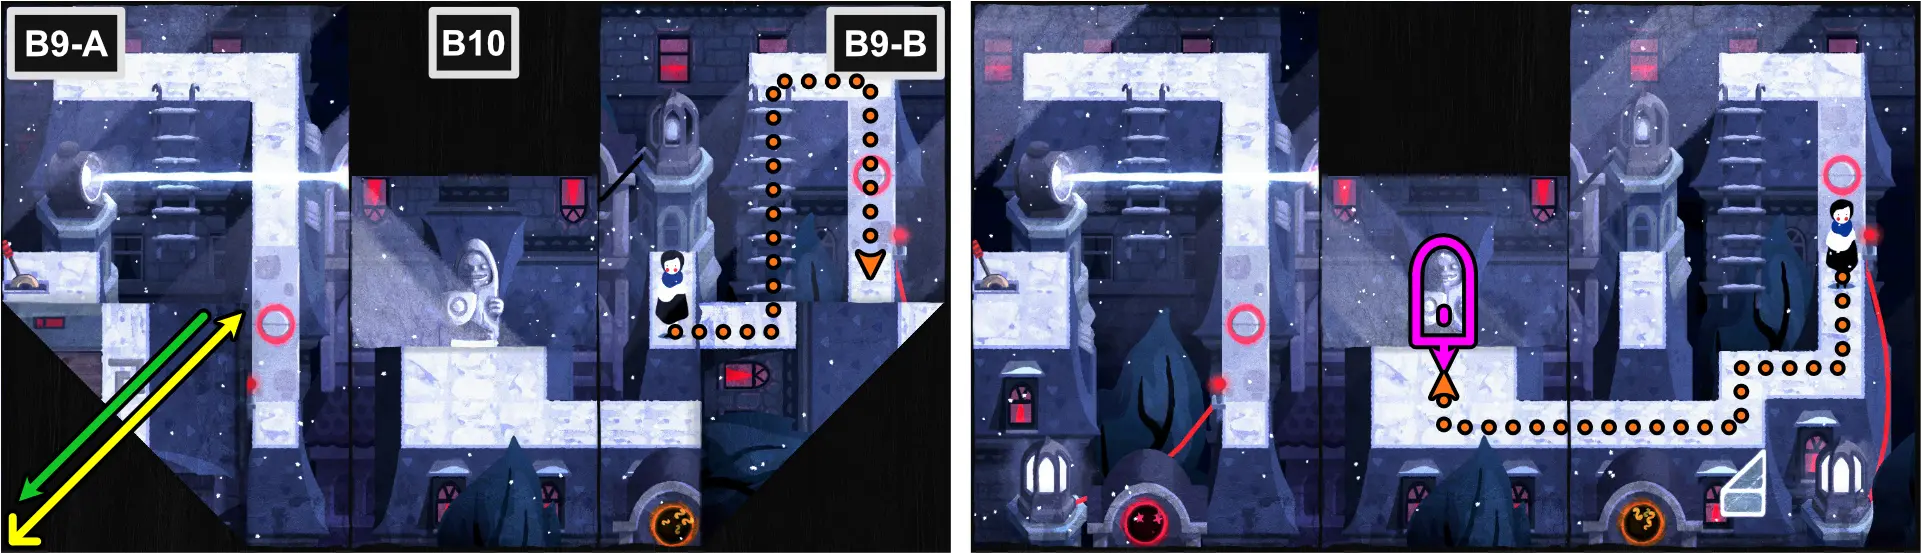
- Using the bottom left corner, fold diagonally, just to the left of the split bridge.
- Follow the path and cross the split bridge in B9-B.
- Unfold B9-A.
- Move Paige to B10 and move the statue 1 space downwards.
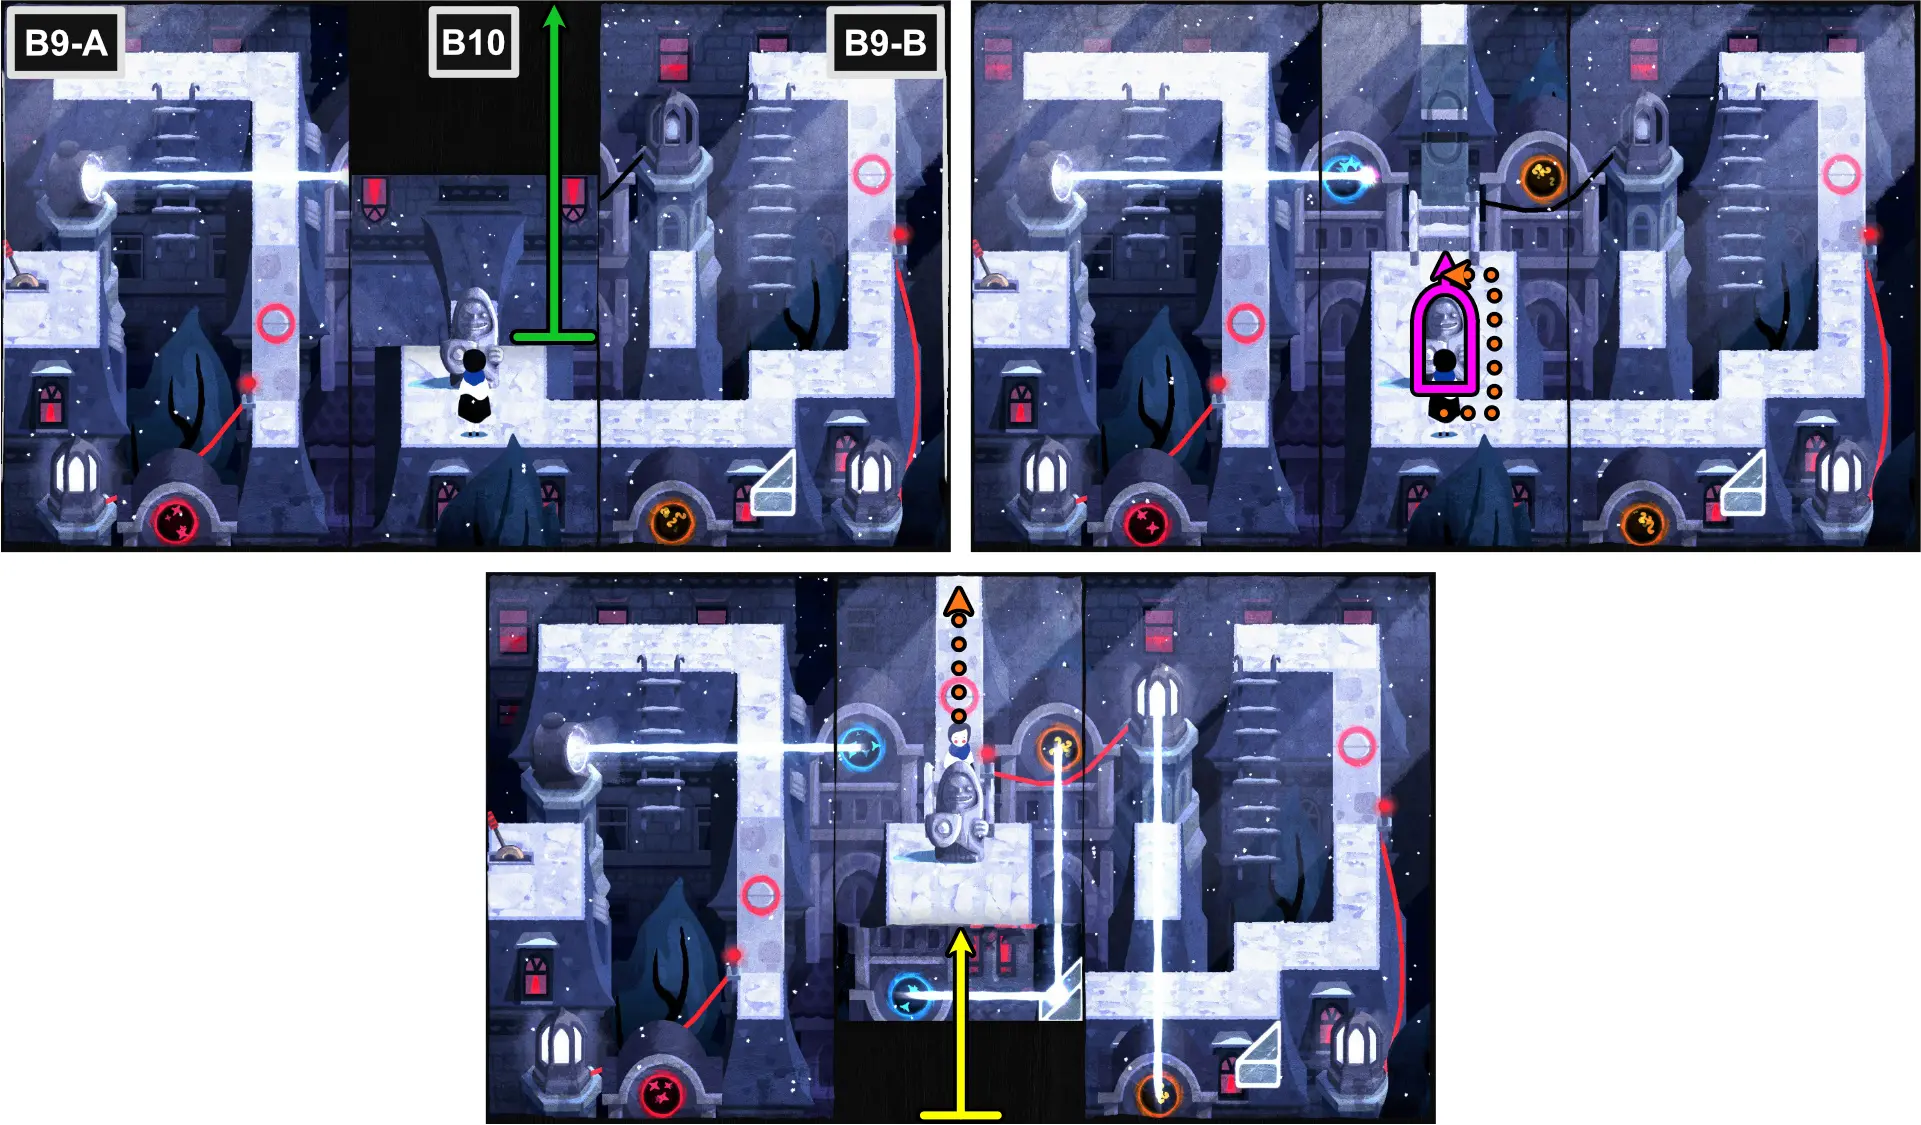
- Unfold B10.
- Move Paige above the statue and move it upwards, by the bottom of the stairs.
- Using the bottom edge of B10, fold horizontally, redirecting the light beam to the blue portal, to the orange portal, then to the light tower.
- Move Paige upward to B11-B.
For this section, map fold directions will only apply to B11-A.

- Pull the lever at the left side of the platform.
- Using the left edge, fold vertically, meeting with the platform at the right.
- Enter the spiral door to leave out of the one in B11-A.
- Unfold the map.
- Move Paige to the platform below in B11-B.
- Using the right edge, fold vertically to redirect the light beam to the red portal and then to the light tower, activating the bridge.
- Move Paige upward to C3.
To the University (C1-C3)
For this section, map fold directions will only apply to C1-A, C2-A, and C3.
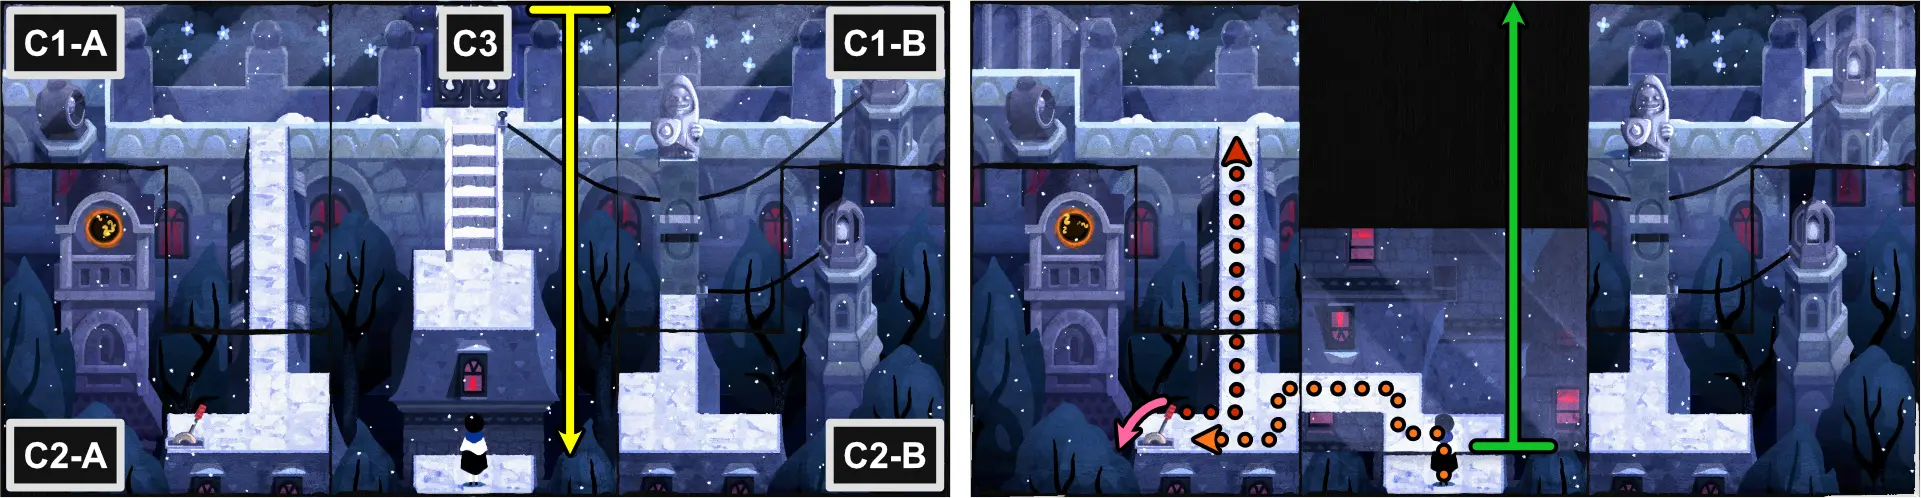
- Using the top edge of C3, fold horizontally, just above the platform Paige is on.
- Move Paige to C2-A and pull the lever.
- Move upward to C1-A.
- Unfold C3.
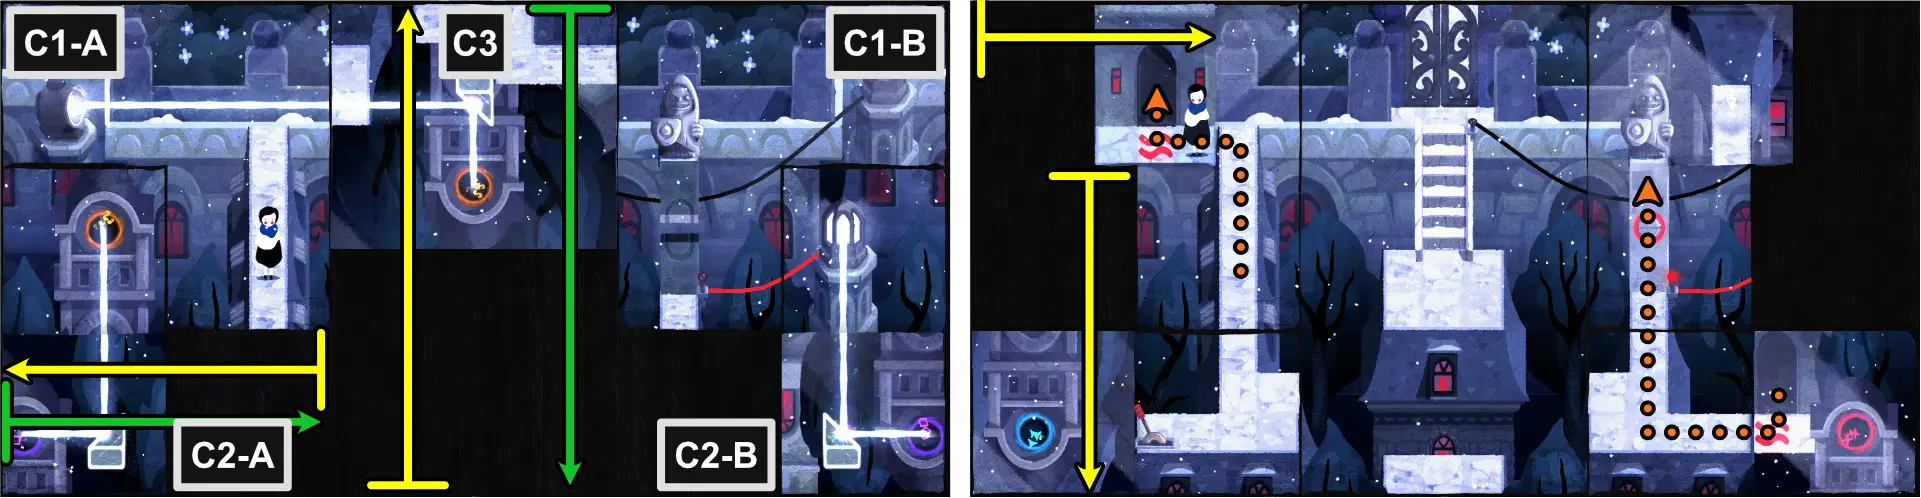
- Using the right edge of C2-A, fold vertically, meeting the opposite edge.
- Using the bottom edge of C3, fold horizontally, meeting the opposite edge, redirecting the light beam to the yellow portal, to the purple portal, and to the light tower.
- Unfold C3 and C2-A.
- Using the right edge of C1-A, fold vertically, aligning with the strip of platform Paige is in.
- Using the top edge of C2-A, fold horizontally, meeting the opposite edge.
- Enter the wave door to exit out of the one in C2-B.
- Move Paige upward, in front of the statue in C1-B.
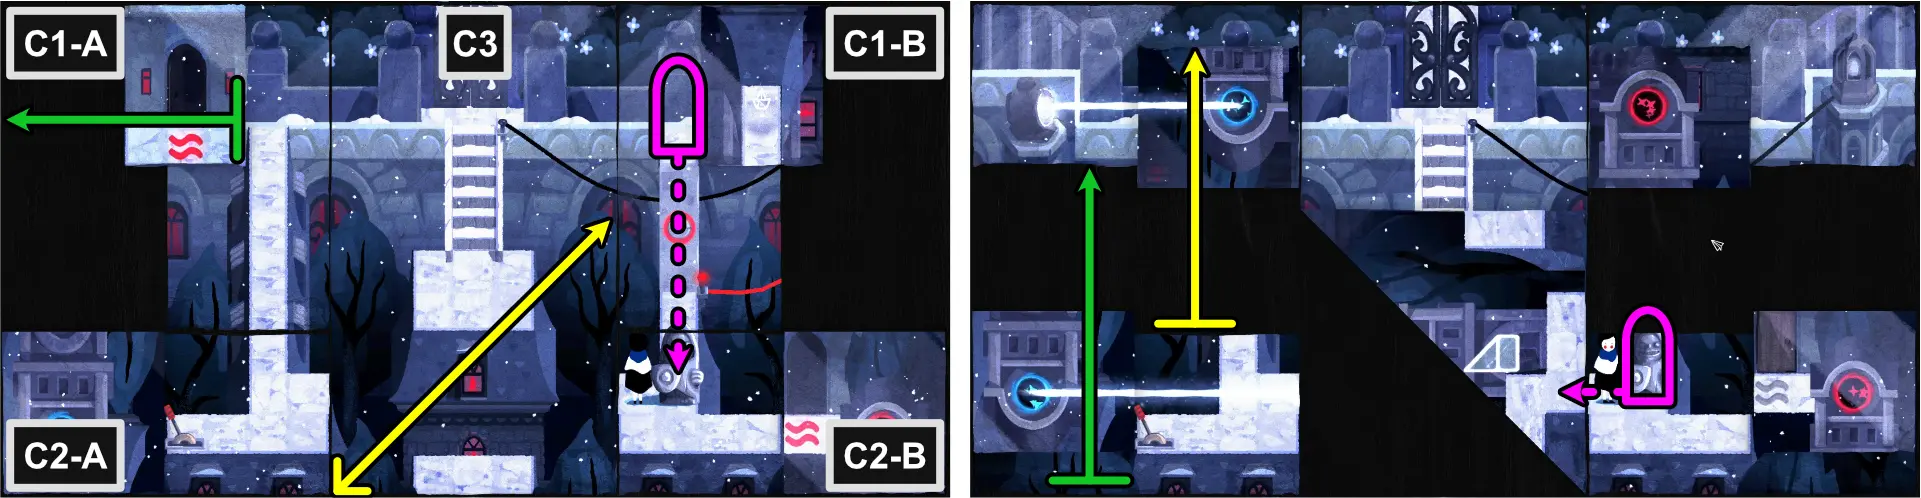
- Move the statue down to C2-B.
- Using the bottom left corner of C3, fold diagonally, meeting with the right edge.
- Unfold C1-A.
- Using the bottom edge of C1-A, fold horizontally, leaving 1 space from the edge.
- Unfold C2-A.
- Move the Statue onto the fold of C3.
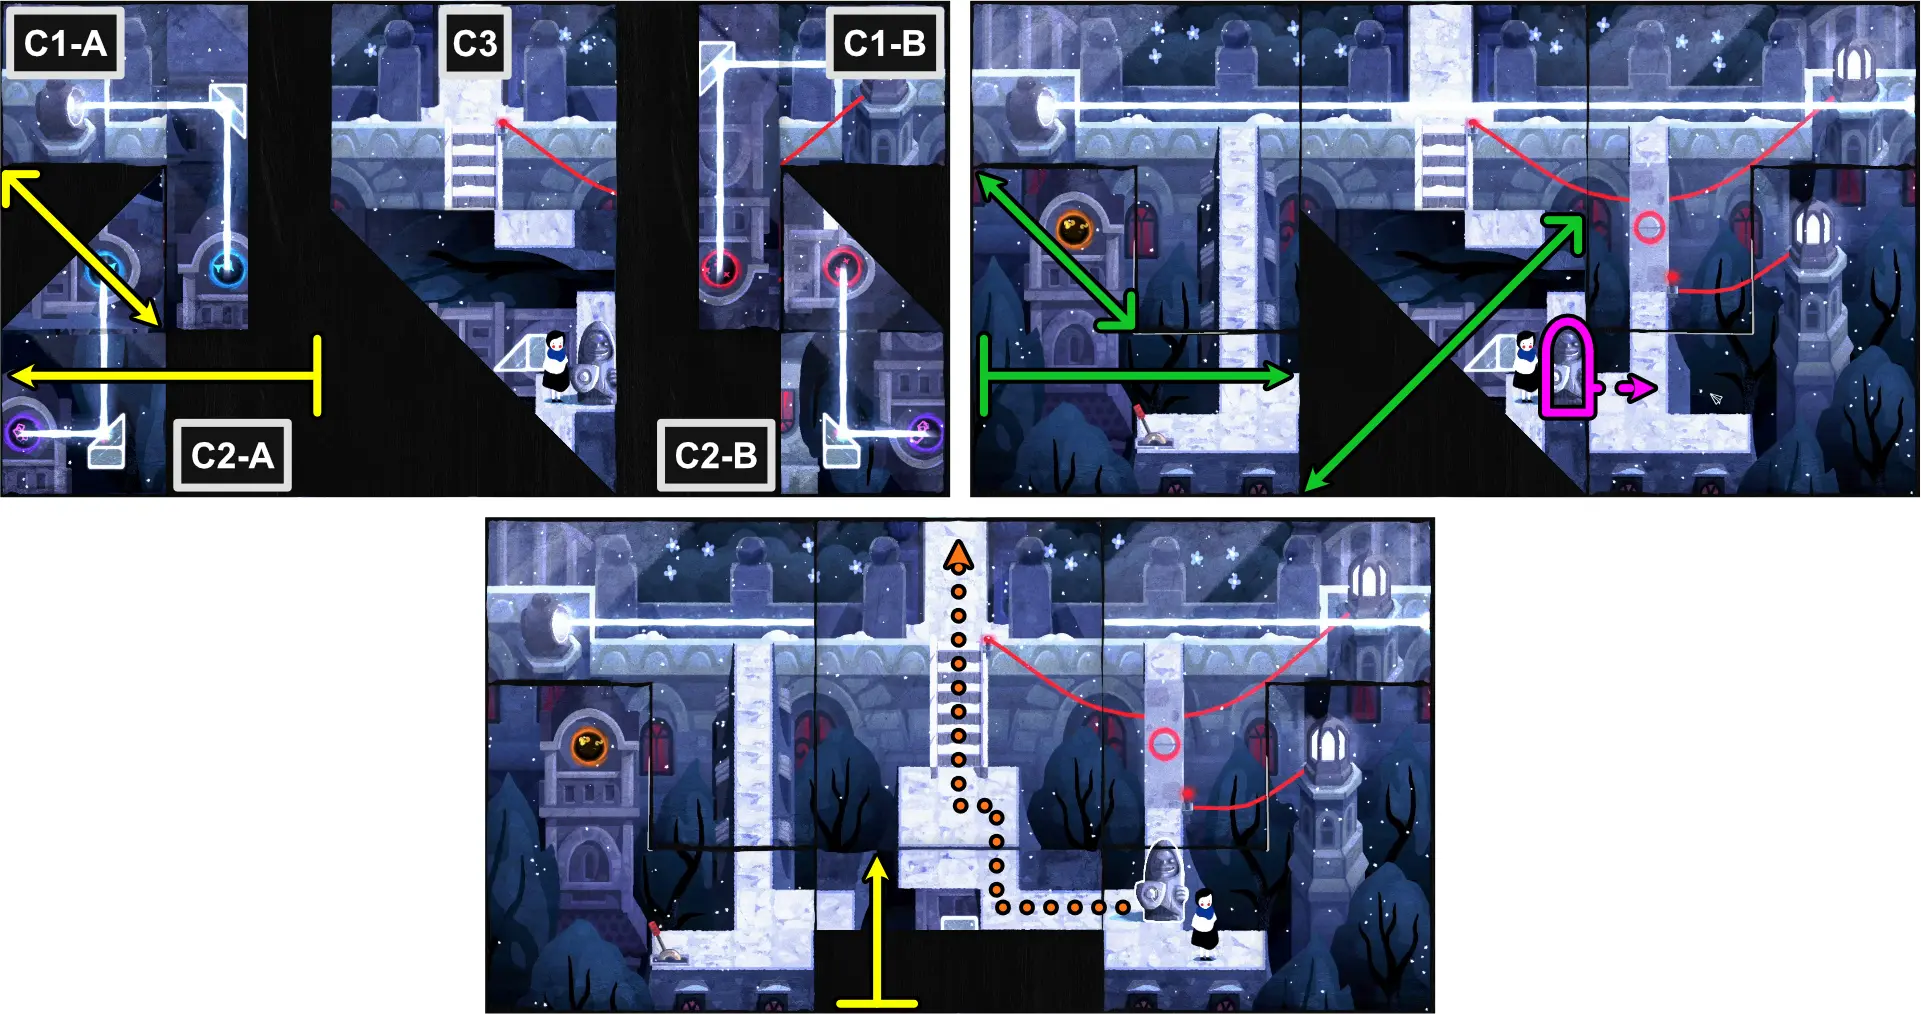
- Using the right edge of C2-A, fold vertically, meeting with the opposite edge.
- Using the top left corner of C2-A, fold diagonally, meeting the bottom fold and redirecting the light beam to the blue portal, to the purple portal, to the red portal, and to the light tower.
- Move the statue 2 spaces to the right, onto C2-B.
- Unfold all maps.
- Using the bottom edge of C3, fold horizontally, creating a path from C2-B to C3.
- Move Paige upward to the end of the level.
Cutscene: Studying in University
- Using all corners, fold diagonally towards the center.
- Unfold the image.
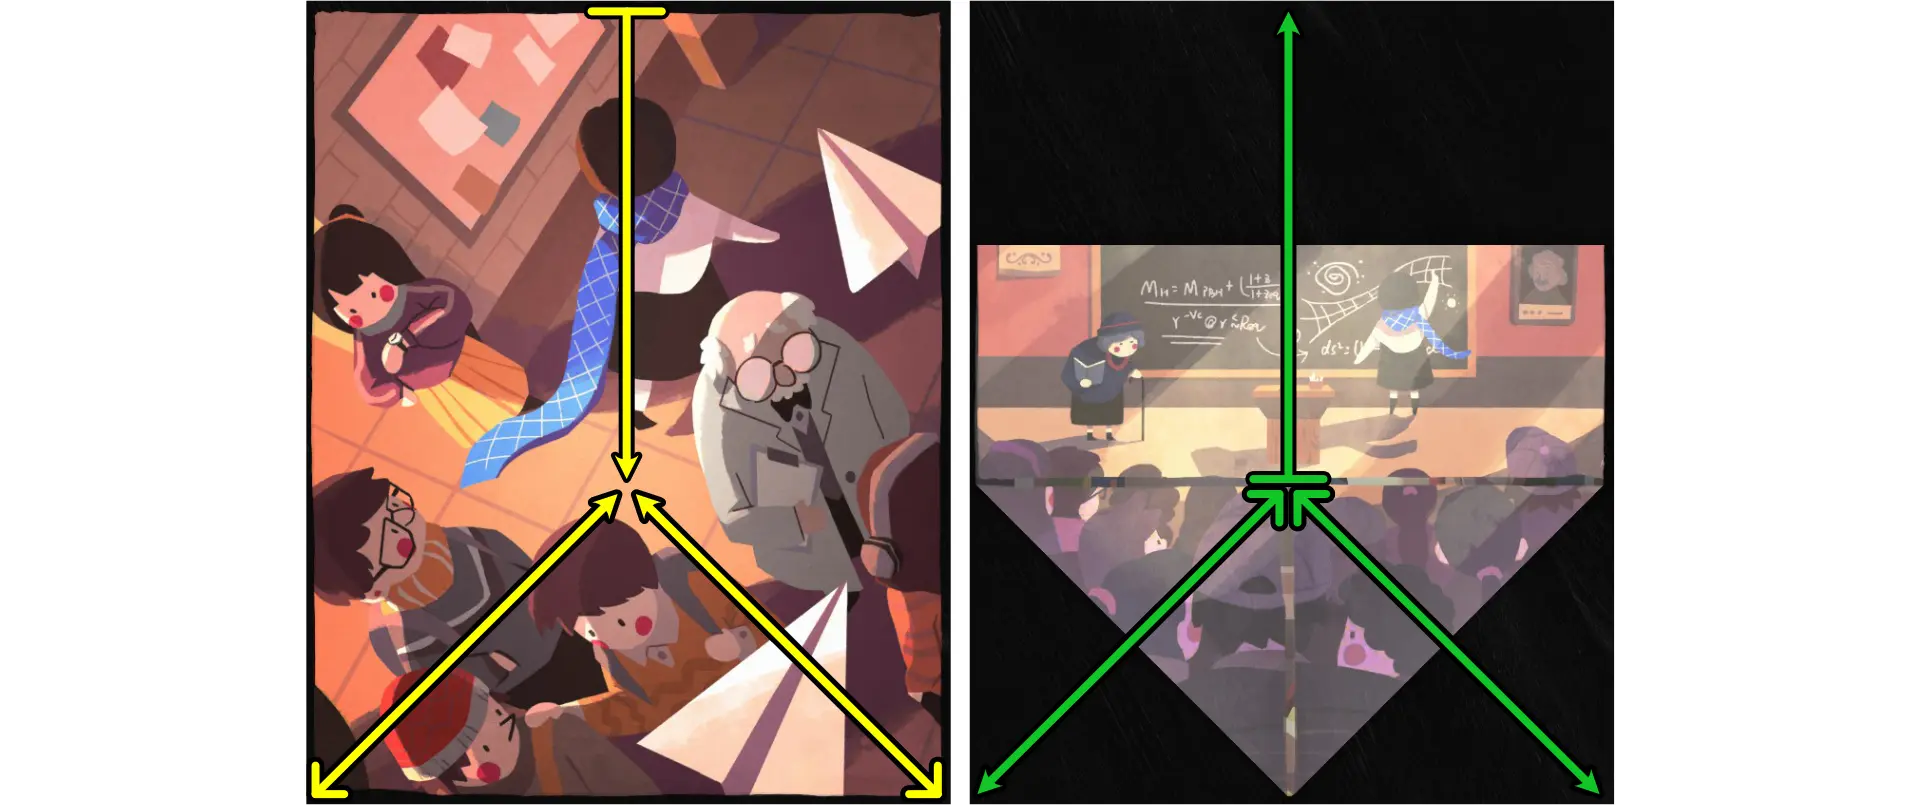
- Using the top edge and bottom corners, fold towards the center.
- Unfold the image.
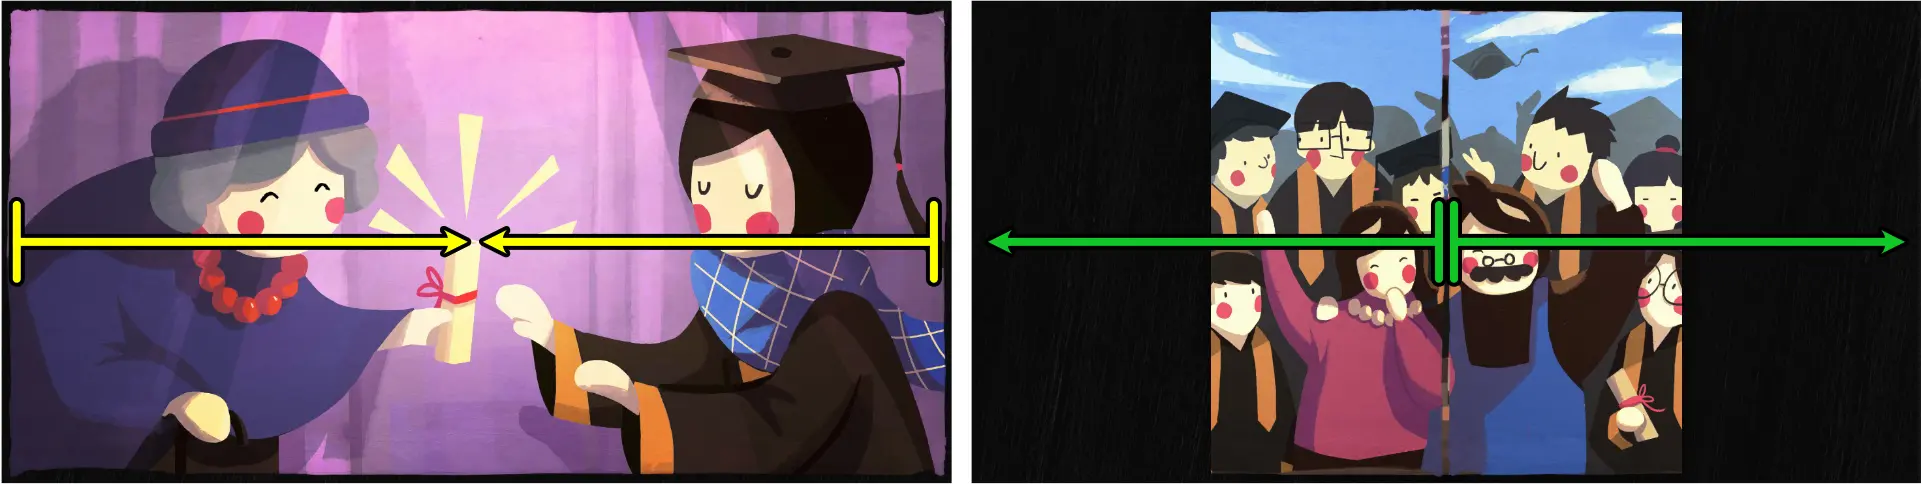
- Using the side edges, fold vertically towards the center.
- Unfold the image.
Epilogue
For this chapter, refer to the image below for the map of the scene and the legend of the symbols and lines that appear.
This chapter is relatively easy and only requires you to fold the map in 1 way to continue to the next one.
For extra achievements you can unlock for this chapter, go to the section “Achievements, Epilogue.”
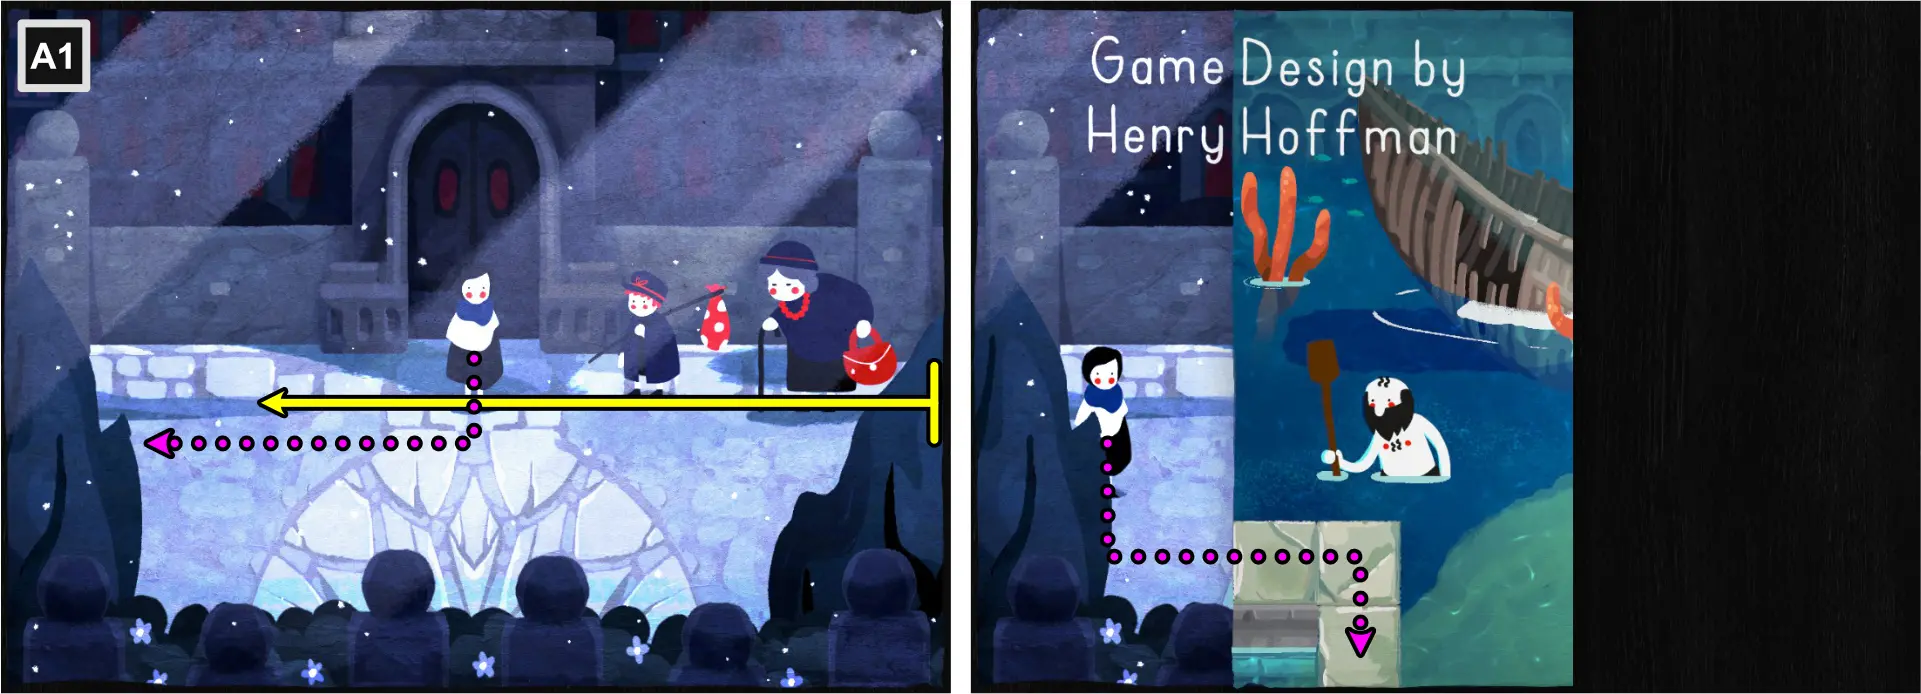
- Move Paige to the left.
- Using the right edge, fold vertically until the words meet.
- Follow the path down to A2.
- Using the left edge, fold vertically until the words meet.
- Follow the path down to A3.
- Using the right edge, fold vertically until the words meet.
- Follow the path down to A4.
- Using the left edge, fold vertically until the words meet.
- Follow the path down to A5.
- Using the left edge, fold vertically until the words meet.
- Follow the path down to A6.
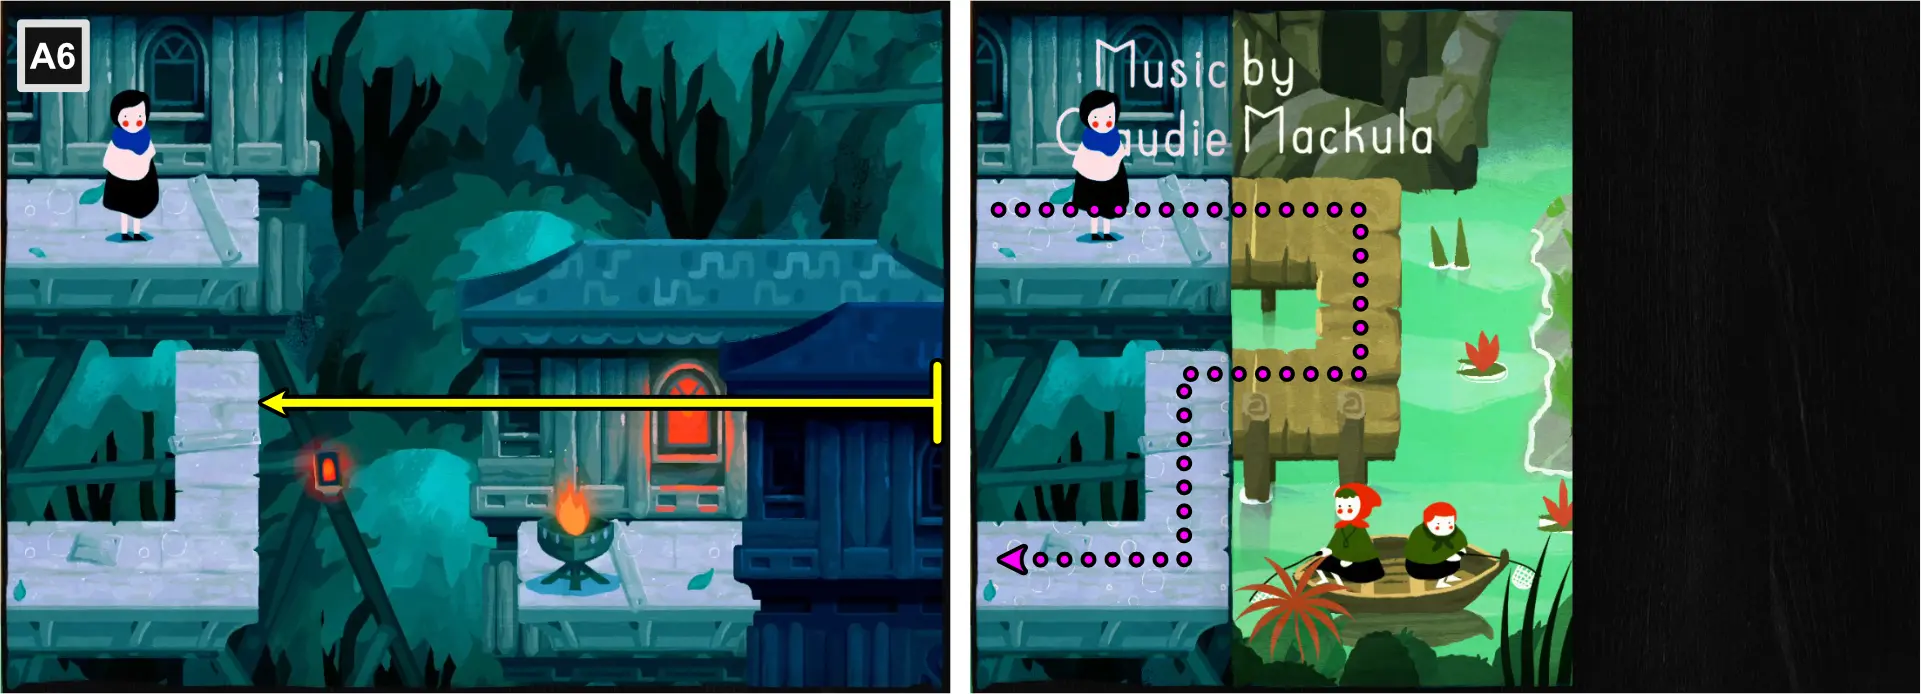
- Using the right edge, fold vertically until the words meet.
- Follow the path down to A7.
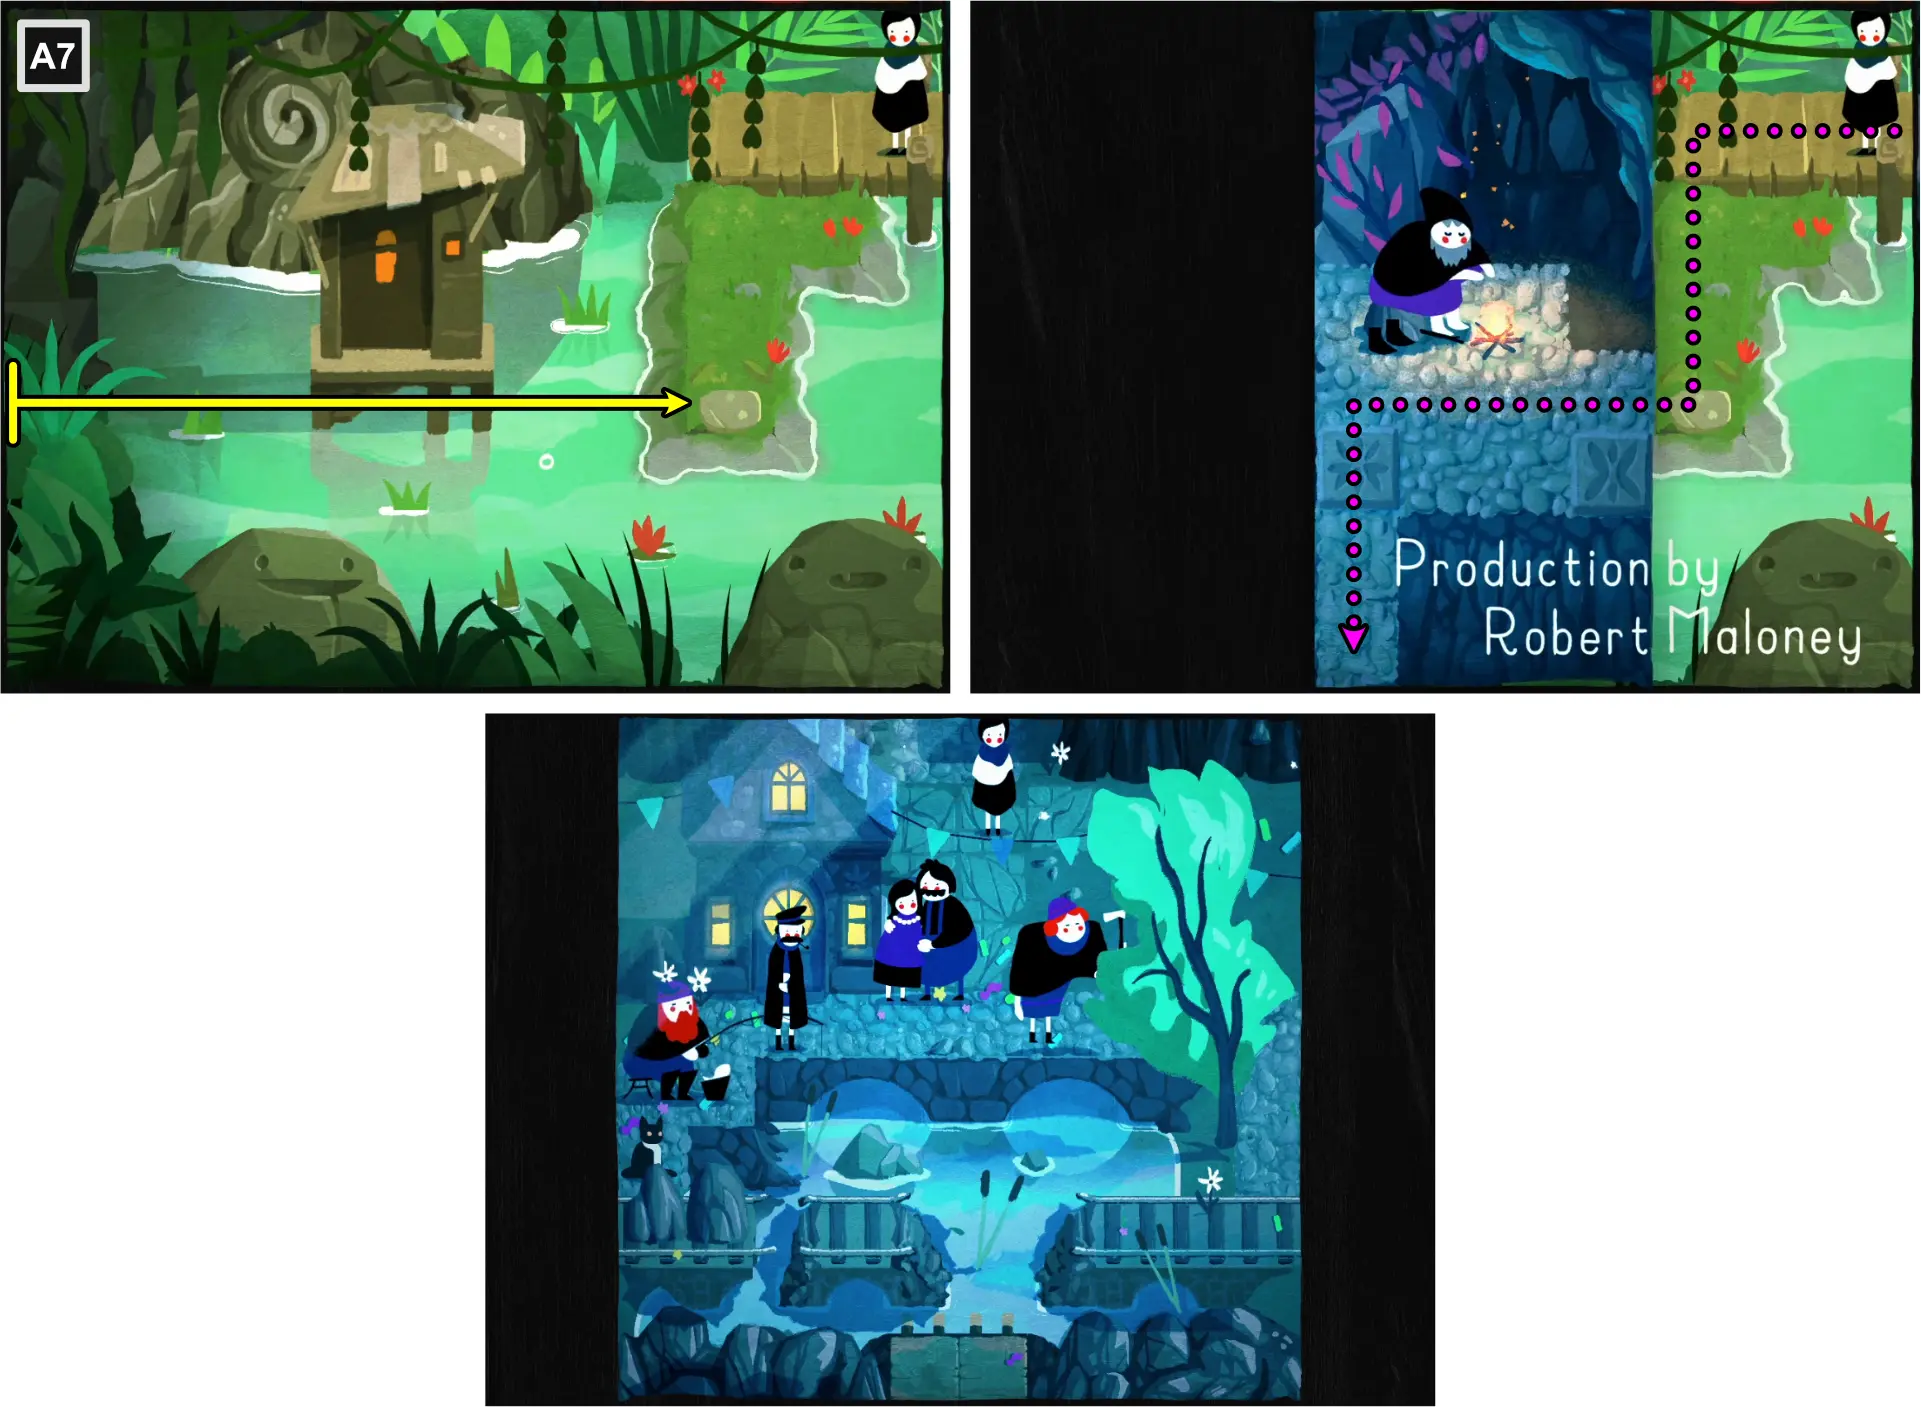
- Using the left edge, fold vertically until the words meet.
- Follow the path down to the end of the map.
Achievements
For the completionists at heart, we’ve listed all the achievements for the game and how to unlock them.
Chapter 1: Home
Fold Over A New Leaf
Complete Home.
Ah, Home Sheet Home!
Collect all Home origami.
The Story Unfolds
Find the memory of Paige and her dad.
Paper Tail
Pet Ollie.
Crumply Old Man
Annoy Winslow.
Unlocking “Ah, Home Sheet Home!” (All Home Origami)
Cat Origami
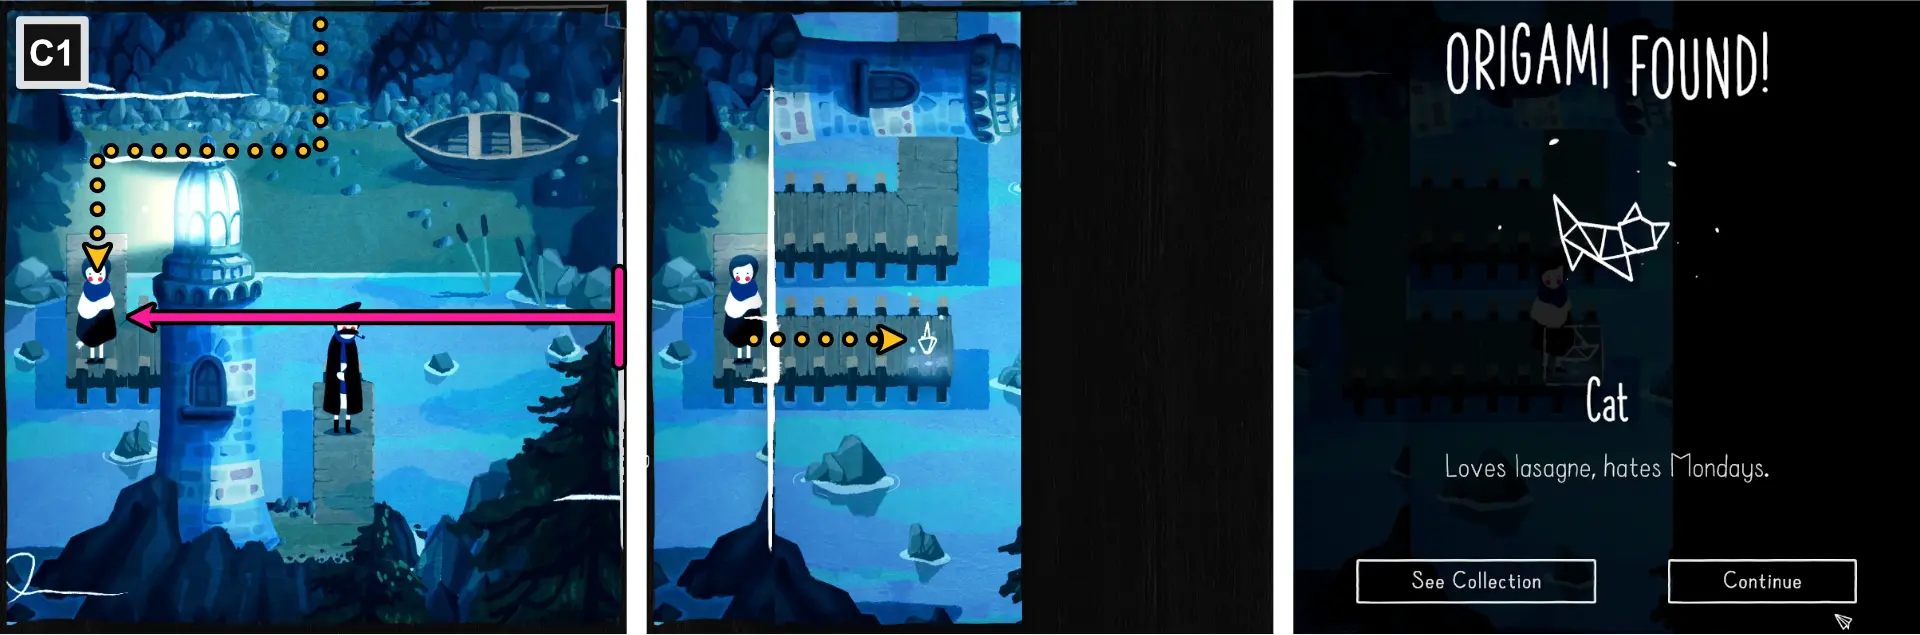
- At C1, position Paige to the left of the lighthouse.
- Using the right edge, fold horizontally, aligning it to the right of Paige.
- Move to the right to collect the Cat Origami.
Star Origami
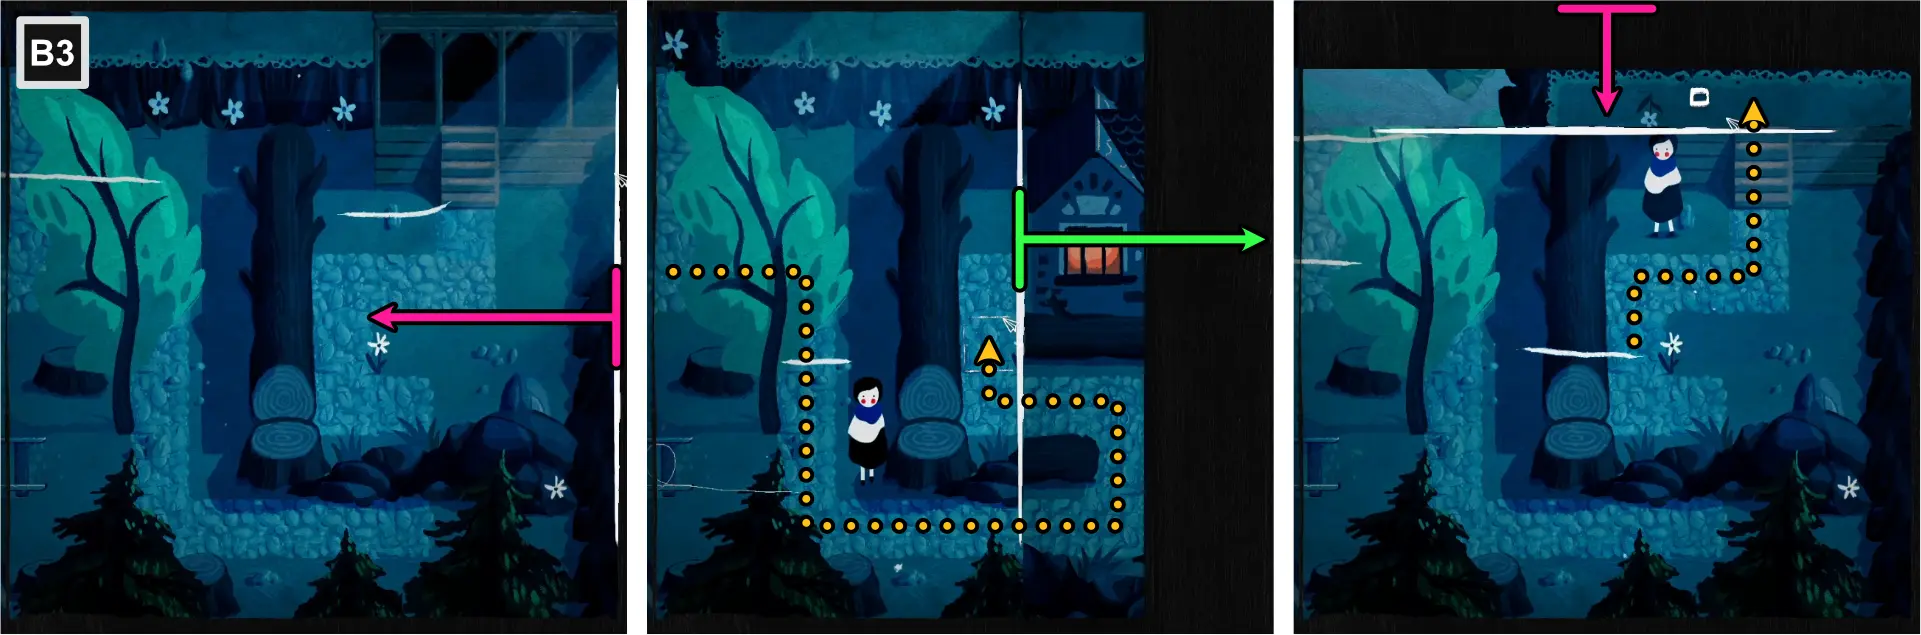
- At B3, using the right edge, old horizontally, aligning it to the path to the right of the log.
- Follow the path until Paige is to the right of the log.
- Unfold the sheet.
- Using the top edge, fold horizontally, aligned with the top of the stairs.
- Move Paige up the stairs, onto the folded part.
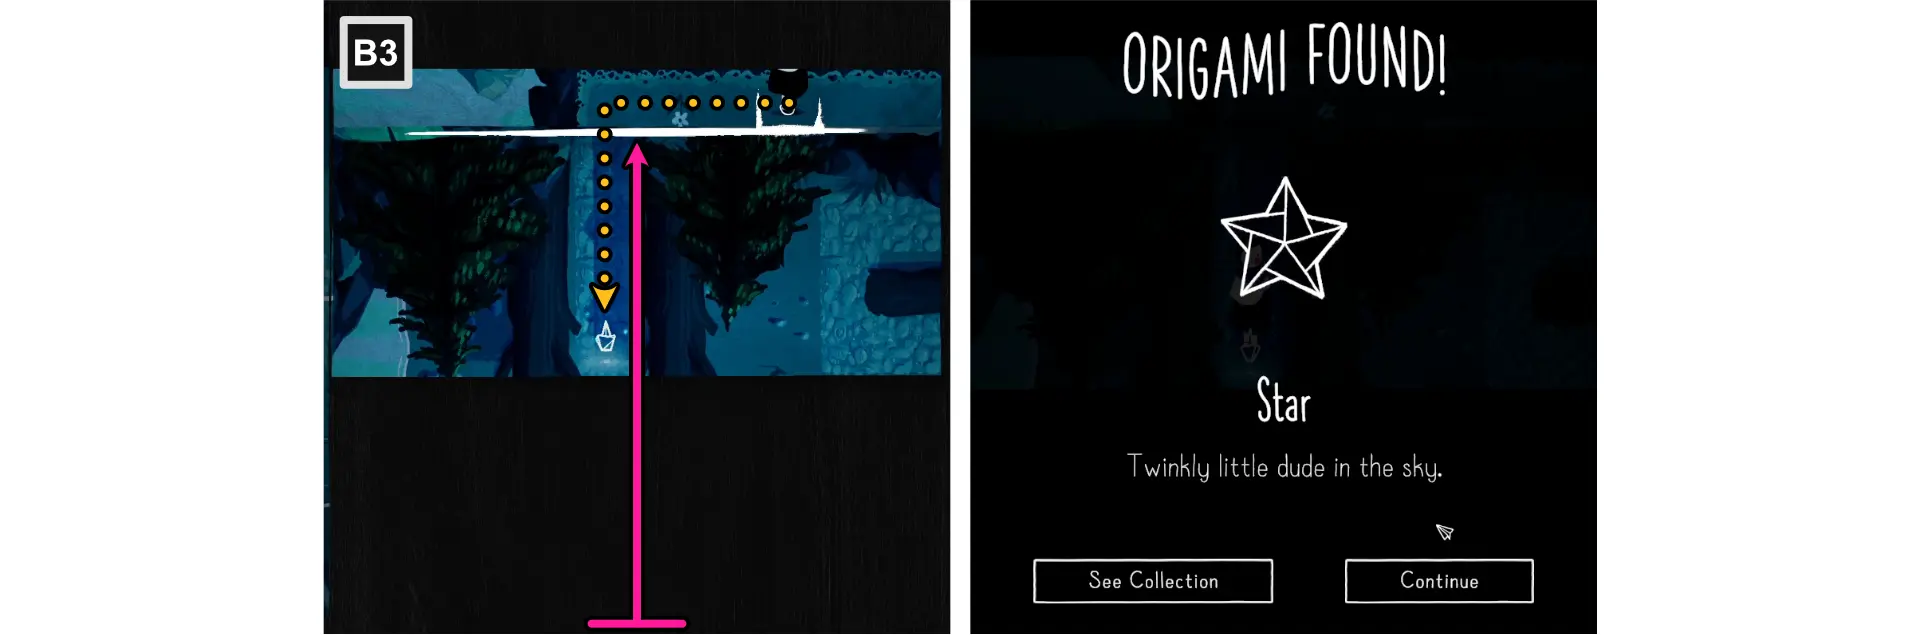
- Using the bottom edge, fold horizontally, aligned with the top fold.
- Follow the path to collect the Star Origami.
Unlocking “The Story Unfolds”
To unlock, reverse the second image during the opening cutscene of Chapter 1.
Unlocking “Paper Tail”
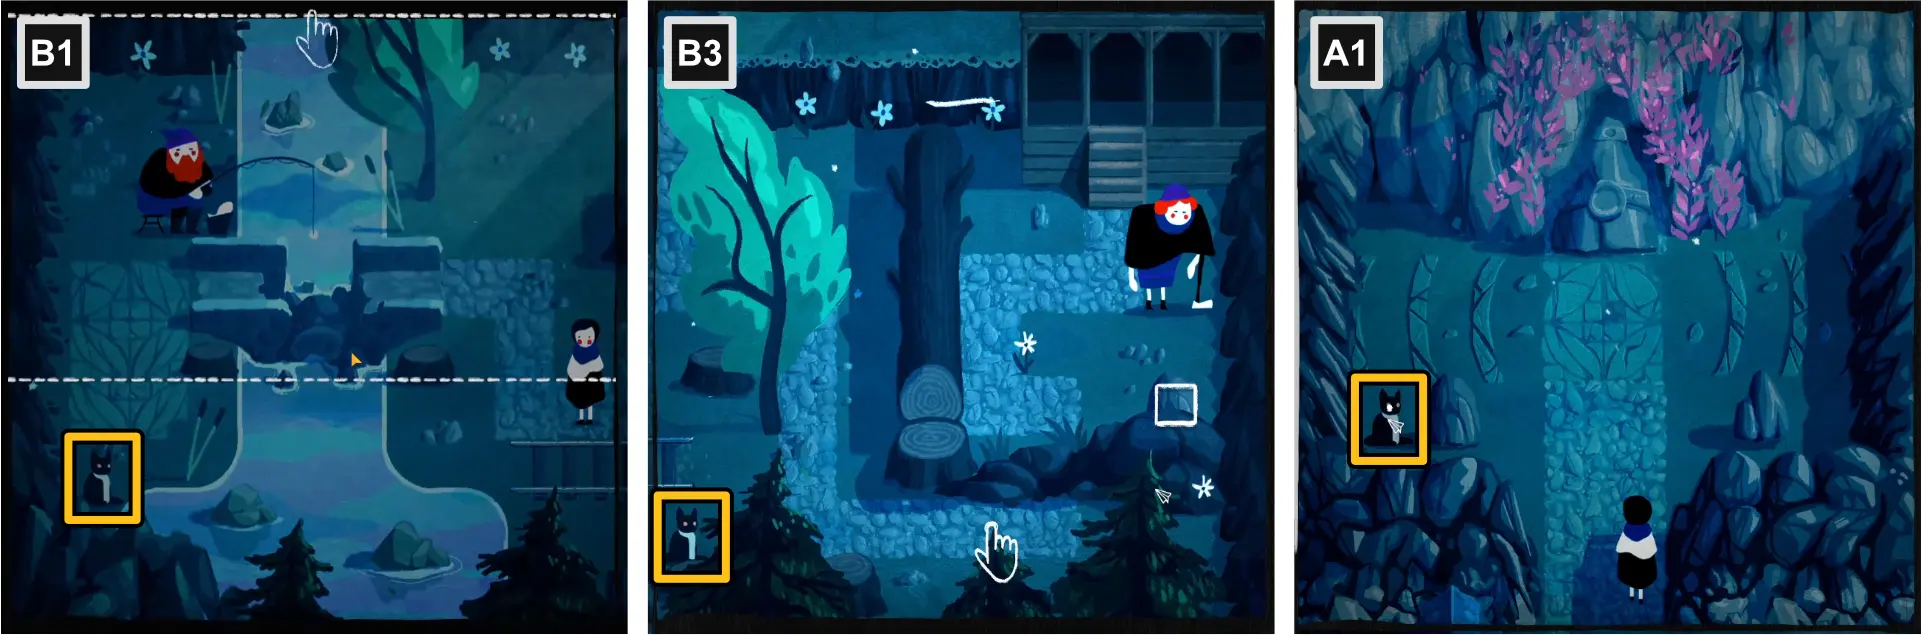
To unlock, pat Ollie the cat. You can find him randomly in B1, B3, and A1 maps of the level.
Unlocking “Crumply Old Man”
To unlock, talk to Winslow until he gets annoyed.
Chapter 2: Cave
Journey to the Centerfold
Complete Cave.
Rock, Paper, Scissors
Collect all Cave origami.
Folding Stones Gather No Moss
Knock over all of the stacked stones.
Unlocking “Rock, Paper, Scissors” (All Cave Origami)
Moth Origami
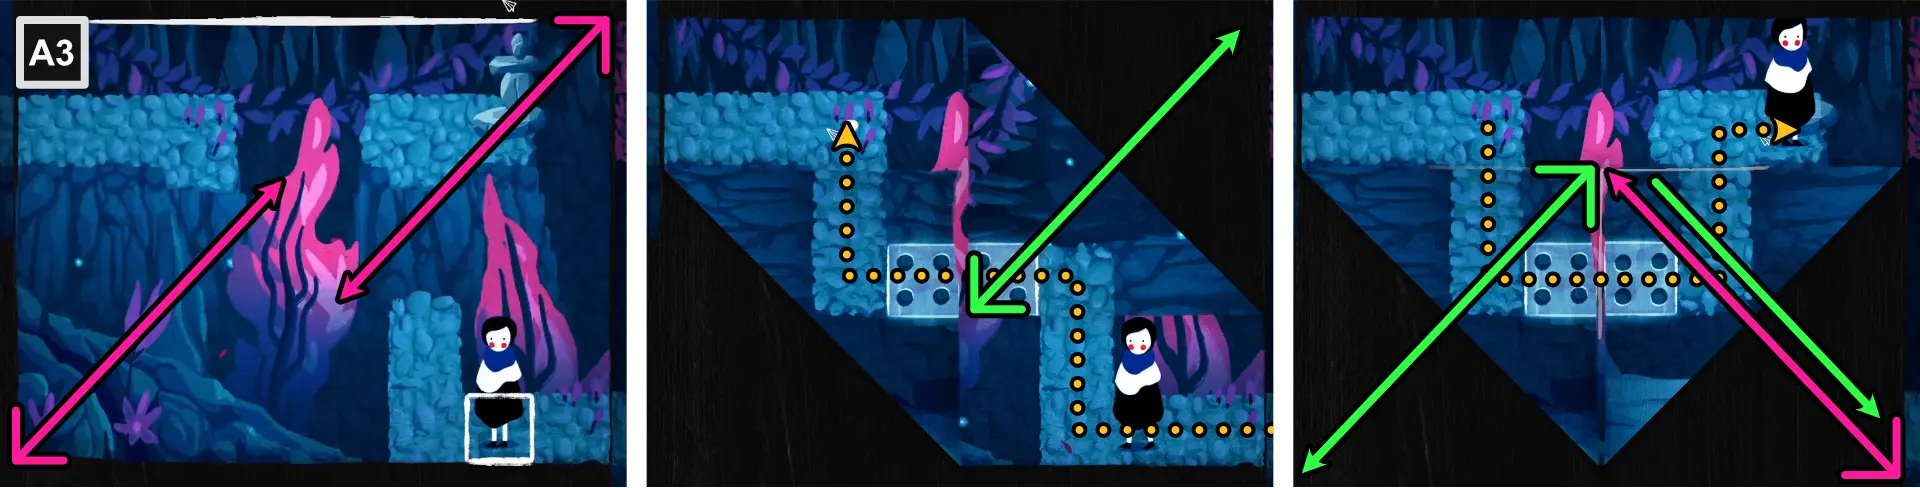
- At A3, using the bottom left corner and top right corner, fold diagonally to connect the four-dotted tiles.
- Follow the path and move to the upper left part of the map.
- Unfold the top right fold.
- Using the bottom right corner, fold diagonally to connect the four-dotted tiles.
- Move Paige to the upper right part of the map.
- Unfold the map.
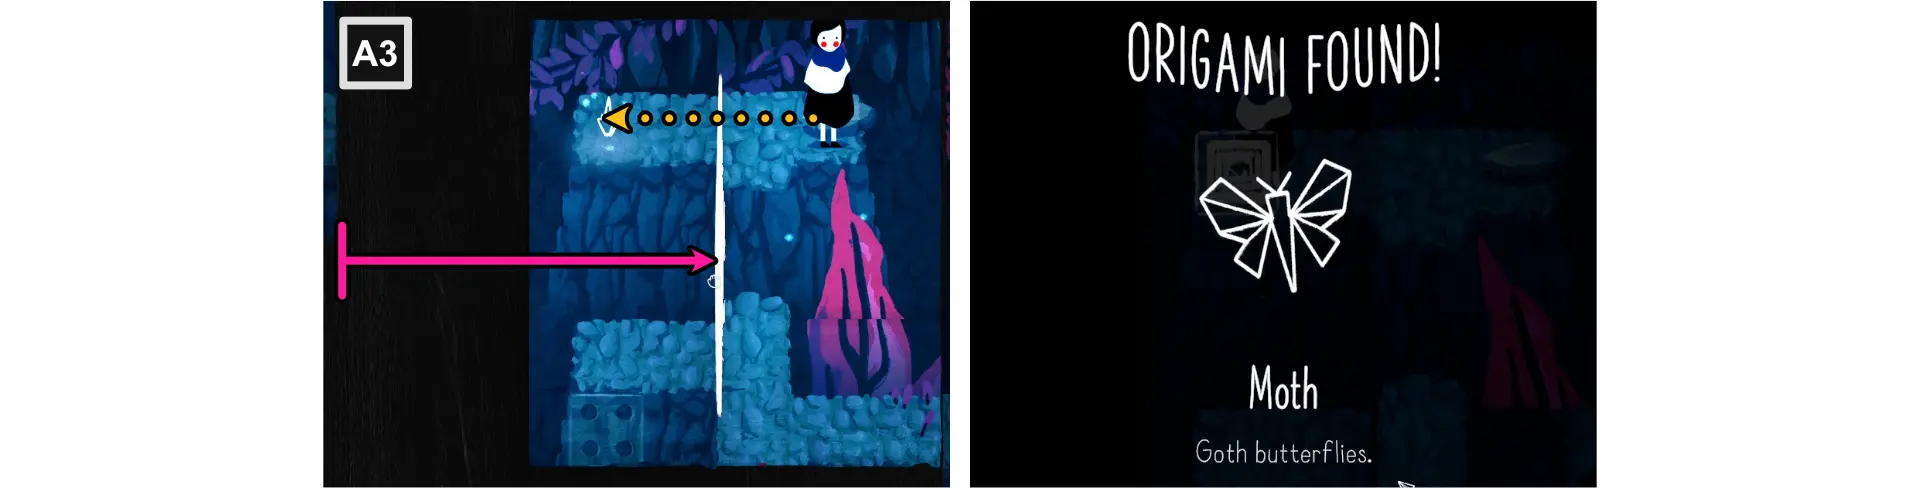
- Using the left edge, fold vertically, aligning with the edge of the platform to the right.
- Move to the left to collect the Moth Origami.
Deer Origami

- At A4, push the boulder forward until it hits the rock.
- Using the bottom edge, fold horizontally, aligning just below Paige.
- Move the boulder downward, on the fold, leaving enough space for Paige to move around the boulder.
- Positioned behind the boulder, move it upward.
- Unfold the map.
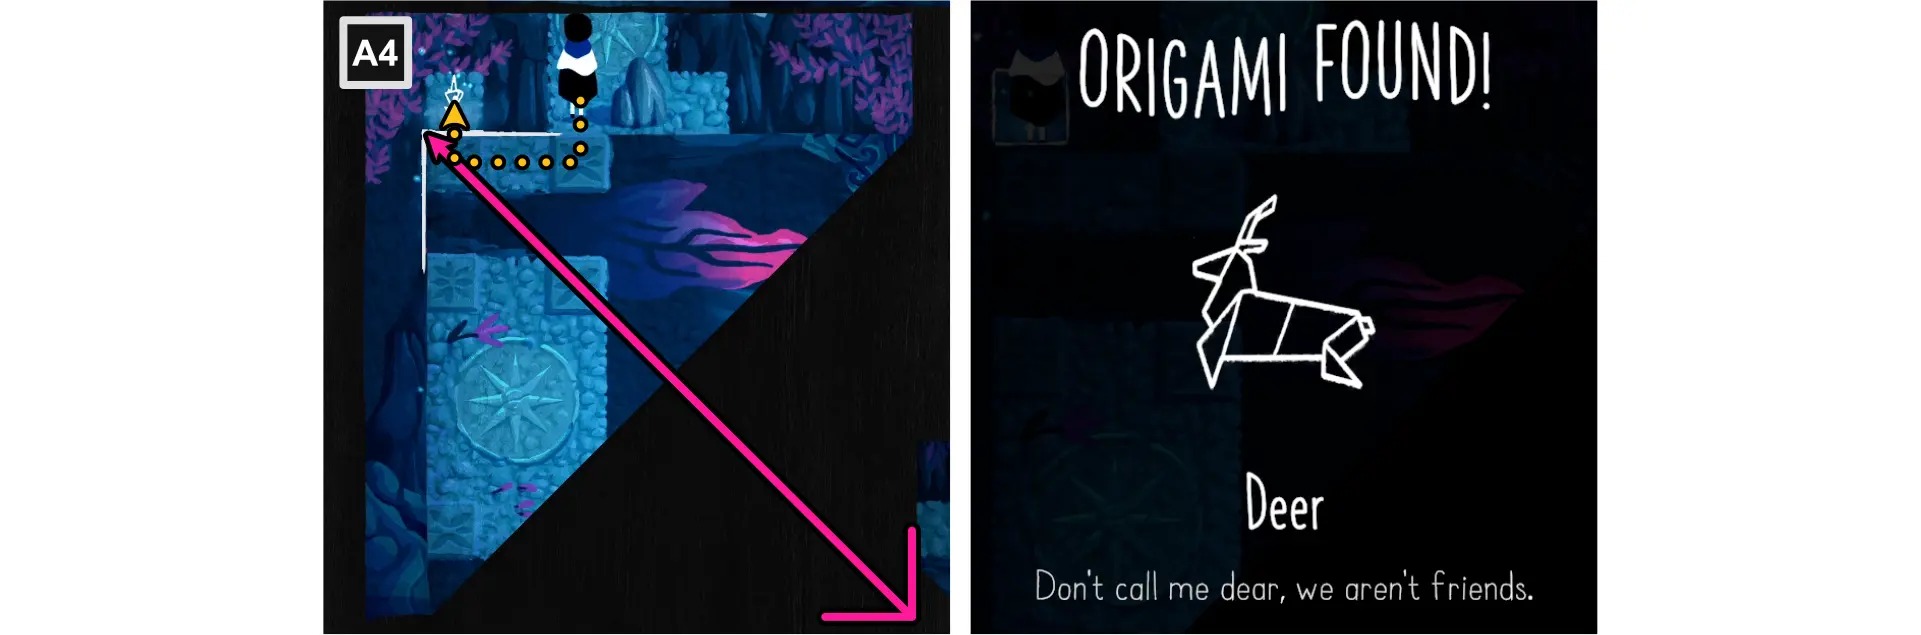
- Move Paige to the top left part of the platform.
- Using the bottom right corner, fold diagonally, aligned to the origami’s platform.
- Follow the path to collect the Deer Origami.
Bat Origami
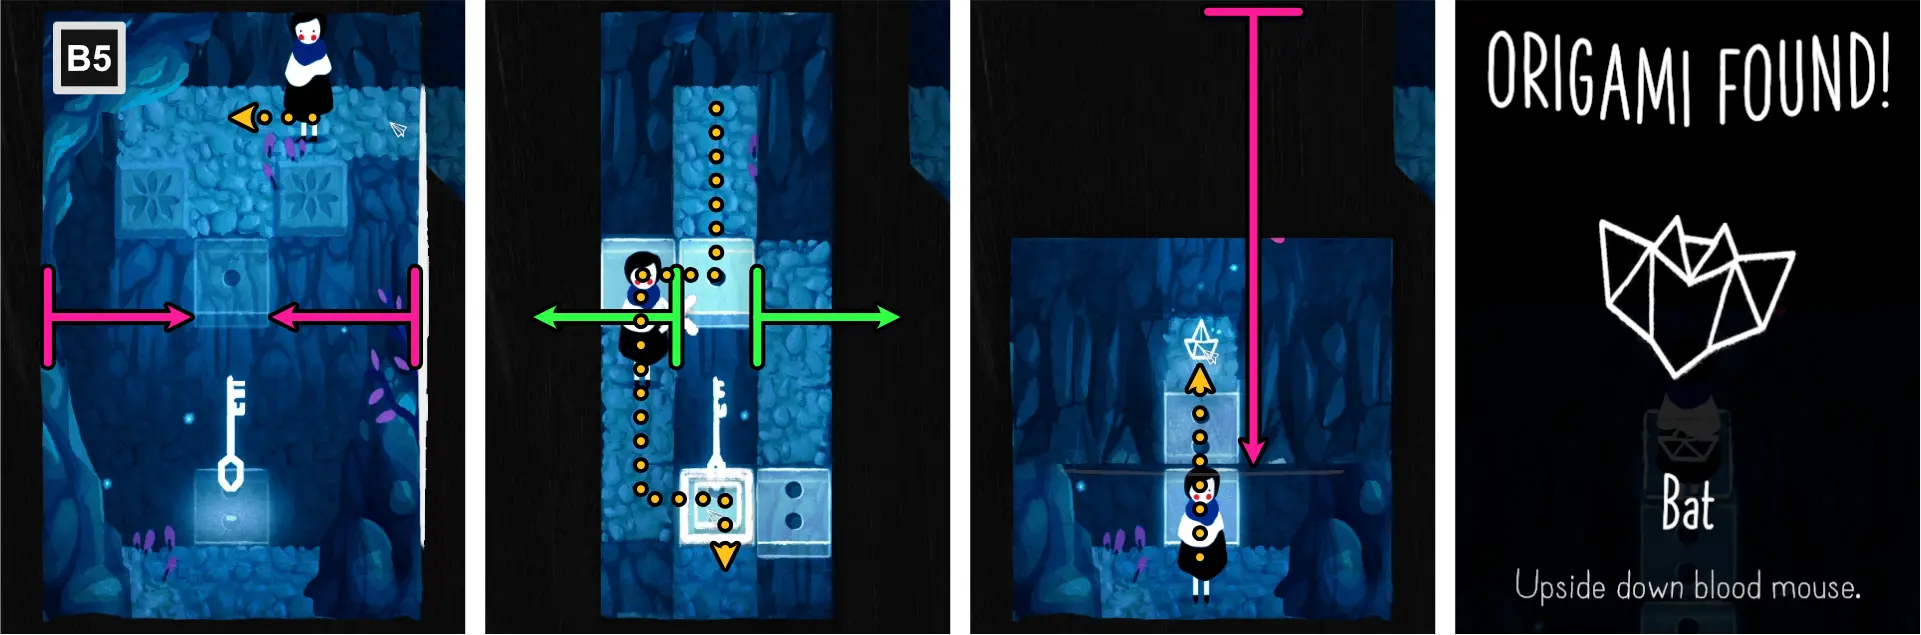
- At B5, move Paige to the top center of the map.
- Using the left and right edge, fold towards the center, leaving 1-tile space in the middle.
- Move Paige to the very bottom of the map.
- Unfold the map.
- Using the top edge, fold horizontally to connect the two-dotted tiles.
- Move forward to collect the Bat Origami.
Mouse Origami
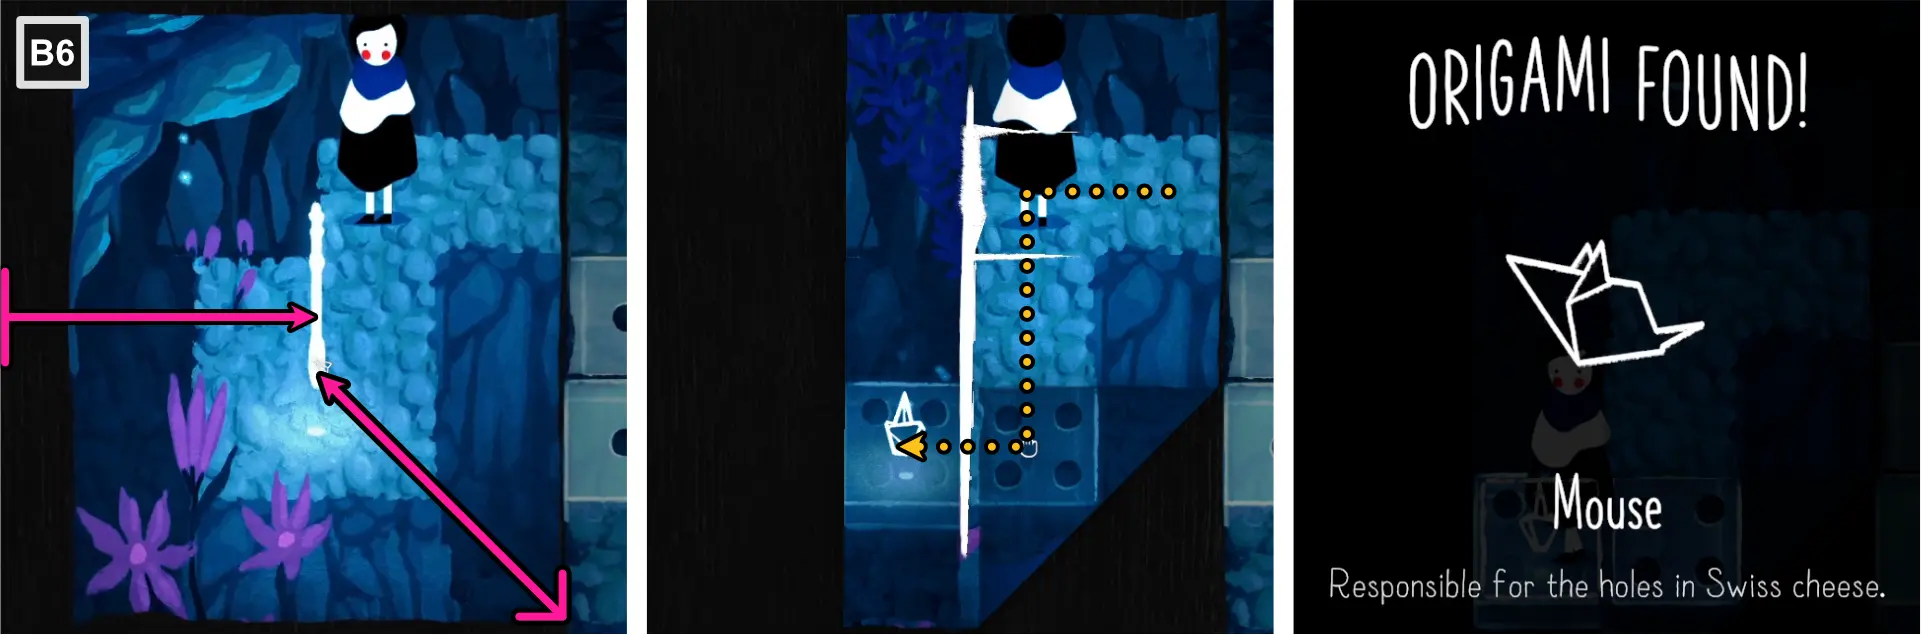
- At B6, using the left edge, fold vertically to the center.
- Using the bottom right corner, fold diagonally to the center.
- Follow the path to collect the Mouse Origami.
Rat Origami
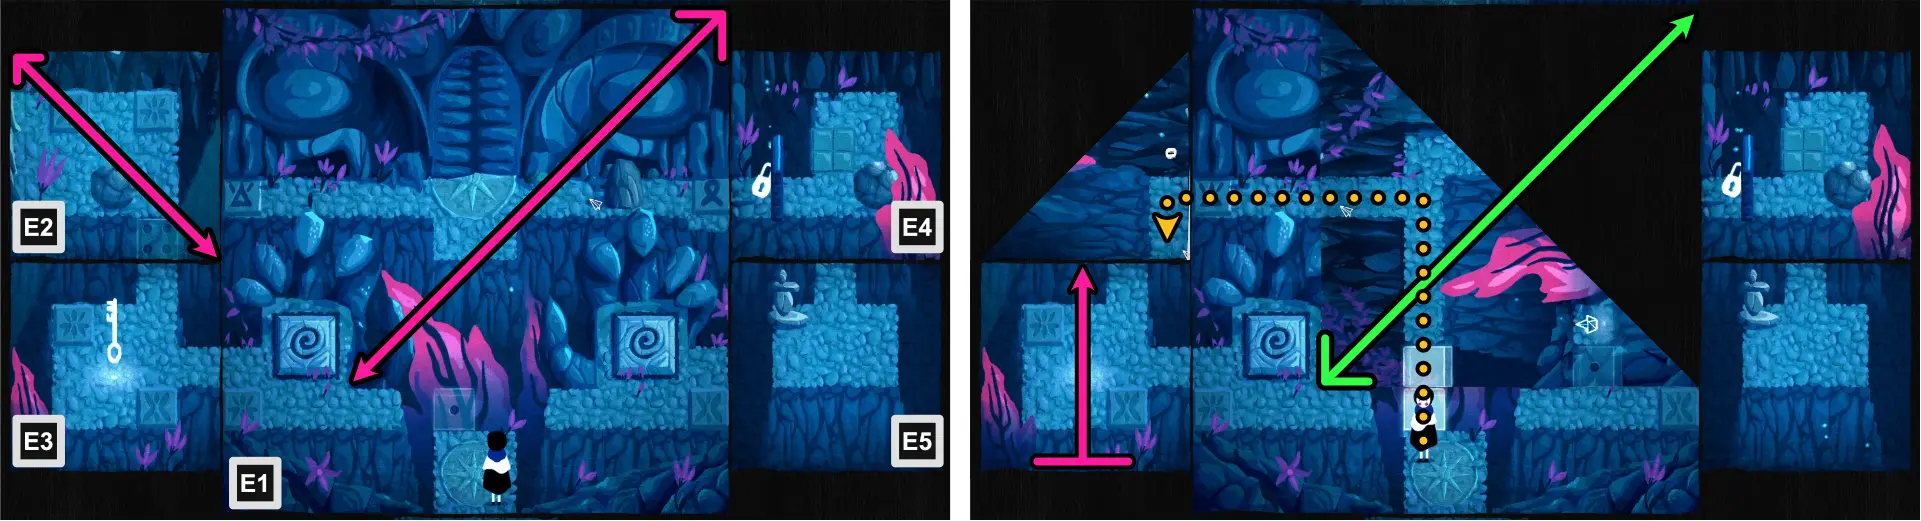
- Using the top left corner of C1, fold diagonally to meet the opposite corner.
- Using the top right corner of C3, fold diagonally, aligning with the left pressure plate.
- Follow the path to go to C1.
- Unfold C3.
- Using the bottom edge of C2, fold horizontally to meet the opposite edge.
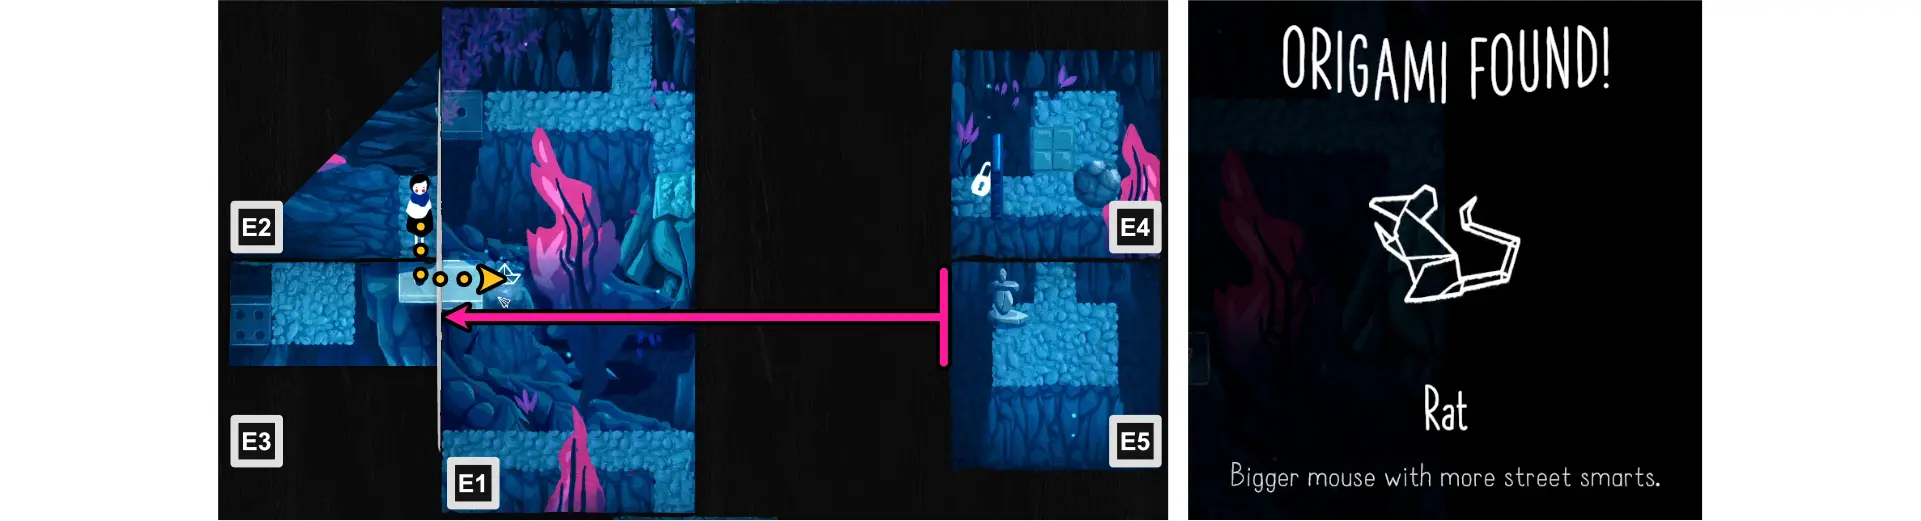
- Using the right edge of C3, fold vertically to meet the opposite edge.
- Follow the path to collect Rat Origami.
Unlocking “Folding Stones Gather No Moss”
To unlock, you must topple over 3 stacks of stones.
Stone Stack 1

- At A3, using the bottom left corner and top right corner, fold diagonally to connect the four-dotted tiles.
- Follow the path and move to the upper left part of the map.
- Unfold the top right fold.
- Using the bottom right corner, fold diagonally to connect the four-dotted tiles.
- Move Paige to the upper right part of the map and knock over the stack of stones.
Stone Stack 2
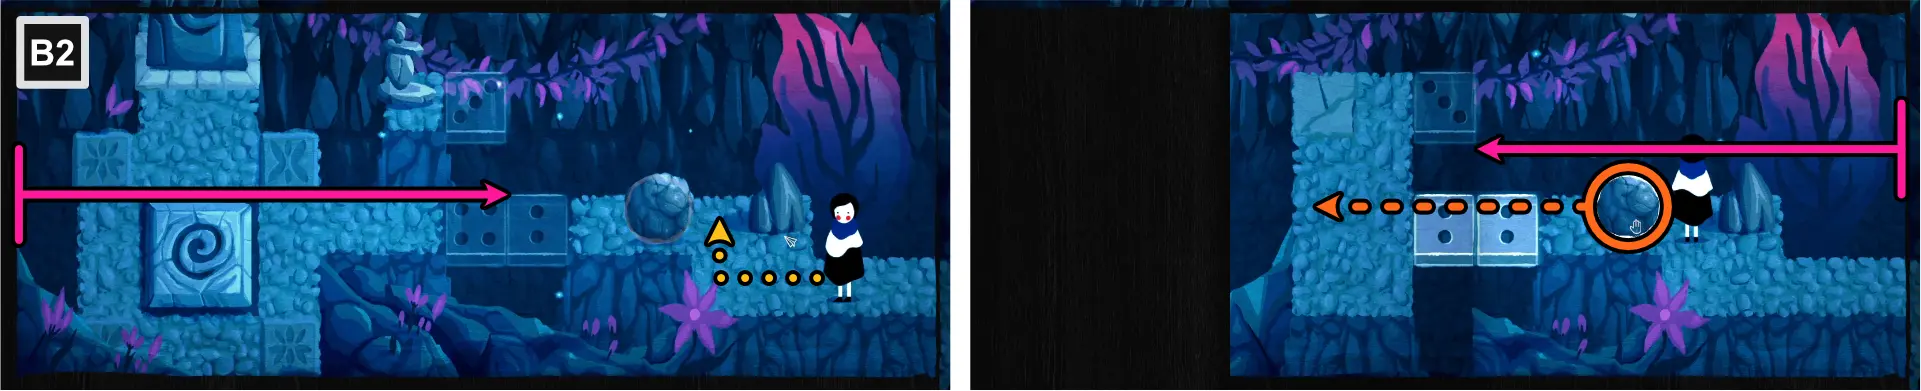
- At B2, using the left edge, fold vertically to connect the two-dotted tiles.
- Push the boulder to the left fold.
- Using the right edge, fold vertically to connect the three-dotted tiles.
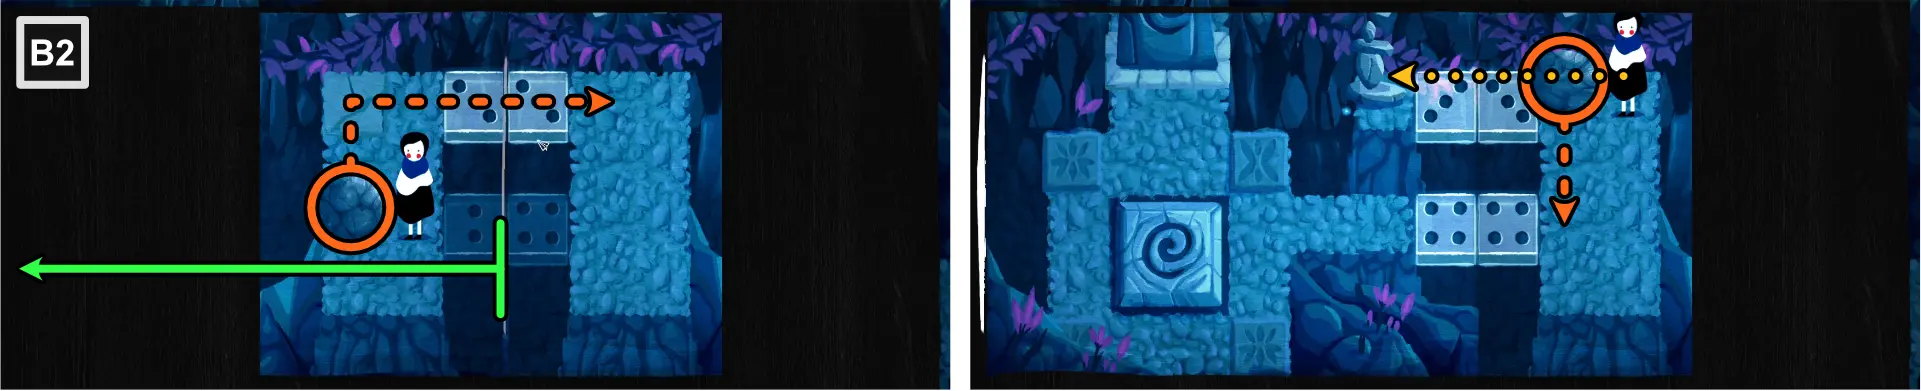
- Push the boulder to the right fold.
- Unfold the left fold.
- Move the boulder downward.
- Move Paige across the three-dotted tile bridge to knock over the stack of stones.
Stone Stack 3
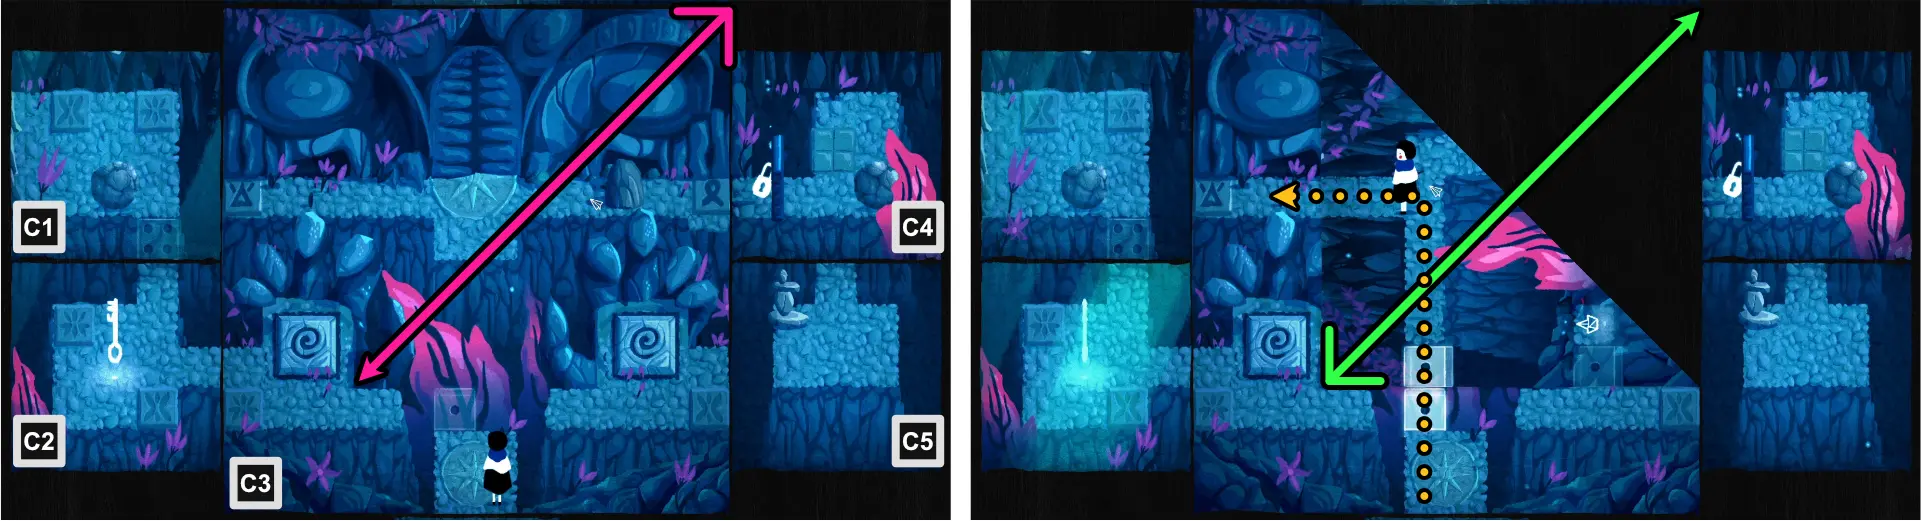
- Using C3’s top right corner, fold diagonally to connect the one-dotted tiles.
- Follow the path to the upper left and stop just above the left pressure plate.
- Unfold C3.
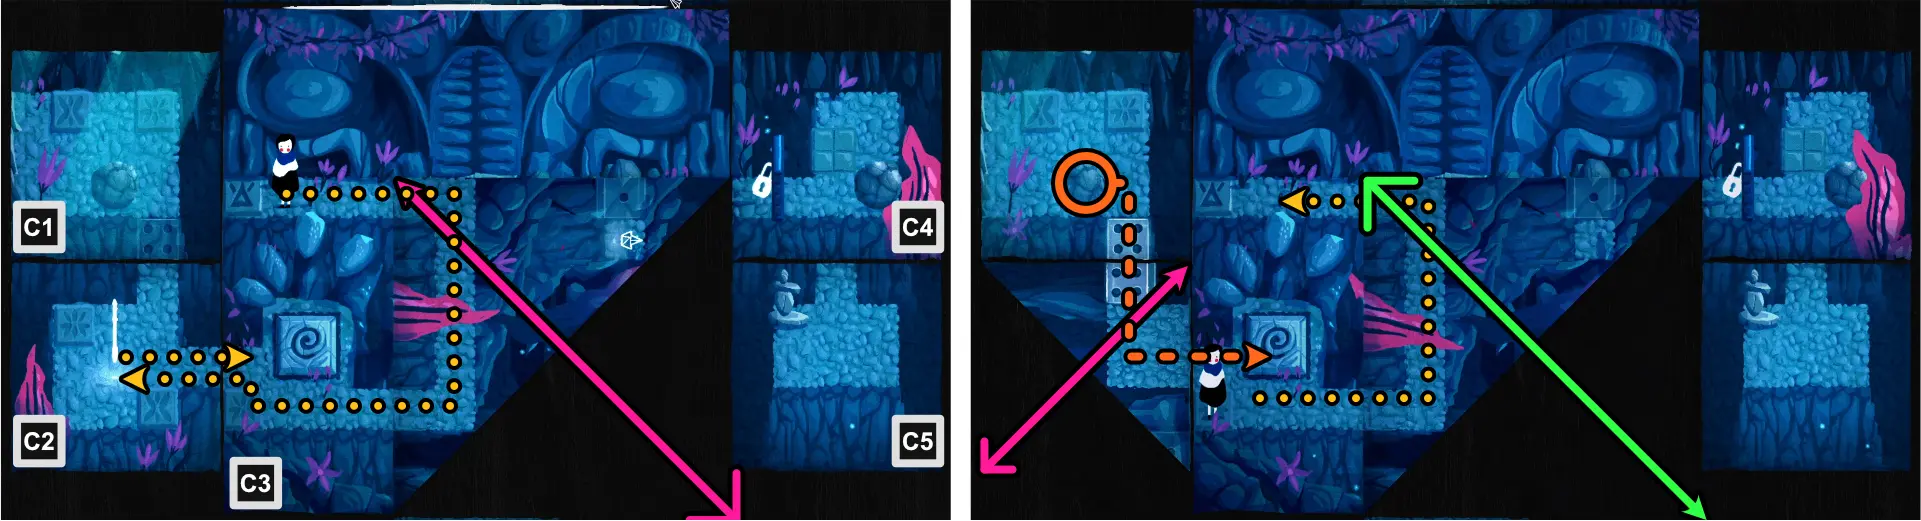
- Using C3’s bottom right corner, fold diagonally to create a path from where Paige is positioned to the bottom where the left pressure plate is.
- Go to C2 and collect the key.
- Go back to C3.
- Using C2‘s the bottom left corner, fold diagonally to connect this map’s four-dotted tile to the one in C1.
- Drag the boulder in C1 down to C2, and then to C3, on top of the pressure plate.
- Move Paige to the upper path of C3 and position her just above the pressure plate.
- Unfold C3.
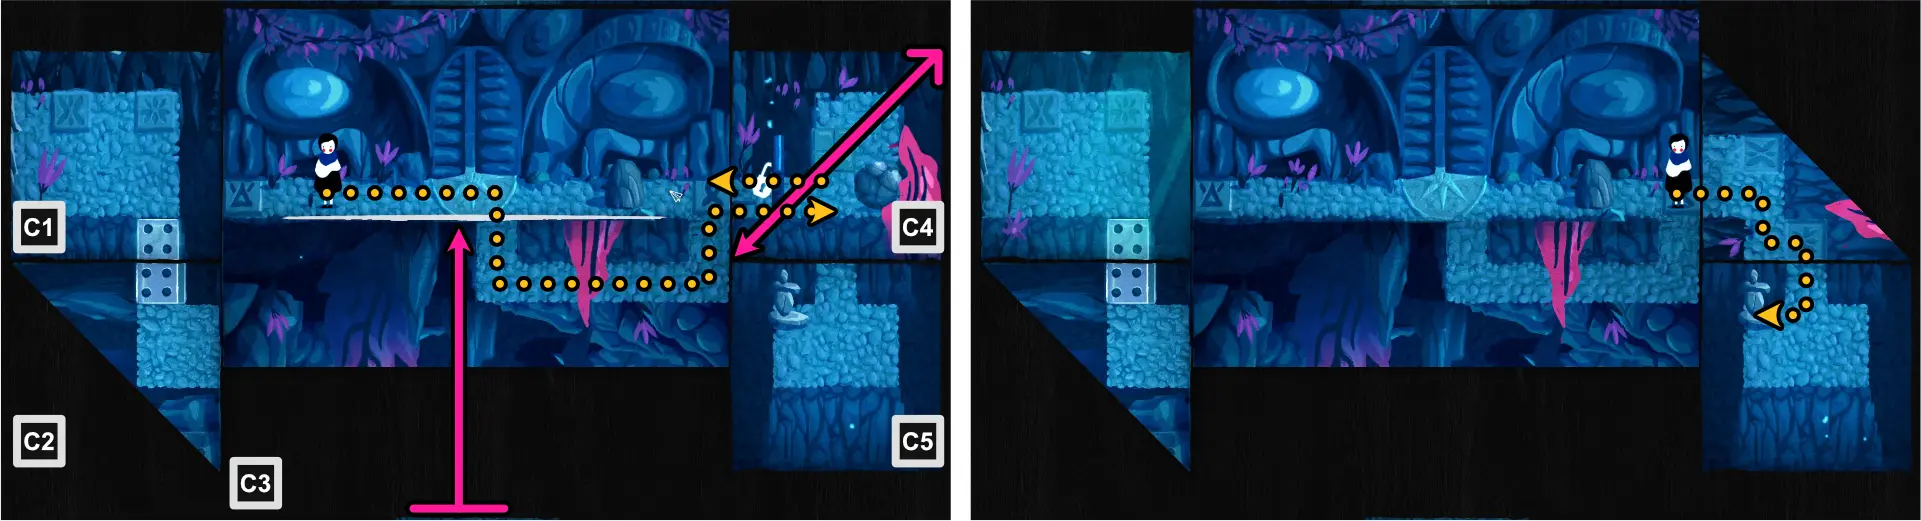
- Using C3’s bottom edge, fold horizontally to align with the upper path where Paige is positioned.
- Follow the path to the right and unlock the door at C4, then go back to C3.
- Using the top right corner, fold diagonally to meet the opposite corner.
- Follow the path to knock over the stack of stones in C5.
Chapter 3: Swamp
Fold your Paper, Alligator
Complete Swamp.
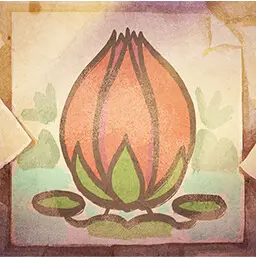
Snakes on a Non-Euclidean Plane
Collect all Swamp origami.
Fold Shoulder
Release the frog.
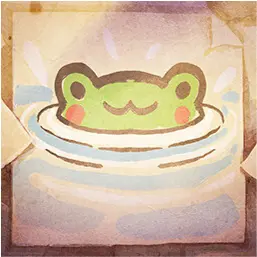
Manifold Destiny
Find the deer in the sky.
Unlocking “Snakes on a Non-Euclidean Plane” (All Swamp Origami)
Frog Origami
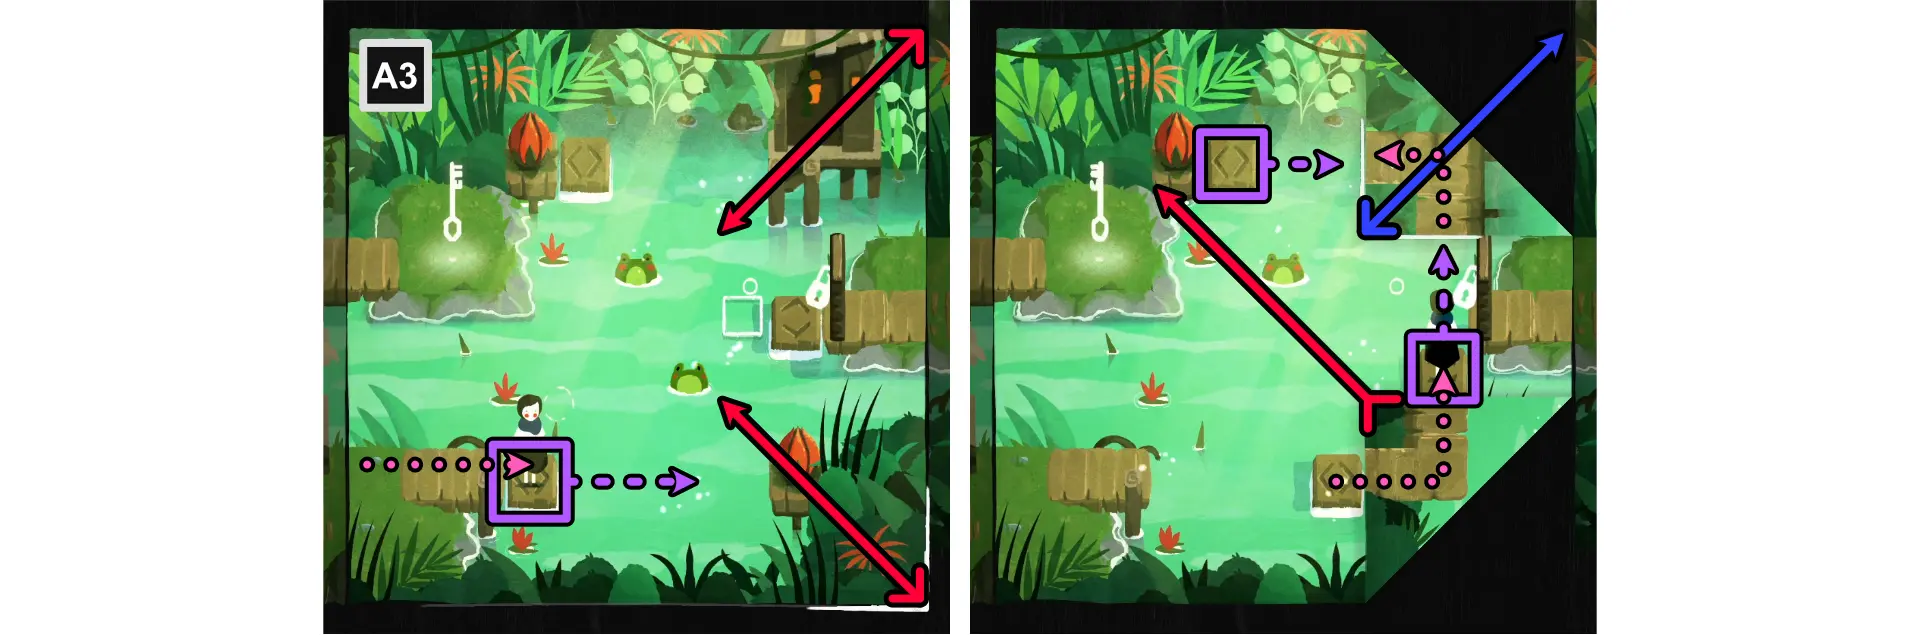
- At A3, using the top right and bottom right corners, fold diagonally, one space to the left of the shack.
- Move Paige onto the floating tile and move it to the right.
- Follow the path and move Paige onto the vertical floating tile.
- Move upwards and onto the platform.
- Move the horizontal floating tile at the top of the map to the right.
- Unfold the top right fold.
- Align the bottom right fold towards the platform where the key is.
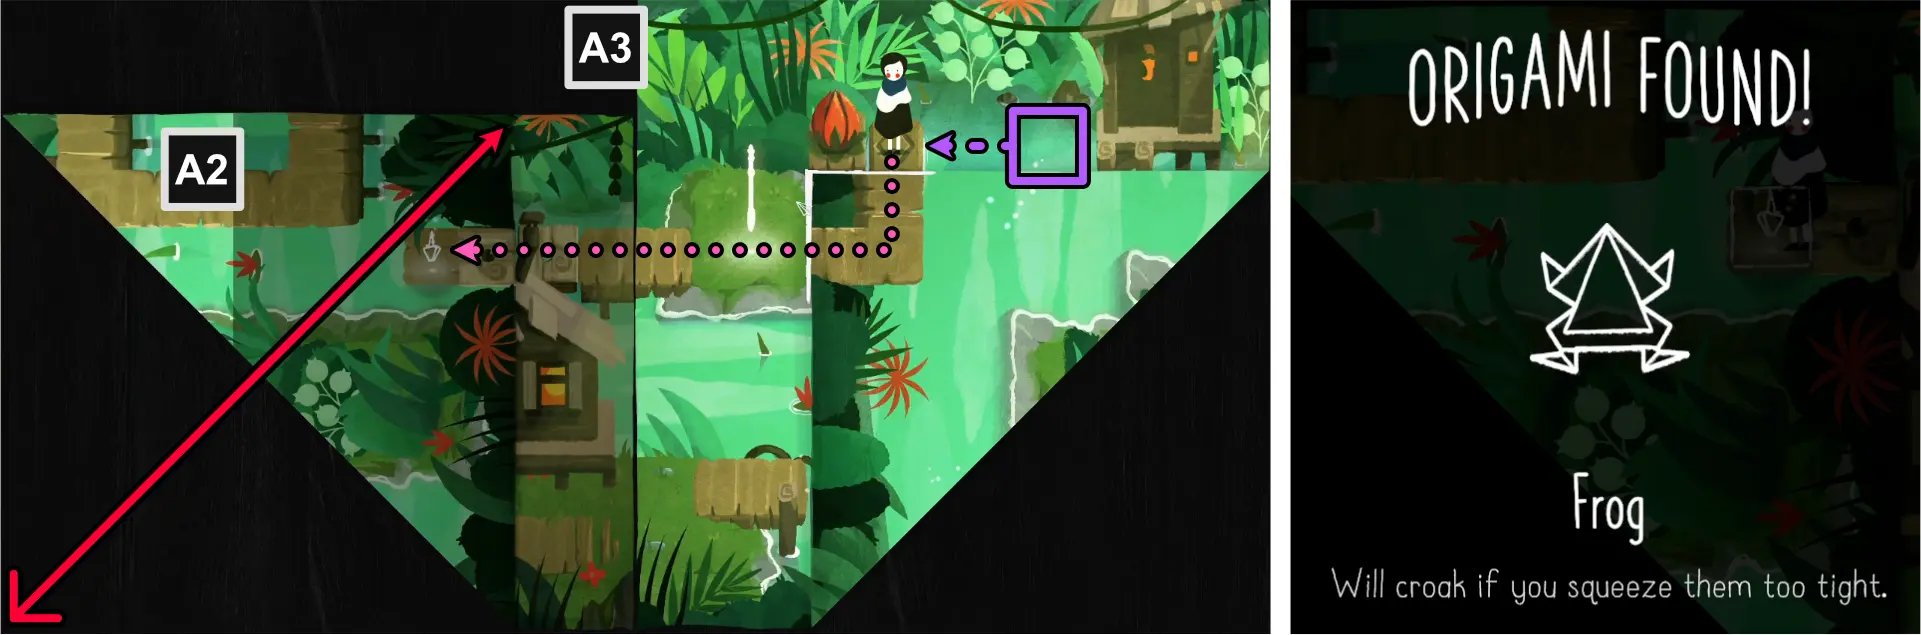
- Follow the path to go to A2.
- Using the bottom left corner, fold diagonally, meeting the top edge.
- Cross the one-dotted tiles and collect the Frog Origami.
Pig Origami
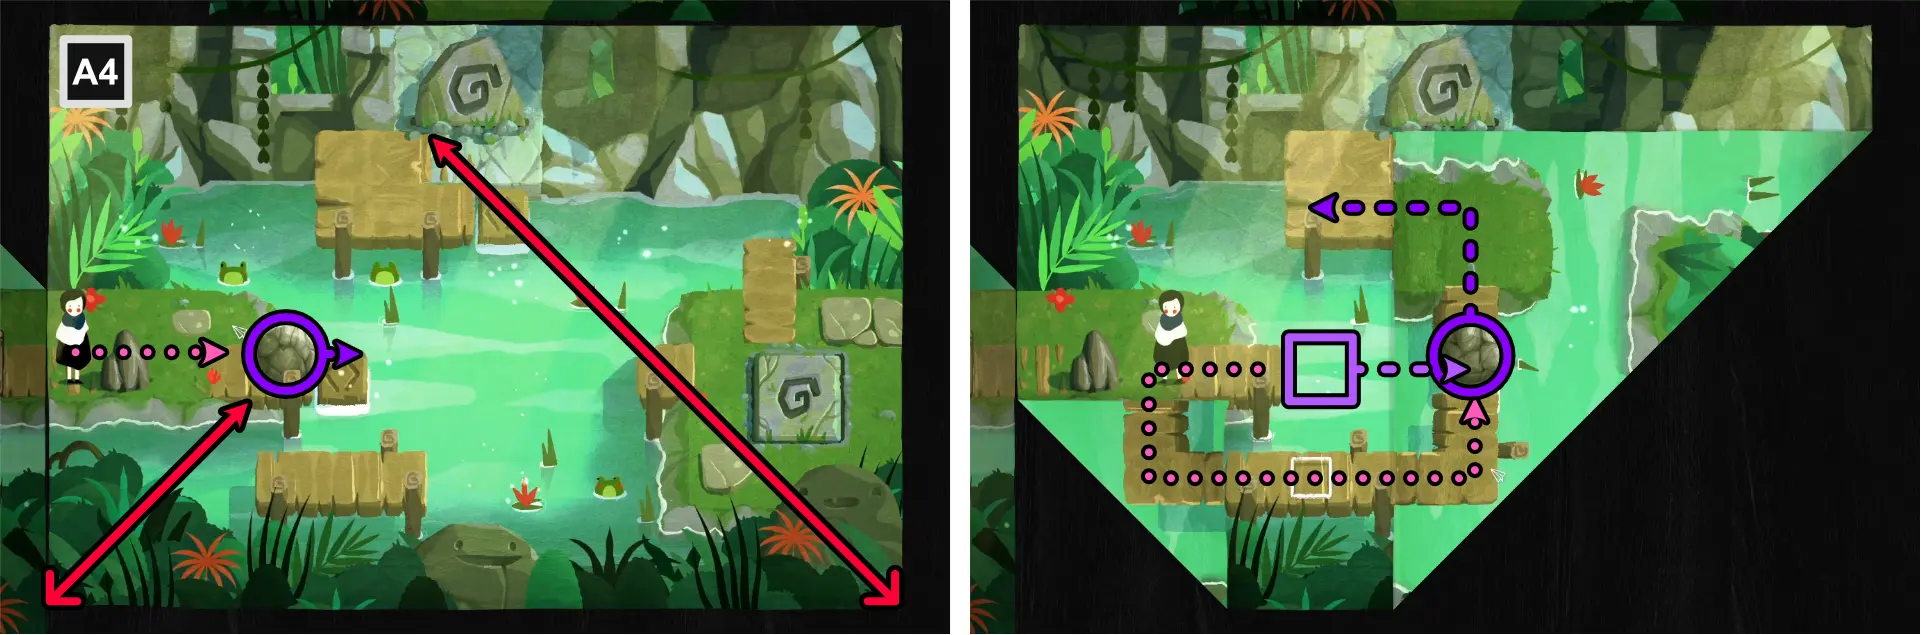
- At A4, using the bottom left corner, fold diagonally, aligning with the row where the boulder is.
- Using the bottom right corner, fold diagonally, aligning with the stone door.
- Push the boulder onto the floating tile.
- Move the floating tile in between the pier gap.
- Position Paige below the boulder.
- Push the boulder towards the platform at the upper left side.

- Move Paige onto the floating tile.
- Move the floating tile to the left.
- Unfold the map.
- Move Paige onto the floating tile.
- Move the floating tile to the right.
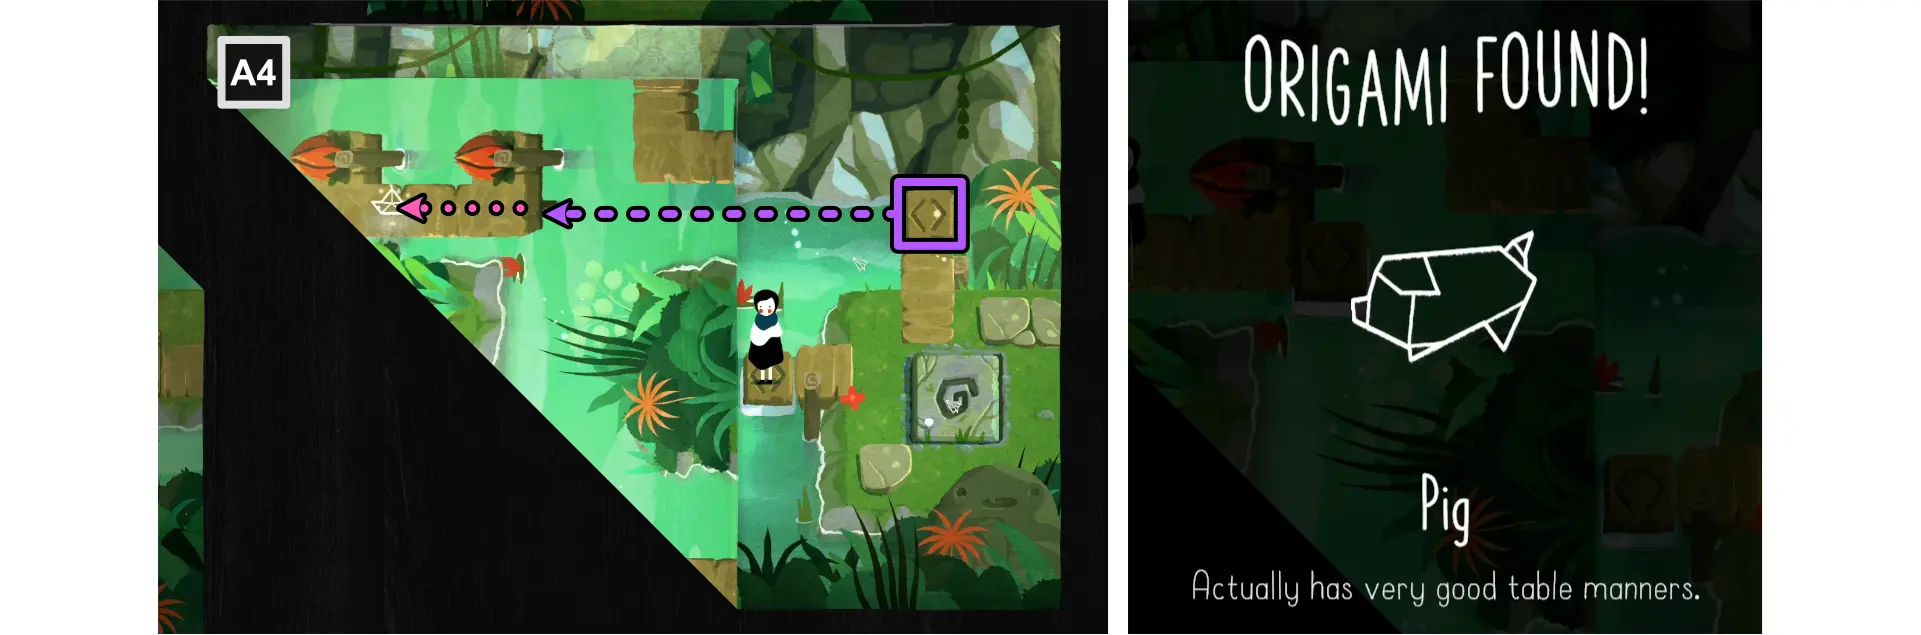
- Using the bottom left corner, fold diagonally, aligning with the floating tile at the center left part of the map.
- With Paige still on the floating tile, move it to the left.
- Move to the left and collect the Pig Origami.
Butterfly Origami
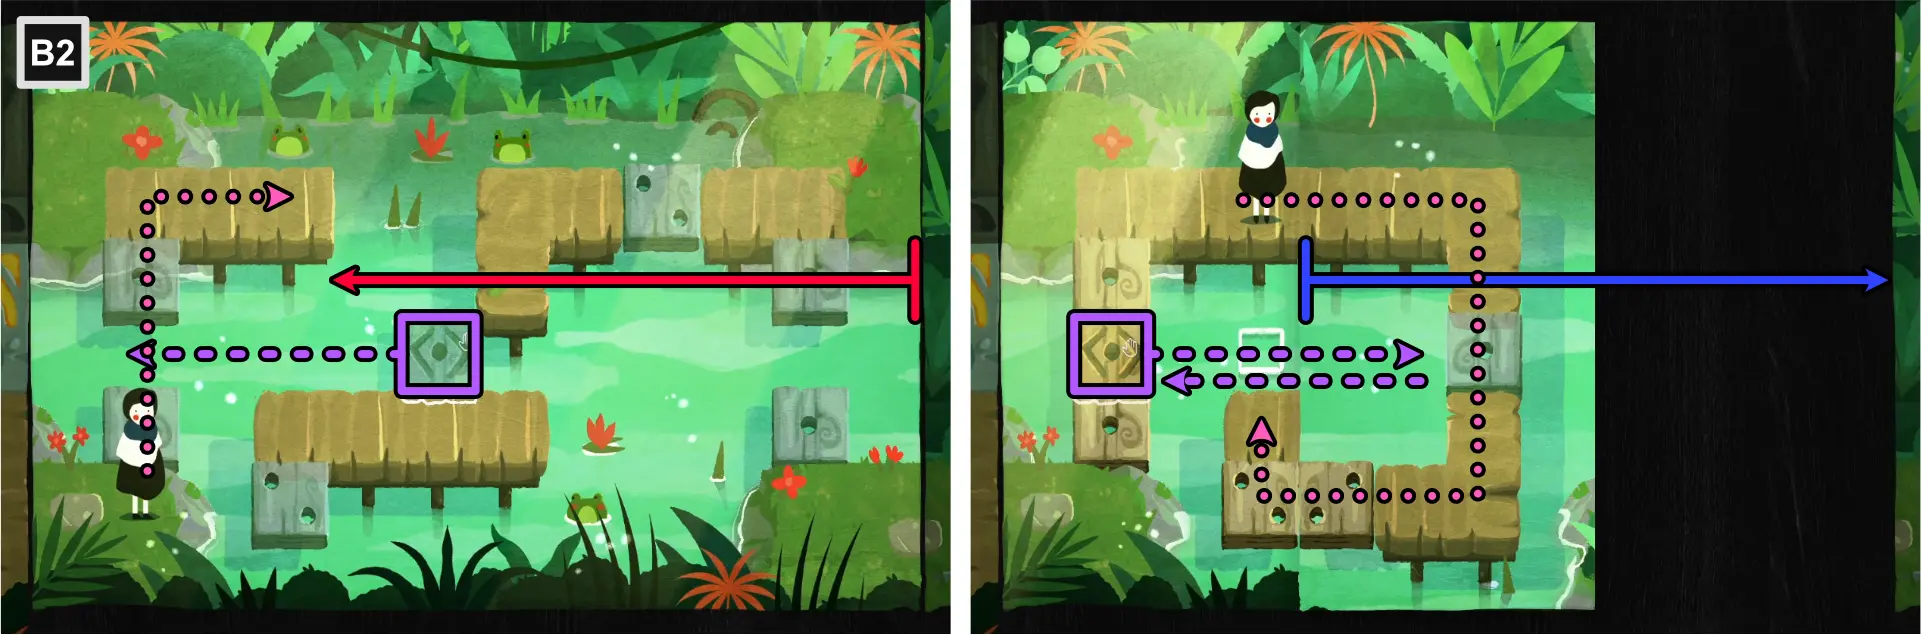
- At B2, move the floating tile to the left, connecting to the one-dotted tiles.
- Move Paige across the tiles and onto the upper left pier.
- Using the right edge, fold vertically to meet with the edge of the upper left pier.
- Move the floating one-dotted tile to the right, meeting with the other one.
- Follow the path until Paige gets to the center.
- Unfold the map.
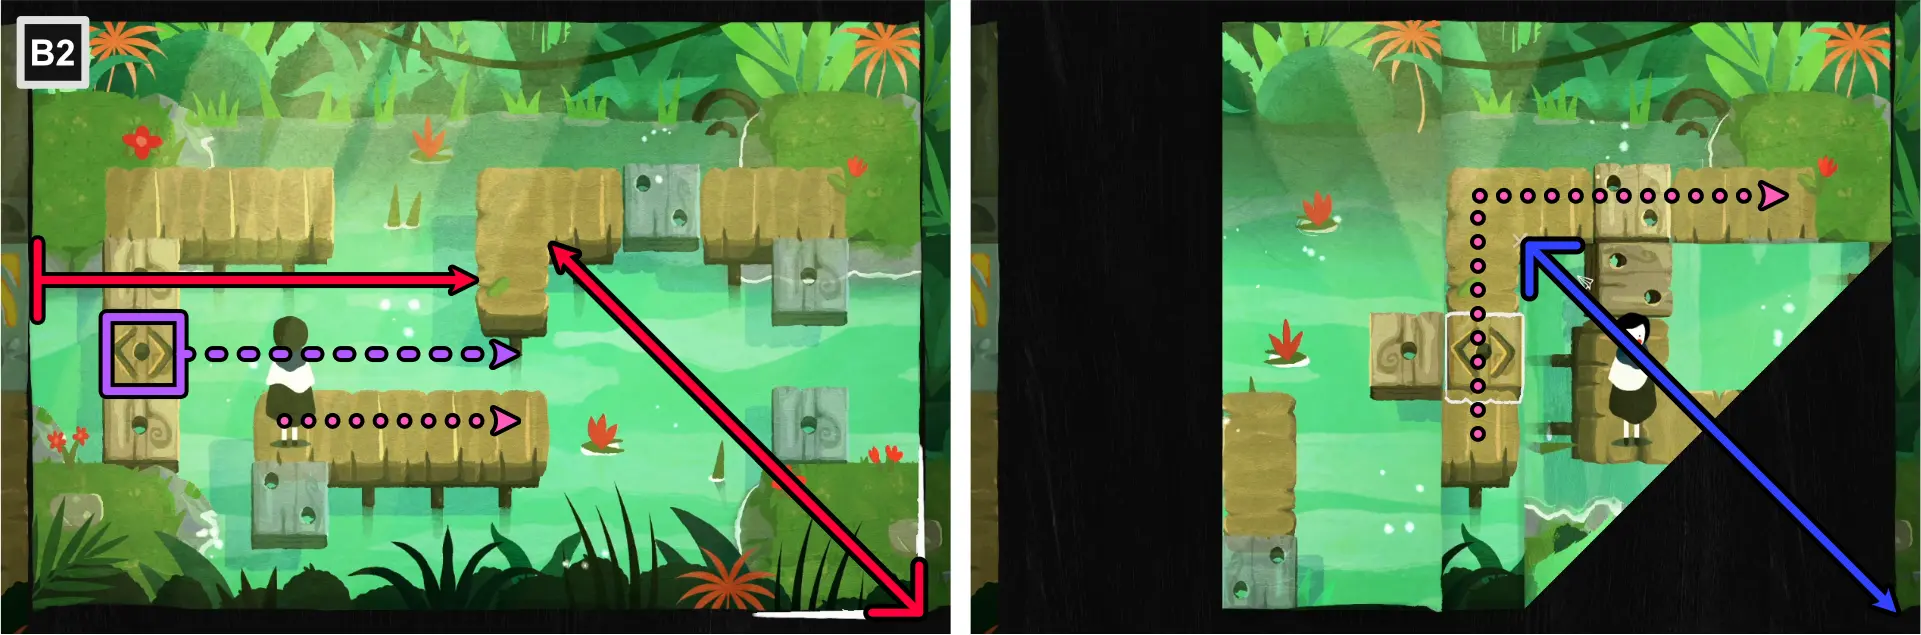
- Move the floating one-dotted tile to the right, in between the pier gap.
- Position Paige in front of the floating tile.
- Using the left edge, fold vertically, meeting with the edge of the upper right pier.
- Using the bottom right corner, fold diagonally, meeting with the inside corner of the upper right pier.
- Move Paige to the upper right platform.
- Unfold the map.
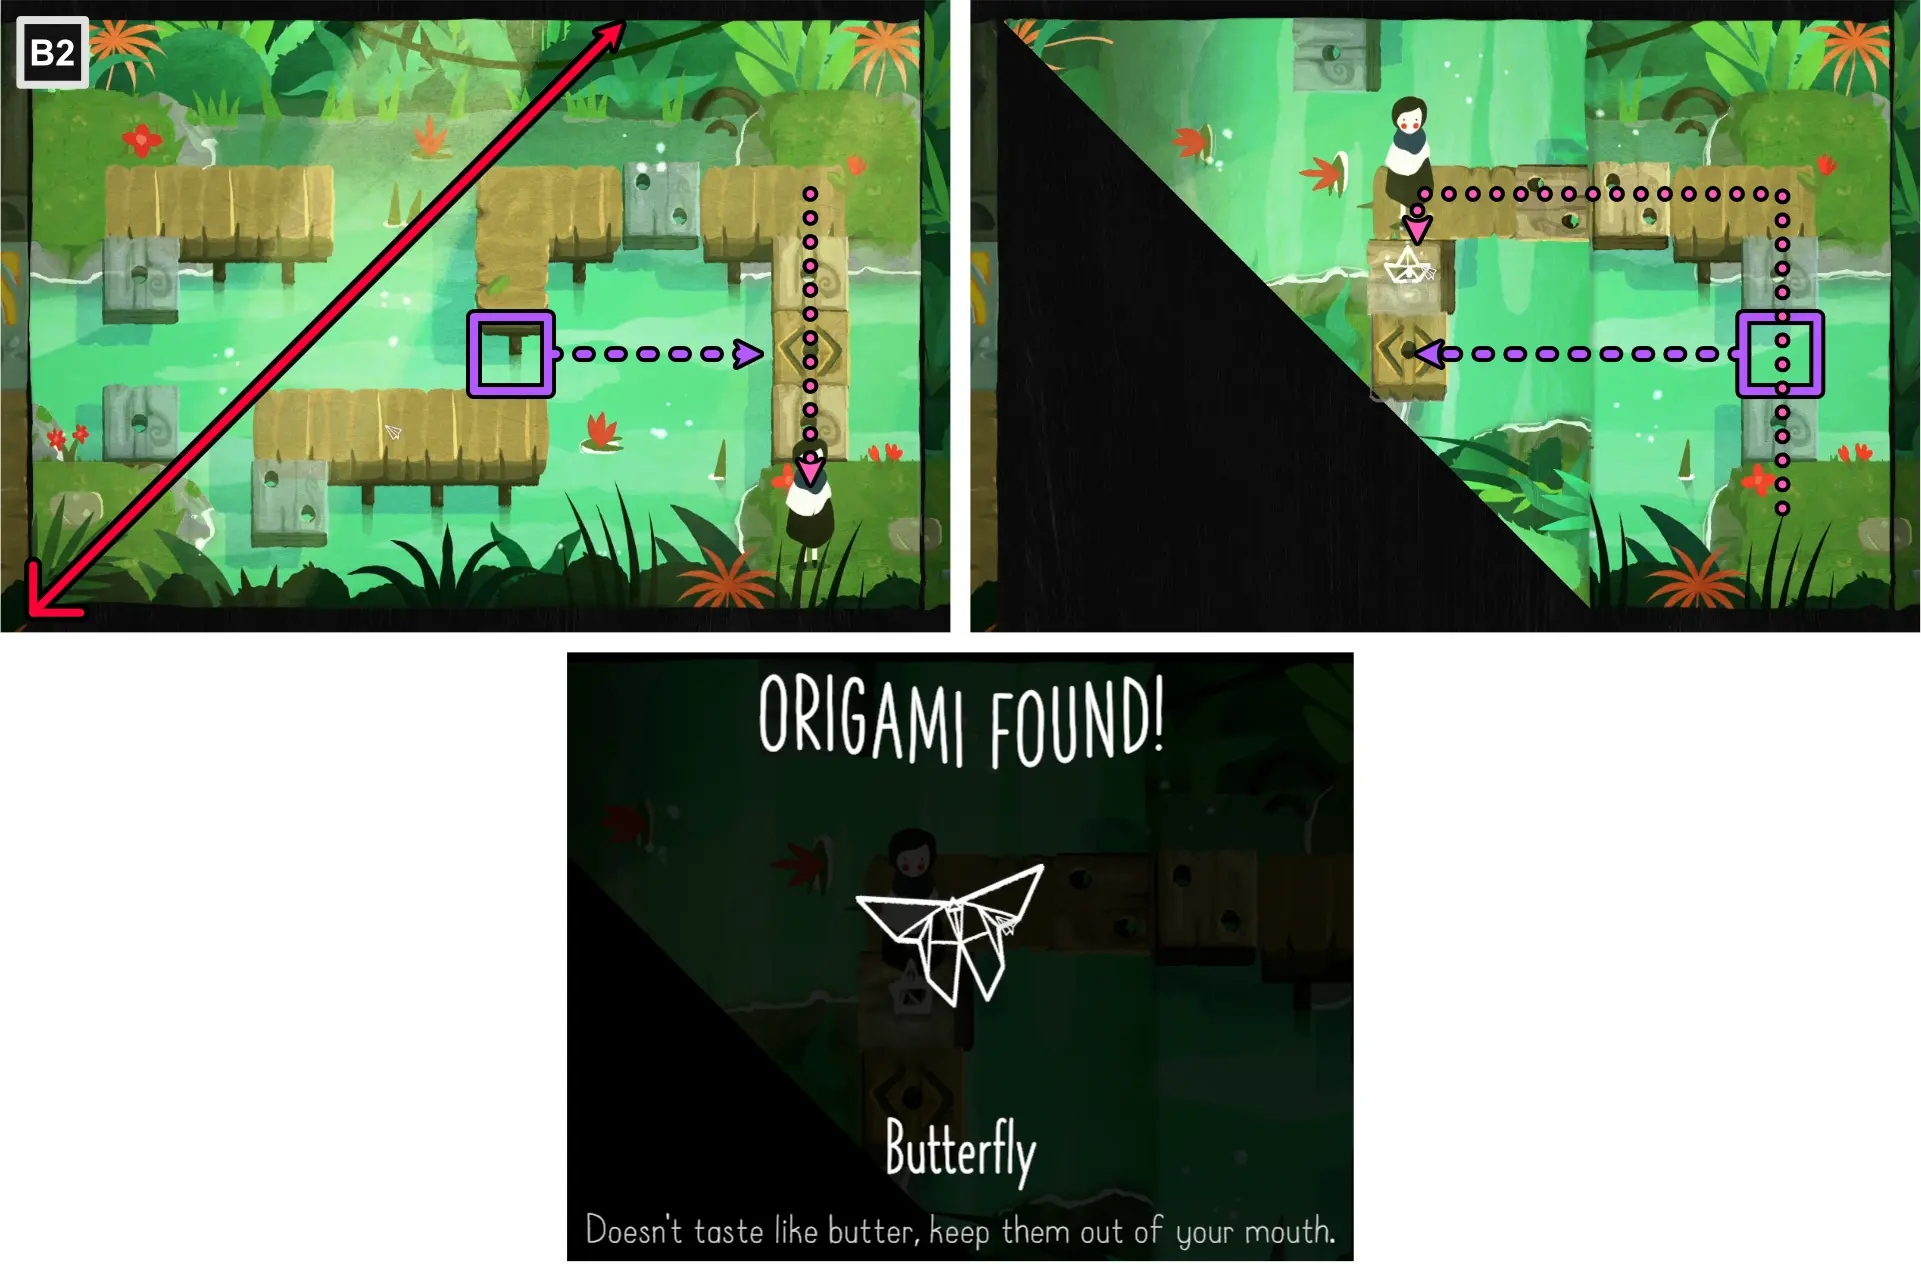
- Move the floating one-dotted tile to the right, connecting to the one-dotted tiles.
- Move Paige to the bottom right platform.
- Using the bottom left corner, fold diagonally, meeting with the top edge.
- Follow the path to the left fold.
- Move the floating one-dotted tile to the left, connecting to the other one.
- Collect the Butterfly Origami.
Snake Origami
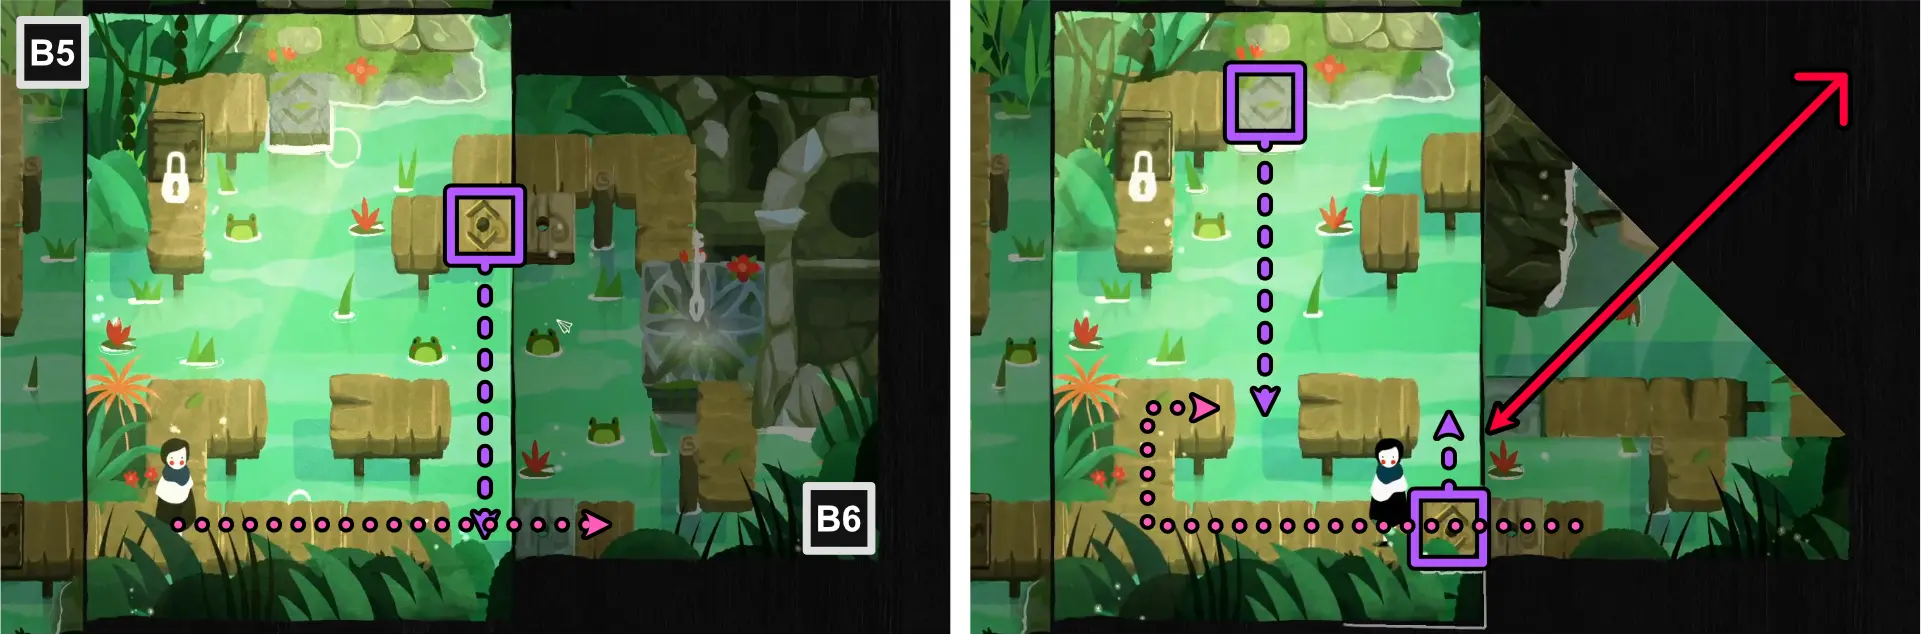
- At B5, move the floating one-dotted tile downward, connecting to the other one at B6.
- Move Paige to B6.
- Using the top right corner, fold diagonally, meeting the left edge.
- Move Paige back to B5.
- Move the floating stone tile downward, between the pier gap.
- Move the floating one-dotted tile upward, connecting with the other one at the fold in B6.
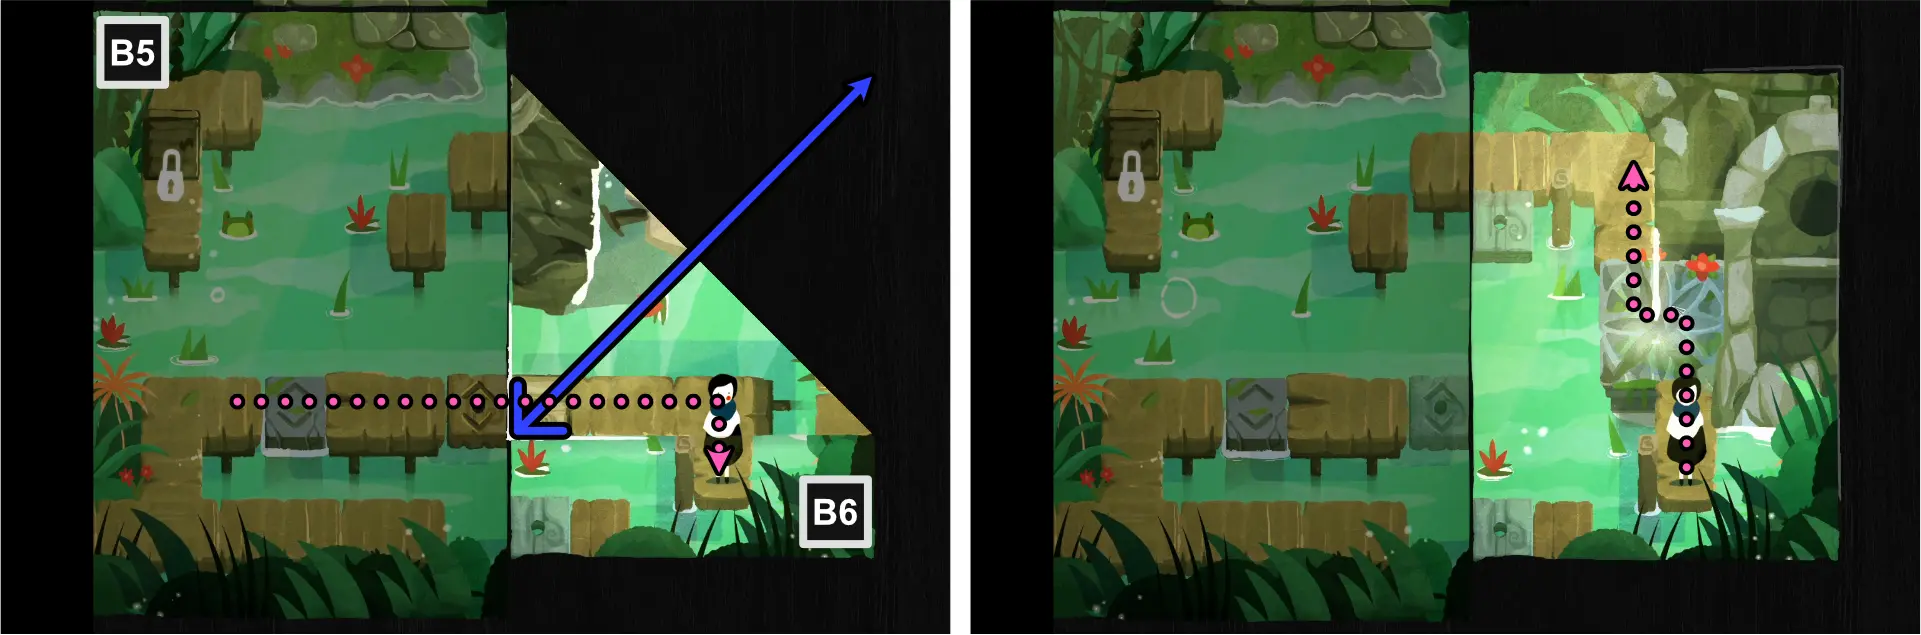
- Cross the pier path created by the floating tiles and go to B6.
- Unfold B6.
- Move Paige to the upper pier.
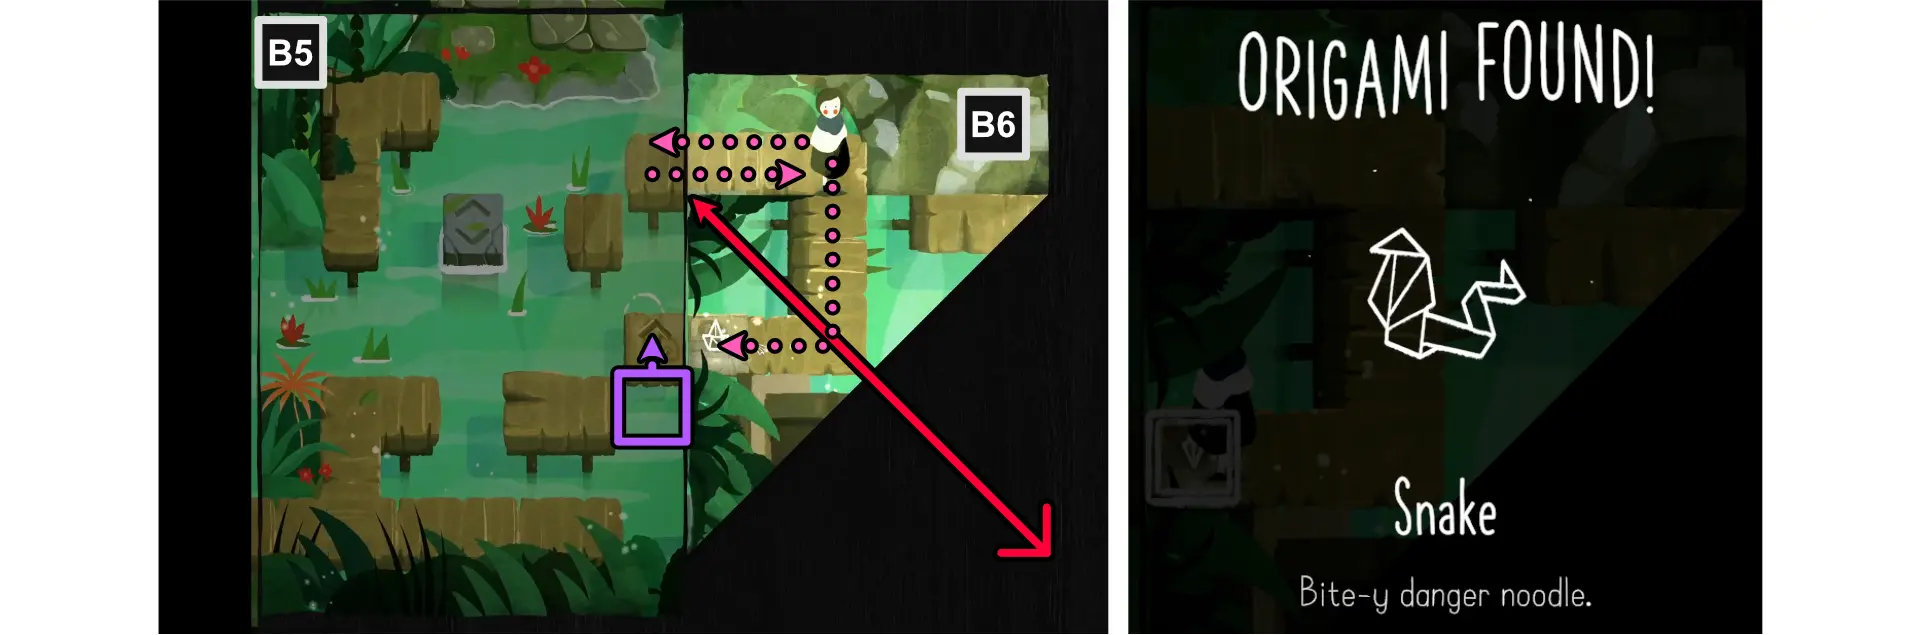
- Using the bottom right corner of B6, fold diagonally, meeting the left edge.
- Move Paige to B5.
- Move the floating one-dotted tile upward to connect to the one in the fold in B6.
- Move Paige to B6 and follow the path to collect the Snake Origami.
Dog Origami
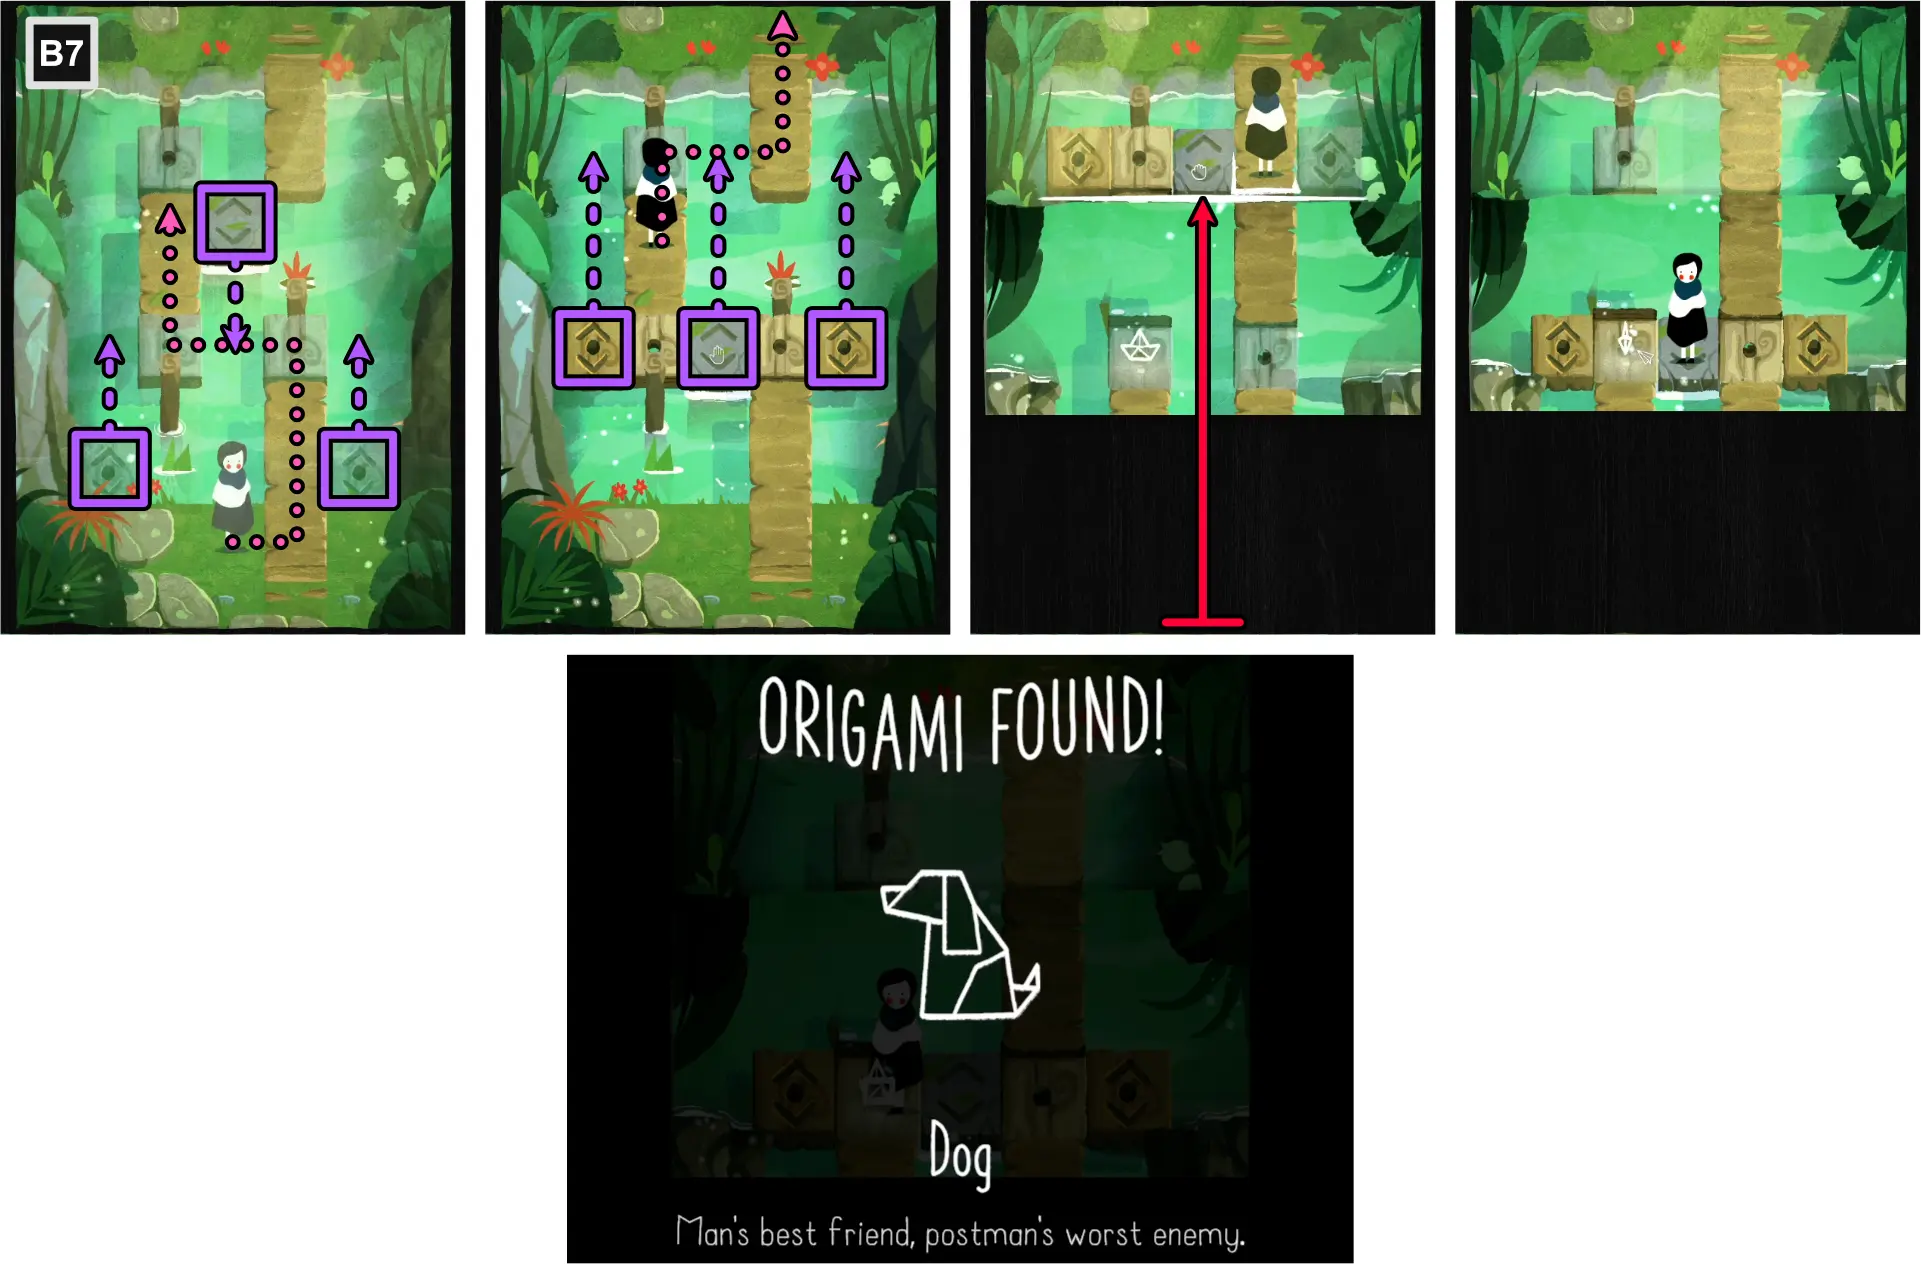
- At B7, Align all floating tiles to the one-dotted tiles at the center.
- Cross the pier and move to the left.
- Align all floating tiles to the one-dotted tile at the top.
- Move Paige upwards.
- Using the bottom edge, fold horizontally, aligning with the row of floating tiles.
- Align all floating tiles to the one-dotted tiles at the bottom.
- Move Paige down along the row of tiles and collect the Dog Origami.
Unlocking “Fold Shoulder”
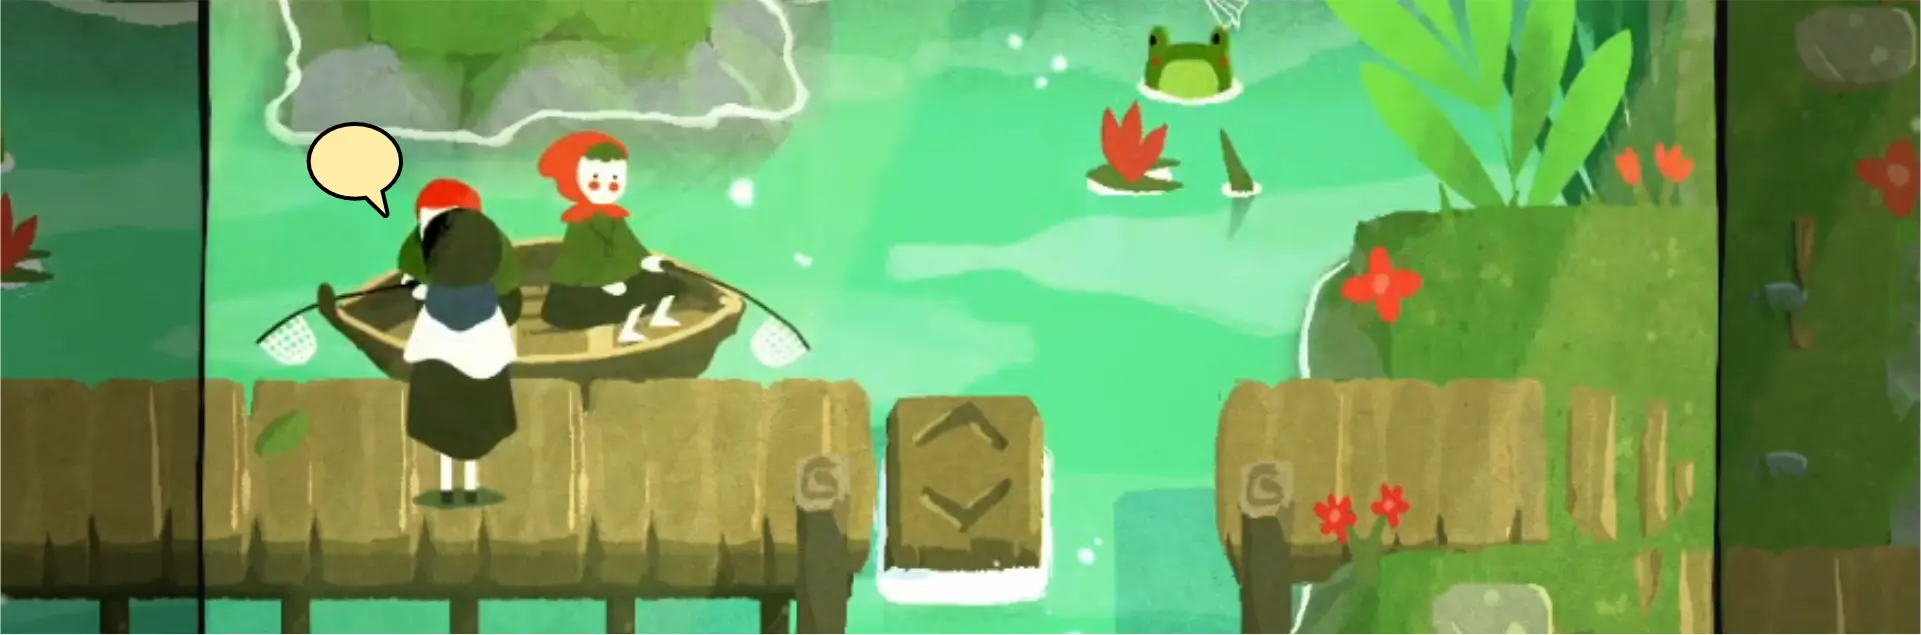
To unlock, talk to the siblings until a frog escapes from their boat.
Unlocking “Manifold Destiny”

To unlock, reverse the image of Oscar in the cutscene at the end of the Swamp chapter.
Chapter 4: Forest
Leaf Me Alone
Complete Forest.
Creased Lightning
Collect all Forest origami.
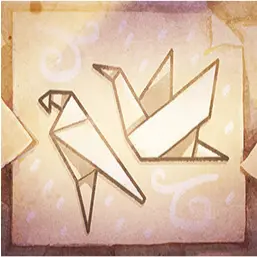
Unlocking “Creased Lightning” (All Forest Origami)
Parrot Origami
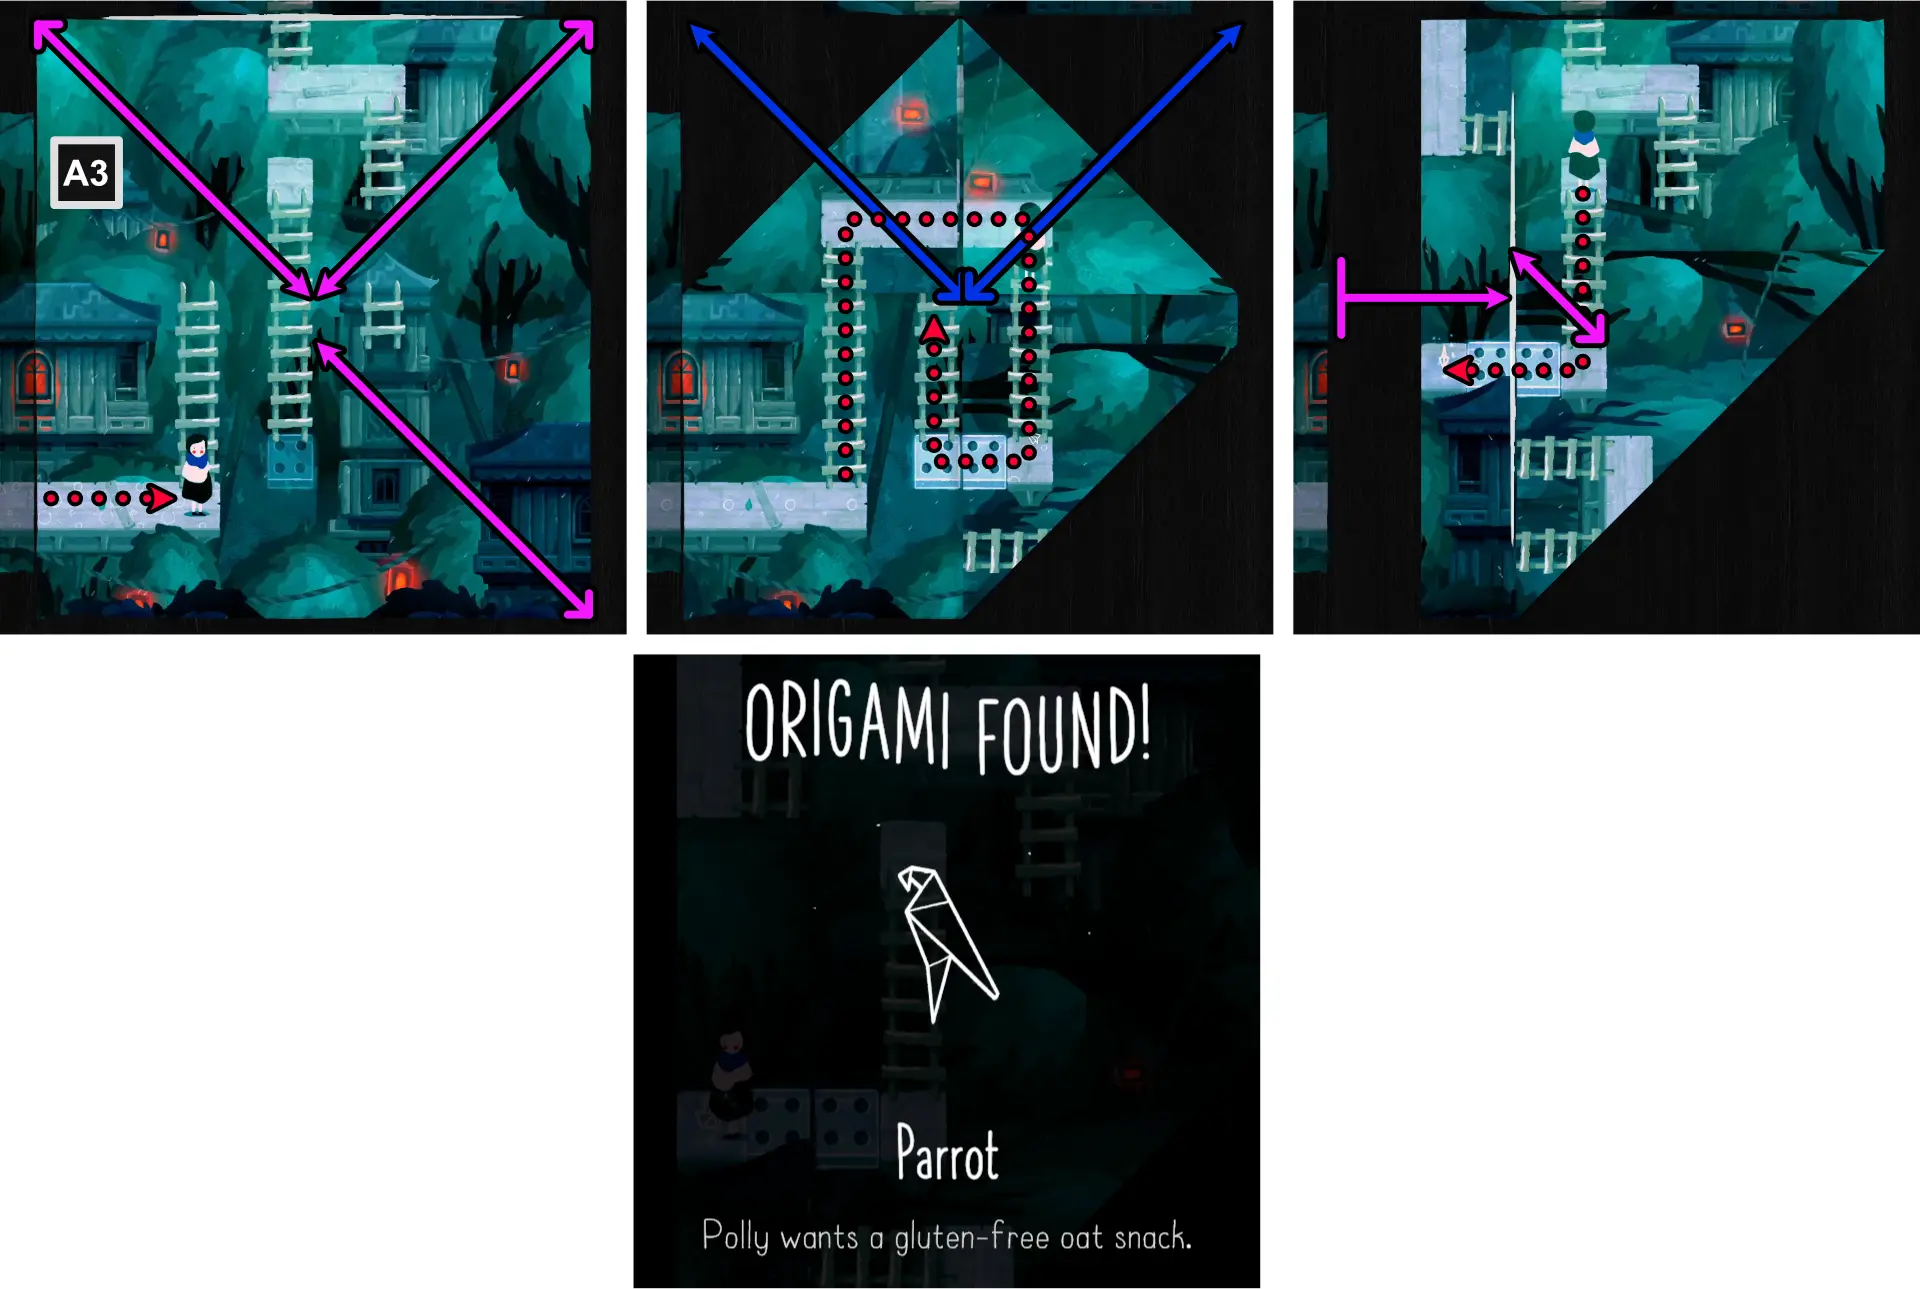
- At A3, using the top right, top left, and bottom right corners, fold diagonally towards the center.
- Move Paige onto the middle ladder.
- Unfold the map.
- Move Paige up the ladder to the top of the platform.
- Using the left edge, fold vertically, one space away from Paige.
- Using the bottom right corner, fold diagonally to connect the four-dotted tiles.
- Follow the path to collect the Parrot Origami.
Crane Origami
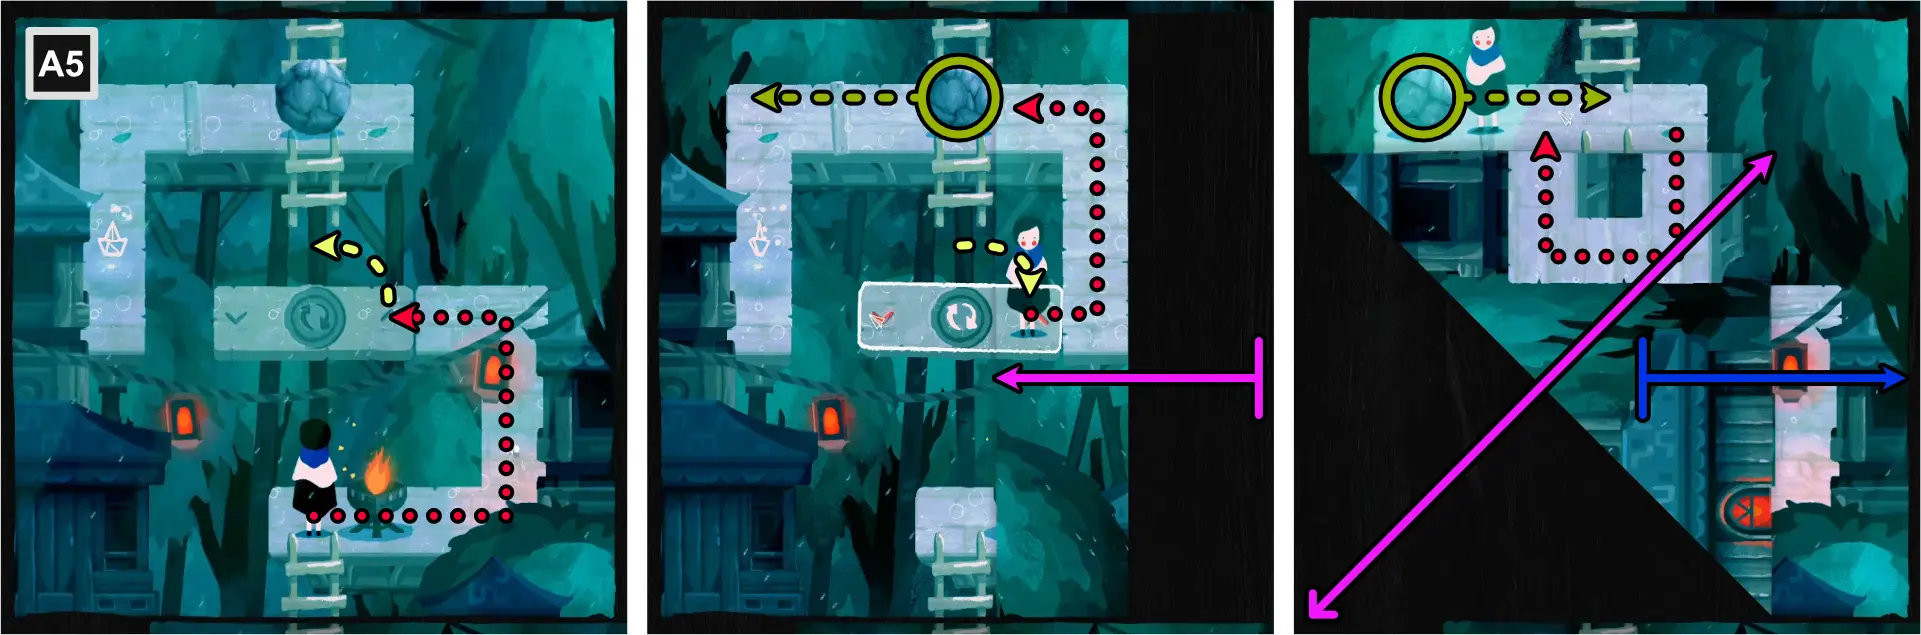
- At A5, move Paige onto the rotating plank.
- Rotate the plank into a vertical position.
- Using the right edge, fold vertically, aligning with the ladders.
- Rotate the plank to bring Paige closer to the platform on the right fold.
- Move Paige to the right of the boulder and push it to the left.
- Unfold the map.
- Using the bottom left corner, fold diagonally, aligning with the top platform.
- Pull the boulder to the right and use the path on the fold to get to the left side of it.

- Unfold the map.
- Move down the path and collect the Crane Origami.
Squirrel Origami
- At B2, move down the ladder and enter the spiral door to exit to the one at the upper right.
- Using the right edge, fold vertically, aligning with the edge of the platform where Paige is.
- Move Paige to the right fold.
- Using the left edge, fold vertically to meet with the other fold.
- Enter the square spiral door to exit out of the other one at the lower right.
- Unfold the right fold.
- Using the bottom right corner, fold diagonally to connect the four-dotted tiles.
- Move across the tiles to collect the Squirrel Origami.
Pigeon Origami
- For this origami, you need to have solved B2 before you can collect it. Paige must be by the left exit, on top of the trap door. View the solution in “Chapter 4, section Abandoned House (B1-B7).”
- Using the right edge, fold vertically, aligning with Paige.
- Enter the triangle door to exit out of the one at the right fold.
- Go down the ladder to collect the Pigeon Origami.
Dove Origami
- Move Paige onto the rotating plank.
- Using the left edge of C2, fold vertically, aligning with the rotating plank.
- Using the top edge of C4, fold horizontally, meeting with the opposite edge.
- Rotate the plank to a horizontal position.
- Enter the spiral door to exit out of the one at C1.
- Go up the ladder and move Paige onto the floating tile.
- Move the tile one space to the right to C4.
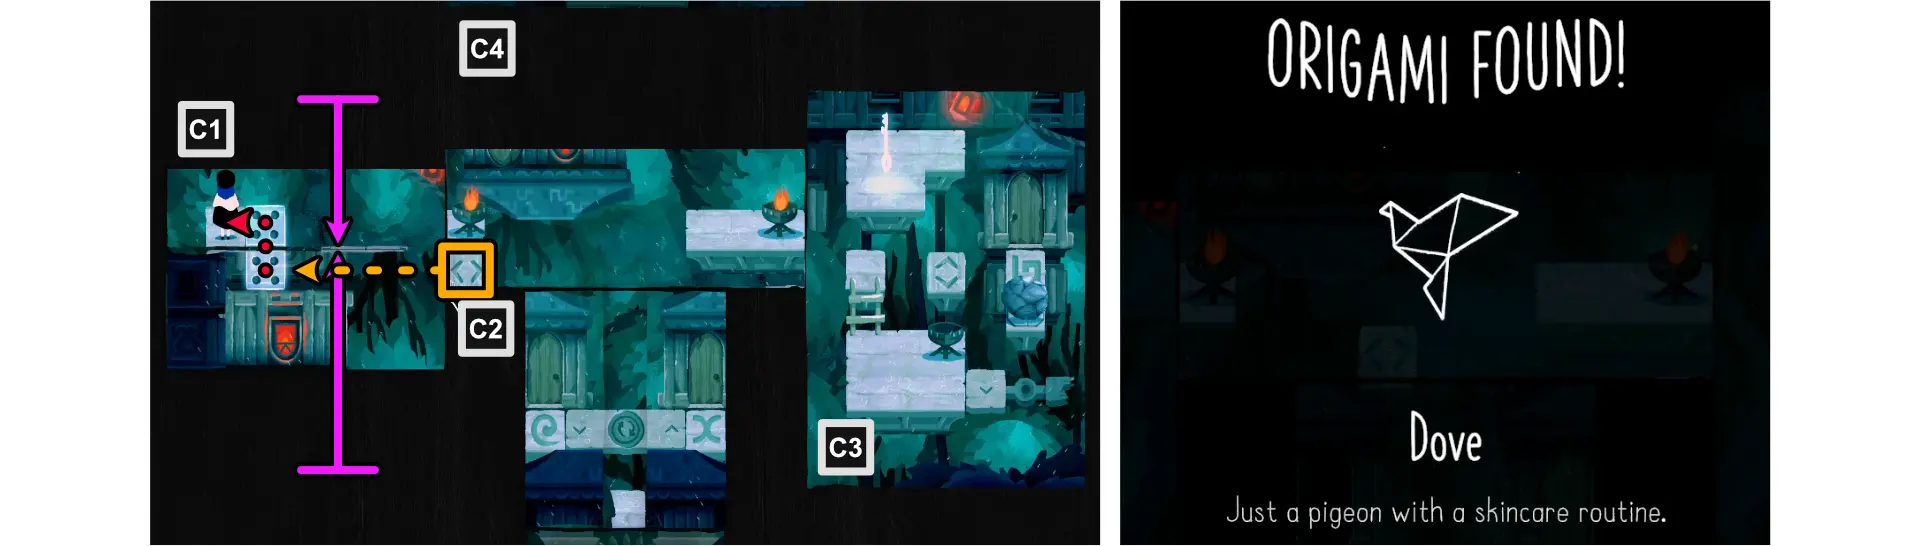
- Using the top edge of C1, fold horizontally to reveal the five-dotted tile.
- Using the bottom edge of C1, fold horizontally to connect to the other five-dotted tile.
- Move the floating tile to the five-dotted tiles in C1.
- Collect the Dove Origami.
Chapter 5: Autumn
Stop, Drop and Fold
Complete Autumn.
Craftwork Orange
Collect all Autumn origami.
Unlocking “Craftwork Orange” (All Autumn Origami)
Flamingo Origami

- Upon unlocking C1, using the bottom right corner, fold diagonally, aligning with the path to C2.
- Move Paige to the small bit of pier to the left of the boy.
- Using the top edge, fold horizontally to meet with the bottom fold.
- Follow the path to collect the Flamingo Origami.
Tiger Origami

- After the festivities have ended (after the cutscene), move to the right to go to C3.
- Position Paige on the left edge of the pier.
- Move the floating tile in front of Paige.
- Using the right edge, fold horizontally, aligned to Paige’s position.
- Follow the path and position Paige on the pier at the right fold.
- Using the left edge, fold horizontally, meeting the right fold.
- Move Paige to the small bit of pier below.
- Unfold the left fold.
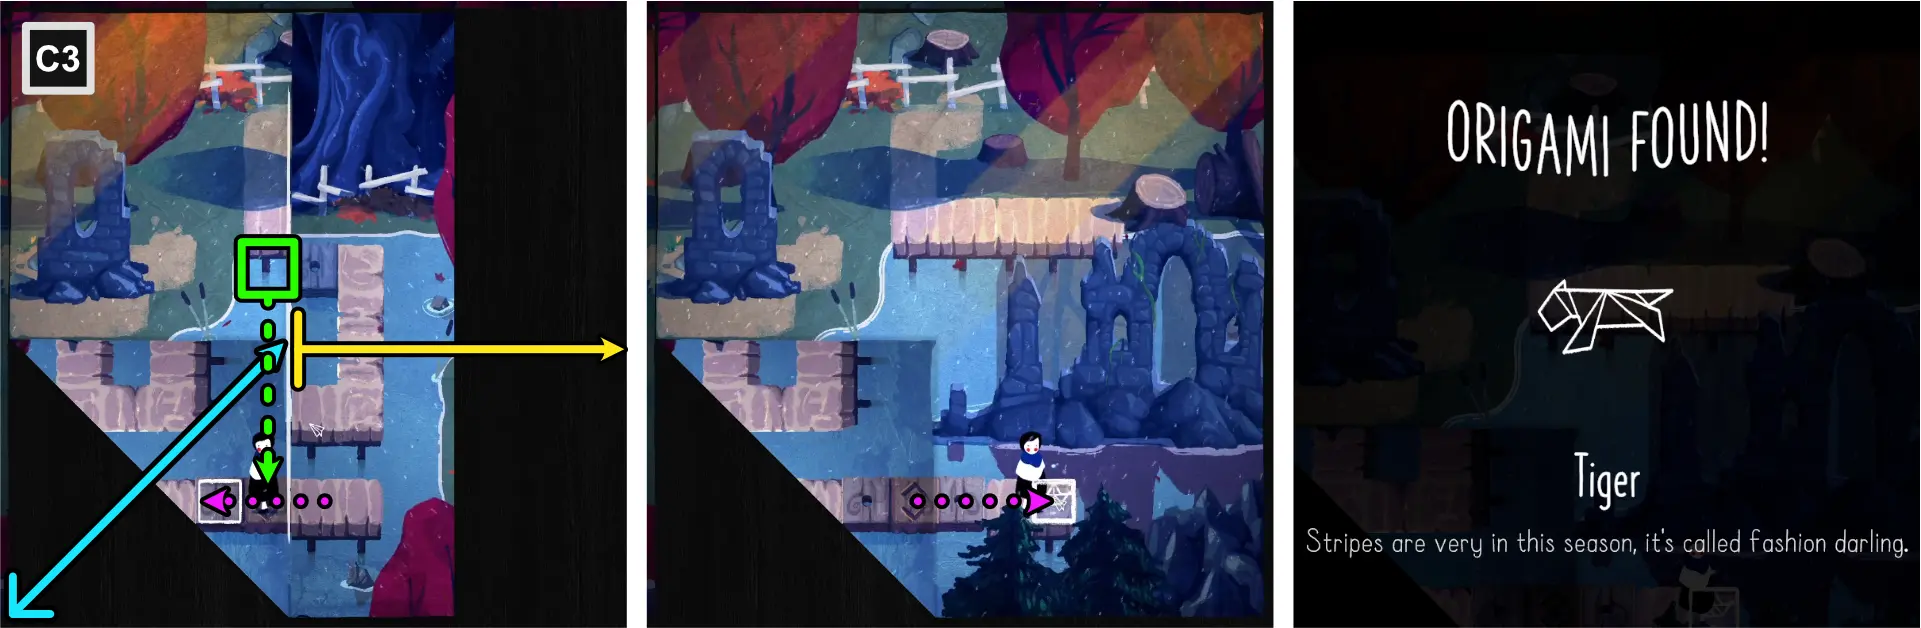
- Using the bottom left corner, fold diagonally, meeting the right fold.
- Move the floating tile downward, bridging the pier gap.
- Move Paige to the left fold.
- Unfold the right fold.
- Move to the right to collect the Tiger Origami.
Chapter 6: Ruins
Jurassic Fold
Complete Ruins.
Papyrologist
Collect all Ruins origami.
Papering the Cracks
Knock over the vase.
Unlocking “Papyrologist” (All Ruins Origami)
Dinosaur Origami
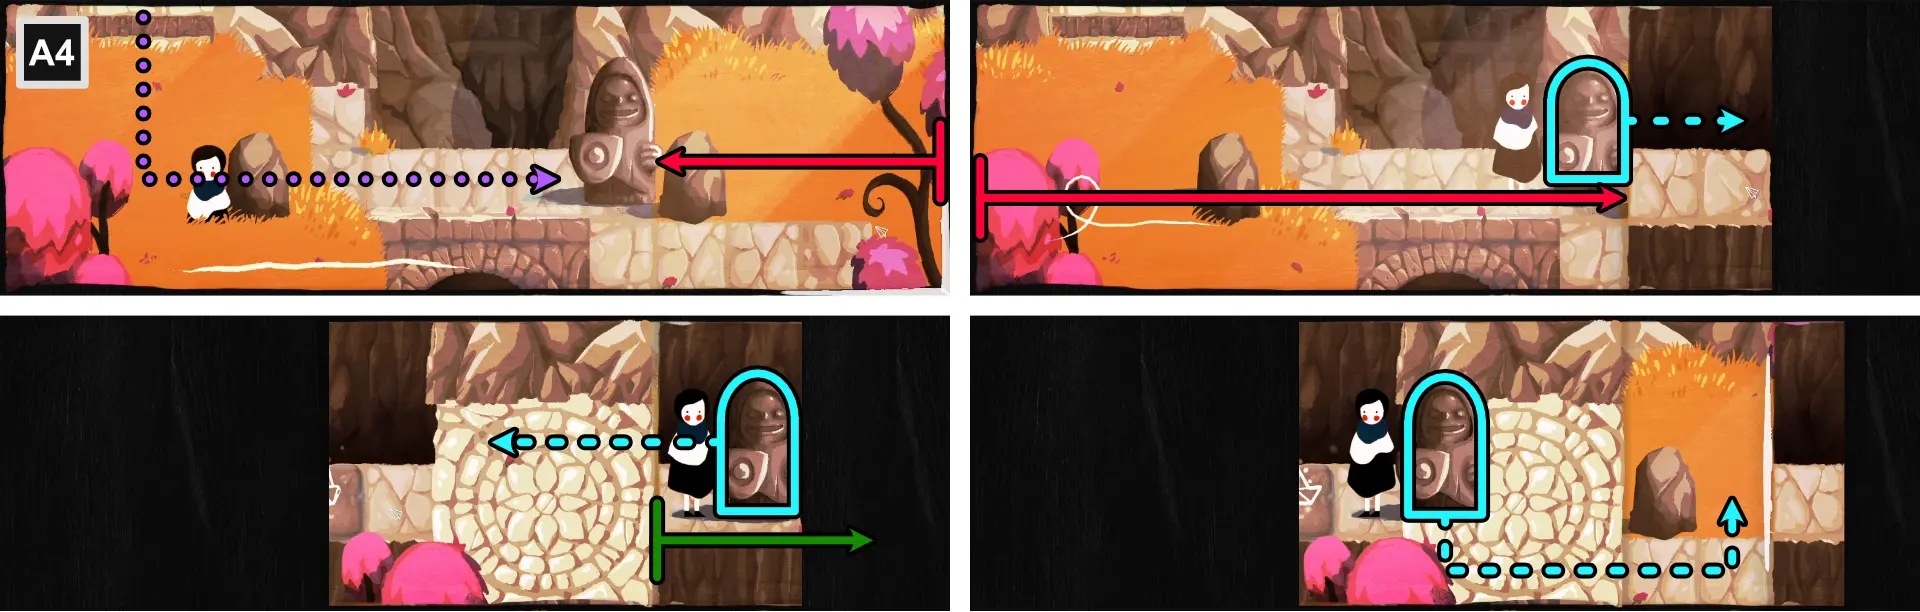
- At A4, position Paige to the left of the statue.
- Using the right edge, fold vertically, just to the right of the statue.
- Push the statue to the end of the right fold.
- Move the statue onto the left fold.
- Move the right fold one space to the right.
- Move the statue to the right of the rock.
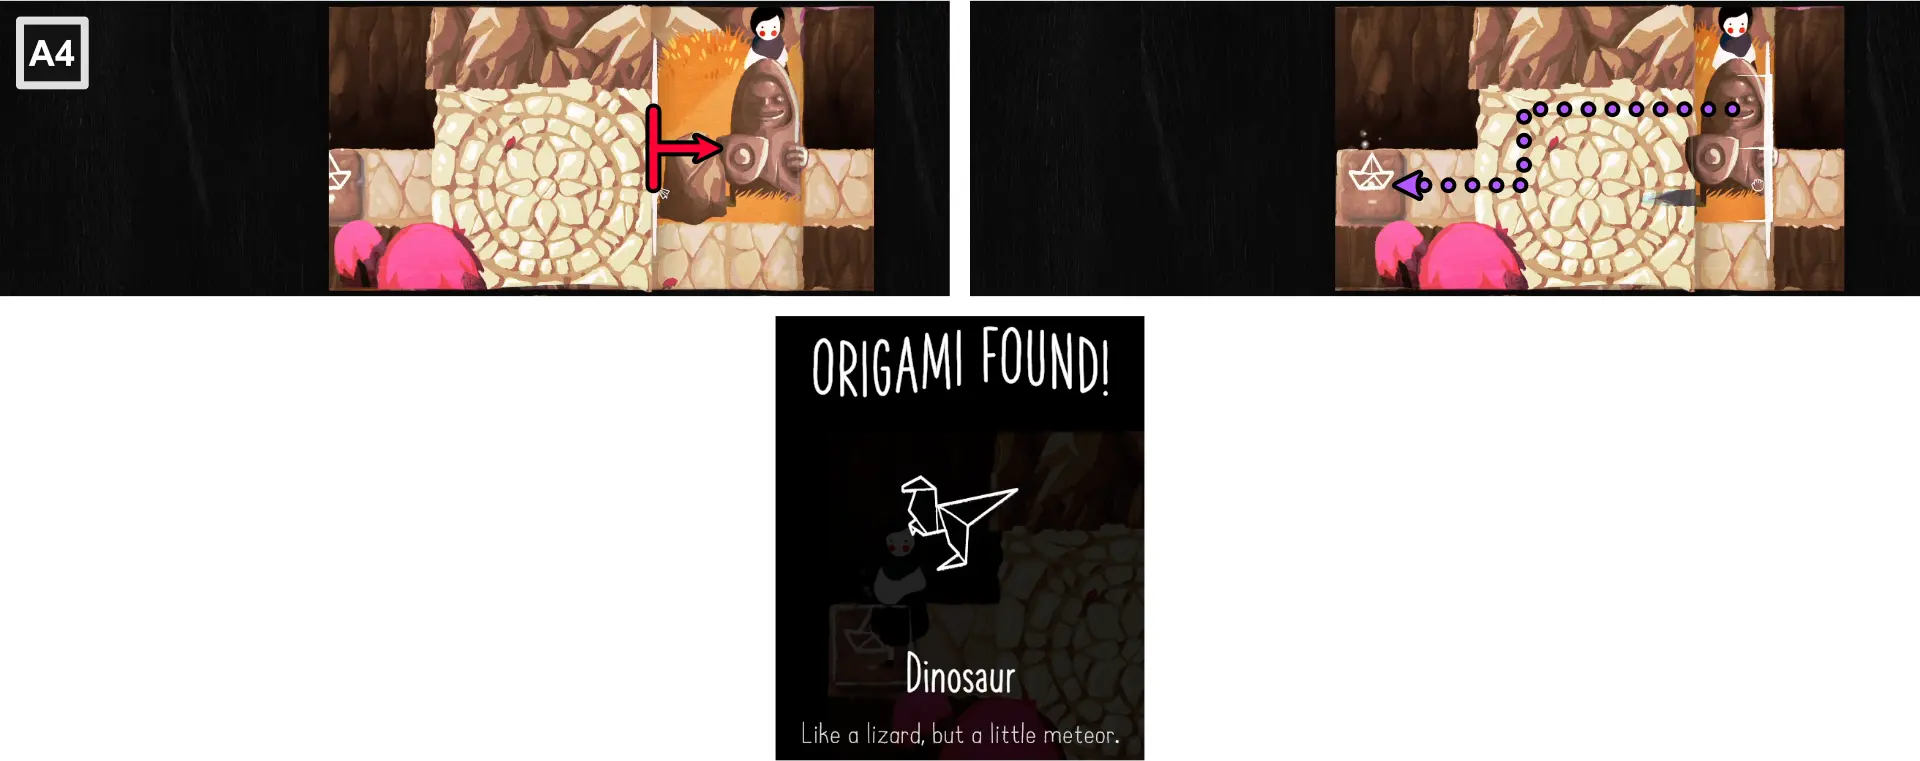
- Move the left fold one space to the right, covering the rock.
- Move to the right and collect the Dinosaur Origami.
Elephant Origami
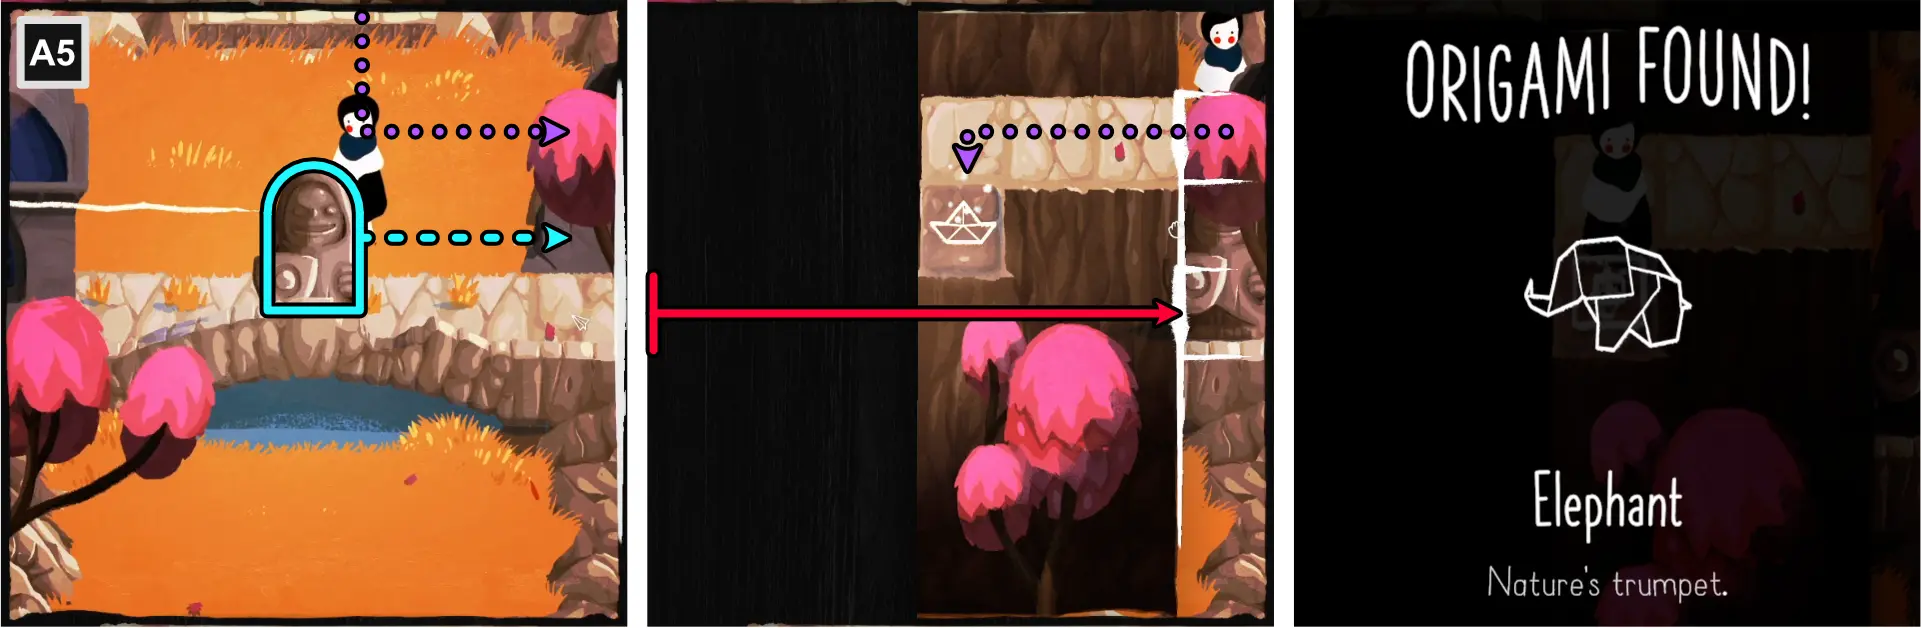
- At A5, move the statue to the right end of the map.
- Position Paige just above the statue.
- Using the right edge, fold vertically, aligning to Paige’s position.
- Move to the right and collect the Elephant Origami.
Giraffe Origami
- At A6, using the bottom edge, fold horizontally, just below the statue.
- Push the statue to the right, leaving a space between it and the rock.
- Position Paige to the right of the statue.

- Push the statue to the left.
- Unfold the map.
- Using the right edge, fold vertically, just to the right of Paige.
- Move to the right and collect the Giraffe Origami.
Lion Origami
- For this origami, you need to have solved B5 before you can collect it. Paige must be by the bottom exit. View the solution in “Chapter 6, section Mysterious Carvings (B1-B7).”
- Using the left edge, fold vertically, just to the left of the floating tile.
- Move to the left to collect the Lion Origami.
Unlocking “Papering the Cracks”

- To unlock, move towards the vase in A1 and knock it over the edge.
Chapter 7: Temple
Holy Sheets
Complete Temple.
Lara Craft
Collect all Temple origami.
Picture Purr-fect
Find the comfy cat.
Unlocking “Lara Craft”
Rock Origami
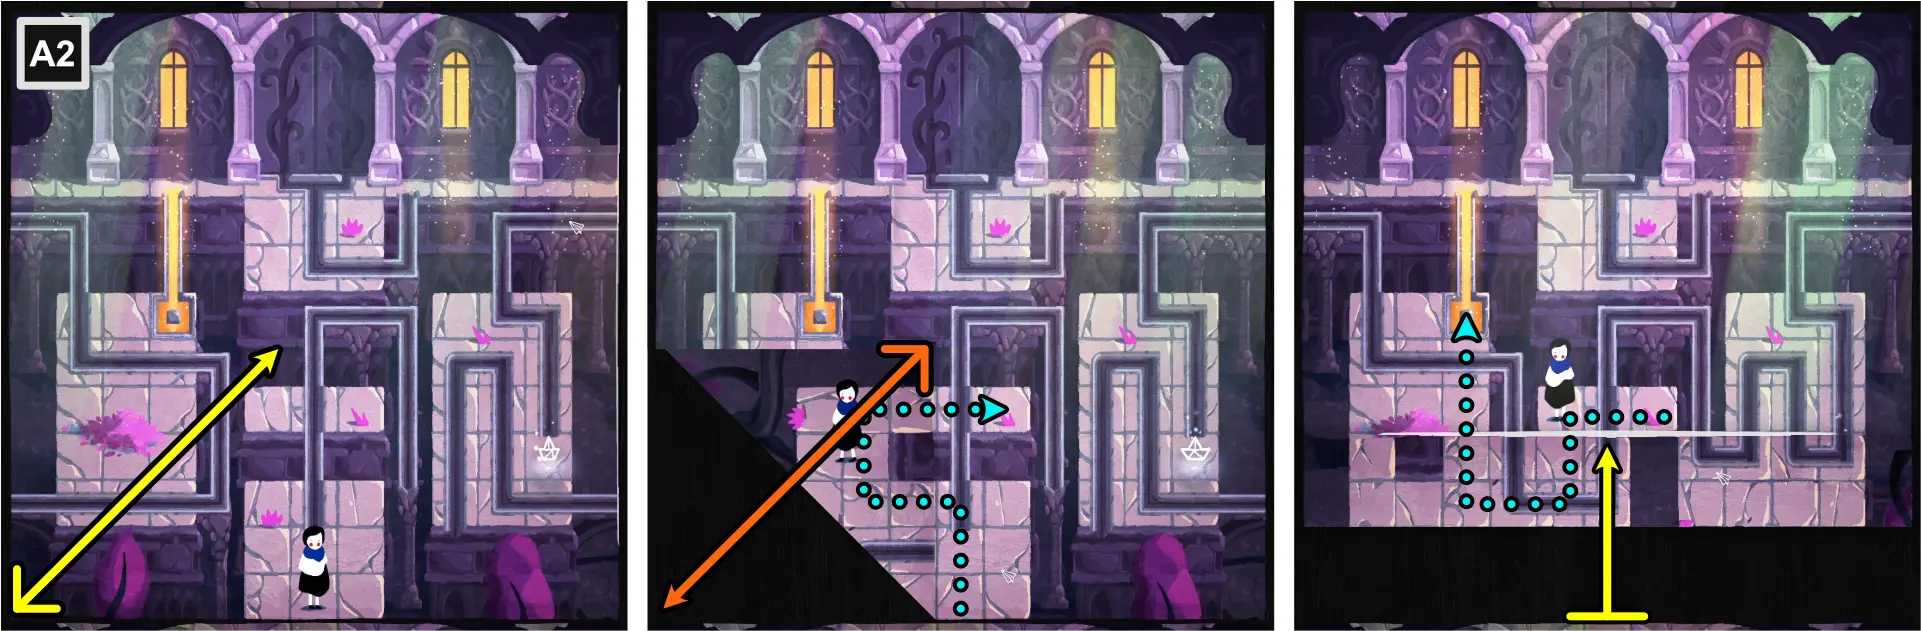
- At A2, using the bottom left corner, fold diagonally, along the edge of the center tiles.
- Move Paige upward, to the strip of platform at the center.
- Unfold the map.
- Using the bottom edge, fold horizontally, meeting the edge of the middle platform.
- Move Paige to the energy tile at the left platform.
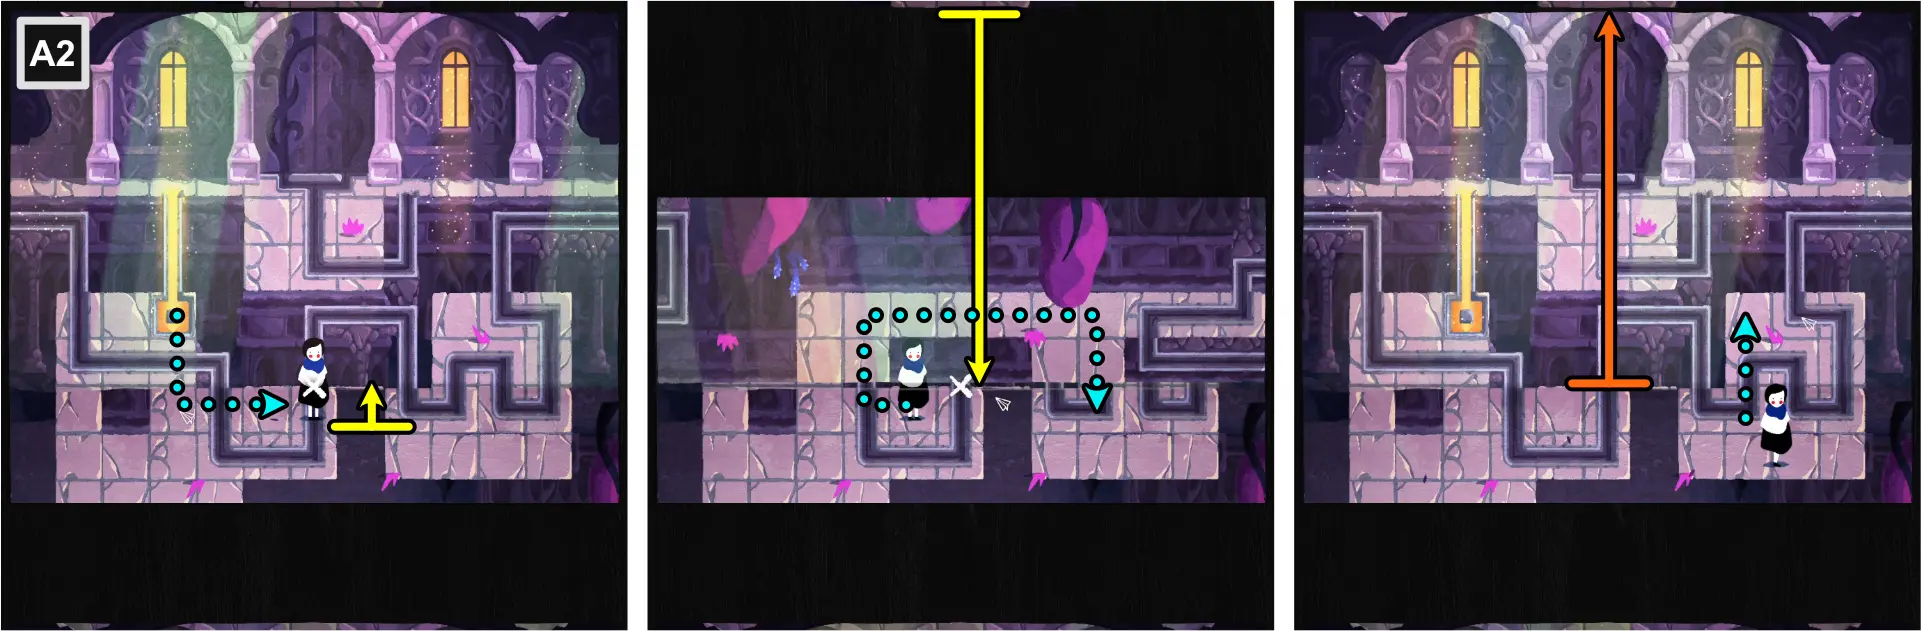
- Move the bottom fold 1 space upward.
- Move Paige onto the bottom fold.
- Using the top edge, fold horizontally, meeting with the bottom fold.
- Move Paige to the right platform of the bottom fold.
- Unfold the top fold.
- Move Paige onto the upper part of the right platform, off the fold.
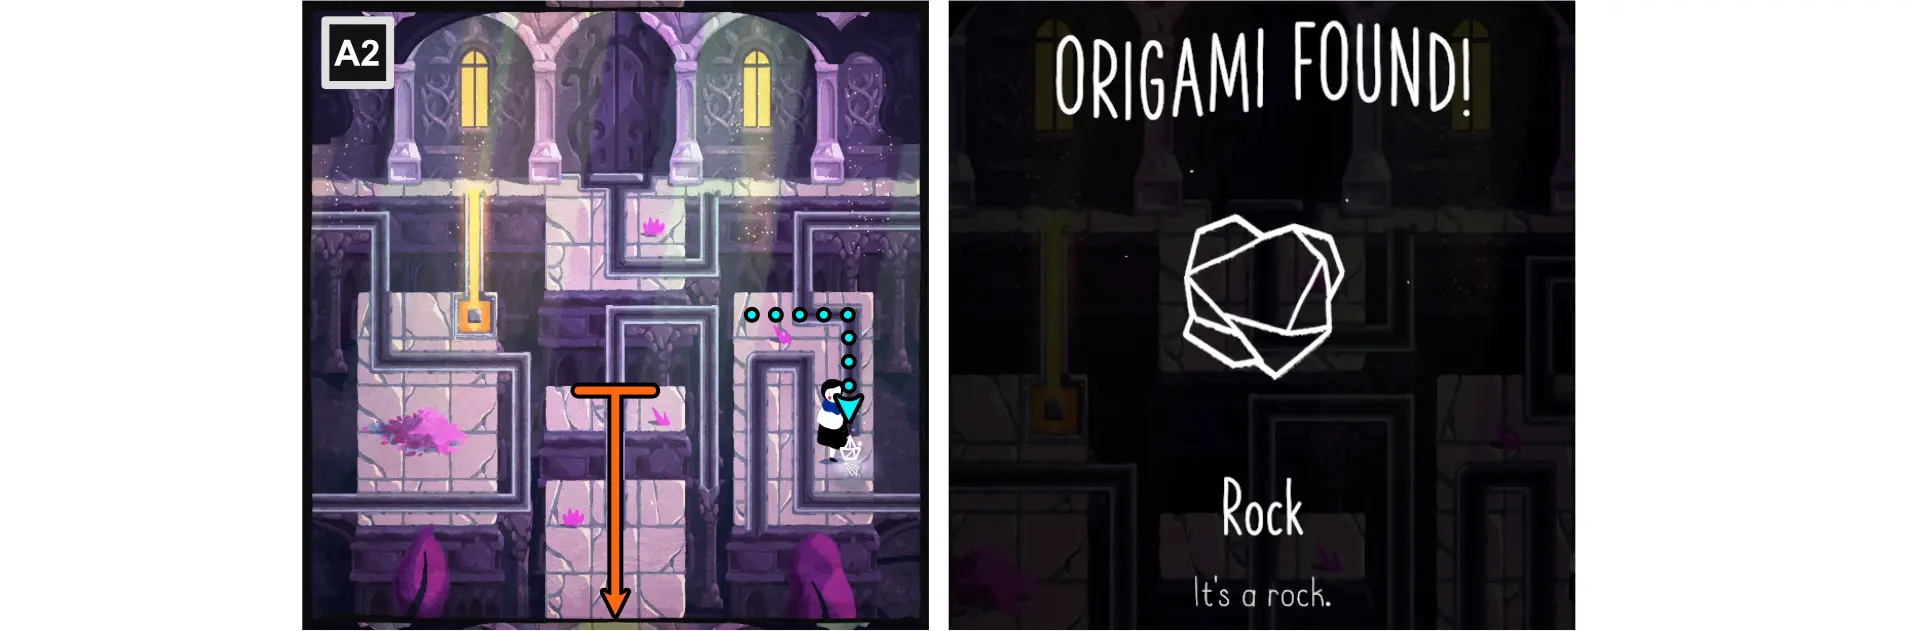
- Unfold the bottom fold.
- Collect the Rock Origami.
Bear Origami
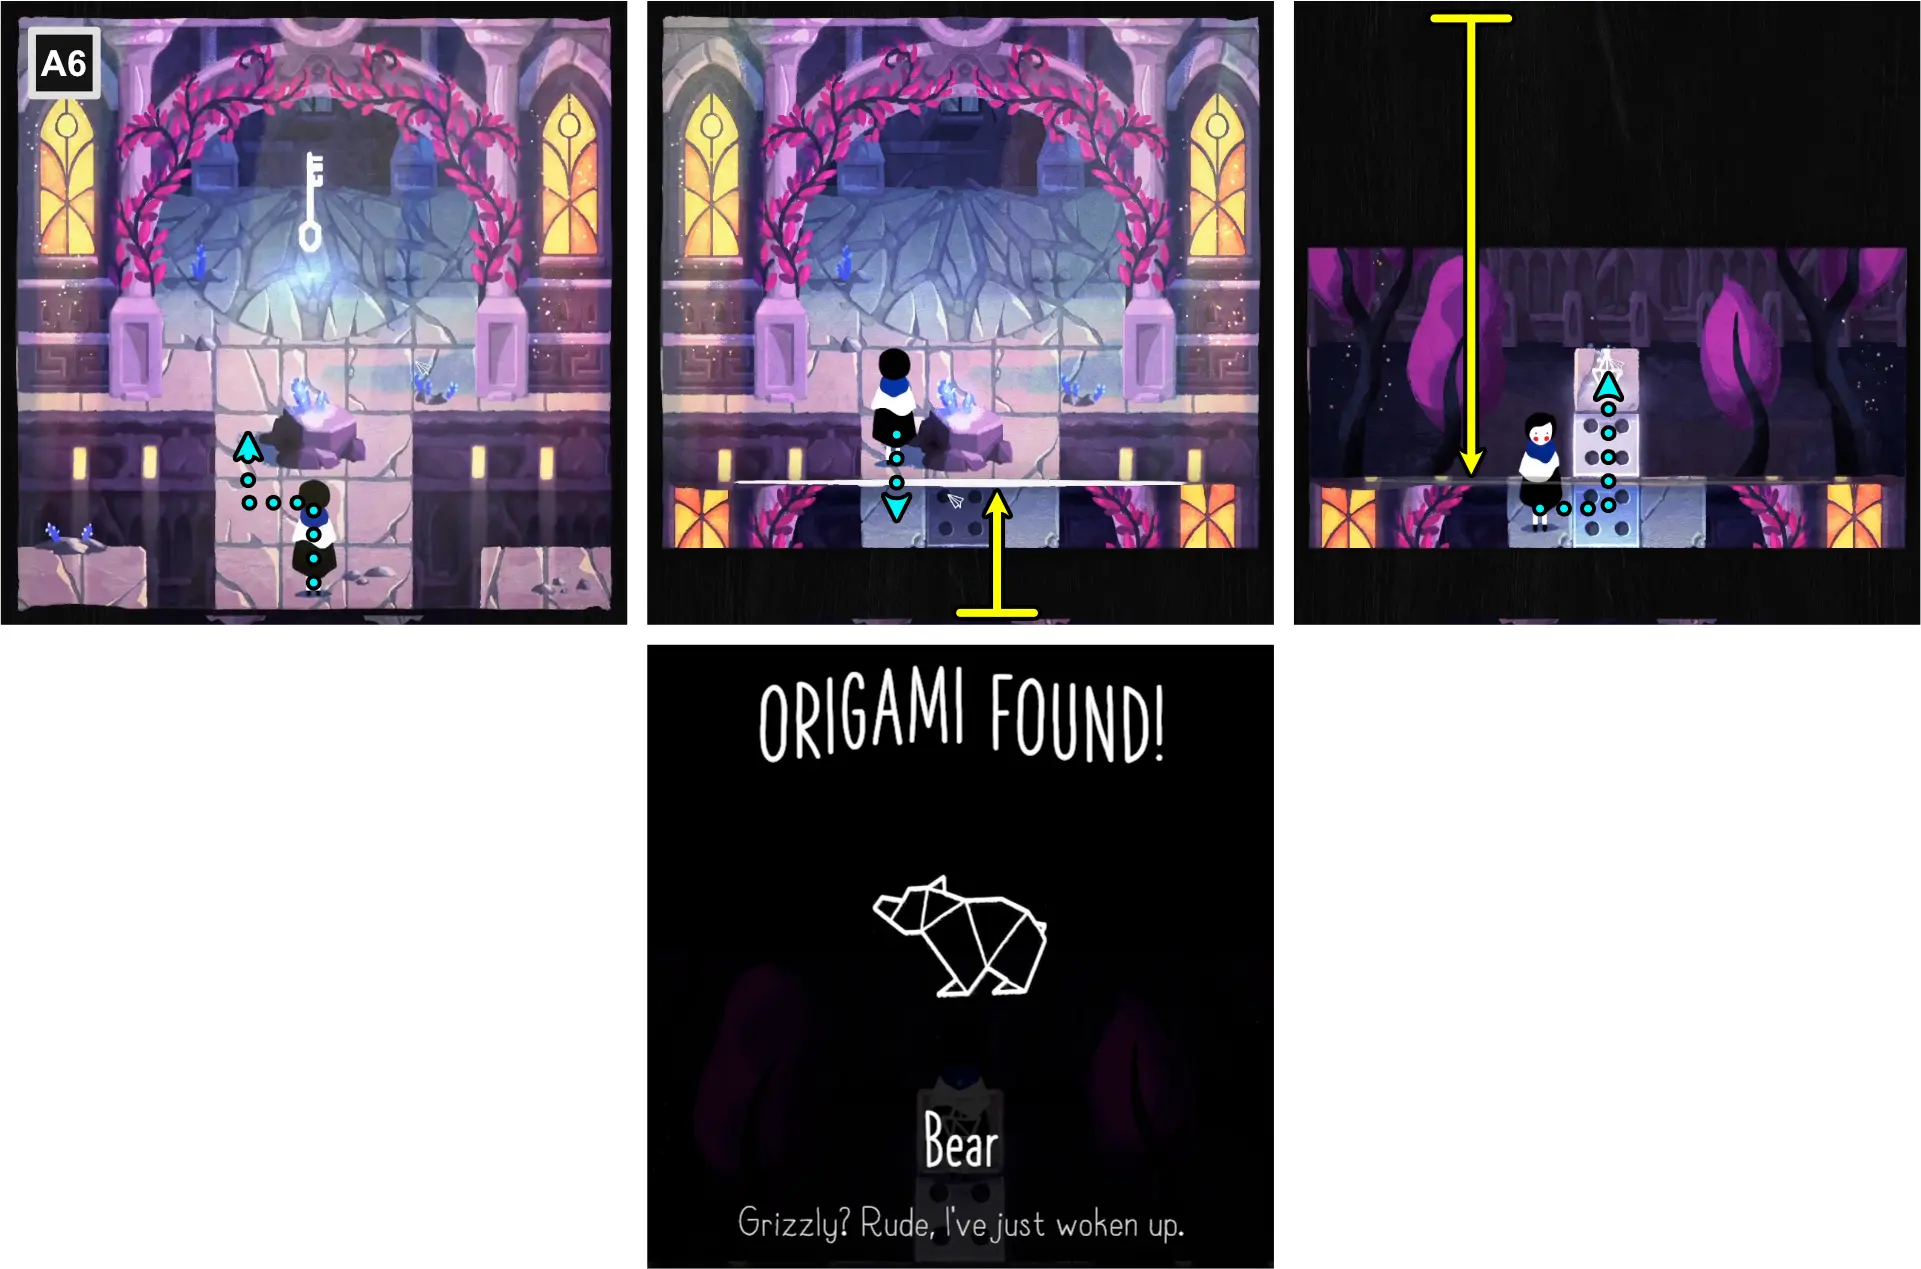
- At A6, move 3 spaces upward, next to the rock.
- Using the bottom edge, fold horizontally, just below the rock.
- Move Paige onto the bottom fold.
- Using the top edge, fold horizontally, meeting the four-dotted tiles.
- Move Paige upwards to collect the Bear Origami.
Rabbit Origami
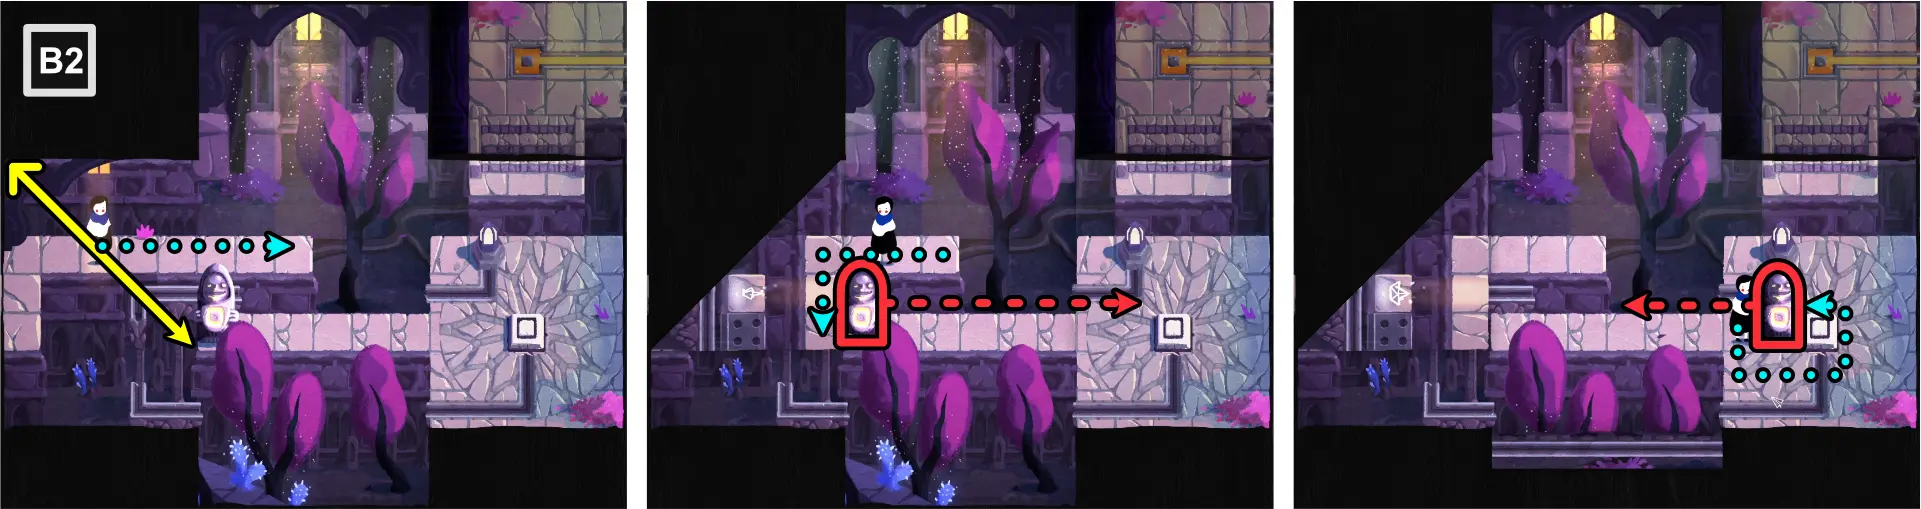
- At B2, move Paige to the right end of the platform.
- Using the top left corner, fold diagonally, aligning just behind the statue.
- Move Paige downward and push the statue just to the left of the pressure plate.
- Move Paige to the right of the statue.
- Push the statue to the left, until you get to the center.
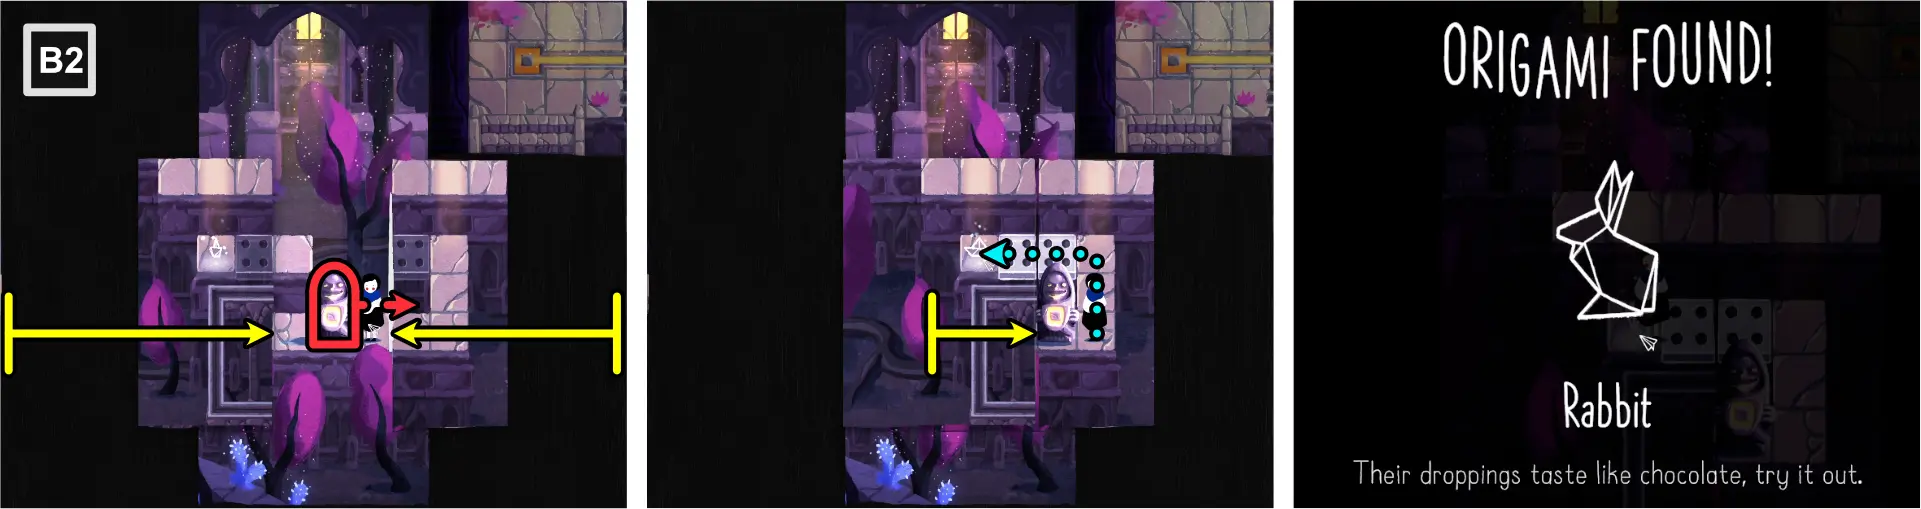
- Using the side edges, fold towards the center, leaving 3 spaces at the middle.
- Move the statue towards the right fold.
- Move the left fold to the right to meet the right fold.
- Follow the path and collect the Rabbit Origami.
Rhino Origami
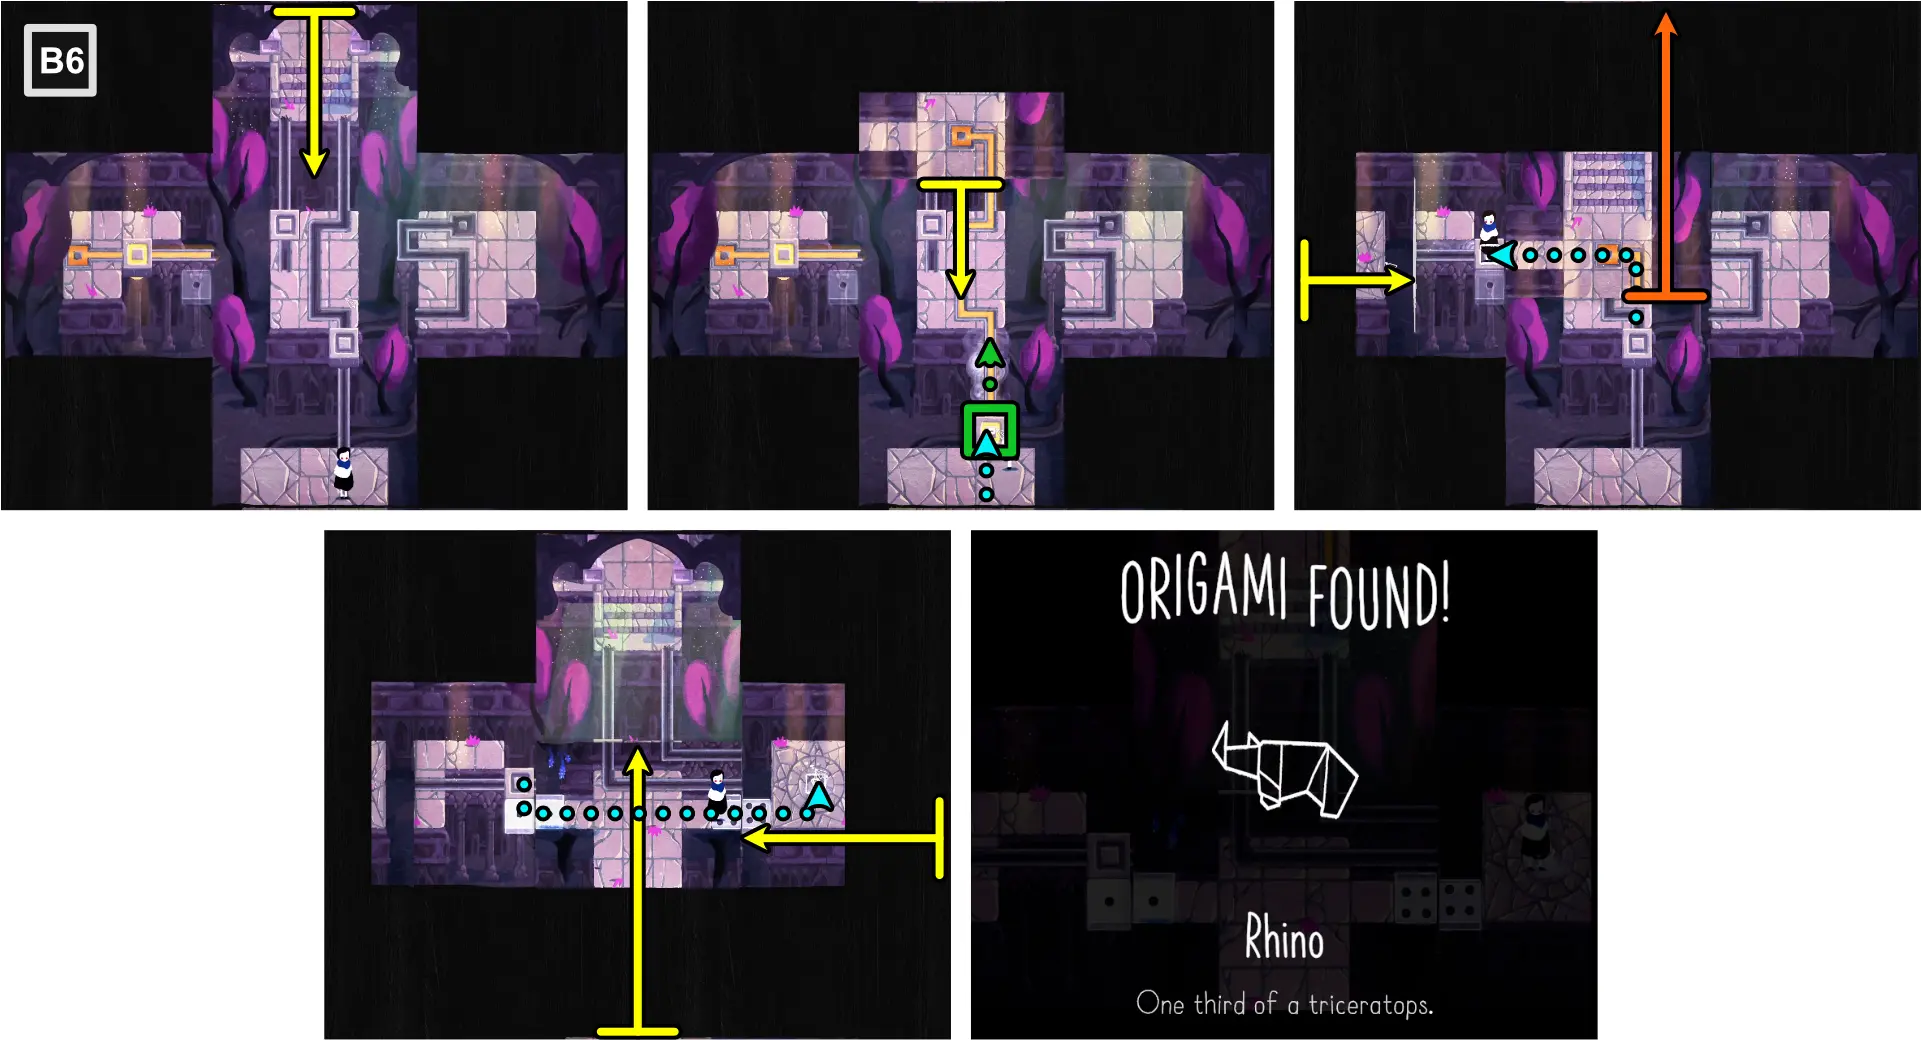
- At B6, using the top edge, fold horizontally to connect the energy lines and move the automated tile at the bottom downwards.
- Move Paige onto the automated tile.
- Move the fold downwards, leaving 1 row of space of the center platform. This will also move the automated tile upwards.
- Using the left edge, fold vertically, covering the energy tile.
- Move Paige onto the automated tile to the upper left part of the map.
- Unfold the top fold.
- Using the bottom edge, fold horizontally, connecting the one-dotted tiles and four dotted tiles together.
- Move Paige to the platform at the right and collect the Rhino Origami.
Spider Origami
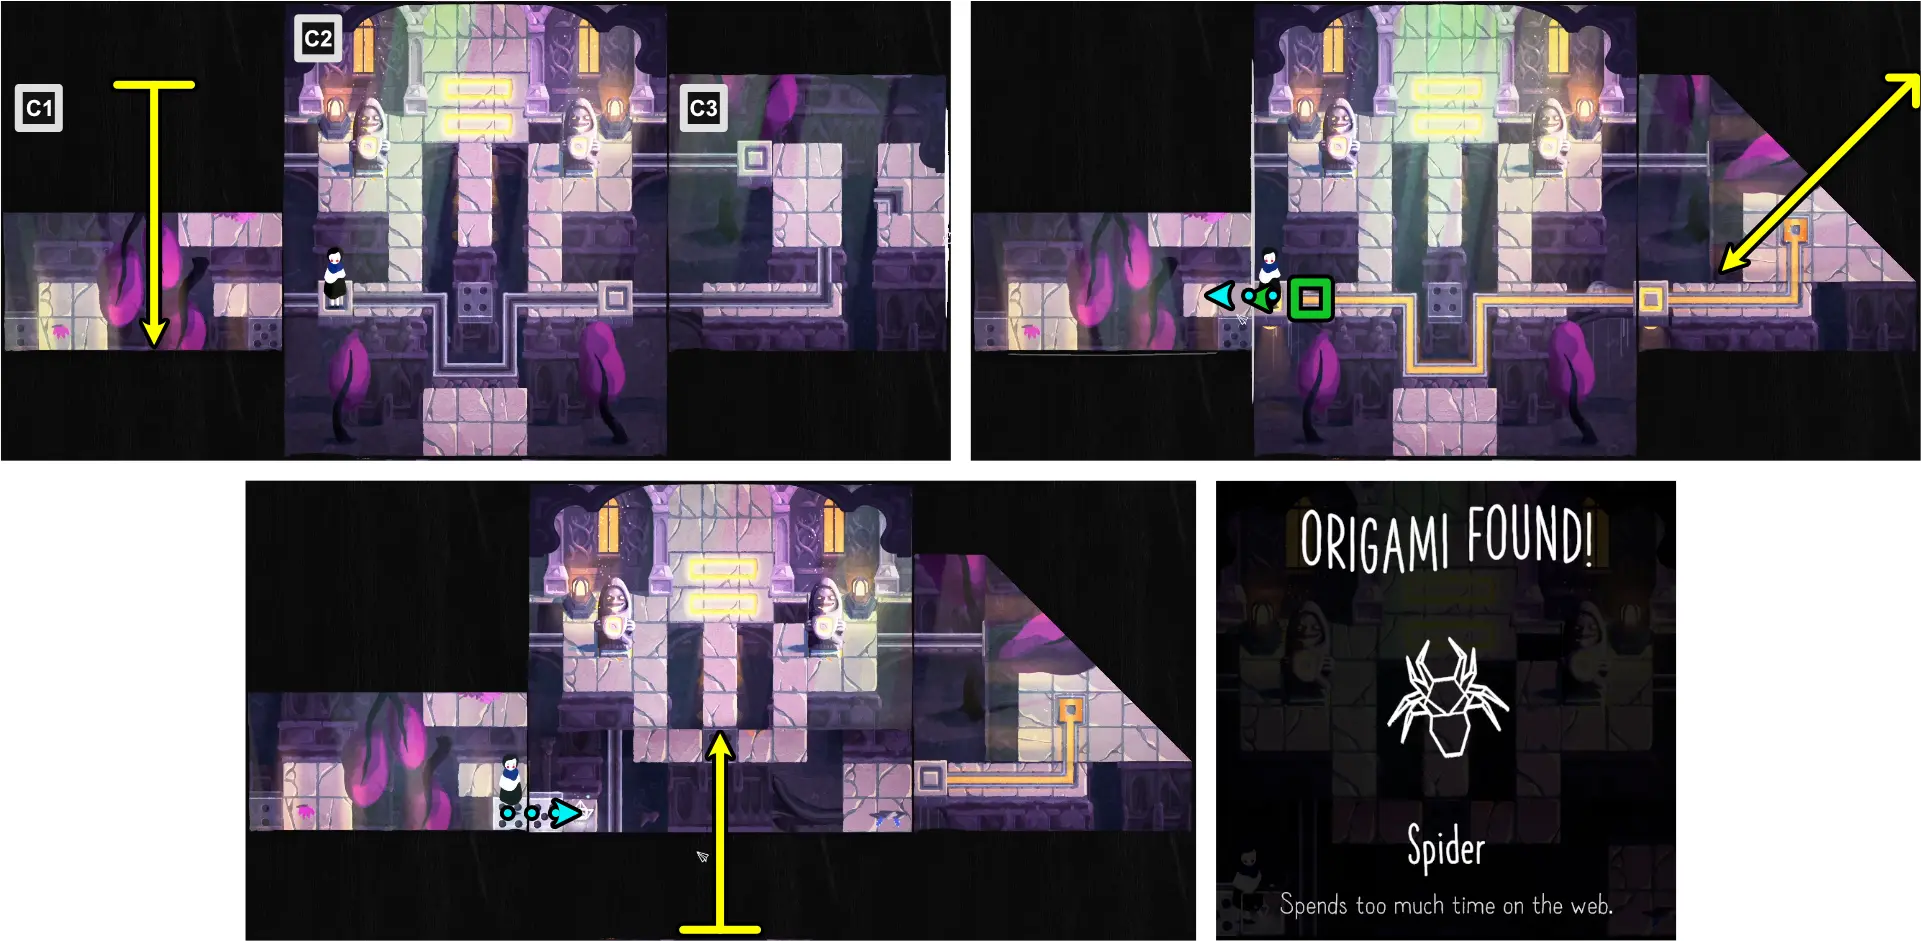
- For this origami, you need to have solved C1-C3 before you can collect it. Paige must be standing on the left automated tile in C2. View the solution in “Chapter 7, section Temple Exit (C1-C3).”
- Using the top edge of C1, fold horizontally, meeting the opposite edge.
- Using the top right corner of C3, fold diagonally to connect the energy lines and move the automated tile in C2 to C1.
- Move Paige onto the fold in C1.
- Using the bottom edge of C2, fold horizontally to connect the five-dotted tiles.
- Move Paige to C2 and collect the Spider Origami.
Unlocking “Picture Purr-fect”
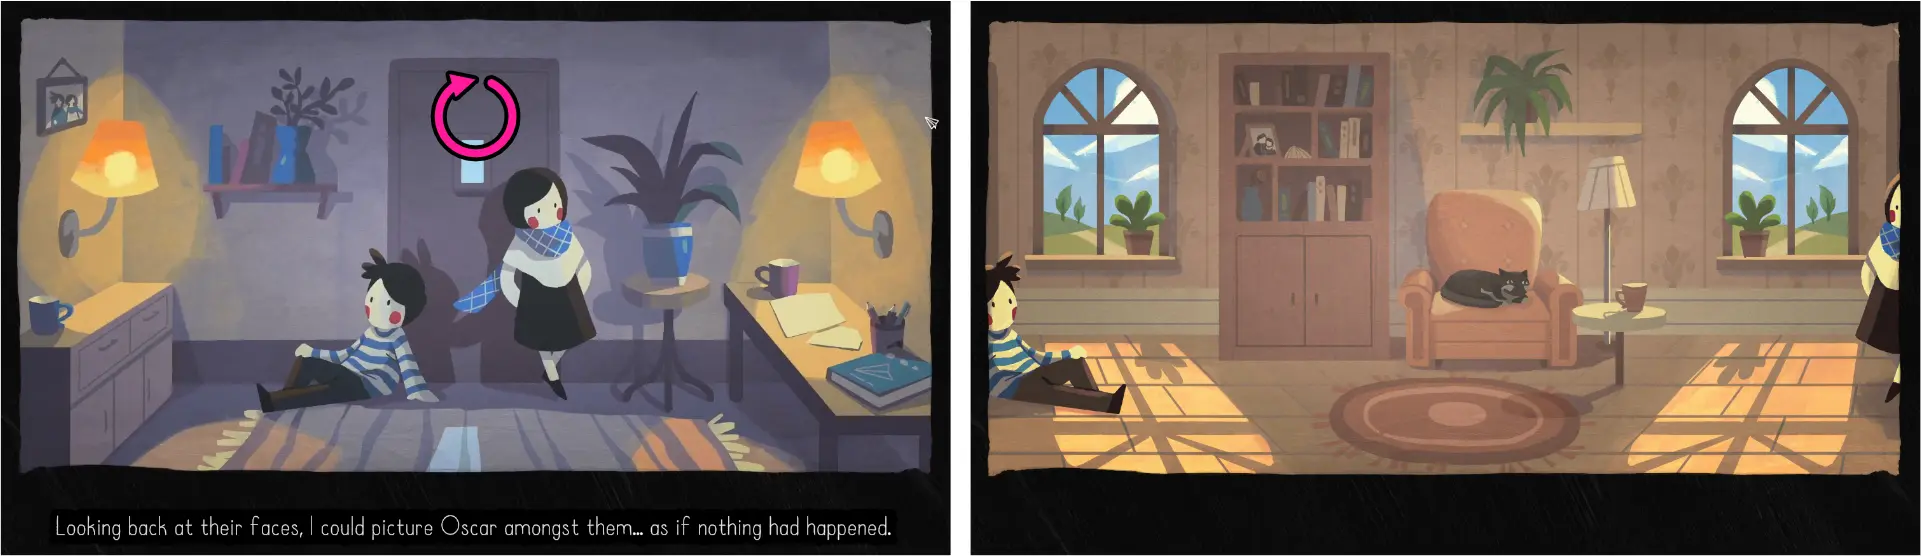
To unlock, reverse the second image in the ending cutscene of Chapter 7.
Chapter 8: Ocean
The Fold Man and the Sea
Complete Ocean.
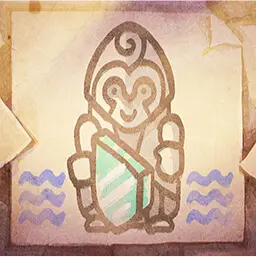
They Sea Me Foldin
Collect all Ocean origami.
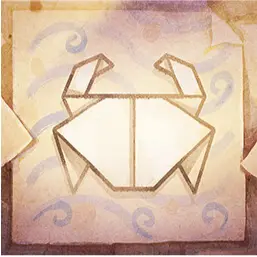
Unlocking “They Sea Me Foldin” (All Ocean Origami)
Squid Origami
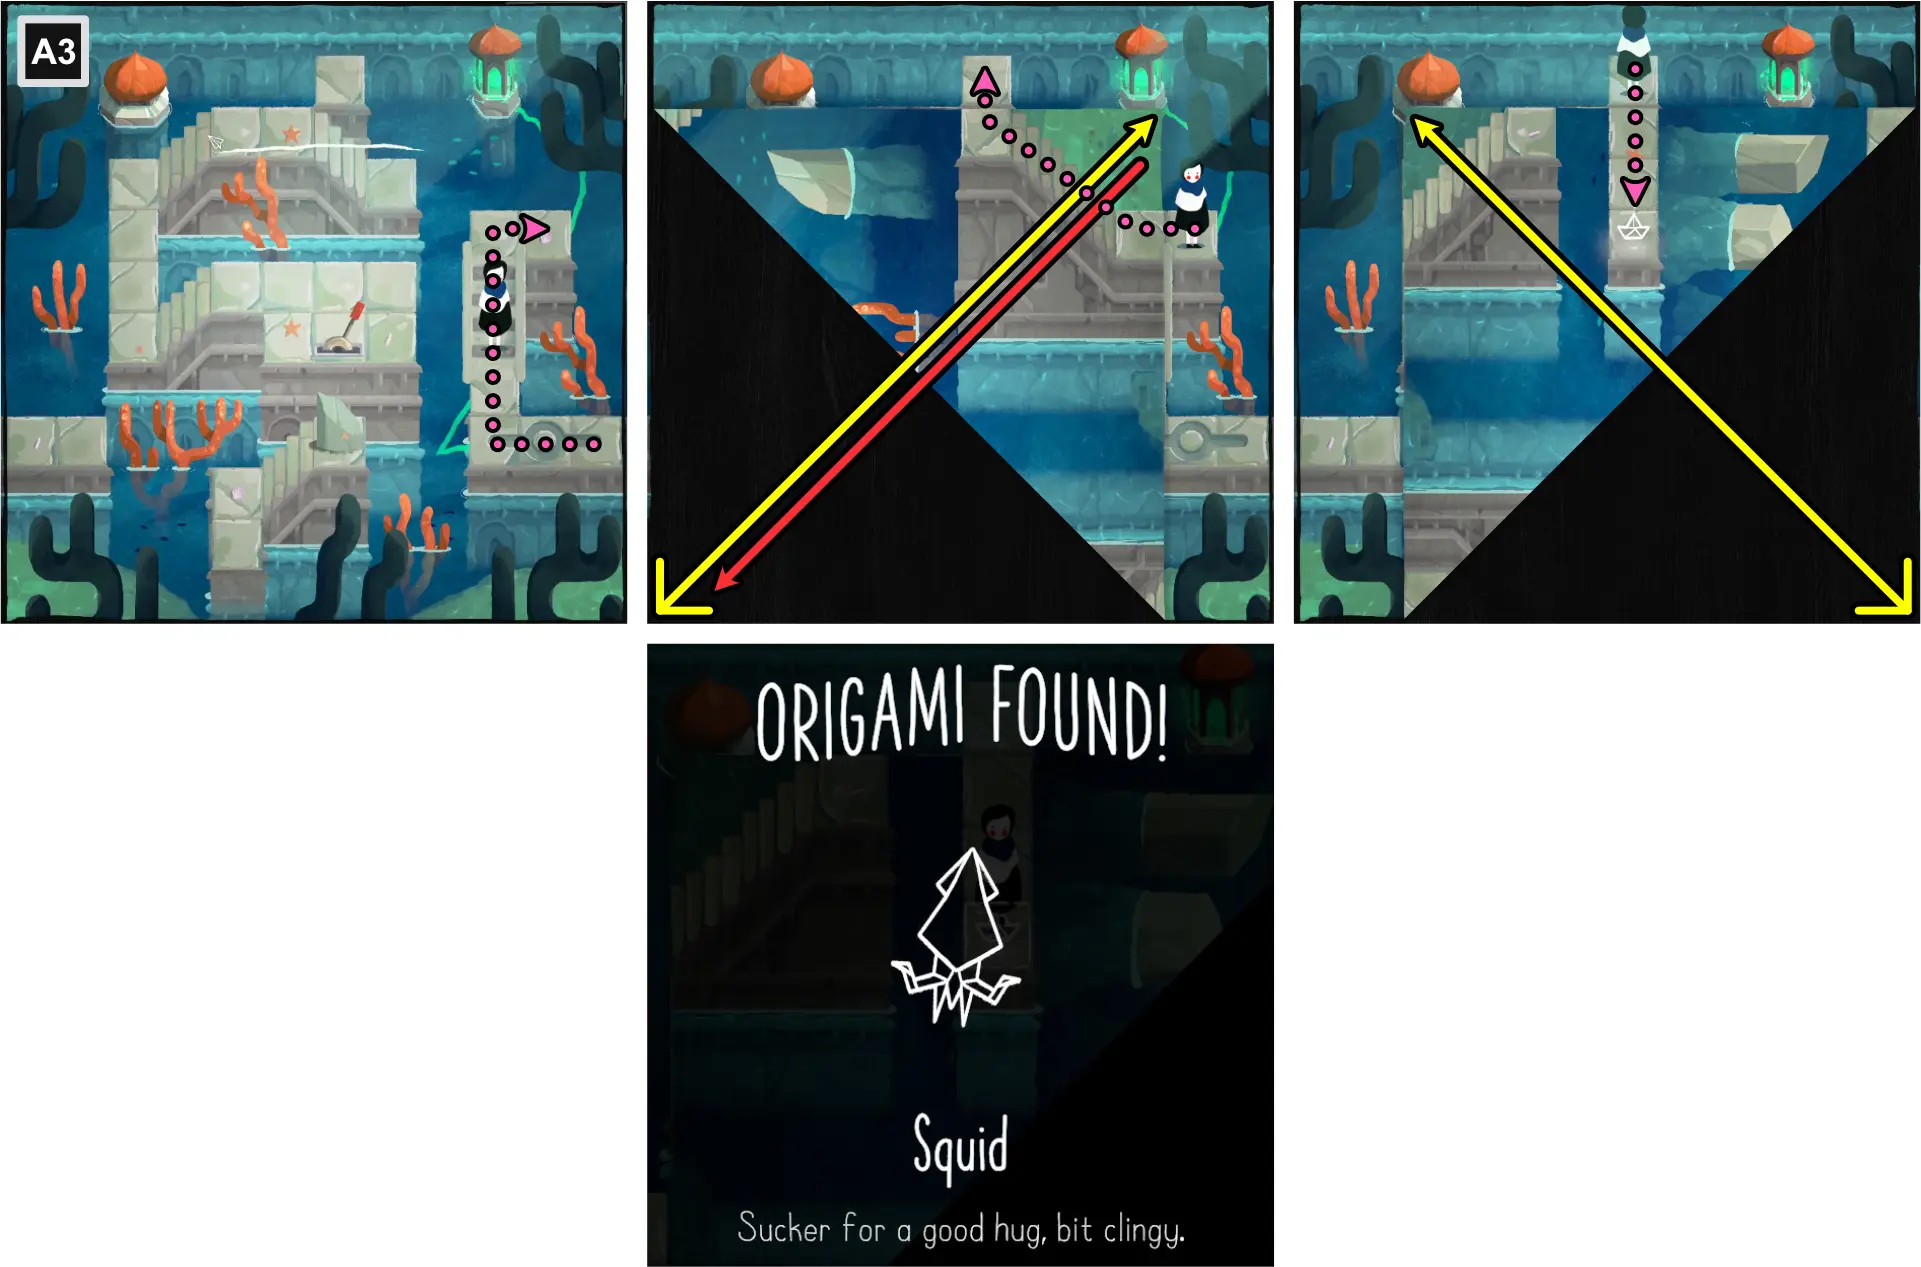
- For this origami, you need to have solved A3 before you can collect it. Paige must be standing on the platform leading to A4. View the solution in “Chapter 8, section The Stranded Man (A1-A8).”
- At A3, Move Paige to the top end of the platform.
- Using the bottom left corner, fold diagonally, aligning with the lantern.
- Move Paige up the stairs, onto the platform square off the fold.
- Unfold the map.
- Using the bottom right corner, fold diagonally, aligning with the platform.
- Move Paige down to collect the Squid Origami.
Seahorse Origami
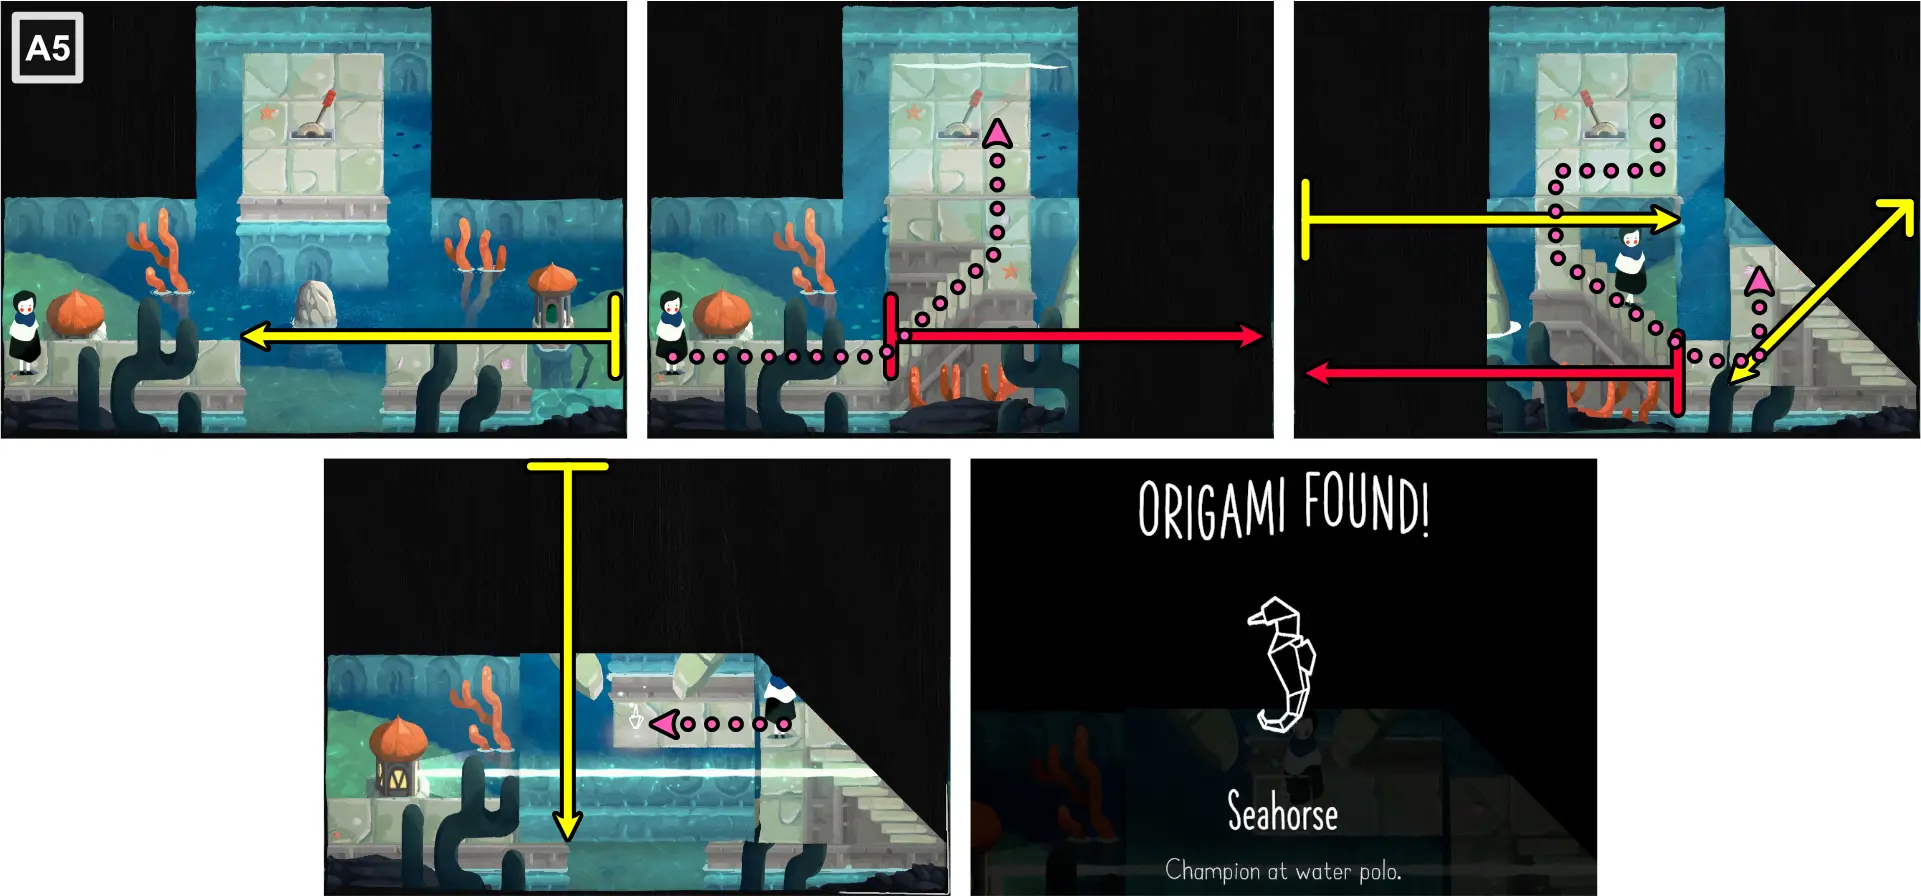
- At A5, using the right edge, fold vertically, aligning with the platform at the top.
- Follow the path to the platform at the top.
- Unfold the map.
- Using the left edge, fold vertically, aligning with the platform at the top.
- Using the upper right corner of the right square, fold diagonally, aligning with the platform to the left of it.
- Move Paige onto the right fold.
- Unfold the left fold.
- Using the top edge, fold horizontally, aligning with the right fold.
- Move Paige onto the middle fold and collect the Seahorse Origami.
Whale Origami
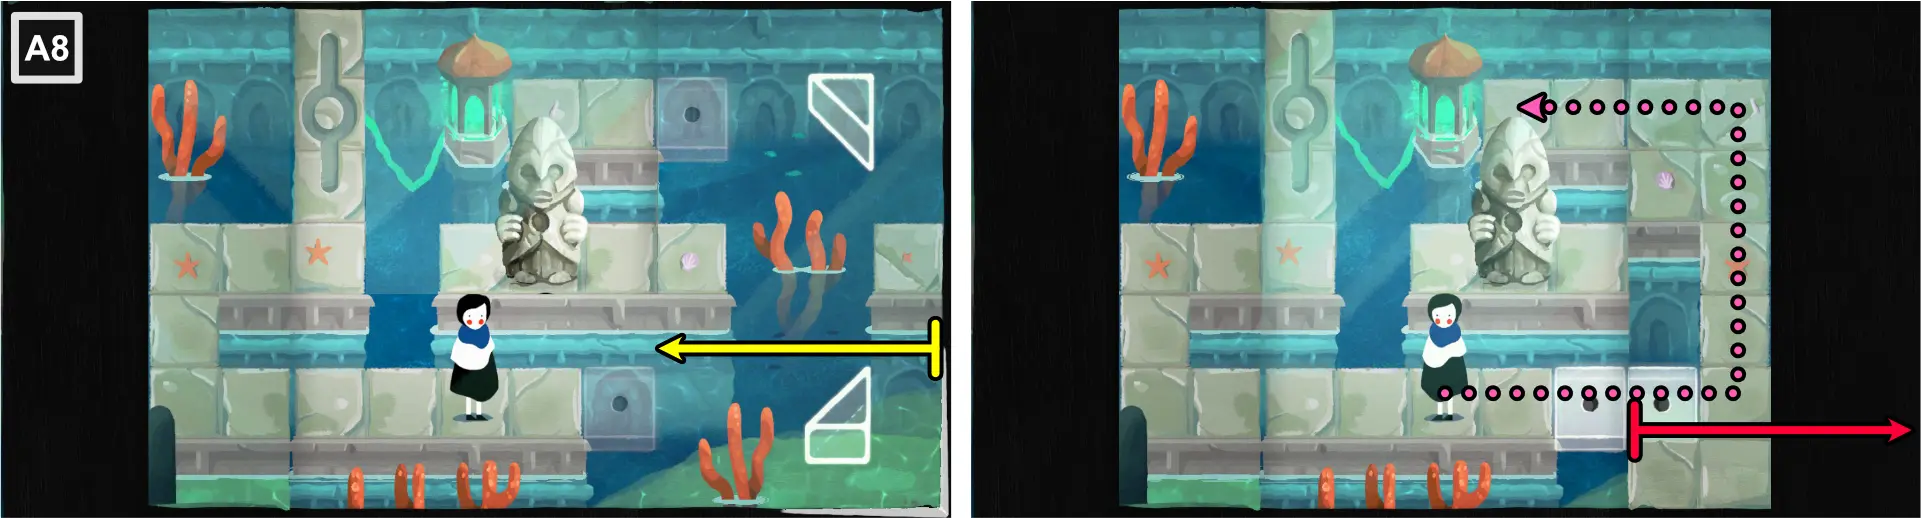
- For this origami, you need to have solved A8 before you can collect it. Paige must be standing on the bottom platform. View the solution in “Chapter 8, section The Stranded Man (A1-A8).”
- At A8, using the right edge, fold vertically, connecting the one-dotted tiles together.
- Move Paige to the right of the lantern.
- Unfold the map.
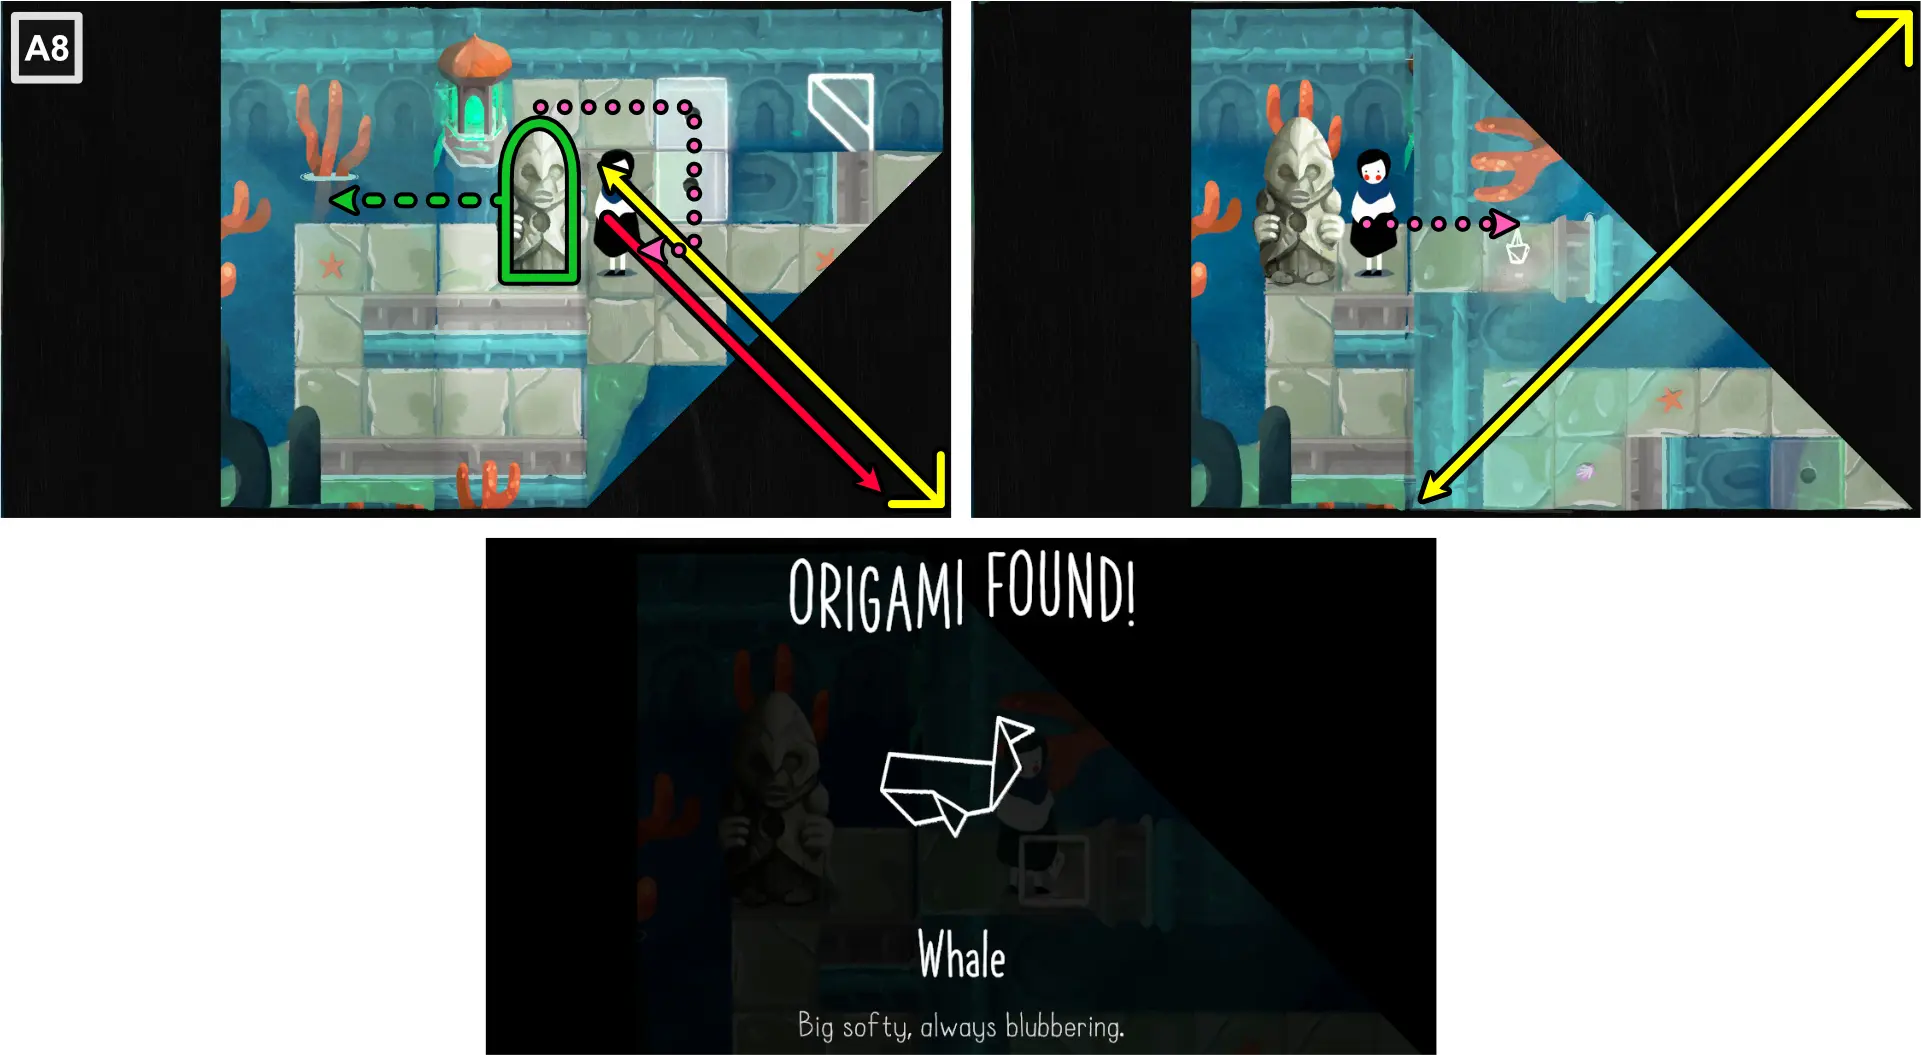
- Using the bottom right corner, fold diagonally, connecting the one-dotted tiles together.
- Move Paige to the right of the statue and push it to the left.
- Unfold the map.
- Using the top right corner, fold diagonally, meeting with the bottom edge.
- Move Paige onto the fold and collect the Whale Origami
Shark Origami
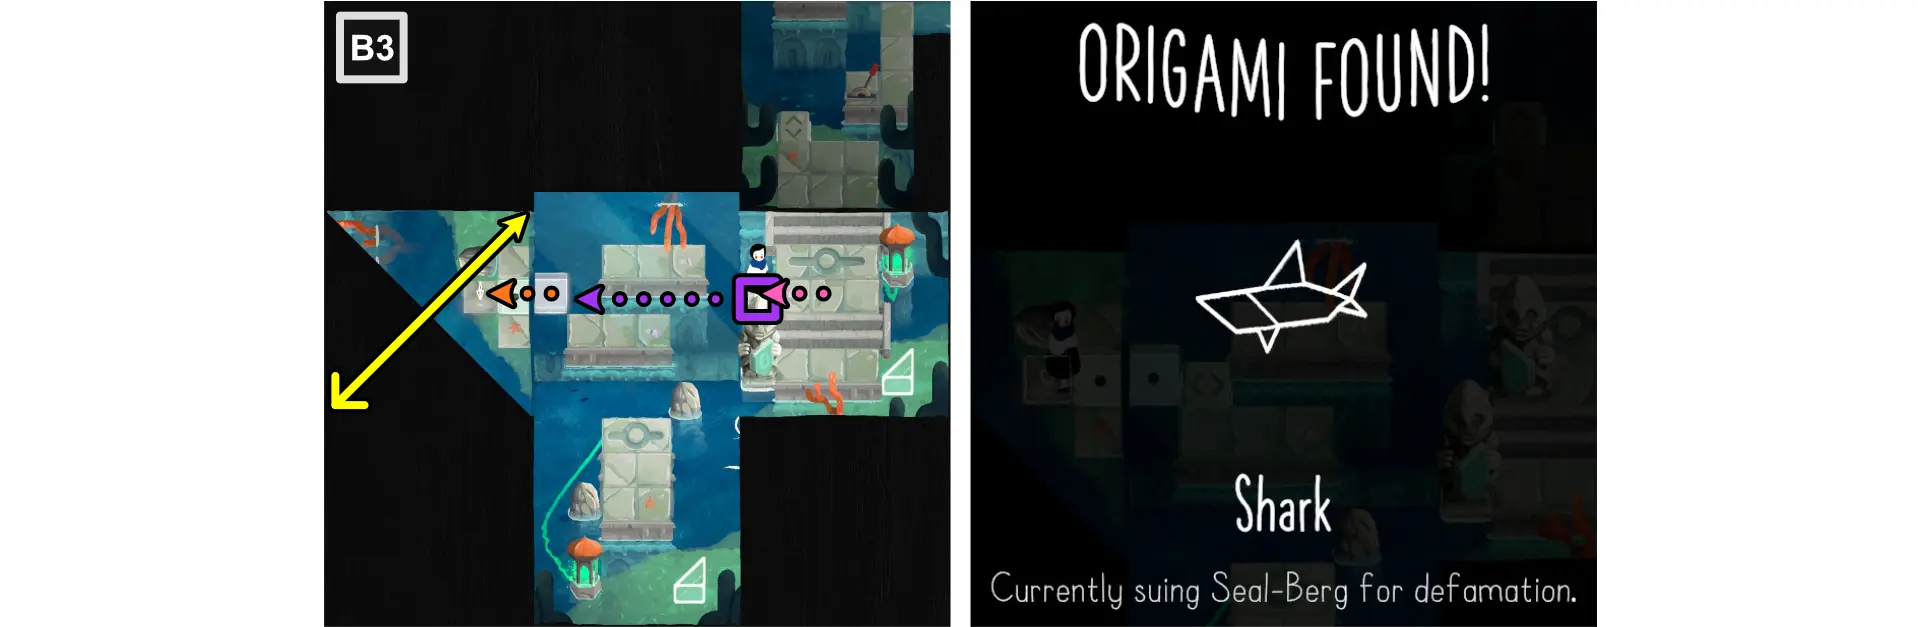
- For this origami, you need to have solved B3 before you can collect it. Paige must be standing on the platform leading to B4. View the solution in “Chapter 8, section The Circle (B1-B4).”
- At B3, using the bottom left corner of the left square, fold diagonally, meeting with the top edge.
- Move Paige onto the upper floating tile and bring her to the left fold to collect the Shark Origami.
Crab Origami
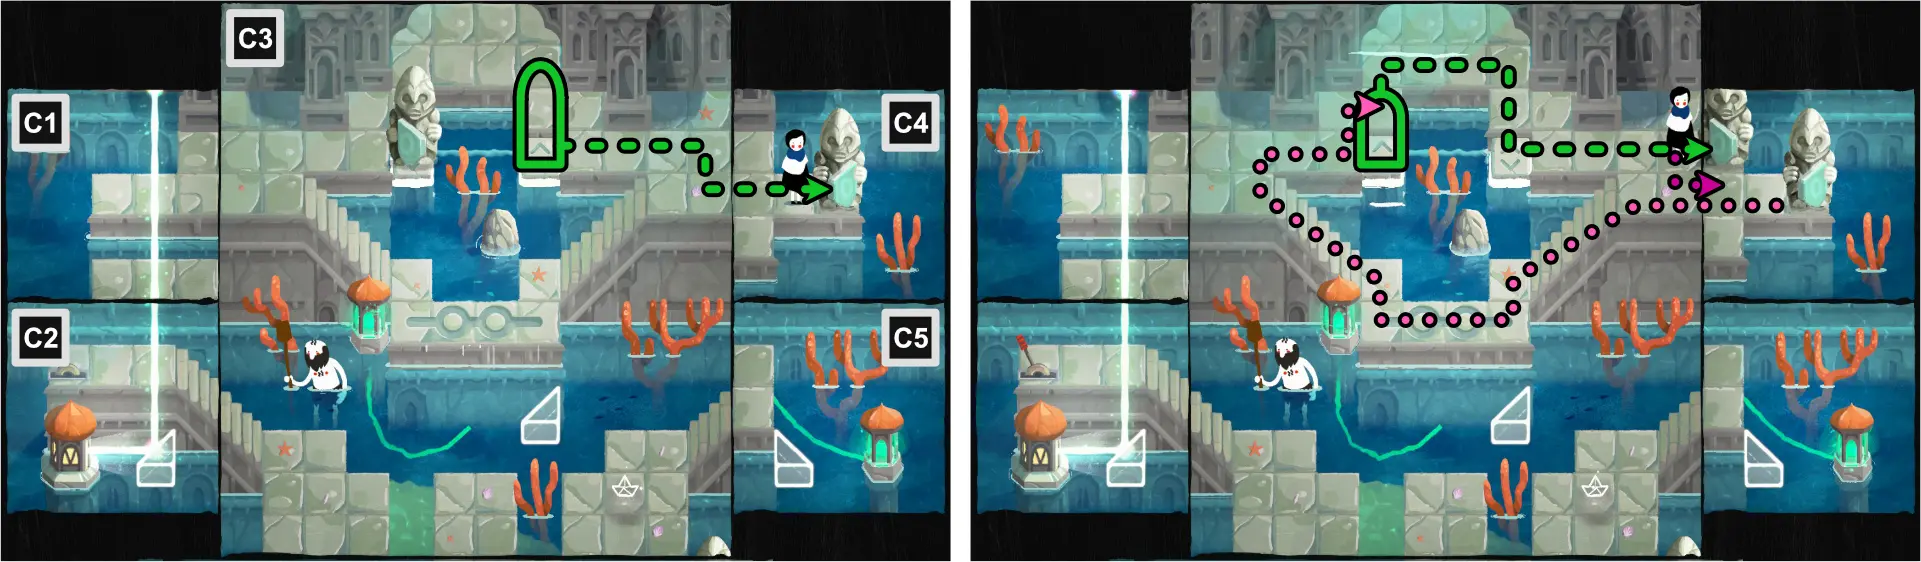
- For this origami, you need to have solved C1-C5 before you can collect it. Paige must be by the entrance to the end of the level. View the solution in “Chapter 8, section Back to the Village (C1-C5).”
- At C3, move both statues to C4. Alternatively, you can also move them to C1.
- Using the top left corner of C3, fold diagonally, meeting with the right edge.
- Follow the path to move Paige to C5.
- Unfold C3.
- Move Paige back to C3 and collect the Crab Origami.
Chapter 9: City
Brave New Fold
Complete City.
Wrapping Up
Collect all City origami.
A Good Snowman Is Hard To Fold
Knock over the snowman.

Peer-Reviewed Paper
Graduate University.
Recycled ideas
Find Hue on the reverse.
Unlocking “Wrapping Up” (All City Origami)
Fox Origami
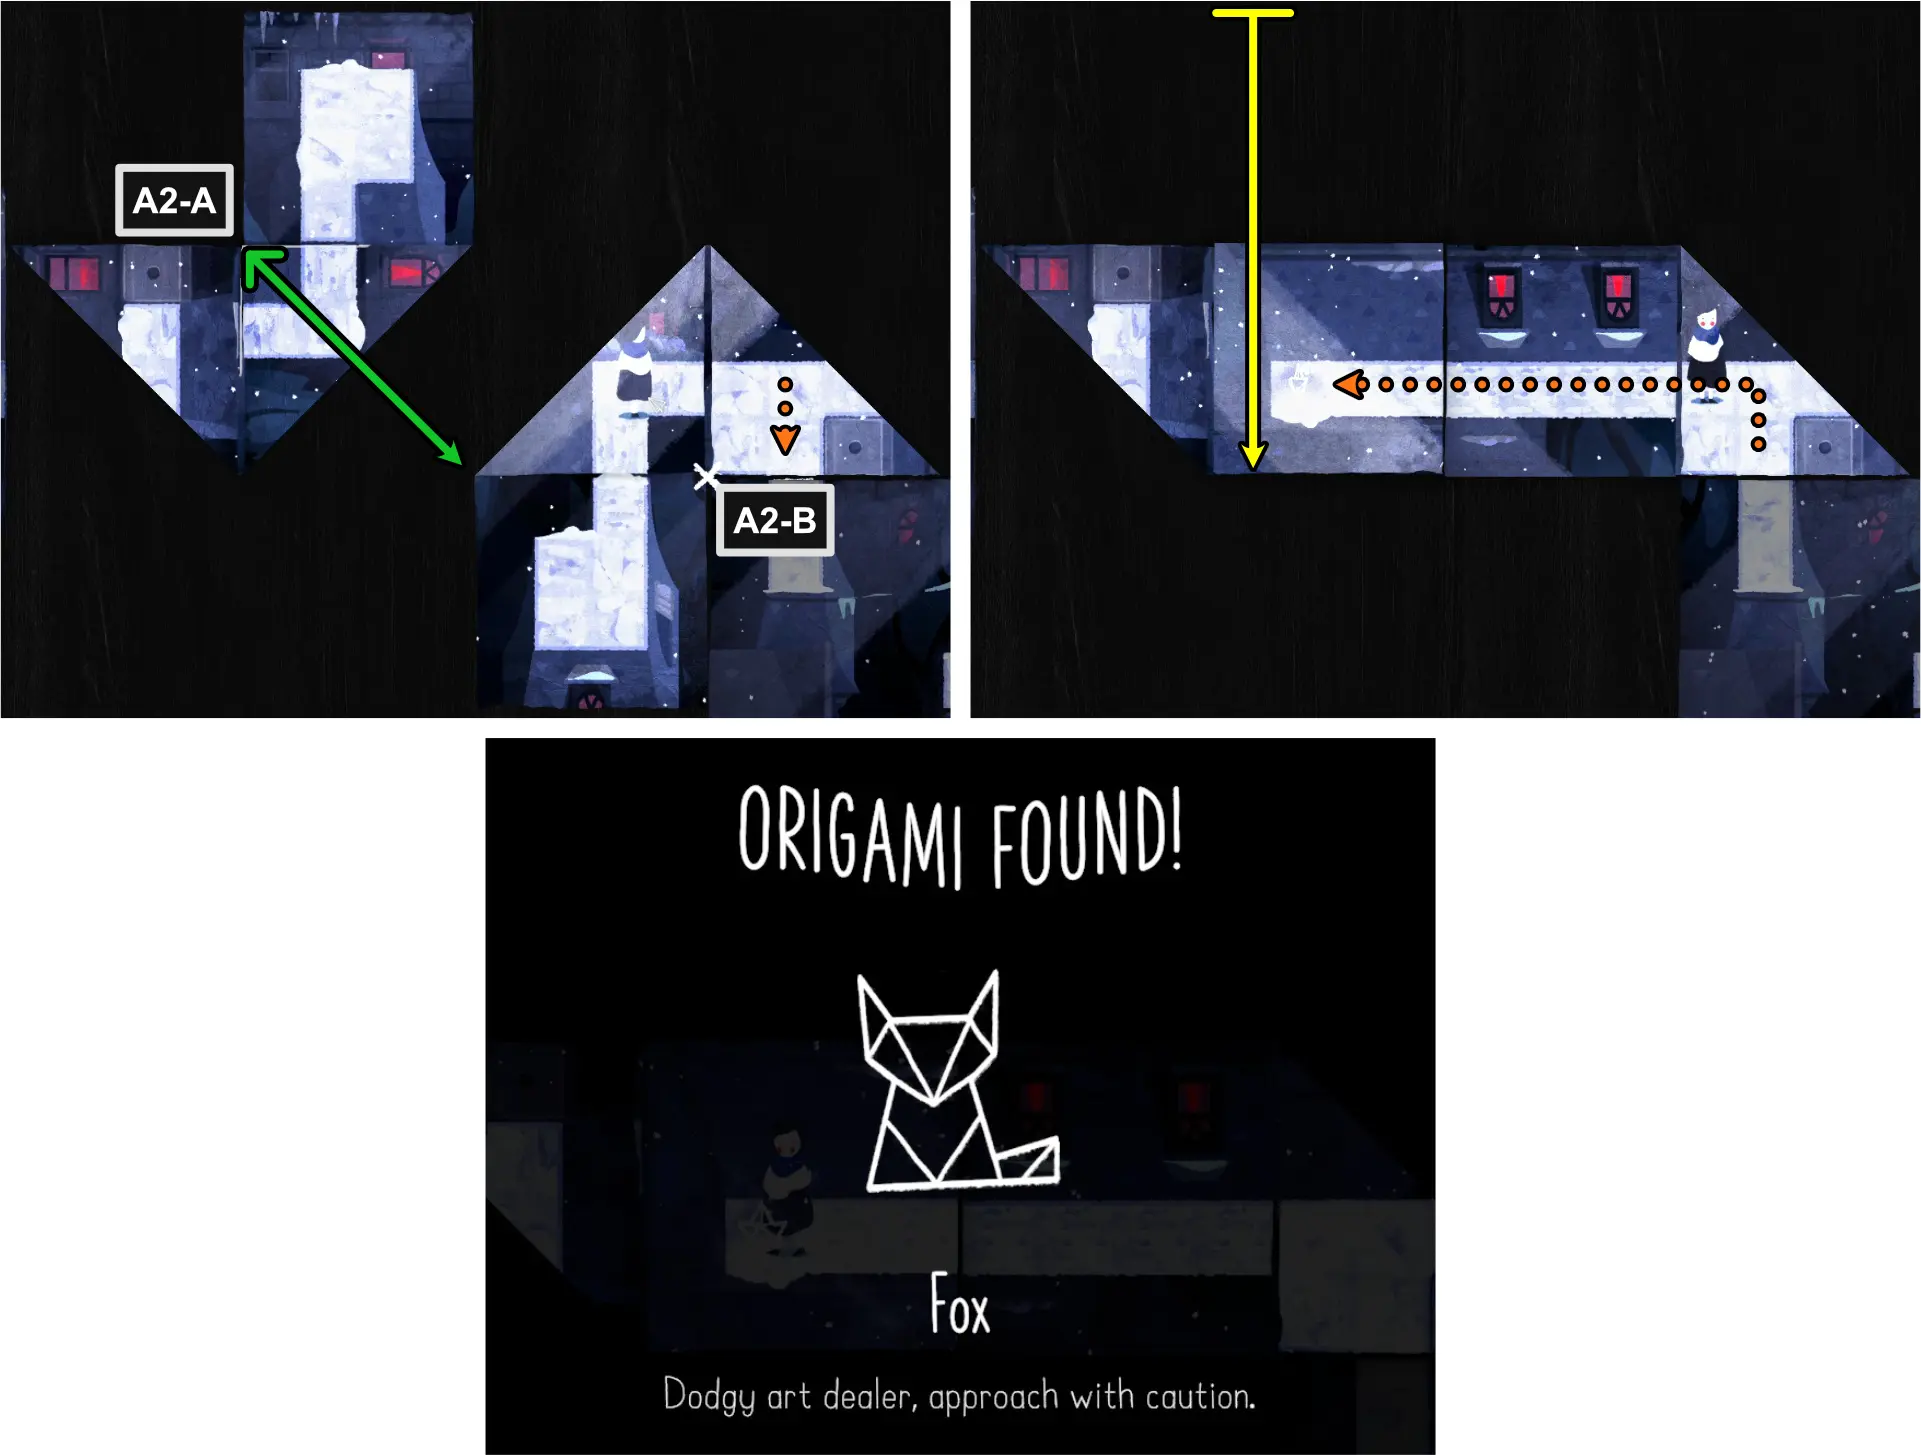
- For this origami, you need to have solved A2-A, and A2-B before you can collect it. Paige must be standing by the entrance to A2-B. View the solution in “Chapter 9, section The Thief (A1-A5).”
- Unfold the bottom right fold of A2-A.
- Using the top edge of A2-A, fold horizontally, meeting with the opposite edge.
- Move Paige to the left and collect the Fox Origami.
Camel Origami

- Using the top edge of A5-A, fold horizontally, just above the platform where Paige is.
- Enter the spiral door to exit out of the one in A5-C.
- Unfold A5-A.
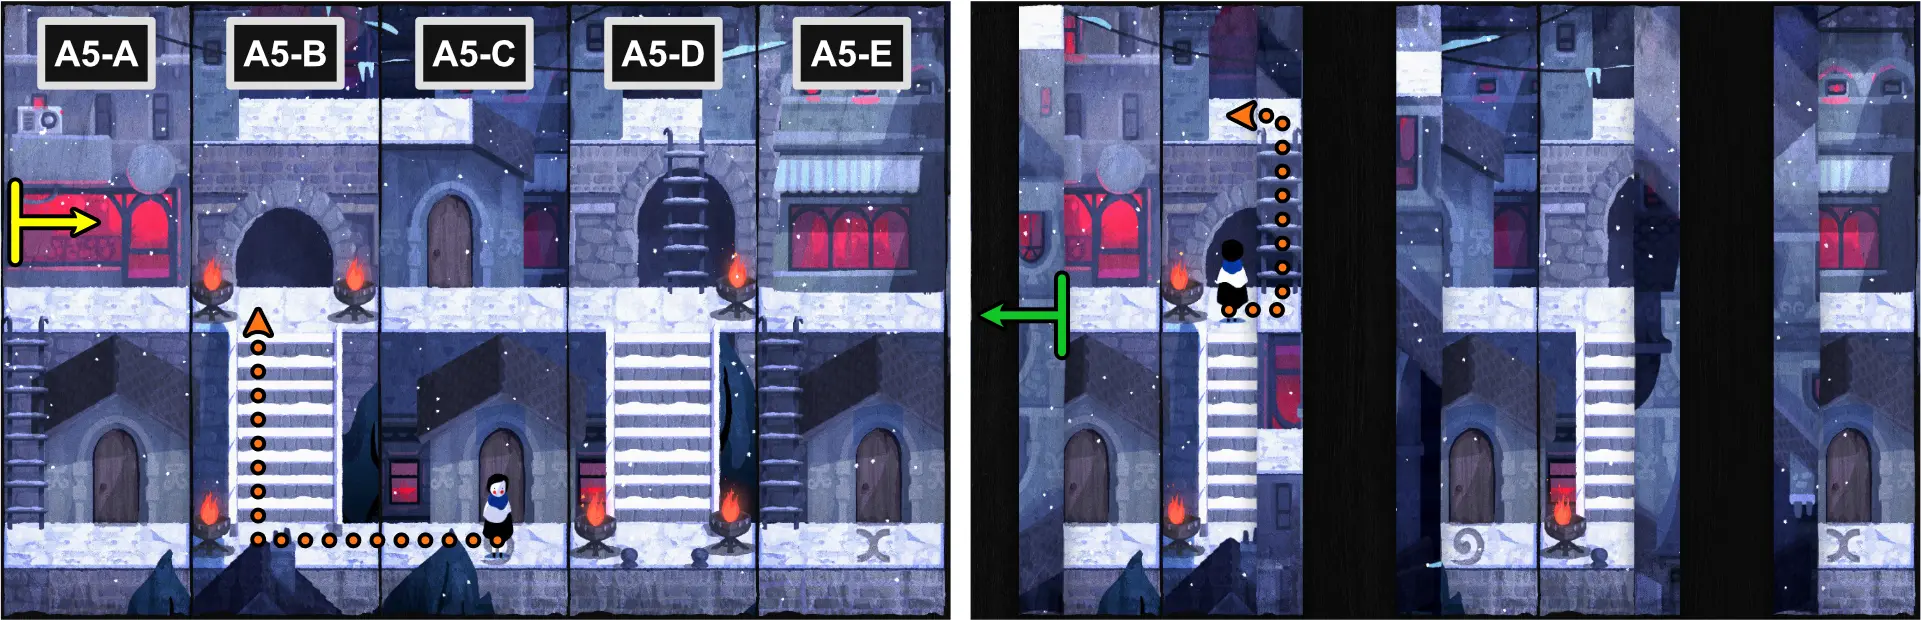
- Move Paige to A5-B, at the left side of the stairs.
- Using the left edge of A5A, fold vertically, just to the left of the door.
- Move Paige up the ladder and onto the unfolded platform at the top.
- Unfold A5-A.
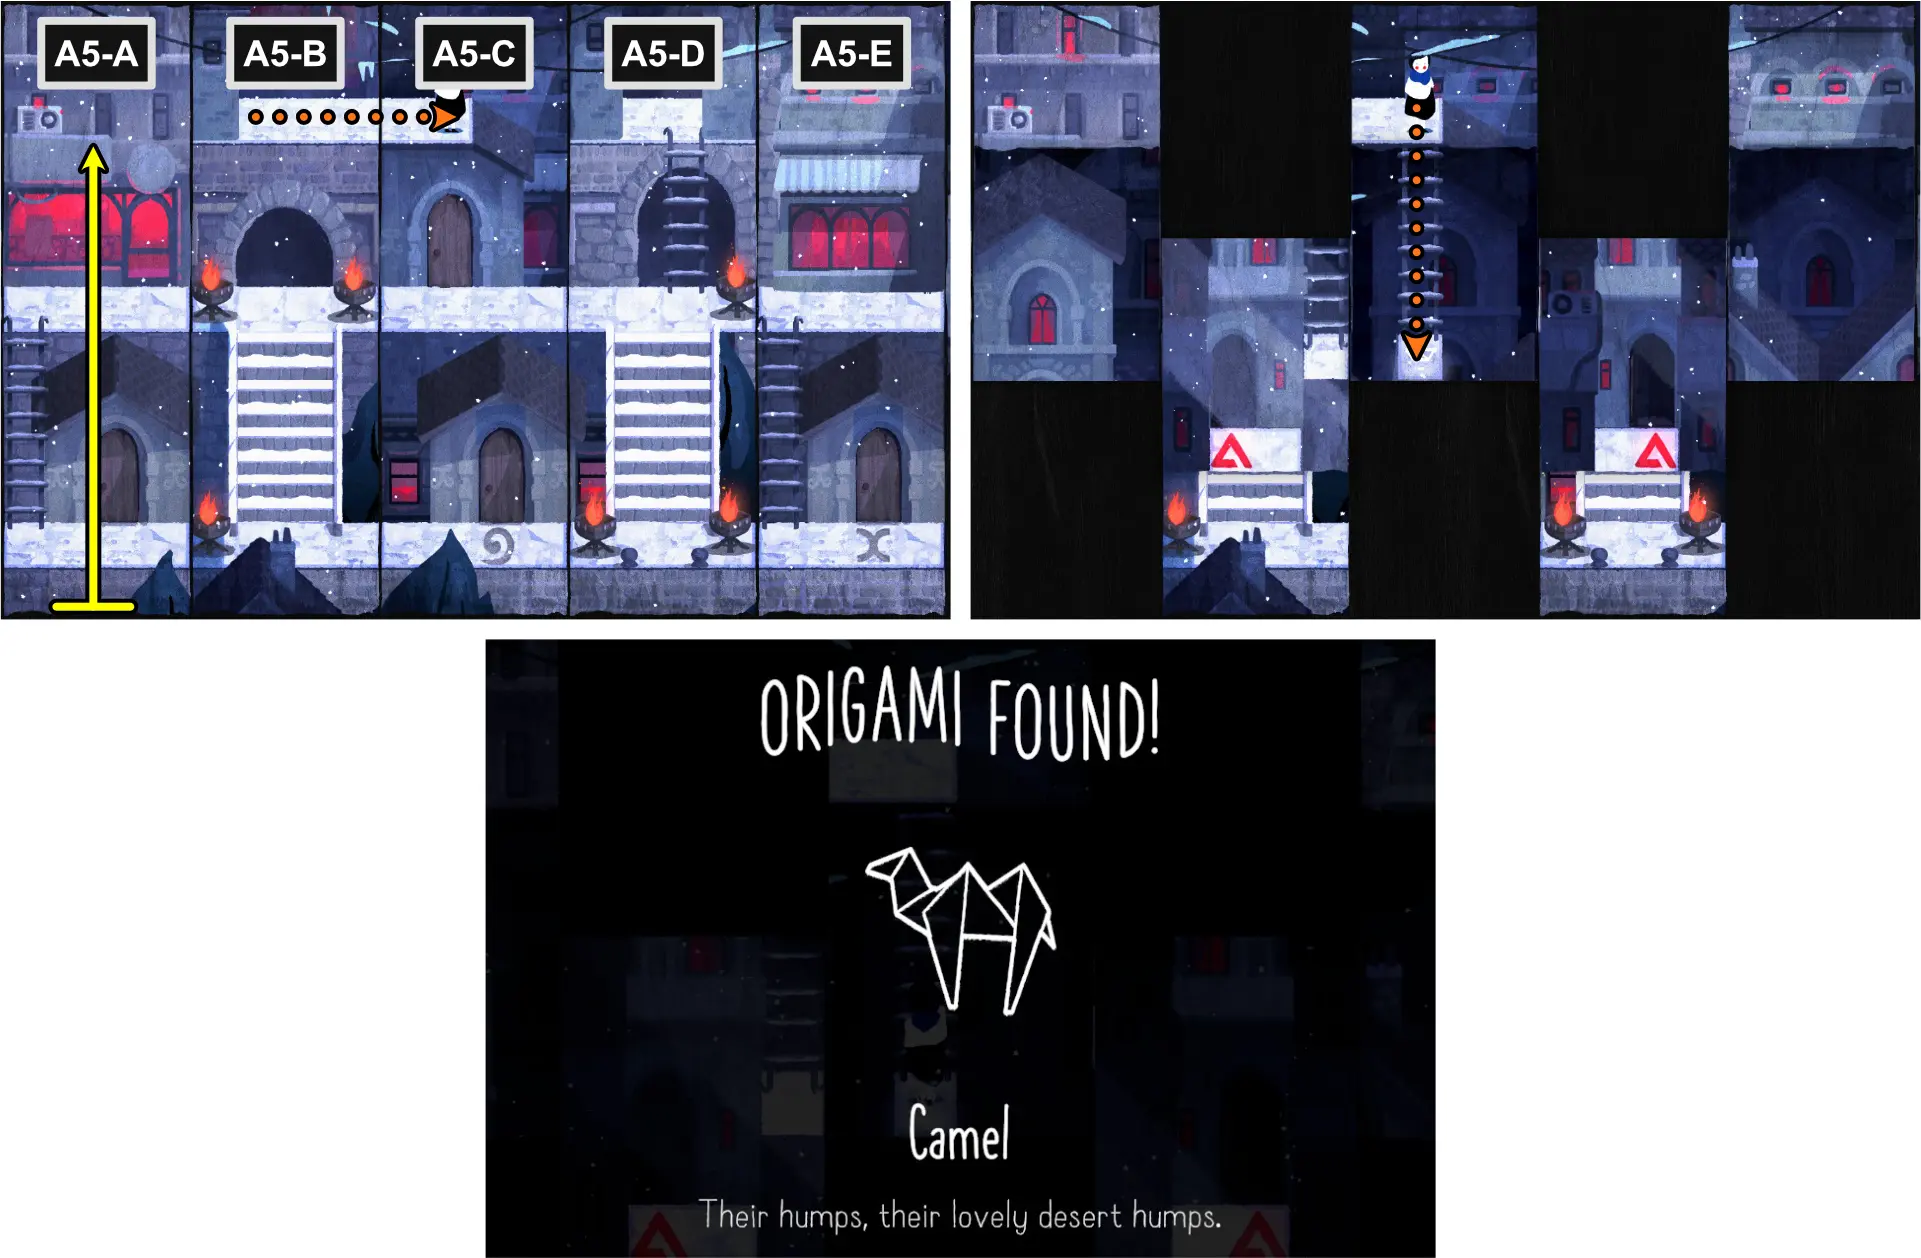
- Move Paige to A5-C.
- Using the bottom edge of A5-A, fold horizontally, just below the box that looks like a radio.
- Move Paige downward to collect the Camel Origami.
Seal Origami
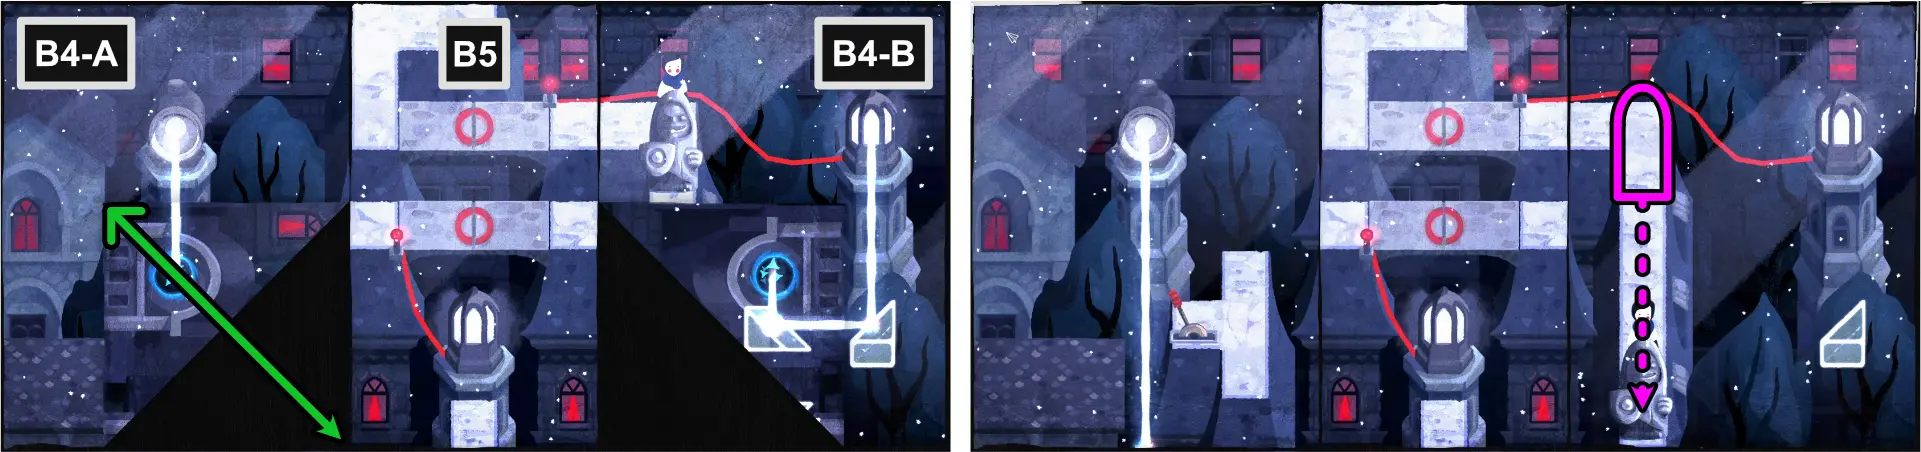
- For this origami, you need to have solved B4-A, B4-B and B5 before you can collect it. Paige must be standing above the statue in B4-B. View the solution in “Crossing the Bridge (B1-B11).”
- Unfold B4-A.
- Move the statue to the bottom of B4-B.
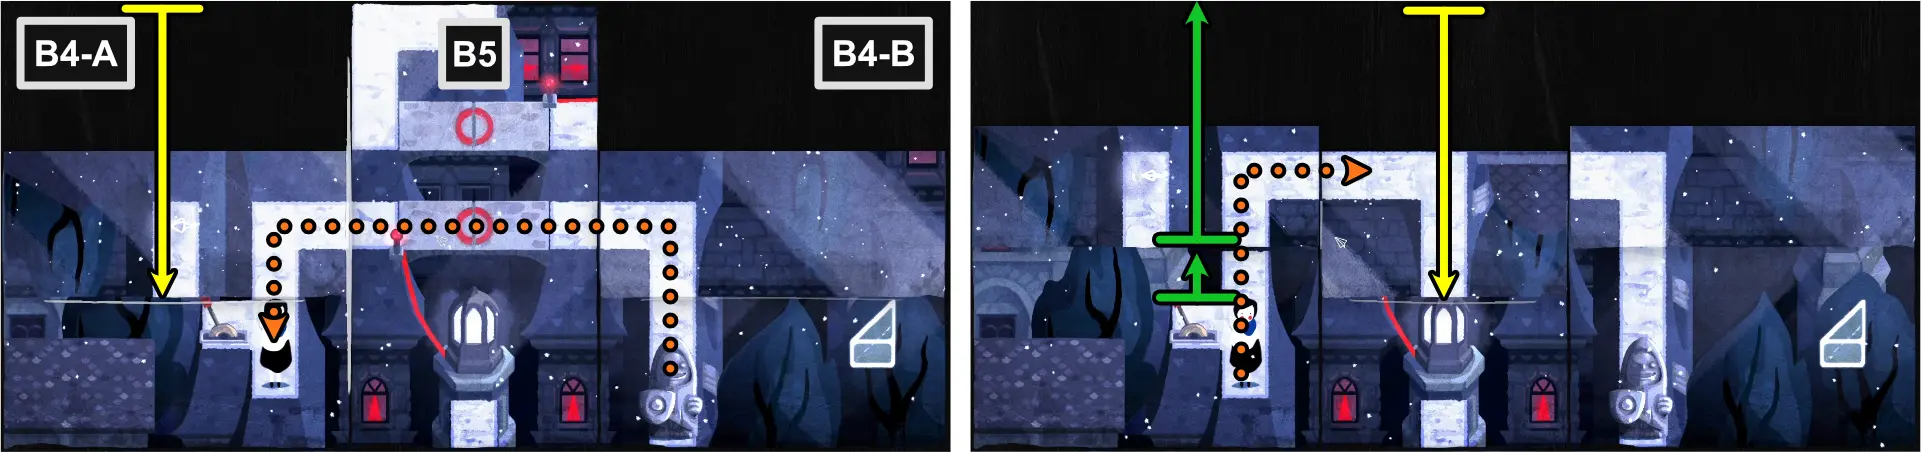
- Using the top edge of B4-A, fold horizontally, just above the lever.
- Move Paige to B4-A.
- Move the fold in B4-A 1 space upward.
- Using the top edge of B5, fold horizontally, just above the light tower.
- Move Paige to B5.
- Unfold B4-A.
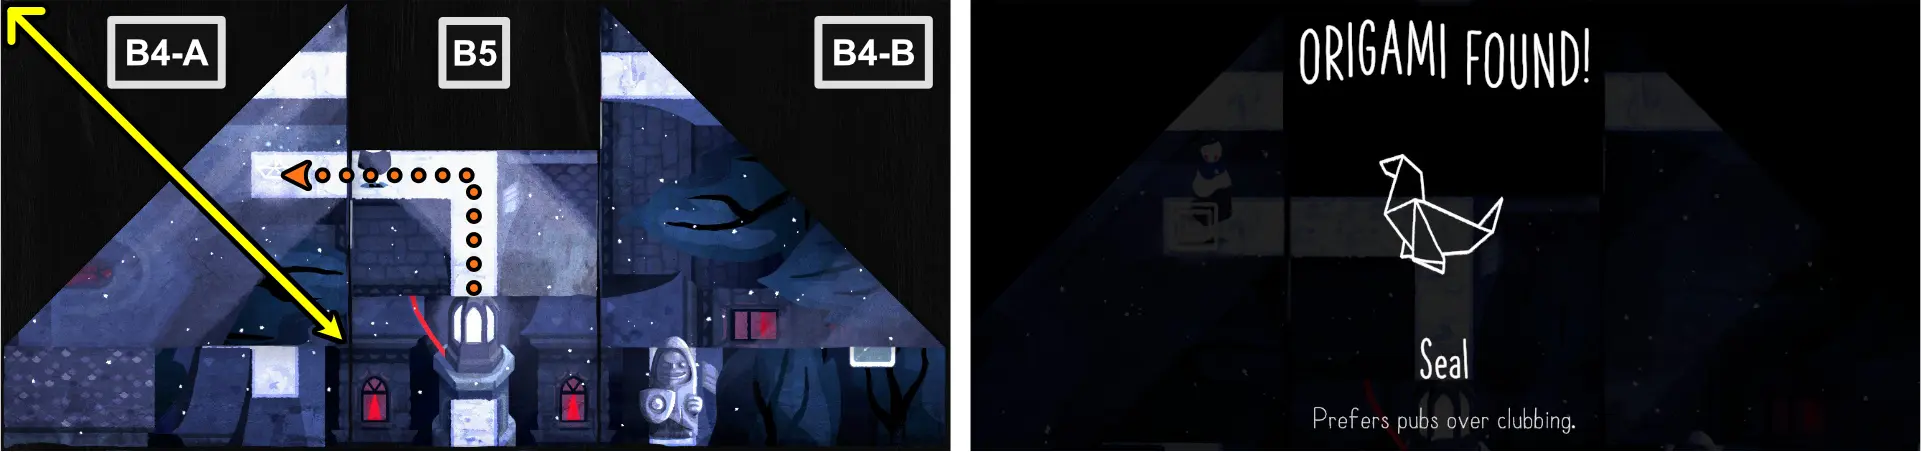
- Using the top right corner of B4-A, fold diagonally, meeting the right edge.
- Move Paige to B4-A to collect the Seal Origami.
Swan Origami
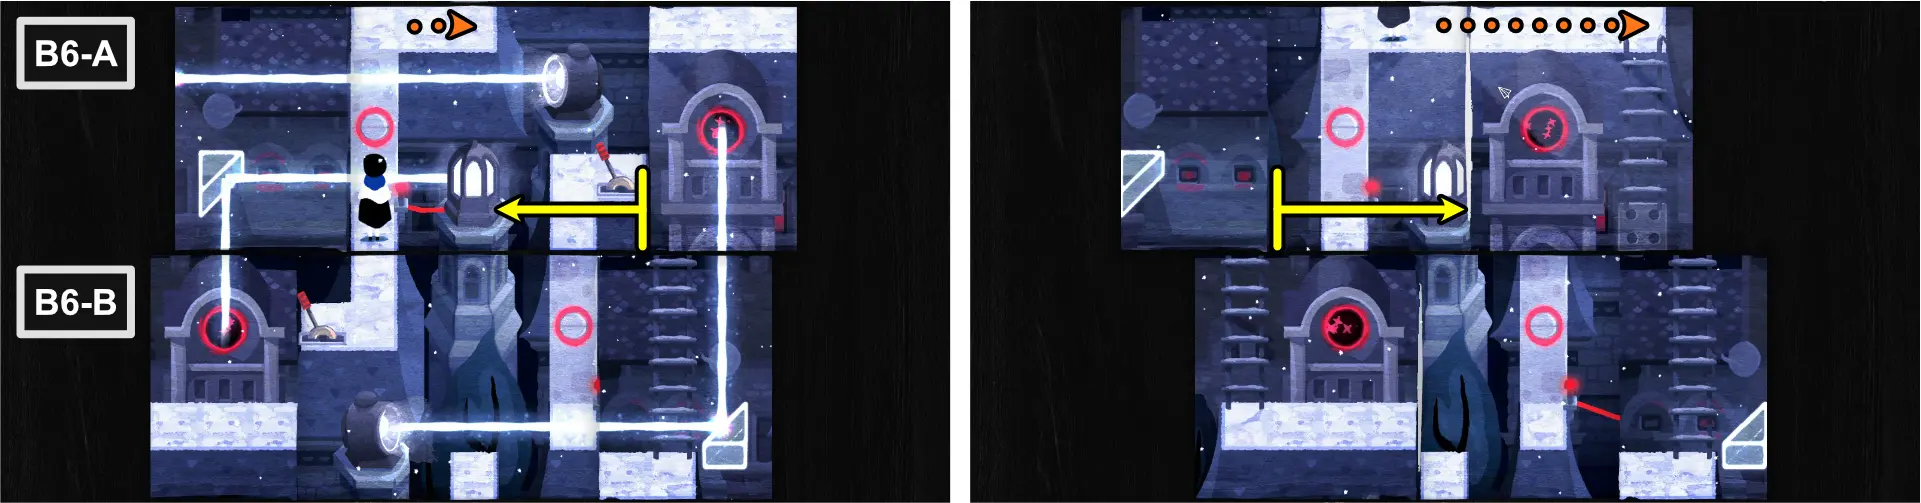
- For this origami, you need to have solved B6-A, and B6-B before you can collect it. Paige must be standing at the top of B6-A, by the entrance of B7-A. View the solution in “Crossing the Bridge (B1-B11).”
- Move the right fold of B6-A to the left, just to the right of the middle light tower.
- Move Paige to the top platform on the right fold of B6-A.
- Move the left fold of B6-A to the right to meet the right fold and connect the five-dotted tiles together.
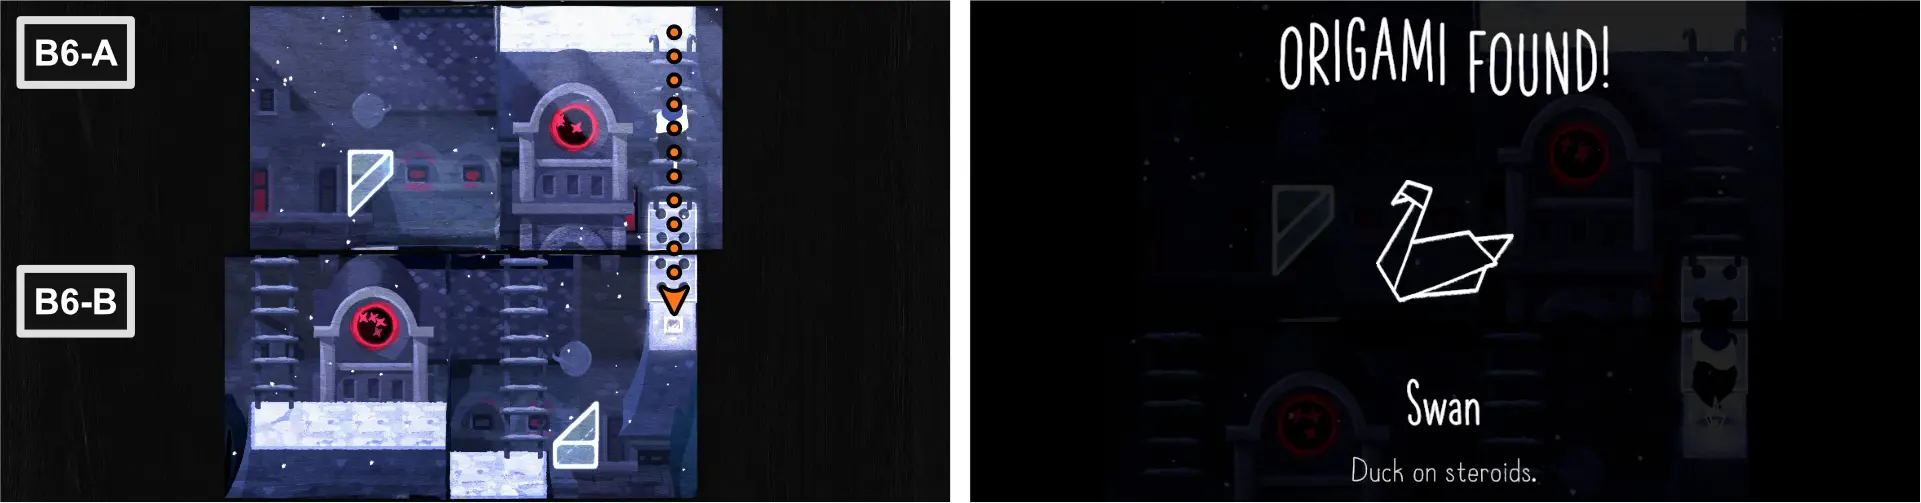
- Move Paige down the ladder to collect the Swan Origami.
Polar Bear Origami
- For this origami, you need to have solved C1-A, C1-B, C2-A, C2-B, and C3 before you can collect it. Paige must be standing to the left of the statue in C2-B. View the solution in “To the University (C1-C3).”
- Move the statue 1 space to the left, moving Paige to C3.
- Using the left edge of C1-A, fold vertically, meeting the opposite edge.
- Using the top edge of C2-A, fold horizontally, meeting the opposite edge.
- Using the top edge of C3, fold horizontally, aligning with the platform in C1-A.
- Move Paige to C1-A and enter the wave door to exit out of the one in C2-B.
- Move Paige to the top of the platform in C1-B to collect the Polar Bear Origami.
Unlocking “A Good Snowman Is Hard To Fold”
- For this achievement, you need to have solved A3-A, A3-B, A3-C, and A3-D before you can collect it. Paige must be standing at A3-D. View the solution in “Chapter 9, section The Thief (A1-A5).”
- Move Paige up the ladder.
- Unfold A3-A.
- Using the top corners of A3-A, fold diagonally, meeting at the center.
- Move Paige to the ladder to the right.
- Unfold A3-A.
- Move up the ladder and push the snowman.
Unlocking “Recycled ideas”
- To unlock, reverse the 3rd image in the cutscene after completing Chapter 9.
Epilogue
Deer Diary
Find the deer on the bridge.
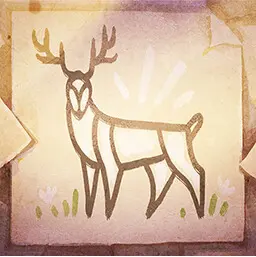
A Clean Sheet
Complete the game without using hints.
Folding Under Pressure
Complete the game in under 4 hours.
You and Who’s Origami
Find all the origami.
Easier On Paper
Find all secrets.
Master of Folds
All achievements obtained.

Unlocking “Deer Diary”
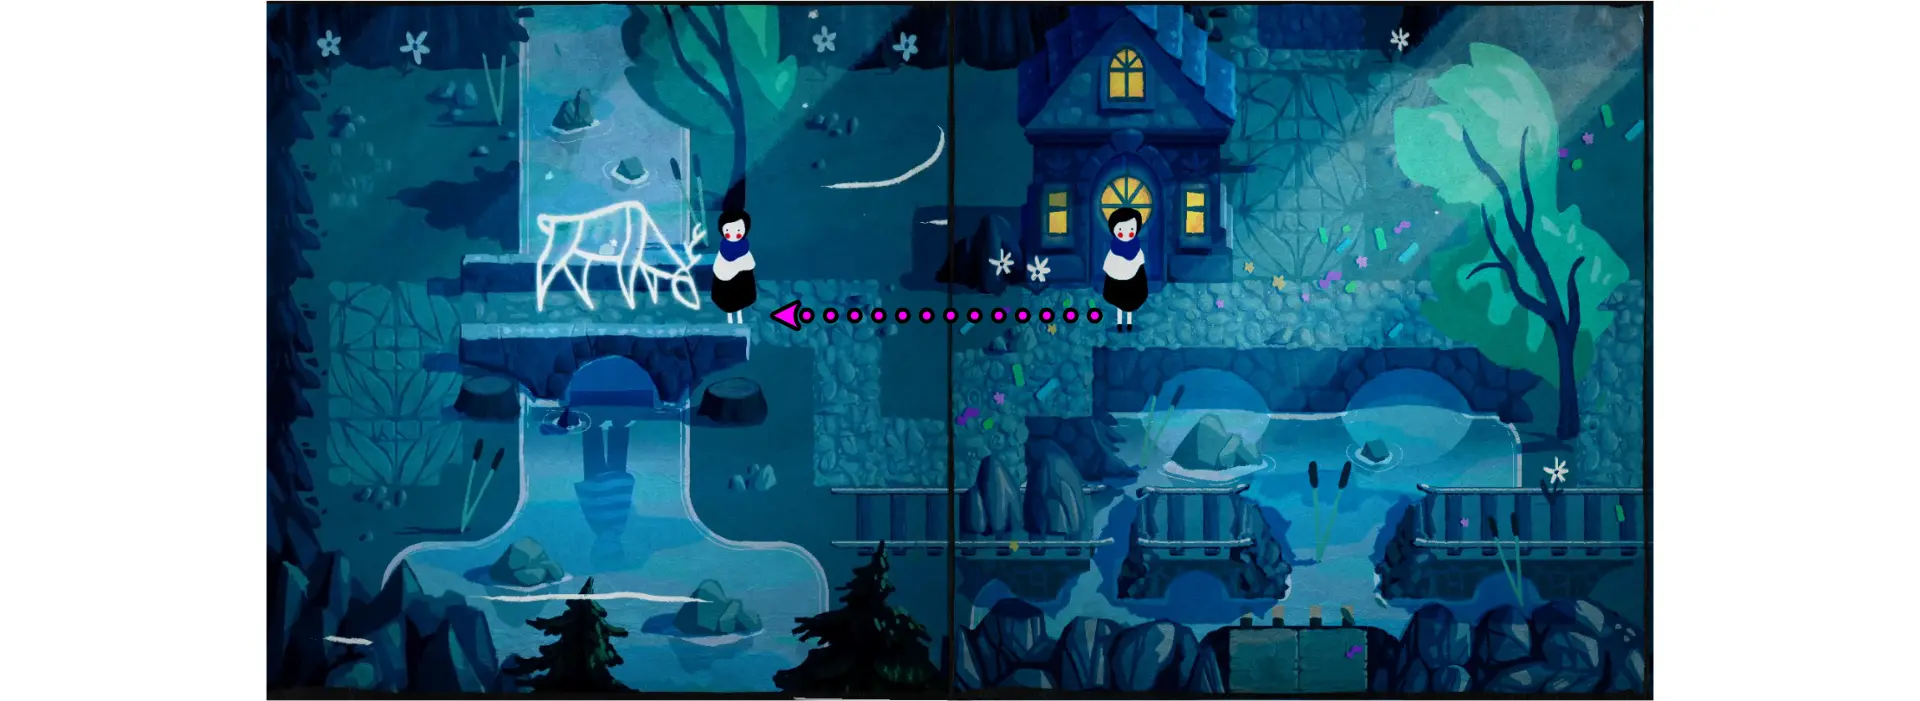
To unlock, continue the game after finishing it and Paige will be at her house. Move to the left to B1 where the deer is.
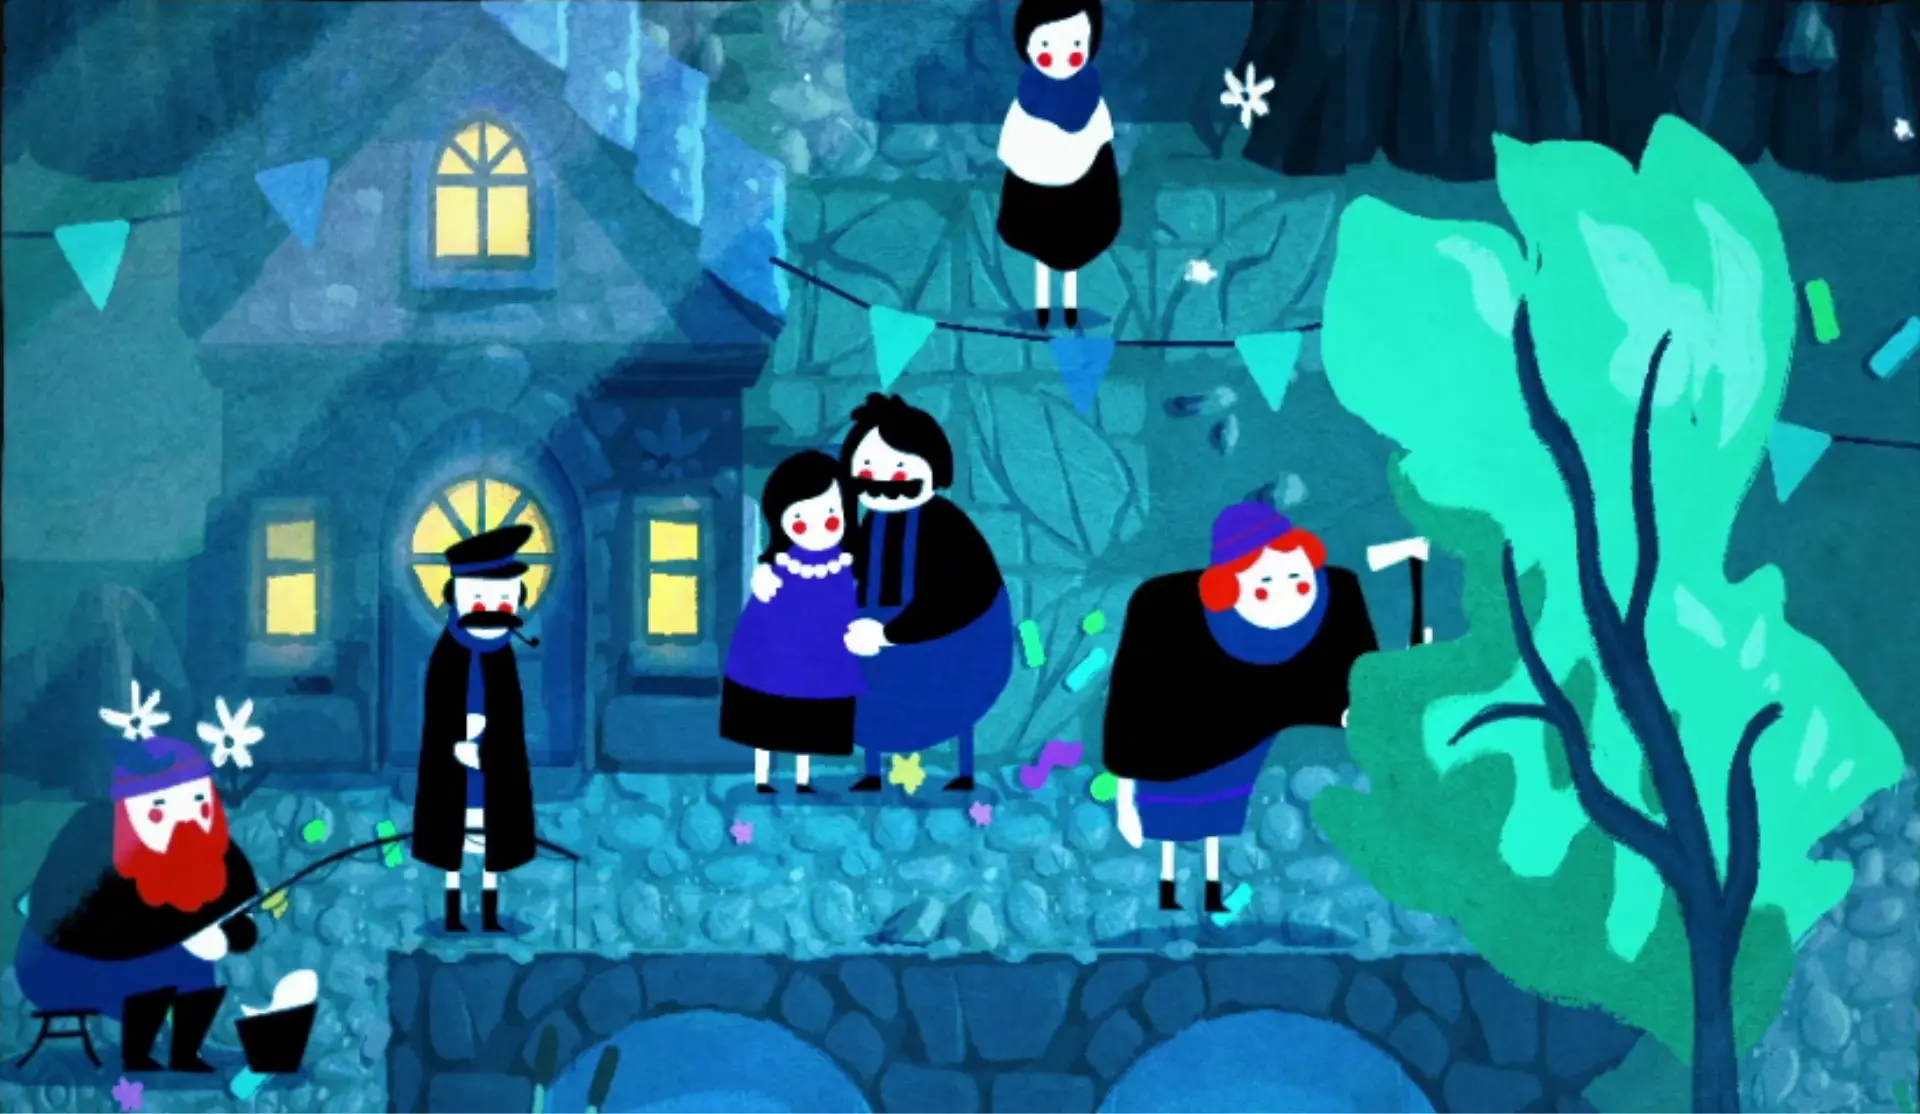
And this marks the end of our walkthrough for Paper Trail! We hope that this article aided you in completing the game or unlocking achievements! Which level did you like the most? Which one did you have the most difficulty with? Was our walkthrough easy to follow? Let us know in the comment section!
Kyle
Friday 6th of September 2024
Heya!
Designer for Paper Trail here. This is a wild, super cool thing to see - we're all really impressed! It's really cool to see how you've organised and presented the information, and made it really digestable! We hope you had as much fun playing the game as we did making it!
Thanks! Kyle.
Level Winner
Friday 6th of September 2024
@Kyle,
Appreciate your comment, we are glad you like our extensive walkthrough!
Keep making great games!
The Level Winner Team