Island Hoppers is a casual game that hits several genres. At its core, it is a map-clearing game where Energy is spent to clear various obstacles and debris in an area. Mixed with this is a farming and management simulation mechanic that places you in the role of a farmer that provides crops and crafts goods to provide for the locals of the area.

Aside from the fun but simple puzzles, the game also features a customizable farm with which to decorate and express your creativity with. But what makes it different from other games that have a similar game mechanic like Spongebob Adventures in a Jam and Homescapes is the adventurous spirit of storytelling told in between puzzle mini-games.

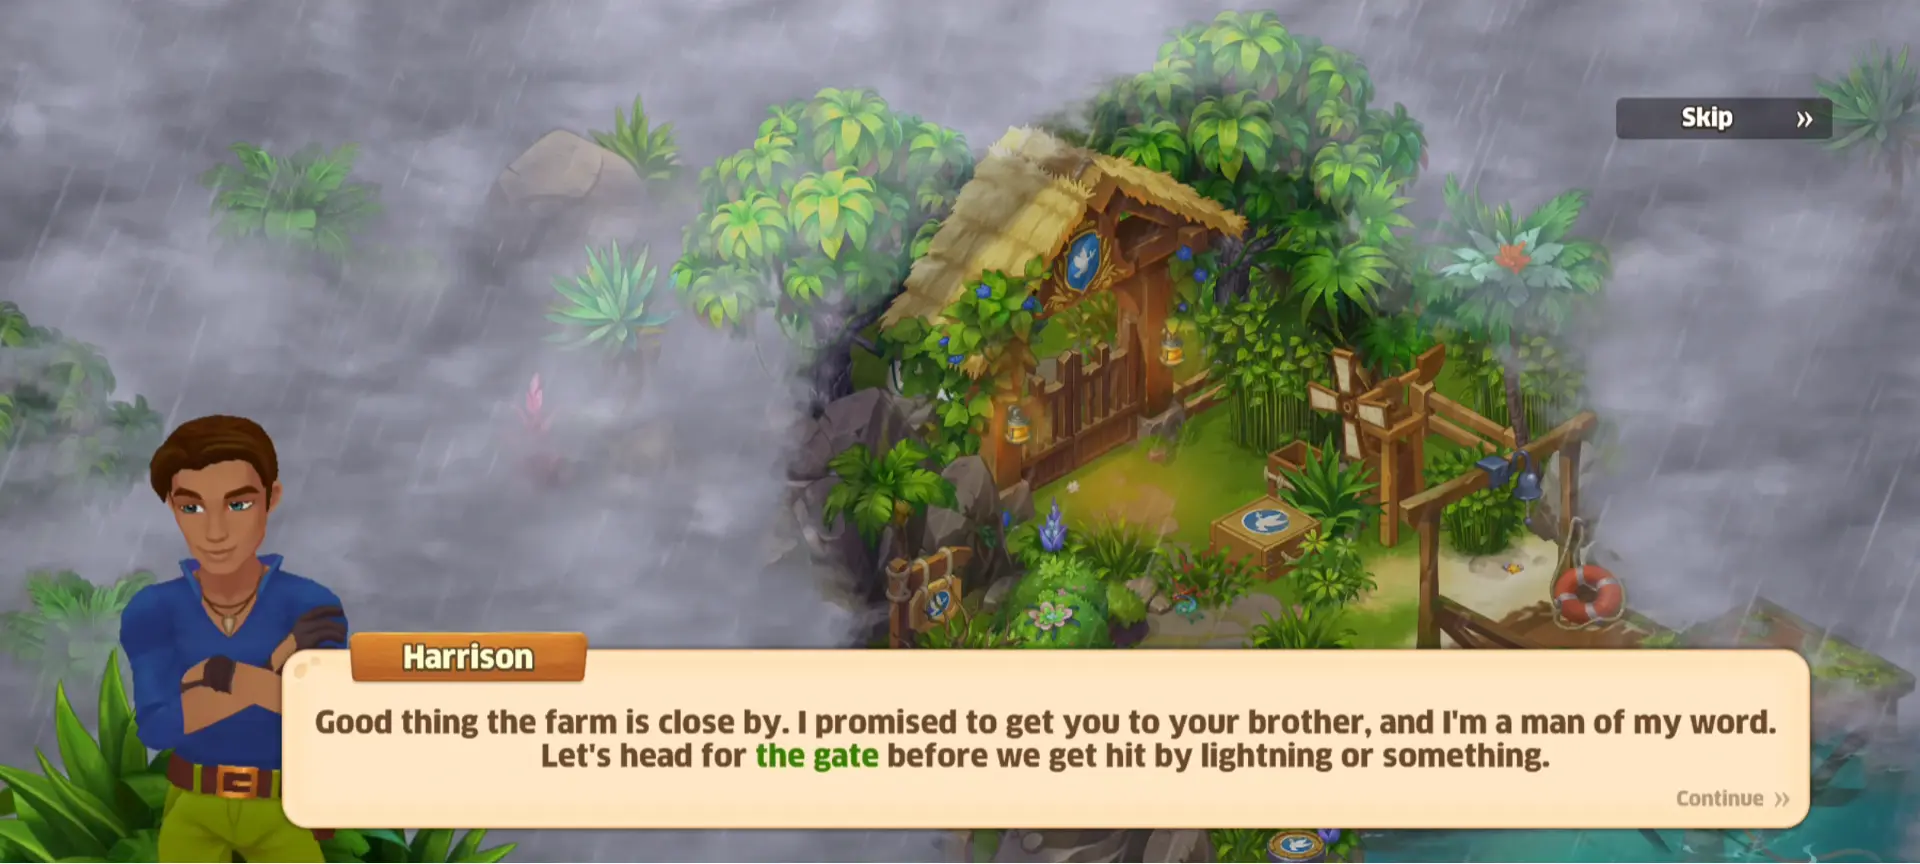
The story starts with Emily, riding a ship through a storm to visit her brother, Jonathan. Together with Harrison, they manage to survive the wreckage and reach her family’s jungle farm. But things are not what they seem at the Harts’ Homestead as they find their farm ransacked and burned. Worst of all, her brother, Jonathan, was nowhere to be found. As they go through various expeditions in the jungle, Emily and Harrison discover secrets and clues to what had happened before they arrived at Jonathan’s farm.
Created by the same makers as Hero Wars: Alliance and Throne Rush, the game is a breath of fresh air from Nexters Global LTD usual genre. With characters that remind us of Disney Mirrorverse but with the cuteness of the Delicious Deluxe Series, Island Hoppers is a game worth keeping in your devices or even as a bookmark on your browser as it is both available in Android, iOS and on PC through their website. First released some time in 2022, the game has been steadily developed and improved and has garnered 10 million downloads in 2024.
However, as simple as the game is, we have found several ways to improve players’ experience with the game. After playing it for some time and reaching level 11, we’ve gathered some interesting tips and tricks that fellow players may find useful to elevate their performance, efficiency and maybe even enjoyment in the game.

- Maneuvering Through Obstacles and Debris
- Game Progression
- Resource Management
- Extras
- Preparations Before Logging off of the Game
Maneuvering Through Obstacles and Debris
There are many plants, obstacles and debris scattered about in your jungle farm and even more in your expeditions. Learning the best practices to deal with them can make you efficient in progressing through the game.
Check Objects Before Clearing or Collecting Them
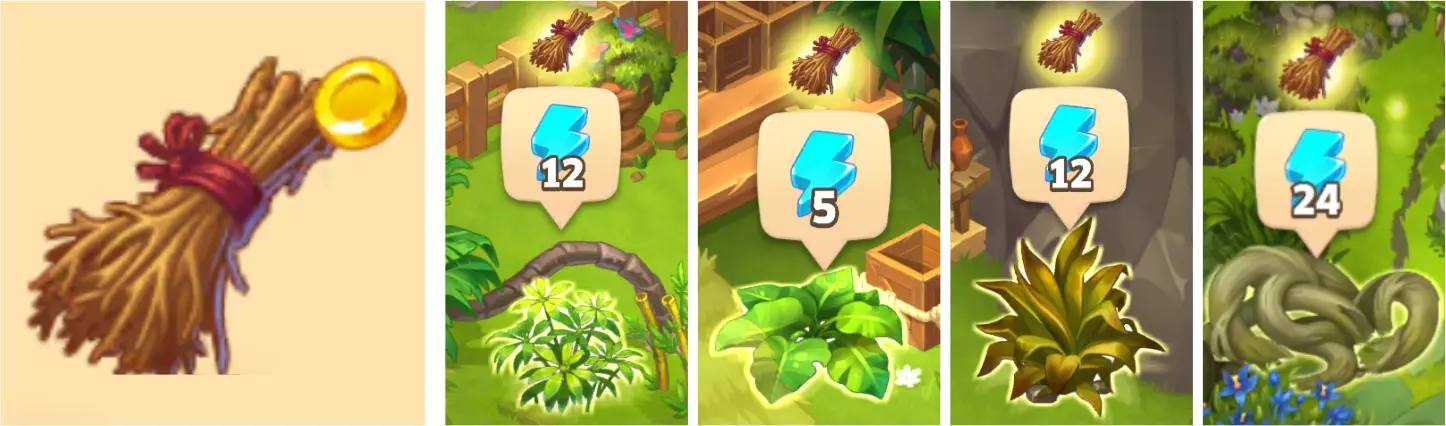
Clearing obstacles can easily be done by tapping and holding the object. But before you become click-happy and start clearing everything you see, you need to remember that Energy in the game is limited. You’ll want to choose the obstacles that you actually need to remove, and the ones that take the least amount of Energy.

To check how much Energy is needed to remove an object, tap it once and it will reveal the Energy requirement along with the resource you can gather from it. If you see a hand icon instead of an Energy icon, that object can be collected without spending Energy.

In the case of pathways that are blocked by obstacles, you can immediately locate which obstacle to remove by tapping the area or item you want to get to. The game will automatically highlight one of the obstacles that block your path. However, this does not mean that this is the only obstacle that you can remove to get there. We recommend always checking the area to see if there are other ways or other obstacles that can be removed that will take less energy to clear.

When it comes to Energy Pots and other items with the Energy symbol on them, we recommend collecting them only if you are planning to keep playing. If not, you can save them for later. It’s better to leave the game with an empty Energy Bar than a full one so that you have some Energy collected by the time you get back into the game. Energy Pots can stack over the Energy Bar limit, but Energy collected passively over time cannot.
Zoom in When Clearing or Collecting Far Away Objects

When making Emily to clear or collect an object from far away, we’ve noticed that she takes a lot longer to get there when our screen is zoomed out and we have a full view of the map. This is because the animation of her walking from one point to the next is played out. However, if you zoom in close to the object instead, Emily will usually appear from the edge of the screen to get to the object. While there will still be a bit of delay sometimes, it’s much faster.
Think Twice Before Using Dynamite

As you play, the game will eventually introduce Dynamite and give you 3 for free. Dynamite can be a very helpful tool in clearing out large amounts of debris and obstacles. It can remove objects in a 7×7 area instantly. However, obtaining them is very difficult as they are rewarded randomly. The game does allow you to purchase them using Gems, but they tend to be very expensive. Because of this, it’s important to think long and hard about where you use your Dynamite and position them in a location that allows you to clear as many obstacles as possible. If you were to buy Dynamite, go for the TNT Bundle or TNT Case instead of the single TNT to save Gems.

Rearrange Structures to Find Hidden Objects
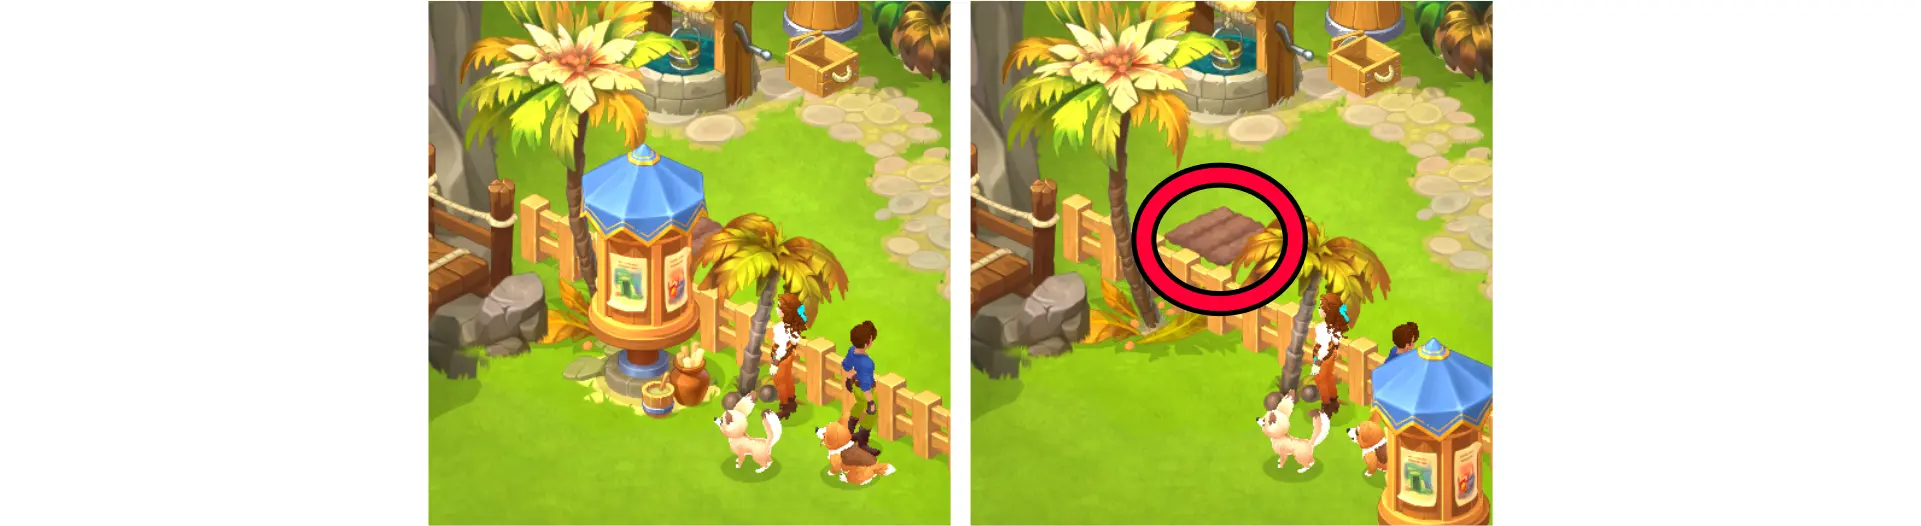
Buildings, vegetable patches and most structures you’ve built or repaired can be moved around by tapping and holding it then dragging to your preferred location. Rearranging your farm may prove to be difficult at the start when it is filled with debris, obstacles and various plants. But once you have enough space, make it a point to move everything around, especially with new areas. Sometimes structures are placed at a certain spot to hide useful objects, the one behind the Events Board. We unlocked the area a couple of levels ago but it was only after we moved it that we realized that there was a Vegetable Patch behind it!

Don’t forget that fences can also be rearranged and stored once an area has been fully unlocked and explored!
Game Progression
Feeling a little lost on what to do? Here are a few things to help you get going:
Check Your Quests to Progress

To progress through the story, you’ll need to complete the quests that appear at the left side of your screen. In some cases, the game may also highlight what you need to click on or do but this will not always be the case. An example of this is the Spot-The-Difference mini game that can be found in the Ancient Ruins where you’ll need to make both rooms look identical. If you missed the instructions that were relayed during the cutscene, you might get confused. Keeping your eye on your quests can help you keep track of what you need to do if you are feeling lost, especially if you accidentally skipped through the dialogue.
Observe Special Events for Rewards

Special Events are entirely optional. They present you with tasks and objectives that must be completed within a certain period of time. These events can range from 1 month, to 1 week, or even just a couple of days.
Participating in the events can reward you with various resources, construction tools, Gold, Gems, Energy, and on rare occasions, a special pet. Most of these tasks can be accomplished passively by simply playing the game and you can view the details and your progress at the bottom of your screen. The rules and format for each event varies so there’s always something new and interesting to look forward to. Below are a few events we were able to participate in while we wrote this guide:
Monthly Event

Monthly Events refresh each month and the objective of the event is to complete tasks in order to fill up the bar at the upper left part of the screen to level up. Each level will present you with a reward. This event refreshes monthly.
There are two types of tasks: Daily Tasks and General Tasks. Daily Tasks refreshes every day and only 3 Free Tasks and 1 Special Tasks are available. General Tasks on the other hand are available throughout the event. 6 of these tasks are Free while 3 of them are Special. Special Tasks are generally a lot easier than Free Tasks.

However, these tasks and rewards that are highlighted in yellow can only be completed and obtained once you purchase a Golden Pass with real-life currency. Along with unlocking these, you will also receive various temporary benefits such as boosting your progress, an additional wind turbine, more nuts, higher Energy capacity, Treasures shown on the map, and the ability to cancel cableway orders.

Farm House Repair

Farm House Repair is an event where Emily, Harrison and Sherlock the Corgi find a secret section of Jonathan’s house and lasts for 3 days. This event is triggered after Sherlock the Corgi gets out of the box which is 8 hours after the box is initially found.
In this event, Sherlock brings Emily and Harrison inside Jonathan’s house and leads them upstairs. The two share what their life was like as kids while they clean and repair the house. Repair Coins are spent instead of Energy to take action and these can be obtained by completing orders from the Order Board. Repairing the house will reward you with Tokens. Once you earn enough Tokens and reach milestones, you’ll be rewarded with Treasure Chests filled with goodies.

After 3 days, Emily will close that section of the house and it will no longer be possible to revisit the event.
Soft Paws

Some time after the Farm House Repair event has ended, the opportunity to adopt a cat will surface in the Soft Paws event. The event starts with a storm that starts to brew on the island. A ship with black sails will dock on the island momentarily for repairs. The owner of the ship brings with him a stray cat and asks Emily if she would want to adopt it. However, it doesn’t get along with Sherlock so you’ll need to gain its trust by obtaining Trust Hearts. These can be obtained by accomplishing daily tasks presented by the event. Passing milestones will earn you rewards and once you earn 28 Trust Hearts, the cat will stay on the island. The event only lasts for 7 days and once it passes, you won’t have another opportunity to obtain the pet cat.

Don’t Move to Another Map Immediately

While the spirit of adventure may urge you to move onto the next big thing as soon as you complete the main quest of a location, we highly recommend taking your time. There are many other treasures and optional quests that can be found in each map and completing them will earn you a special reward. An example of this is the Fennec Fox that you can keep as a pet from the Ancient Ruins. While it may take more time and Energy, the trade off is worth it, especially since you cannot go back to a location that you have already left.

A map would usually be found somewhere on your expedition that can give you a hint on where the other treasures and mini-games are in that location. Once you’ve obtained the map, you can view it by tapping the treasure chest icon at the lower left corner of the screen then tapping the map icon at the right side of the screen.

If for any reason you wish to come back to the location, you have 24 hours after moving to the new location to revisit the previous one before it becomes permanently unavailable.
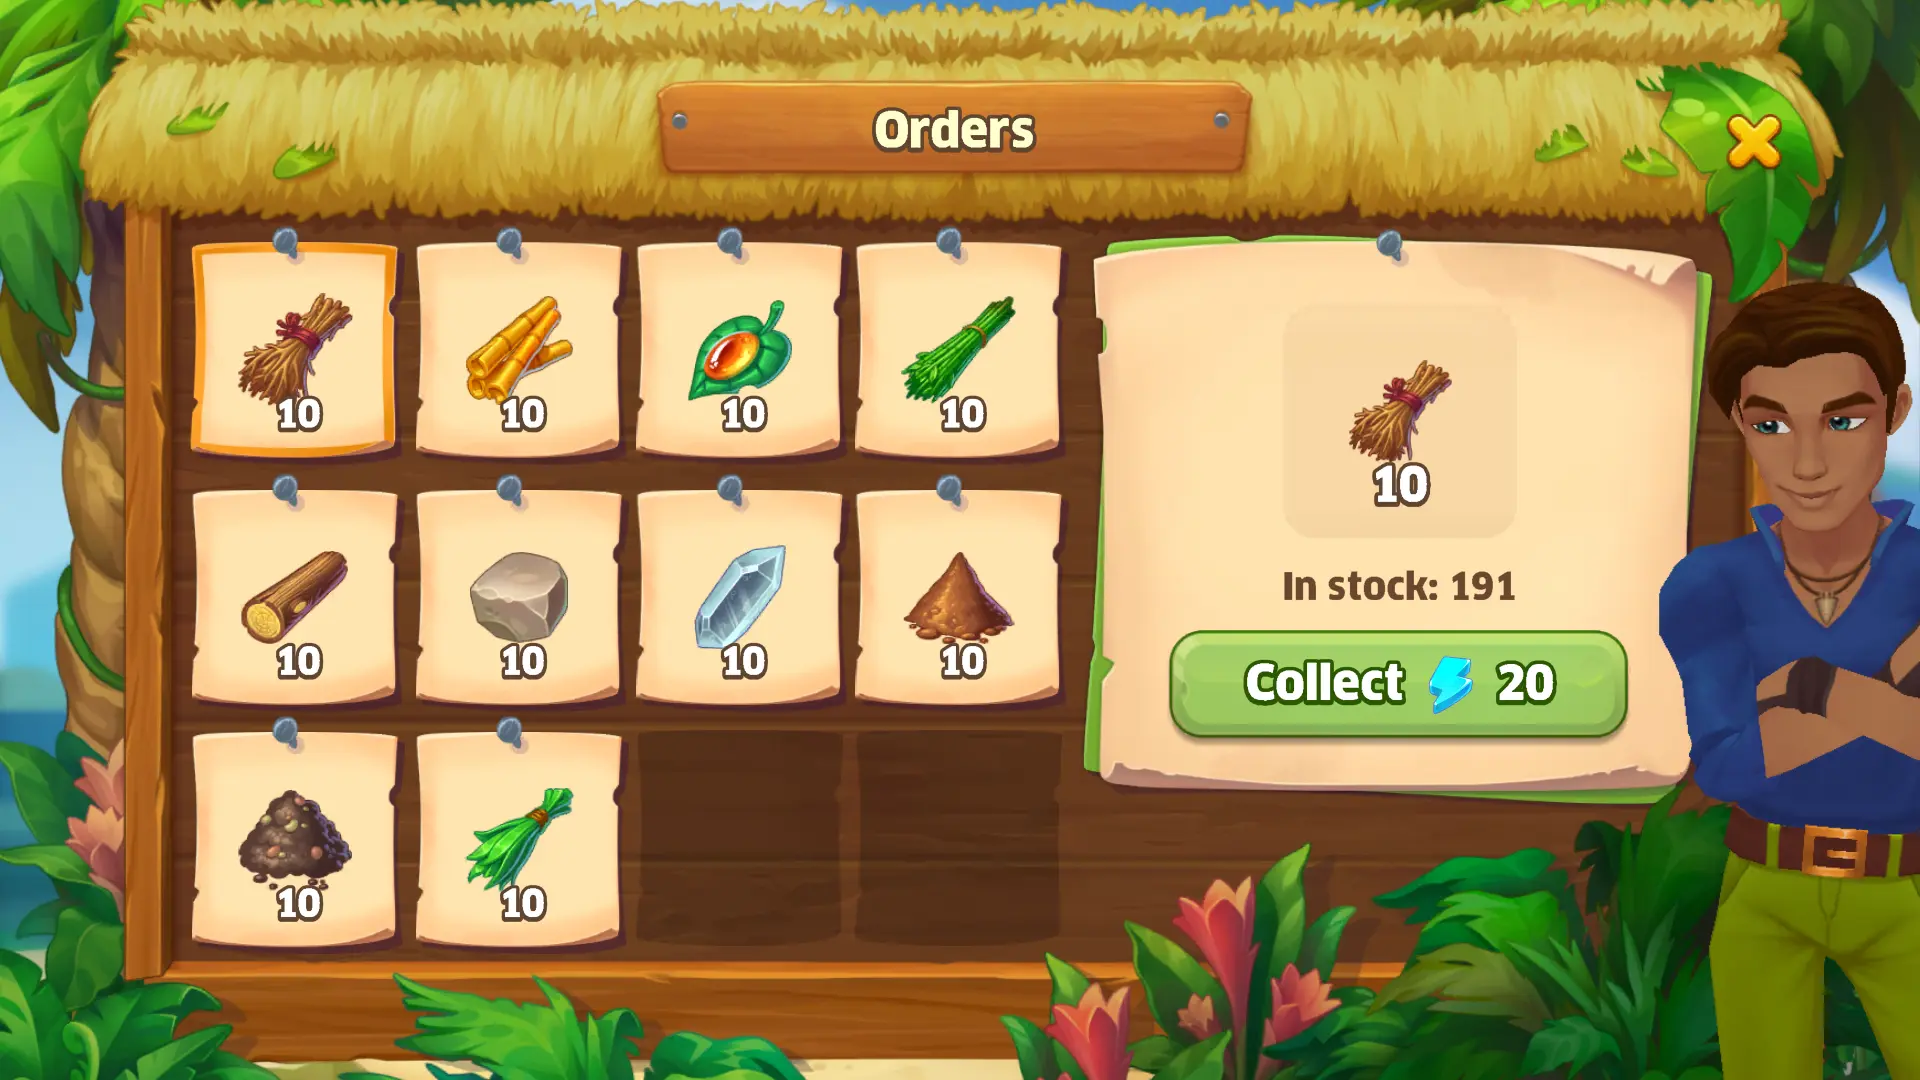
Complete Order Board Requests for Gold and Tools

The Order Board contains requests from locals for crops and goods produced by your farm. Completing an order will reward you with Gold and Experience. Completing a certain number of orders will reward you with a chest filled with construction tools such as a Bone Saw Blade, a Bone Comb, and a Bone Palette-Knife. These tools can only be obtained through deliveries and are required to build new facilities or move forward with your expeditions. While there is no time limit for any of these quests, your progress towards milestones for these tool rewards are only retained within the day. After 24 hours, the progress is reset.

Because of this, we recommend players to stop fulfilling requests from the Order Board after obtaining the final milestone of the day. Focus instead on planting crops, harvesting resources and producing goods in order to fill up the orders much quicker for the next day.

In some rare instances, you may see the board with a play button or watch ad button. When that appears, a bonus order will appear at the right side of the board. Instead of crops or products, you need to watch an ad to fulfill this order. Be quick, for this bonus order will only be around for 30 minutes!
Take Cableway Orders for Energy

At level 11, you’ll unlock the Cableway which is a facility that Weiss used for his mining business. Now that he’s no longer around, Emily and Harrison have decided to use it for something that benefits locals: transferring supplies!

The Cableway works similarly to the Order Board where crops and goods are requested by the locals. What makes this different is that 3-5 different products are ordered at a time. Loading each box will reward you with Experience. Loading all boxes will reward you with Fruits and Mineral Additives that are used to create Dog Biscuits for Sherlock the Corgi. While you won’t earn any Gold from this, the items you do obtain can help refill your Energy Bar.

Resource Management
Resource Management is a very important aspect of the game and honing this skill will definitely help you advance faster. In general, it is always a good idea to stockpile resources in order to complete orders more efficiently, especially those that take time to generate or create. However, certain resources are a lot harder to come by than others and it makes a lot of sense to keep them in your inventory until you need them.
Types of Resources
We have divided resources into four types: Farmed Crops, Gathered Resources, Produced Goods and Traded Resources. To help you distinguish which resources you need to constantly generate and which ones you should save, we’ve written down a few notes for each category.
Always Plant Seeds on Vegetable Patches for Farmed Crops
Farmed Crops are obtained by planting seeds and harvesting the produce after a certain amount of time has passed. They are the most low-cost resources in the game since seeds are cheap and most will grow within minutes. They are used to fulfill orders, create feed for your animals or make other products. You’ll want to be constantly producing them as much as possible so that you won’t have a hard time fulfilling orders and producing other products when needed.

Vegetable Patches are squares of tilled soil that are required to plant seeds to produce vegetables. You have 6 of them provided at the start of the game. You’ll only be able to increase the number of patches you have by unlocking more areas or buying them from the store once you’ve unlocked the ability to purchase them at certain levels. You can only buy them one at a time and each patch costs 300 Gold.
| Icon | Product | Cost | Level Unlocked | Growth Duration |
 | Beans | 3 Gold | 3 | 45 seconds |
 | Wheat | 4 Gold | 5 | 1 minute |
 | Corn | 6 Gold | 8 | 2 minutes |
 | Pumpkin | 8 Gold | 10 | 20 minutes |
Between these 4 crops, the most important ones to plant and grow at the start would be Beans, especially at level 5 for creating Feeders and at level 16 for creating Llama food. Wheat is the second important product, especially at level 7 for creating Wheat Bread and at higher levels for creating other types of baked goods at the bakery. Corn will have more use at level 9 for creating Goat Food and level 16 for creating Llama food. Pumpkin on the other hand is only used for Pumpkin Bread by level 10 but may be more important later down the line.
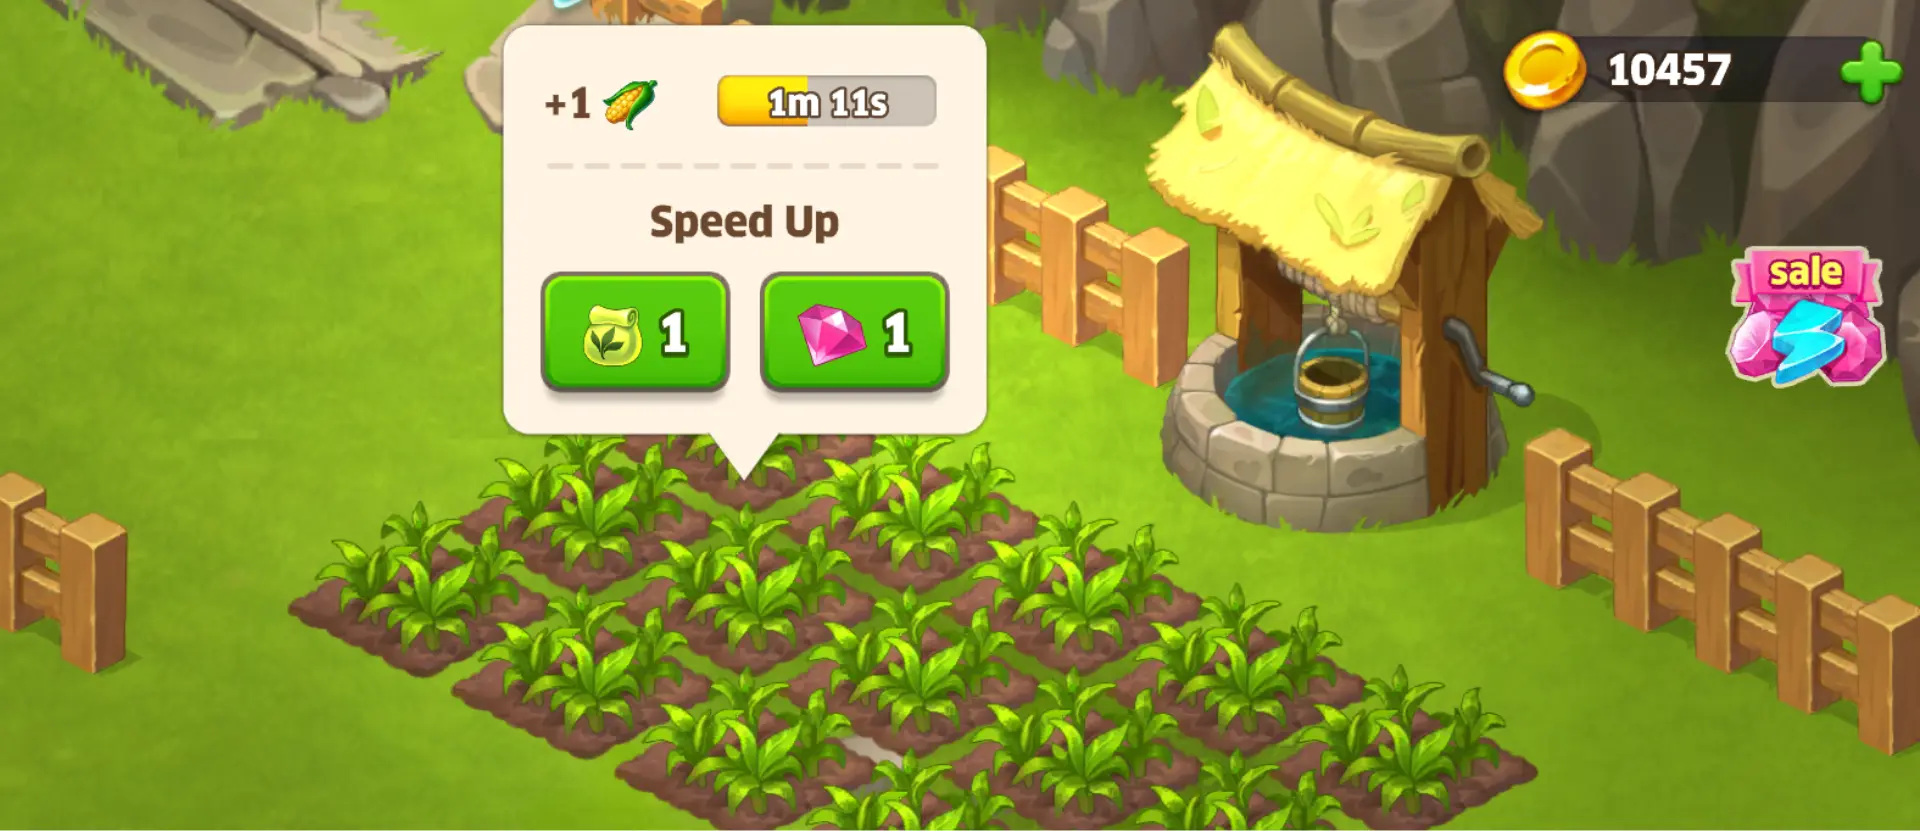
If you want to speed up the growth of your crops, you can spend Gems or use Fertilizer on the patch.
One very important thing you should remember is not to use all your Farmed Goods into creating these other products because they are also heavily requested at the Order Boards.
Reserve Your Energy for Gathered Resources
Gathered Resources are obtained typically by using Energy to harvest or clear plants, debris and obstacles in the area. They are a lot quicker to obtain as long as you have Energy to spend. However, if your goal is to progress through maps and levels quickly, it’s recommended to only gather resources that you need outside of the obstacles you need to clear.
There are many harvestable objects on the map and learning which ones can give you what you need can help you avoid spending Energy on the wrong ones. While it is possible to see what items an object can give you by simply tapping them once, it helps to have a general idea of what to look out for.
Log

Logs can be collected from broken wooden structures, planks, empty boxes and barrels, fallen logs, and the various trees in the game and uses energy to harvest.
In the first 10 levels, they are primarily used for creating Boards and Wooden Beams using the Sawmill and building structures.
Stone

Stones can be collected from gray rocks or dark brown mossy rocks of all sizes. Flat rocks or light brown mossy rocks do not produce stones.
In the first 10 levels, they are primarily used for producing Ore and Quartz Sand using the Quarry and building structures.
Grass

Grass can be collected from most flowery fields and plants as well as green to yellow green patches with thin blades of grass.
In the first 10 levels, they are primarily used for creating Wicker Blanks using the Sawmill, Cords using the Rope Workshop, and building structures.
In our experience playing the game, this resource is the one that we ran out of the most. When you get the opportunity to harvest a lot of Grass, take it!
Brushwood
Brushwood can be collected from bushes with large leaves, bushes with clusters of smaller leaves, or overgrown vines.
In the first 10 levels, they are primarily used for creating Wicker Blanks using the Sawmill, and building structures.
Jute

Jute can only be collected from long, fibrous plants with small leaves on top.
In the first 10 levels, they are primarily used for creating Cords using the Rope Workshop, and building structures.
Bamboo

Bamboo can only be collected from bamboo plants.
In the first 10 levels, they are primarily used for creating Wicker Blanks using the Sawmill, and building structures.
Resin

Resin can only be collected from trees with yellow flowers.
In the first 10 levels, they are only used for building structures.
Clay

Clay can be collected from flat gray rocks and brown, layered, rocks.
In the first 10 levels, they are only used for building structures.
Peat

Peat can be collected from grassy areas with dark gray-brown dirt.
In the first 10 levels, they are only used for building structures.
Quartz

Quartz can be collected from light gray rocks that may be layered, mossy, or mossy with flowers.
In the first 10 levels, they are primarily used for producing Quartz Sand using the Quarry, and building structures.
Water

Water can only be collected from the Well which is unlocked at level 7.
In the first 10 levels, they are primarily used for creating Cords using the Rope Workshop, creating Llama Food using the Barn, and building structures.
Fish

Fish can be collected from the debris on the water by the pier at level 9. Only the debris that has a fish swimming around it will give you Fish.
Fish are only used to feed Sherlock the Corgi for him to bring you Nuts.
Fruits, Gold, and Energy

Fruits can be randomly harvested along with the other resources mentioned previously. However, they are more likely to be found in collectible resources like boxes, pots, chests, and some debris from the water along with Gold and Energy. Collecting these will not consume any Energy.
Think Twice Before Producing Goods
Creating products to fulfill orders is one of the main objectives of the game so it makes sense to make them in batches for future orders. This is an especially practical strategy when you are out and about exploring other locations or after you’ve logged out of the game. However, you must always consider the resources you have on hand before taking that step. Some products only need one or two resources or crops to create while some need several. For your reference, we’ve listed the products that can be made with the facilities at your farm that are unlocked within the first 10 levels.
Sawmill

At the beginning of the game, you’ll unlock the Sawmill. This structure is used to create Wicker Blanks, Boards, and Wooden Beams. It requires 10 Wind Power to function.
| Icon | Product | Level Unlocked | Crafting Duration | Requirements |
| Wicker Blank | 2 | 3 minutes | 5 Bamboo 10 Grass 10 Brushwood |
|
 | Board | 3 | 10 minutes | 5 Logs |
 | Wooden Beam | 12 | 30 minutes | 15 Logs 1 Cord |
Among all these products, Boards are the easiest to make at 5 Logs per piece. If you have more than enough stock of Logs, we recommend making a lot in batches. Wicker Blanks are nice to stock up but if you have plenty of Bamboo on hand.
Barn

At level 5, you’ll unlock the Barn. This structure is used to create Feeders, Goat Food, and Llama Food. It requires 15 Wind Power to function.
| Icon | Product | Level Unlocked | Crafting Duration | Requirements | Amount Produced |
 | Feeder | 5 | 1 minute | 6 Beans | 8 |
 | Goat Food | 9 | 3 minutes | 3 Corn | 12 |
 | Llama Food | 16 | 5 minutes | 7 Beans 7 Corn 3 Water | 12 |
All these products are necessary for feeding Chickens, Goats, and Llamas to obtain Eggs, Milk and Wool. Once the food has been produced and collected, they will automatically be transferred to the facilities that house these animals where they are fed. However, it is not necessary to feed your animals regularly, especially if there is no need for the goods that they produce, if there is a surplus of goods, or if there are no animals available.
Chicken Coop

At level 5, you’ll unlock the Chicken Coop. This structure is used to house Chickens that can lay Eggs but they must be supplied with Feeders from the Barn before they can produce them. You can buy 8 Feeders with 3 Gems if you’re in a rush but we generally do not recommend it since there are better uses for your Gems.
| Icon | Product | Production Duration | Requirements |
 | Egg | 8 minutes | 1 Feeder |
Unlike other farming games, Chickens will not stay with you forever. Once they’ve laid a certain number of eggs, they will disappear from your coop and leave Fruits behind. You’ll need to purchase more Chickens to keep the Egg production going.
At level 11, you can purchase up to 4 Chickens. This number will increase as you level up. Pedigree Chickens, though expensive, do not seem to have a purchase limit.
| Icon | Animal | Cost | Eggs Produced (8 minutes) | Total Eggs Produced |
 | Chicken | 200 Gold | 1 | 16 |
 | Pedigree Chicken | 9 Gems | 2 | 32 |
Eggs are used to make Cookies at the Bakery at level 14 and used to fulfill orders at the Order Board. However, the demand for this product is not too high at your early levels so it is best to not focus too much on Egg production.
If you want to speed up the production of Eggs, you can spend Gems or use Animal Vitamins on your Chickens.
Quarry

At level 6, you’ll unlock the Quarry. This structure is used to create Ores, Quartz Sand, and Pigments. It requires 15 Wind Power to function.
| Icon | Product | Level Unlocked | Crafting Duration | Requirements |
 | Ore | 6 | 3 minutes | 5 Stones |
 | Quartz Sand | 9 | 10 minutes | 1 Stone 5 Quartz |
 | Pigment | 19 | 45 minutes | 5 Stones 3 Processed Clay 5 Blueberries |
Among all these products, Ore is the easiest one to produce since all you need are Stones and a few minutes. Since Stones are one of the resources that are routinely gathered when exploring, you’re most likely to have a lot of them at hand, especially since they aren’t a requested item from the Order Board. Quartz are a lot less common but aren’t really used in creating other products other than for constructing buildings so Quartz Sand is also worth stockpiling if you have enough Quartz. Pigment on the other hand needs a lot more items to create so only make them when necessary or if you have a surplus of resources on stock.
Bakery

At level 7, you’ll unlock the Bakery. This structure is used to produce Wheat Bread, Pumpkin Bread, and Cookies. It requires 15 Wind Power to function.
| Icon | Product | Level Unlocked | Crafting Duration | Requirements |
 | Wheat Bread | 7 | 5 minutes | 5 Wheat |
 | Pumpkin Bread | 10 | 10 minutes | 5 Wheat 5 Pumpkin |
 | Cookies | 14 | 20 minutes | 7 Wheat 2 Eggs |
Of all the products this facility can produce, Wheat Bread is the most low-cost so it makes sense to stock up on it. However, Wheat is also one of the regularly requested crop at the Order Board. Only make Wheat Bread to stock if you have an abundance of Wheat. The same goes for the other products on the list, especially since they aren’t always ordered and there is not much need for them in your first few levels.
Goat’s House

At level 9, you’ll unlock the Goat’s House. This structure is used to house Goats that can produce Goat Milk but they must be supplied with Goat Food before they can produce them. You can buy 12 Goat Food with 4 Gems if you’re in a rush but we also do not recommend it since there are better uses for your Gems.
| Icon | Product | Product Duration | Requirements |
 | Goat Milk | 10 minutes | 1 Goat Milk |
Just like with the Chicken Coop, Goats will not stick around indefinitely but they do stay a lot longer. They also drop fruits before they leave the house.
At level 11, you can purchase up to 3 Goats but the limit will increase as you level up. To our knowledge, Pedigree Goats can be purchased with no limit.
| Icon | Animal | Cost | Goat Milk Produced (10 minutes) | Total Eggs Produced |
 | Goat | 420 Gold | 1 | 24 |
 | Pedigree Goat | 12 Gems | 2 | 48 |
Goat Milk is used to create various products for the Bakery such as Cream at level 10 and Butter at level 14. We recommend keeping a couple of goats on board and keeping them fed once you’ve unlocked this facility because the next level will unlock the Dairy. That structure will use Goat Milk for most of its products so it’s good to have some stock ready.
If you want to speed up the production of Goat Milk, you can spend Gems or use Animal Vitamins on your Goats.
Dairy

At level 10, you’ll unlock the Dairy. This structure is used to produce Cream and Butter and primarily requires Goat Milk for their products. It requires 20 Wind Power to function.
| Icon | Product | Level Unlocked | Crafting Duration | Requirements |
 | Cream | 10 | 10 minutes | 1 Goat Milk |
 | Butter | 12 | 20 minutes | 2 Goat Milk |
 | Custard | 16 | 45 minutes | 3 Goat Milk 5 Future Ingredient (?) 3 Eggs |
Both Cream and Goat Milk will be products that are requested at the order board so having a steady stock of both will be beneficial. Just make sure that you have more stock of Goat Milk than Cream because once you unlock Butter at level 12, you’ll need them to produce it.
Pet Shop

At level 11, after completing your first Cableway order, the locals will send you Mineral Additives that can be used for pet food, unlocking the Pet Shop building. It requires 10 Wind Power to function.
| Icon | Product | Level Unlocked | Crafting Duration | Requirements |
 | Dog Biscuits | 11 | 30 seconds | 1 Fish 1 Mineral Additives |
 | Fish Sticks | 14 | 1 minute | 1 Fish 1 Future Pet Item (?) 1 Wheat |
Dog Biscuits will fill up the bar a lot more in the Corgi Kennel and it seems to be the only product you can make with the Mineral Additives at your early levels. Because of this, it’s highly advised to make them as much as you can when both items are available.
Trade Resources Sparingly
Some resources can be obtained by exchanging it for something else. Most of these Traded Resources should only be exchanged when the need for it arises.
For the Campfire, Cauldron, and Nut Crusher, there are 3 bars that can be filled by certain items to obtain their respective resources. Once all these bars are filled, you’ll need to wait for a few minutes before you can exchange items again. But if you don’t want to wait, you can use a Snowflake to speed up the timer. These Snowflakes can be obtained randomly as you play the game.
For the Corgi Kennel, there is only 1 bar that can be filled up at a time and it cannot be sped up with a Snowflake.
Trade Resources for Fire at the Campfire

At level 5, Fire can be produced by the Campfire which is sometimes used for building structures or completing requirements for quests when exploring. Brushwood, Peat, and Resin are used to fill the bar to obtain 5 Fire. It takes 1 minute for a bar to cool down.
Each item fills up the bar in varying degrees:
| Icon | Item | Amount Filled |
 | Brushwood | 1/13th of the bar |
 | Peat | 1/5th of the bar |
 | Resin | 1/10th of the bar |
Trade Fruits for Energy at the Cauldron

At level 5, Fruits can be exchanged for Energy at the Cauldron. Fruits can be obtained through different means:
- Harvesting resources and clearing debris
- Opening Chests and Boxes
- Leveling Up
- Connecting Your Account
- Collecting Dailies
- From Chicken Coops and Goat Houses when the Chicken and Goats have produced everything that they can
Blackberries, Mangosteens, Figs, Mangoes and Pomelos are used to fill the bar to obtain 15 Energy. It takes 5 minutes for a bar to cool down.
Each Fruit fills up the bar in varying degrees:
| Icon | Item | Amount Filled |
 | Blackberry | 1/9th of the bar |
 | Mangosteen | 1/4th of the bar |
 | Fig | 1/5th of the bar |
 | Mango | 1/3rd of the bar |
 | Pomelo | 3/5th of the bar |
Trade Pet Food for Nuts at the Corgi Kennel

At level 9, Nuts can be obtained by feeding Sherlock the Corgi. Fish can be obtained from the water by the pier by tapping the debris that has fish swimming in it while Dog Biscuits and Fish Sticks can be produced by the Pet Shop at level 11.
Once the Pet Shop has been unlocked, we recommend not feeding Sherlock the Corgi with only Fish since these can only fill up 1/8th of the bar while Dog Biscuits can fill up 1/5th of the bar. We unfortunately cannot determine how much Fish Sticks can fill up yet but generally, feeding Sherlock food from the Pet Shop is better than just Fish by itself.
Sherlock will bring you a random assortment of Nuts 5 minutes after filling the bar. Since it does take time to obtain the Nuts, we recommend feeding Sherlock as soon as you get enough to fill the bar so that you won’t have to wait for these Nuts when you need them.
Trade Nuts for Energy at the Nut Crusher

At level 9, Nuts you obtained from the Corgi Kennel can be exchanged for Energy at the Nut Crusher. Walnuts, Peanuts, Hazelnuts, Almonds, and Pecans are used to fill the bar to obtain 10 Energy. It takes 15 minutes for a bar to cool down.
Each Nut fills up the bar in varying degrees:
| Icon | Item | Amount Filled |
 | Walnut | 1/11th of the bar |
 | Peanut | 3/29th of the bar |
 | Hazelnut | 3/20th of the bar |
 | Almond | 1/5th of the bar |
 | Pecan | 15/16th of the bar |
Gathering and Production
Aside from our notes from the previous section, we also have a few other tricks and strategies that can help in gathering and producing goods:
Don’t Sell Your Resources

Gold can be tough to come by if you’re not actively going through your expedition or if you’re stuck with an order board filled with difficult requests. In those cases, you could consider selling the resources in your inventory.
Any item with a Gold coin at the upper right corner of its icon can be sold to earn some extra Coin. Most of these items are resources you’ve gathered by harvesting and clearing obstacles. However, we highly discourage doing this because the trade off isn’t worth the amount of Energy you spent on collecting these resources. Most of these will only be sold for 1-5 Gold per piece. You are better off waiting for Energy to gather the resources you need to complete the requests in your Order Board.
Order Resources in a Pinch
In some cases, you may find yourself in need of a certain gathered resource which cannot be harvested from your farm or from the other locations you are exploring. When this happens you can visit the Shed, which is unlocked at level 10, to ask Harrison to bring you the resources you need. He can bring you 10 pieces of a resource for 20 Energy each.
The exchange is not too bad of a tradeoff and does help tremendously when you’re in a pinch. However, before you go using it, we do recommend clearing the plants and debris on your farm or other locations to collect your resources first before you spend all that Energy to order them. This is a lot more beneficial to you in the long run since the extra space will make it easier to place new buildings that you get when you level up. Take this option once the resources you’re looking for become hard to find or if the path to it is currently inaccessible.
Make the Most Out of Your Wind Power

Wind Power is needed to make most of your facilities function to produce goods and products to sell or to feed your animals. Most of them require 10 to 15 Wind Power each to start up and you’ll need Wind Turbines for that.
At the start of the game, you’ll have a couple of Wind Turbines on your farm. But as your farm grows and more facilities are introduced, so does the demand for Wind Power.
Repairing the already existing Wind Turbines on your farm should be prioritized since they only require you to collect the necessary resources. Buying a Wind Turbine from the store can be quite expensive and also requires you to build it from scratch with collected materials. While you may think that buying every Wind Turbine available to you may be beneficial in the long run, we don’t recommend this if you do not need them yet. It takes a hefty sum of Gold which could be better used for something else.

One thing the game does not outright tell you is the fact that Wind Power is only spent when starting up the facility, not for every product created. This means that no matter how many products are lined up, it will only use Wind Power once until all the jobs are done. Instead of constantly buying more Wind Turbines, it may be more practical to spend Gems to increase production slots. Slots do get more expensive for each one you buy though.

However, if you are hurting for Gems or want to spend your Gems on other things, one other thing you can do is to simply add more jobs to the production before the facility finishes completing all of its jobs. But even if you don’t do this, Wind Power will still replenish itself after some time, just like Energy.
Utilize your Pets

Some time after you’ve met Sherlock the Corgi, the Pet House will become available to build. This structure allows you to change Sherlock’s appearance once you’ve unlocked his costumes. Costumes can be obtained as a reward for completing events.

More pets will become available to you as you play the game. They can be obtained from optional quests or events. Be warned that if you miss the quest or event for them, you can no longer obtain them.

Some pets will play the same role as the Corgi and can only have their appearance changed while some will have an additional purpose. They can be brought on expeditions or aid you with farm work. Equipping them with an accessory will determine what kind of assistance they can provide you with. Each pet will have different accessories but similar icons as the others that have the same effect.
| Accessory | Effect |
| Finds random rewards on adventures. | |
| Finds Energy on adventures. | |
| Finds Gold on adventures. | |
| Finds Tools on adventures. | |
| Finds Animal Vitamins and Fertilizer on adventures. | |
| Finds Berries on adventures. | |
| Finds Snowflakes on adventures. | |
| Harvests more crops from raised beds. | |
| Finds Nuts on adventures. | |
| Finds random animal feed on adventures. | |
| Finds Pet Coins for purchasing pet skills on adventures. | |
| Finds Water on adventures. | |
| Finds Gems on adventures. | |
| Finds Emeralds on adventures. | |
| Finds Treasury Gate Tiles on adventures. | |
| Finds Gems when you spend Treasury Gate Tiles. | |
| Spends Golden Keys to find Energy. | |
| Finds Energy when you spend Treasury Gate Tiles. | |
| Spends Golden Keys to find Gems. |
To collect the item that they found, tap your pet when a green question mark appears above their head.

At the pet house, aside from choosing their appearance, you can also choose your pet’s current activity by tapping the buttons below it.
| Button | Activity |
| At the farm | |
| Taking a walk | |
| On an expedition | |
| In its home |
Extras
Below are some tips that can help you get some extra rewards and goodies while you play the game:
Connect Your Account

Some time after you’ve reached level 5, a man on a raft named Juteigh will drop by and ask for help. This event is not the start of a quest but rather an opportunity to connect your account!
The game saves your progress locally to your device. If you uninstall the game, this will also delete your save file and you’ll have to start all over again if you decide to reinstall it. To keep that from happening, connecting your account to an email address, a Facebook account, or a Store ID (Google Play Store or Apple App Store) will store your progress online.
Doing this will also give you the added benefit of continuing your progress through multiple devices. Just remember that you cannot have the game open on different devices with the same save at the same time! Aside from these benefits, the game will also reward you handsomely with Gold, Energy, Gems, and Fruits! We also got some extra Energy after we opened the game through a different device!

In our experience, connecting your account through your device’s Store ID was the quickest option and gets done without a hitch. It’s connecting through your email and Facebook that we had a bit of trouble with. The good news is that you only need to connect to one of the options presented.
However, if you want to gain all the rewards from connecting your account to all three main options listed on the screen, or if you just want Juteigh to leave your island, we recommend connecting the rest by opening the game through their website.

That’s right! You can actually play this game on your computer through a browser if you prefer to play on the computer! We found that connecting your account this way was a lot smoother and went without any problems.
Match Pairs of Cards to Earn Energy and Experience

At level 7, once the area where the Bakery and the Well have been unlocked, Emily will find a card board game. Once it has been cleaned up and prepared, you’ll unlock a new mini-game which requires you to match as many pairs of cards as you can within 45 moves.
The more cards you match, the more Energy and Experience you get. You get even more if you finish the game in the least amount of moves. Completing the game can earn you up to 40 or more Energy and up to 70 or more Experience. The first game you play will only have 12 cards, but this will increase in the next games.

The best way to play this game effectively is by opening cards in order. Doesn’t matter if it’s left to right, top to bottom, as long as they are adjacent to each other so that it’s easier to keep track of what you’ve opened or what you haven’t. If you have a hard time remembering, open up the cards slowly so that you don’t quickly forget the images that appeared. Alternatively, you can also have a notepad by your side to write down what you saw. The game can’t penalize you for that!
Login Everyday for Daily Rewards

Daily Rewards are a good reason to check up on your game at least once a day. You can earn Gold, Energy, Gems, Fruits, Fertilizer, Vitamins and so on. What’s great about Island Hoppers though is the fact that they will not punish their players for missing a day. If you weren’t able to log in on day 5, instead of restarting back to day 1 when you come back, they’ll consider that log in your day 5 and continue on. You’ll get a grand prize every 7th day, and get another special gift on every 8th day except for the last one which is given on the 30th day.
Watch Ads for Extra Energy, Gems, and Gold
Aside from the bonus order at the Order Board, here are a few more ways to obtain extra Energy, Gems, and Gold through ads:
Floating Chests by the Pier

There are usually up to 4 floating chests you can find by the pier. In our experience, two of them usually give 20 Energy each, one of them gives 500 Gold and another one gives 2 Gems. These chests are replenished after some time has passed.
Treasure Chests at Expeditions

Treasure Chests ads can usually be found in expeditions among other treasures and energy pots. You can only obtain the reward after watching an ad.
Pop-up Envelopes

These envelopes usually offer 20 Energy if you watch an ad. However, these pop-ups show up rarely and randomly and will only stay on screen for a few seconds.
Trade Gifts With Friends

At level 8, Emily will encounter a Toucan with a letter from a person who wants to make friends with her. From here, the Friends tab is introduced where you can add friends that also play the game or add random players as friends. Once they have accepted your request, you can send each other free gifts to help each other out. You can only send 10 friend requests at a time and up to 5 gifts at a time. This is another good way to get some extra Energy.
Preparations Before Logging off of the Game
Before you leave the game to do other things, here’s a list of things you may want to take care of first:
Check the Matching Cards Mini-Game

Since you can only play this mini-game once every 6 hours, it’s always a good idea to drop by and check its current cool down so you’ll know what time is a good time to come back to check on the game.
Check the Water by the Pier

The water by the pier will occasionally spawn debris which you can collect to obtain Fish, Gold, Energy and so on. Make sure to check and collect before you leave!
Empty out Your Energy Bar

Before you log out, you should always make sure to empty out your Energy Bar. Do not collect any Energy Pots and clear out as much debris as you can until it reaches zero. Even if the object requires more Energy than you have, Emily will still go and remove as much as she can until all her Energy is out. The obstacle will remain but the amount of Energy needed to clear it will be reduced for next time. Having zero Energy as you log off will mean being able to collect as much Energy as you can up to your Energy Bar’s limit.
Feed Your Animals

If you have any animals in your Chicken Coop, Goat House or other facilities, be sure to provide them with some food so that by the time you return, you will have an abundance of goods.
Put Your Facilities to Work

Make sure to leave your facilities in production before you go. Just like with Crops, it’s best to choose the products that you really need or the ones that take the longest time to create. Check the section “Resource Management, Think Twice Before Producing Goods” for ideas on what products are the best to produce if there aren’t any specific orders you need or want to fulfill.
Plant Crops on all Vegetable Patches

Planting before leaving will leave you with patches of fully-grown Crops ready for harvest. Choosing to plant Crops that you have low stock of may be wise, but it may be wiser in certain instances to choose the Crops that take the longest to grow. Check the section “Resource Management, Always Plant Seeds on Vegetable Patches for Farmed Crops” for ideas on which crops are best to plant if there aren’t any specific orders you need or want to fulfill.

And this marks the end of our Beginner’s Guide to Island Hoppers! We hope that this article aided you in your quest to repair the farm back to its former glory and to find Emily’s missing brother!
What is your favorite part about the game? Were our tips useful? Are there other games you think we should look into? Let us know in the comments!