From the first stirrings of life beneath water, to the great beasts of the stone age, to man taking his first upright steps, you have come far. Now it’s your turn to take the stage and raise your tribe of hunter-gatherers into a glorious and powerful people in Civilization: Eras & Allies.
Civilization: Eras & Allies is an empire-building game similar to titles like Evony: The King’s Return, Sea of Conquest or Tower of God: New World. In Civilization: Eras & Allies, you’ll train troops, conquer new lands, make allies and enemies, and build a civilization that can hopefully withstand the test of time. Civilization: Eras & Allies is available on both the Google Play Store and the App Store. Note, too, that the game doesn’t run on emulators.
Let me be clear here: this is not Civilization on mobile devices.Civilization: Eras & Allies is an empire-building game, and while there are some elements carried over from Civilization VI, Eras & Allies should be treated as its own game.
In this beginner’s guide for Civilization: Eras & Allies, we’ll discuss the following topics:
- Founding A Civilization: taking territory, researching technology, constructing structures and districts, and advancing through the ages.
- All Things Martial – Heroes: I’ll divide this into two sections. The first section will be about heroes – how to get them, how to strengthen them, and what they do.
- All Things Martial – Units and Armies: This second section will teach you about units and armies – how to move them, unlocking unique units, counters, the importance of Morale and AP, training more guys and reinforcing your armies.
- Making Money: how to earn resources and the many ways of nabbing freebies.
- Making Friends: the importance of alliances and what you can do for them (and what they can do for you)
Lastly, if you’re looking to skim through for a fast breakdown, feel free to jump to the “Quick Tips” sections.
A Foreword: Beginner’s Protection
One important feature in any mobile empire builder is beginner protection, dubbed Novice Protection. Essentially, this is a shield that protects you from being attacked and attacking other players, giving you time to familiarize yourself with the game and put down some roots before being thrust into the action.
In Civilization: Eras & Allies, new players are given 48 hours of Novice Protection. This means that, for 48 hours starting from your first login:
- Your cities, armies, and tiles cannot be attacked by other players.
- You capture tiles much faster than normal.
- You instantly recoup some losses from battle.
- Armies spend less AP when performing combat actions.
- Recalling heroes return 100% of militia resources.
I’ll be frank – 48 hours is not a lot of time. Thankfully, though, it’s just enough time to cover the basics of the game and get solid footing before being thrust out into the world. Let’s get to it.
Founding A Civilization

The first step of any civilization is settling down into a permanent home. But any tribe can plop down their stuff and create a settlement, it takes a learned hand to guide those people from being a simple collection of farmers, hunters, and gatherers into a grand and powerful civilization. And while Civilization: Eras & Allies does have a tutorial, it tends to paint in broad strokes without giving you time to digest each lesson. So, in this section, we’ll talk about the absolute basics of the game, beginning with establishing a powerful capital city.
Quick Tips:
- Each city you control can work a certain number of tiles. Higher-level tiles produce more resources per hour.
- To take a tile, you’ll need to capture it with an army. Tap on an unowned tile and select “Capture” to fight for it.
- Red highlights around a tile mean that you don’t have enough clearance level to take that tile. Prove your worth by conquering barbarian outposts of increasing level!
- You can only capture tiles adjacent to a tile you already own, adjacent to an outpost you own, or adjacent to a tile an alliance mate owns.
- You get more tile allowance every 8h20m or by completing Origin Quests.
- Always be researching something. Research only costs time, so there’s no excuse for leaving the research queue idle!
- Insight (blue beakers) can be used to rush research. You can earn Insight from Origin Quests and capturing ruins. Certain capital structures that provide an hourly Insight income. Prioritize getting these up as quickly as you can.
- Eurekas are special tasks you can complete to help research progress. Completing a technology’s Eureka shaves off 30% of its research time.
- Because of how long research takes, especially in the later game, it’s always a good idea to go for a technology’s Eureka.
- Eurekas aren’t constrained by your period. You can fulfill Eurekas for technologies beyond your current research scope.
- Be sure to build city center buildings as each of them helps greatly with a city’s development.
- You can rush city buildings by paying Gold; if the timer is at 5 minutes or less, you can rush it for free. A notification will appear in a city if you can rush for free.
- Districts unlock new, powerful buildings for a city. Each District also has a passive bonus and can unlock a new feature (usually minigames). Districts must be built on tiles, but provide a flat +40 production to compensate for the tile they consumed.
- To advance to the next era, you need to earn enough production and science.
- Production is earned by owning tiles; the higher a tile’s level, the more production it contributes. Districts grant +40 production.
- Science is earned by researching technology. You generally have to complete most of an era’s research projects to earn enough science to advance.
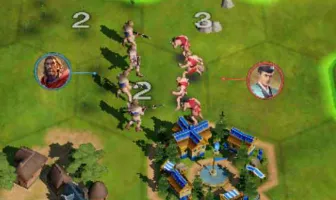
Territory
All civilizations require territory. The more land your civilization owns, the more land your people can work, which leads to more production and food. Tiles that your cities own are highlighted in green:
To take a tile, you’ll need to defeat the tile guards on it. Tap on a tile that’s outside of your territory, tap “Capture” to take over that tile, select which of your armies you’d like to do the fighting, and finally tap the yellow sword icon on the right side of the screen.
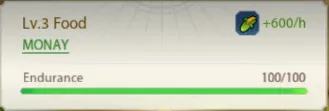
Tiles within your territory passively produce resources every hour; the higher the tile’s level, the more resources it’ll produce. Tap on a tile, then check the upper right of the info panel that pops up to see what resource that tile provides.
Not all tiles are created equal. Tiles that have visible resources on them, like stone, iron, or farmlands, will produce much more of that resource per hour. Tiles also have levels, which also influence their resource generation rates.
You may also have noticed that some valuables tiles have red highlights around them:
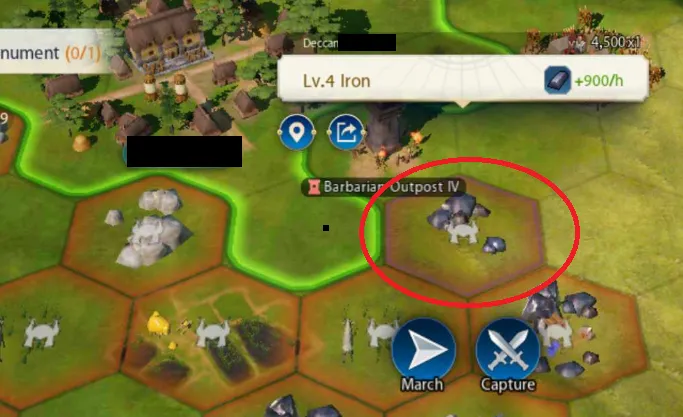
To take these tiles, you’ll need to first prove your mettle by clearing a barbarian outpost of a specific level – which you’ll want to do anyway for resources. Clearing a level 1 outpost lets you fight a level 2 outpost, which unlocks level 2 tiles, and so on.
There’s a limit to the number of tiles each city can work, and this cap increases both over time (every 8h20m) and by completing Origin Quests.
Lastly, note that you can only capture tiles adjacent to one you already own, adjacent to an outpost you own, or adjacent to a tile owned by one of your alliance mates.
Technology
It’s incredibly important to always be researching something in empire builders. Better technology leads to more efficient resource gathering, new structures and mechanics, stronger units, and so much more.
To start research, tap on the technology in question and choose to research that topic – no resources required. After that, just wait out the timer, and bam, new technology.
Now, there are two ways to accelerate your research. The first way is by spending Insight, indicated by blue beakers. Insight is a special currency that can be spent to rush research; the more time a technology needs to finish, the more Insight it will cost to rush it. Insight can be acquired by completing Origin Quests or by capturing ruins; certain city structures, such as the Monument in the early game, also provide an hourly Insight income. You can also earn Insight by simply not researching anything, which I wouldn’t really recommend, but is nice a bonus in case you forgot to set something before you closed the game. I suggest gunning for your Insight structures as soon as possible – knowledge is power, after all!
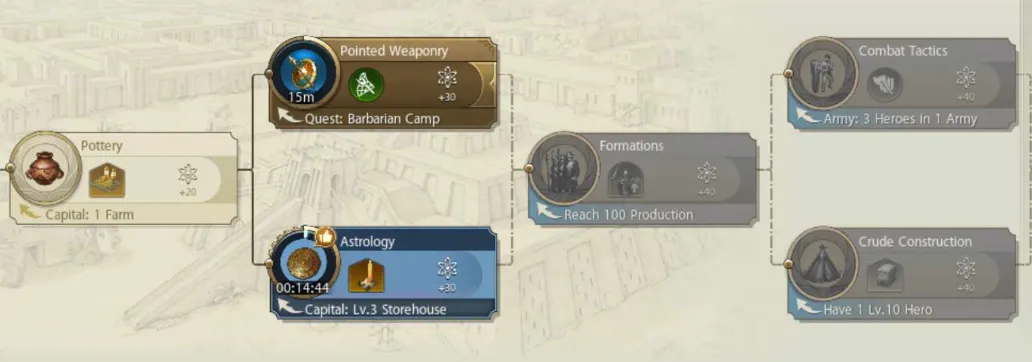
The second way to rush research is by triggering Eurekas. Eurekas are specific tasks that you can optionally complete to help research along, and you can see the Eureka of each technology by either looking below its node in the tech tree or by tapping the technology in question.
These can range from completing certain Origin Quests to having capital buildings at a certain level or even possessing certain income ranges. While it may seem troublesome to go for these extra objectives, achieving Eurekas is very helpful as a technology’s Eureka will reduce its research time by 30%. As technology research time grows exponentially from era to era, it’s best to cultivate an early habit of jumping the extra hoops for Eurekas from the get-go.
Lastly, note that Eurekas aren’t restricted by your era or research progress. Fulfilling Eurekas for technologies that you can’t research yet – even those from other eras that wouldn’t logically make sense yet – will count.
City Center Structures
Development doesn’t happen just outside your walls. Within your cities, you can build a myriad of structures that provide a wide array of helpful effects to help your civilization become even more powerful.
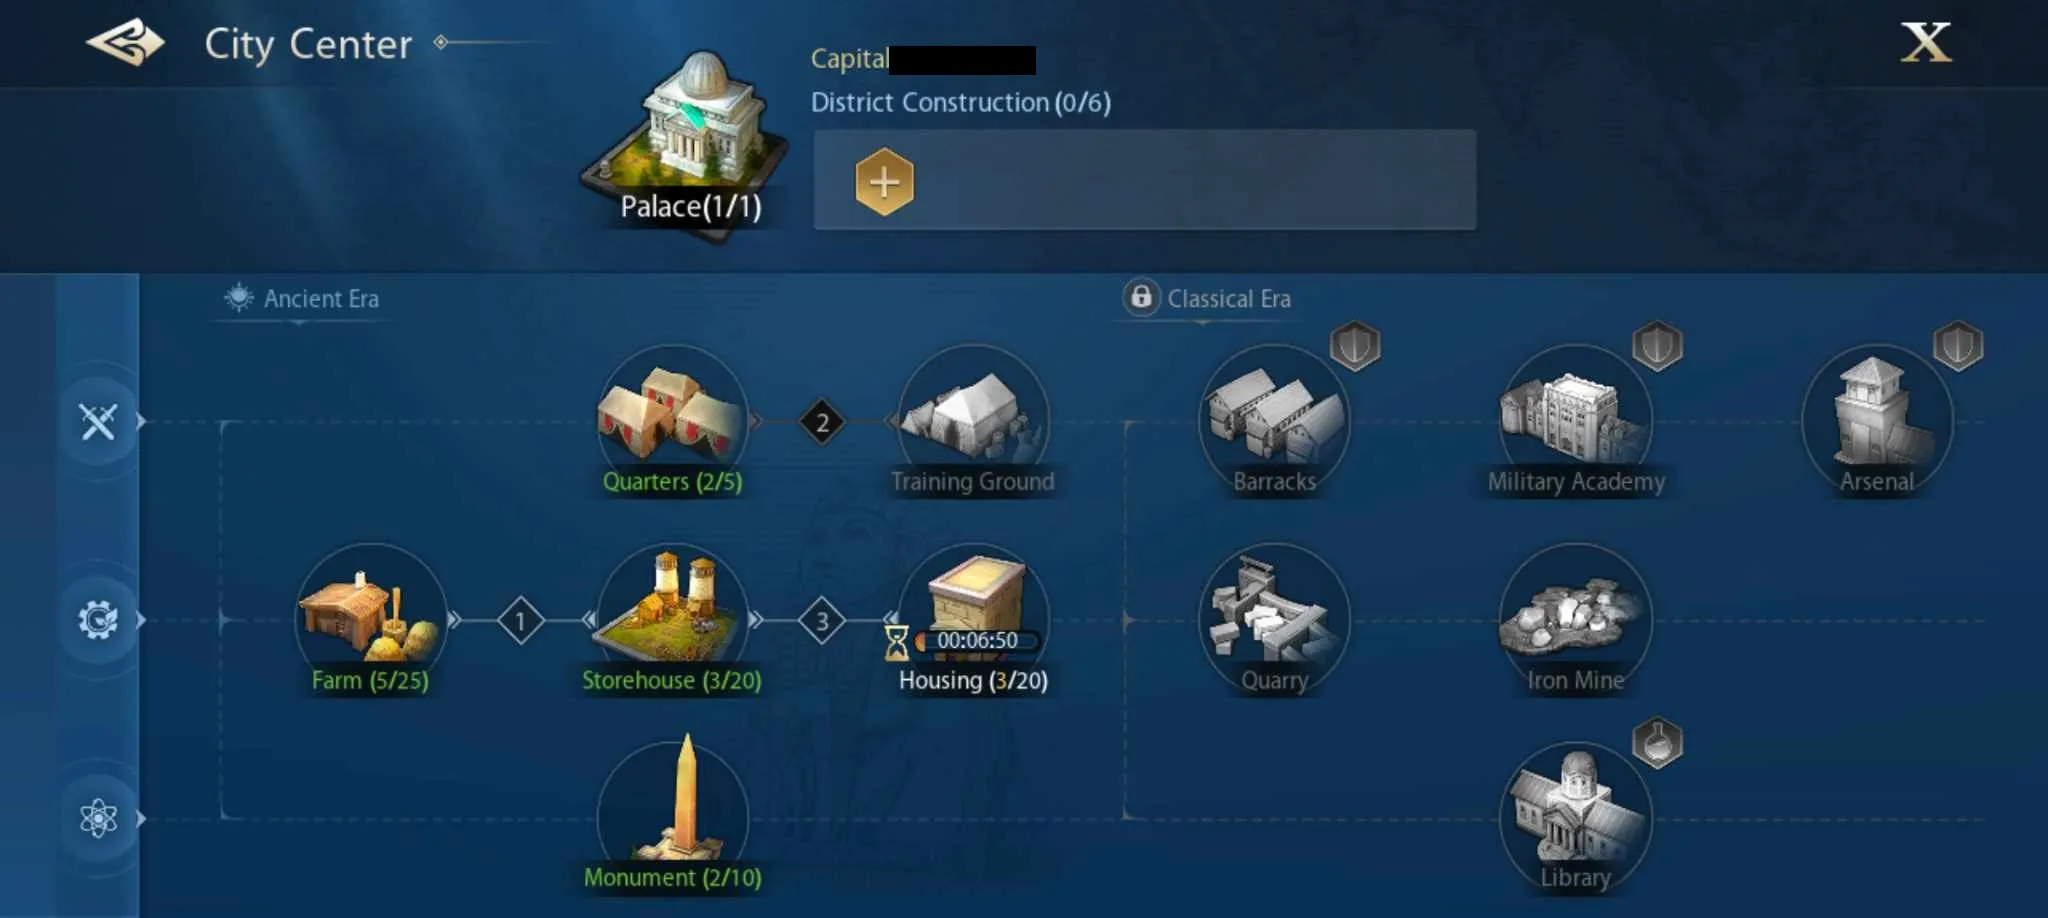
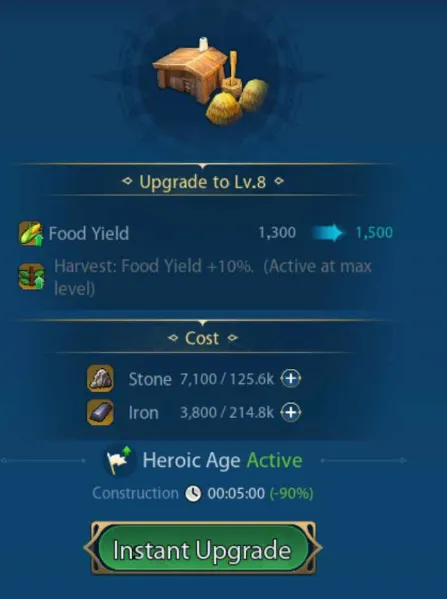
To build a structure, just tap on it on the structure tree, pay the resources, and then wait for the timer to count down. You can also upgrade structures to increase their level and efficiency. Note that structures are locked by both prerequisite levels and your current era. For example, in the image above, the Training Ground requires me to build a level 2 Quarters first.
If you really need a structure right now, you can choose to rush production. This costs Gold, which is premium currency. However, note that you can rush a building for free if the remaining construction/upgrade is five minutes or less. You’ll get a helpful notification on a city if you can do this.
As with technology, always try to be building or upgrading something. If you aren’t, that’s time wasted!
Districts
As you unlock new technologies, you’ll eventually gain the ability to construct Districts. These are specialized zones within a city that are dedicated to a specific aspect of growth – military might, economic growth, population, production, and so on.
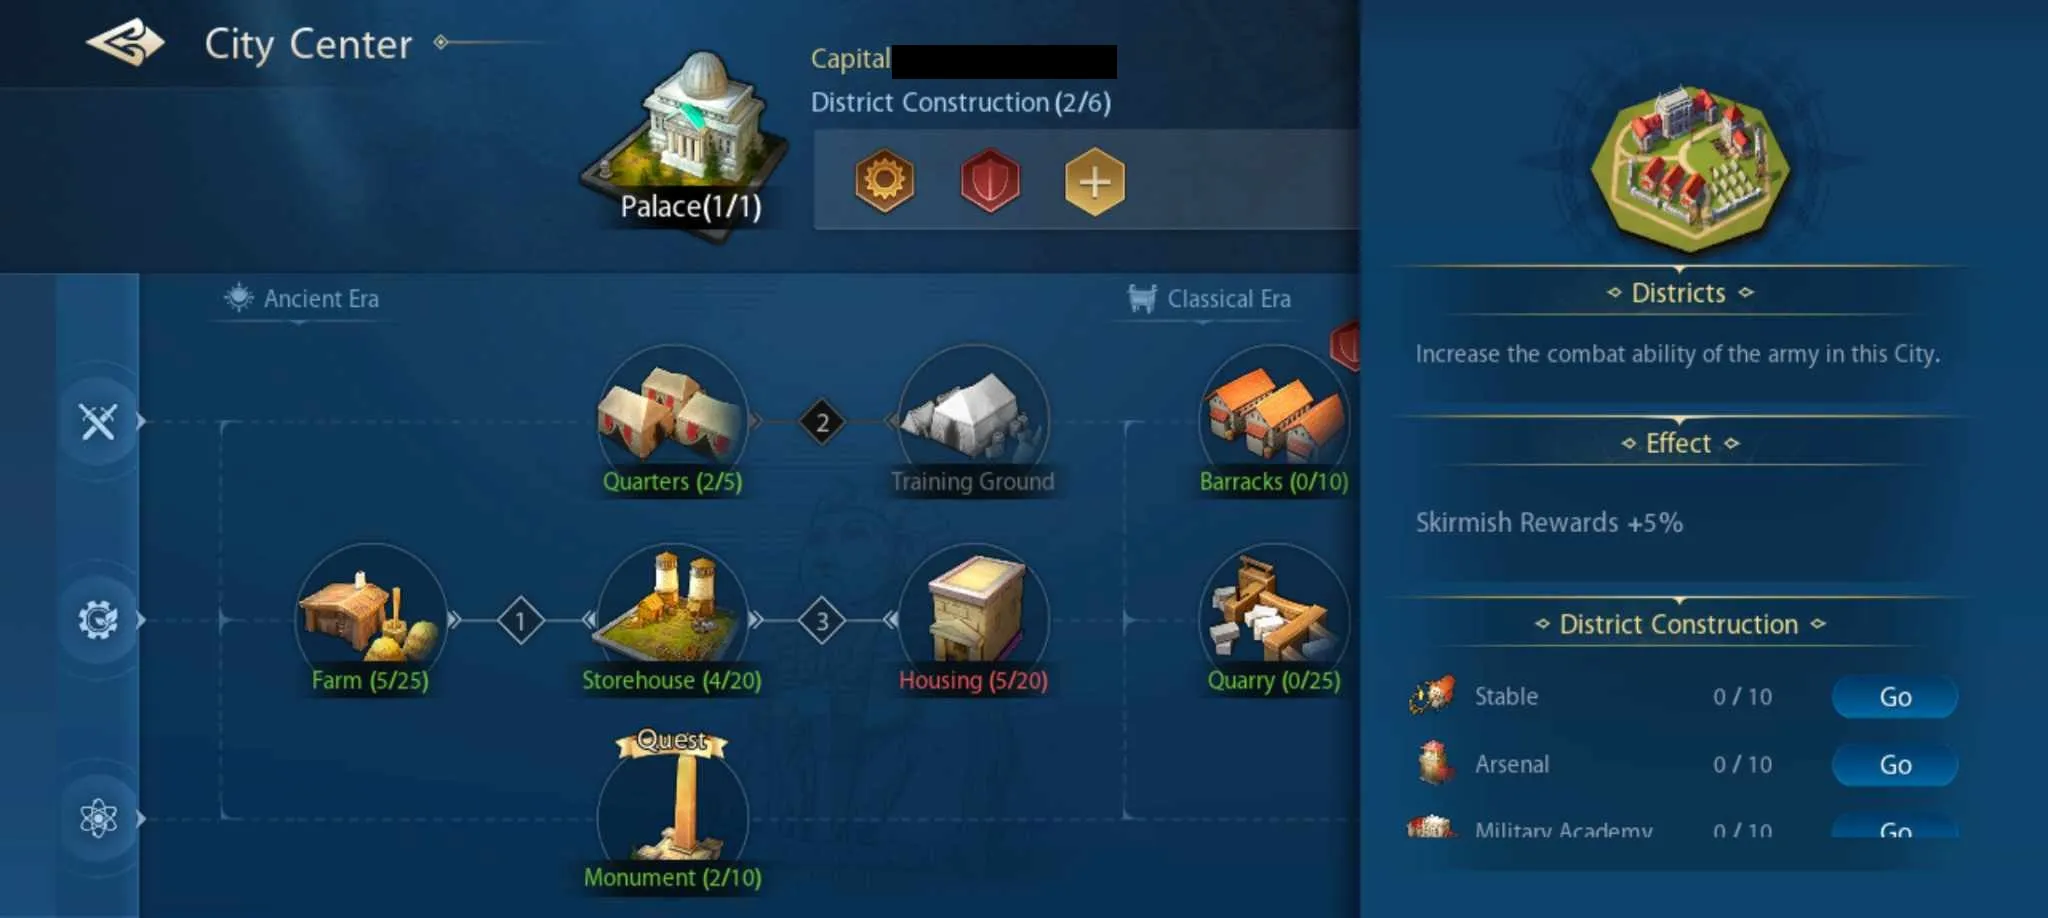
Districts essentially serve as tech buildings as certain city structures require you to have a certain District before they can be built. Industrial Districts, for example, allow their host city to build Workshops and Factories (with the required technology, of course). Apart from this, each District offers a small but potent passive bonus depending on what type of District it is; Encampments, for example, increase skirmish rewards (a minigame) by 5%, while Industrial Zones increase the instant construction timer by 10 minutes, allowing you to rush buildings faster and more efficiently. Each District might also unlock a new minigame, such as skirmish at the Encampment or Hexera at the Industrial Zone.
This allows you to specialize your cities and streamline your production and economy. On top of their unlocks, Districts also provide a flat +40 production towards your production score.
Each city can have a maximum of six Districts. To build a District, tap on a tile that a city owns, select “Construction”, and then pick what District you’d like to build.
Advancing Through the Ages
So you’ve got a nice Ancient Era society going. You’ve finally got the knack of throwing seeds into the ground and waiting for stuff to grow, as well as buildings to put food in so it doesn’t rot so fast. Your armies have some semblance of organization now instead of being a ragtag bunch of men with clubs. Your priests and scientists finally have a place to sit down and think.
But you and your people can aspire to so much more by advancing through the eras.
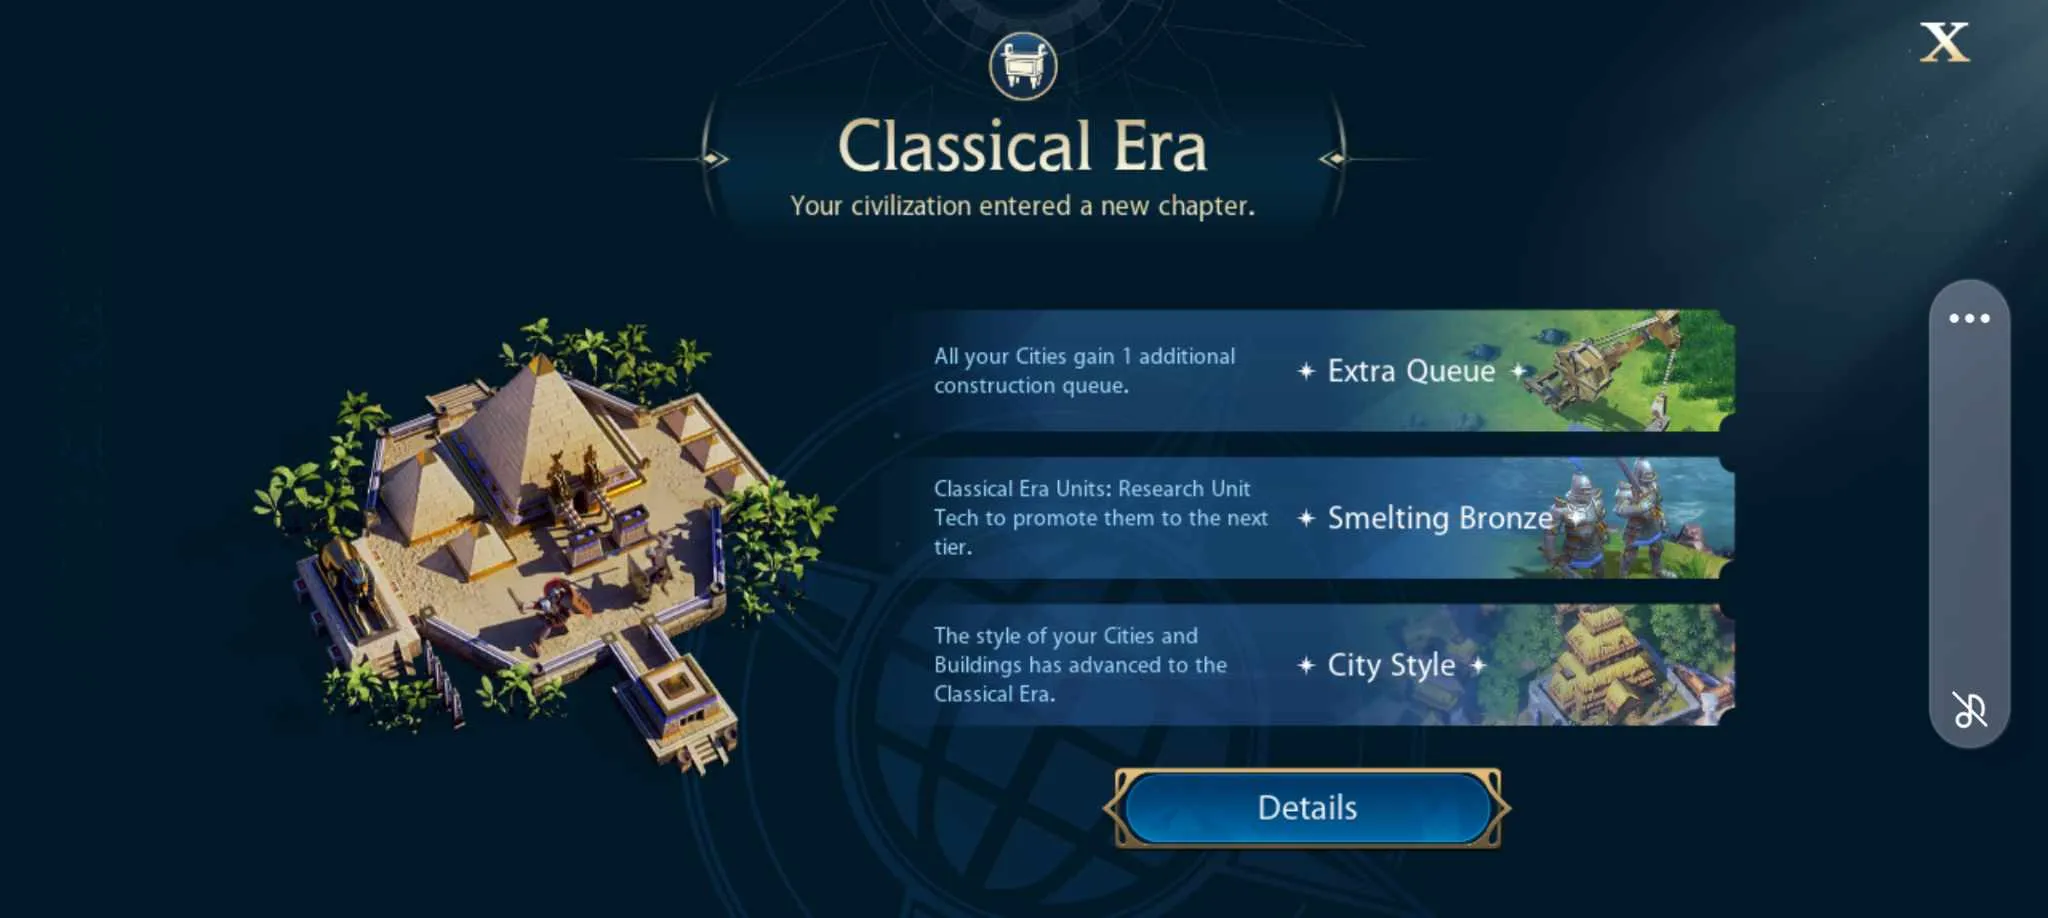
Progressing to a new era unlocks the next tier of technology for your civilization, allowing you to develop your people even further, as well as unlock new, nifty features. There are two main obstacles when it comes to era advancement, however: production and science. Your required production and science to advance to the next era can be seen here…
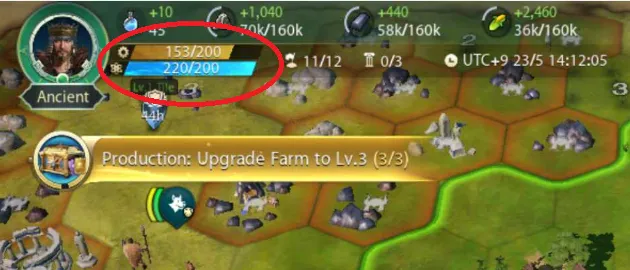
…where production is shown in the orange bar and science in the blue bar. Now, let’s talk about getting more of the stuff.
- Science is earned by completing research on new technologies. You’ll usually have to research most (if not all) technologies from an era to earn enough Science.
- Production is earned by owning tiles and districts. The higher the level of the tiles you own, the more production each of them gives; level 1 tiles give 4 production while level 11 tiles give 470 production. As mentioned earlier, Districts always give 40 production.
Once you’ve earned enough production and science, tap on your portrait in the upper left to advance your era!
All Things Martial – Heroes
Now that you know the basics of empire management, it’s time to get to the next aspect – fighting. In empire builders, conflict is a question of “when” and not “if”, and it’s your job to understand how to raise a proper fighting force before your Novice Protection expires. As combat in Civilization: Eras & Allies is a matter of both heroes and armies, let’s talk about heroes first.
Quick Tips:
- Heroes lead your armies. Each army has a maximum of three heroes (unlocked via technology); each of these heroes can lead a type of unit that matches that hero’s type – an infantry hero can only lead infantry units.
- Heroes have skills, which they use in combat. Skills are important determinants in battle.
- Heroes can level up and gain stats. As a hero gains levels and stats, they become considerably more powerful.
- You get heroes via the gacha. There are three gachas – a faction-based gacha (dependent on the country you chose at the start of the game) which costs Civilization Tokens to pull on, a premium gacha which costs Gold to pull on, and a standard gacha which only costs silver to pull on.
- The premium and faction gachas don’t share a pool. Some heroes in the faction pool appear in other factions’ banners as well; Boudica, for example, is present in the Greek, Chinese, English, and Korean faction gachas.
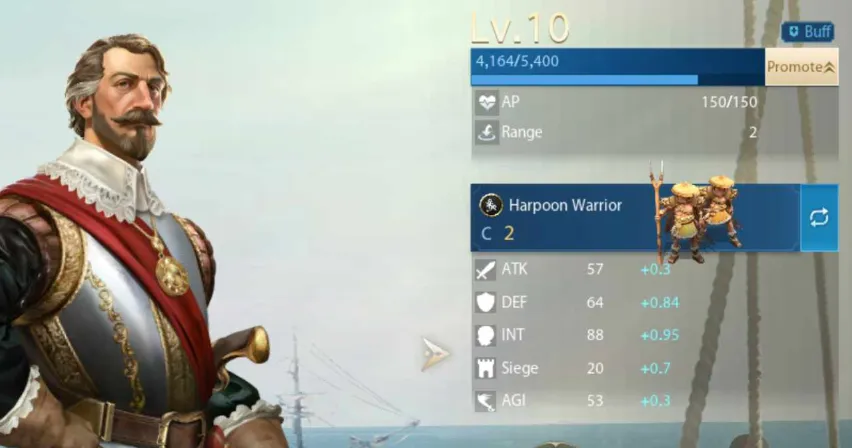
- The higher a hero’s level, the better its stats. The stats are ATK (physical damage), DEF (physical damage mitigation), INT (intelligence damage and intelligence damage mitigation), Siege (affects endurance damage when attacking cities), and AGI (determines who acts first when there are multiple heroes in play).
- Heroes gain stats when they level up. Every promotion or ascension also gives you 10 stat points that can be freely assigned to any stat except Siege.
- Experience earned by any hero is dumped into a shared hero XP pool, which can then be assigned as you please.
- Hero level is capped by Origin Quest progression. Because of how heroes affect army size, always go for max level on the heroes you use frequently.
- Good ways to earn lots of experience is by doing Drills (fighting tile guards again on tiles you already own, requires “Drill” technology, will consume AP) or by playing the skirmish minigame (requires an Encampment District).
- Heroes have one skill by default and gain access to their 2nd and 3rd slots via promotion. These slots are empty and can be filled in with a skill card.
- Skill cards can be obtained through the gacha or by retiring heroes.
- Like hero experience, skill experience is dumped into a pool that can be freely distributed. However, the only reliable way to gain skill experience is by sacrificing heroes.
- The best way to earn skill experience is by pulling on the standard banner as it only requires silver to pull on, which you’ll be producing anyway. Sacrifice the low-level heroes you get from this banner, and feed the skill experience to your favorite heroes.
- Promotion unlocks a hero’s skill slots. Starting from the second promotion, you’ll need to sacrifice a hero of the same rarity.
- Ascension is the process of fusing duplicates of a hero to make one copy stronger. A hero can only ascend as many times as it has stars; for example, 4* heroes can be ascended four times.
- You can fully reset a hero which will refund skill experience, titles, and ascension duplicates. This reset is on a shared one-day cooldown with all heroes.
- Heroes can’t be reset while they’re in an army.
Hero Basics
Heroes are the heart and soul of your army. Without them, nothing gets done.
First, let’s discuss what a hero can do. Each hero can:
- Lead an army of units on the world map. Each army can have up to three heroes, and each hero commands a division of units that match their type; infantry heroes, for example, can only lead infantry into battle. Yes, this means that your starter Warrior and Scout are, in fact, heroes. Just not very good ones.
- Use skills in battle. Hero skills are often the determining factor in what makes a hero good or bad, and a smart player will cultivate heroes that match their playstyle and preferred army.
- Level up and gain stats. Skills often derive their values from stats, so raising the correct stats on a hero will allow you to get better mileage out of them.
Getting More Heroes
To get more heroes, you’ll need to pull on the game’s gacha. There are three gacha types:
- Faction-based gacha. This gacha requires Civilization Tokens to pull on, which you get from doing Origin Quests. This gacha is weighed towards specific heroes that match your current culture, though some of these heroes can be found in several faction gacha pools – Boudica, for example, is present in the Greek, Chinese, English, and Korean faction gachas. Note that some heroes can only come from this pool. This gacha also has legendary skill cards – more on that in a bit.
- Premium gacha. This gacha has a wide assortment of heroes that anyone can use. Pulling on this gacha requires Gold, which as I’ve mentioned earlier is premium currency. You’re guaranteed a 4* with every pull, and you can pull for free on this banner once every 24 hours.
- Standard recruit. This banner only requires silver, which you can reliably produce in-game. However, the highest rarity you can get here is Epic (purple) at a very low chance. The main use of this banner is to pull chaff units and convert them into skill experience.
Stats and Leveling Up
As a hero fights, they’ll gain experience, which in turn leads to more stats and skills.
Each hero has five main stats:
- ATK determines normal attack damage and offensive skill efficiency.
- DEF reduces damage from normal attacks and offensive skills.
- INT both increases the damage of intelligence skills and reduces damage taken from them.
- Siege affects endurance damage when an army with the hero attacks a city (or tile). The higher this is, the more endurance damage they do.
- AGI determines action order in combat.
While these stats go up on their own with each level, you also gain 10 stat points with each promotion or ascension you can assign freely (except for Siege). It’s up to you whether you want to use these points to patch up a hero’s weak points or double down on their strengths.
Heroes gain experience by fighting, or better yet, being fed hero experience. Any time your heroes gain experience, it’s dumped into a pool which can then be distributed as you wish among your heroes. However, note that heroes have a level cap which is determined by your progression – if you want higher level heroes, do more Origin Quests. Andbecause army size is tied to hero level – more on that in a bit – the heroes you actively use should always be at max level.
Good ways to earn a large amount of experience are by doing Drills or participating in the skirmish minigame.
- Drills allow you to challenge tile guards repeatedly for some quick experience. Drills require you to have researched the Drill technology (it’s in the Classical Age). To perform a drill, tap on a tile you own, then select “Drill” – this will cause your army to engage with tile guards of the same level as the tile. Note that this still consumes army AP!
- Skirmish is a once-per-day minigame that you can play to get not just hero experience but also basic resources as well as Insight. You’ll need an Encampment District to be able to play this minigame.
Hero Skills
Apart from stats, heroes also have powerful skills that they can leverage in combat.
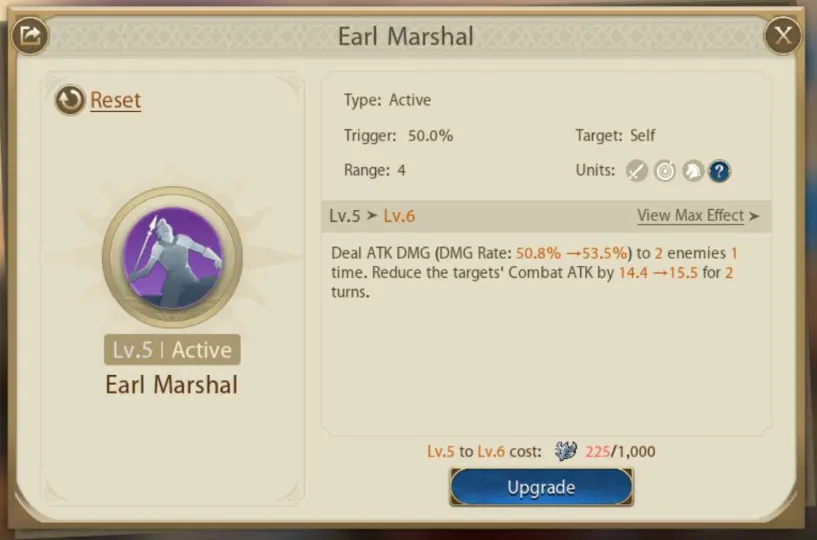
Each hero starts with one skill, and as they level up and become stronger, they gain access to two more skill slots. Now, while a hero’s first skill is with them forever, their second and third skills must be assigned via skill cards, which are mostly obtained through the gacha. You can also choose to retire heroes to gain skills.
Skills can be leveled up to increase their multipliers. Just as with hero experience, skill experience is lumped into one pool that’s shared between all your heroes. However, the only way to get more skill experience is by sacrificing heroes. This is where the standard banner comes in – increase your silver income, pull more low-rarity heroes, and convert them into skill experience for your better heroes.
Promotion
Heroes can be promoted at certain thresholds, which gives them stat points to spend but more importantly unlocks their skill slots.
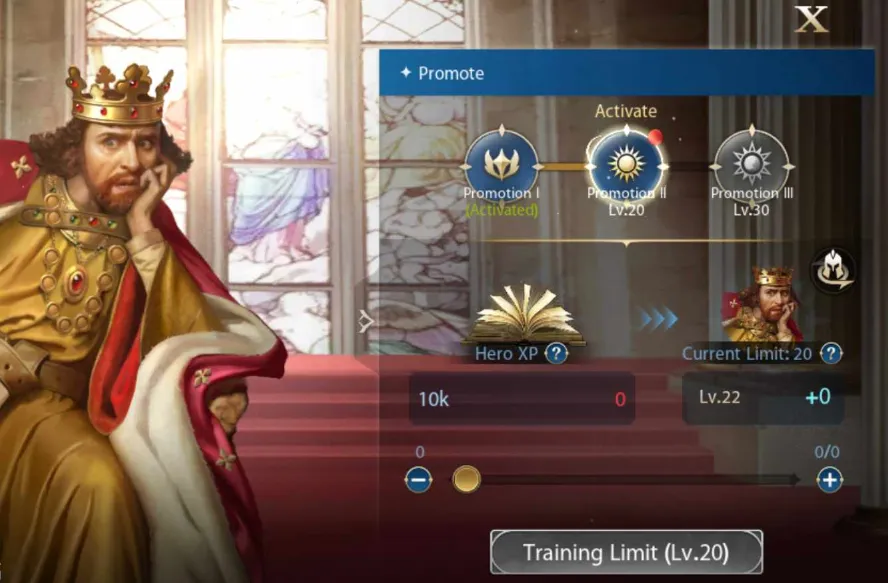
While the first promotion is free, the second one is more challenging as it requires not only that a hero’s main (first) skill be at level 10 but also requires you to sacrifice a hero of similar rarity. While the extra skill slot helps a ton, think carefully before you do this, especially when it comes to 5* units!
Ascension
As with most gacha games, heroes can also be ascended, which in layman’s terms means fusing them with duplicates.
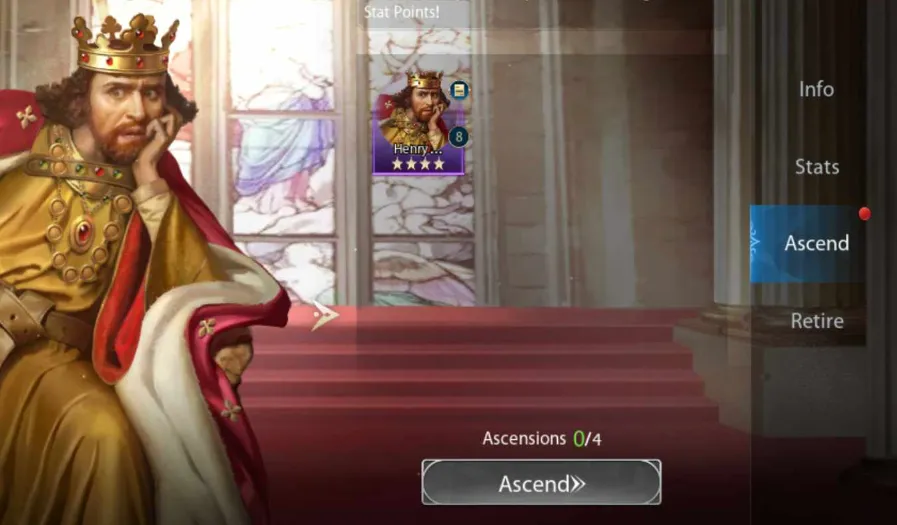
By ascending a hero, you add a red sheen to one of their stars and give them another 10 stat points to spend freely. However, there’s an opportunity cost here as you may also wish to retire duplicates instead to gain their skill cards. Each hero can only ascend a number of times equal to their stars; 4* heroes can ascend up to 4 times while 5* heroes can do so up to five times.
Resetting
The good news is that there is a takeback option if you think a hero is underperforming despite all the investment you’ve poured into them. To reset a hero, tap on this button here (it’s in the lower left corner of the hero screen):

This will refund some hero development materials: all skill experience, promotion 2 and 3 materials, titles, and ascension duplicates will be returned to you – note that the hero retains their level. However, there’s a one-day cooldown in between hero resets, and this is shared across all your heroes. A hero must also not be in an army to be reset.
All Things Martial – Units and Armies
Next, let’s talk about your units and your armies. Your heroes are powerful, yes, but equally important are the men they command, and a well-maintained, organized army is a force to be reckoned with indeed.
Quick Tips:
- An army refers to a unit comprised of up to three heroes and the units under their command.
- Upgrade your Quarters city center building to field more armies at once.
- Once again, heroes can only command units of the same type as that hero. Cavalry heroes can only command cavalry units, and so on.
- Units under a hero’s command can be swapped out while the army is on standby.
- Passive bonuses can be triggered by having two heroes of the same unit type as well as two heroes from the same era – this second bonus requires a Hall of Eras structure.
- Specific sets of heroes can also trigger a bond bonus, which adds another passive buff to the army.
- Removing a hero from a leader slot after that army has engaged in combat will disband all militia under that hero’s command. 80% of the resources spent to train those militia will be returned to you; if you’re under Novice Protection, you retain 100% of the resources spent. This still means that you will need to train new militia in your cities to replace your disbanded troops.
- Armies have two main mechanics: AP and Morale.
- AP is spent whenever you fight and replenishes at the rate of 1 AP per 3 minutes. Exhausting an army to negative or zero AP will result in the Tired debuff, which prevents an army from moving and making them sitting ducks!
- Morale represents your army’s fighting spirit, and it caps at 100. For every two tiles an army travels, it loses 1 Morale. Each point of Morale below 100 reduces the damage that an army deals, capping at a 70% reduction at 0 Morale.
- Morale is recovered by standing still. Returning to a city or fort that you own instantly replenishes morale.
- Units are trained as militia in your cities. You can either manually or automatically train militia. Training militia costs food and iron.
- The Training Grounds building is vital as it improves militia training speed and increases the number of militia a city can have.
- Park armies in a city to replenish their forces via the “Army” button. You can then either manually add units to a hero’s cohort or just press “Auto Conscript” to refill all companies of an army. Don’t forget to replenish your forces regularly – fewer men means a less effective army.
- Just like heroes, units have stats. Units also have a unique Speed stat which determines how fast they move on the world map.
- Units also have a Cost, which is factored against the total cost of the entire army. By default, each hero has a Cost cap of 2, meaning you can deploy units up to a total Cost of 6 to an army. This cap can be increased by building and upgrading an Audience Chamber.
- Unlock new units whenever you can. While the basic unit of each era is a respectable upgrade compared to its predecessors, unique units not only have higher stats but also skills that can assist in combat.
- There is a limited number of non-basic units that can be assigned. Pay attention to their skills and try to assign them to heroes who can maximize those units.
- Unlocking new units sometimes has a cost. Sometimes you need to pay a strategic resource or even sacrifice a hero. To view your current and unlockable units, tap on the main menu in the lower right of the screen, and then tap “Units”.
- Infantry counters Ranged, Ranged counters Cavalry, Cavalry counters Infantry.
- An army’s Inclination is determined by the number of hero skills that correspond to each Inclination. The three Inclinations are Damage, Survival, and Control.
- When the combatants have roughly the same combat strength, army Inclination is more important. Damage counters Survival, Survival counters Control, Control counters Damage.
- Pay attention to enemy armies so that you can choose the right unit and skill lineup.
- Combat in Civilization: Eras & Allies is resolved automatically. Heroes engage in auto-resolved eight round combat where they use skills and normal attacks against each other, as well as their units.
- Combat ends if one side runs out of units or if no winner is decided after eight rounds. If the latter is true, then both sides enter a “Draw” state. Armies in the Draw state cannot move and will fight again after three minutes.
- Casualties in battle can either be wounded or killed. Wounded units stay in their army but don’t contribute to its combat strength; by visiting one of your cities or fortresses, wounded units can jump back into action immediately. Killed units are gone forever and must be replaced.
Heroes and Armies
Your military might in Civilization: Eras & Allies is enforced by your armies. An army is a collection of up to three heroes (requires Formations to unlock the third hero slot) as well as the units under their command, and you can only have so many armies on the field at once (upgrade your Quarters building to field more armies).
A few things to keep in mind here:
- As mentioned earlier, a hero can only lead units of a similar class; infantry heroes can only lead infantry units, ranged heroes can only lead ranged units, and so on. These units can be swapped out at will while your army is resting in one of your cities. We’ll discuss units in more detail later.
- Each unit can only be assigned to one hero.
- Two passive bonuses can be triggered by having at least two heroes of the same unit type, as well as at least two heroes of the same Era. You’ll need to have built a Hall of Eras for this bonus to activate.
- Heroes can have bonds, which trigger a passive boost when they’re slotted with two other specific heroes. Bond boosts apply to the entire army.
- Removing a hero from a formation will disband their current militia. Only 80% of the disbanded militia’s training resources will be returned to you unless you still have Novice Protection, in which case you’ll get 100% of the resources back.
The last part is especially tricky as it means that after your Novice Protection is over, you’ll be losing resources whenever you swap out army leaders. Use your Novice Protection time to find leaders that you like using and come up with a sound strategy – that is unless you’re willing to pay the price whenever you switch. Do note that the hero dismissal/replacement penalty doesn’t apply if the unit in question hasn’t seen action yet.
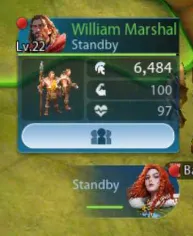
Lastly, note that a hero can only lead so many men into battle. In general, a hero can lead a host of warriors equal to its level * 100; for example, this means that a level 10 hero can lead 1000 men. The long and short of this is that higher-level heroes have a huge numerical advantage, so aim to always have your heroes at the highest level possible!
Army Mechanics
Once organized into an army, there are two stats you need to pay attention to. These are AP and Morale, and careful management of both is essential to getting the most out of your armies.
- AP, or action points, determines the stamina of your army. Ordering an army to engage in certain combat or construction actions will cost 15 AP (8 if you’re still under Novice Protection). Moving or returning to your tiles is free. AP has a cap of 120 and regenerates at the rate of 1 AP per 3 minutes (even if you’re offline). If an army hits 0 or negative AP, it will receive the Tired debuff, which prevents it from taking any action at all – even if it recovers AP during this time.
- Morale determines the fighting spirit of your soldiers. For every two tiles an army travels, it will lose one morale. The lower an army’s Morale, the less damage it does, to a maximum of -70% damage at 0 Morale. To recover Morale, you can leave an army idle, which heals 1 Morale per 2 minutes. Returning to a city or fortress you own instantly replenishes Morale.
The AP and Morale system caps your effective range as if you reach out too far, your armies will need a ton of downtime to get up to optimal fighting strength. In the beginning, this won’t be too bad as you’ll normally be fighting around your capital anyway, but keep these two stats in mind as you delve deeper and deeper into the game!
Reinforcing Your Army
Whenever armies fight, they’ll lose some men. That’s just a part of warfare. Your task is to ensure that there are enough reserves to replace the units you’ve lost, and that’s where militia training comes in.
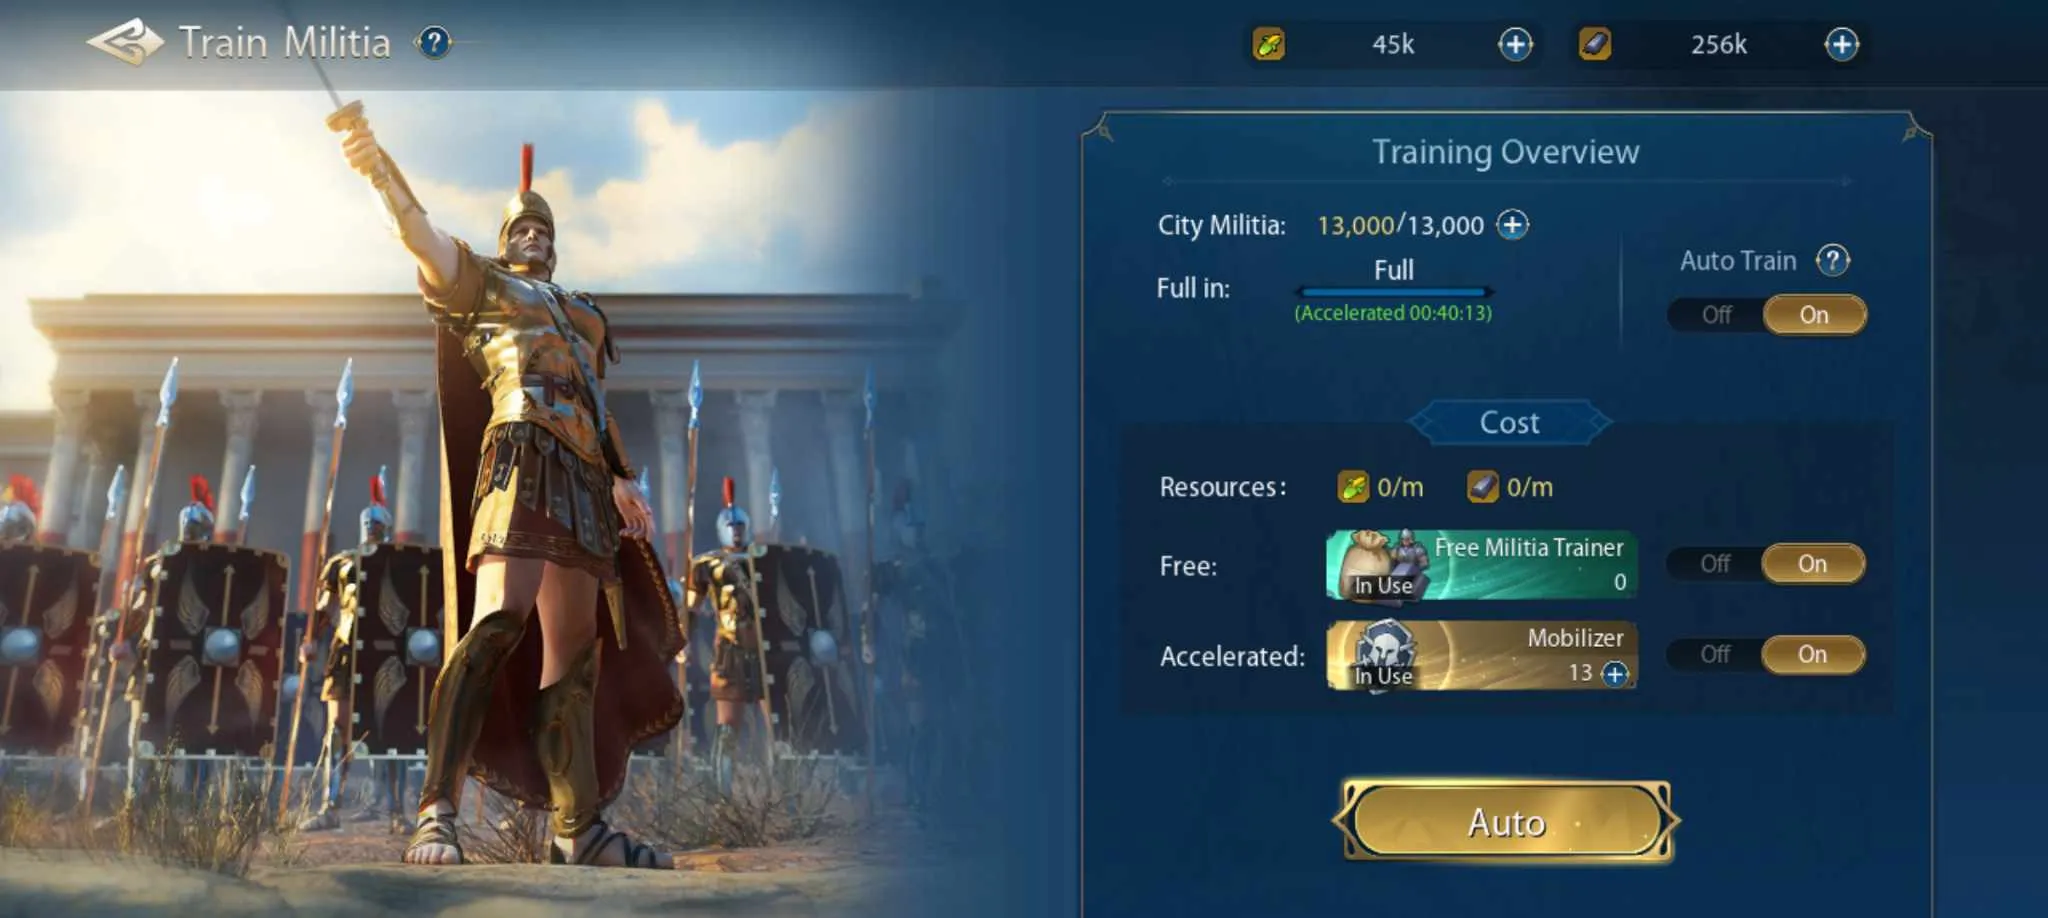
Militia units can be produced either automatically or manually (ideally keep it on automatic mode) in your cities. While training is ongoing, more reserves will be added to your militia count, and you’ll automatically pay both food and iron to train militia until you reach your cap.
There are several ways to optimize militia training:
- You can use Free Militia Trainers to waive the usual resource cost.
- Militia mobilizers are special items that increase the rate of militia training.
- The Training Ground city center structure improves both the training speed and the maximum amount of militia a city can keep in reserve.
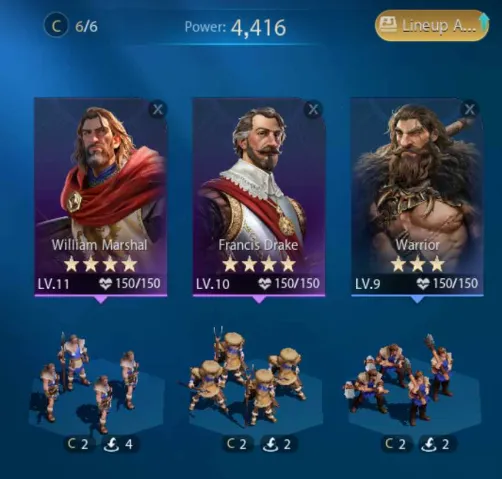
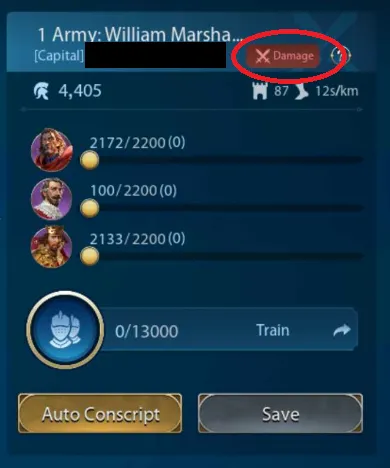
These militia are converted into fighting units for armies whenever they’re in a city. To add militia to an army, you’ll need to use the conscription screen. To open this screen, tap on your city, tap “Army”, then select the army you’d like to edit.
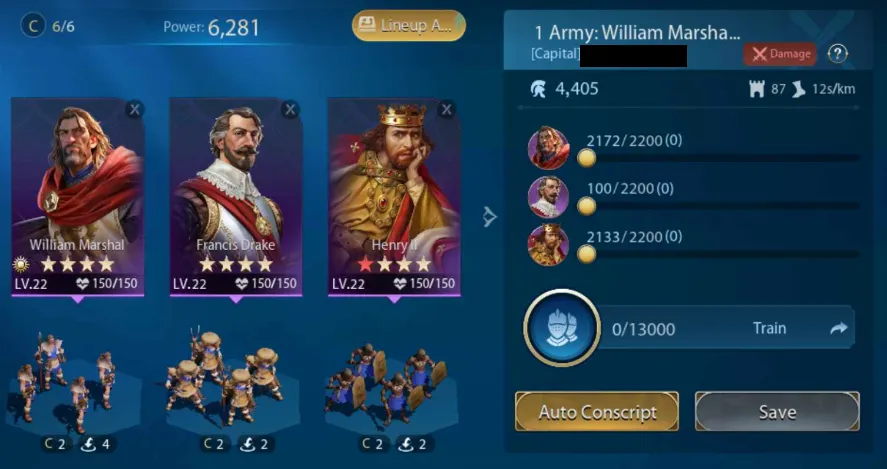
The conscription screen allows you to add units to each hero’s company. The current and maximum number of units each hero can lead is visible on the right-hand side of the screen; in the image above, William Marshal’s unit currently has 2172 men out of a possible 2200, while Francis Drake only has 100 men out of a maximum of 2200. You can either drag the sliders on the screen to replenish each hero’s cohort or better yet, just tap “Auto Conscript” at the bottom of the screen to refill your armies.
Don’t forget to regularly replenish your fighting force – fewer units mean that an army’s punching power will be severely diminished!
Units
Each hero commands a specific type of unit, which they draw from the militia in your capital. Think of it this way: if a hero commands archers, they’ll take 1000 militia from your capital and train them into archers to be used in their unit.
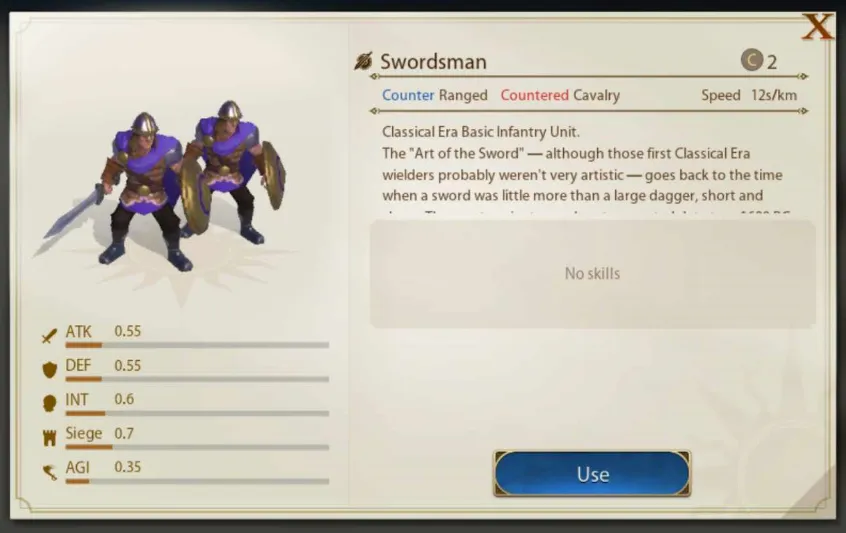
Each unit has stats, just like heroes:
- ATKis physical damage, which affects the damage of normal attacks and physical skills.
- DEF reduces physical damage.
- INT increases intelligence skill damage and mitigates intelligence damage.
- Siege affects endurance damage.
- AGI determines action order in combat.
- Units additionally have a Speed stat, which determines how fast they move on the world map.
Each unit also has a Cost associated with it:
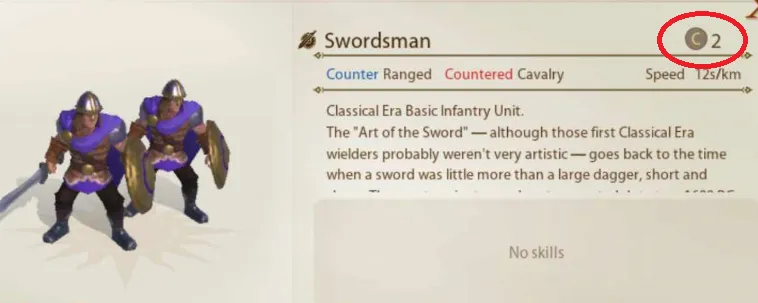
Costs prevent you from deploying all your best units in a single army. Each unit type under a hero’s command adds to the Cost of that army, and each hero can support up to two Cost. This means that an army with three heroes has a Cost cap of six.
While Cost isn’t too important in the early game, you’ll start running into units with higher Cost than usual as you progress – the first will be the Longswordsman in the Medieval Era, which has a Cost of 2.5. To remedy the problem of Cost, you can build and upgrade an Audience Chamber (a city center structure) in the Medieval Era to increase the Cost caps of all of a city’s armies.
Unique Units
Your vanilla units are all well and good – especially if you’re jumping from one technological era to the next – but unique units are a cut above the rest. This is not only because of their generally higher stats and better focus on specific fields but also because they have skills.
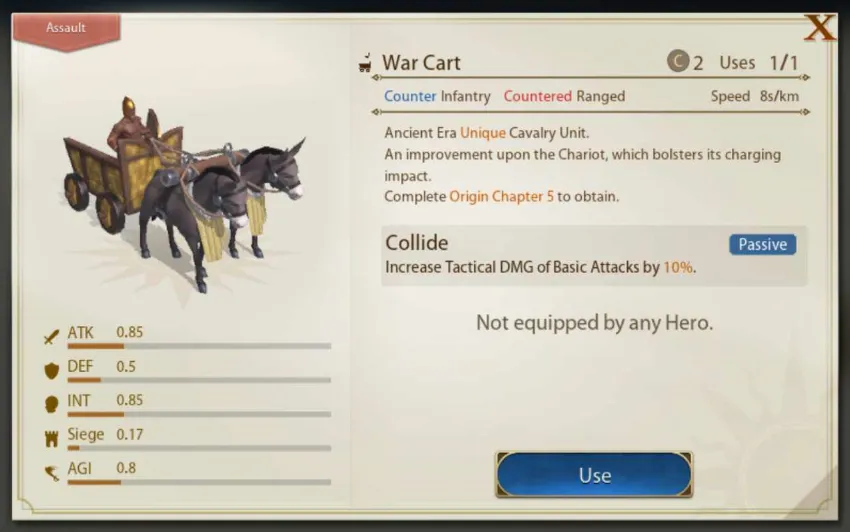
You’ll almost always unlock the basic unit of each type in an early technology. To unlock unique units, however, you’ll need to accomplish certain tasks, which can involve doing Origin Quests, unlocking technology, or even sacrificing specific strategic resources or heroes.
Do note that, unlike basic units, these unique units can only be assigned to a certain number of heroes…

In the image above, you can see that while I can assign as many Warriors as I want, I can’t assign any more Harpoon or Axe Warriors (0/1). I can, however, assign one more Spear Warrior (1/2). Pay attention to these units’ unique abilities and try to assign them to a hero who has a complementary skillset.
To see your current available units and available alternatives, tap on the “Units” button on the lower right of the screen (you may have to tap on the three lines to open the menu).
Counters
As with all empire builders, certain units counter other unit types. However, Civilization: Eras & Allies has two levels of counters – one on the unit level and the other on the Inclination level.
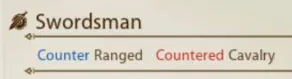
The basic unit triangle goes as such: Infantry counter Ranged, Ranged counters Cavalry, Cavalry counters Infantry. No, it doesn’t have to make sense.
The second layer of counters is tied to an army’s Inclination.
An army’s Inclination is determined by the average amount of hero skills in that army. Hero skills are generally sorted into three categories: Damage, Survival, or Control, and whichever the army has the most of will result in the army having that Inclination. Now, when battles are closely tied (i.e., both armies have around the same combat strength), the game will weigh Inclination more heavily.
The Inclination triangle is: Damage counters Survival, Survival counters Control, Control counters Damage.
Pay attention to enemy armies in both PVP and PVE to ensure that you have the appropriate unit and Inclination counters!
Combat Resolution
Finally, let’s delve into combat itself. As with most mobile empire builders, Civilization: Eras & Allies uses auto combat to resolve battles between armies.
Whenever armies fight, the following happens:
- Both armies are drawn into auto-resolved turn-based combat. Turn order is determined by AGI; faster heroes go first, while heroes with similar AGI will be assigned a random spot in the turn order.
- Heroes will take turns attacking and using their skills, along with their unit.
- Combat ends when either side runs out of units or if eight combat rounds have passed. In the latter case, you’ll see the result as a “Draw”. Drawn battles will be fought again after three minutes. If two armies reach three draws, they will both retreat. Armies in a Draw state cannot move.
- Units lost in battle can either be wounded or killed. Wounded units are put in an inactive mode where they don’t contribute to an army’s combat strength, but can be restored by parking the army in a city or fortress. Killed units are gone forever and will need to be replaced with more militia.
Making Money
Your beginner resources will carry you far, but eventually, you’ll start running out of steam and will have to work to earn resources just like everyone else. Here’s how to get more resources to keep your militia coming and your empire running like clockwork.
Quick Tips:
- While tiles passively produce resources for your empire, don’t forget that resource quantity is determined by a tile’s level. Aim for higher-level tiles when you can.
- Later on, you’ll be able to upgrade the tiles you own. Remember to do this!
- Some city center structures passively produce resources. Don’t forget to upgrade them.
- While we’re at it, make sure you’re upgrading your Storehouse to store more resources.
- Certain technologies, such as Harvest, will allow you to work tiles for resources. Working on tiles costs Edicts, which passively regenerate over time.
- You can harvest ruins for more Insight.
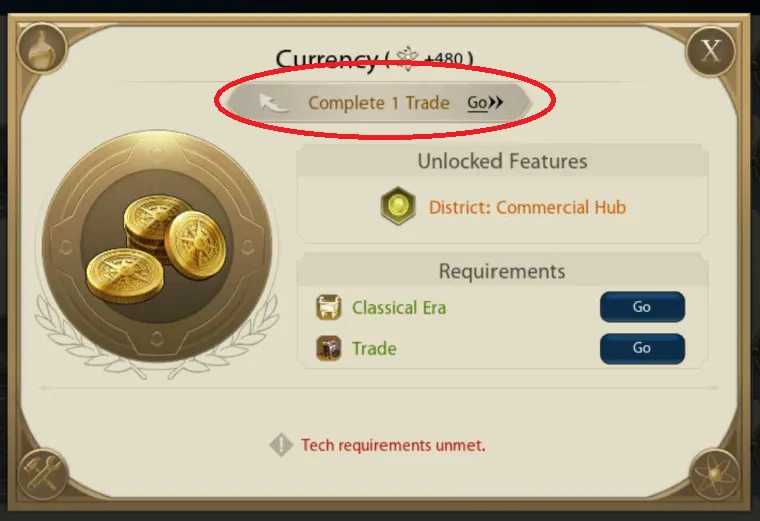
- Once you have a Commercial Hub, you can trade resources with an NPC. You’ll get a fair 1:1 exchange (called tax-free in-game) on up to 50,000 resources, or 100,000 if you have a Market in your city.
- As your Prestige grows, you’ll be able to trade more resources tax-free.
- Always do your Origin Quests. These not only unlock new mechanics and progression but also give a considerable amount of beginner resources.
- In the same vein, do your Guidance Quests as they’re meant to be finished alongside your Origin Quests.
- Missions allow you to dispatch heroes for resources. While some missions grant you basic resources, others will give you opportunities such as free militia for an army or even skill or hero experience.
- Always join events as they tend to give out a ton of resources. Check the Events button regularly.
- The cash shop holds the battle pass, where you can turn in missions to accumulate progress and redeem rewards.
- Prestige is Civilization: Eras & Allies’ VIP system. You get a free resource chest every couple of hours as well as passive bonuses based on your Prestige level. Earn Prestige points by pulling 5* heroes or participating in events.
- Feats are achievements that you can collect in-game. Completing enough Feats lets you withdraw a prize from the Feats menu.
- Milestones are event campaigns that are unlocked when alliances or players on a server hit specific goals. These events won’t hang around forever, so be sure to participate when a milestone is live.
Tile Resources
Let’s start with the most basic way to gain resources – tiles. Remember that each tile in your territory passively produces resources, with higher-level tiles yielding more resources.
To maximize your resource income, aim to capture as many high-level tiles as possible. As for the low level tiles you already own, you’ll eventually unlock the ability to raise their levels with a Workshop. Once you have this tech, don’t forget to come back and get those tiles up to speed!
Resource Generators
Some city center structures passively generate resources as well. These are the Farm (food), Housing (silver), Quarry (stone), and Iron Mine (iron).
Keep these generators upgraded as their yields go up with each level.
Upgrade Your Storehouse
And since we’re already talking about city center structures, don’t miss out on upgrading your Storehouse.
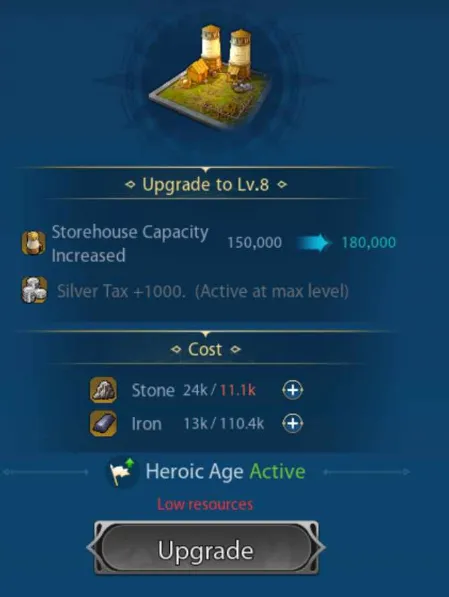
The higher the level of your Storehouse, the more resources it can store.
Working Tiles
By the time you reach the Classical Era, you’ll probably be hurting for resources. That’s where working tiles comes into play.

The first tile action you can take will very likely be harvesting. Harvesting is unlocked via the (what else?) Harvest technology. This gives you the ability to dispatch workers to tiles to bring back a sizeable number of resources, which is dependent on the tile itself. Tiles with stone, for instance, will yield more stone per harvest, while ruins will also bring back Insight with each harvest.
You can harvest a tile up to 3 times at once, and each harvest attempt takes 10 minutes. Each harvest attempt consumes three Edicts, which you can see here…
…and these Edicts regenerate at the rate of one Edict per hour. Alternatively, you can buy more with Gold if you really want to.
Note that a tile’s features don’t affect the harvest income, only the tile level does.
As you unlock more technologies such as Bronze Working or especially Tile Improvement, you’ll be able to take even more actions with tiles, such as cutting down forests for even bigger amounts of resources or building tile improvements such as camps or roads that can cut travel time. Just remember – every time you work on a tile, it’ll cost you some Edicts, so spend wisely!
Trading
Once you have a Commercial Hub, you’ll be able to trade resources you don’t need for resources that you do need.
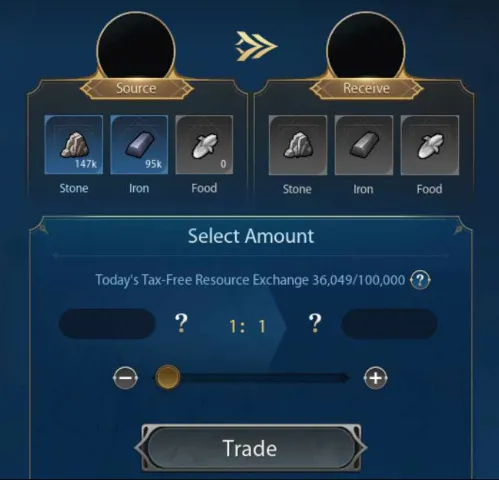
Trading allows you to barter with food, stone, and iron, for more food, stone, and iron. Exchanges are done on a 1:1 basis, though note that this ratio will only persist for up to 50,000 resources (100,000 if you have a Market in your city center). The higher your Prestige, the more tax-free equivalent exchanges you can do, and these exchanges reset on the next day.
To trade, open the main menu in the lower right, and then tap on “Trade”.
Origin Quests and Guidance
Origin Quests not only serve as your main method of progressing through Civilization: Eras & Allies, but they also dole out massive rewards that are especially helpful in the early game. Tap on the “Insight” quest on the upper left of your main screen to access your Origin Quests.
Always prioritize doing your Origin Quests – that way, you’ll be able to advance much faster.
Apart from Origin Quests, there are also Guidance Quests which you can find in the same tab. Like Origin Quests, these are one-time rewards for accomplishing tasks and are meant to guide you through the game’s mechanics.
Missions
Your heroes can undertake missions, which are sort of like commissions. Each mission will task you to dispatch a hero (sometimes with a special requirement) for a certain amount of time, and in return, you’ll get resources. Usually. Other times, you’ll get bonuses such as instant militia for that hero’s army or even skill experience.
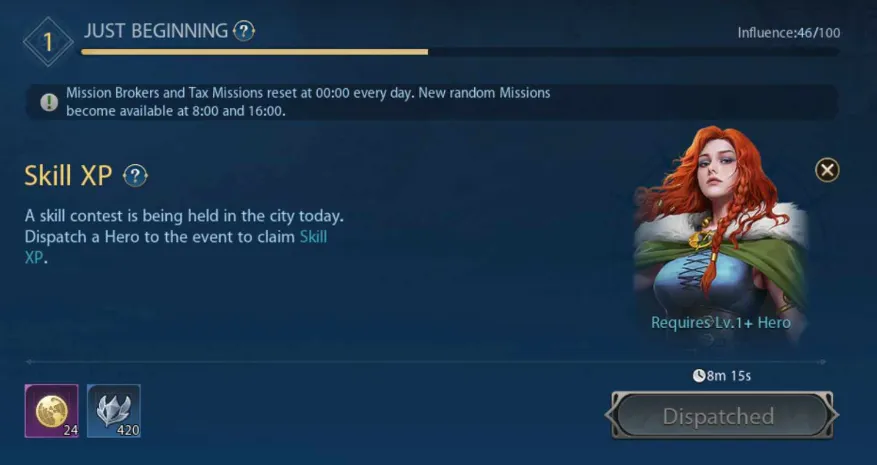
As you complete missions, you’ll gain Influence, which is measured in a bar on the missions screen. The higher your influence, the higher the chance of getting higher-level missions which give more resources.
New missions become available as the day progresses, so be sure to log back in and nab new missions for more loot. Also, don’t forget to manually claim your rewards!
Events
Live service games thrive on events and Civilization: Eras & Allies is no exception. Events are a great way to get more free stuff, and as a new player, most of your newbie resources will be found here.
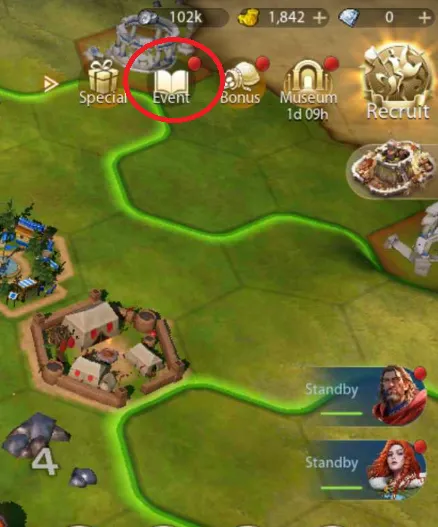
Remember – a red dot on the event button means that there’s something new up for grabs.
Cash Shop Freebies
Right beside the event button is the “Bonus” button, which is a lie as it actually leads you to the cash shop. For F2P players, the main attraction here will be the battle pass.
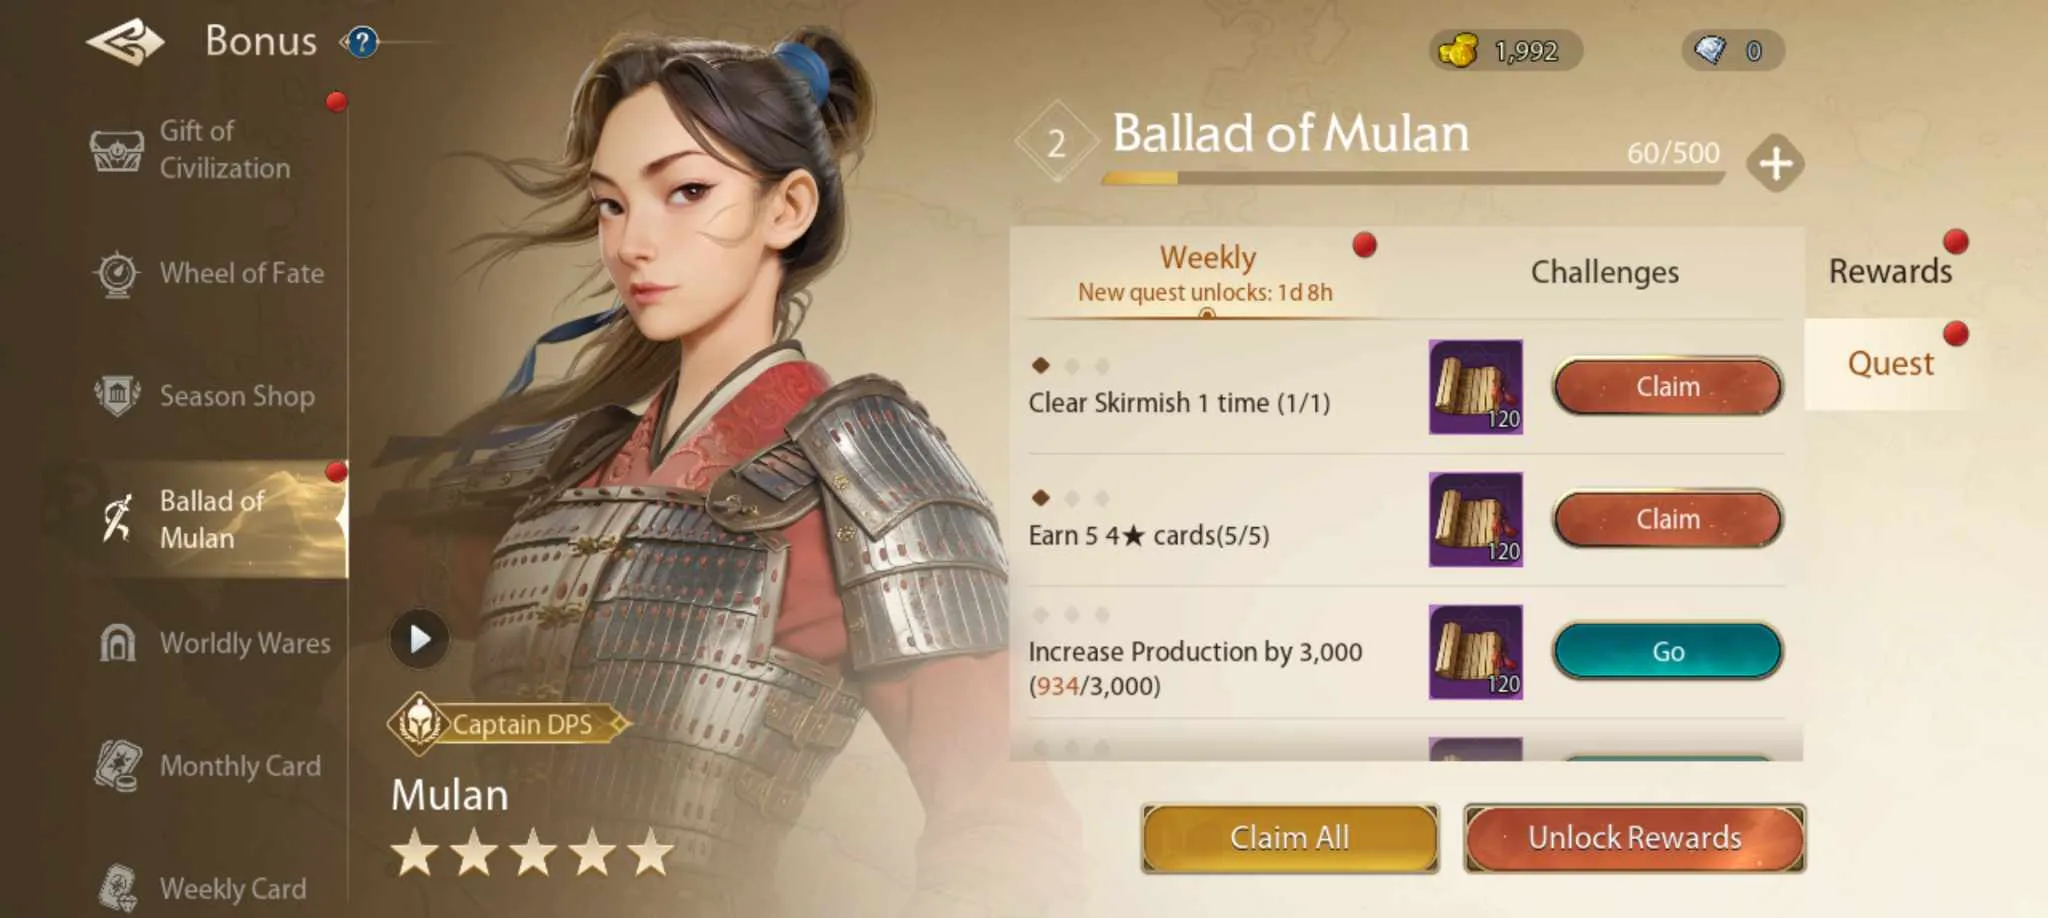
As with other battle passes, there’s a paid and free battle pass, with decent prizes even on the free track. Be sure to come back often to turn in your quests and claim your battle pass rewards!
Prestige
Prestige is Civilization: Eras & Allies’ VIP system. As with most empire builders, the more you spend time (and especially money) on the game, the higher your VIP level. Don’t fret though – even free players can get VIP freebies.
To access your Prestige bonuses, tap on your portrait on the upper right, then tap on the emblem on the left side of the screen.
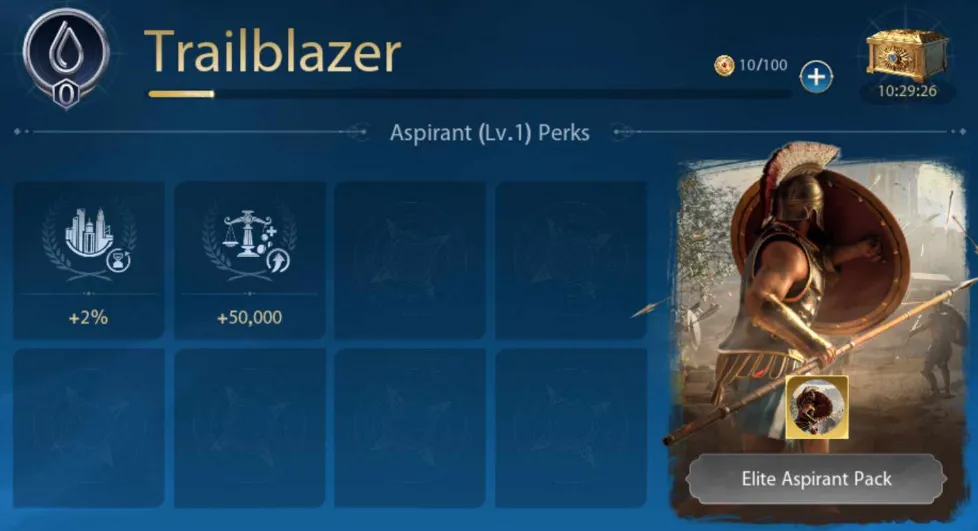
Your Prestige level is important for two reasons. Firstly, you can claim a chest of resources from your Prestige tab every so often, with the amount of resources dependent on how high your Prestige level is. Second, each Prestige level grants you passive bonuses.
You gain Prestige points by pulling 5* heroes or by joining events.
Feats
Civilization: Eras & Allies has achievements, labeled Feats in the game.
You can view your achieved Feats (and more importantly claim Feat rewards) by going to your profile in the upper left, then tapping “Feats” in the lower right.
Milestones
Milestones, like achievements, commemorate important thresholds. But unlike Feats, Milestones must first be unlocked by players on a server hitting specific goals.
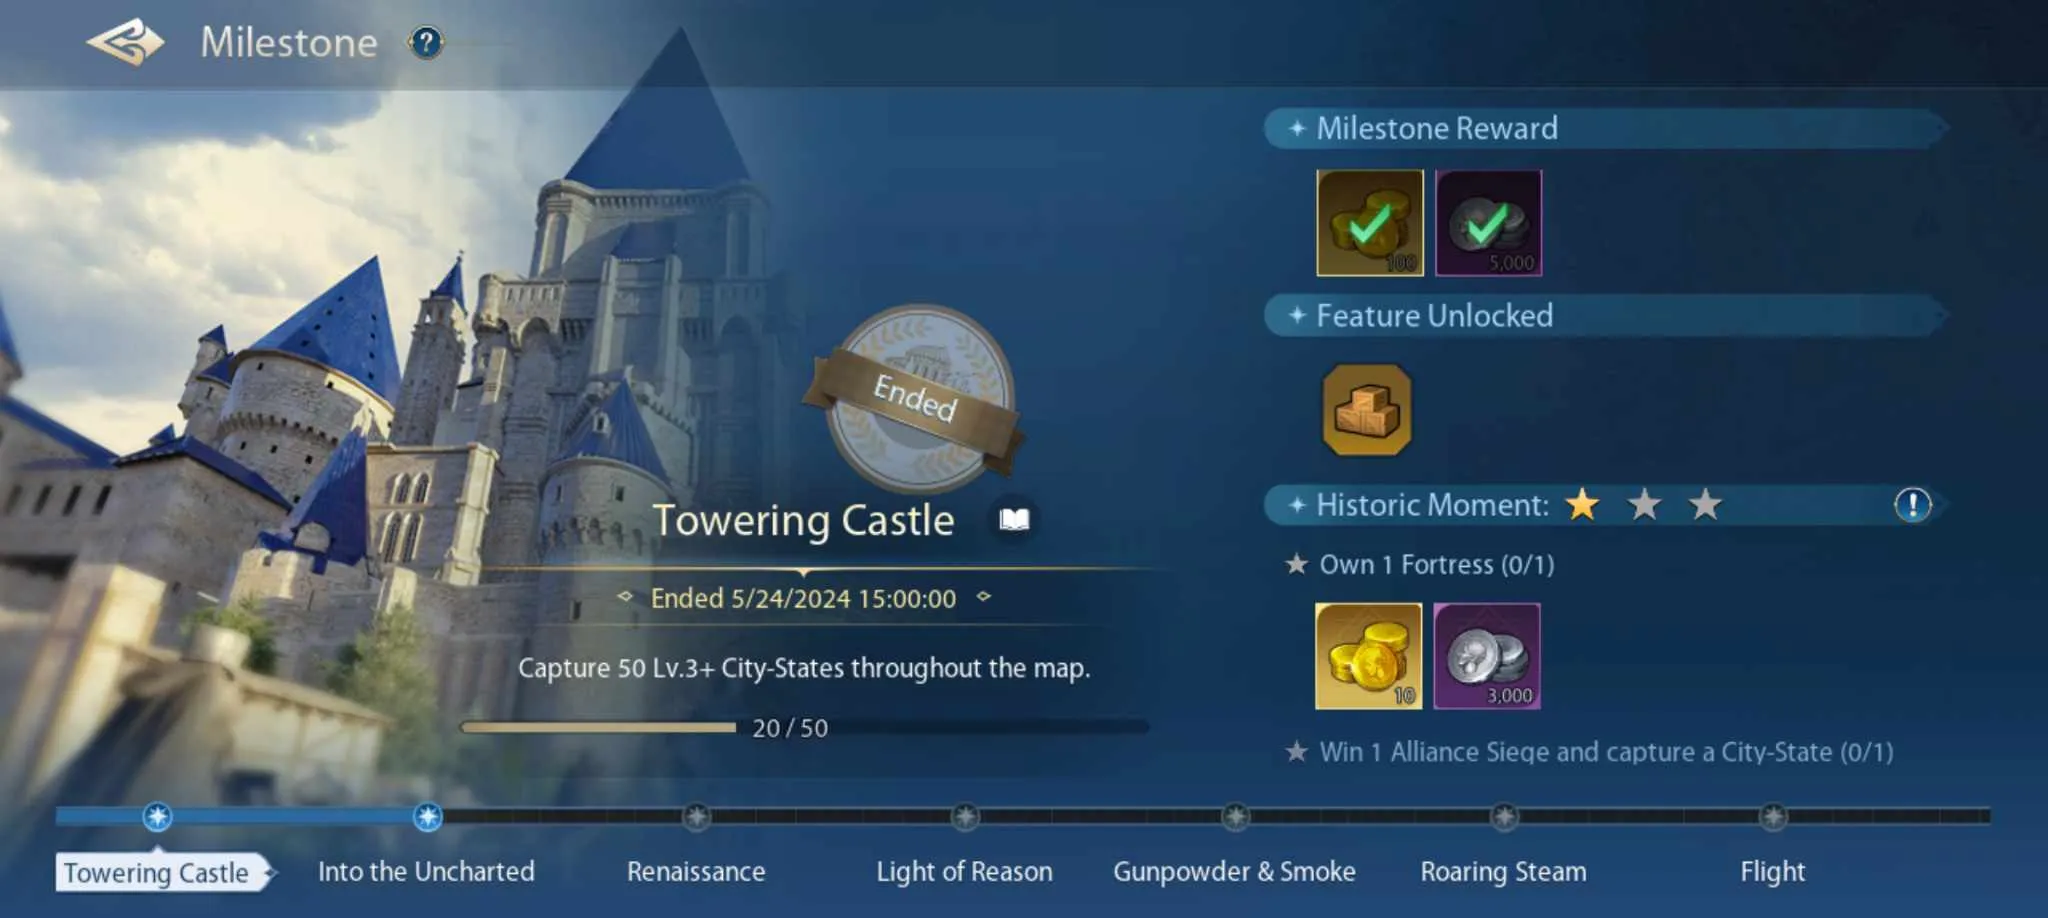
Once a Milestone is unlocked, it’ll be available for a limited period. During that time, you can fulfill certain requirements to claim prizes. You can view Milestones by tapping on the main menu (the three lines on the bottom right), and then tapping on “Milestones”.
Making Friends
Lastly, let’s talk about alliances. All empire builder games have an alliance system, and joining one is, I would say, a requirement to progressing in the game. After all, a lone civilization is easy prey, but together, you become much more formidable and powerful. Here are the reasons why you should join an alliance.
Quick Tips:
- Joining an alliance for the first time nets you 200 Gold.
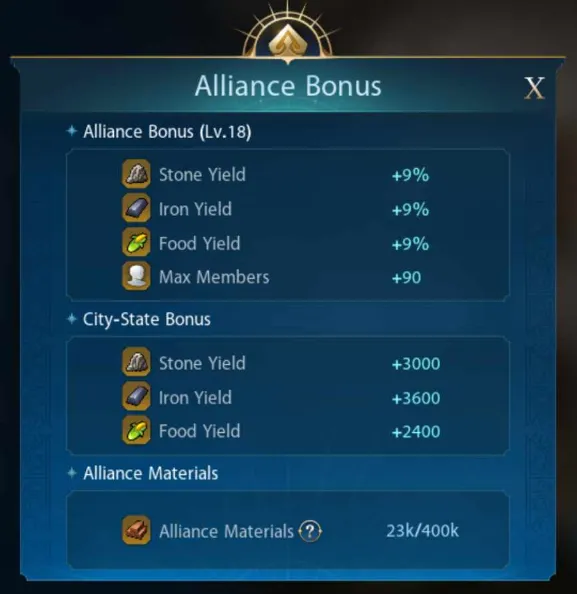
- Just being in an alliance grants you passive buffs to your resource generation. The higher the alliance’s level, the bigger the bonus.
- You can capture tiles adjacent to an alliance member’s tiles. Please coordinate with your allies before you do this.
- Alliance shops sell neat stuff, but only accept Honor and Credit as currency.
- Honor is earned via Wonder Quests, capturing resource tiles, or doing drills. In general, just keep fighting and you’ll earn the stuff.
- Credit is earned by joining alliance sieges or in Wonder Collaborations.
- Alliance shops refresh at midnight, server time.
- Alliance events provide you with even more freebies on top of regular events.
- You can rally armies to attack big targets – such as city-states – together with your allies. Pay attention to your alliance’s chat and especially scheduled pins to coordinate your war efforts.
- Help out in sieges whenever you have the resources to spare as this earns you alliance Credit.
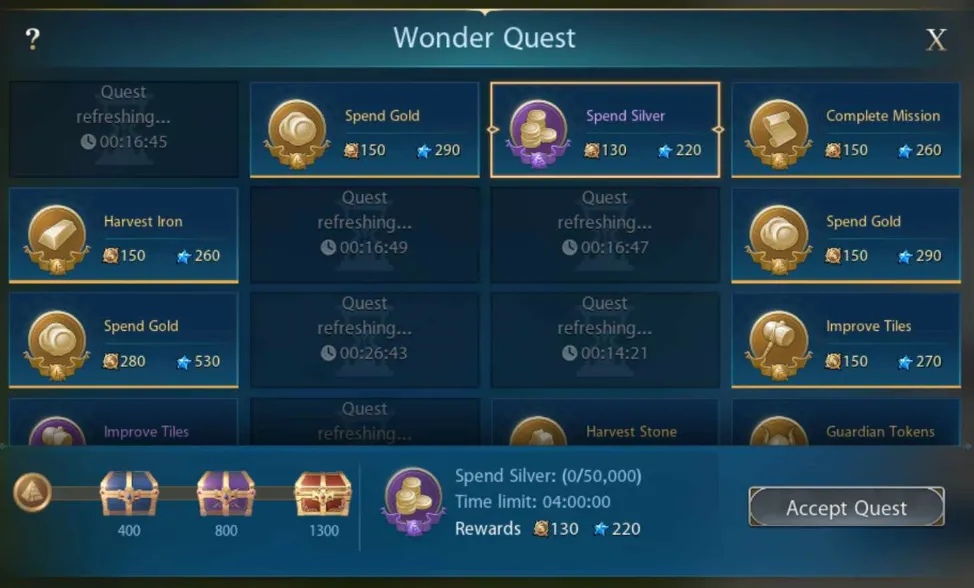
- Wonders provide incredible bonuses for alliances that manage to build them.
- Wonder construction progress is earned by taking on wonder quests. The more quests the alliance completes, the faster the wonder is built. Finishing quests also nets you some alliance Honor.
- You must have been in an alliance for at least 24 hours and meet a minimum production score before you can take on wonder production quests.
- As a general rule, be sure you can finish a wonder quest before you take it. Failed quests can slow down wonder construction progress!
- Don’t be afraid to ask your alliance mates for advice. Most alliances are welcoming to new members as everyone can contribute alliance experience.
First-Time Join Bonus
If, for some reason, the idea of joining an alliance doesn’t appeal to you despite it pretty much being necessary. Hopefully, this sweetens the deal: the first time you join an alliance, you get a bonus of 200 Gold. Yes, Gold, the premium currency.
Note that this is a one-time thing; you can’t leave an alliance and join another one to get more Gold.
Production Buffs
Apart from the initial sign-on bonus, alliances also provide a passive resource production boost to all of their members.
The higher the alliance’s level, the bigger the passive buff. Fortunately, helping your alliance level up is pretty easy – experience you earn in battle is also added to your alliance’s experience at a 1:1 ratio, so just by fighting, taking tiles, and doing drills, you’ll help your alliance level up!
Territory
I mentioned this at the beginning of this guide, but alliance members can capture tiles adjacent to those of their allies, waiving the usual requirement of having an adjacent tile or an outpost. Before you do this, though, be sure to coordinate with your allies as they may have had plans for those resource high-yield tiles near their city!
Alliance Shop
Each alliance has access to a shop that sells nifty stuff such as militia, silver, resource packs, and even Insight and Prestige points!
However, the alliance shop doesn’t accept silver or Gold. Instead, you’ll have to pay with either Honor (blue stars) or Credit (Gold stars). Essentially, the more you help your alliance, the more it can help you. Quid pro quo, as it were.
- Honor is earned by helping with Wonder Quests, capturing resource tiles, or doing drills.
- Credit is earned by joining alliance sieges or in Wonder Collaborations.
The alliance shop refreshes at midnight, server time.
Alliance Events
We’ve already gone over the importance of joining events for free resources. Alliances increase your event income as they allow you to participate in alliance events.
As with normal events, pay attention to the current alliance events in your server to get the most rewards possible.
Rallies and Sieges
As you explored the world with your scouts (you have been exploring, right?), you might have found city-states, powerful neutral entities. While taking these city-states by yourself is possible given enough resources and sheer stubbornness, it’s better to work with your allies to take down these big prizes.
Pay attention to your alliance’s announcements and scheduled map pins to see when and where your guild’s marshal requests your assistance. Be sure to help whenever you can as participating in sieges nets you alliance Credit!
Wonders
Wonders, like in Civilization, are powerful structures that confer immense bonuses to whichever alliance has them. These can range from massive resource generation like the Pyramids, the Hanging Gardens, or Stonehenge to faster development via the Temple of Artemis or even extra quests through the Oracle.
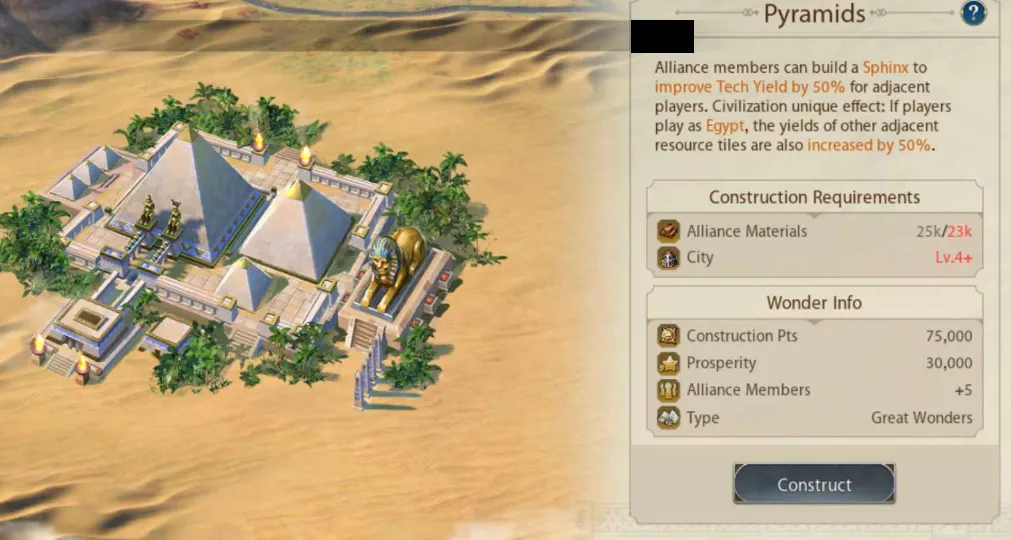
Unlike other buildings, Wonder construction is done differently. Instead of throwing resources at it and waiting down a timer, alliance members will need to take on quests to add progress to the Wonder. These quests are timed, so be sure that you can finish a wonder quest before taking it on.
A few things to note:
- While Wonders provide their bonuses to all members (depending on the Wonder in question), only the alliance leader and/or senior members can initiate Wonder construction.
- You must have a minimum production level before you can take on Wonder quests.
- You must also wait 24 hours after joining an alliance before you can take on Wonder quests.
The Social Aspect
Finally, don’t underestimate the social aspect of joining an alliance. While this guide is meant to help beginners find their footing in the early game, you’ll want old hands to explain more advanced concepts and guild tactics to you – and it helps that alliances are almost always very welcoming to new players since you can help just by fighting and doing your own thing. Don’t be afraid to speak up and ask your alliance mates for advice!
Will You Stand the Test of Time?
The road to greatness is rough, rocky, and treacherous. You’ll need all your cunning and wit to avoid the many pitfalls in your path, and the enemies in your way will be legion. But all of your efforts will be worth it in the end, when you stand on high with your people at your back and your allies at your side.
That concludes this beginner’s guide to Civilization: Eras & Allies, and I hope that with this knowledge under your belt, you’ll be able to build a solid foundation on which to base your future conquests. If you have any tips or tricks that you’d like to share (especially for completely new players to the genre!) or have any suggestions or corrections for this guide, let us hear your voice in the comments below!