If you like creepy puzzle games that challenges your brain to think or ones with a mystery that pulls you into its world’s lore such as the Cube Escape and The Room: Old Sins series, but also love the picturesque atmosphere of games like Dear Esther and Firewatch, there’s a big chance that you’ll also enjoy this game.

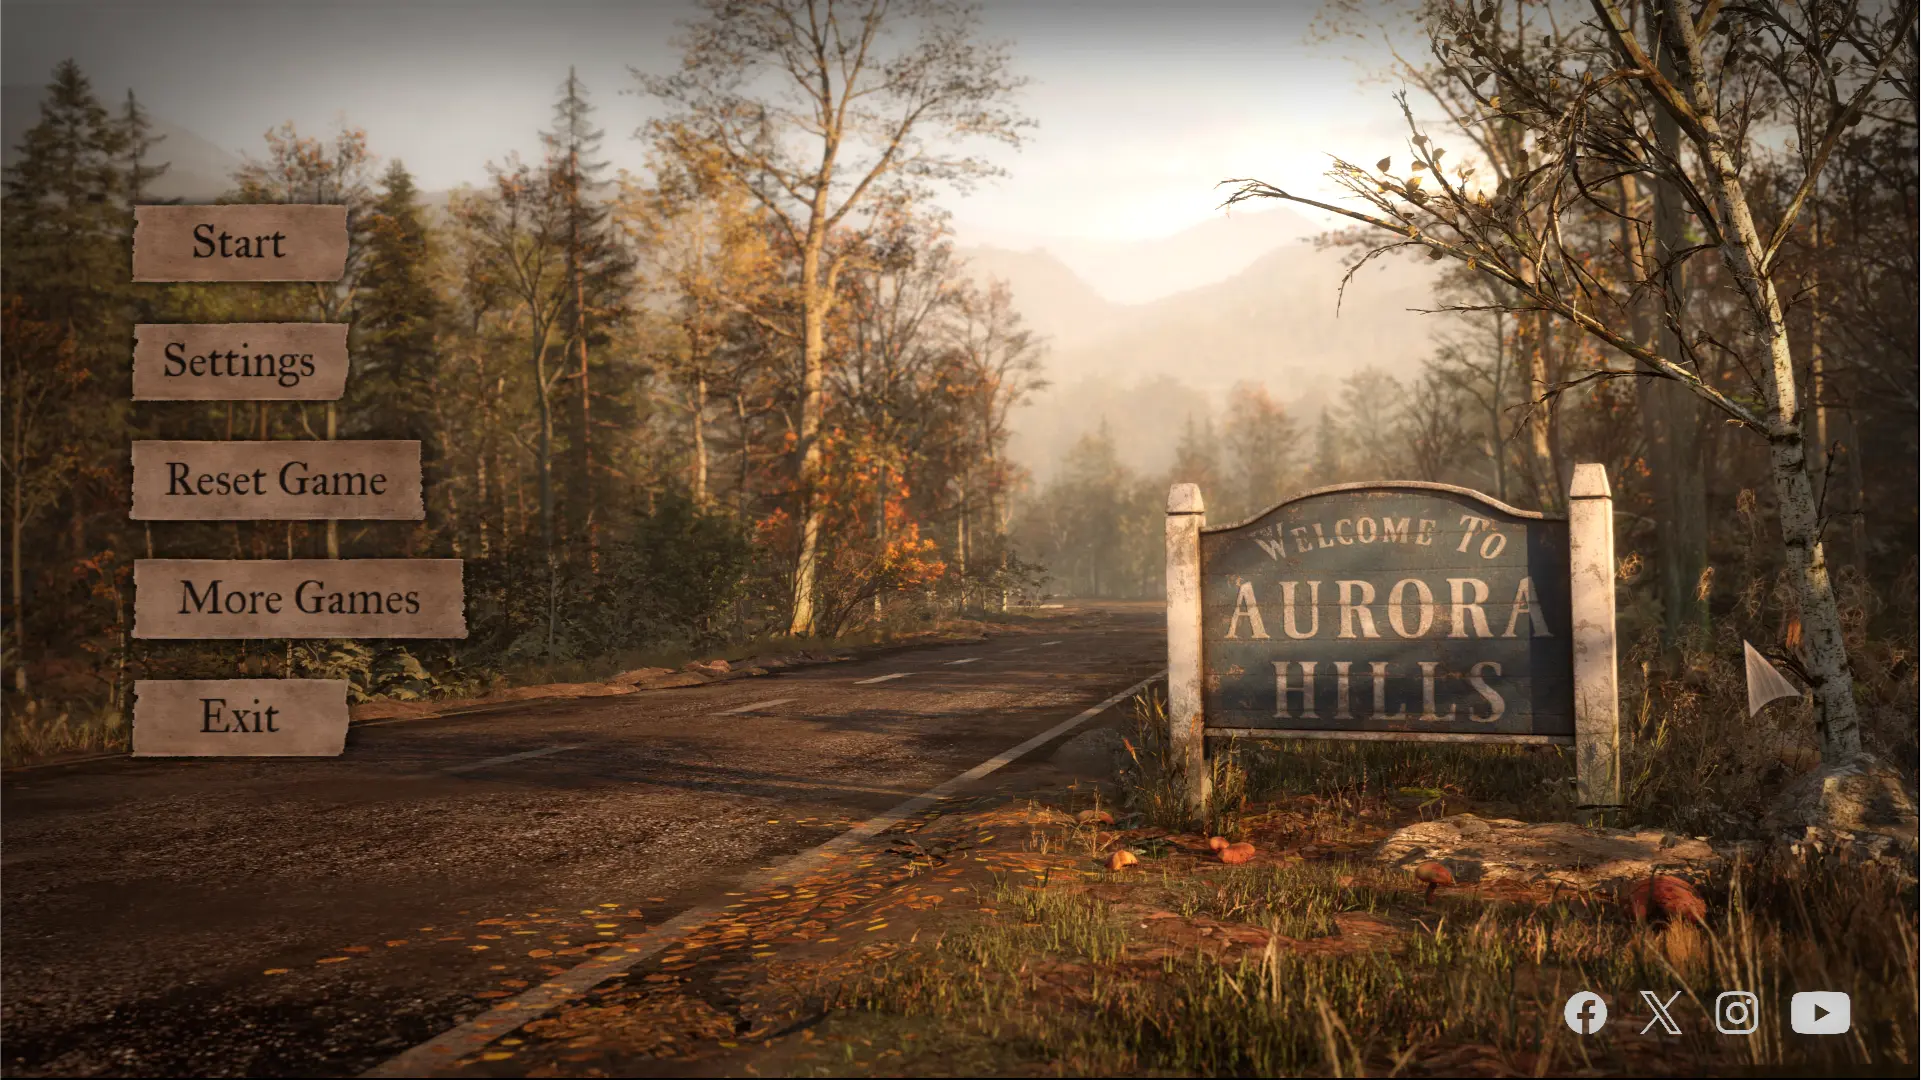
Aurora Hills is a point and click puzzle adventure game created by the same makers of the Meridian 157 series. The game features Novasoft Interactive’s signature eerie yet hauntingly beautiful atmosphere. With such attention to detail, you can see the love and passion this wonderful indie game developer has poured into their creation.
A big improvement to their previous game, which is already fantastic in itself, their newest title features gorgeous scenery, challenging puzzles and an enhanced user interface and game mechanics. With their player base growing, the developers have implemented a better hint system, a hard mode, a colorblind mode, and various language options such as English, French, Russian, German, Chinese (Simplified), Spanish, Portuguese, Italian and Japanese.
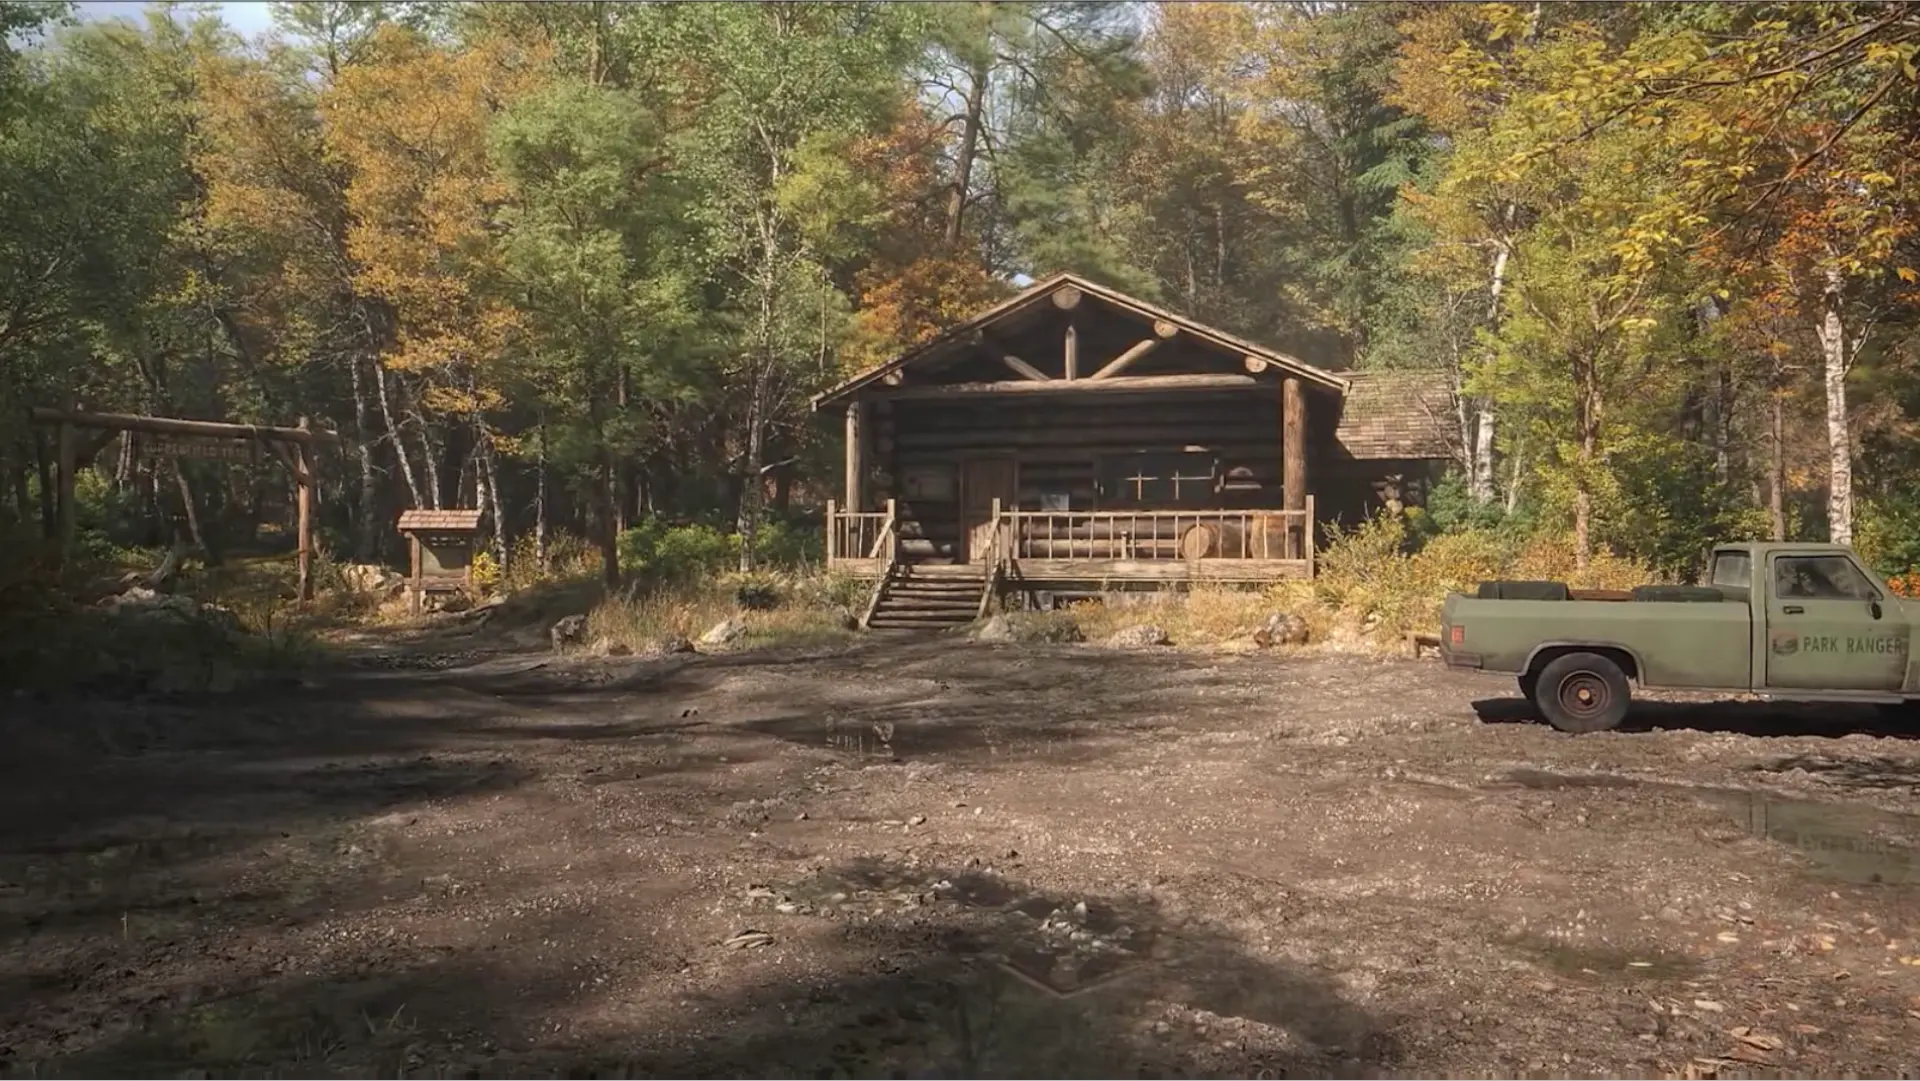
Set in the year 1981, in a small West Virginian community deep within the Appalachian Mountains, you play as Ethan Hill, a park ranger investigating the mysterious disappearances of its residents. Once a bustling town known for its lovely scenery and prosperous industry, Aurora Hills has grown desolate, bare, and lifeless. Plagued with missing persons reports for years, the mystery only deepens as more people start vanishing in just a span of 6 months. The stress of these unsolved cases have eventually crawled into Ethan’s own life outside of work.
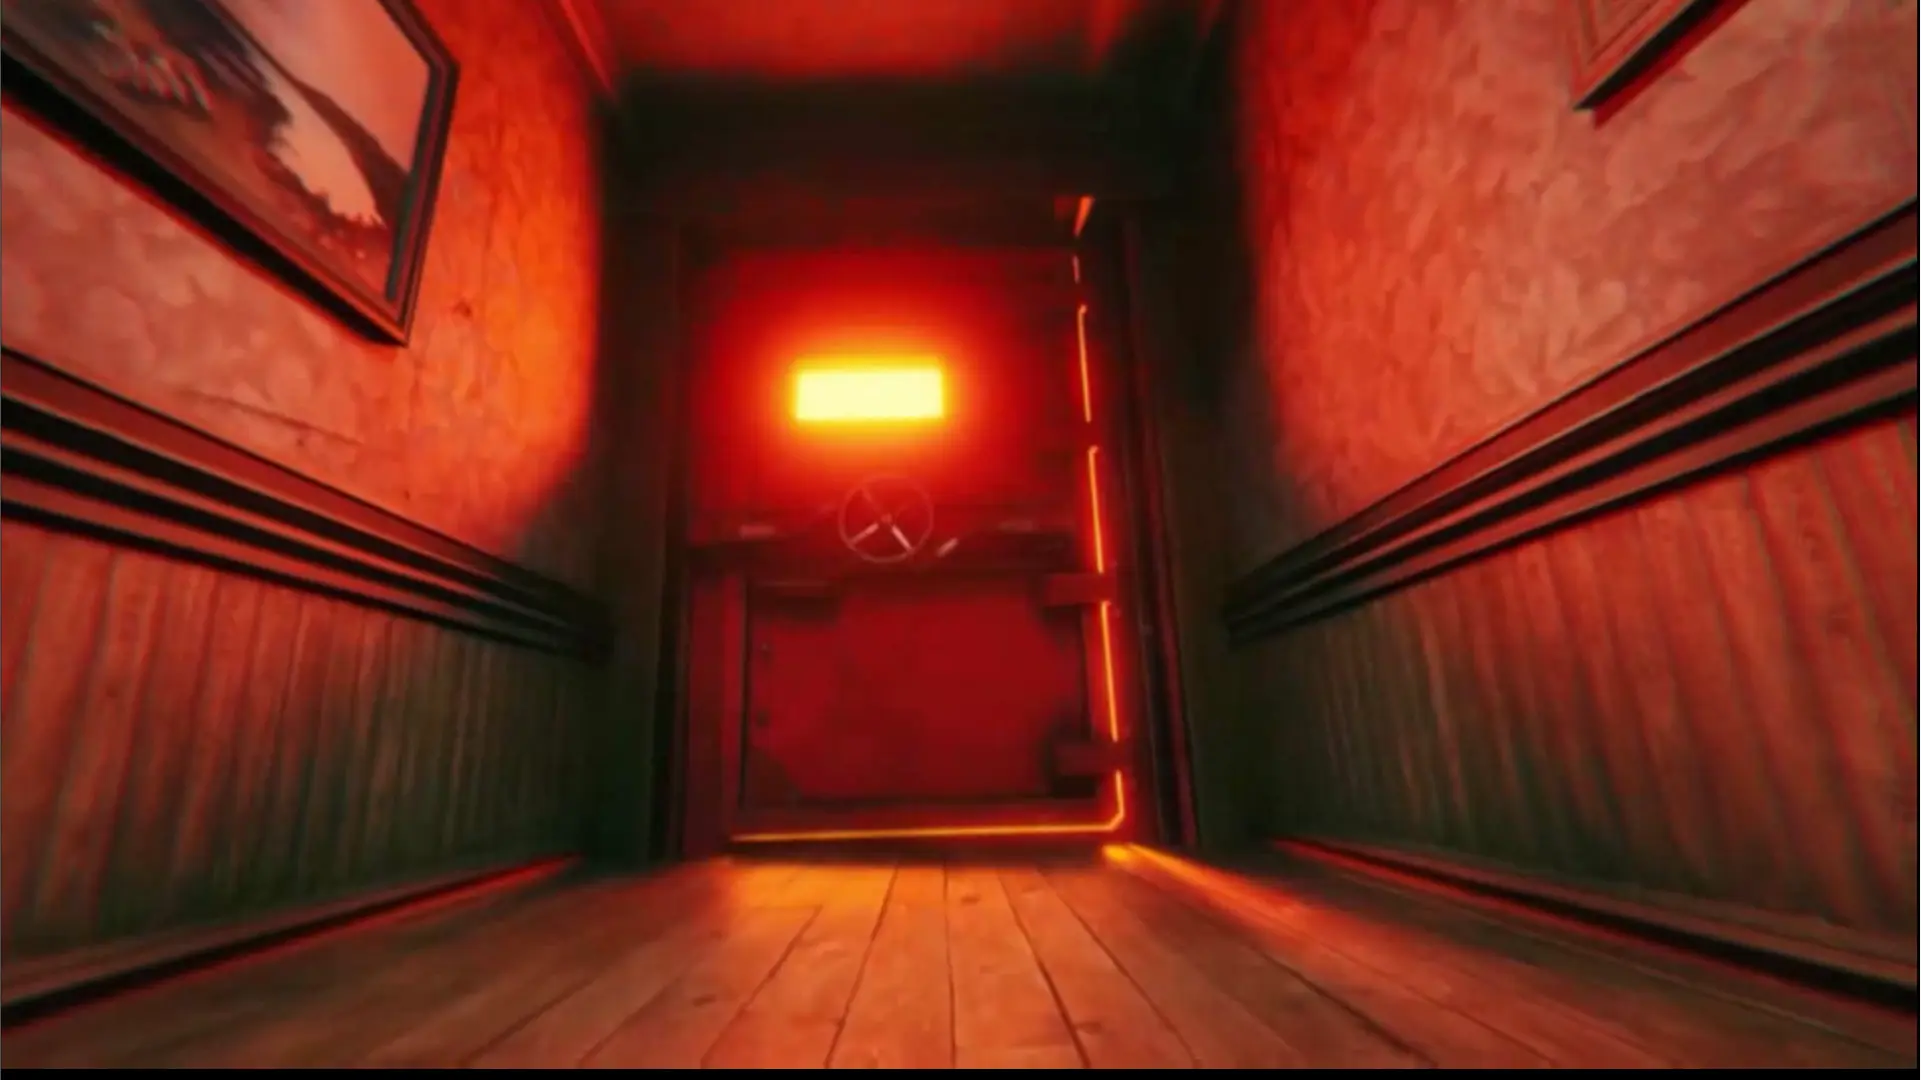
Living alone in a house that’s been neglected, with trash scattered all over the place, our protagonist had been continuously suffering from a series of eerie and unexplainable recurring nightmares. A dark hallway with a painting of a factory that seems to move, a red, vaulted door with an ominous energy, and the terrifying manner the dream ends: with Ethan being pulled away from the door with great force.
But Ethan Hill is not alone in his quest to solve these peculiar disappearances. With the help of his partner Jennifer Reid, and the curious clues found all over the region, you set off to find these missing people and discover the hidden secrets of Aurora Hills.
To play the game, you’ll need to tap an area to move closer to it, or tap an object to collect it or inspect it. Objects collected will show up on the vertical bar to your left and can be used on other objects or puzzles in the game to interact with it, solve it and move forward. Some objects can also be combined using the button on the upper left part of the screen.
There are also some objects that will reveal puzzle mini-games that can either be solved by finding clues around the area or by figuring it out through trial-and-error. Take note that while some puzzles seem to be possible to solve immediately, the game may not accept the solution unless you trigger a specific event first. An example of this is Jen’s locker which can’t seem to open with the solution until after the lights go off.
If you find any odd or interesting things that cannot be collected, you can use your Camera, which is found on the lower right corner of your screen, to take in-game screenshots to be used as a reference for later. Take note that the number of screenshots you can keep is limited and we recommend saving the slots for important images and deleting the ones you no longer need.

The game can be played in two difficulty settings: Normal and Hard. In Normal Mode, puzzles seem easier because you can get hints and help if you get stuck. In Hard Mode, puzzles feel harder since you cannot get hints or help to solve them. The differences between the two modes are small and the solution is the same for both modes.
An example of their differences is in one puzzle where you have to place pictures in certain positions on a board. In Normal Mode, the pictures will snap into the correct location if it’s near enough. In Hard Mode, they will not. If you ever change your mind, the difficulty modes can be changed anytime in the settings.
Aurora Hills is an ongoing series and this walkthrough only covers the first chapter, which was released on April 20, 2024 in PC for Windows and Mac OS, and mobile for Android and iOS. At the time of writing this guide, the other chapters have not been released yet, but we will be updating you with walkthroughs for them once they are!

Ethan’s House
Getting Ready for Work
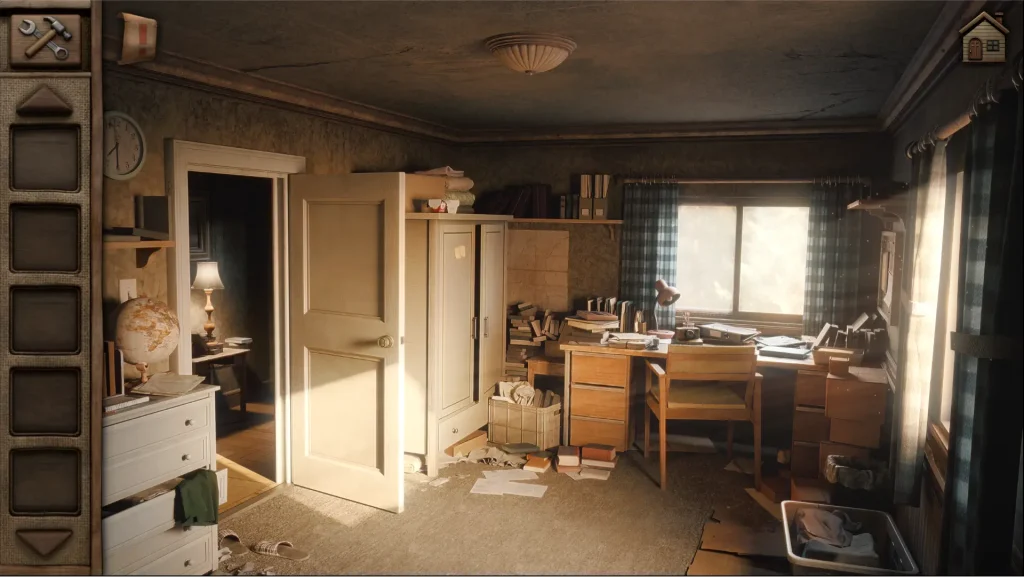
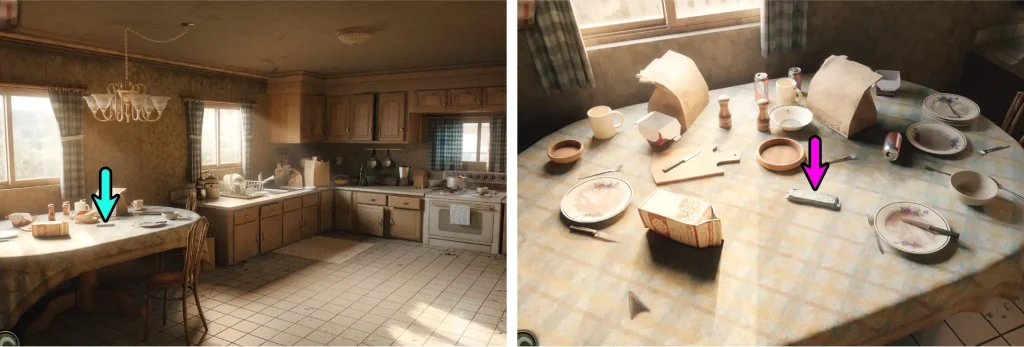
Ethan Hill is awoken from his recurring nightmare by his alarm clock and realizes that he is running late for work. But before he can leave, you need to get his Car Keys, his Ranger Uniform, his Camera, his Photo Album, and something to eat.
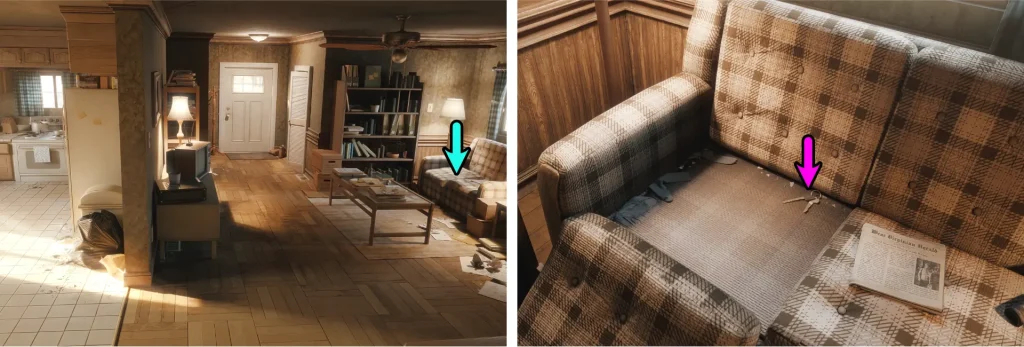
Car Keys – found in the living room downstairs, under the couch cushions.
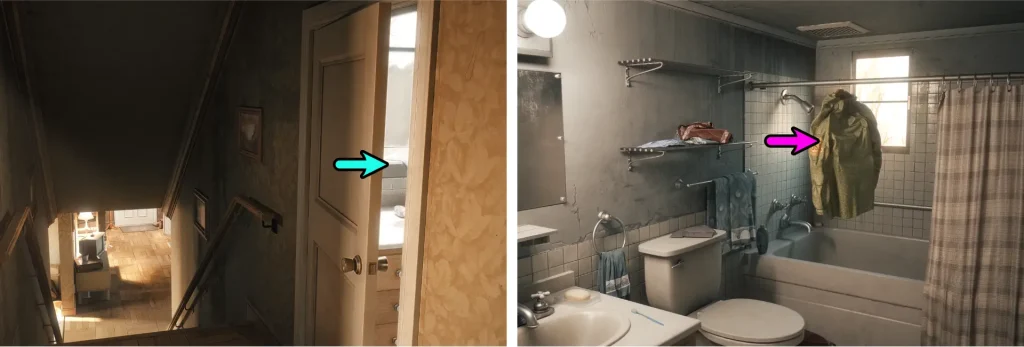
Ranger Uniform – found in the bathroom, hanging above the bathtub to dry. The bathroom is just outside Ethan’s room, near the staircase.
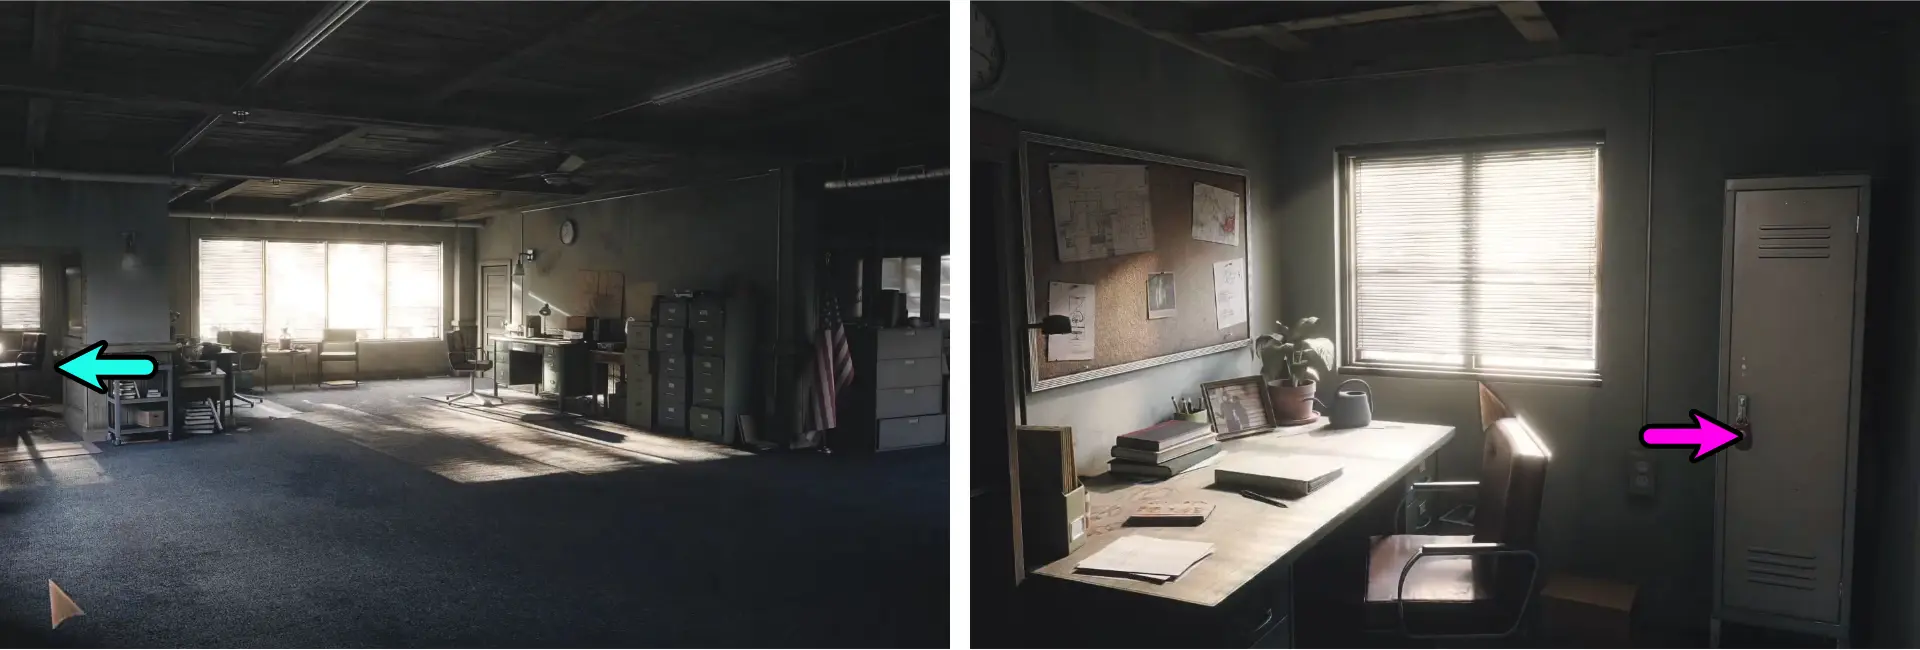
Camera – found at the desk at the right side of the bedroom.
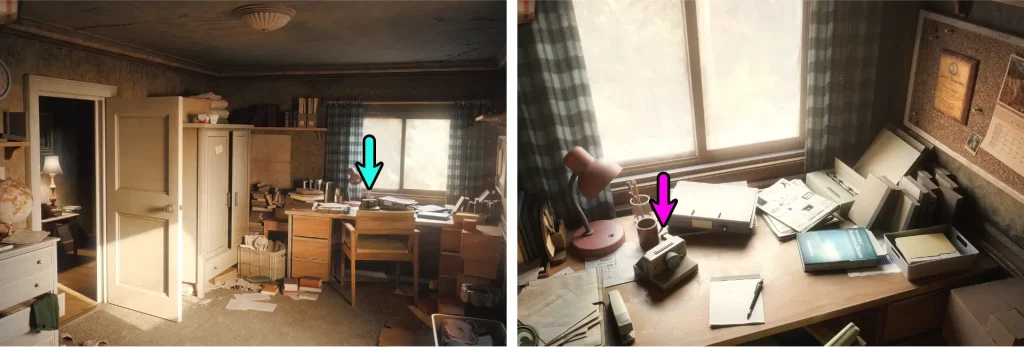
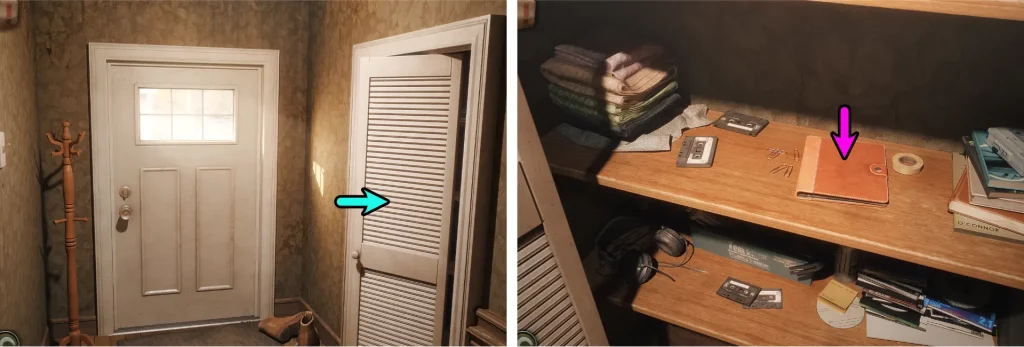
Photo Album – found inside the closet found by the front door of the house.
Something to eat – an Energy Bar can be found at the dining table in the kitchen.
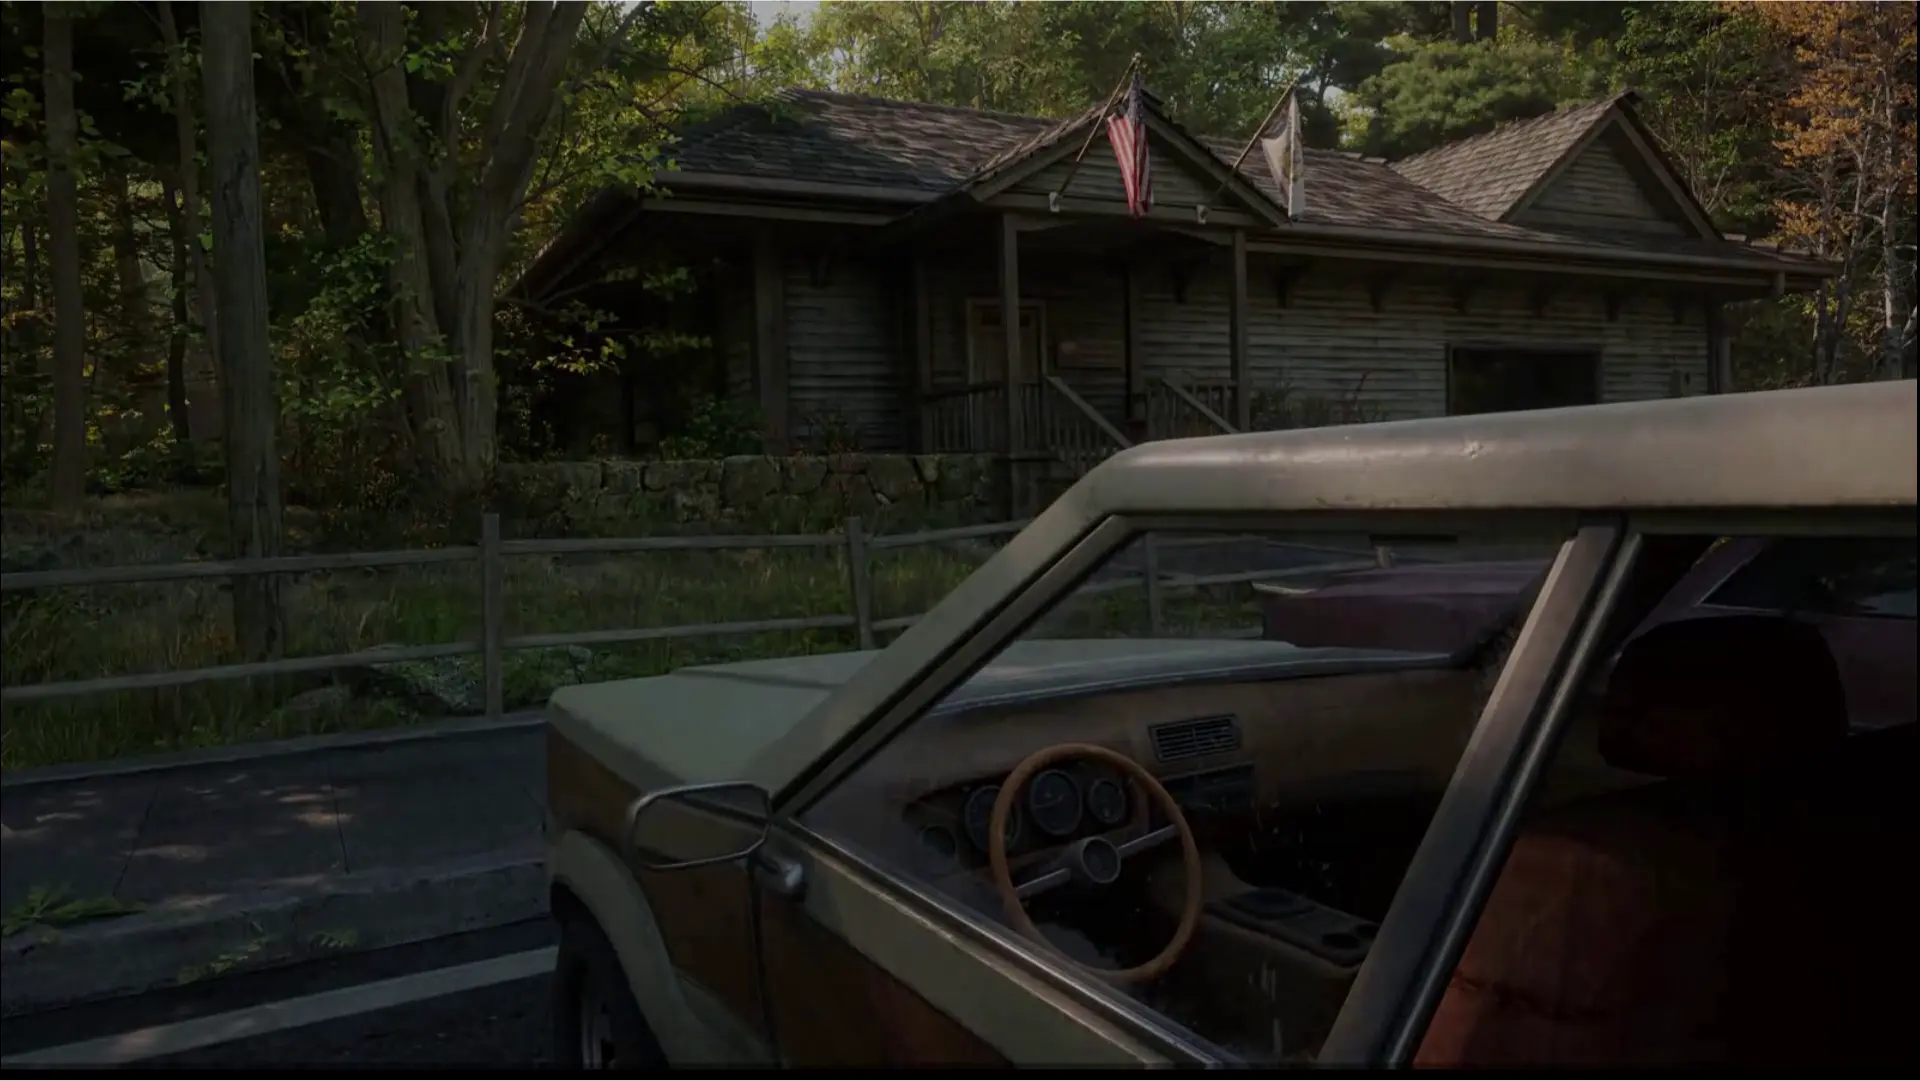
Once you’ve obtained everything you need, exit through the front door. Use the Car Keys on the car and enter it.
Ranger Station
Make Coffee
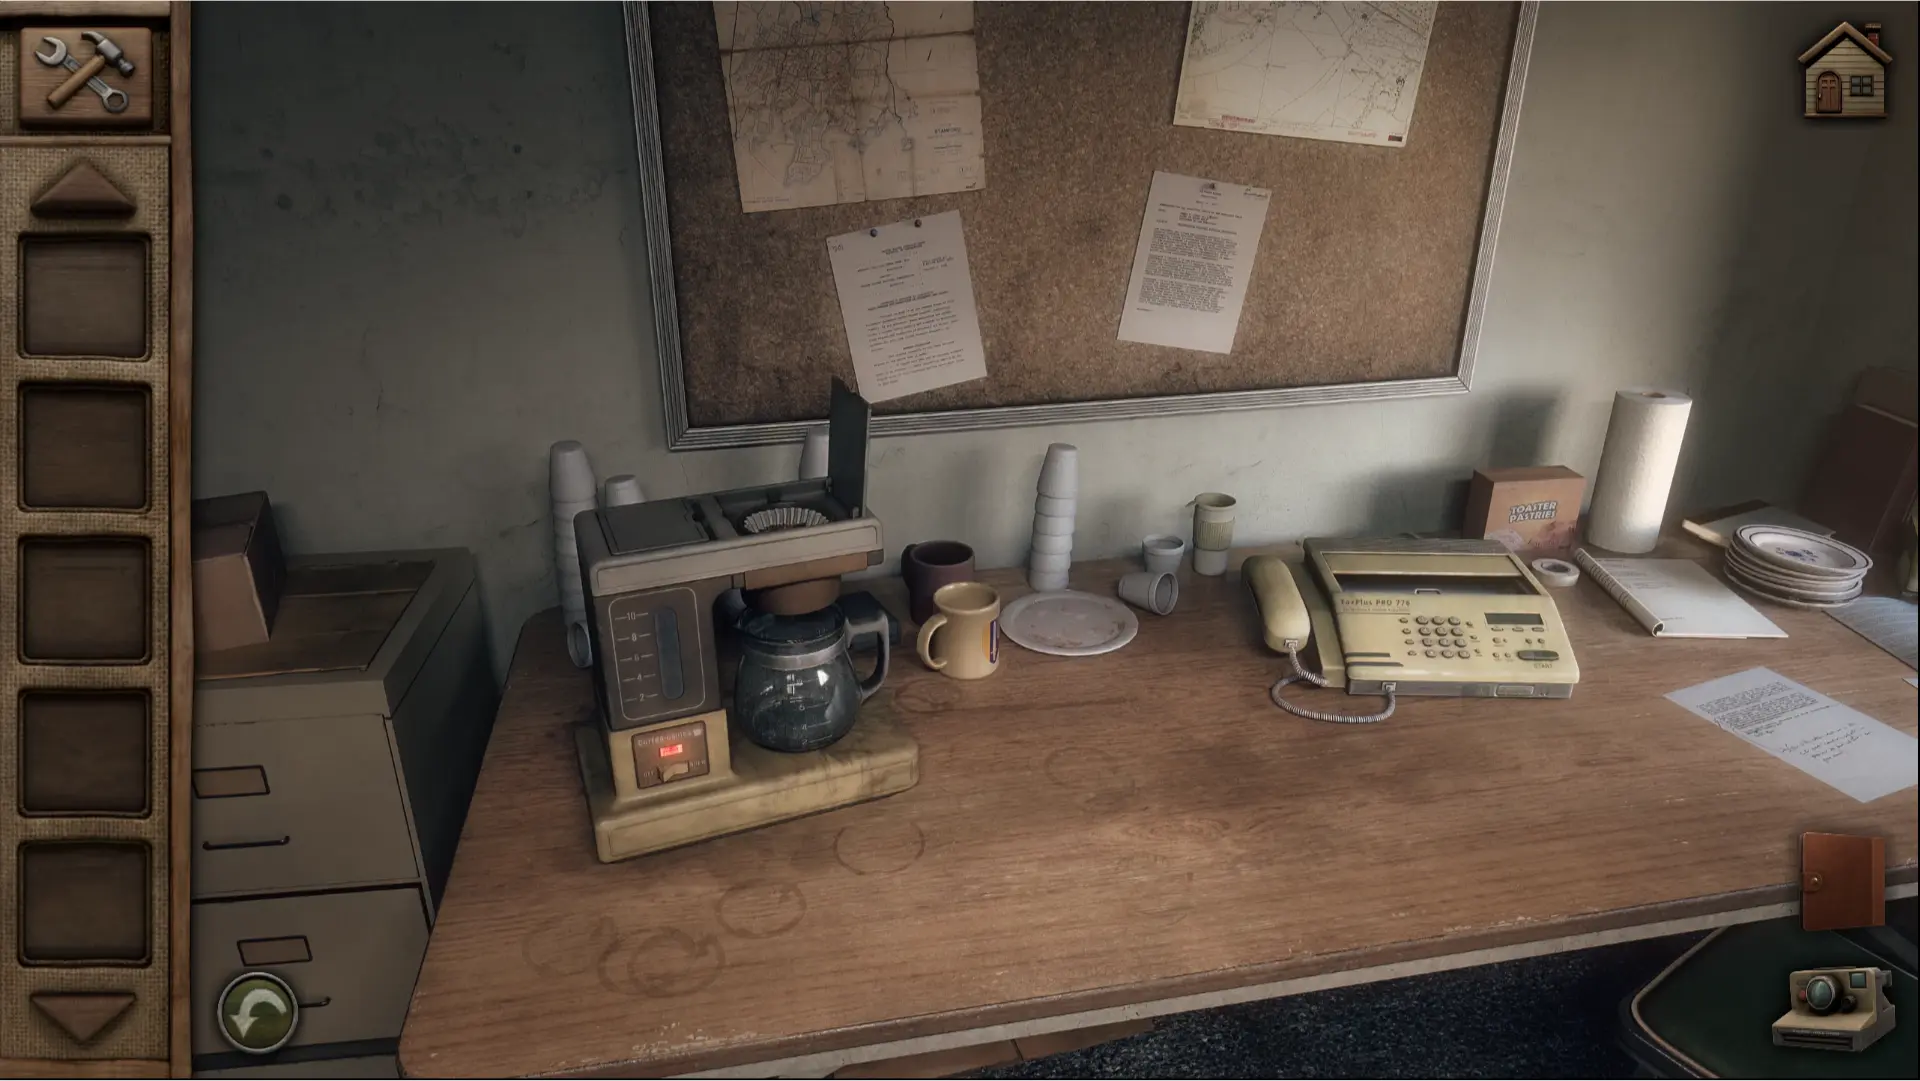
Before getting started, Ethan needs to make some coffee for himself. You’ll need to find the Coffee Pot and the Coffee Can.
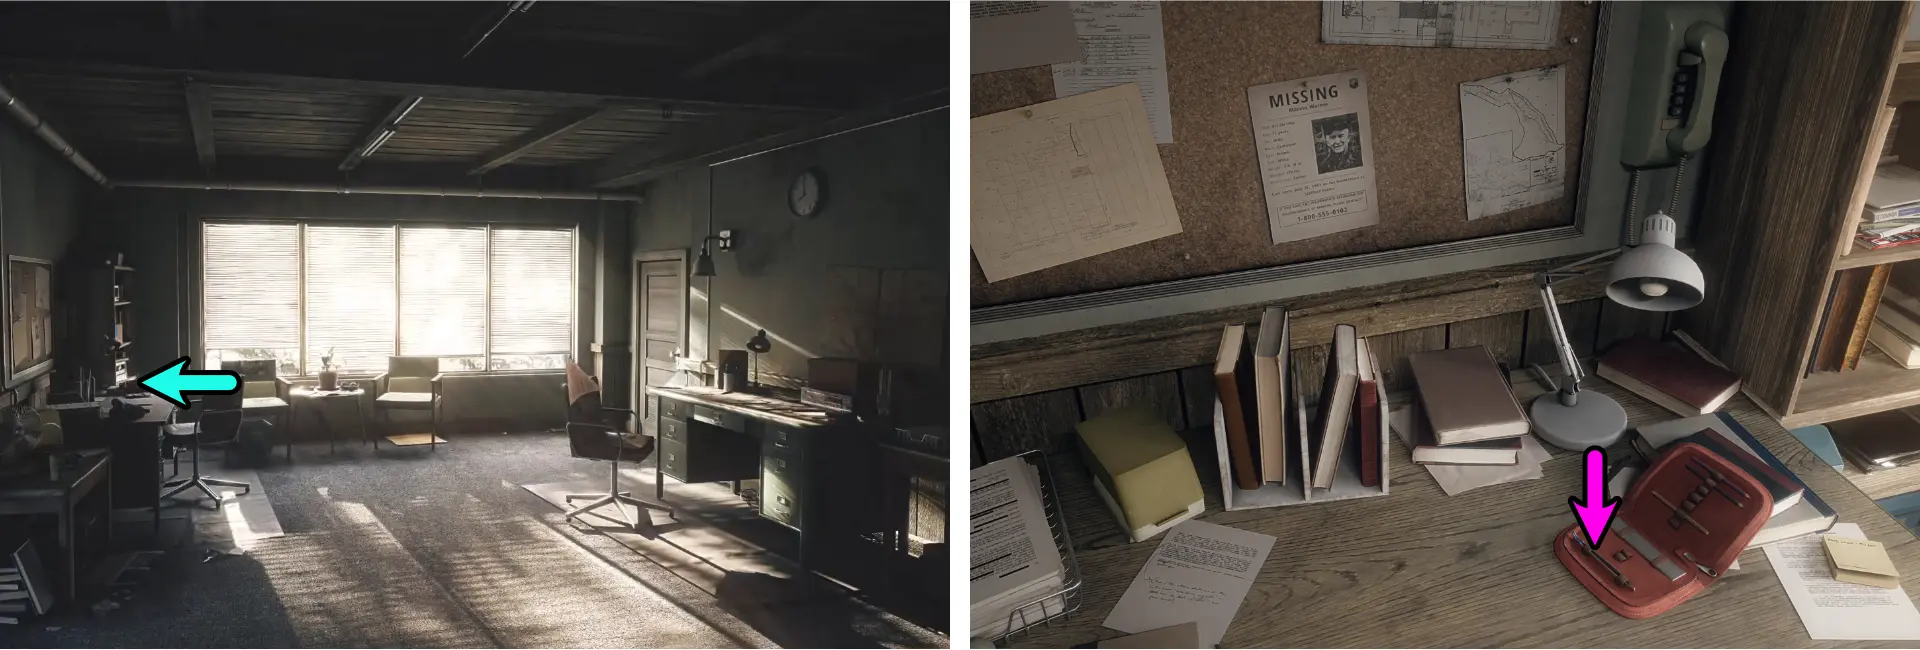
Coffee Pot – found on the desk in the left room (Jen’s Office). It is next to the stack of notebooks.
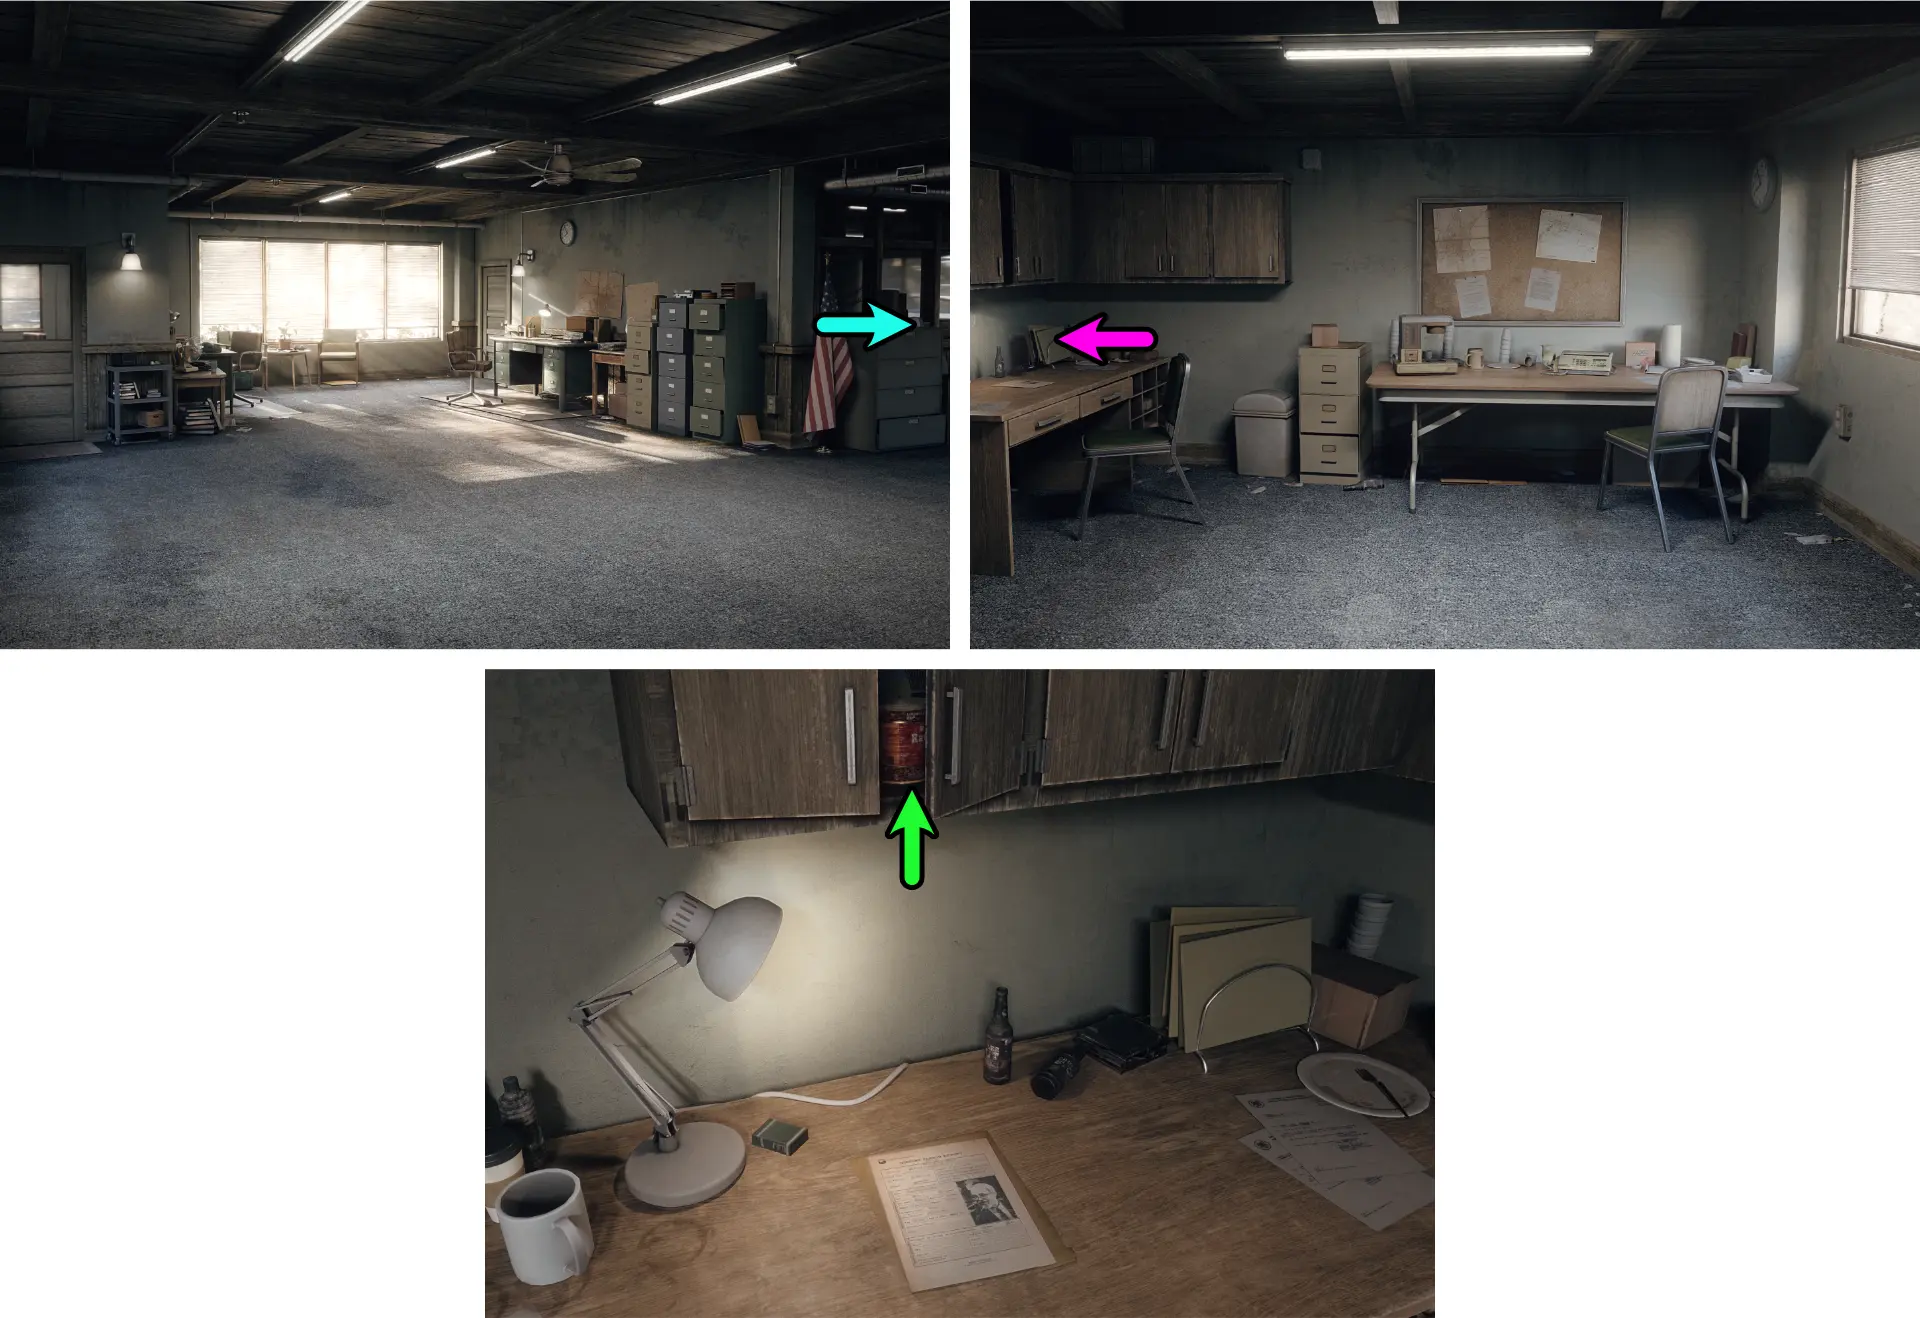
Coffee Can – found peeking from the cupboards by the left desk at the right room.
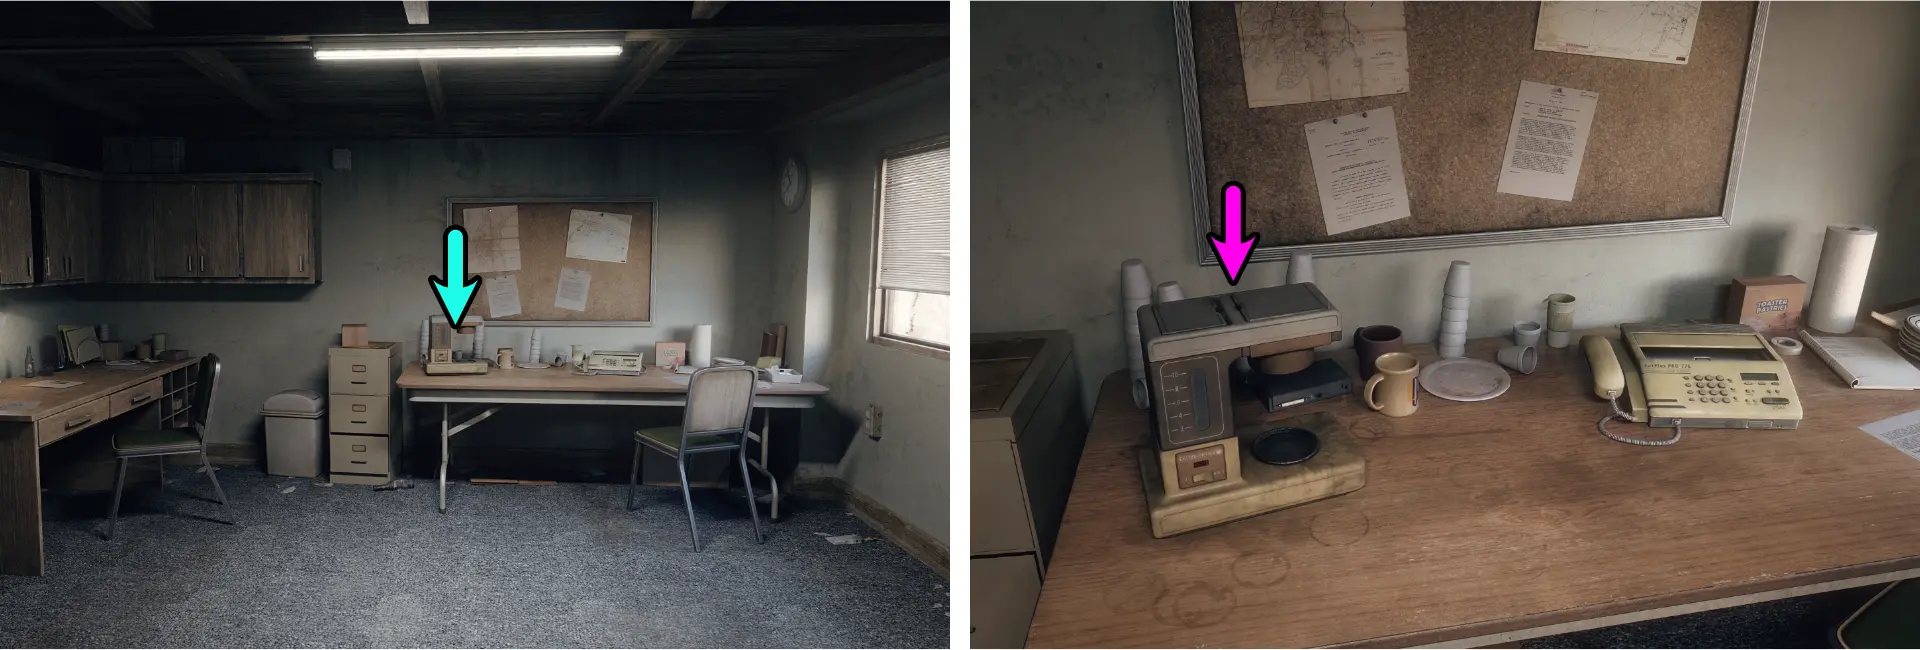
Once you’ve obtained both items, go to the desk to the right, where the fax machine and coffee machine are. This is in the same room where you found the Coffee Can.
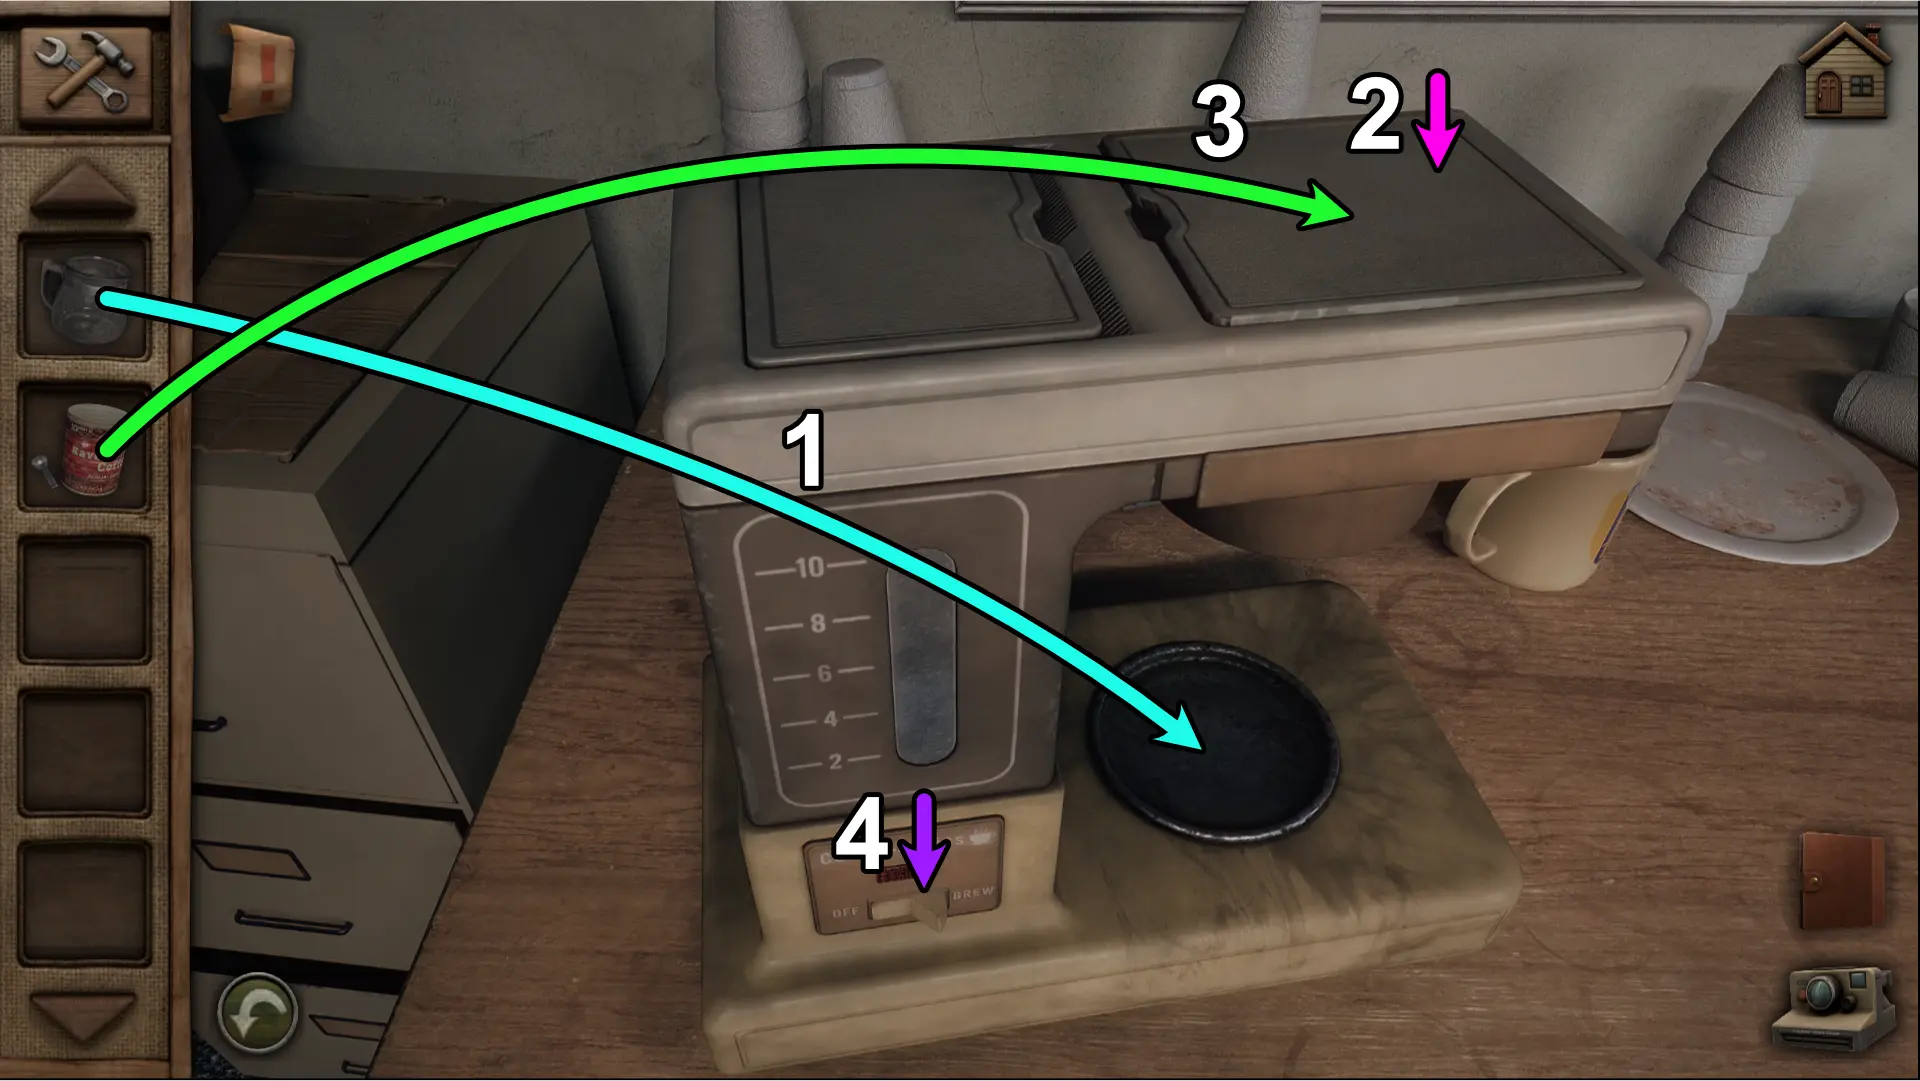
- Approach the Coffee Machine and place the Coffee Pot at the circular slot.
- Open the hatch above it the Coffee Machine.
- Place the contents of the Coffee Can inside the hatch.
- Flip the switch to Brew.
Getting the Power Back
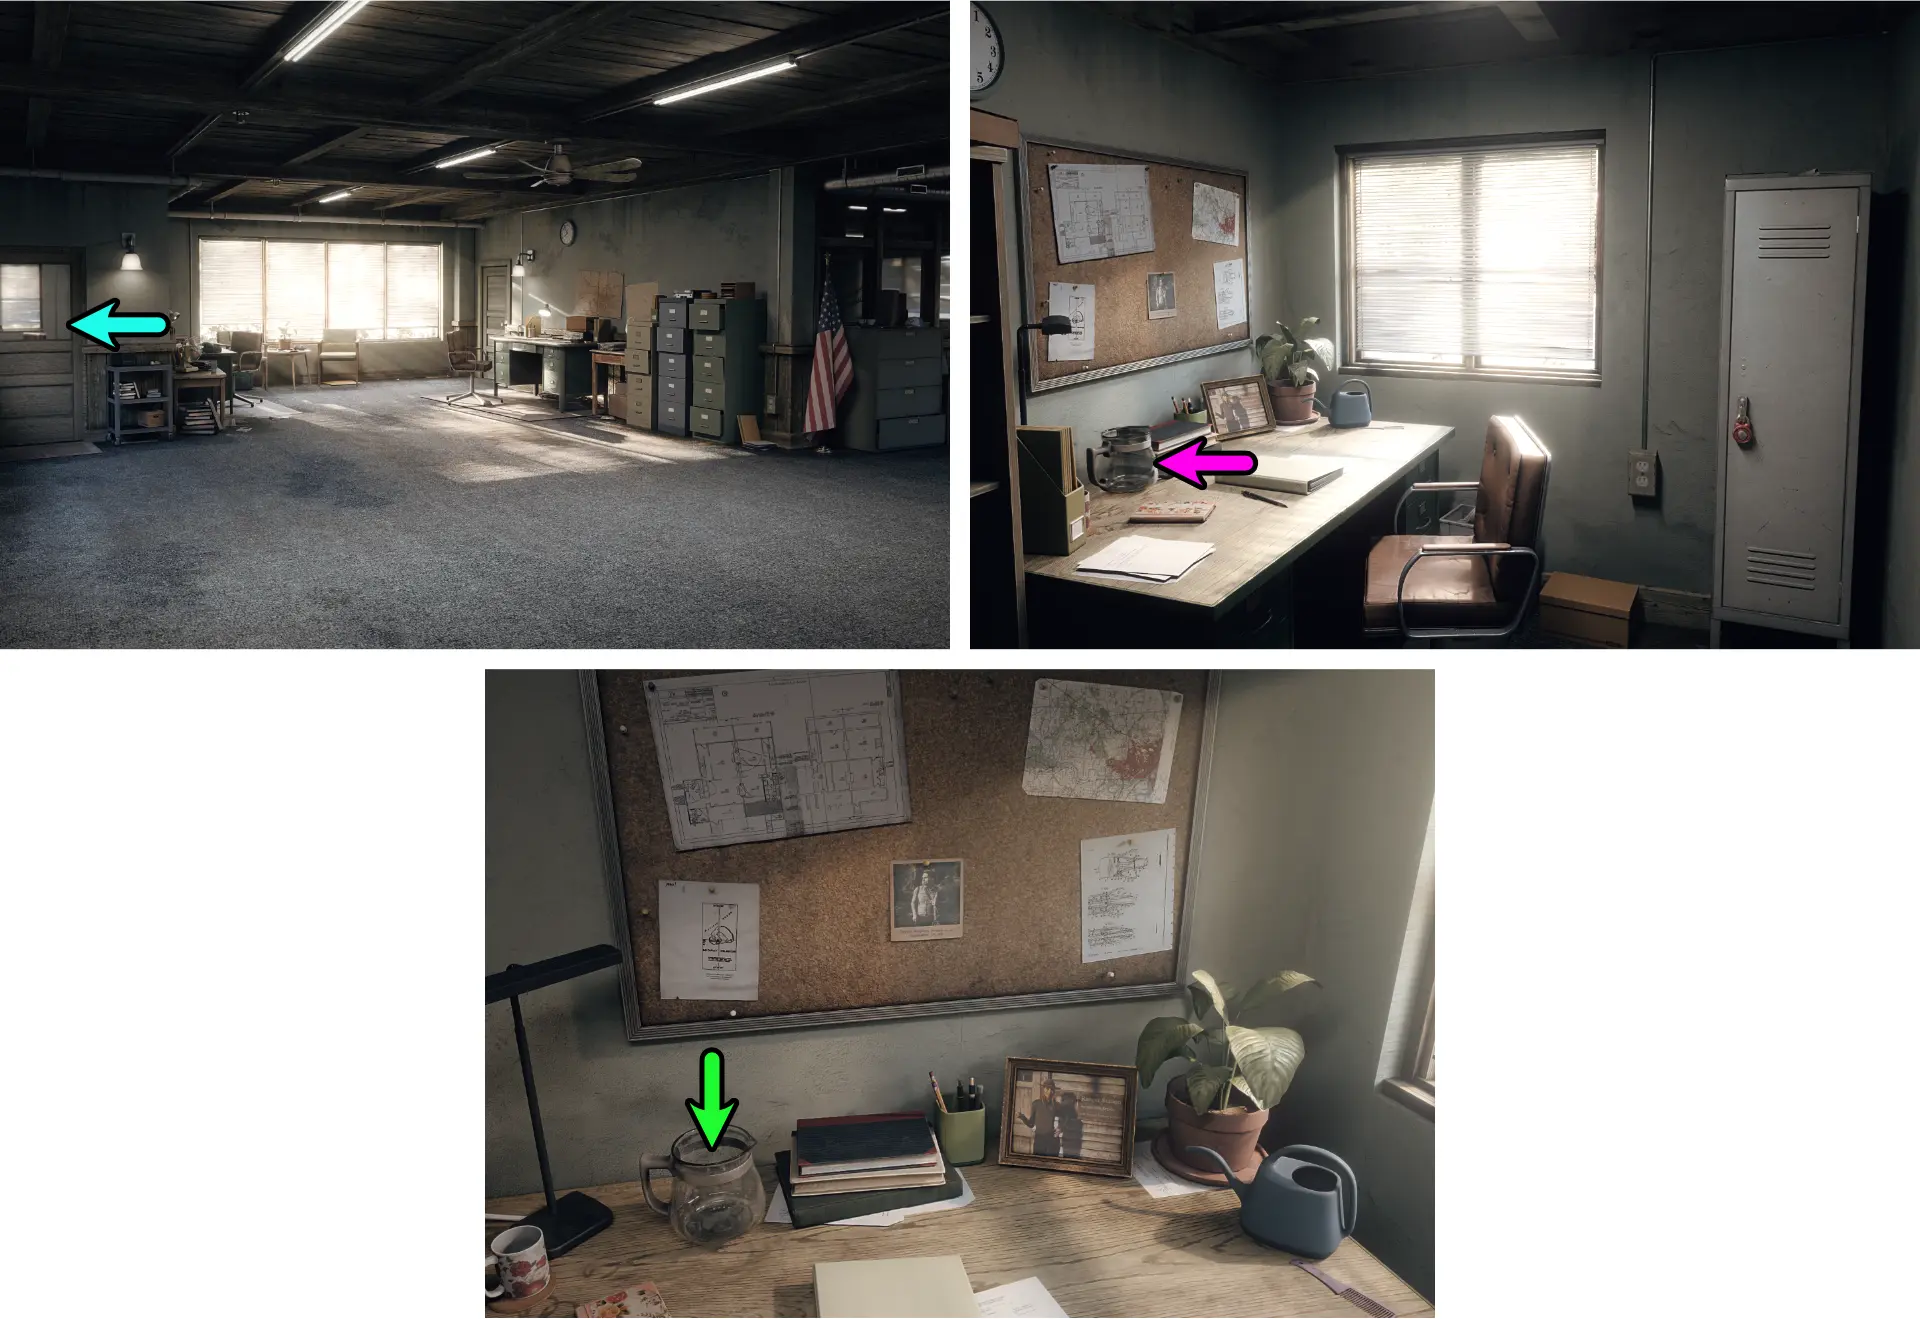
While waiting for the coffee to brew, Ethan will see the fax machine printing something. However, before it finishes, the lights will go out. You’ll need to find a way to get into the Basement, fix the fuse box, and get power back to the office.
Opening Jen’s Locker
Jen’s locker contains an item and a clue that will help you enter the Basement.
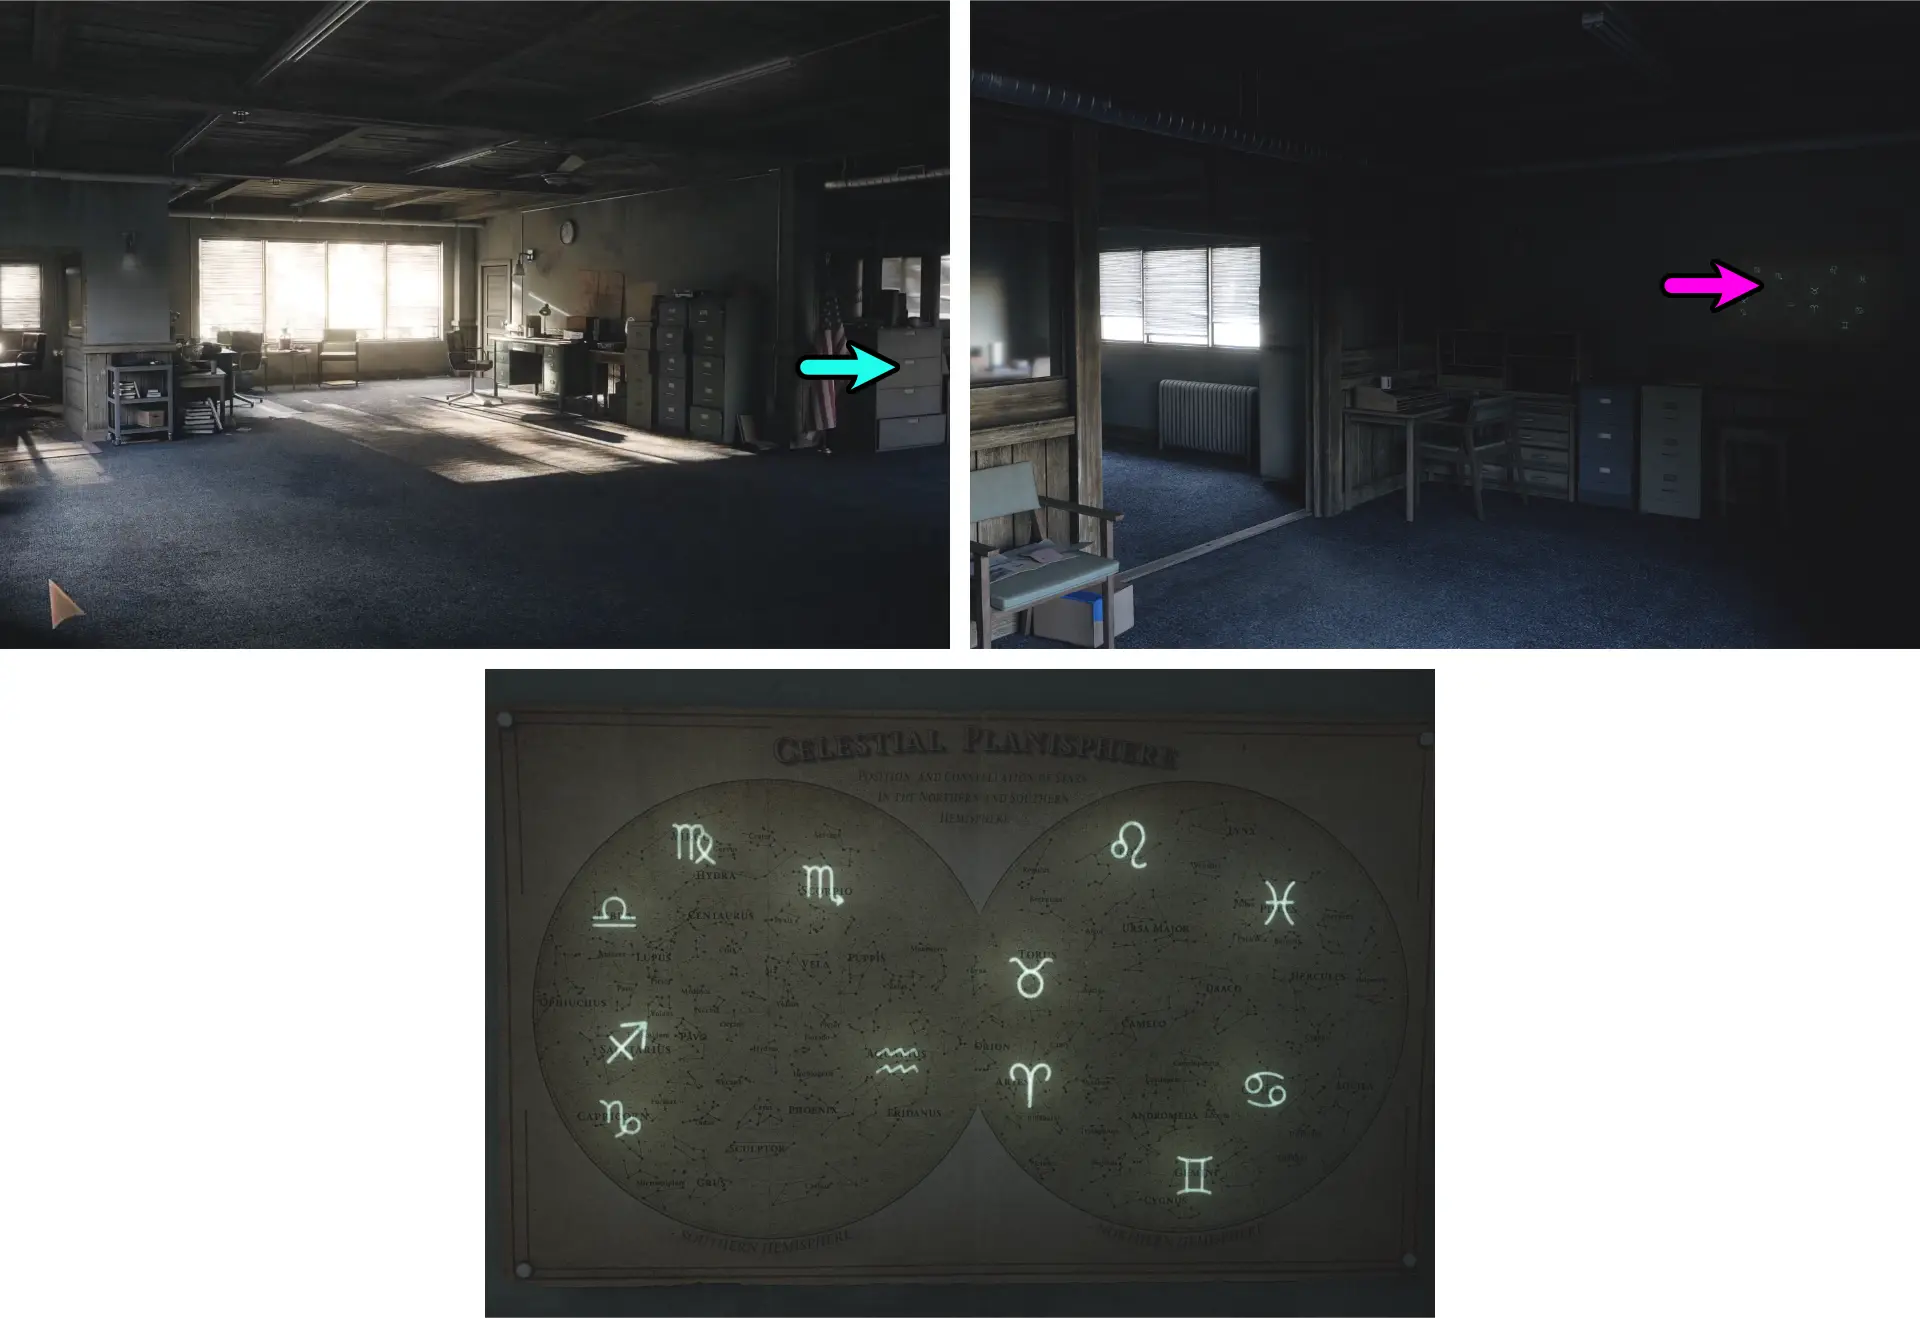
- Go to the right side of the office.
- Approach the poster of the Celestial Planisphere and take a picture of it for reference.
- Go to the left room where Jen’s office is.
- Investigate the locker’s red lock.
You’ll notice that there is a sequence of zodiac symbols above the red lock similar to the ones in the poster you took a picture of. In the middle is a knob that can be moved in 8 directions. To unlock it, base the movement of the knob on the positions of the zodiac symbols. The directions in order should be:
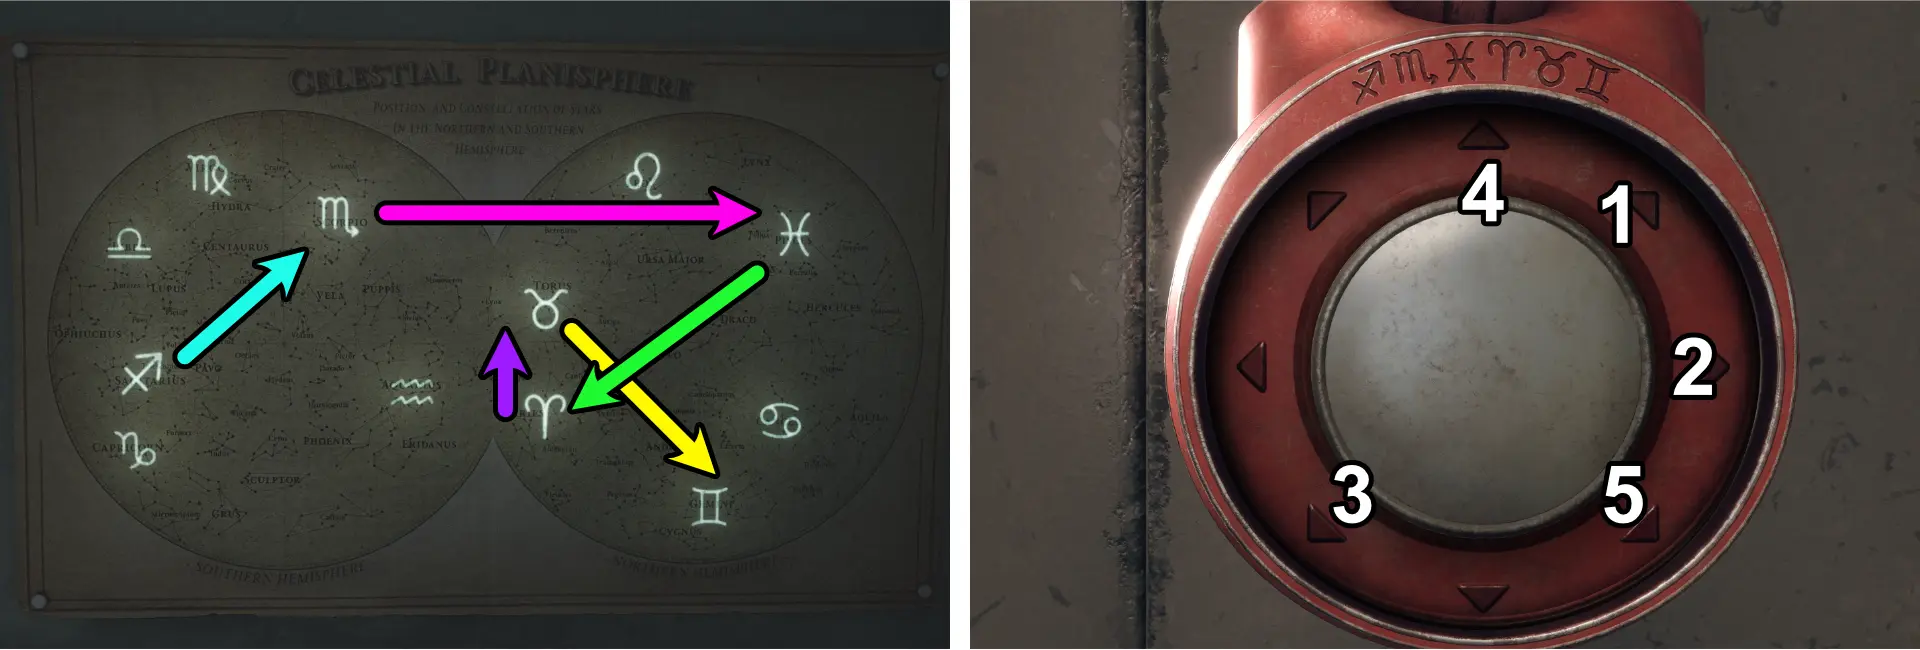
- North East
- East
- South West
- North
- South East
Upon opening the locker:
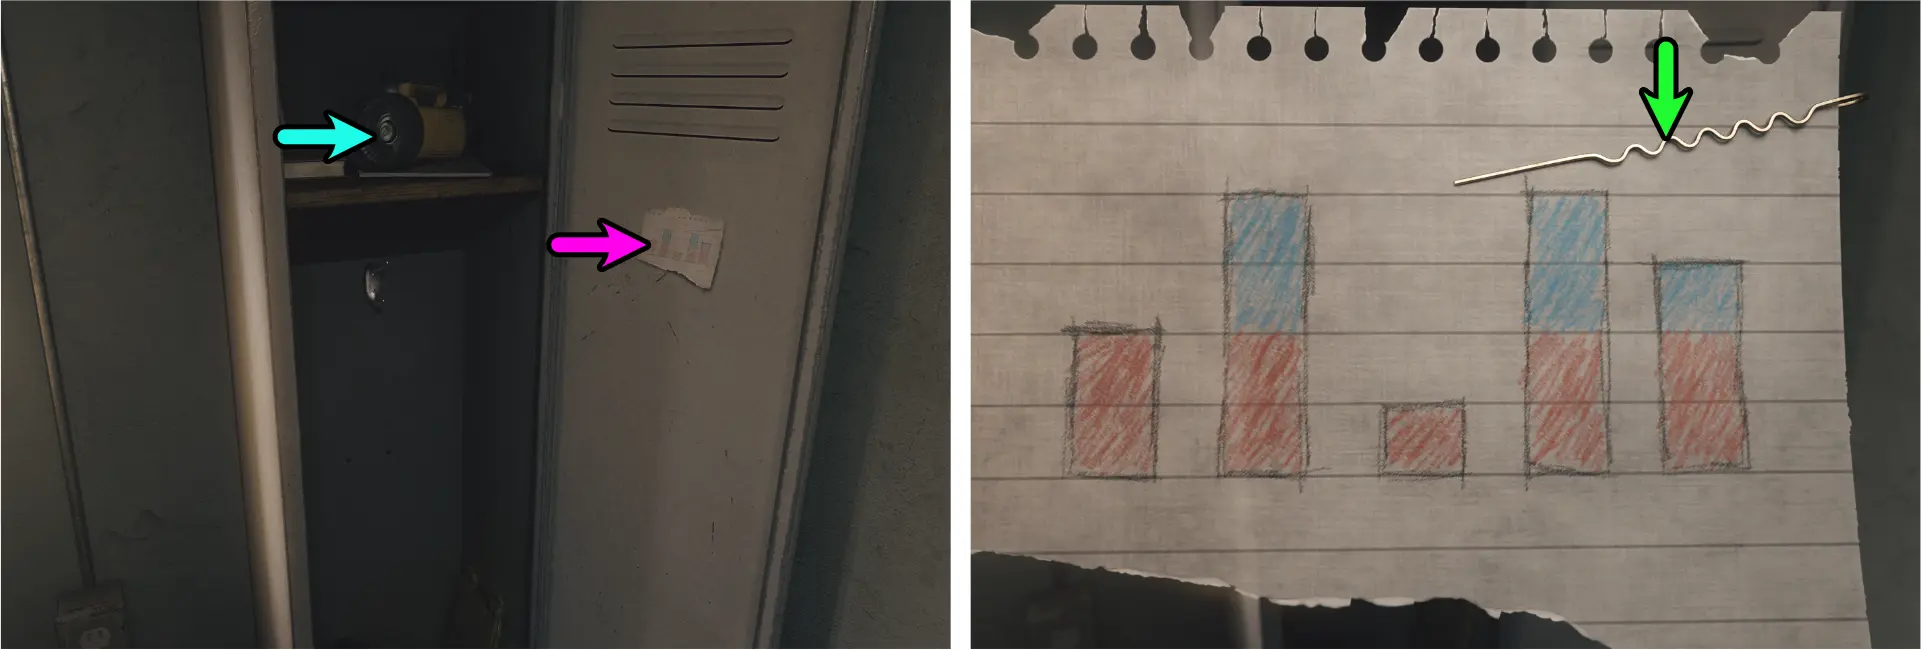
- Take the flashlight at the top shelf.
- Investigate the piece of paper at the back of the locker’s door and take a picture of it for reference.
- Take the Hairpin from the piece of paper.
Unlocking the Basement
The door to the Basement can be found at the middle of the office, next to a desk. If you try to open it, it won’t budge because of a piece lodged inside the keyhole.
- Approach the desk directly to the left of the basement door.
- Open the red pouch on the desk.
- Take the Tweezers.
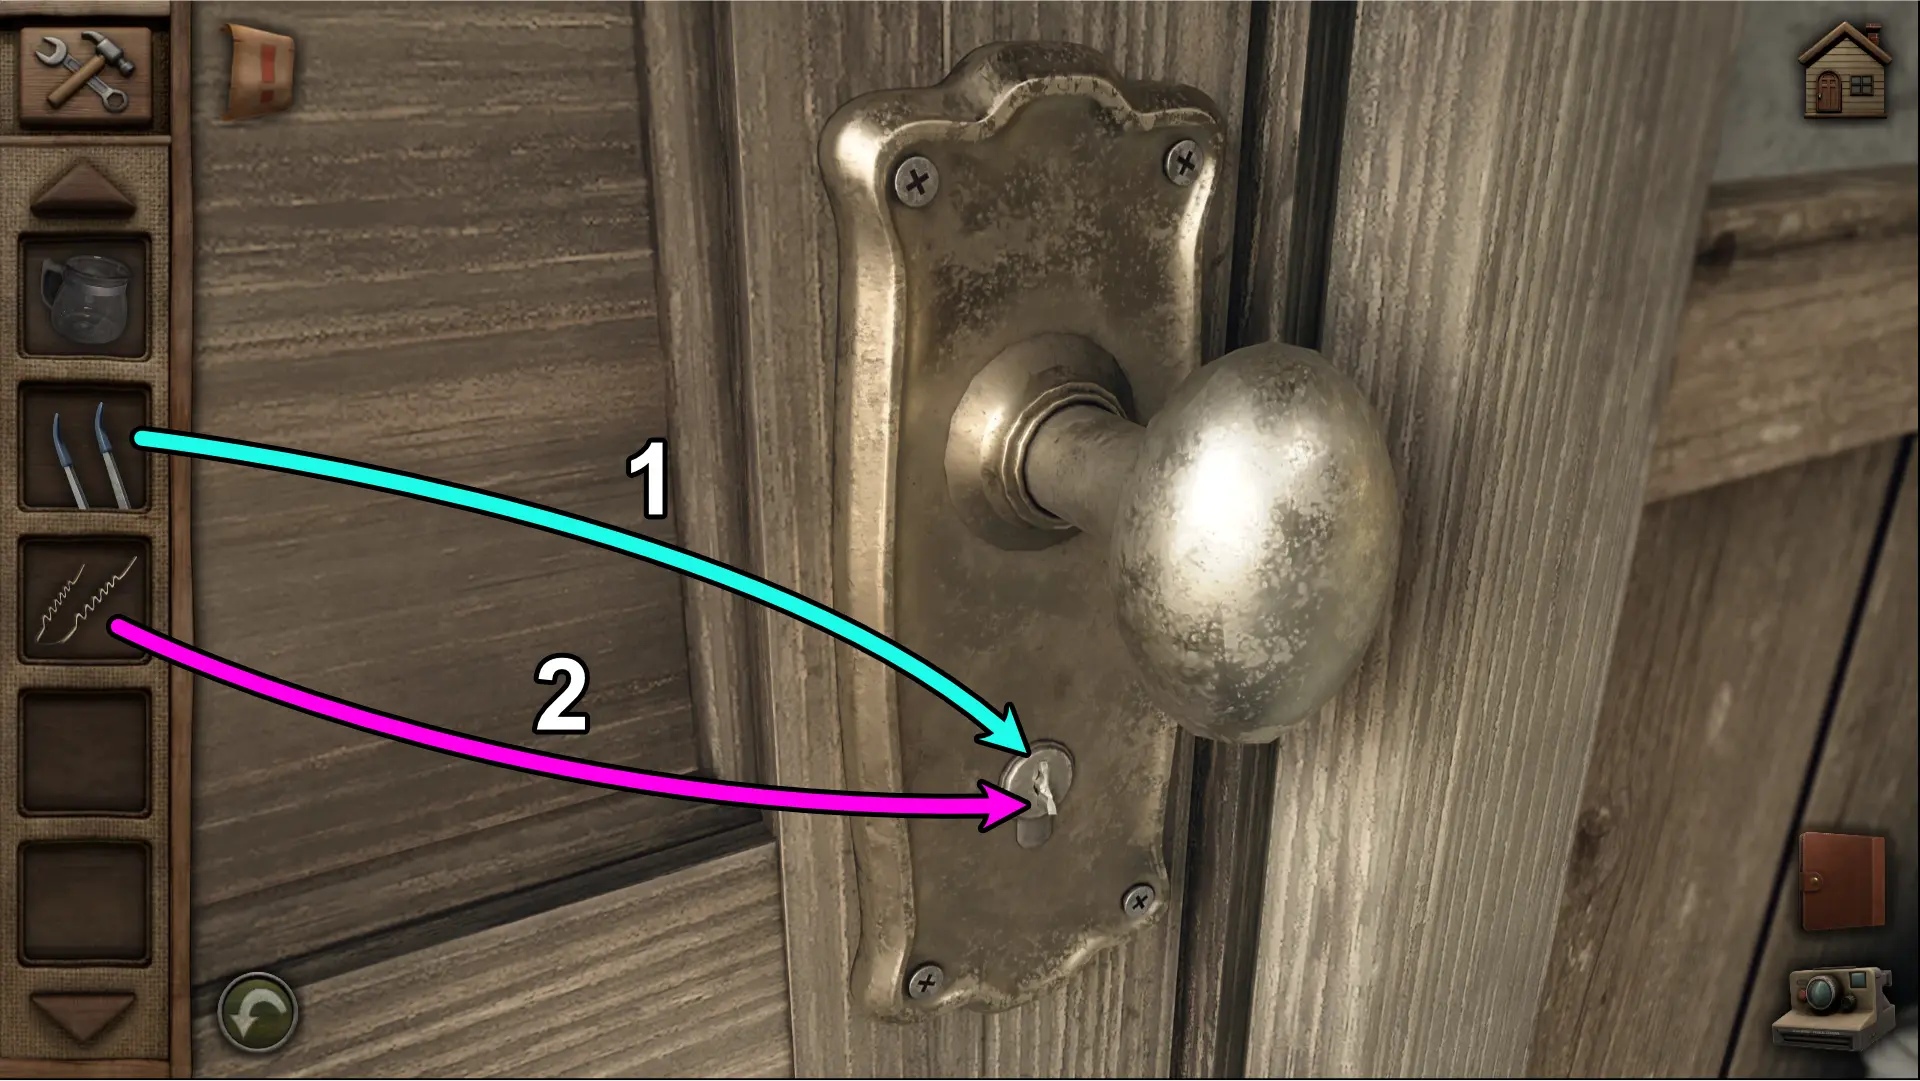
- Use the Tweezers to get rid of the piece inside the keyhole.
- Use the Hairpin you found in Jen’s locker to pick the lock.
- Copy the pattern you saw in the piece of paper behind Jen’s locker’s door on the lock’s mechanism and the door should open.
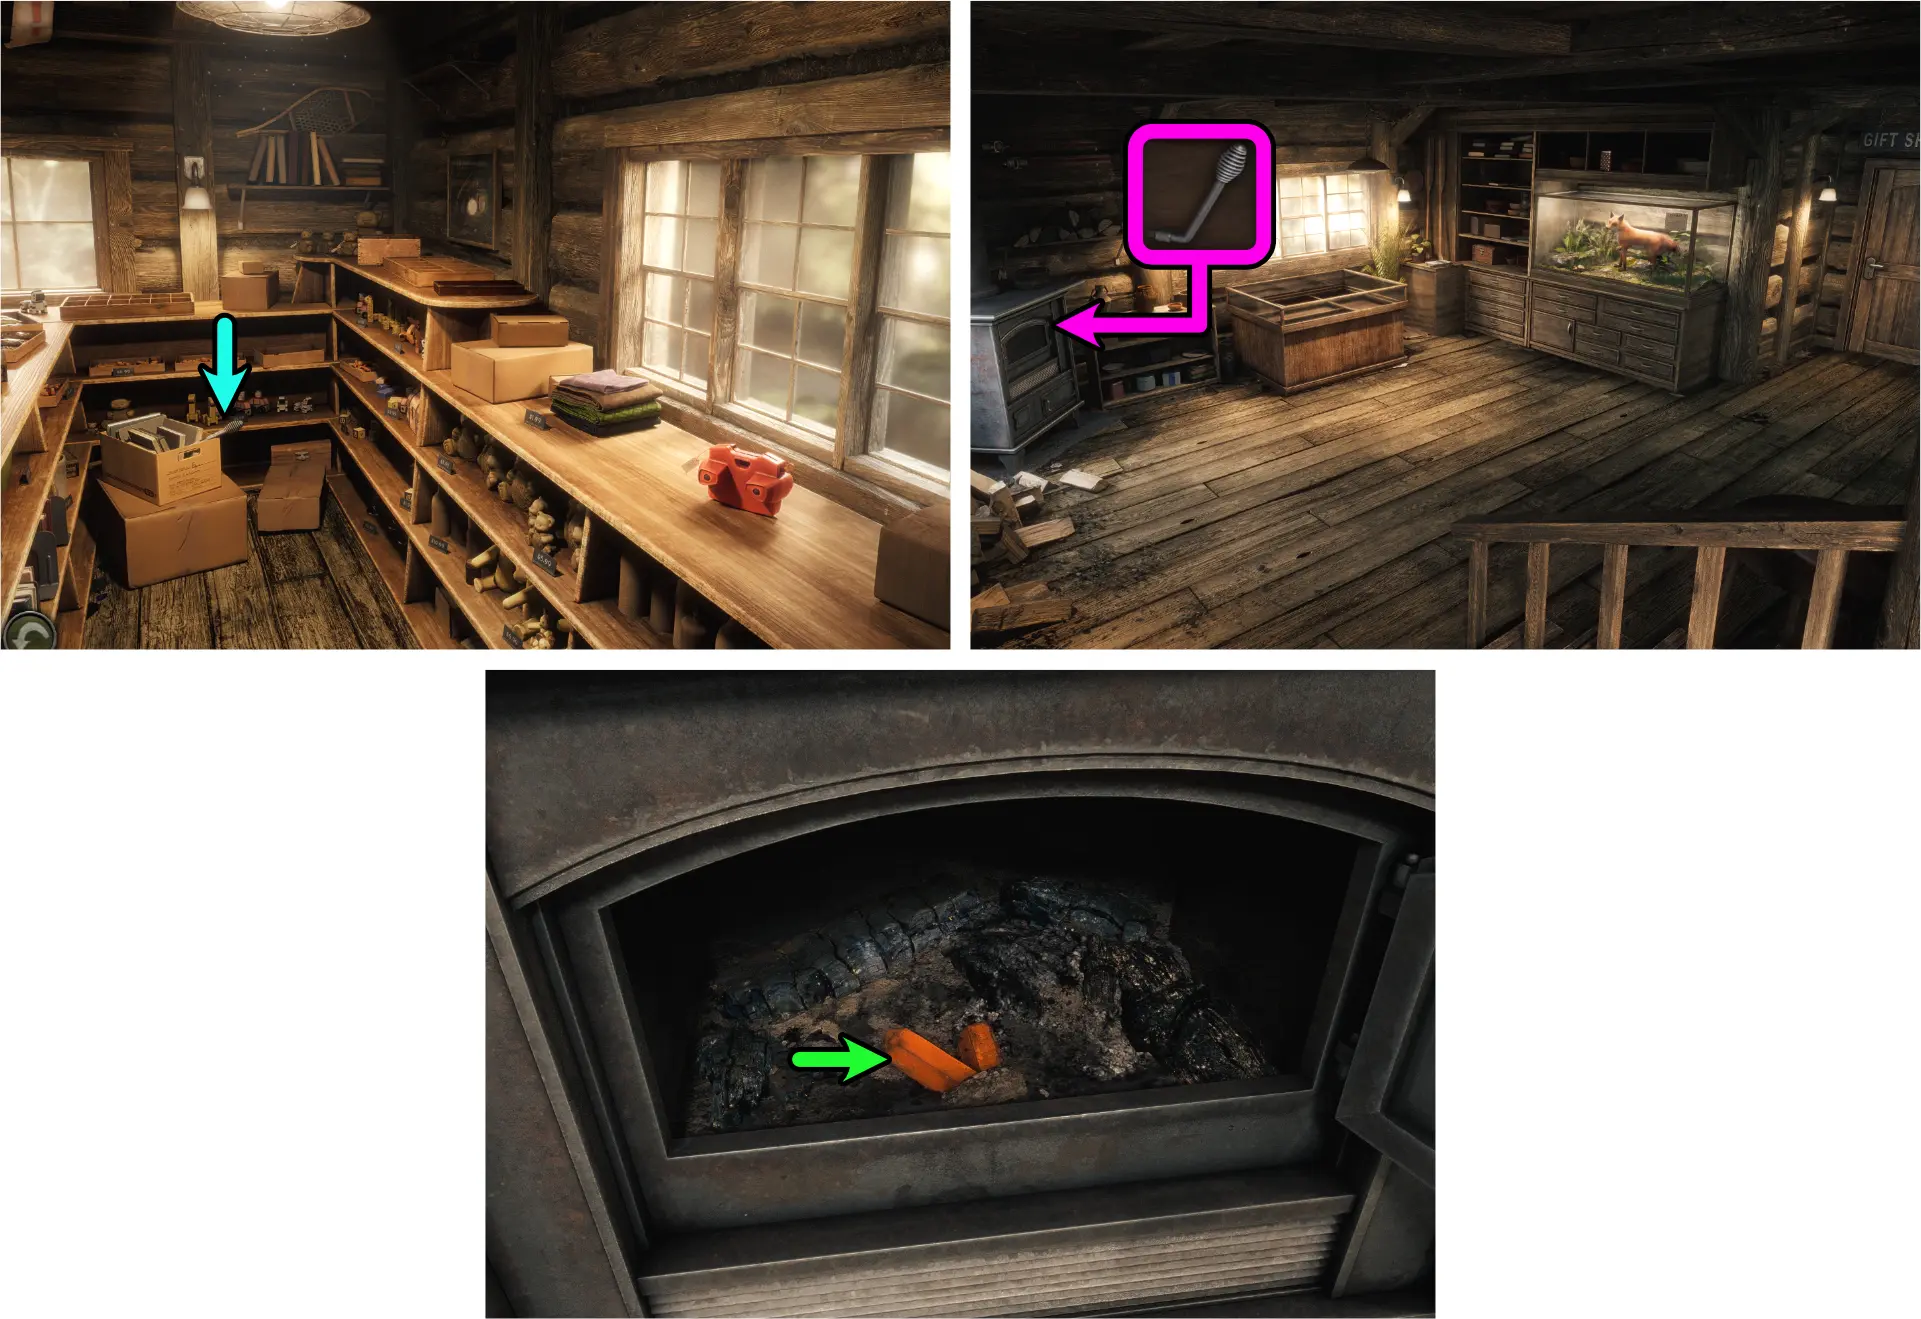
Fixing the Fuse Box
Upon entering the basement, you’ll see the fuse box to the right and a doorway to the stairs at the back.
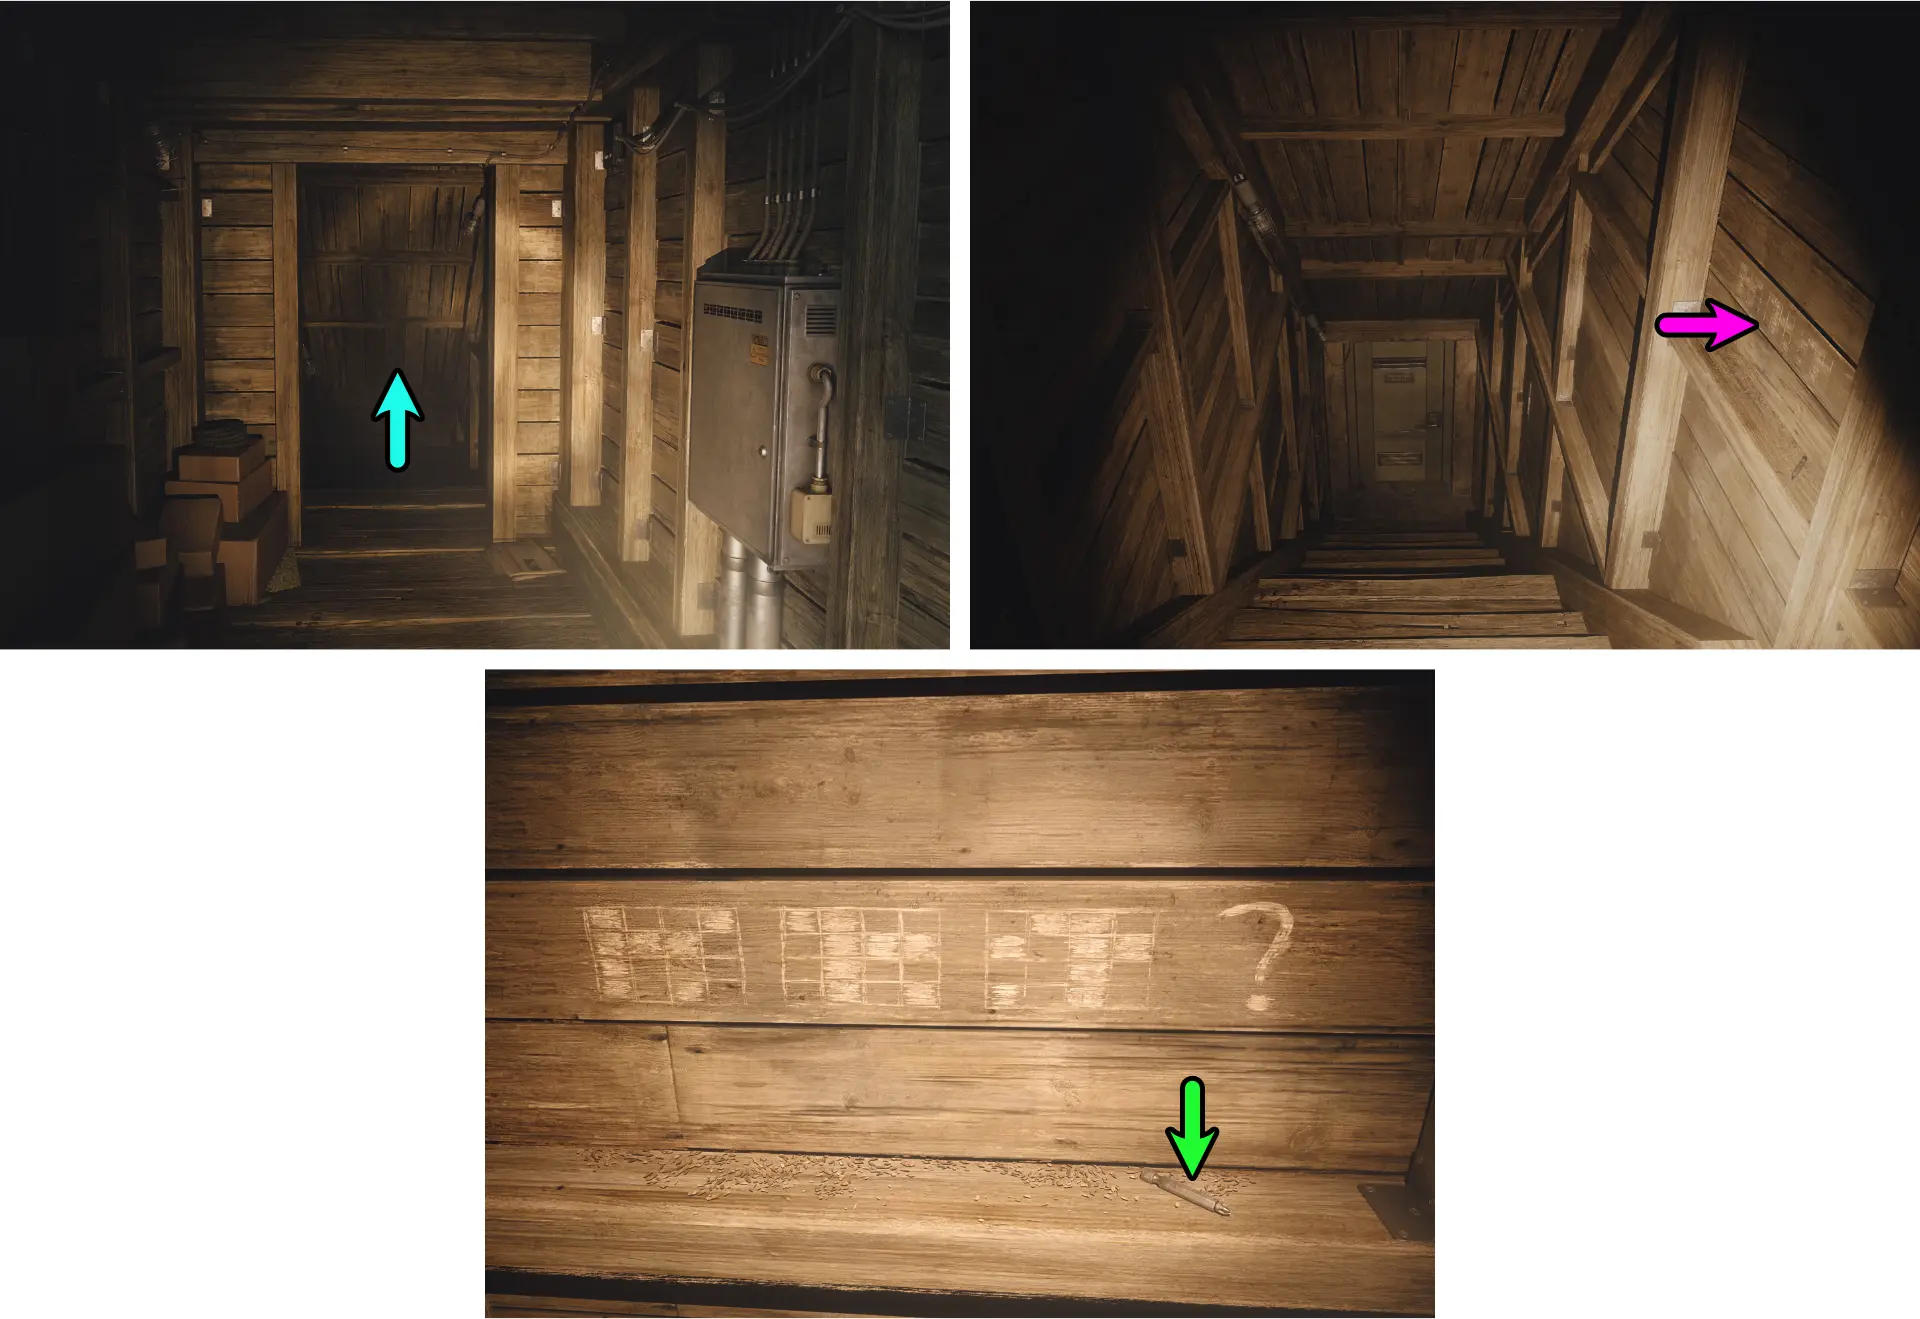
- Go through the doorway while using the Flashlight.
- Investigate the scratches on the wall to the right.
- Take a picture of the drawings on the wall.
- Take the Screwdriver Piece.

- Leave the basement and investigate the desk next to the basement’s door.
- Take a closer look at the middle drawer.
The middle drawer has a lock that consists of a 4×4 grid of rectangular buttons similar to the drawings on the basement wall. The three illustrations show a sequence where the highlighted rectangles are shifted to the left. The answer to this puzzle is the 4th sequence to the illustration. The answer should look like the image below:
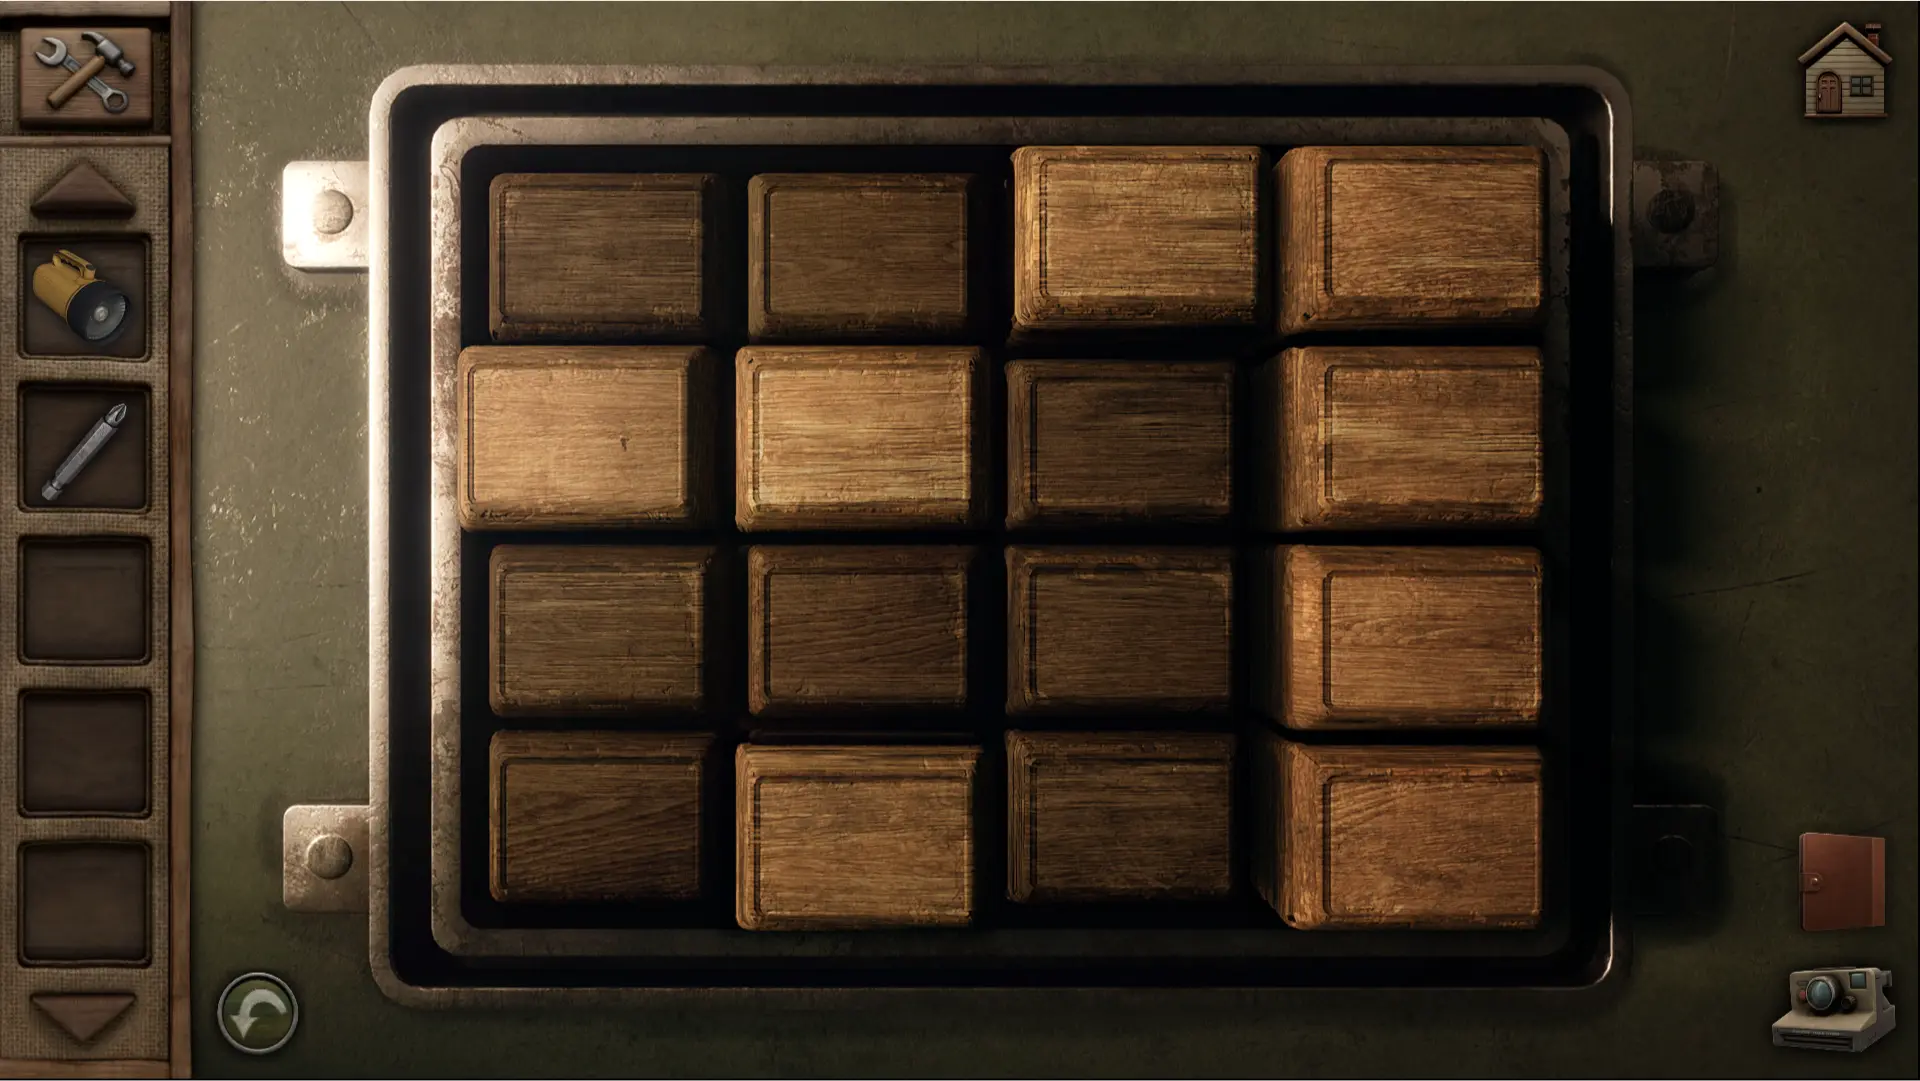
Once the drawer has been unlocked:
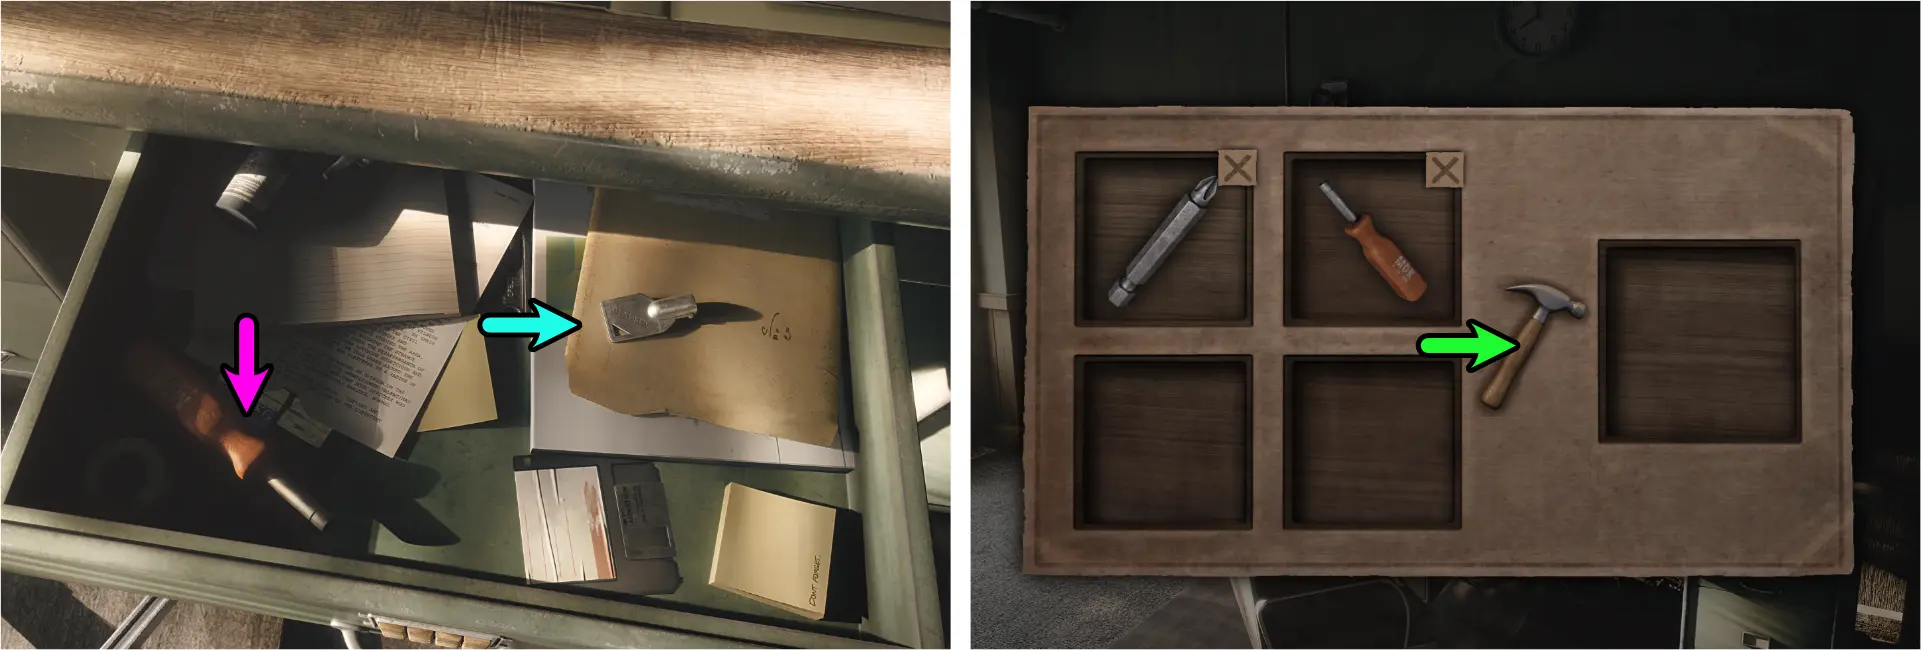
- Take the Special Key.
- Take the second Screwdriver Piece.
- Combine the two Screwdriver Pieces to get a Screwdriver.
- Leave the office and go outside.
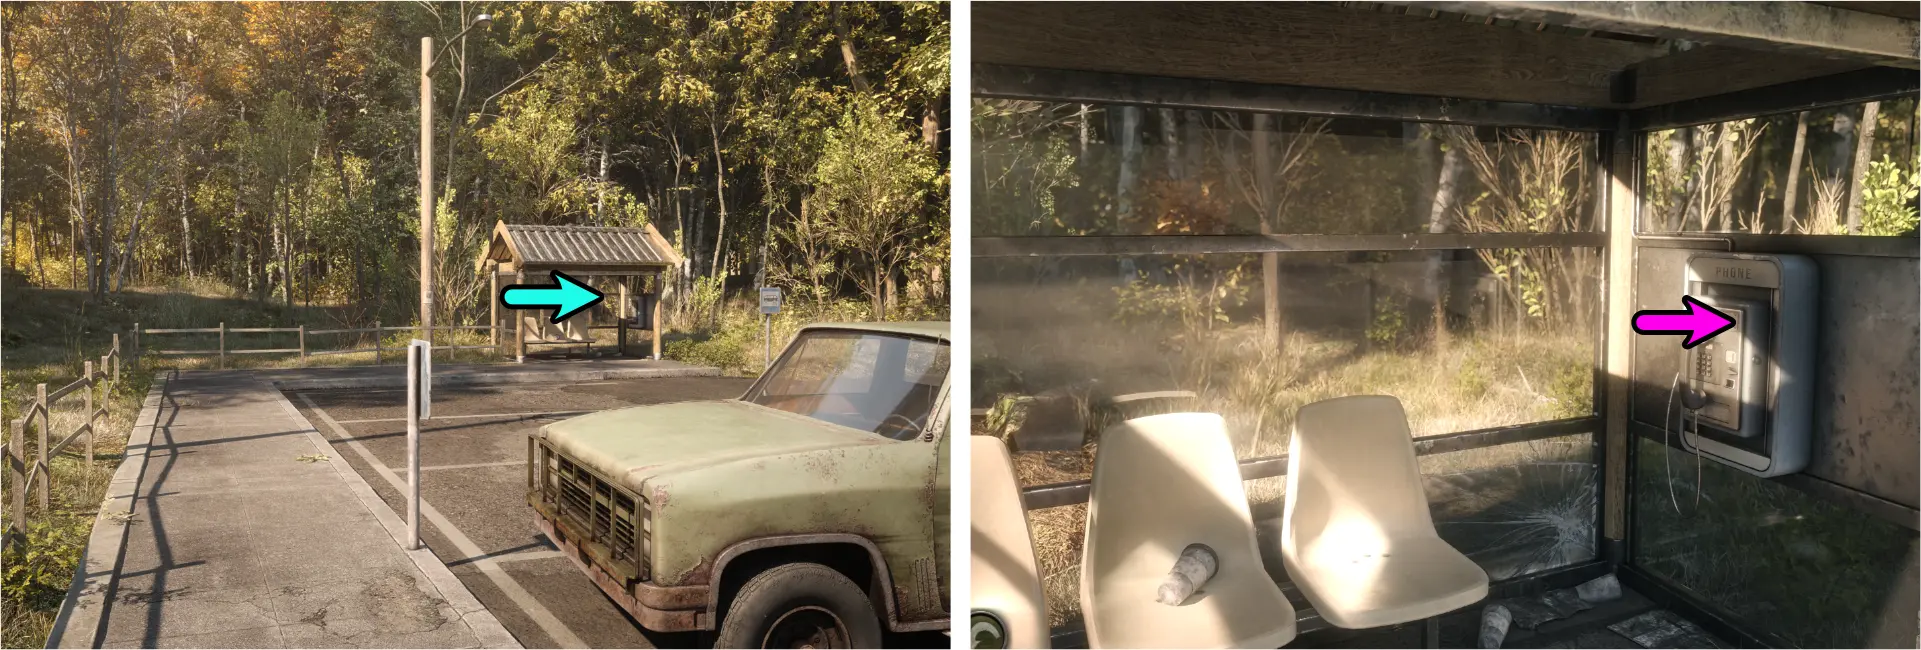
- Move to the area where the green truck is and keep moving forward until you get to the phone booth.
- Investigate the phone booth and use your Screwdriver to open the small hatch.
- Take the Four Amp Fuse.
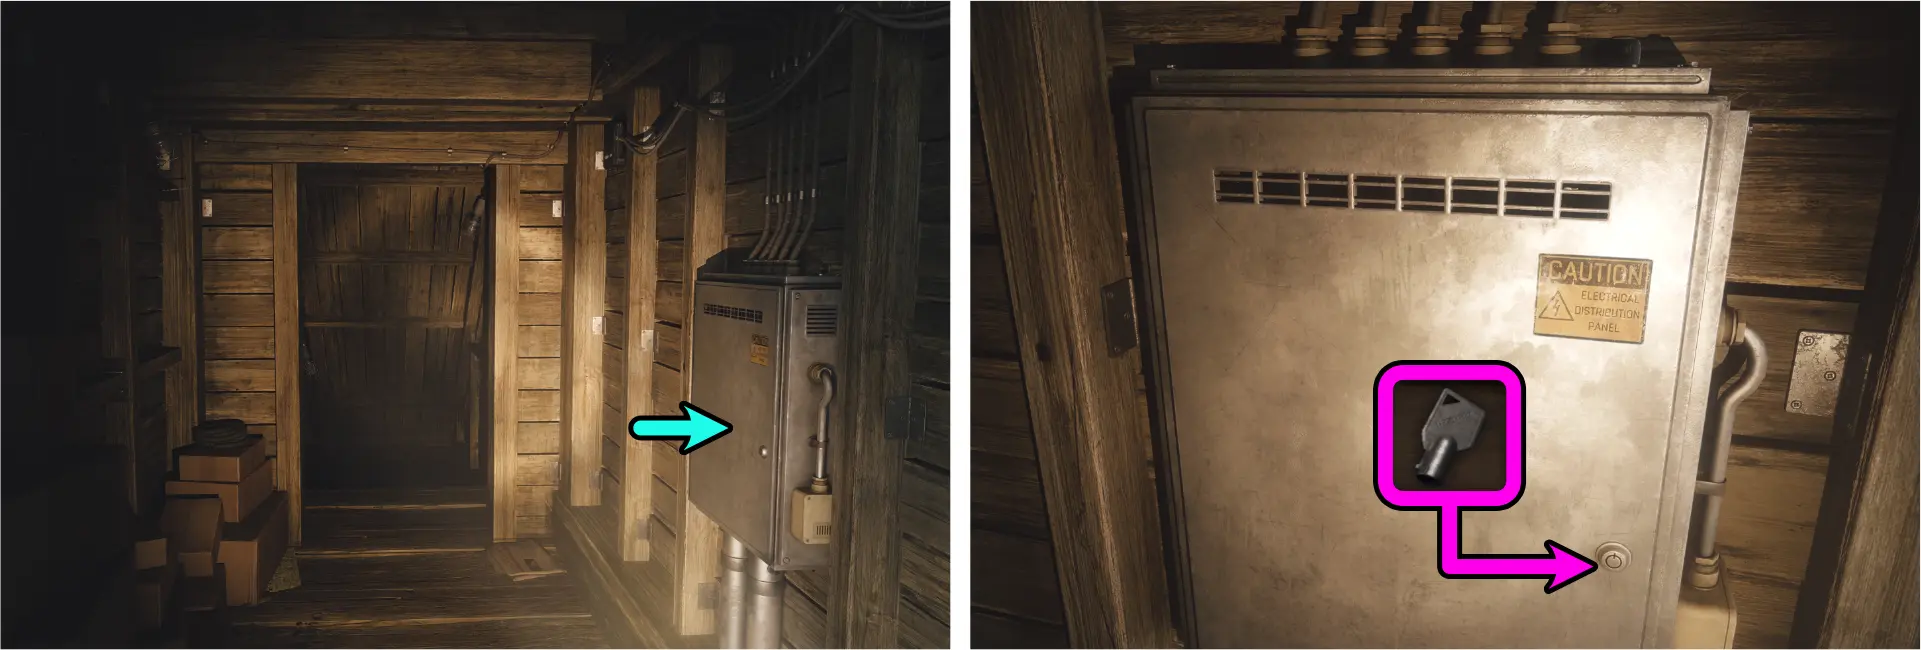
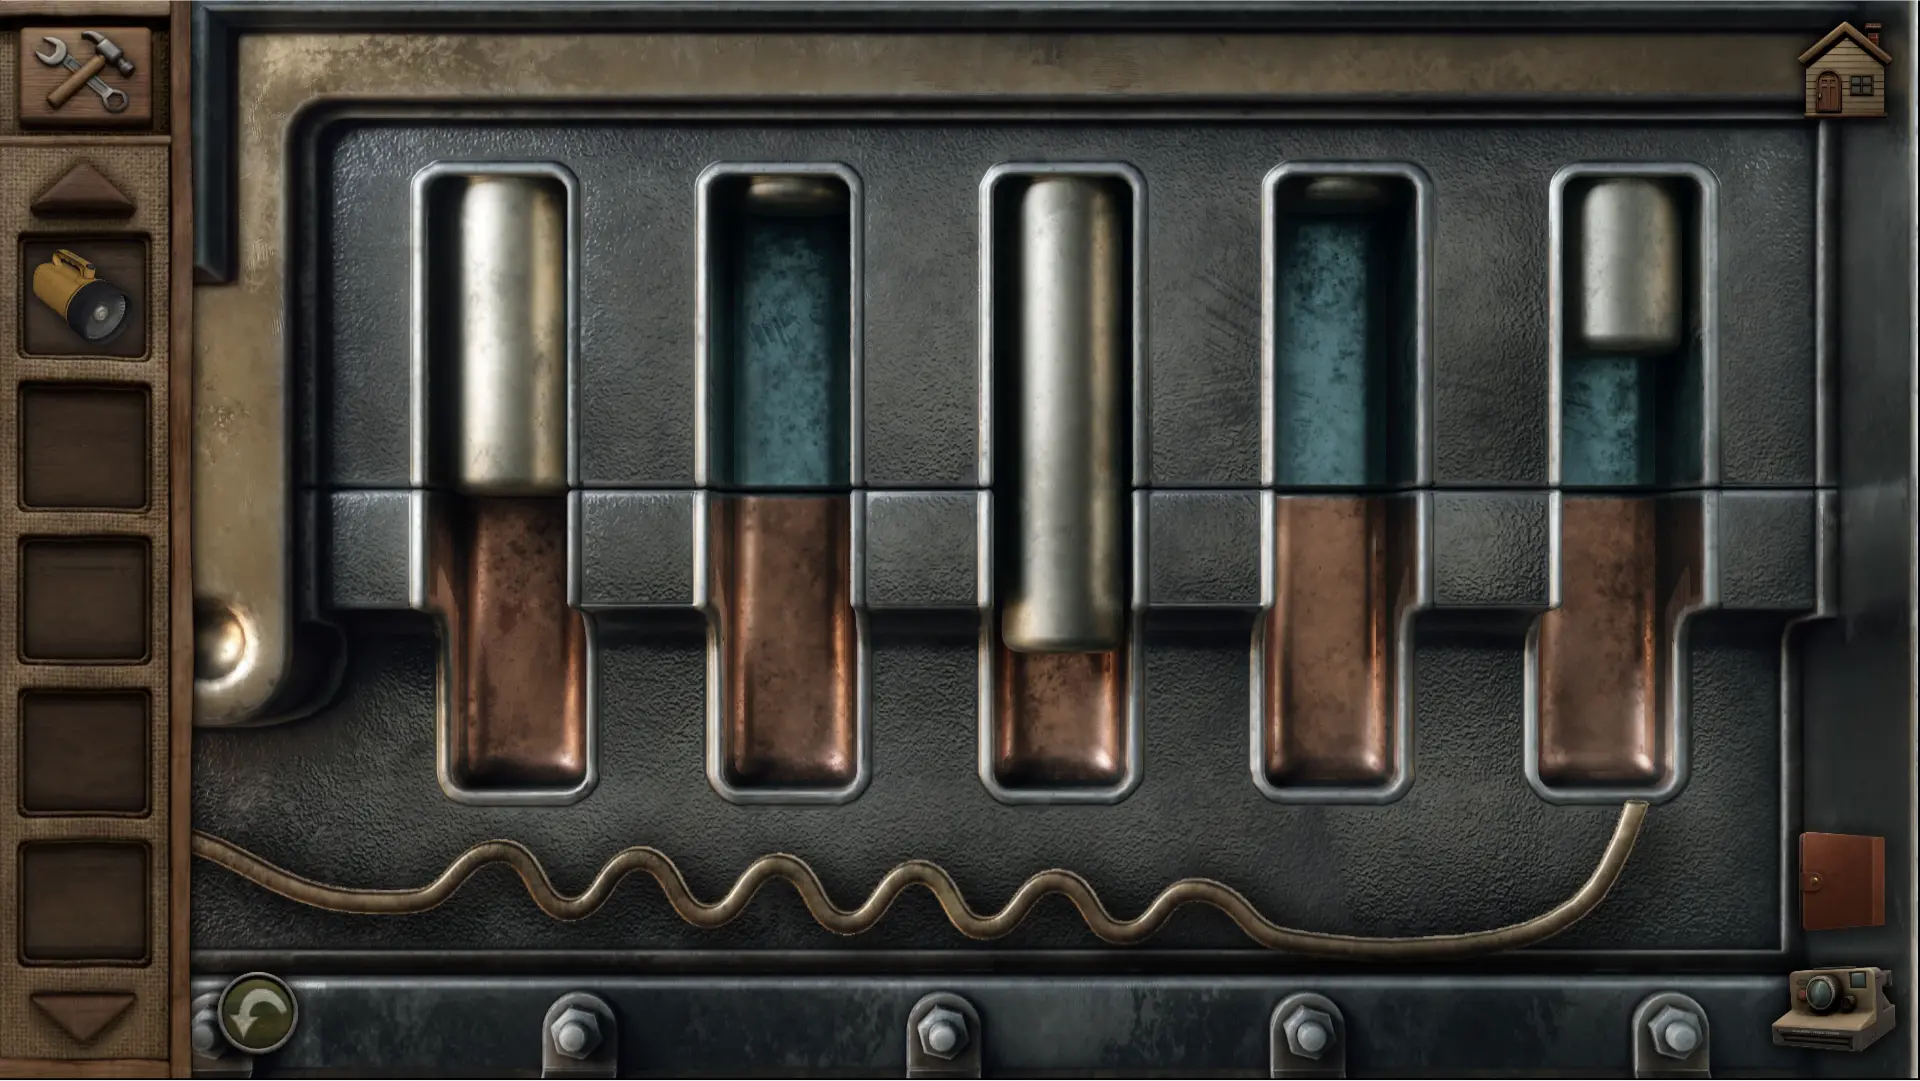
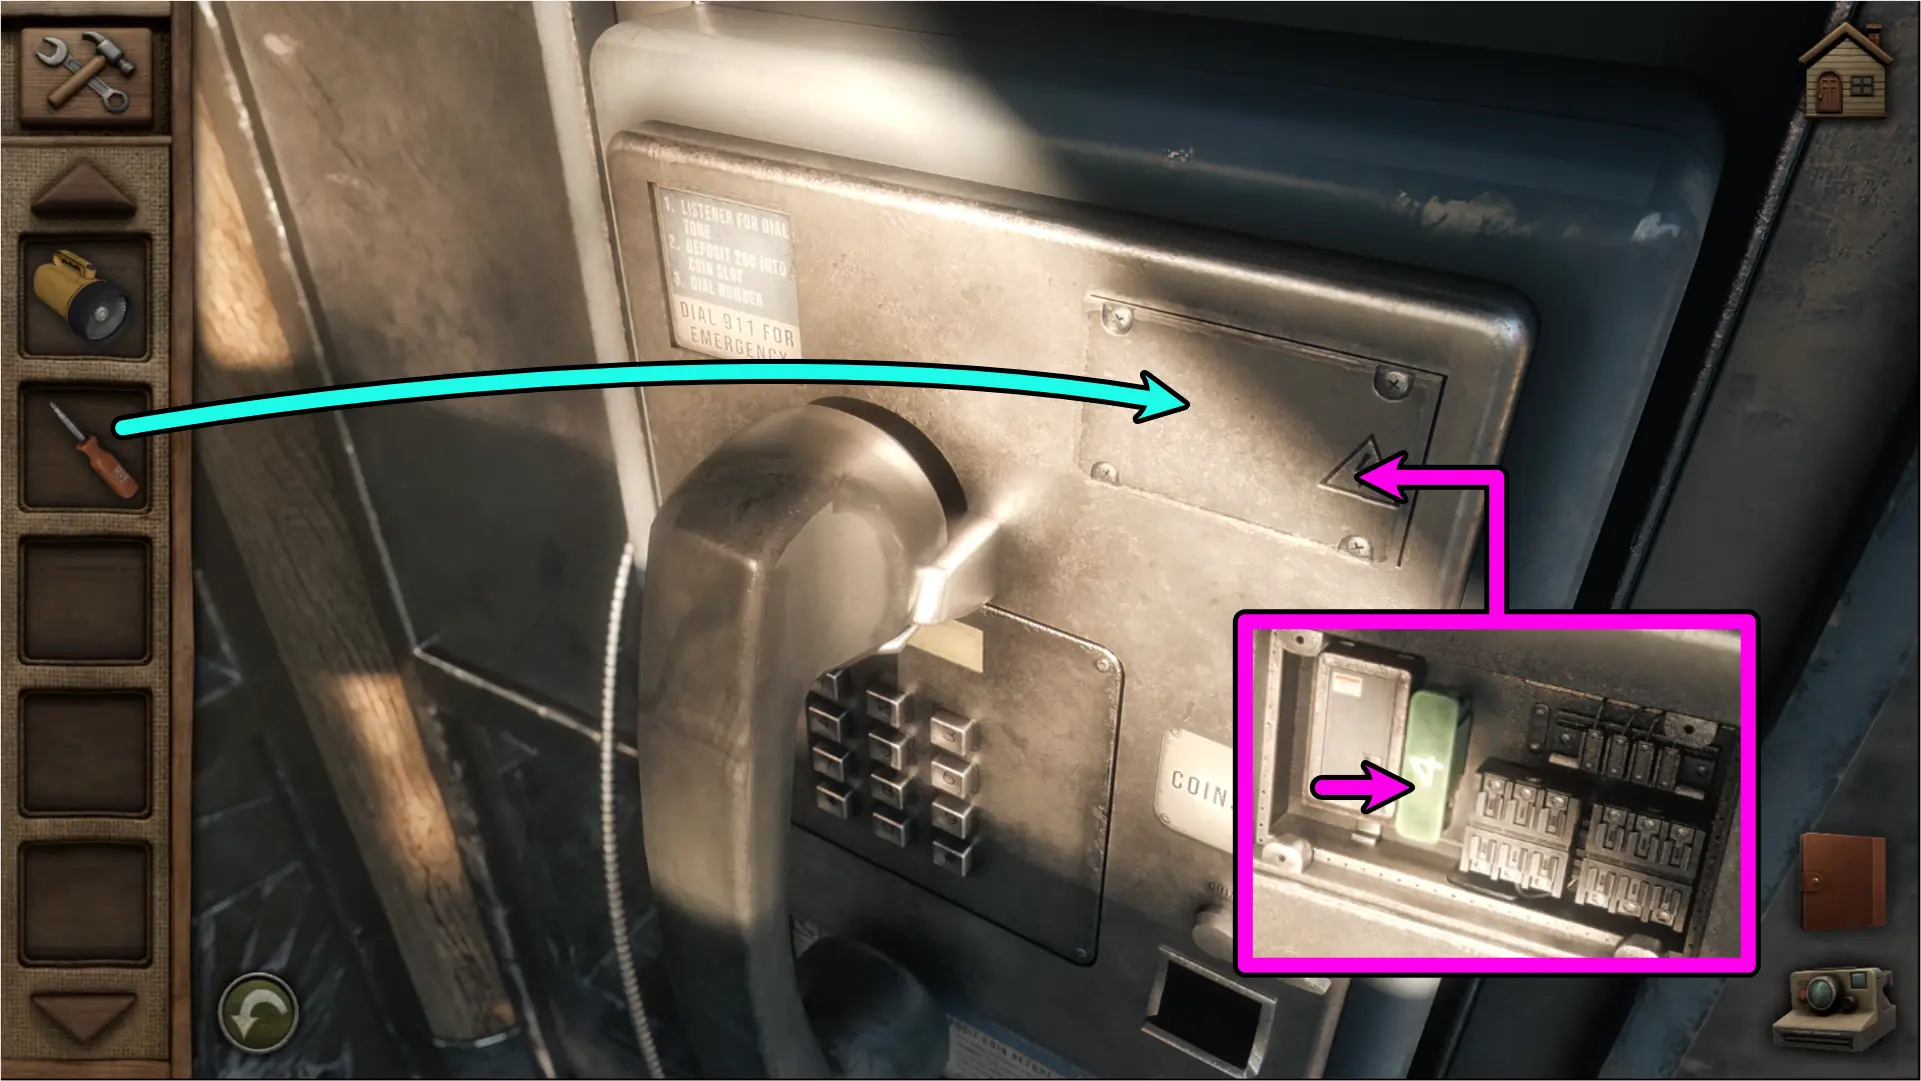
- Go back to the basement’s fuse box and open it with your Special Key.
- Replace the blown fuse with your Four Amp Fuse.
To solve the fuse box puzzle, you’ll need to arrange the Amp Fuses so that the sum of their power is equal to the green bar shown at the meters to the right. The first meter should be equal to 2, the second should be equal to 3, and the third should be equal to five. The answer should look like the image below:
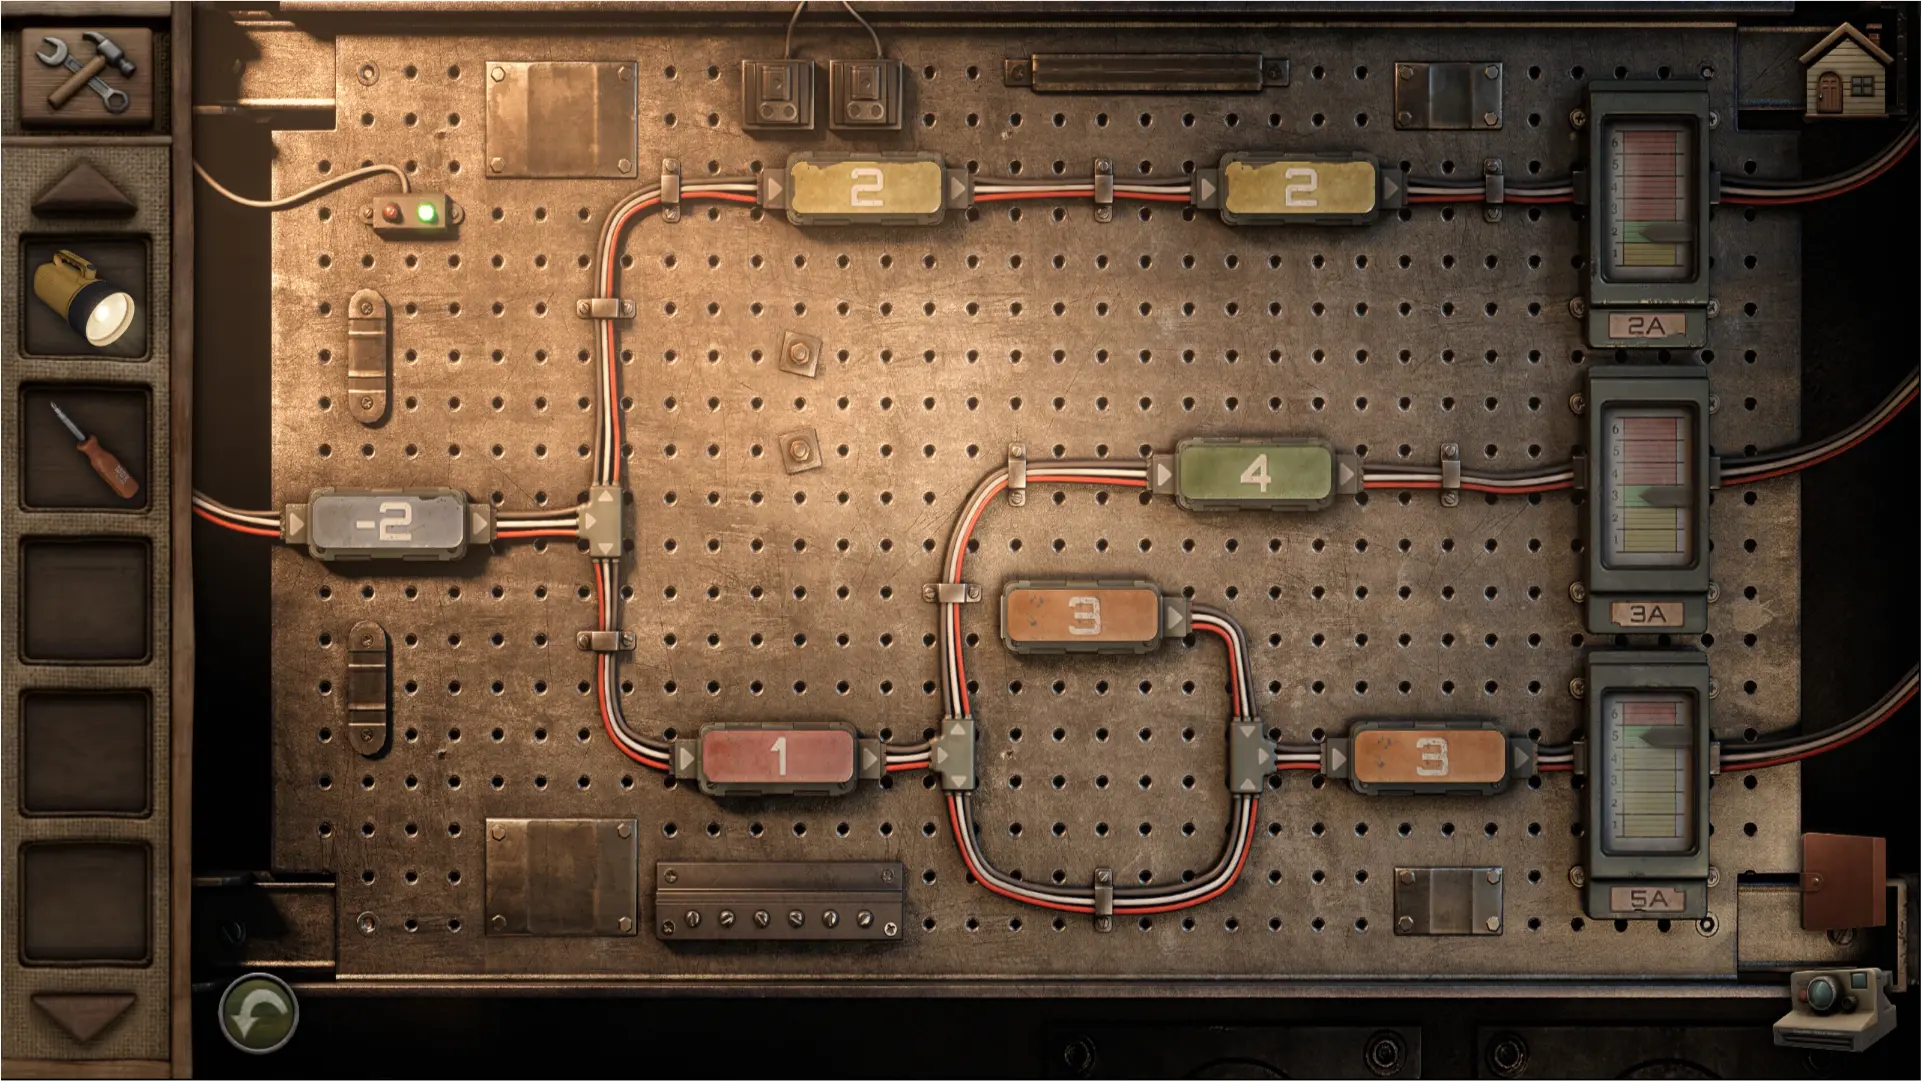
Upon solving the puzzle, the power should come back to the office.
Getting the Keys to the Ranger Truck
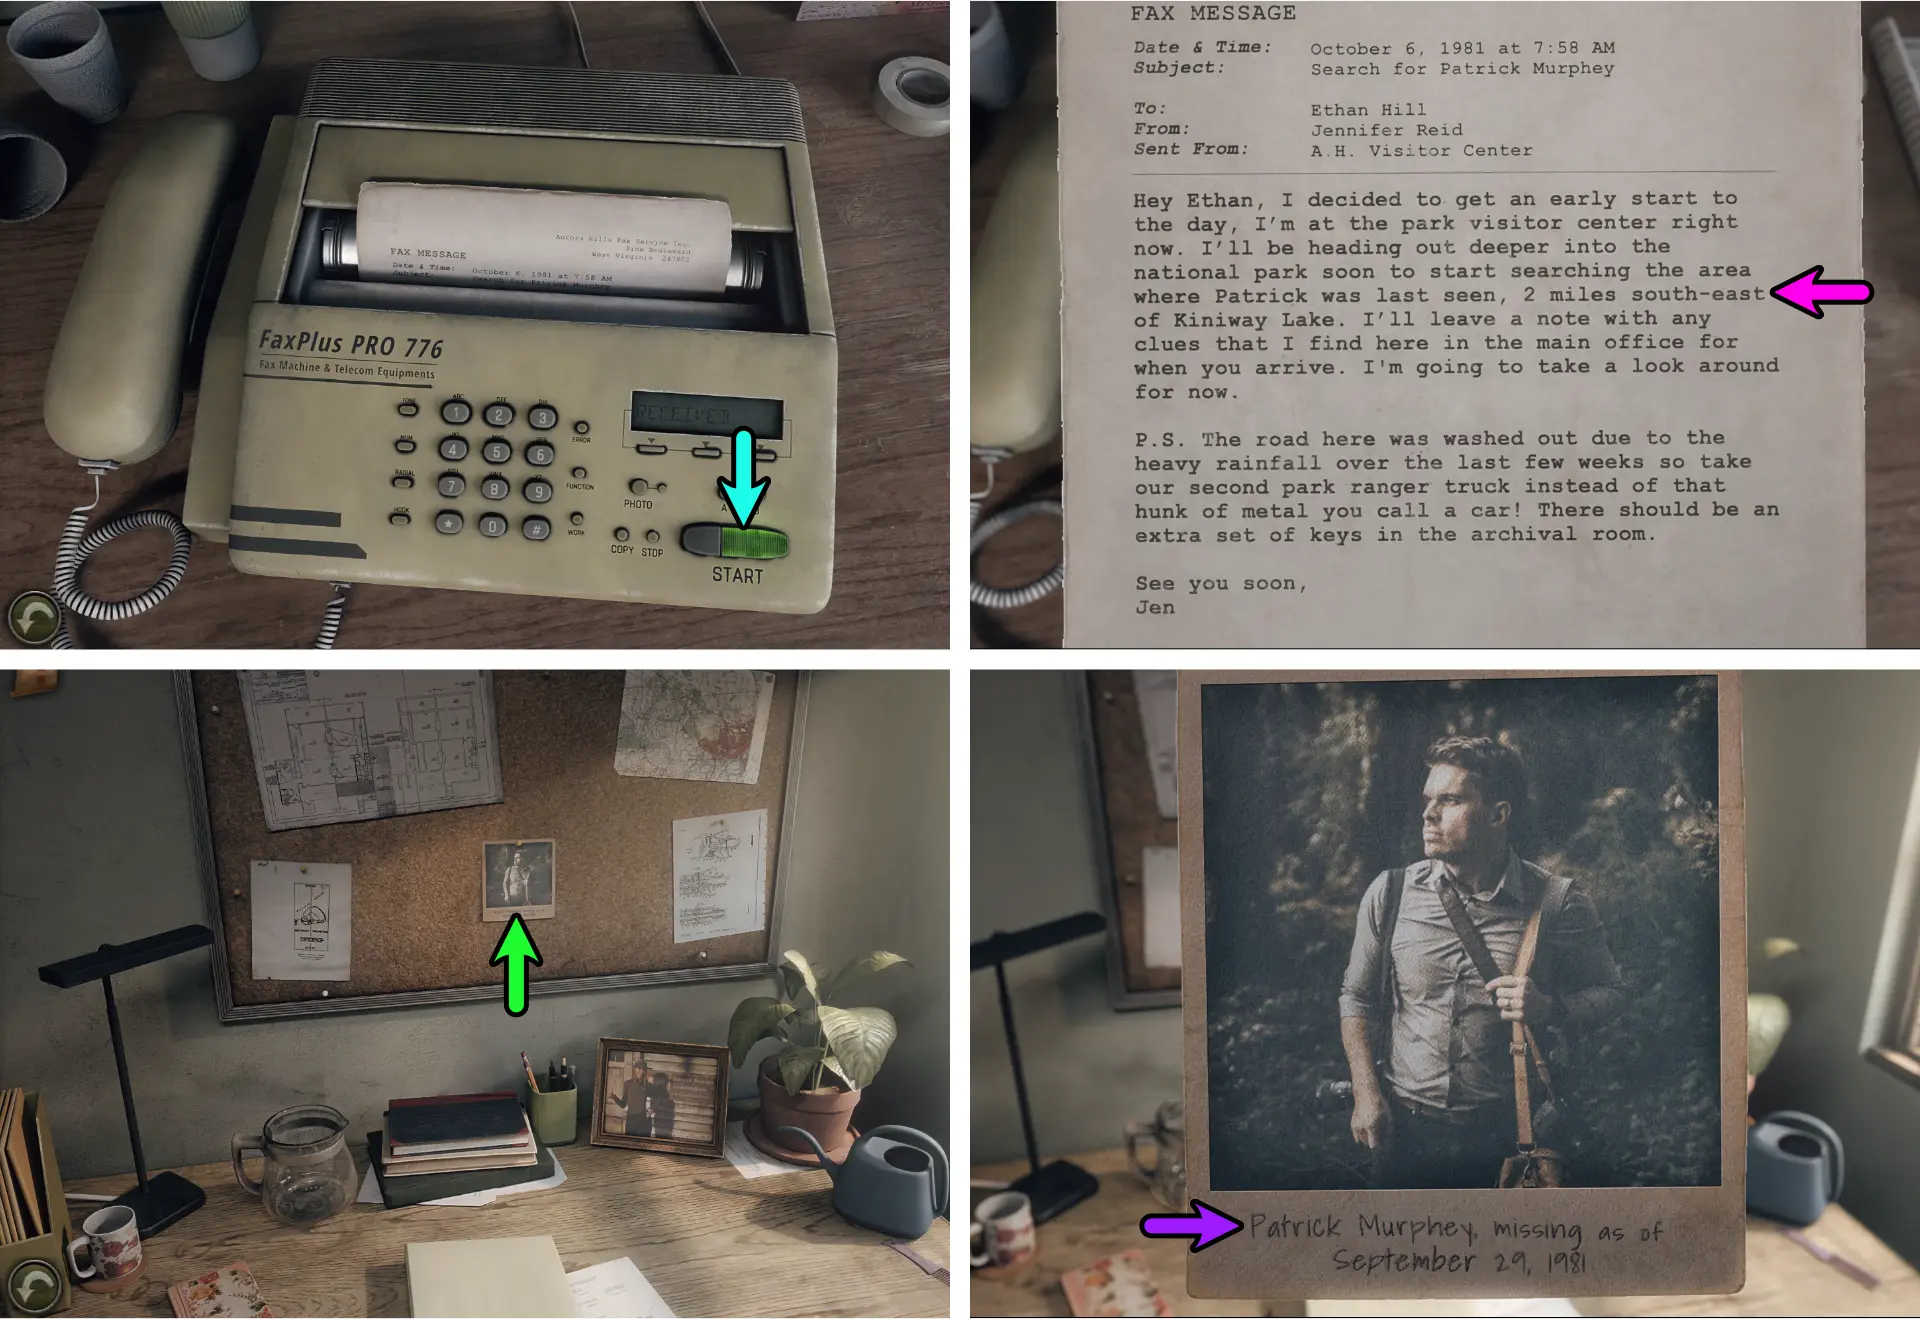
Go back to the room to the right and check the fax machine. You’ll see a message from Ethan’s partner, Jen. She tells you that she’ll be going further into the park to investigate the location where Patrick Murphy was last seen. She also tells you to take the extra set of keys for the second ranger truck in the Archival Room.
Unlocking the Archival Room
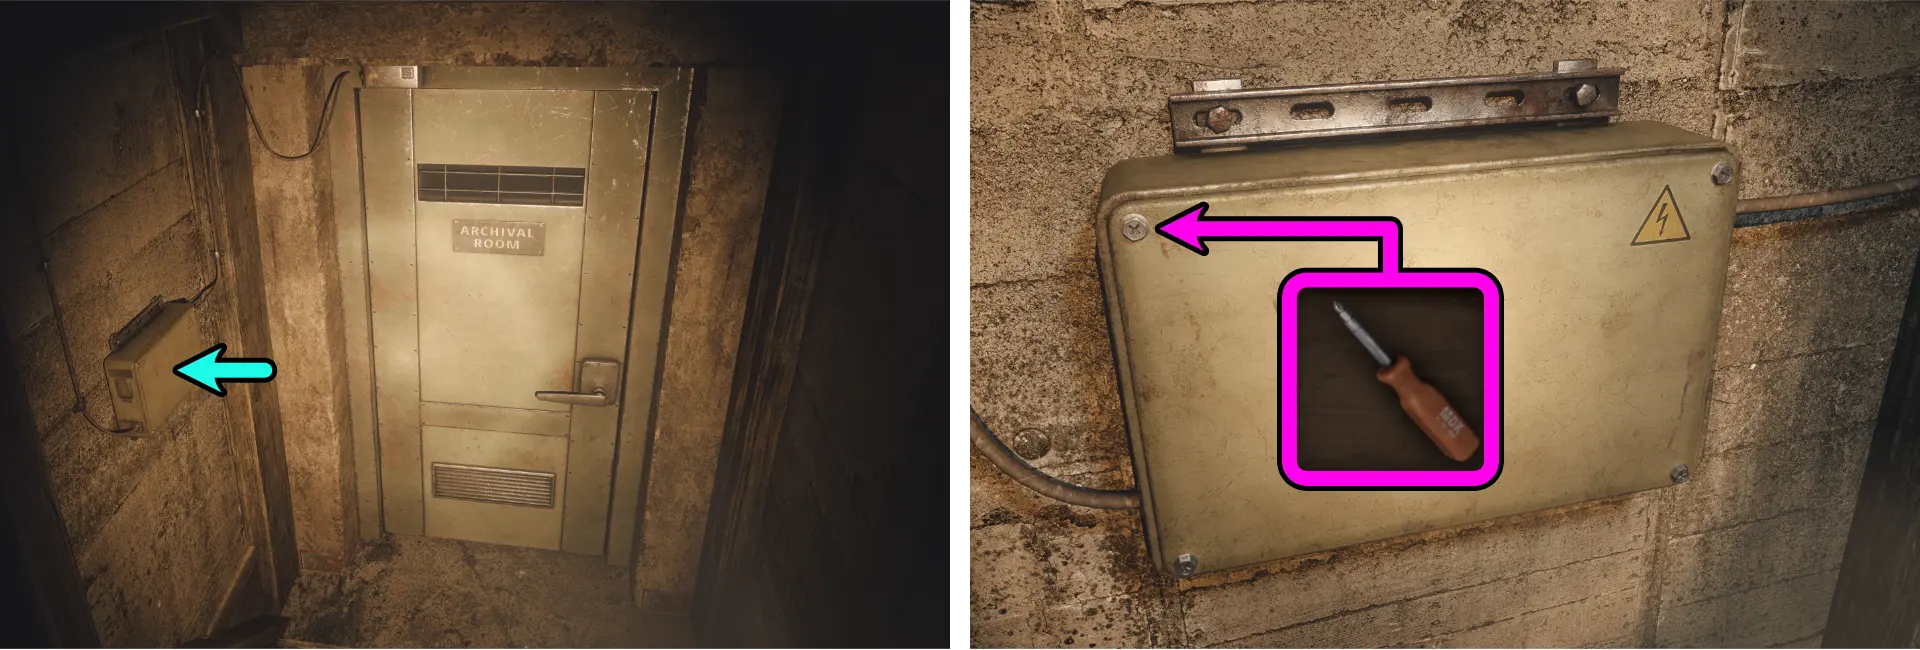
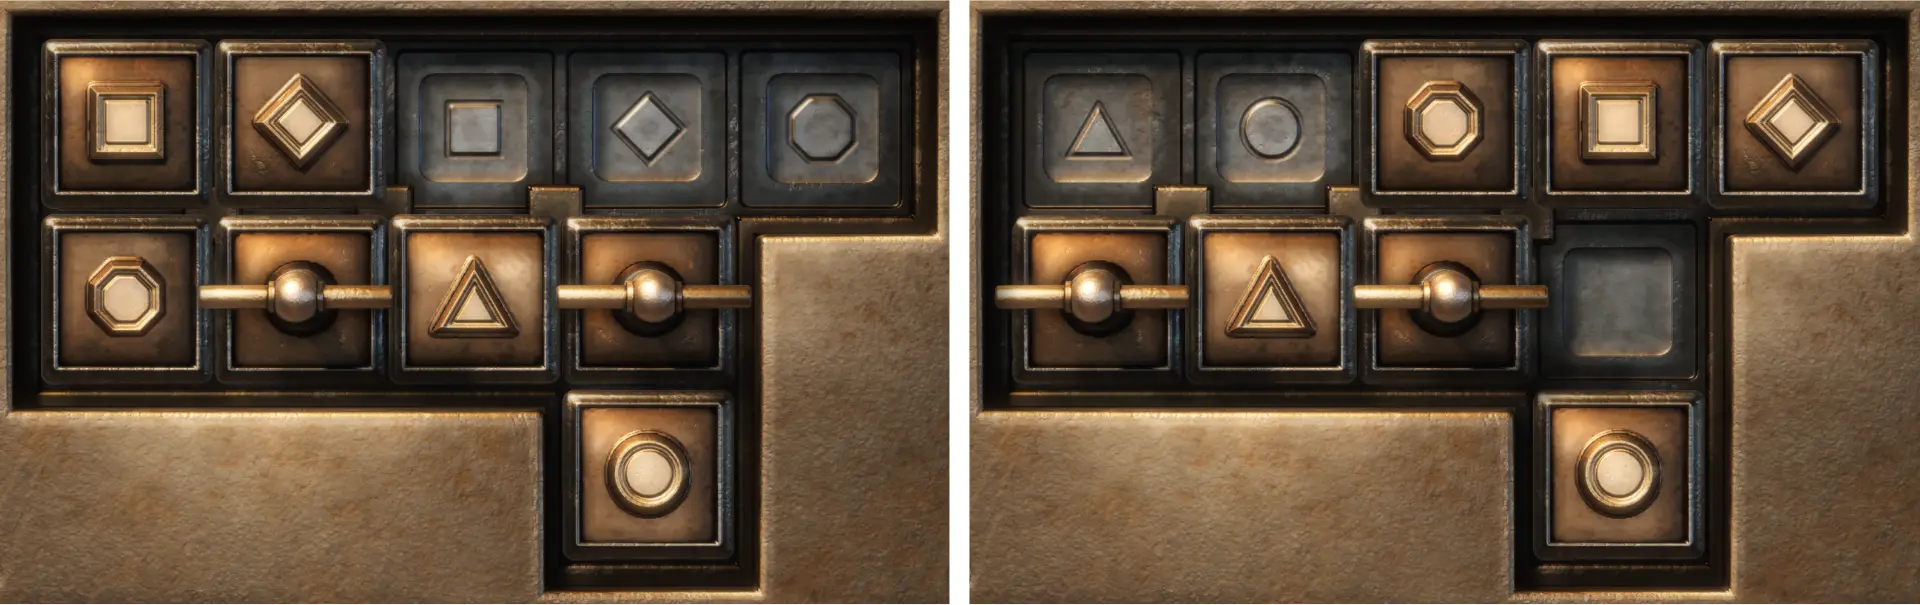
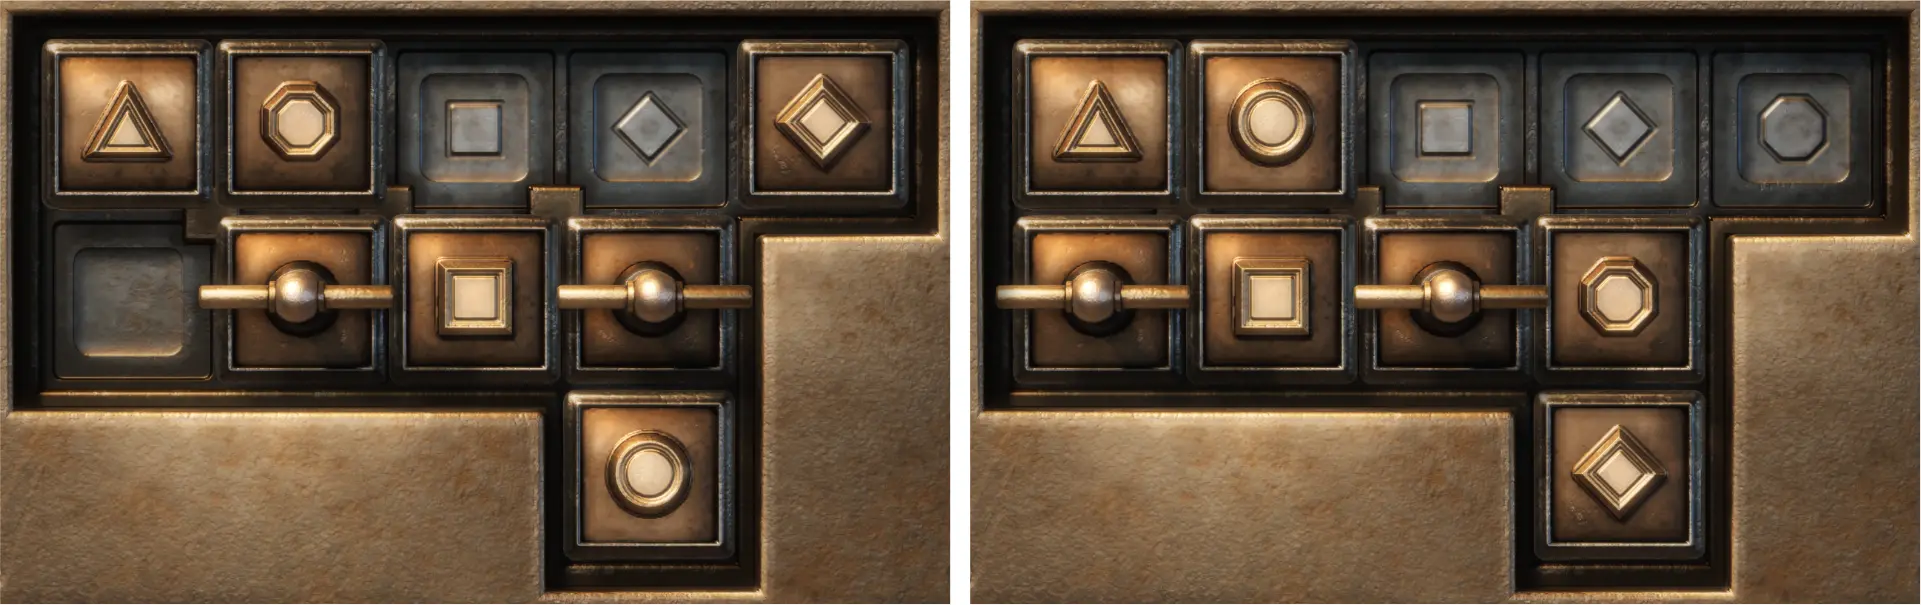
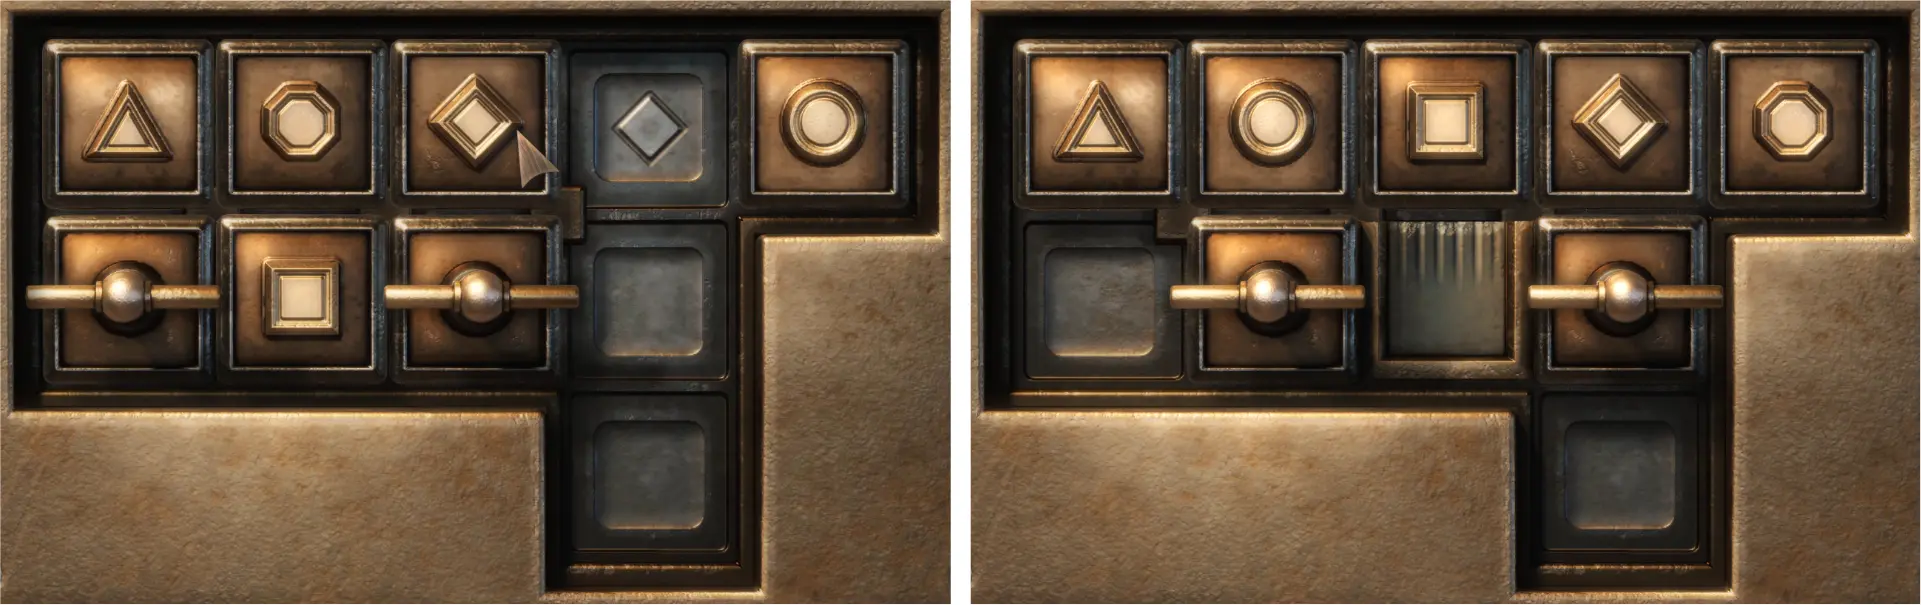
The Archival Room can be found in the basement. The room is locked and must be opened by fixing the electronic lock by opening the box next to the door. Use the Screwdriver to open the fuse box.
To solve the electronic lock puzzle, You’ll need to move the knobs at the top, middle, and bottom that can connect two tubes together. The answer should look like the image below:
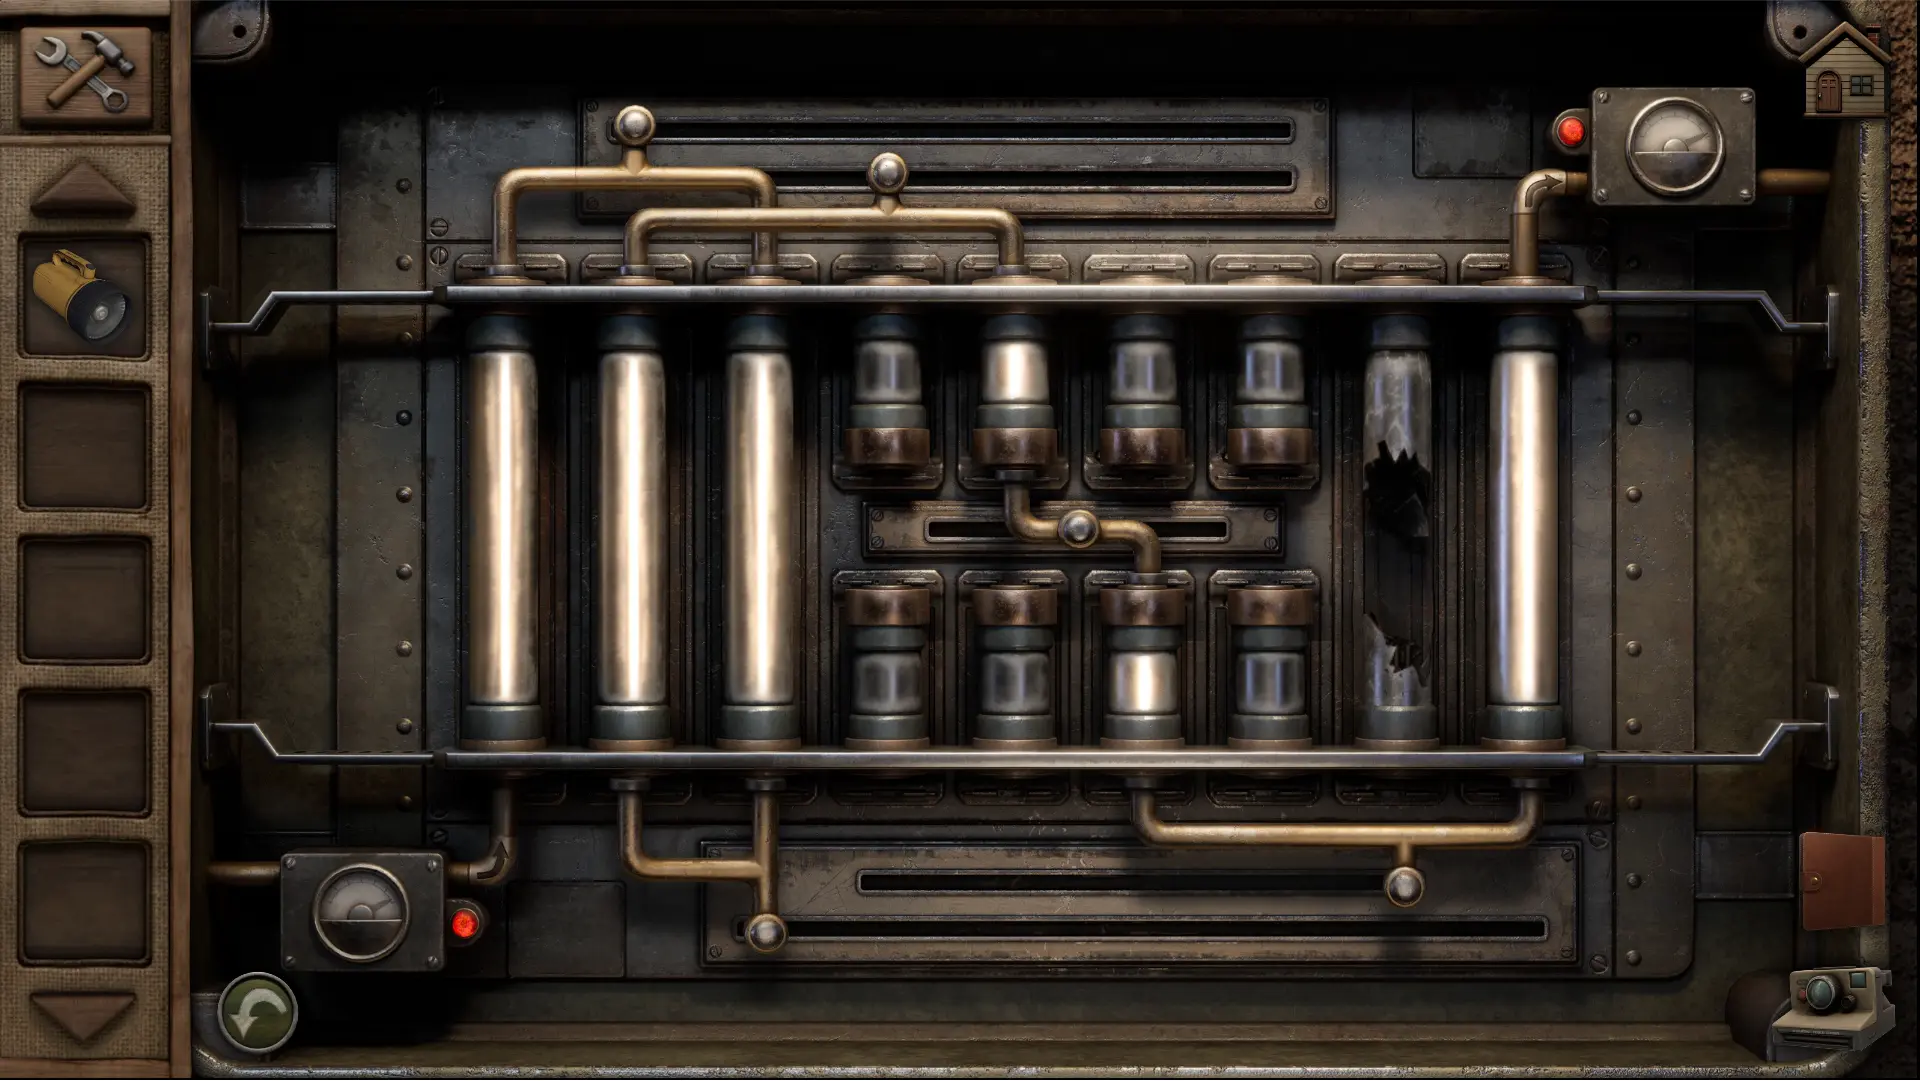
Upon solving the puzzle, the Archival Room should open.
Unlocking the Safe
Once inside the Archival Room, you’ll see a board to the left which has pictures of 6 missing people. You’ll need to arrange them in the correct positions in order to get the clue to open the small safe box on the desk to the right. The safe contains the key for the second ranger truck.
Finding the Last Seen Locations of the Victims
To find more information about the victims, you’ll need to look around the office for their files or posters.
Patrick Murphey – Information about his last whereabouts can be found in Jen’s fax message, which is at the right desk in the right room. You’ll need to press the start button to print out the full fax message. His last seen location is “2 miles southeast of Kiniway Lake.” As for his picture, you can find it on the corkboard of Jen’s office.
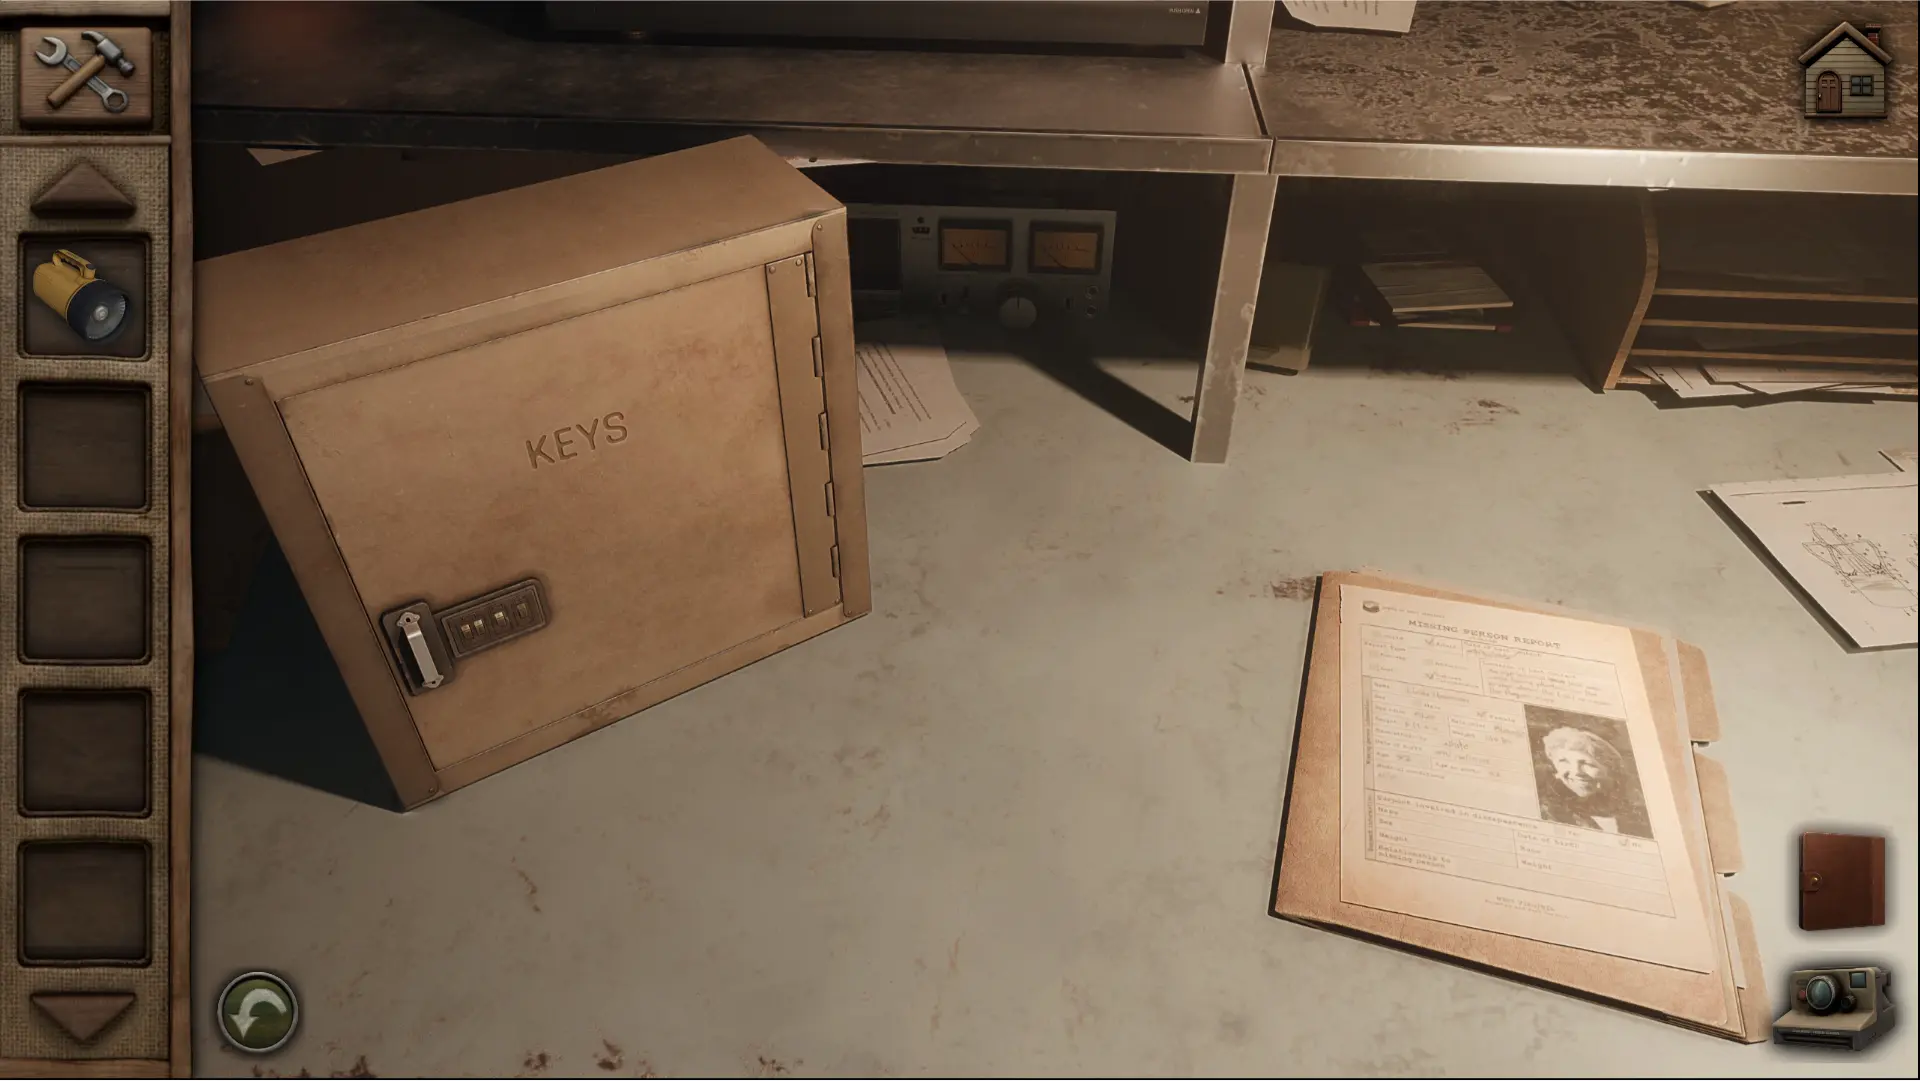
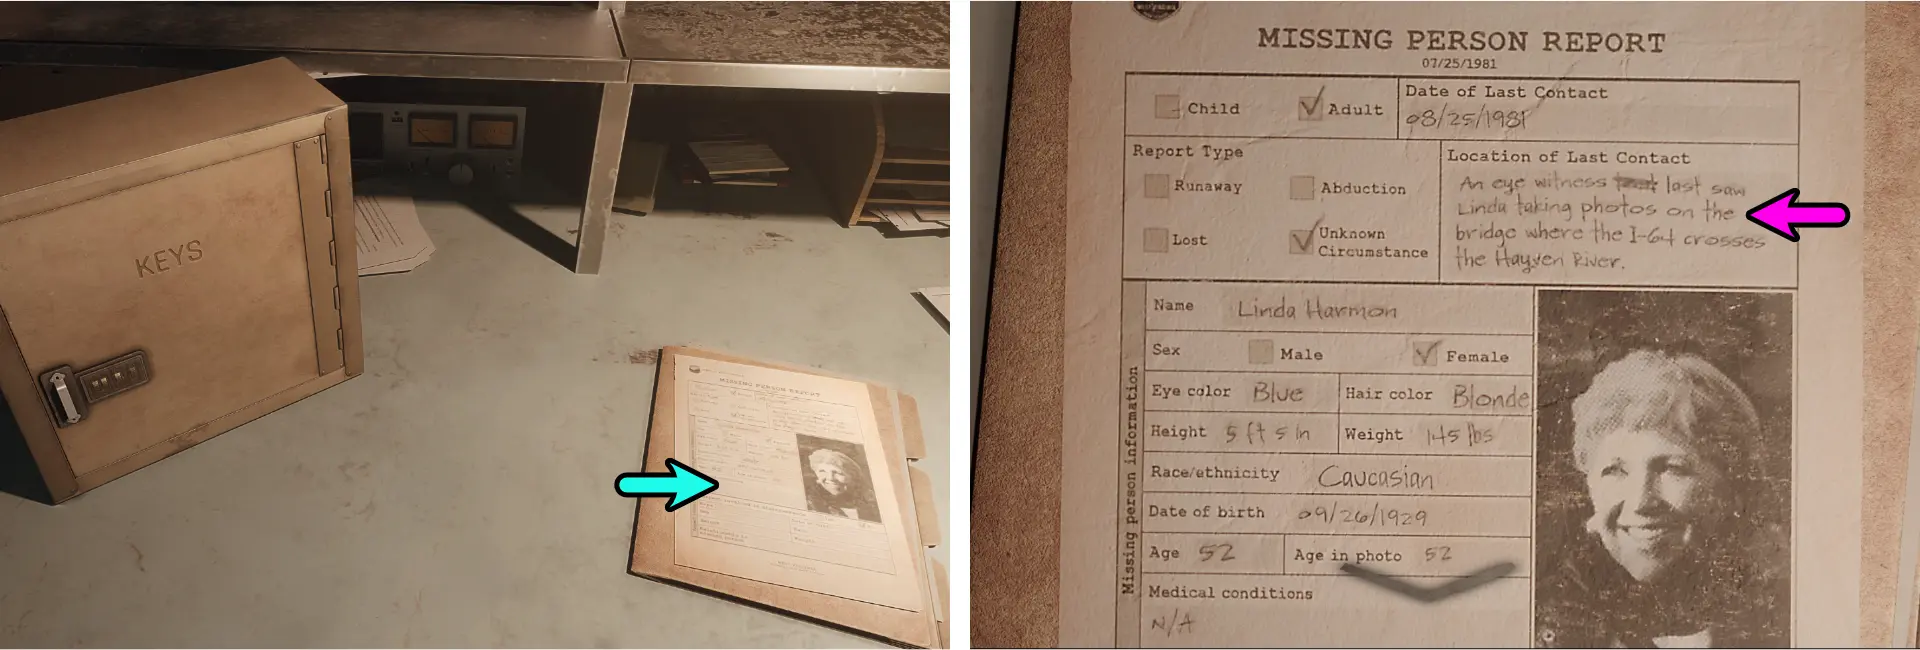
Linda Harmon – Her file is found on the desk at the archival room where the safe box is. Her last seen location is “the bridge where the I-64 crosses the Hayven River.”
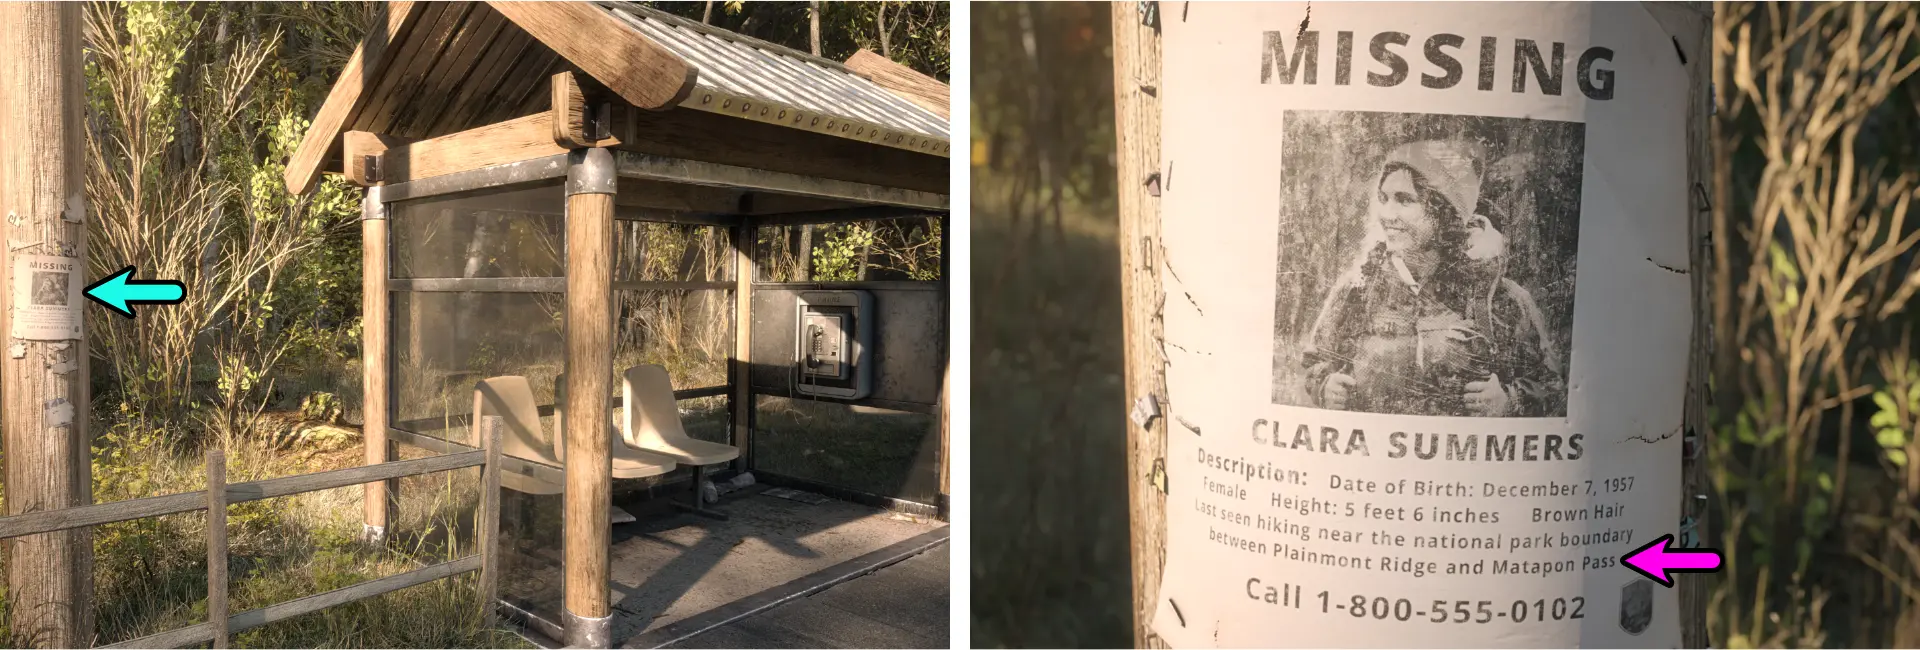
Clara Summers – Her poster is found on a post outside the office, next to the phone booth. Her last seen location is “near the national park boundary between Plainmont Ridge and Matapon Pass.”
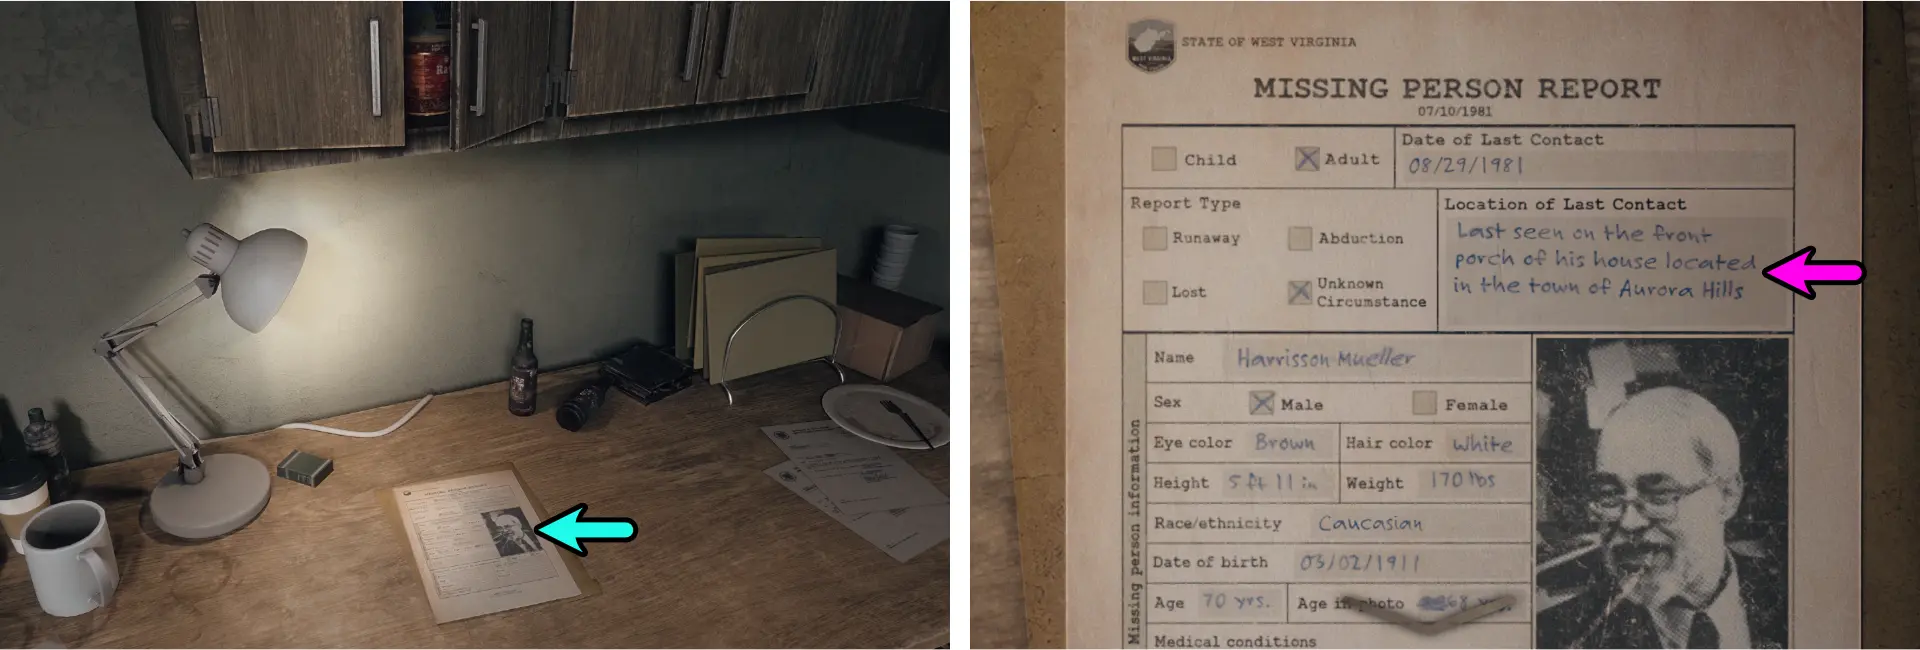
Harrisson Mueller – His file is found on the desk in the right room where the cupboard is. His last seen location is “the front porch of his house located in the town of Aurora Hills.”
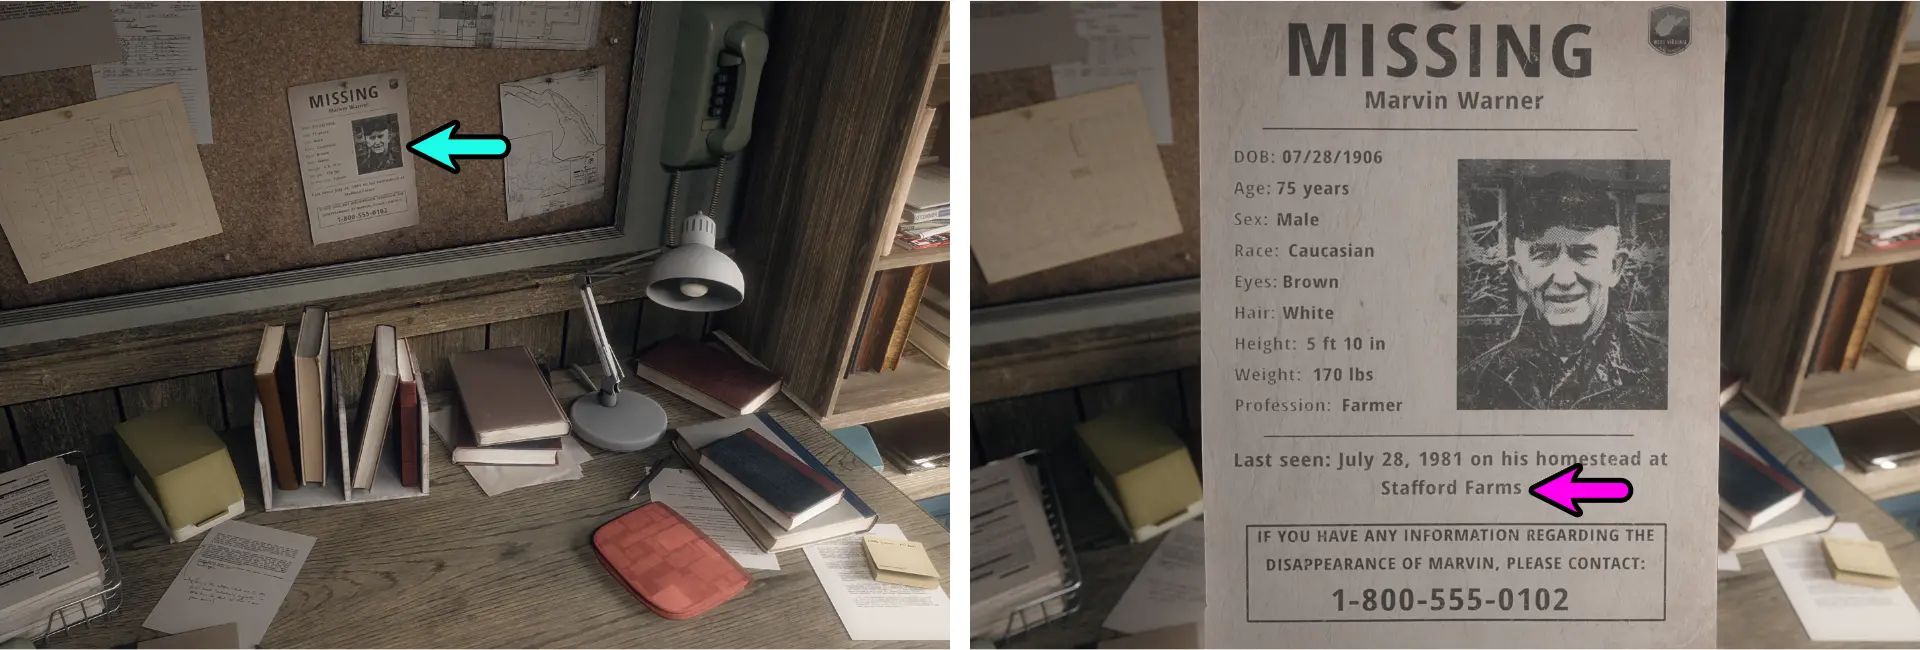
Marvin Warner – His poster is found on the corkboard at the left desk at the central space of the office. His last seen location is “on his homestead at Stafford Farms.”
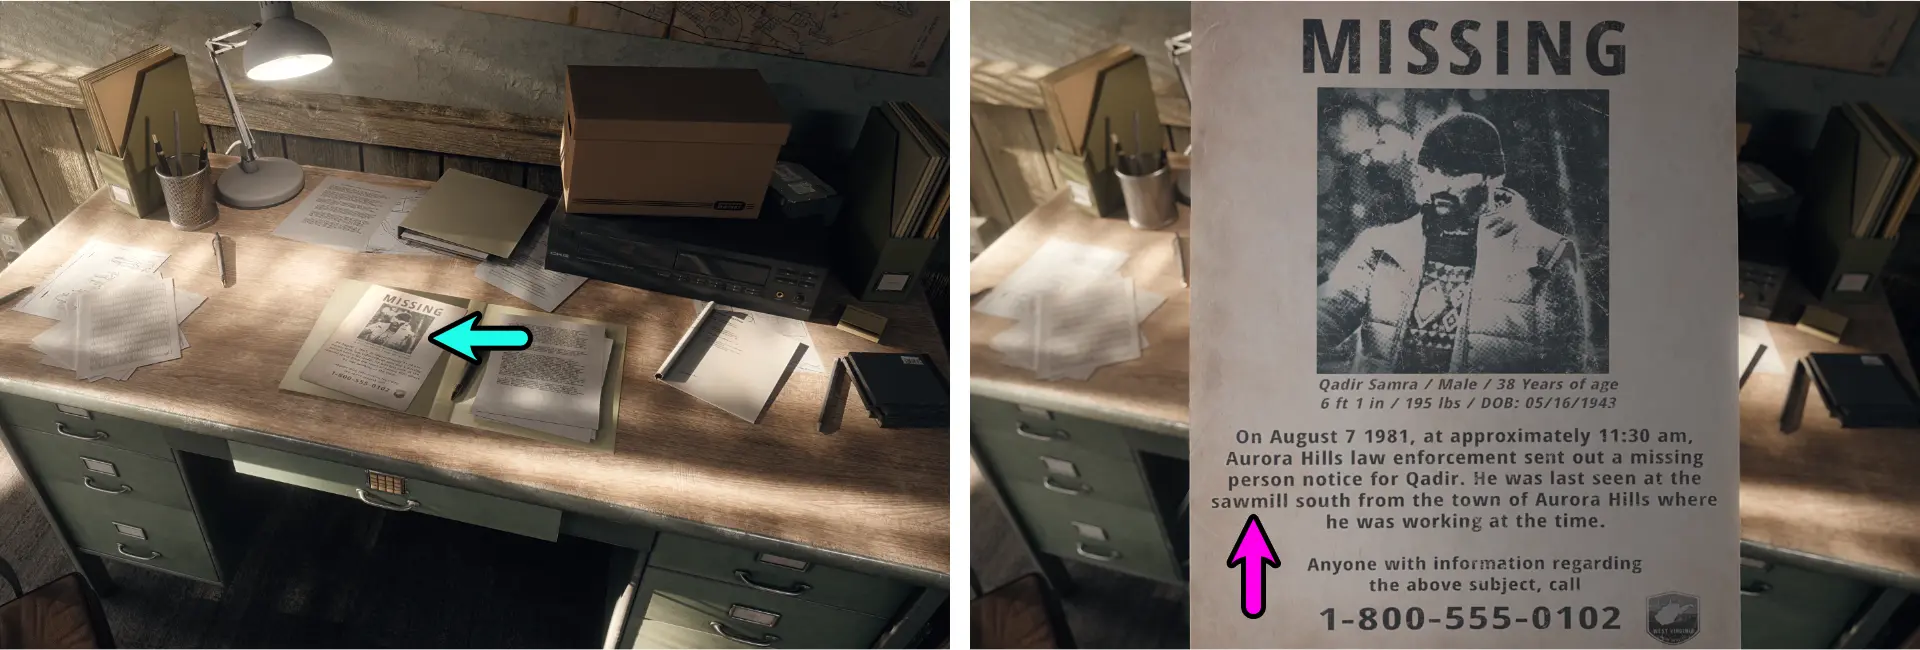
Qadir Samra – His poster is found on the desk next to the basement door. His last seen location is “at the sawmill south from the town of Aurora Hills.”
After arranging the images in the correct locations, the solution should look like the image below:
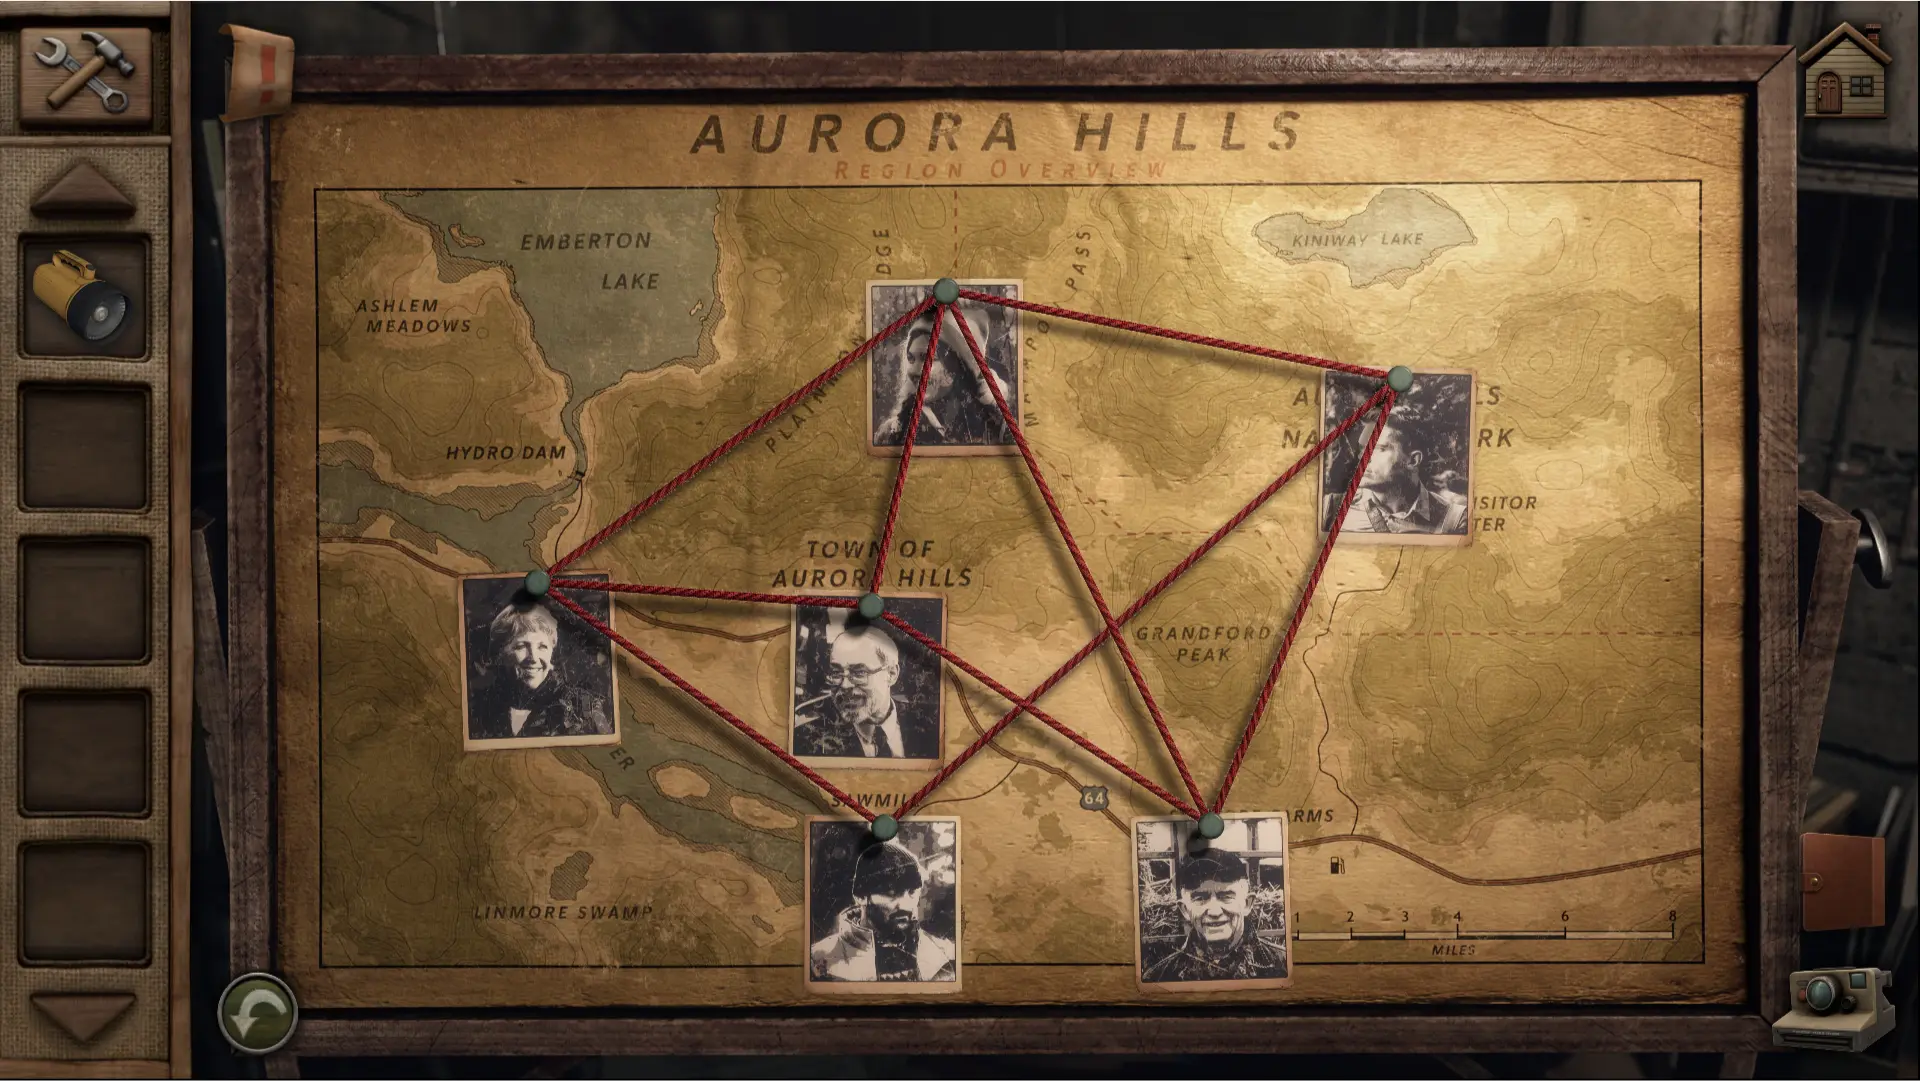
Take a picture of the board for future reference.
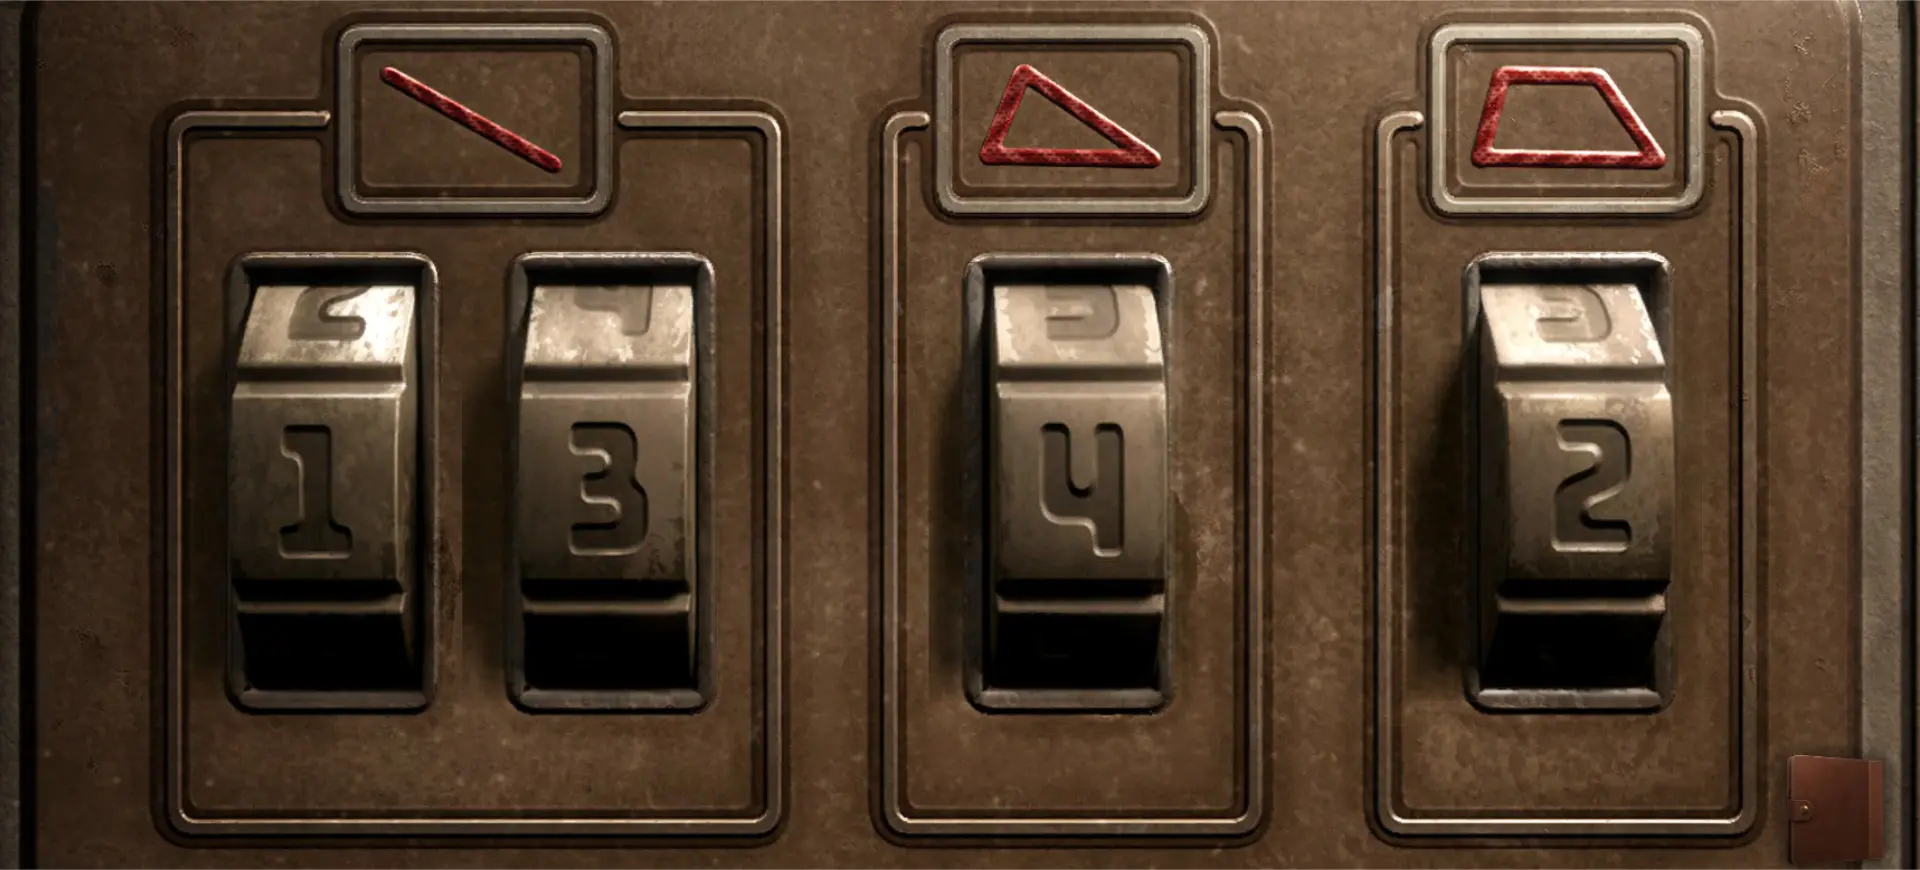
Getting the Numbers for the Safe
The safe requires 4 numbers to open. The line and shapes above the numbers are the clue. To get the correct numbers, you’ll need to count the number of lines, triangles, and rhomboids that appear on the board, as illustrated by the image below.
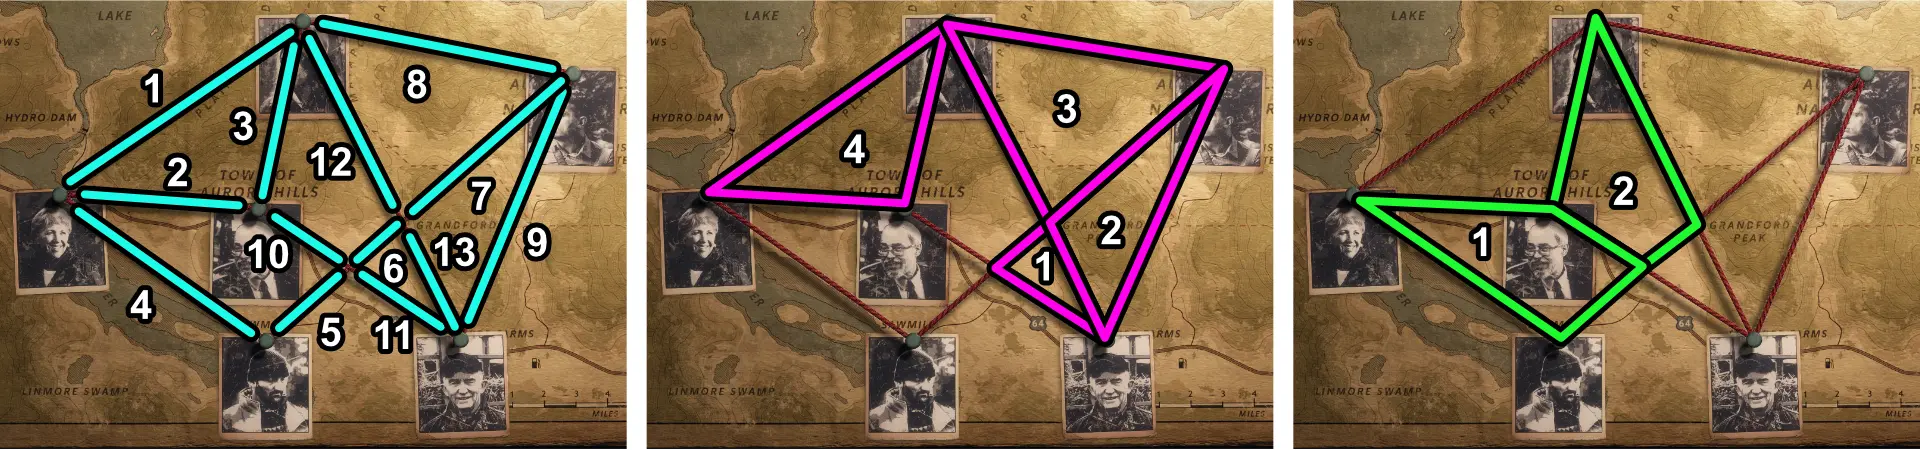
The code for the safe should be 1324.
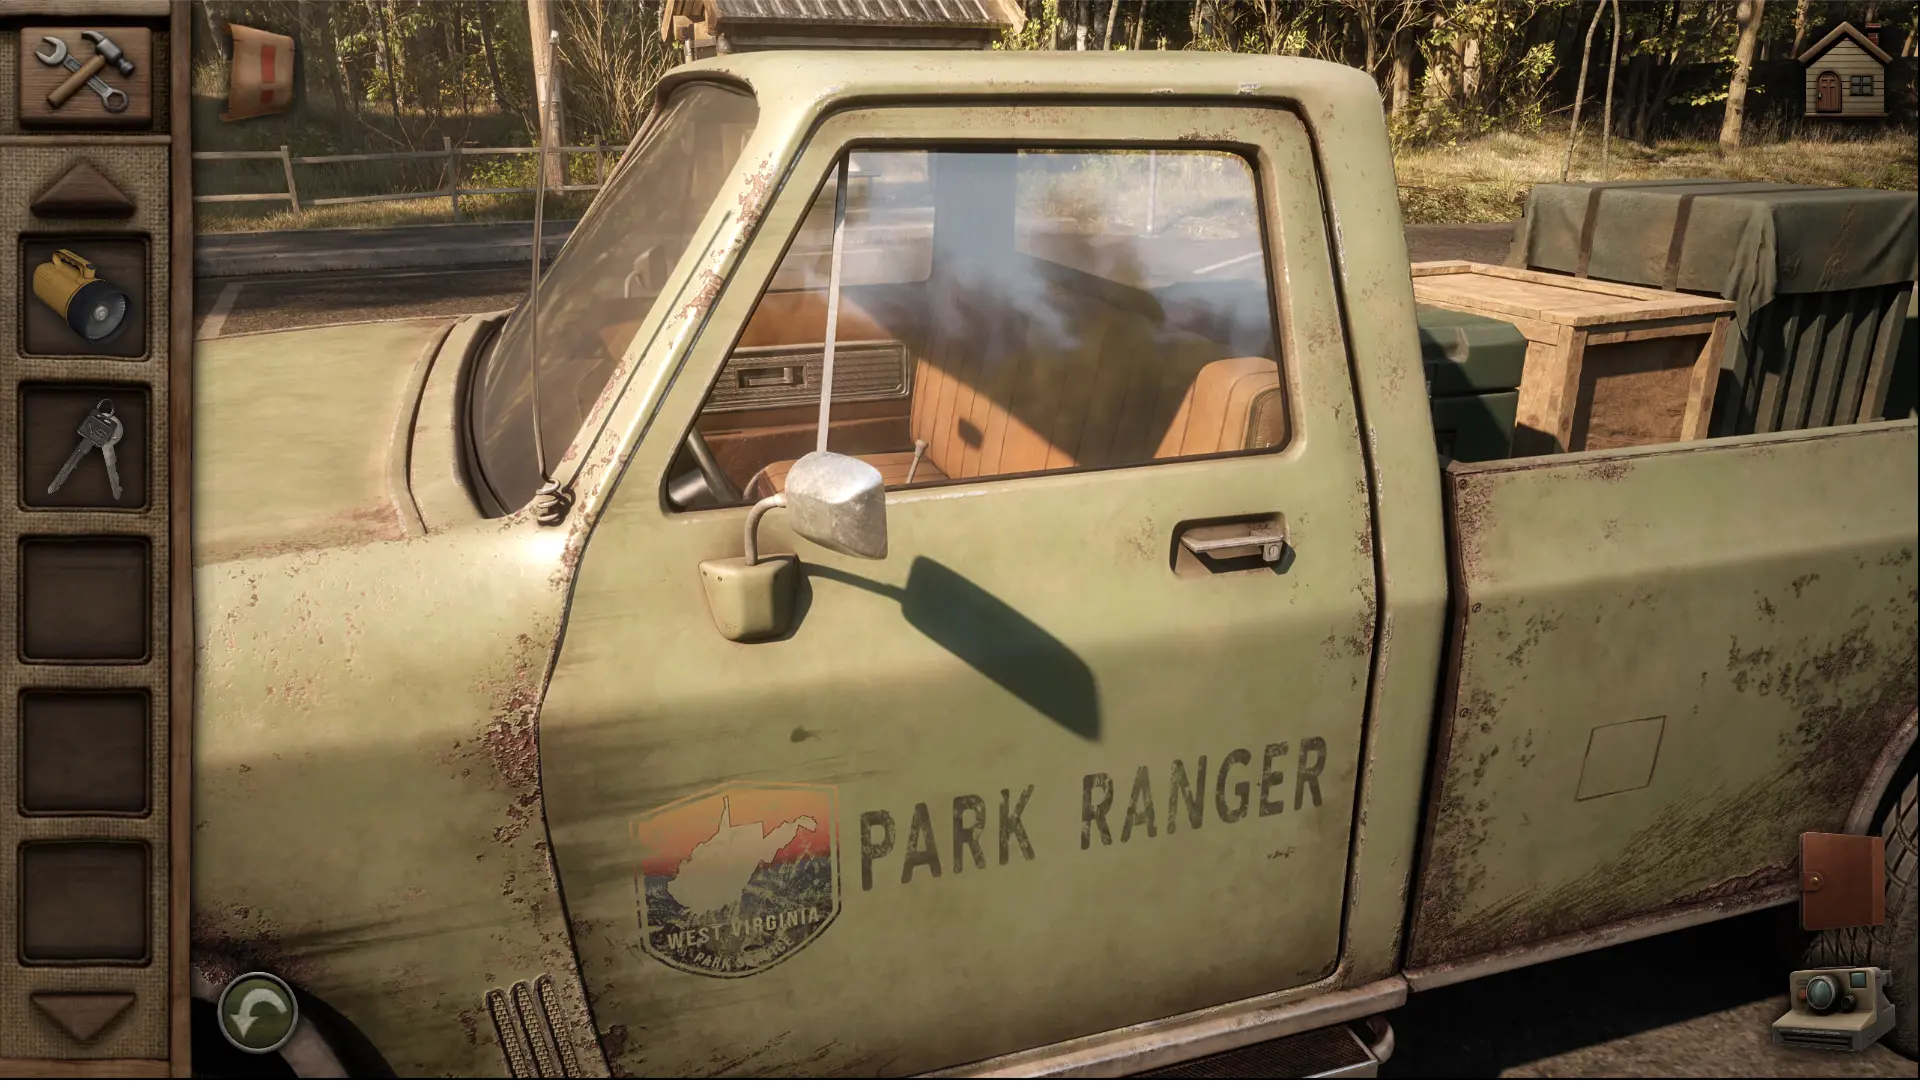
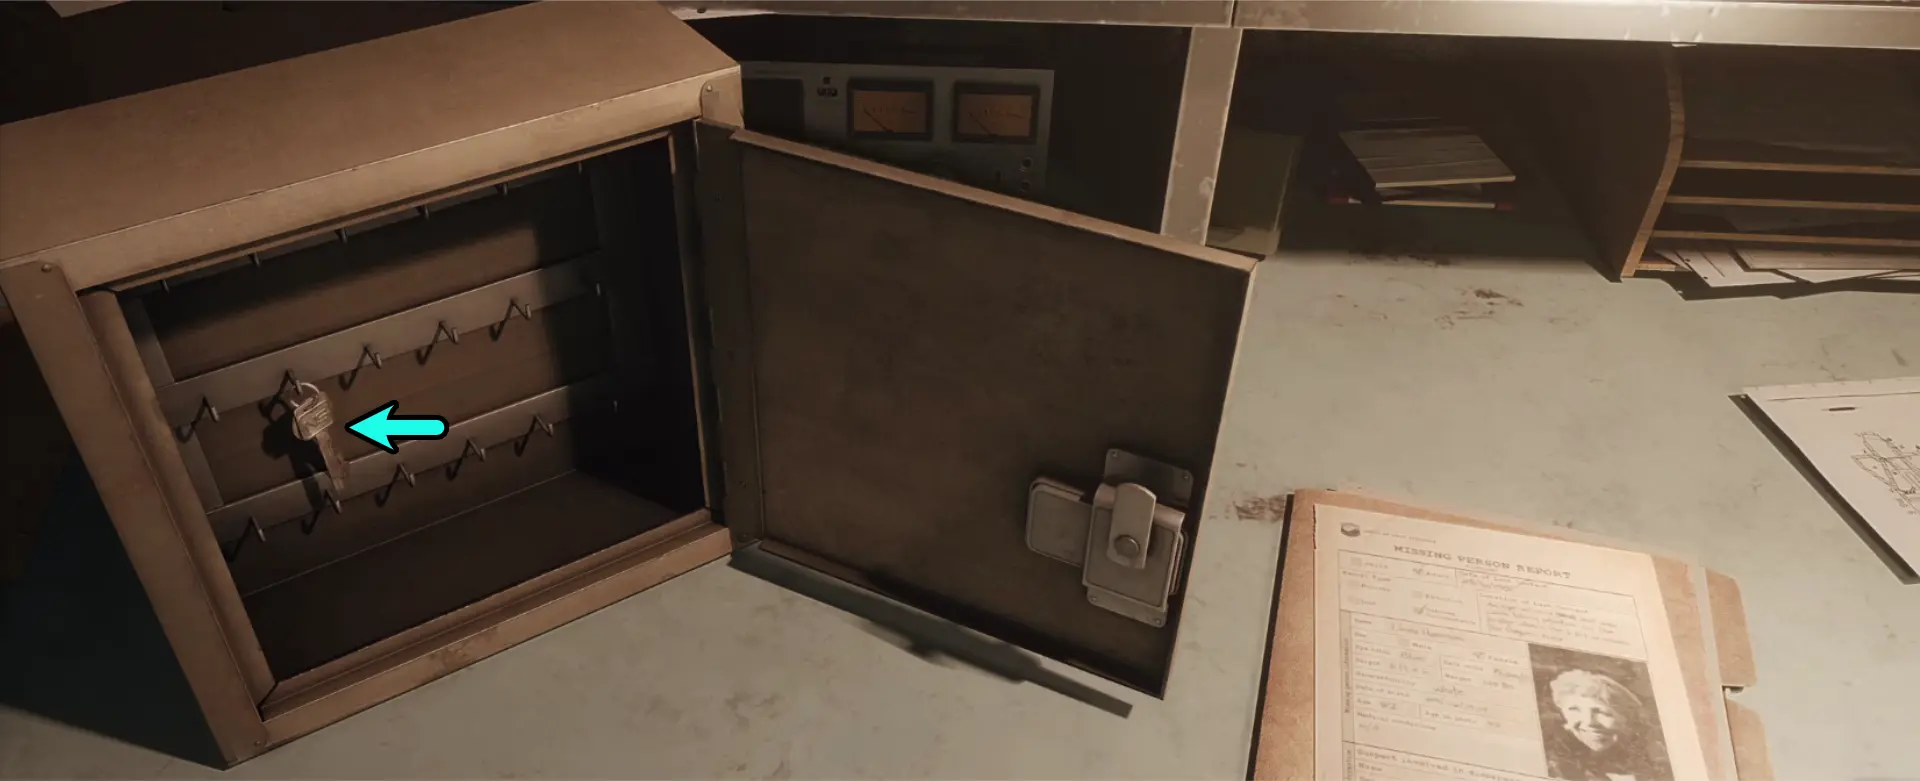
Once the safe has been opened, take the Car Key inside it. Go outside and use it on the green ranger truck at the parking lot to unlock and enter it.
Park Visitor Center
Unlocking the Gift Shop
To unlock the Gift Shop, you’ll need to find the key for it.
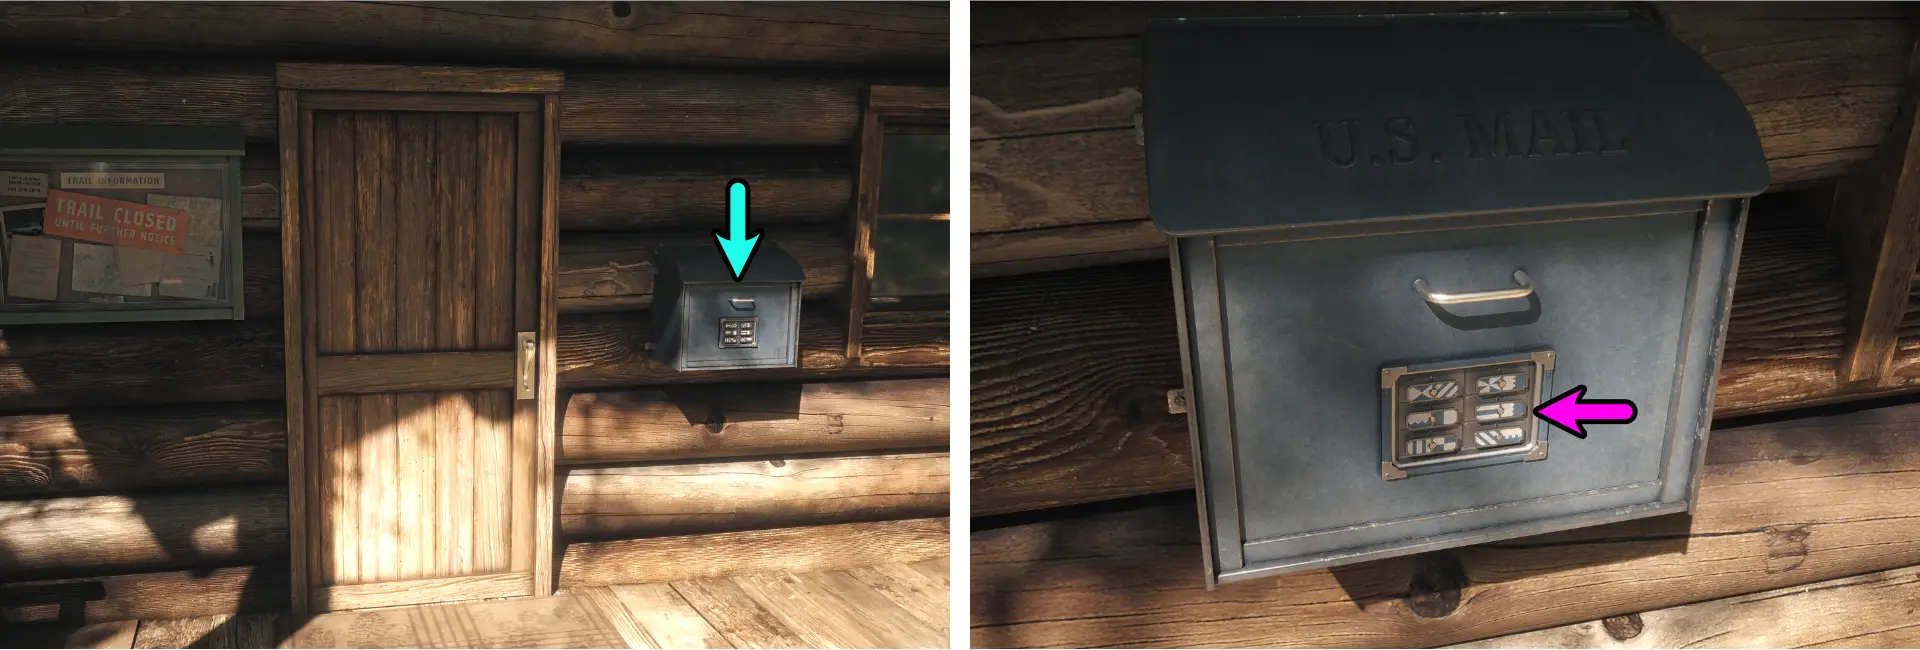
Opening the Mailbox
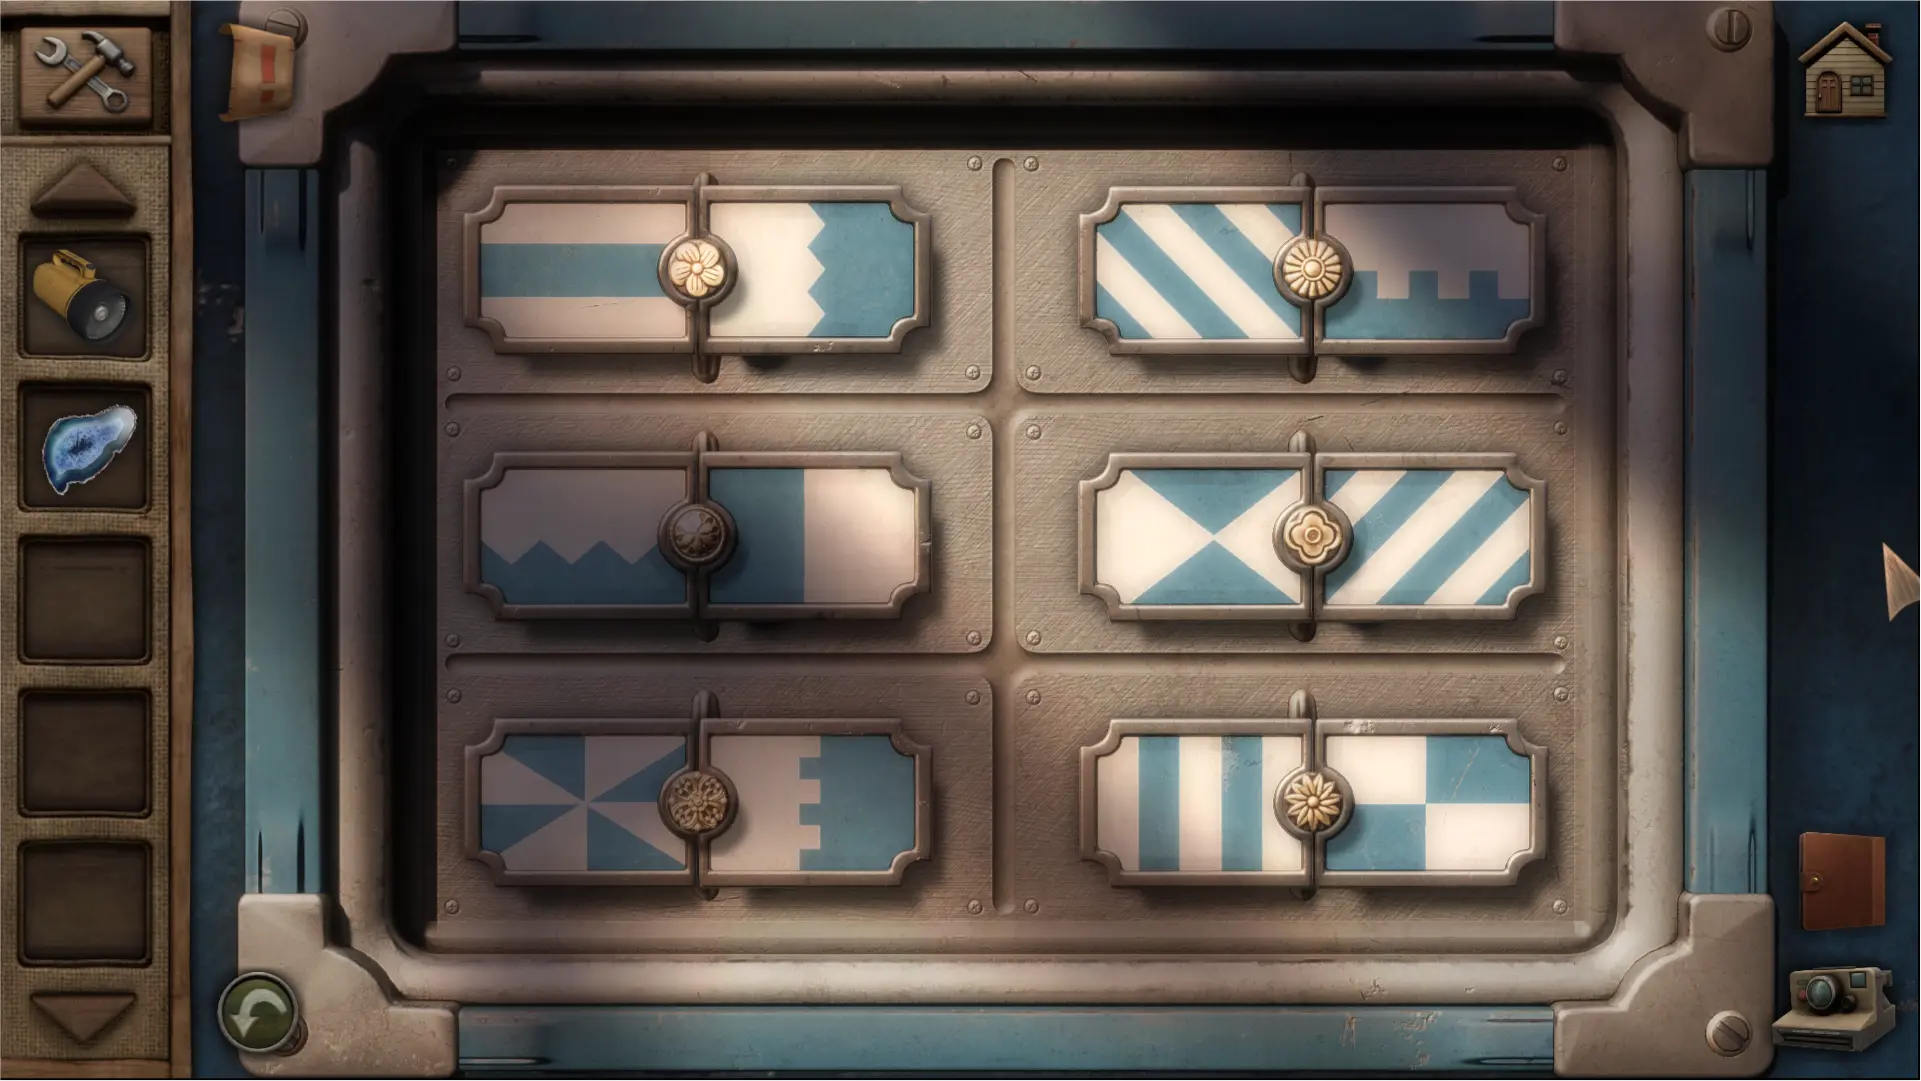
Upon reaching your destination, approach the Park Visitor Center. You’ll notice a blue mailbox to the right of the door. It is locked with a puzzle consisting of 6 pairs of patterns with a knob at the center. You’ll need to find a clue inside to get the correct pattern pairings.
- Enter the center and approach the Visitor Information Desk.
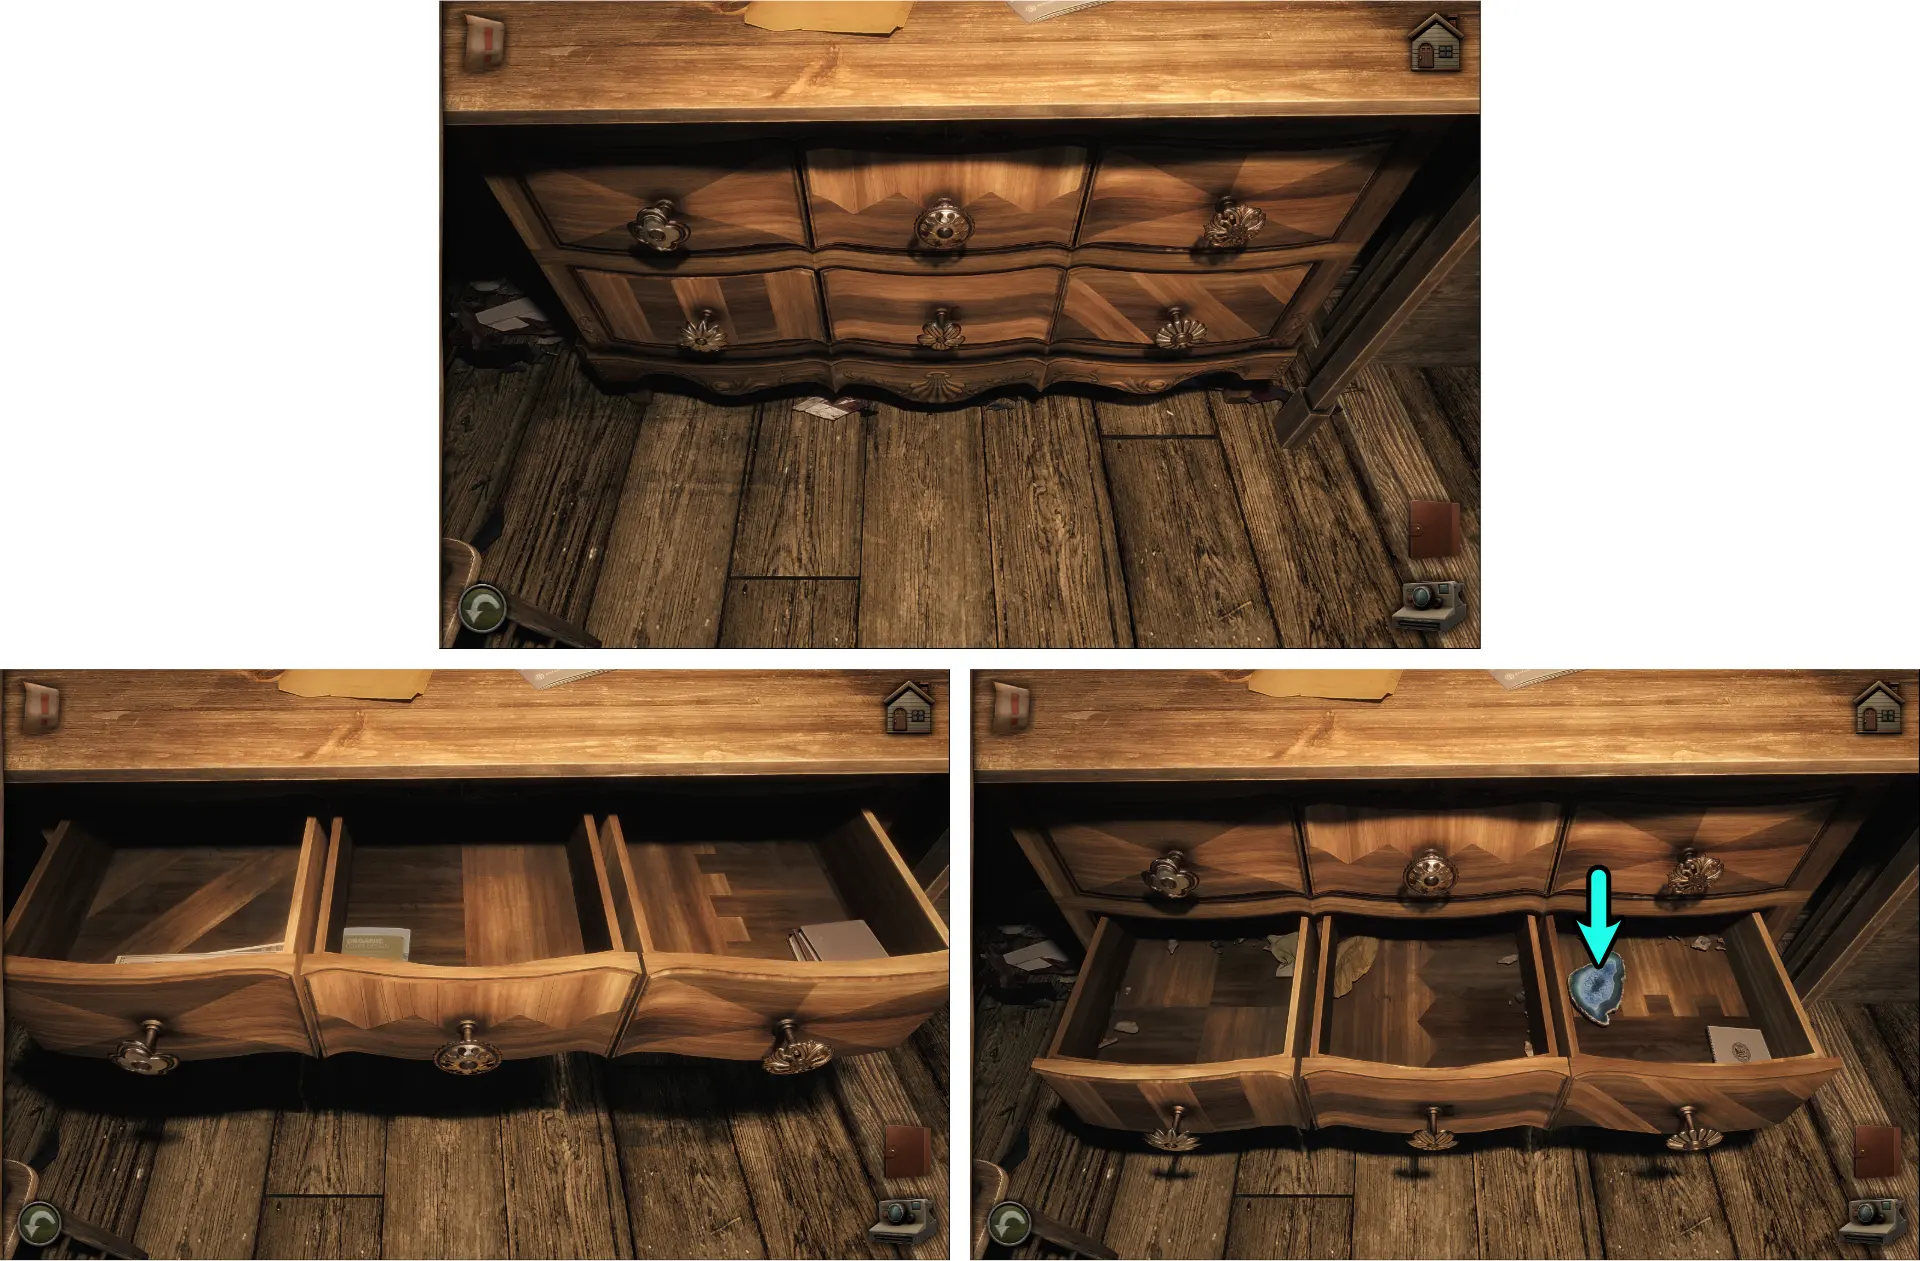
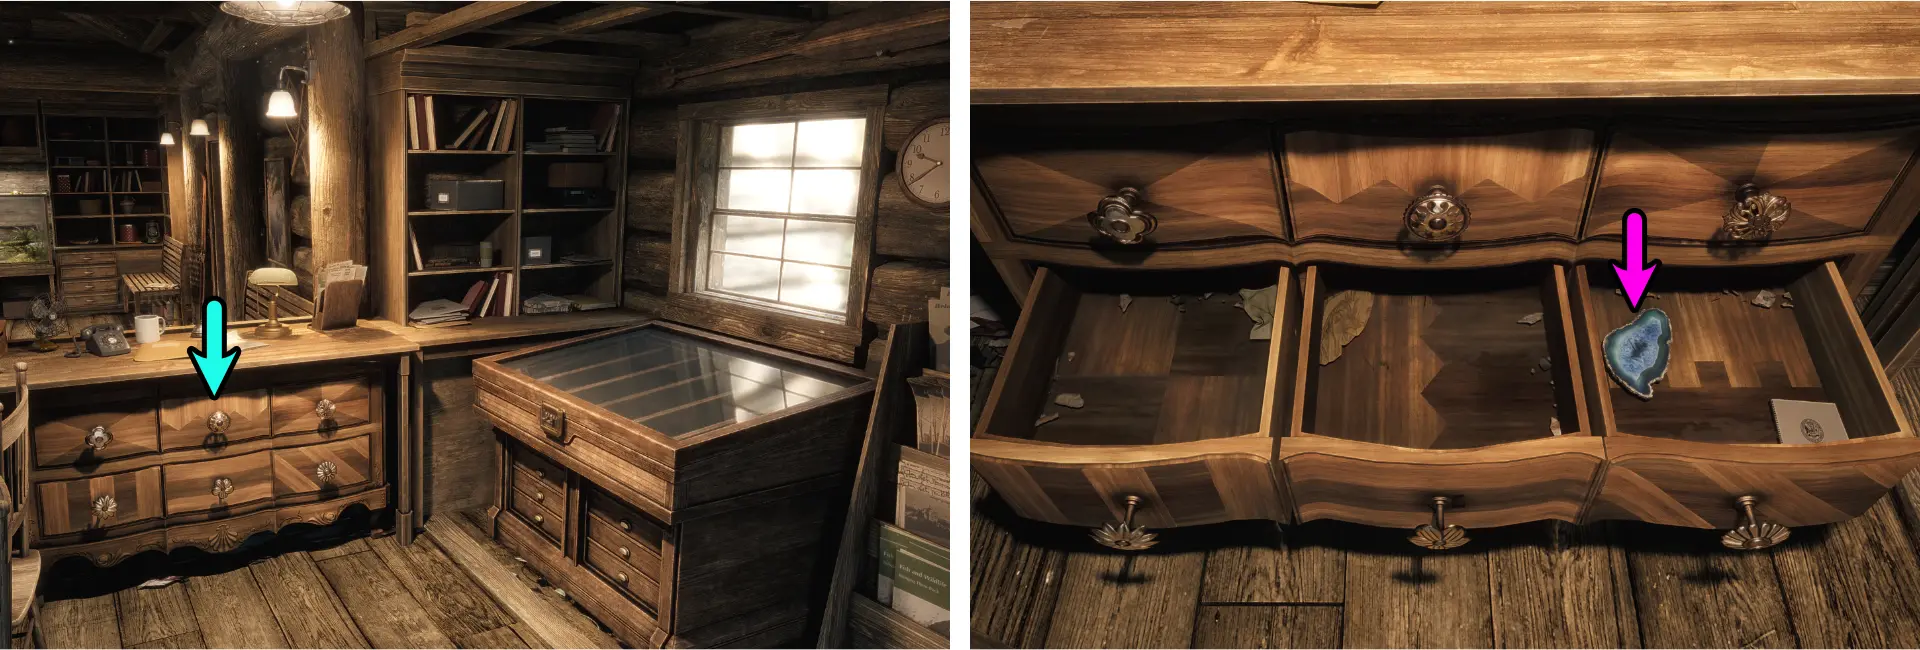
- Approach the drawers at the left side.
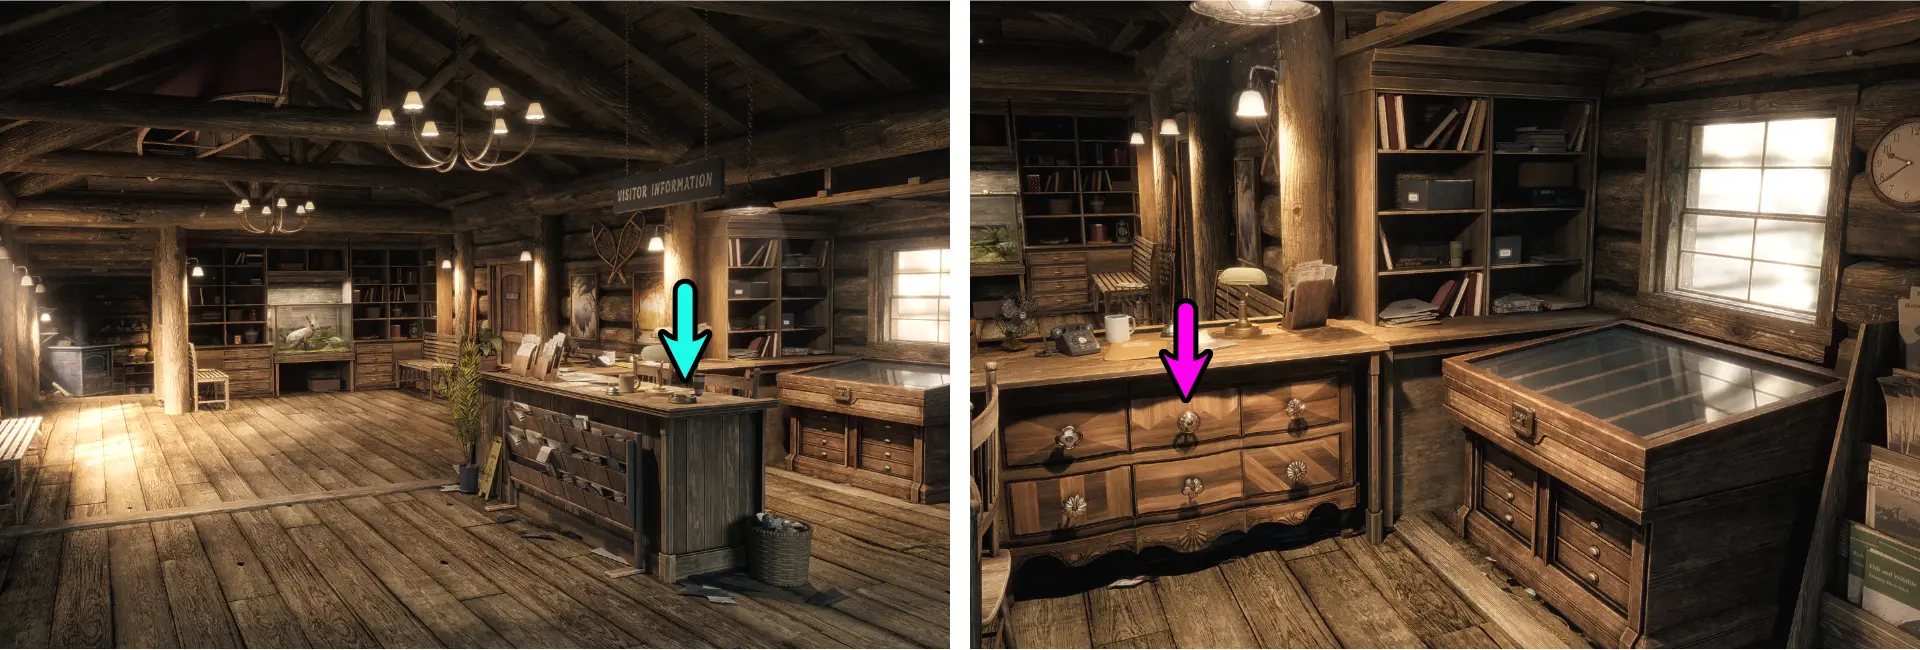
- Open all the top drawers and take a picture for reference.
- Open all the bottom drawers and take a picture for reference.
- Take the Agate from the 3rd bottom drawer.
Go back to the mailbox and investigate its lock. You’ll need to cross-reference the patterns and the knobs to the ones on the mailbox. The solution should look like the image below:
Opening the Package
Once the mailbox has been opened, you’ll find a brown package inside it. However, you’ll need to find something to cut the string off to open it.

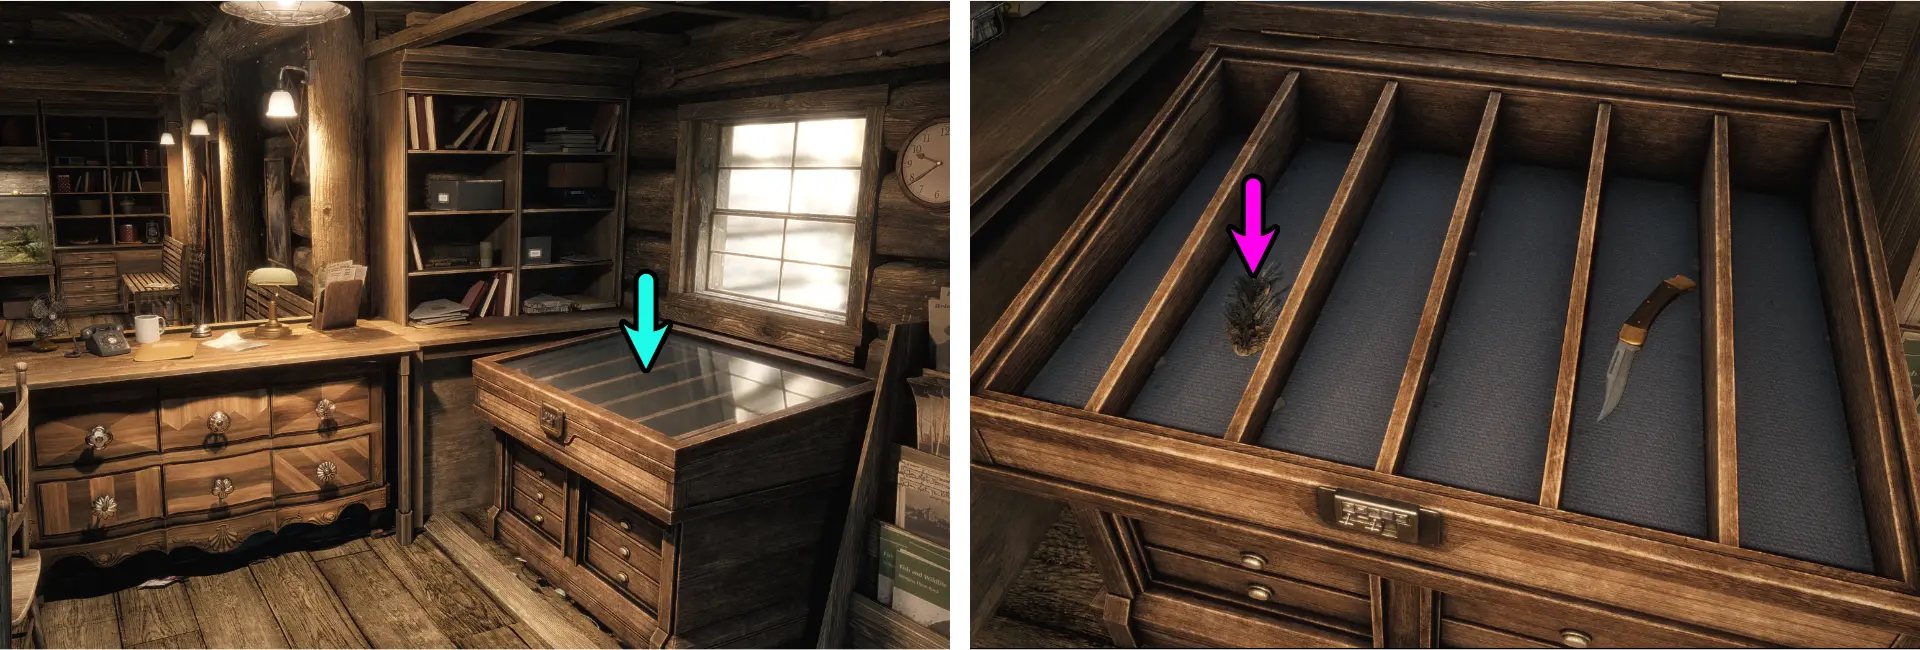
Go back inside the Park Visitor Center and take a look at the display table at the Visitor Information area.
For the display table’s lock puzzle, you need to place the tiles on the slots with the same shapes as the one on the tiles. To solve it, follow the steps below:

- Move the diamond tile upward, then to the left.
- Move the 3-tile bridge to the right.
- Move the triangle tile to the left.
- Move the hexagon tile downward.
- Move the square tile to the left.
- Move the diamond tile to the left.
- Move the triangle tile to the left, then insert down into the 3-tile bridge.
- Move the diamond tile 3 spaces to the right.
- Move the square tile 3 spaces to the right.
- Move the hexagon upward, then 2 spaces to the right.
- Move the 3-tile bridge to the left.
- Move the triangle tile upward then to the left.
- Move the hexagon tile to the left.
- Move the 3-tile bridge to the right.
- Move the square tile to the left, then insert down into the 3-tile bridge.
- Move the 3-tile bridge to the left.
- Move the diamond tile to the left.
- Move the circle tile 2 spaces upward, then to the right.
- Move the diamond tile to the right, then 2 spaces downward.
- Move the hexagon tile to the right, then downward.
- Move the circle tile 3 spaces to the left.
- Move the hexagon tile upward, then to the right.
- Move the diamond tile 2 spaces upward.
- Move the 3-tile bridge to the right.
- Move the square tile upward, solving the puzzle.
Once the display has been unlocked:
- Take the Stibnite and the Knife.
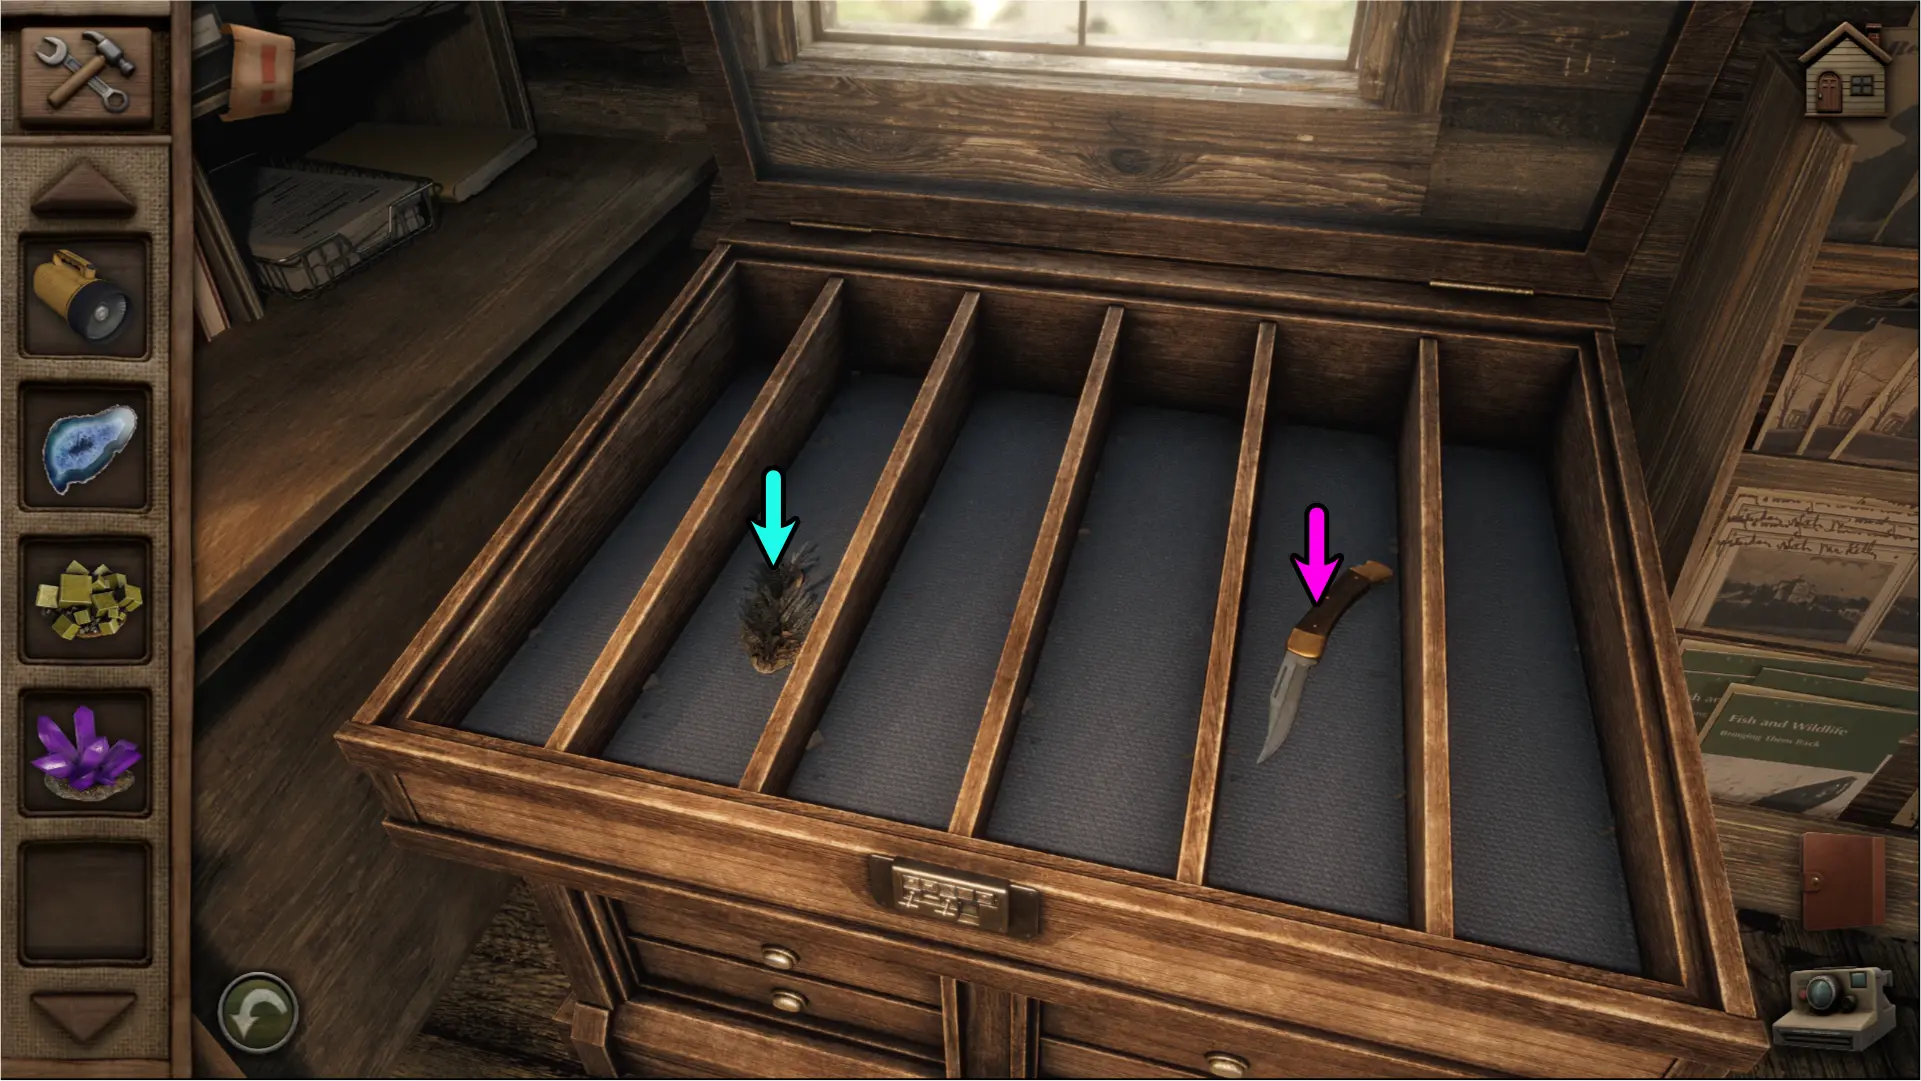
- Go back to the mailbox and use the Knife on the package to open it.
- Take the String and the Magnetic Dart.
Getting the Gift Shop Key
The Gift Shop Key can be found in the drainage, underneath the Park Visitor Center.
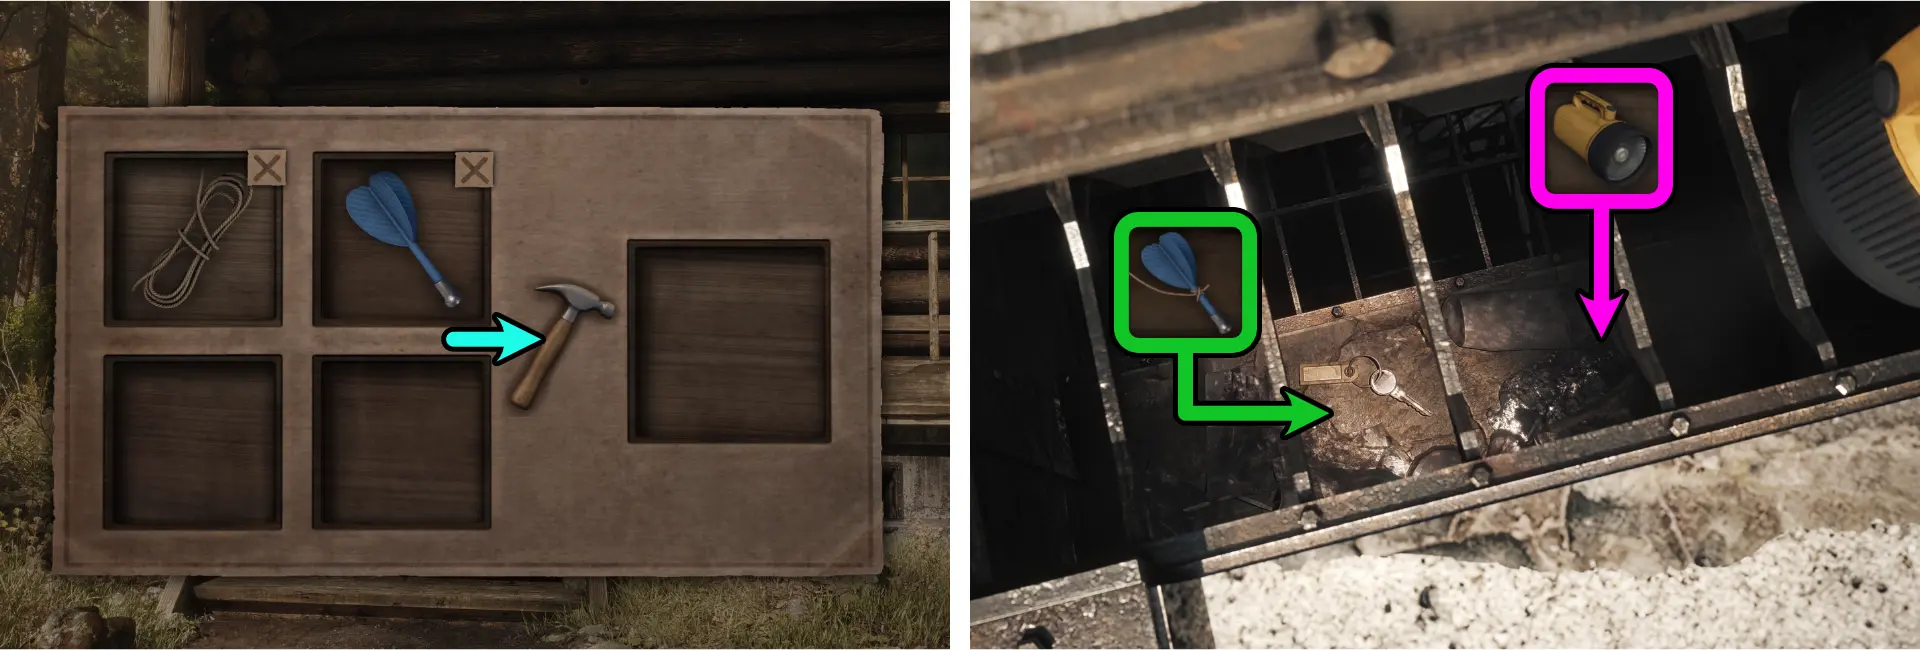
- Combine the String and the Magnetic Dart.
- Use the Flashlight on the drainage.
- Use the Magnetic Dart with String on the key to fish it out.
- Take the Gift Shop Key.
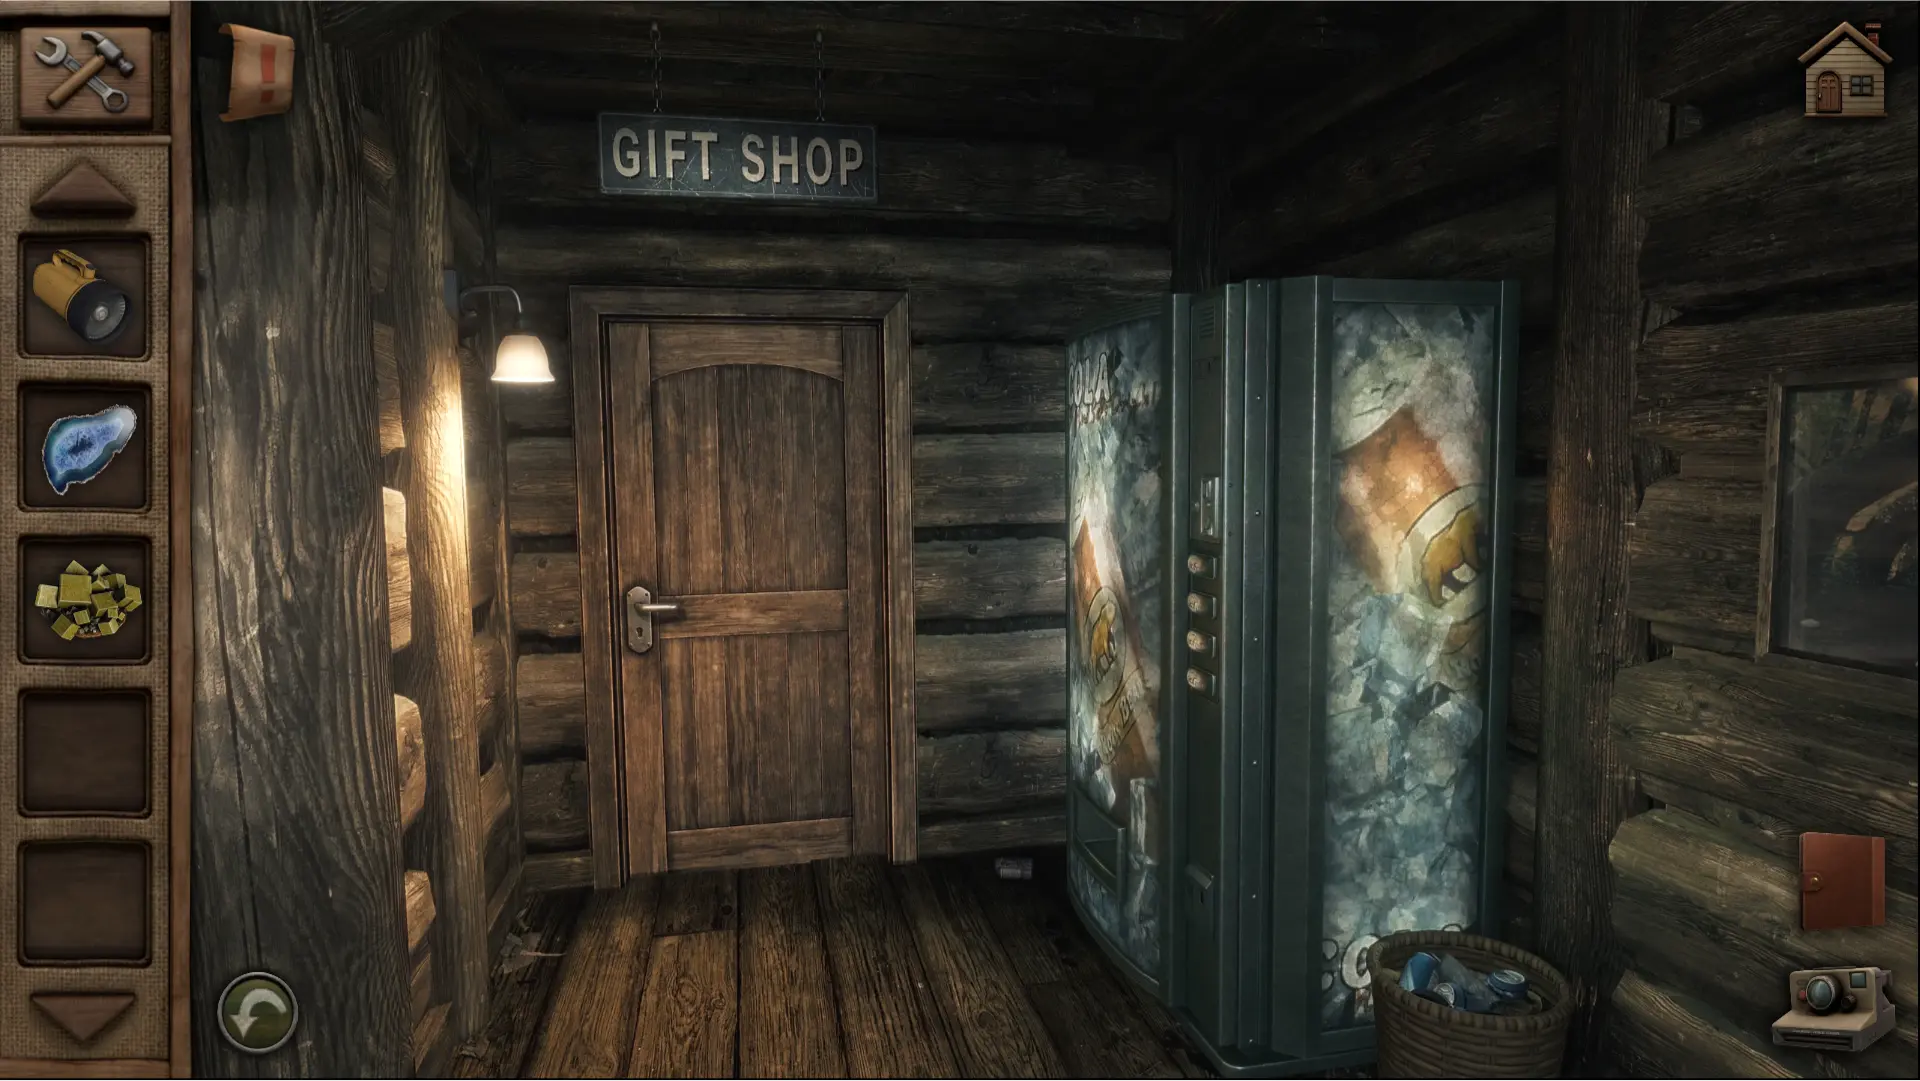
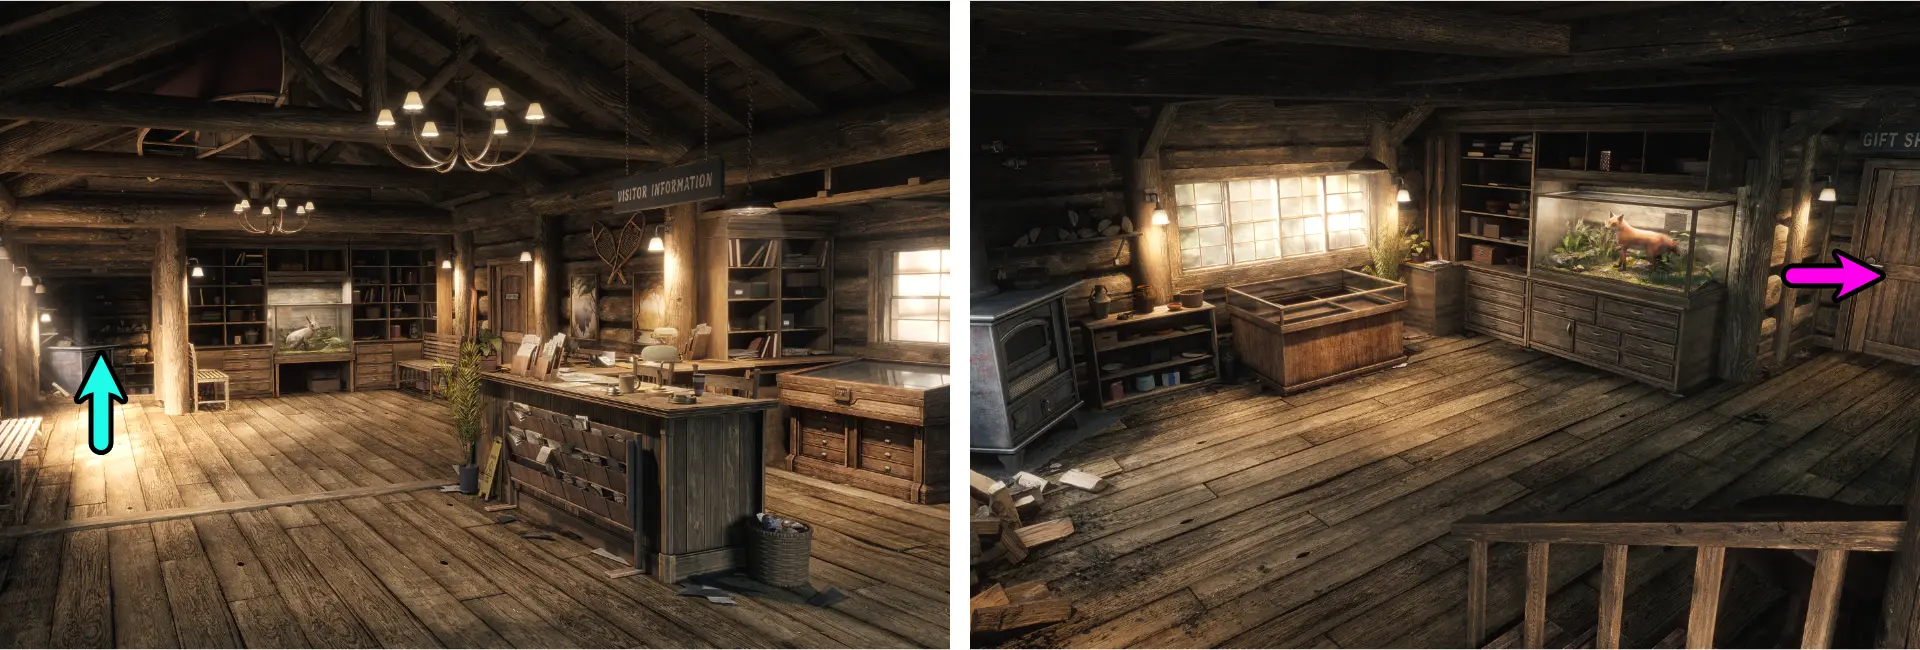
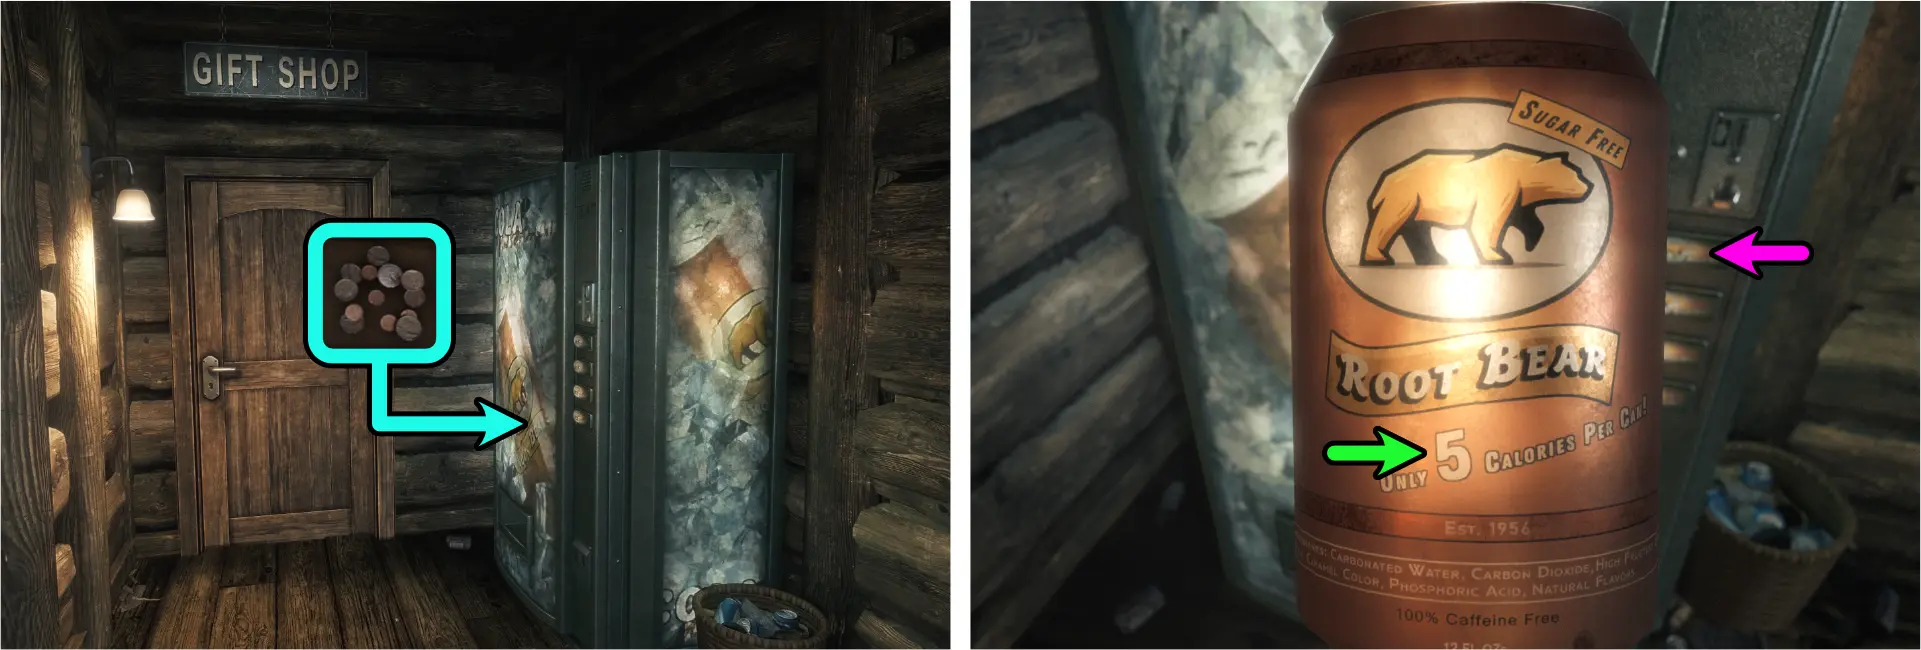
You can now use the key to enter the Gift Shop that’s found further inside the Park Visitor Center, next to the vending machine.
Unlocking the Staff Room
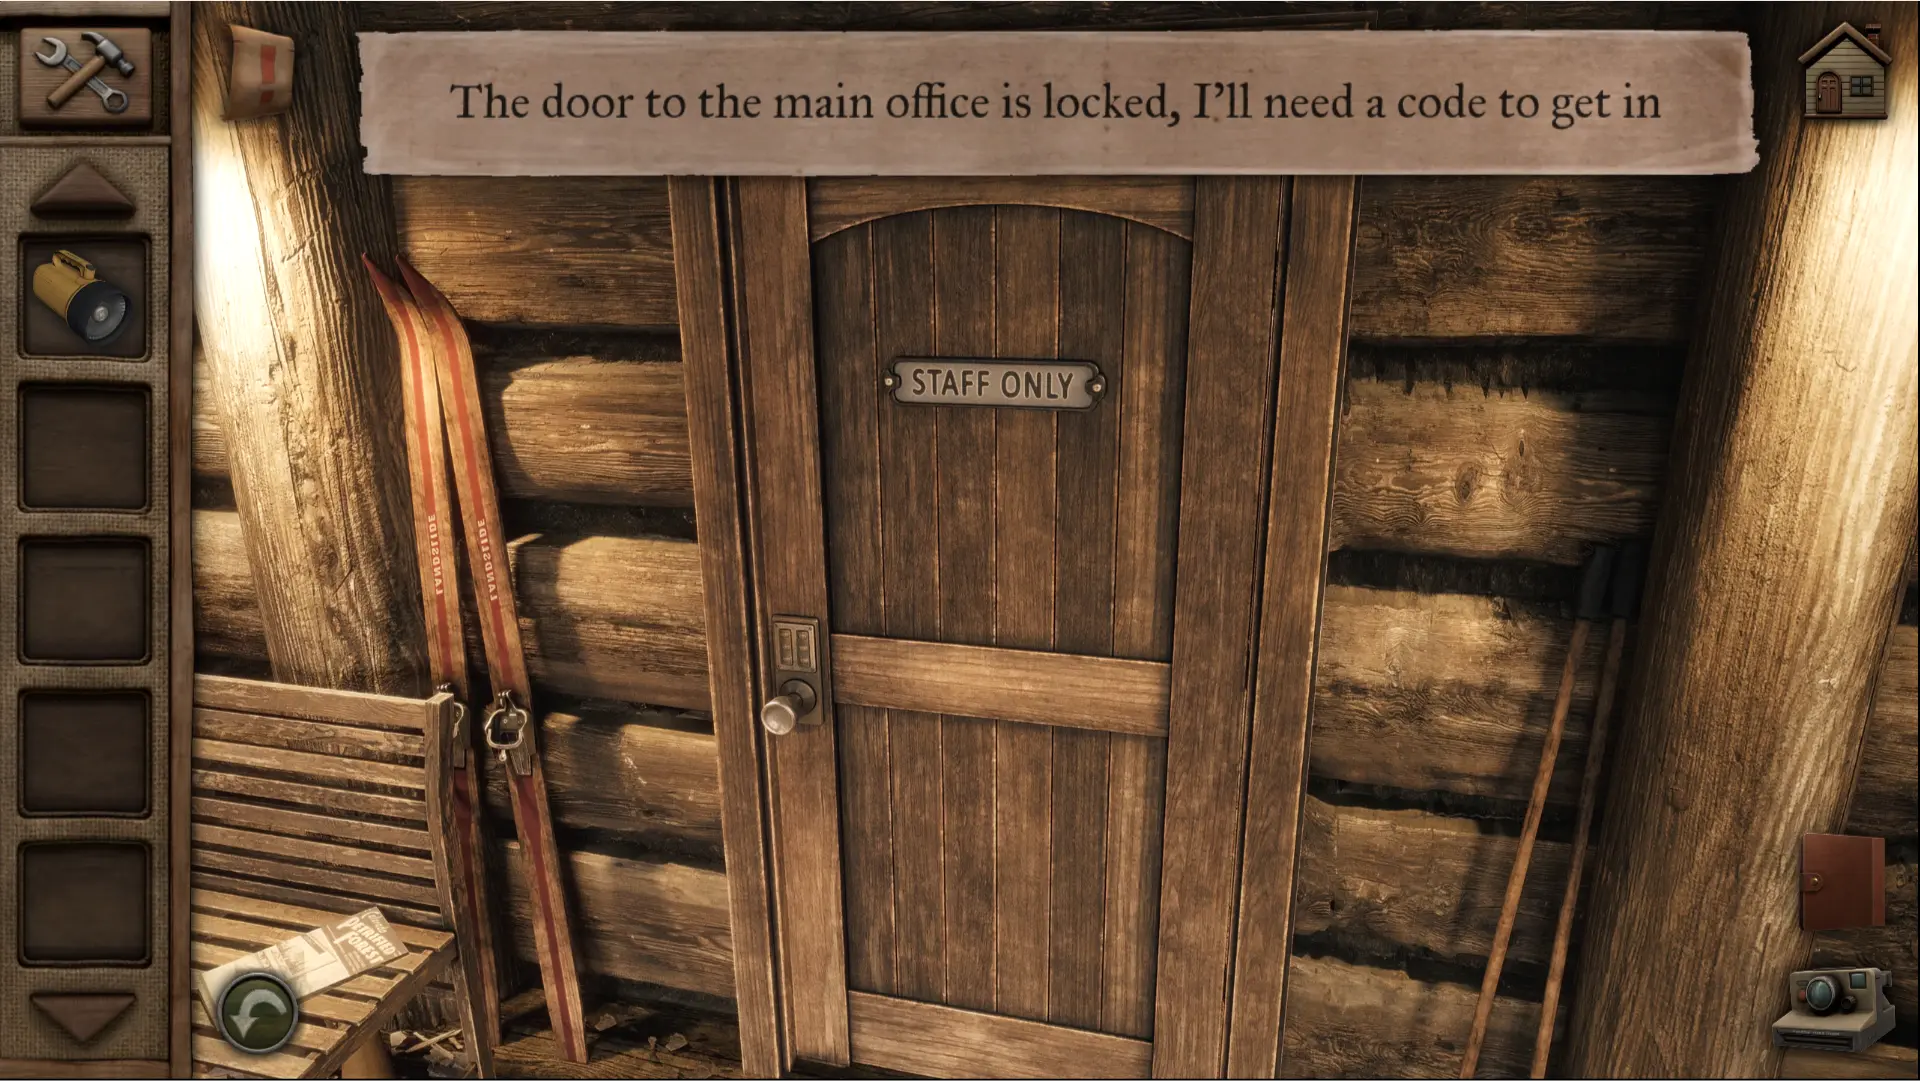
To unlock the Staff Room, you’ll need to find the 6-number combination for the lock.
Opening the Cash Register
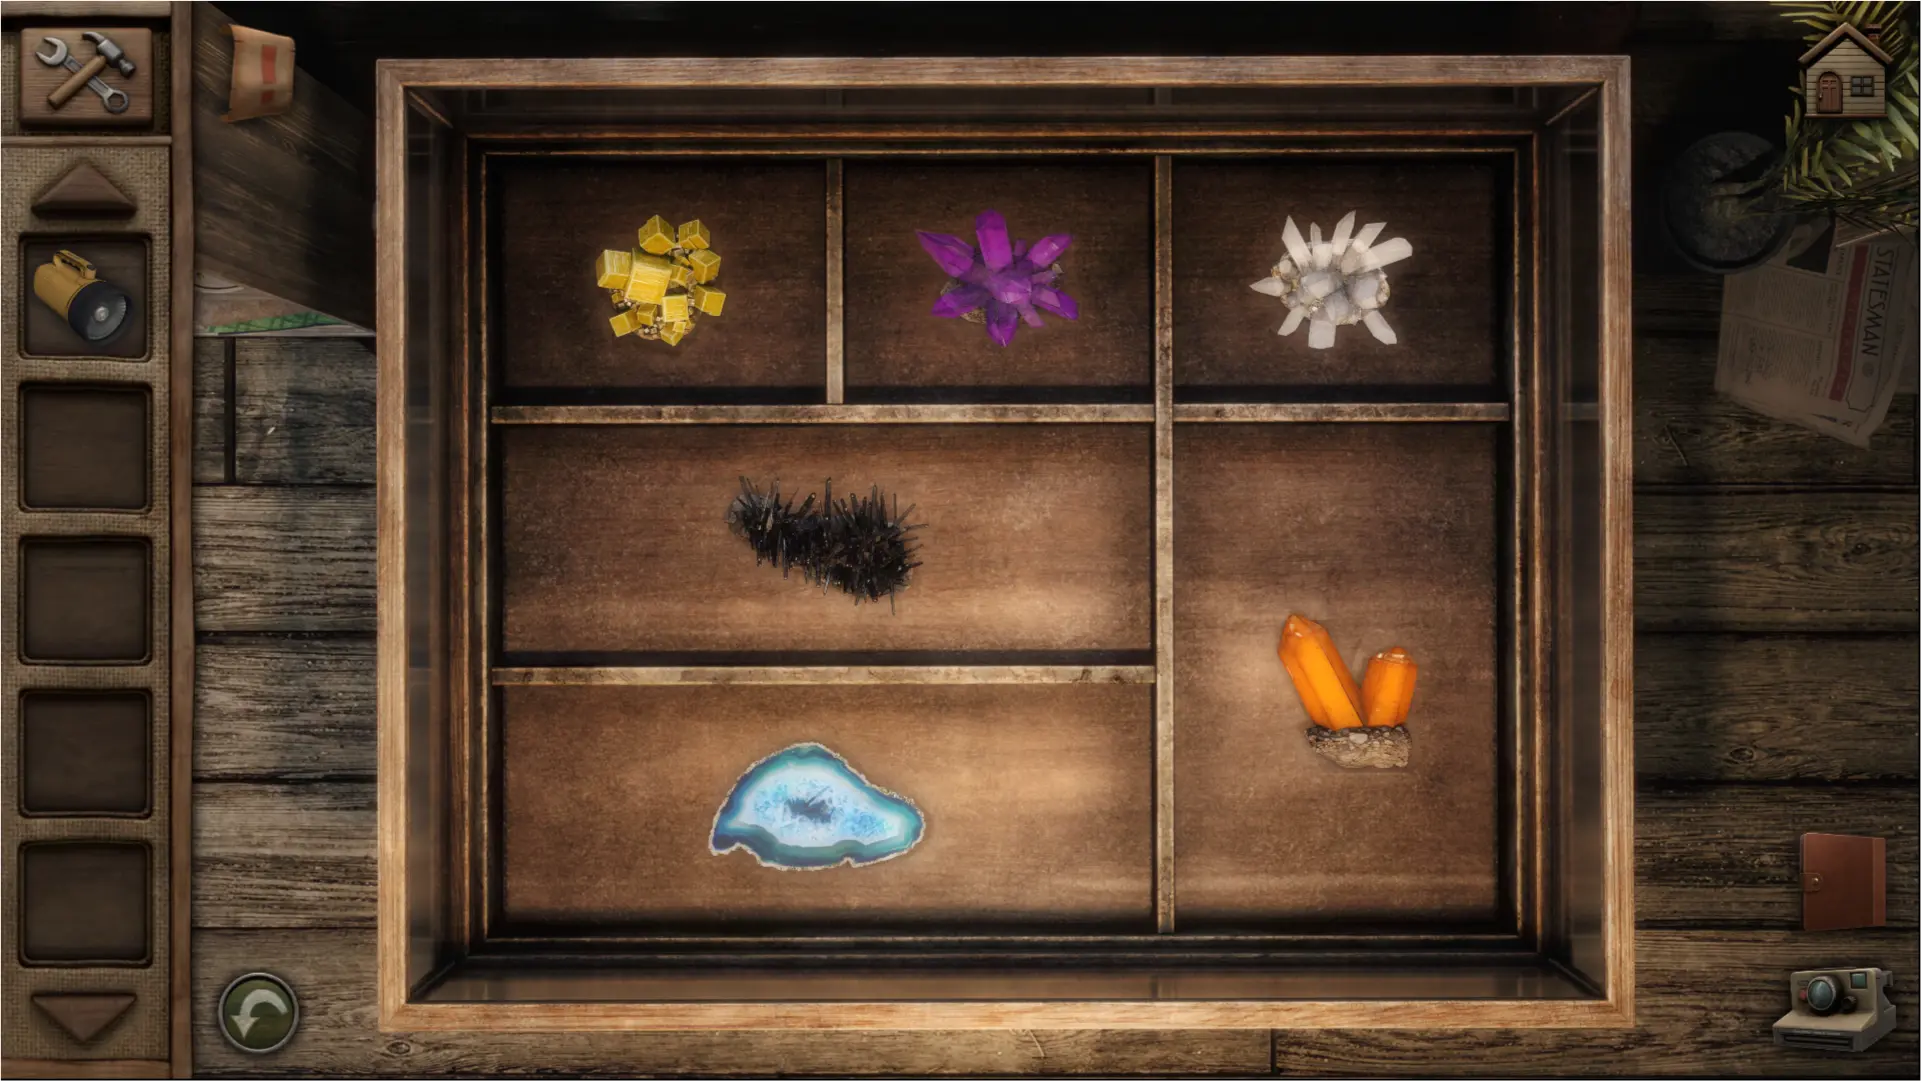
At the Gift Shop, you’ll see a cash register with 6 buttons and some colors drawn above it. These colors are a clue to the code to opening it and refer to the gemstones that are placed inside the display case in the area outside the Gift Shop. The gemstones can be found in the following locations:
Blue Agate – found in the third drawer of the bottom row of the drawers at the Visitor Information Desk.
Black Stibnite – found in the display case at the Visitor Information Desk. The solution to opening the display case is in the section “Park Visitor Center, Unlocking the Gift Shop, Opening the Package.”
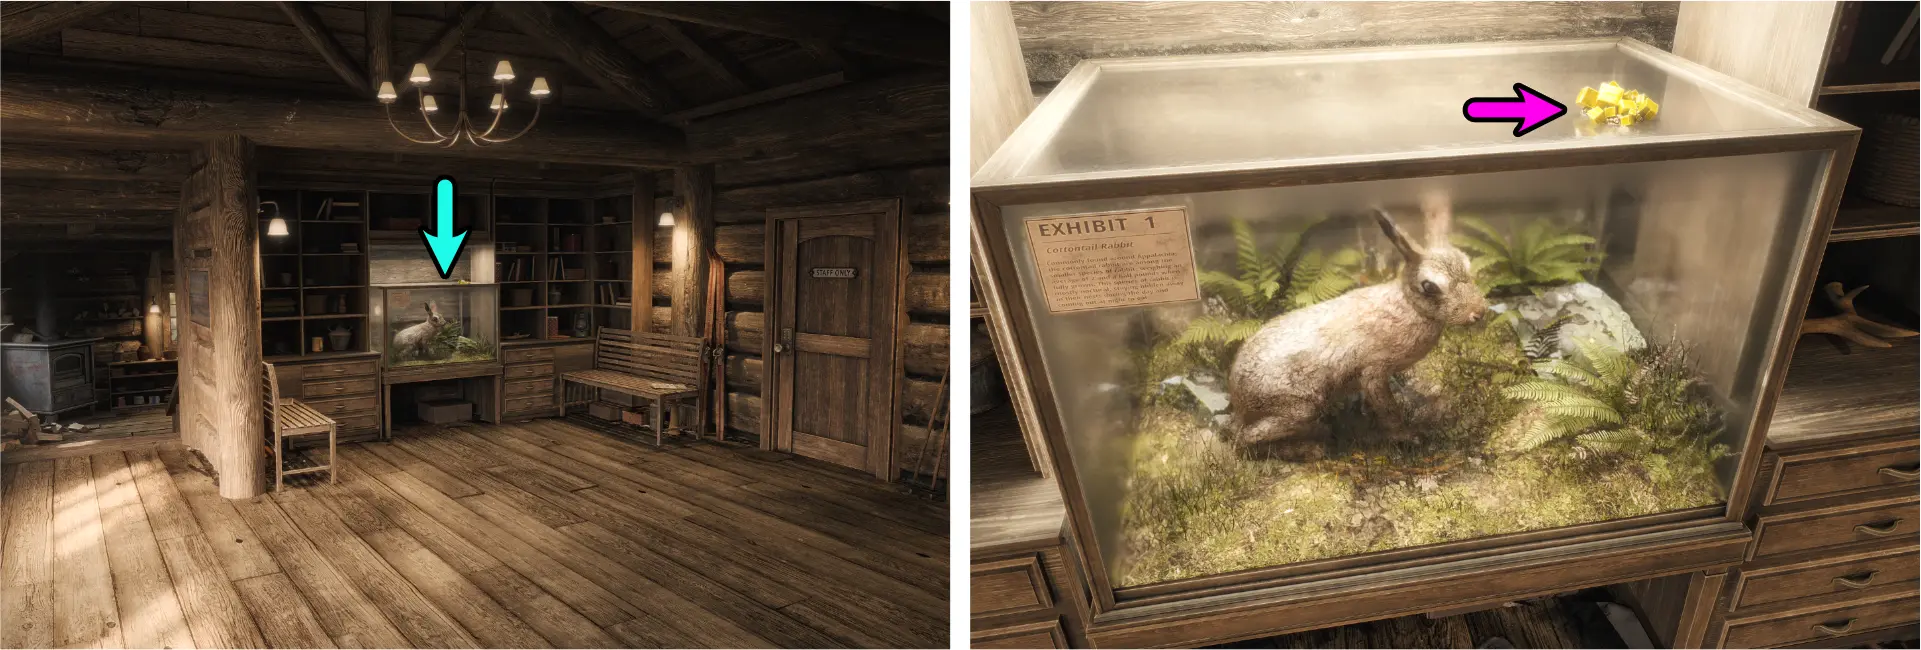
Yellow Pyrite – found above the Exhibit 1 Rabbit display just outside of the Staff Room.
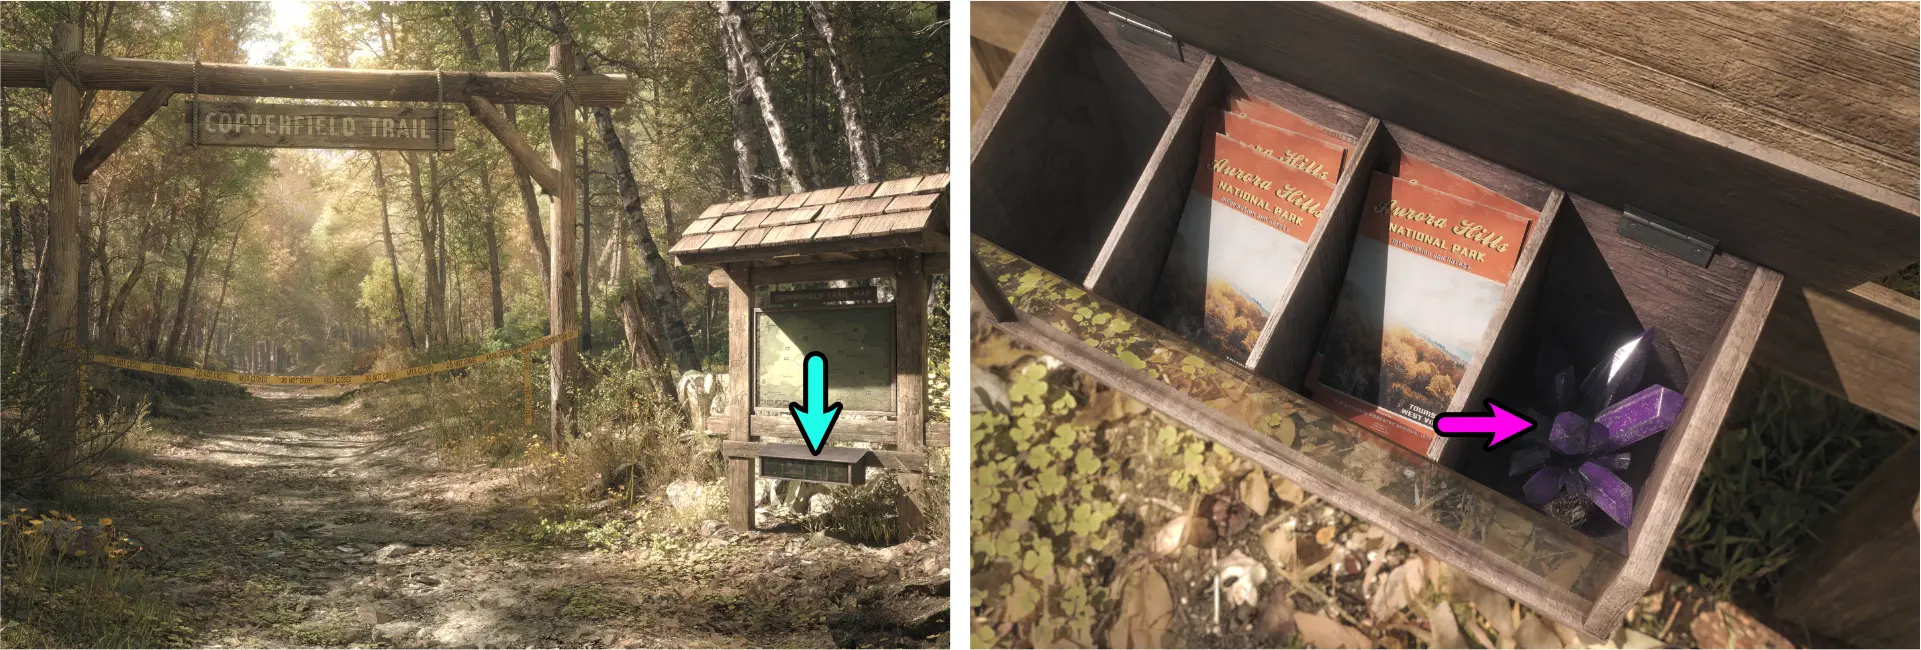
Purple Amethyst – found outside of the center, at the Copperfield Trail Map stand next to the entrance of the park. It is inside the box filled with flyers.
White Quartz – found inside the Gift Shop. It is on a tray at the lower right side of the screen when you approach the left area where the mounted fish is.

Orange Topaz – found at the area outside of the Gift Shop. It is inside the furnace and you’ll need to retrieve the Handle to open it. The Handle is inside a box found at the right area of the Gift Shop.
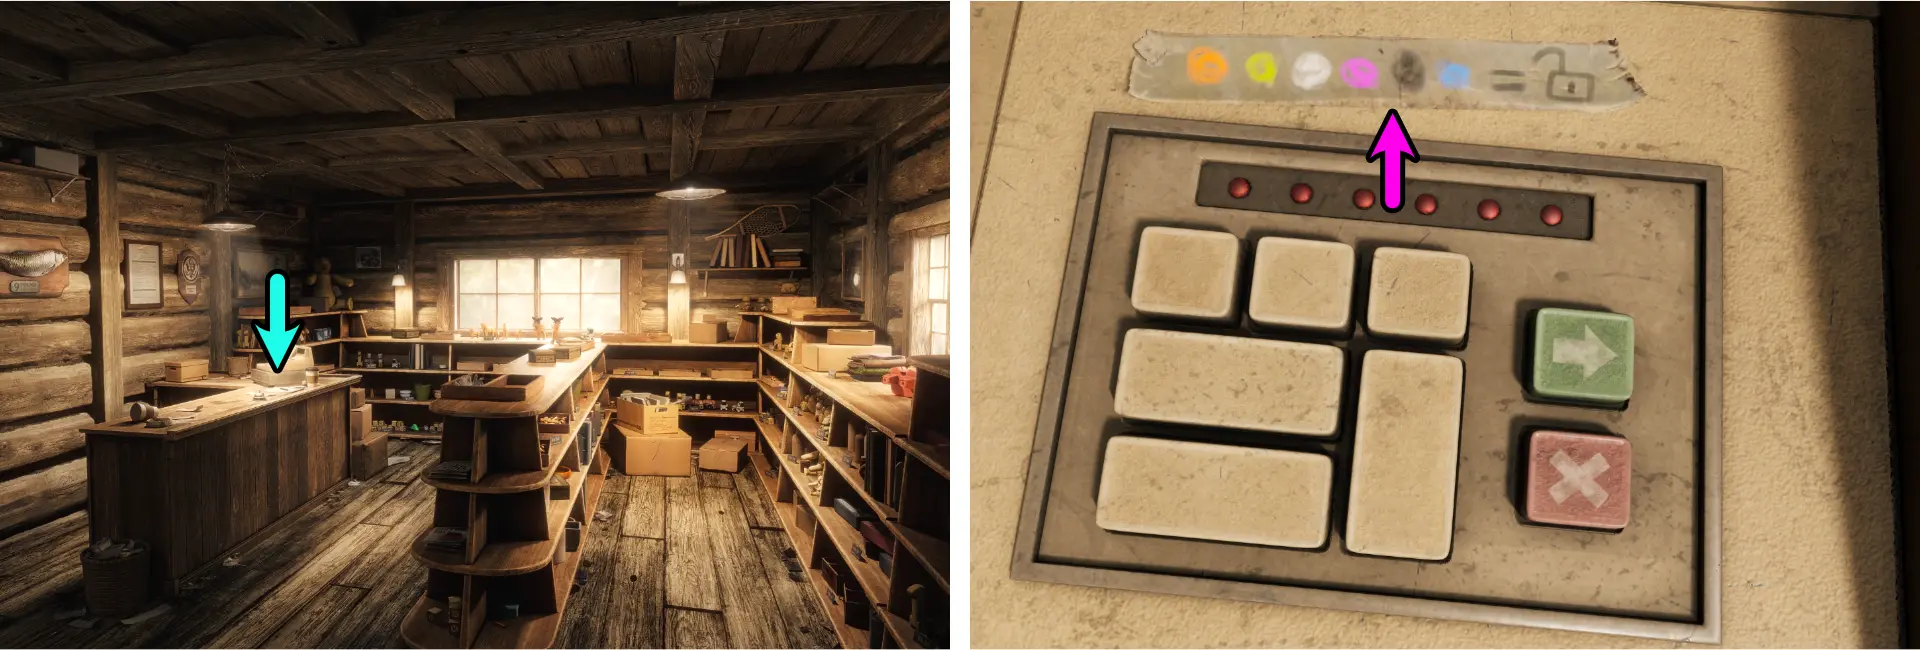
Once you have all 6 gemstones, place them in the correct boxes using the silhouettes to determine their positions. The solution should look like this:
Take a picture of the display for reference and go back to the cash register inside the Gift Shop. Use the color hint above to figure out the order that the buttons must be pressed before hitting enter. Refer to the image below for the correct sequence:
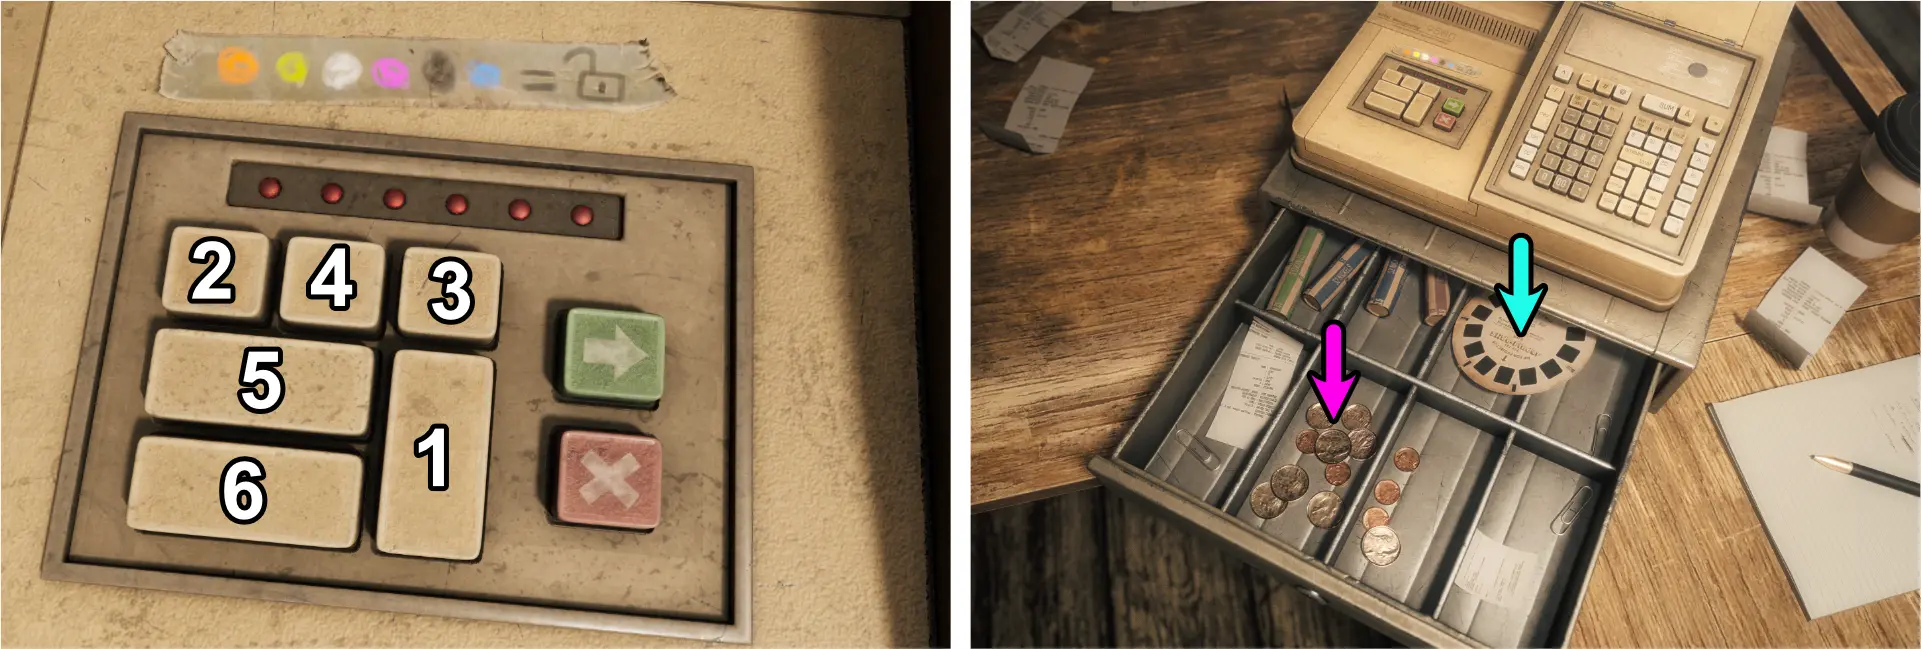
Upon opening the cash register, take the Toy Disc and the Spare Change.
Getting the Combination Lock
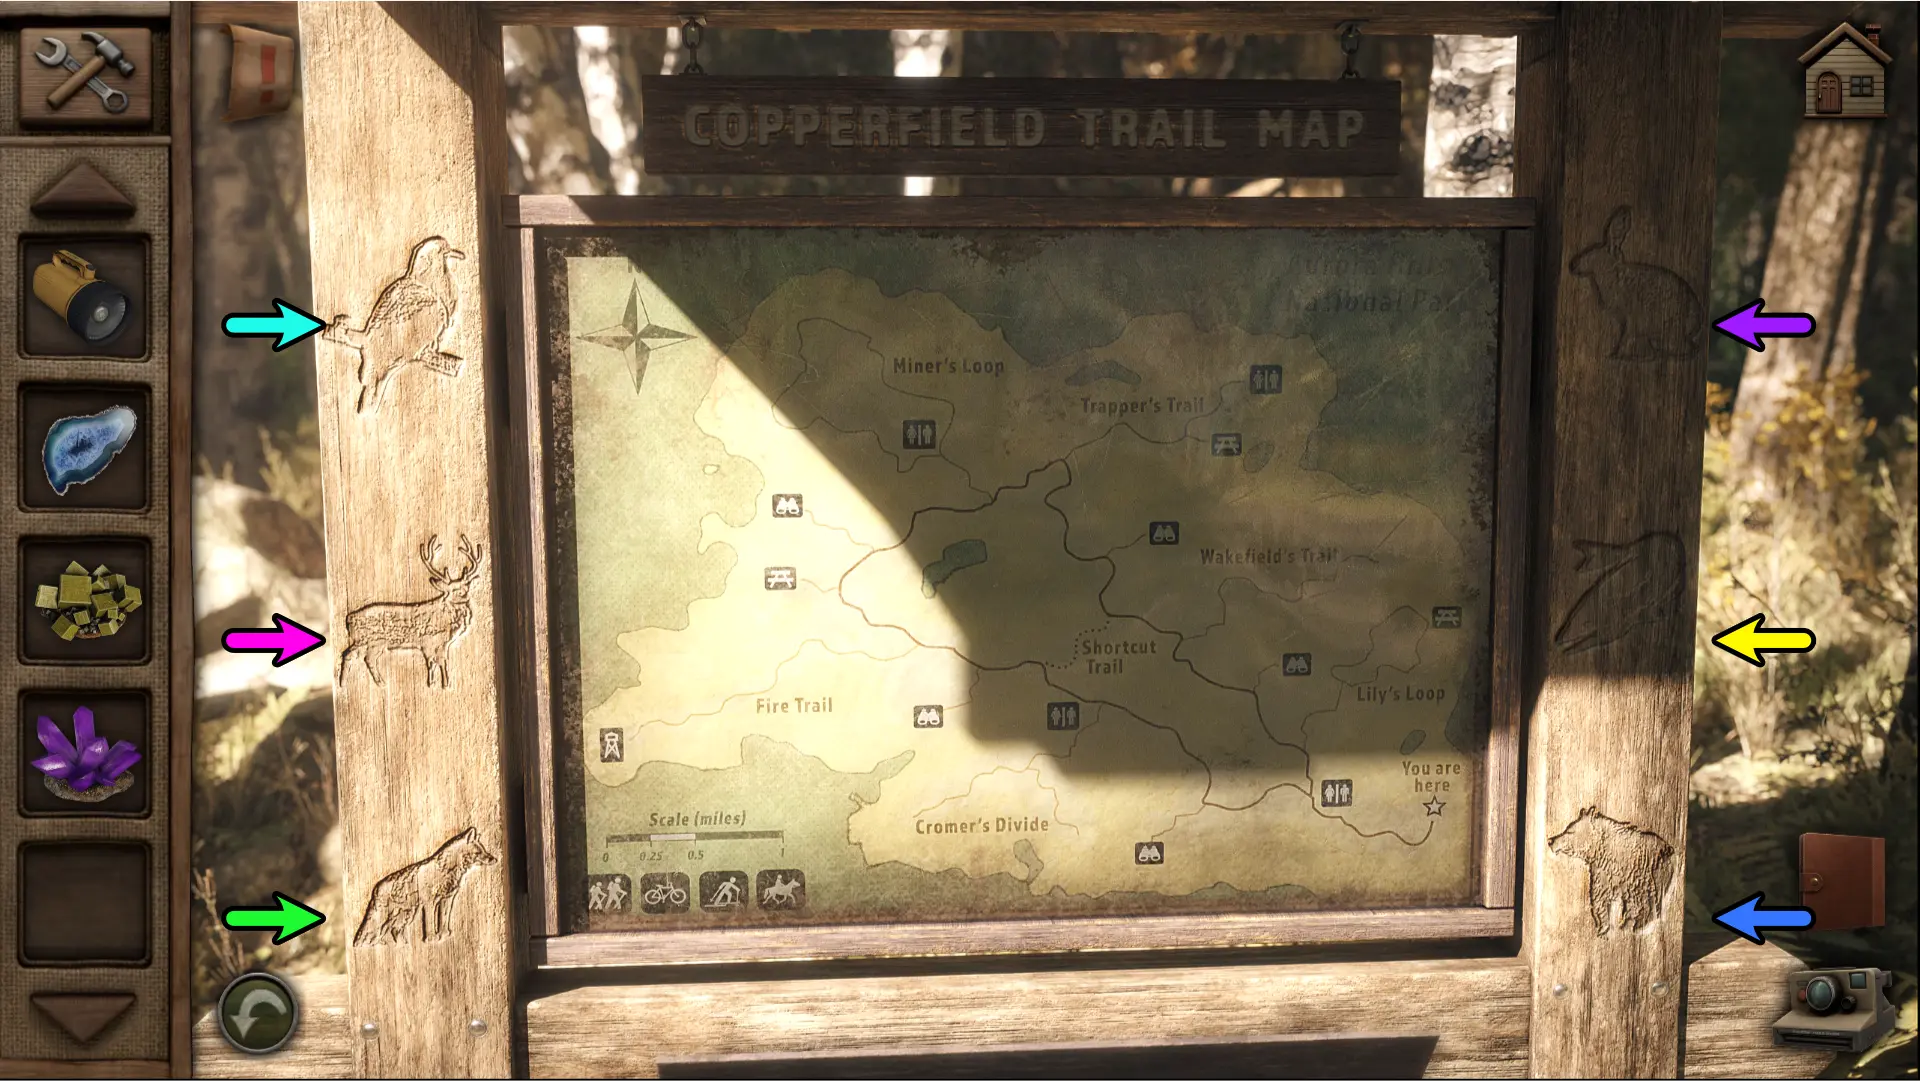
To get the combination lock, you’ll need to get the numbers that correspond to the animal silhouettes found on the Copperfield Trail Map stand outside of the Park Visitor Center. Take a picture of the stand for reference.
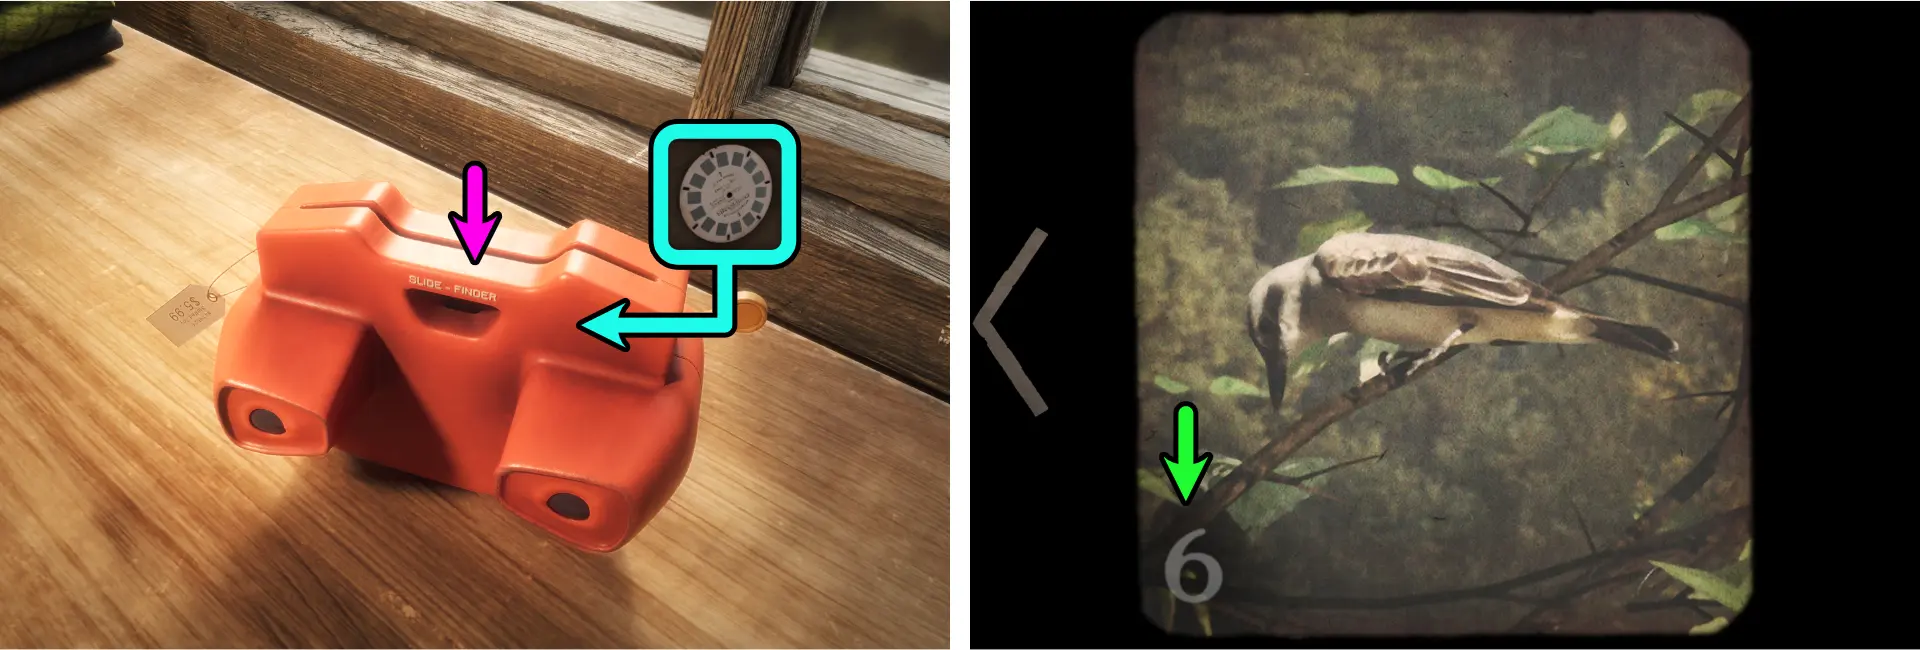
Bird – found in one of the images of the Toy Disc when viewed on the Viewfinder. The Viewfinder is located on a shelf at the right area of the Gift Shop. The number associated with the Bird is 6.
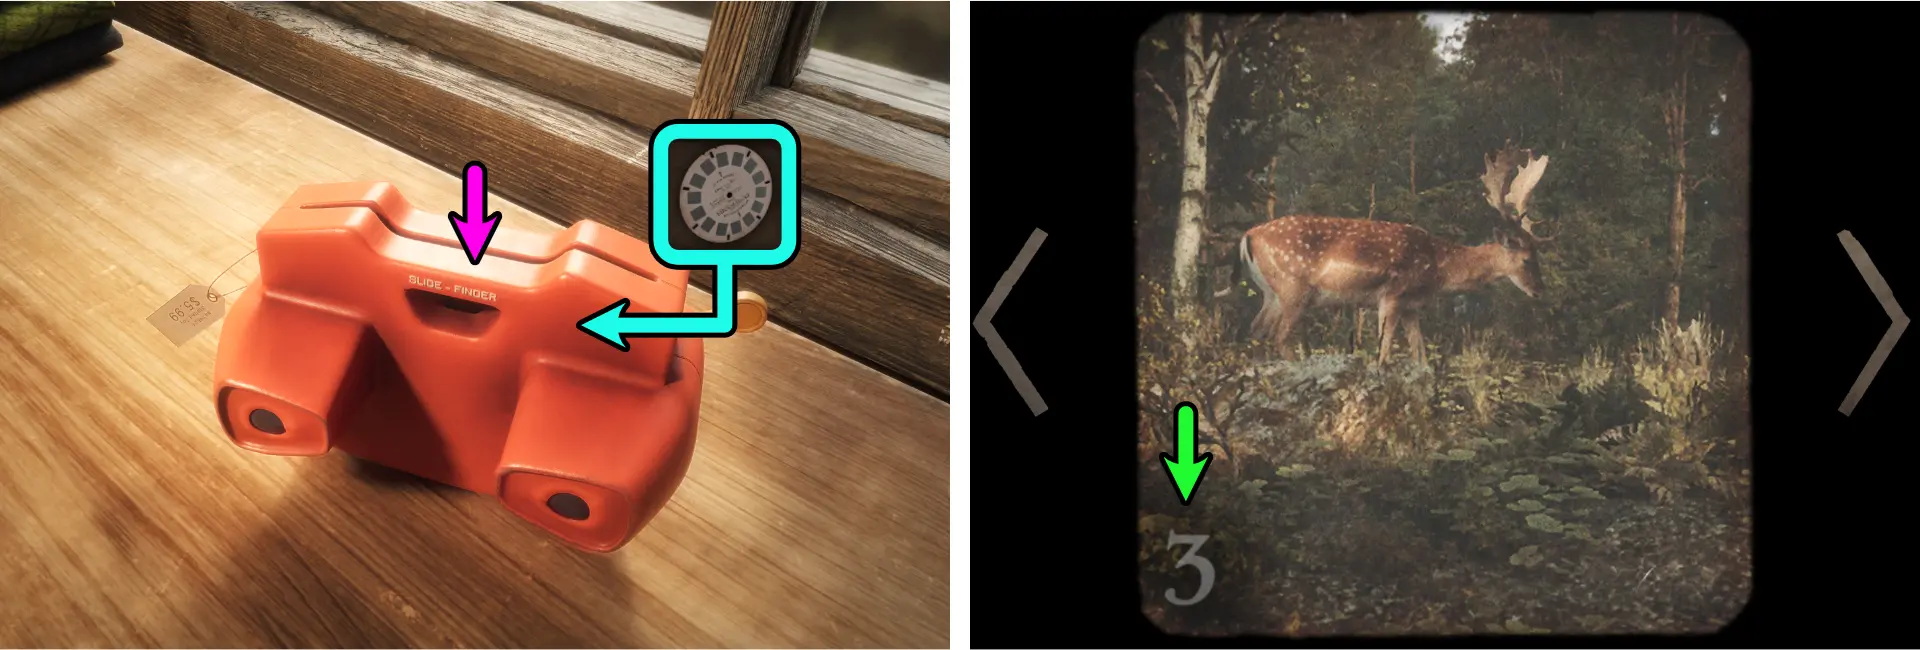
Stag – also found in one of the images of the Toy Disc when viewed on the Viewfinder. The number associated with the Stag is 3.
Fox – found on a glass display in the area outside of the Gift Shop. The number associated with the Fox is 2.

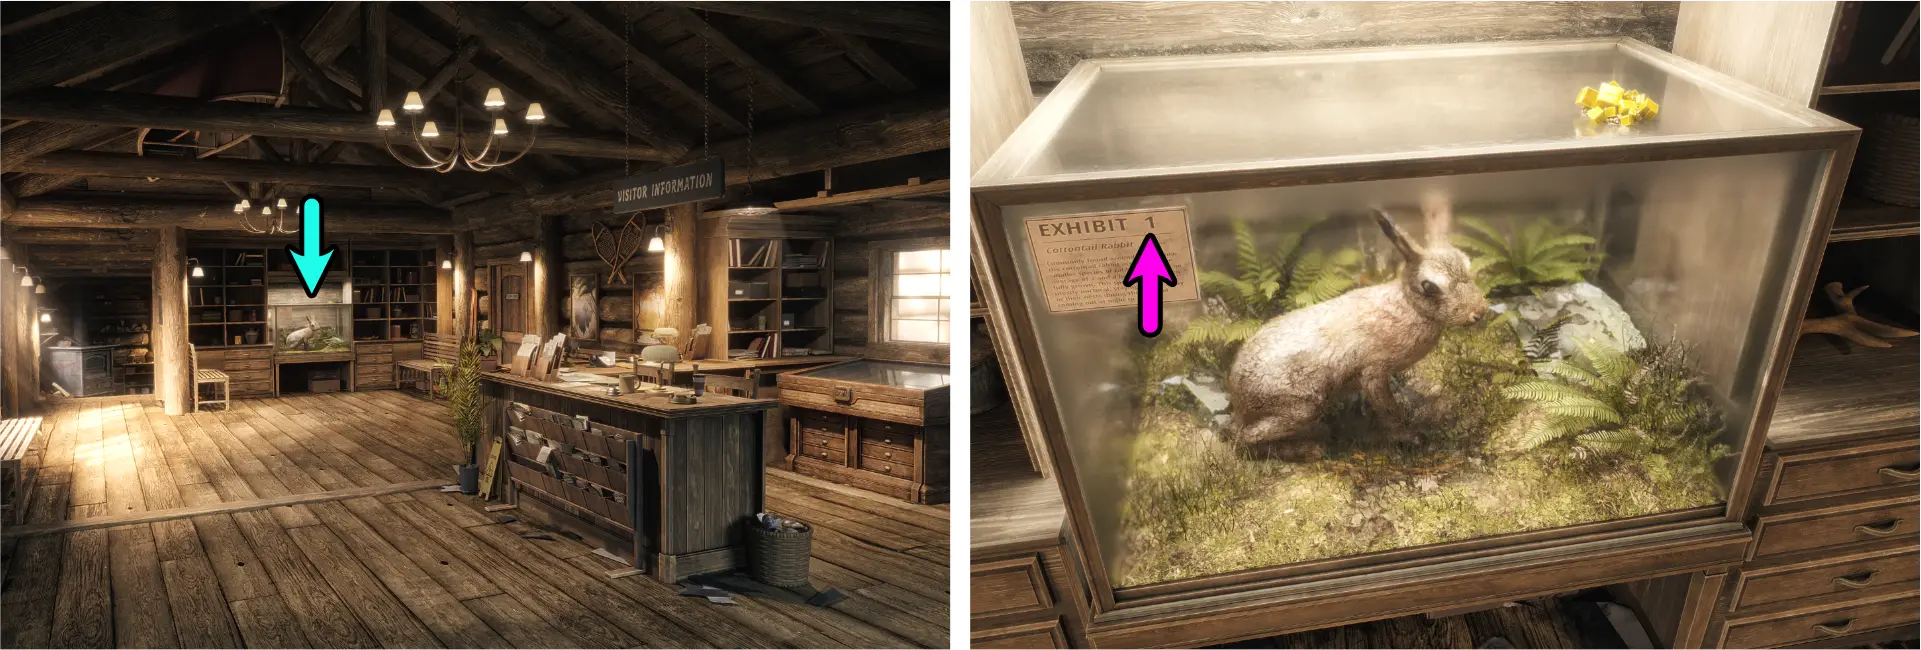
Rabbit – found on a glass display in the area just outside of the Staff Room. The number associated with the Rabbit is 1.
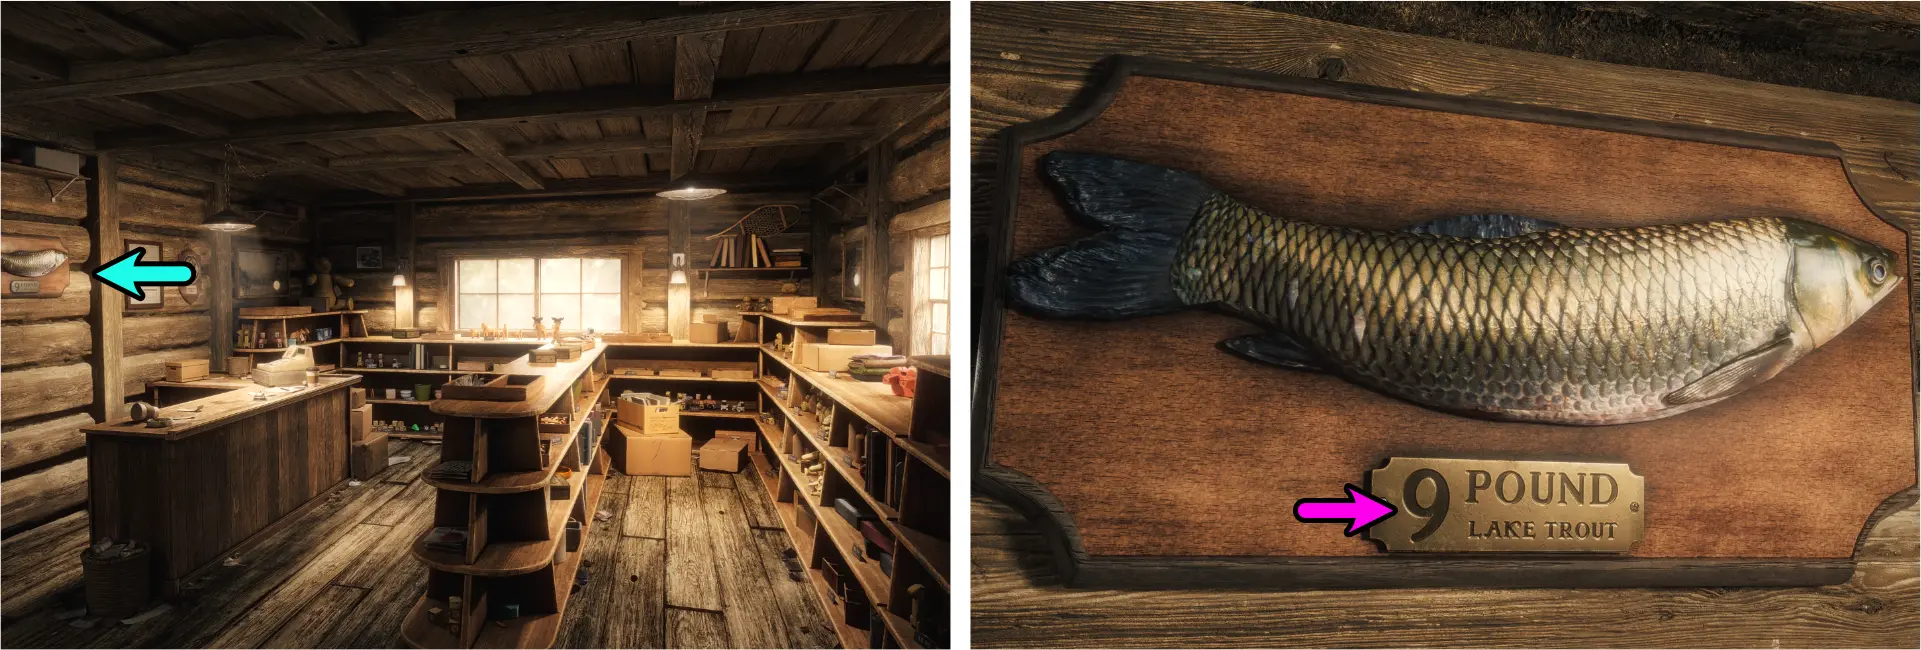
Fish – found mounted on the wall of the left side of the Gift Shop. The number associated with the Fish is 9.
Bear – found in a Root Bear can. To get the can, you need to put in the Spare Change you got from the cashier into the Vending Machine found just outside of the Gift Shop. Press one of the buttons and a can will be dispensed at the bottom of the machine. The number associated with the Bear is 5.
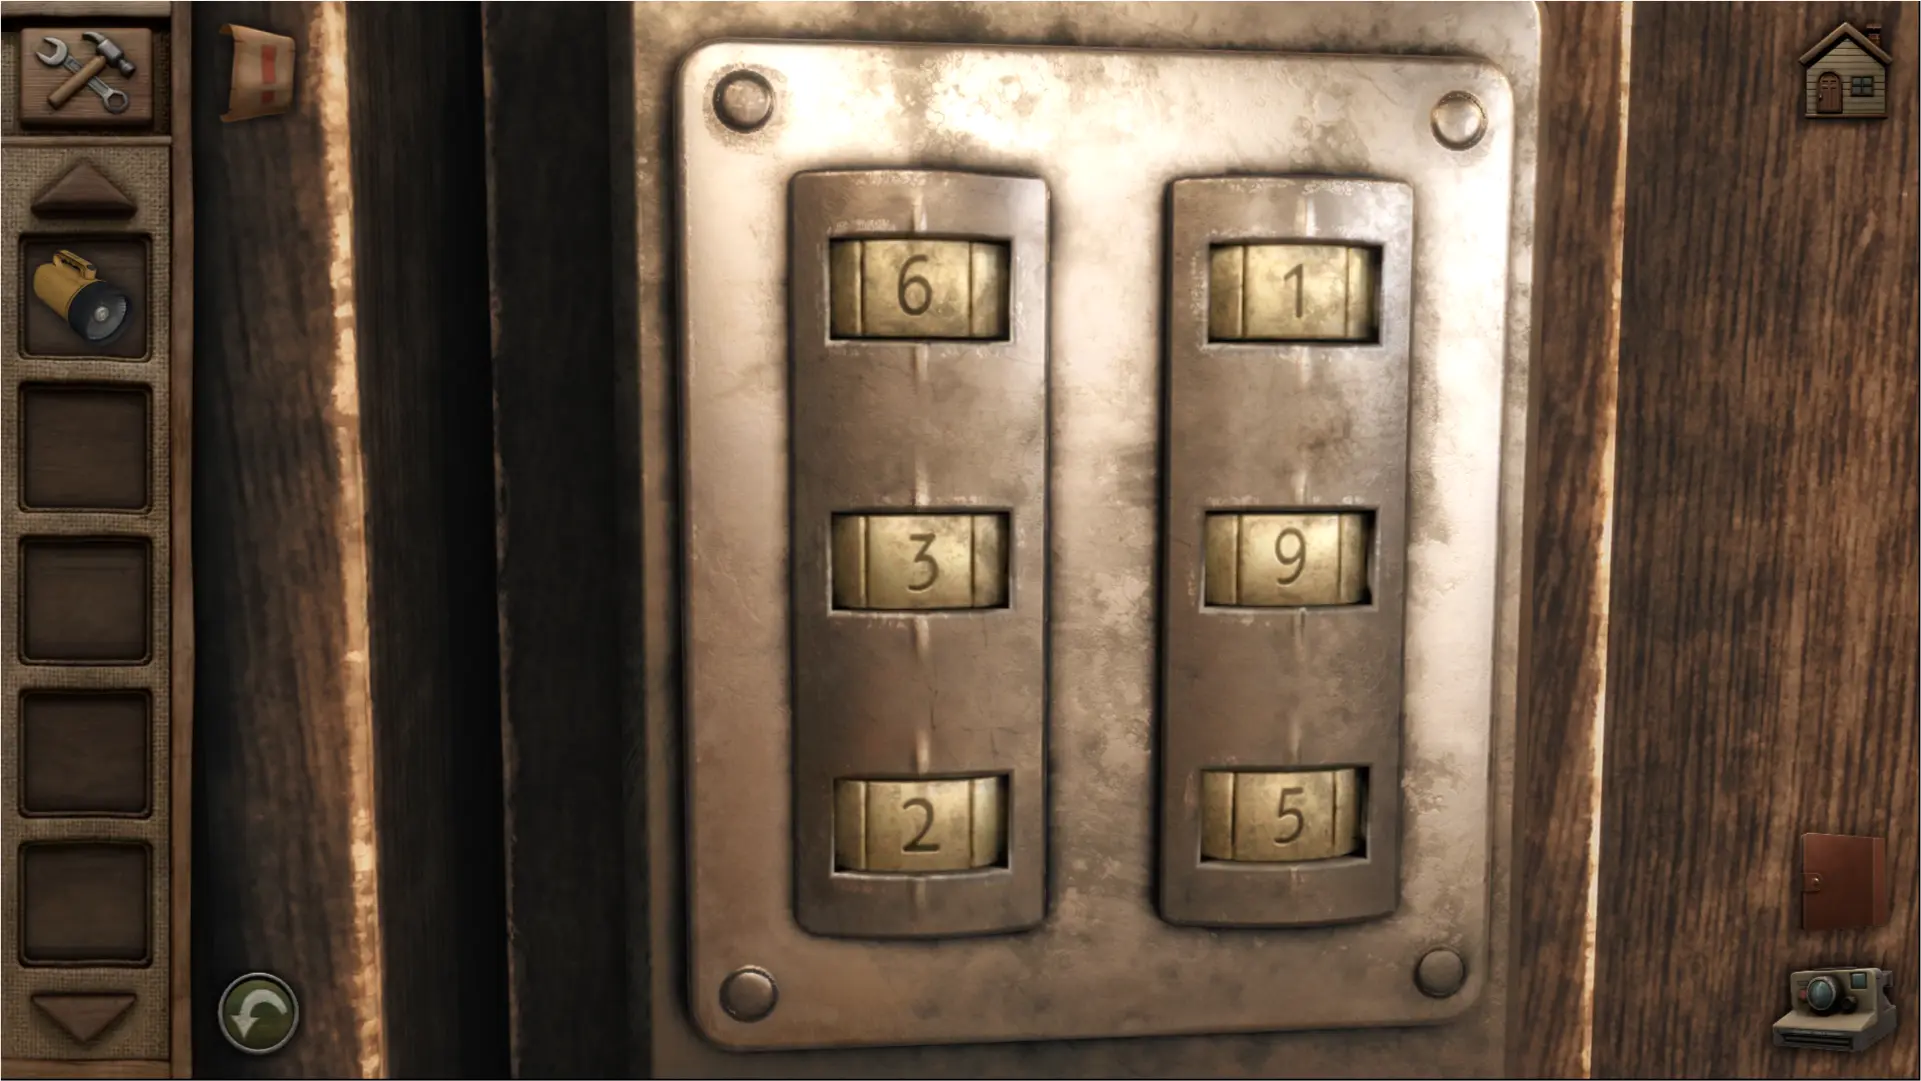
The combination of the lock for the Staff Room is shown in the image below:
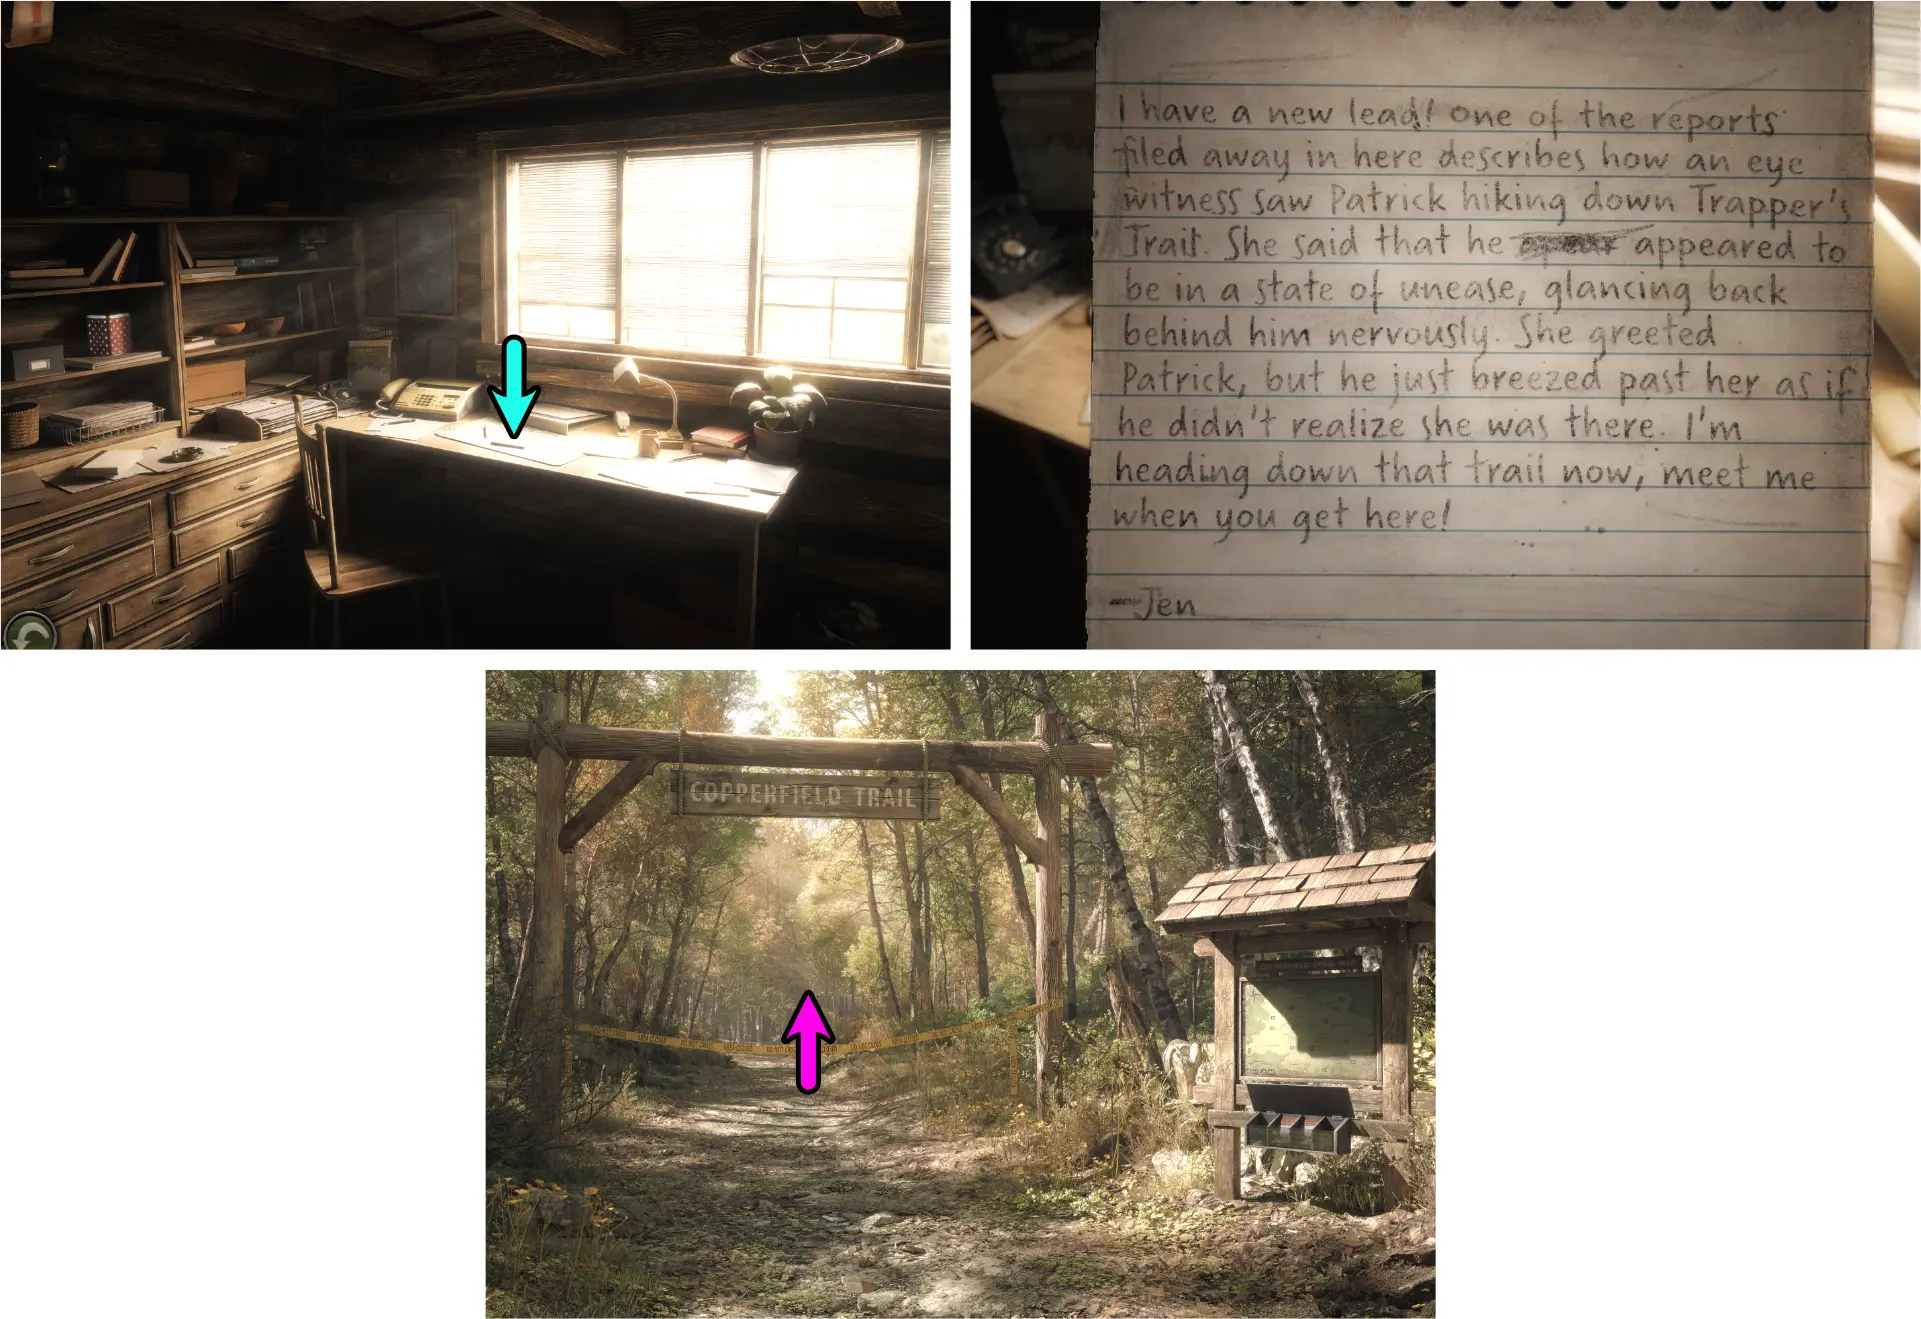
Once the Staff Room is unlocked, approach the desk and read the note Jen left on the notebook. It’ll tell you that she went on ahead to investigate the Trapper’s Trail. Leave the Park Visitor Center and go into the Copperfield Trail.
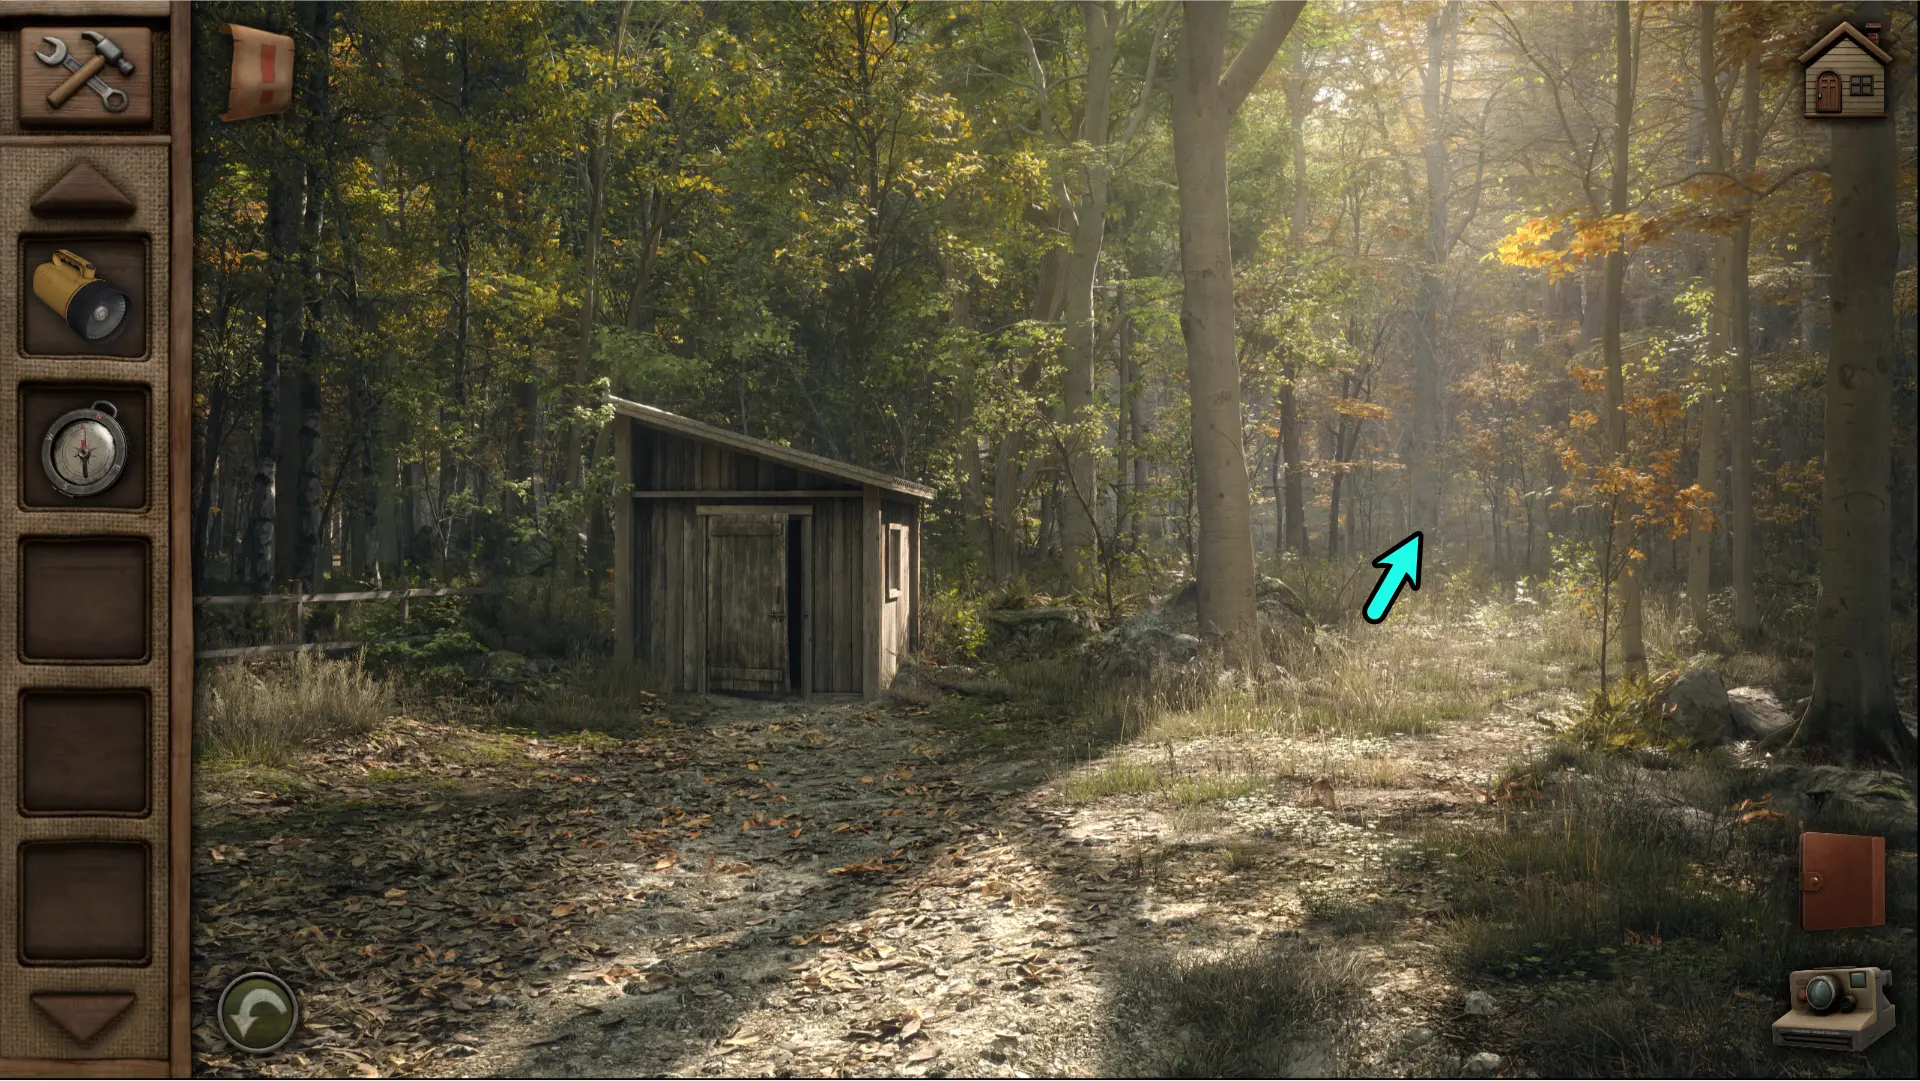
Trapper’s Trail

Unlocking the Restroom
Before you can start your investigation, you’ll first need to find Jen. The clue to her location is found inside the Restroom. You’ll need to find a few things before you can unlock it.
Unlocking the Red Toolbox
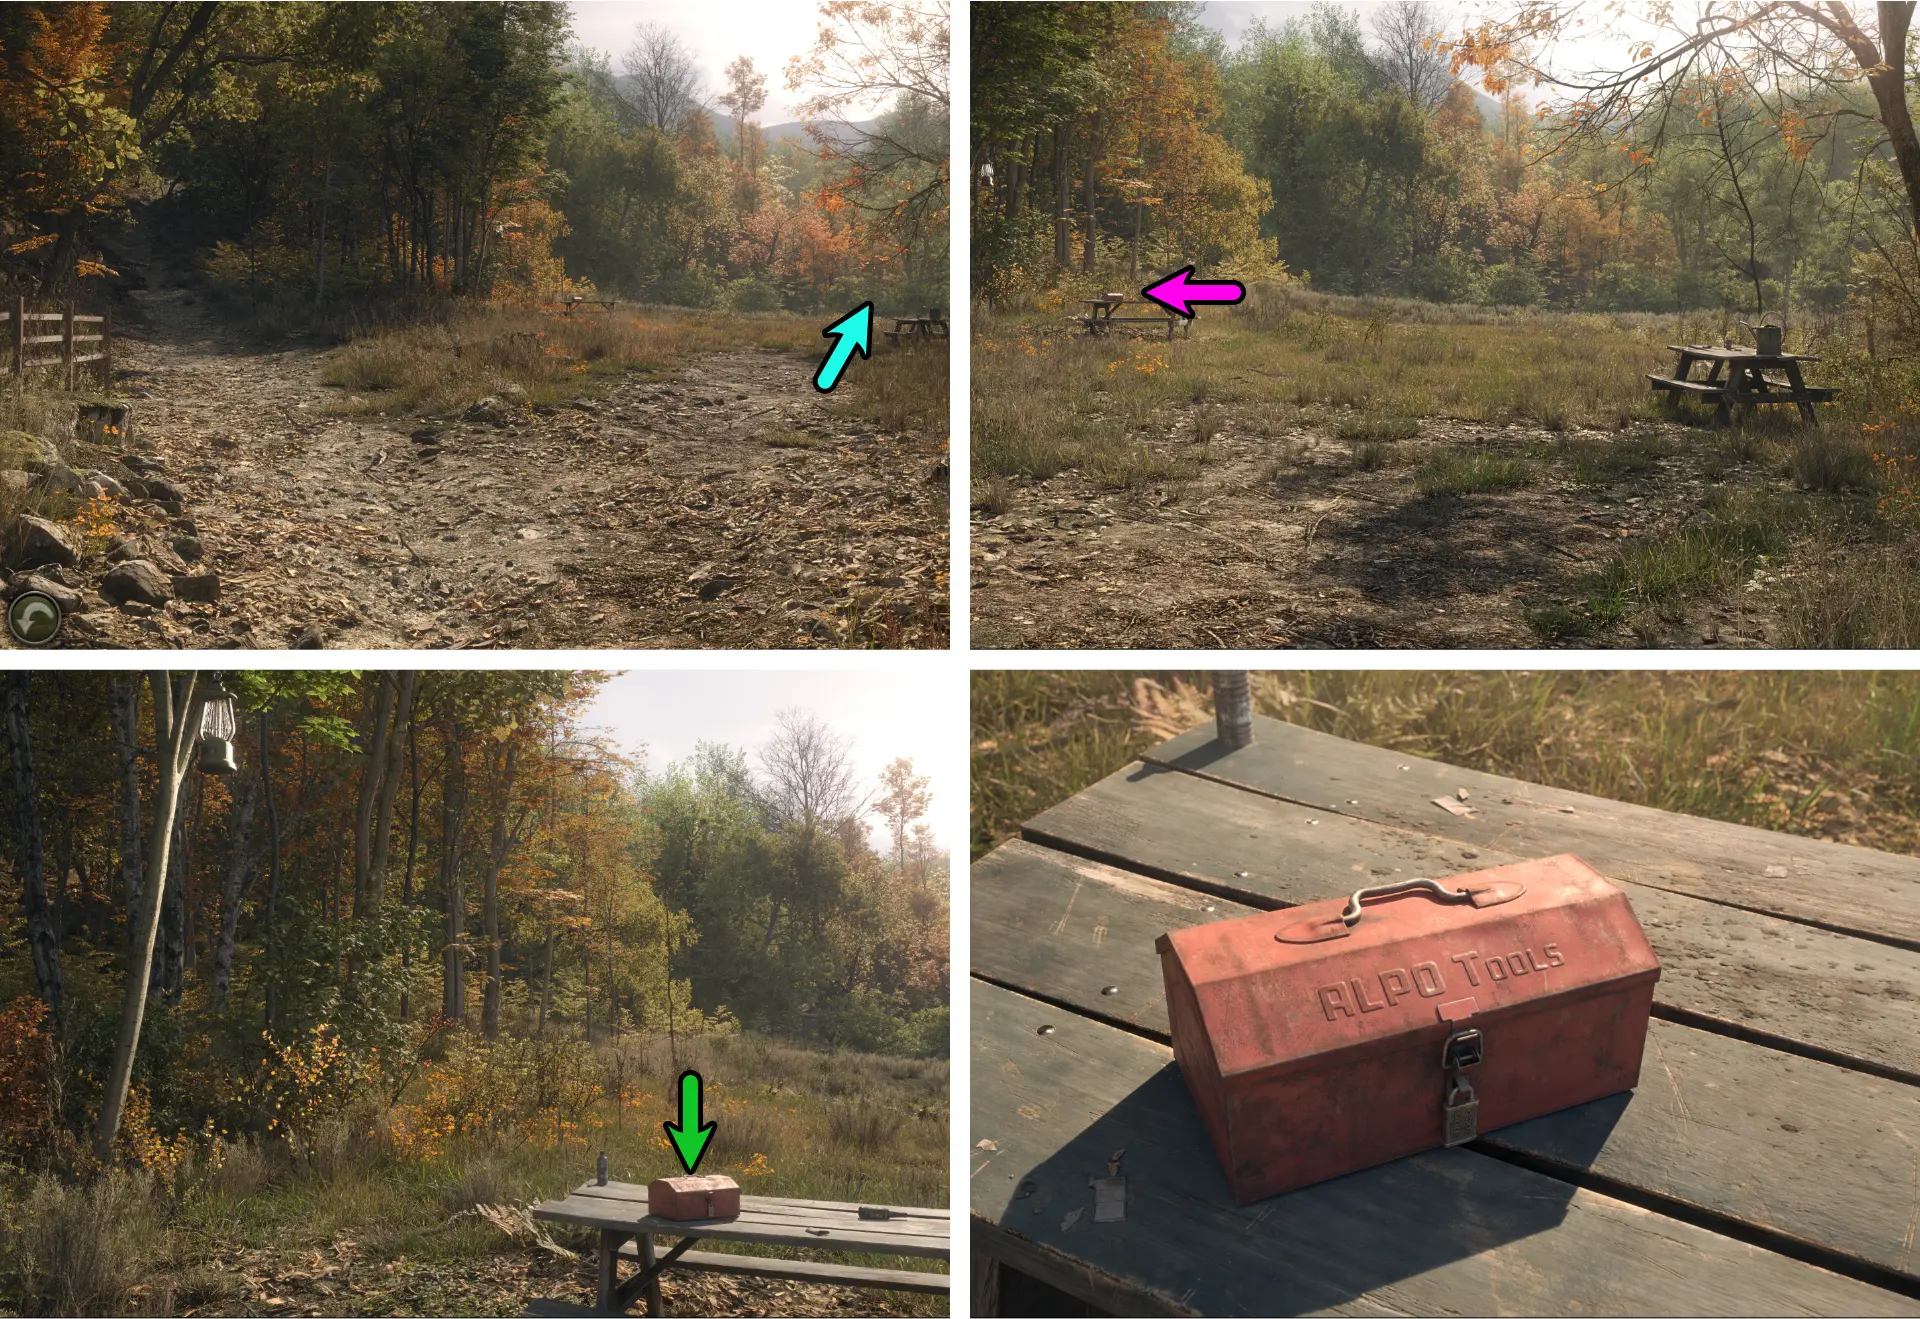
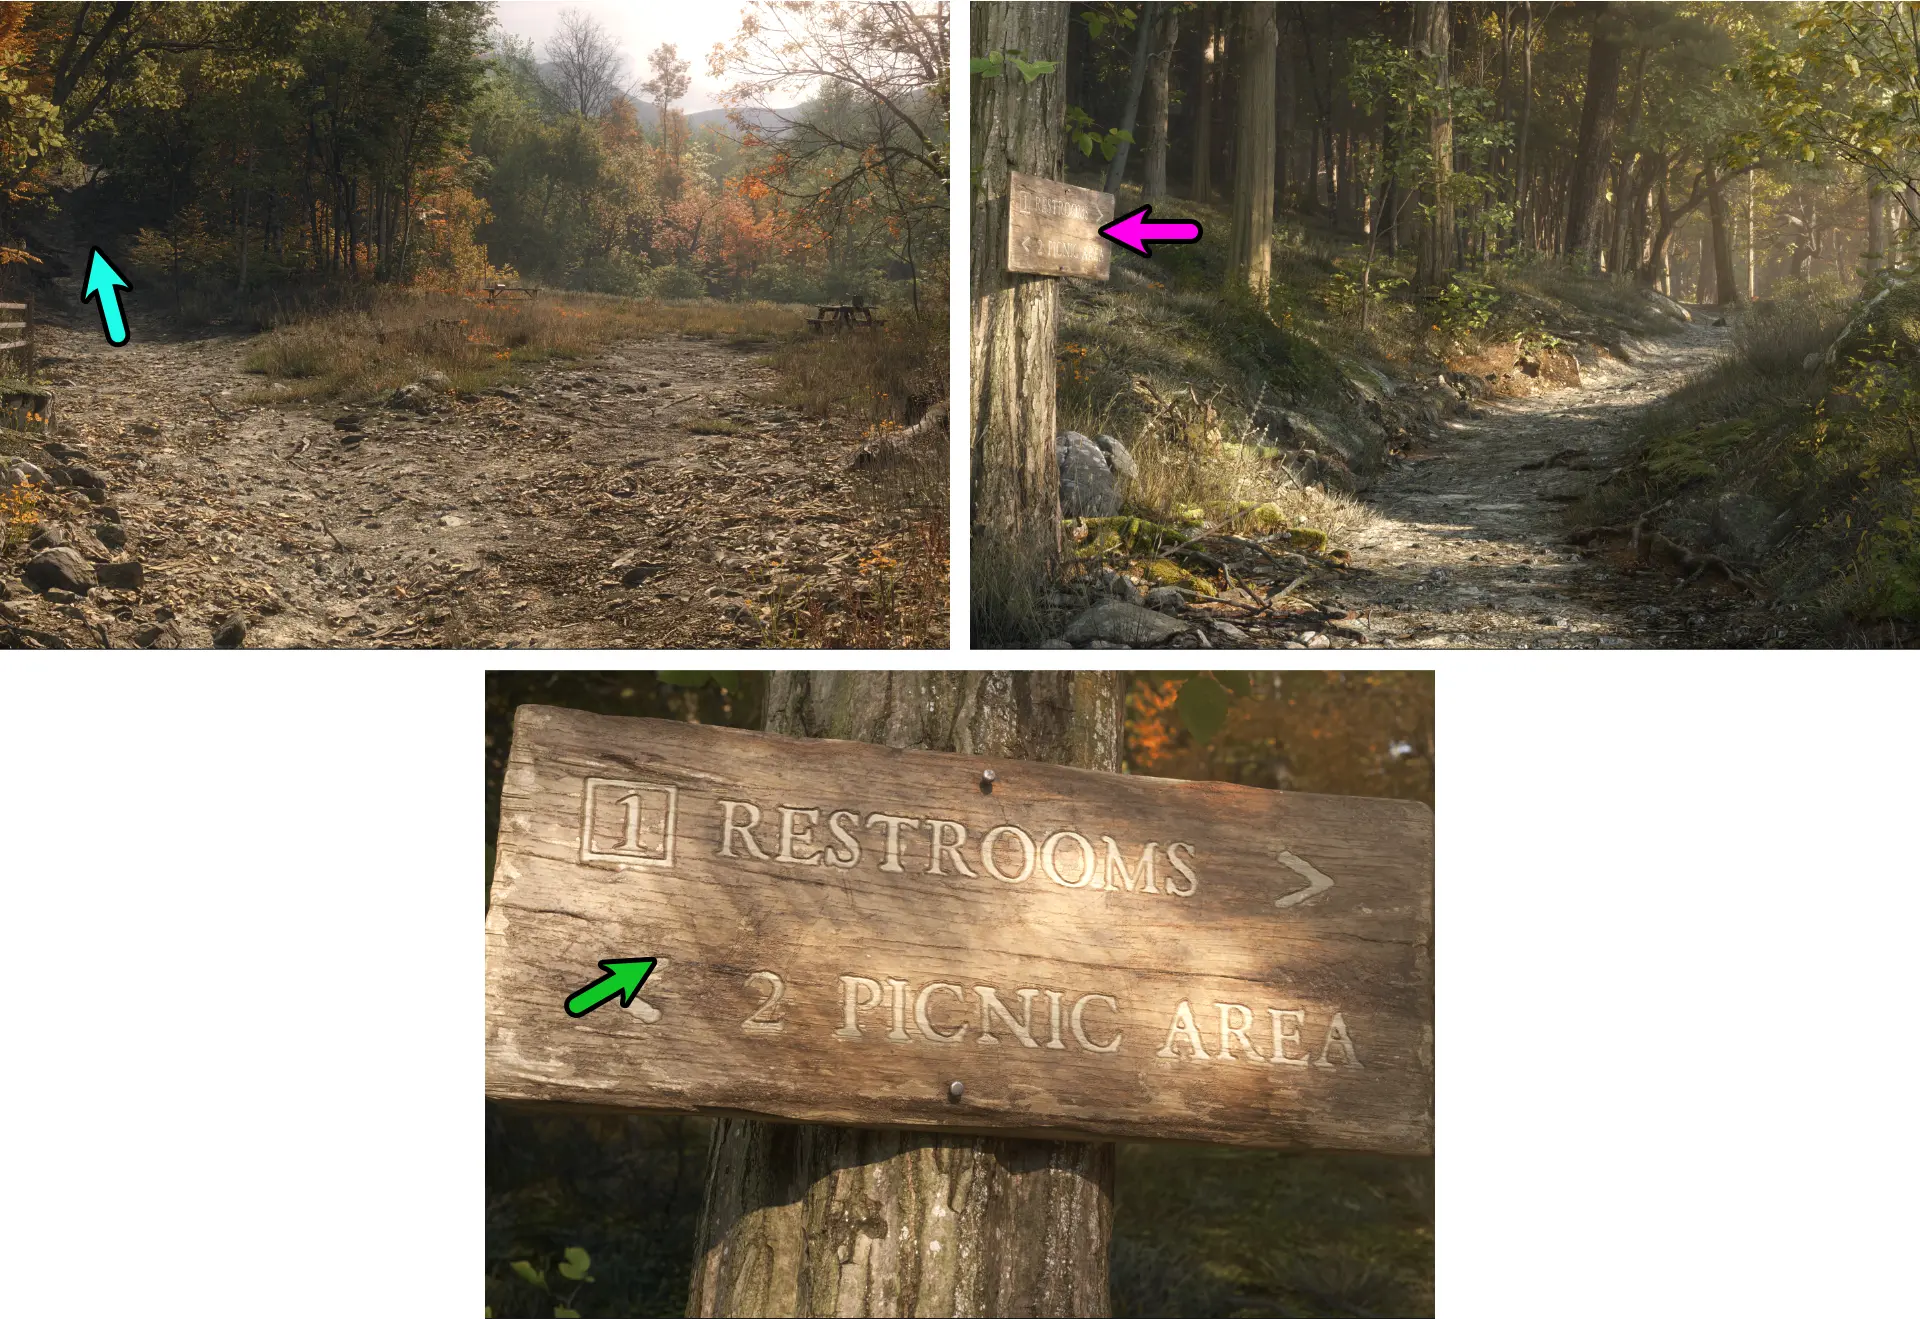
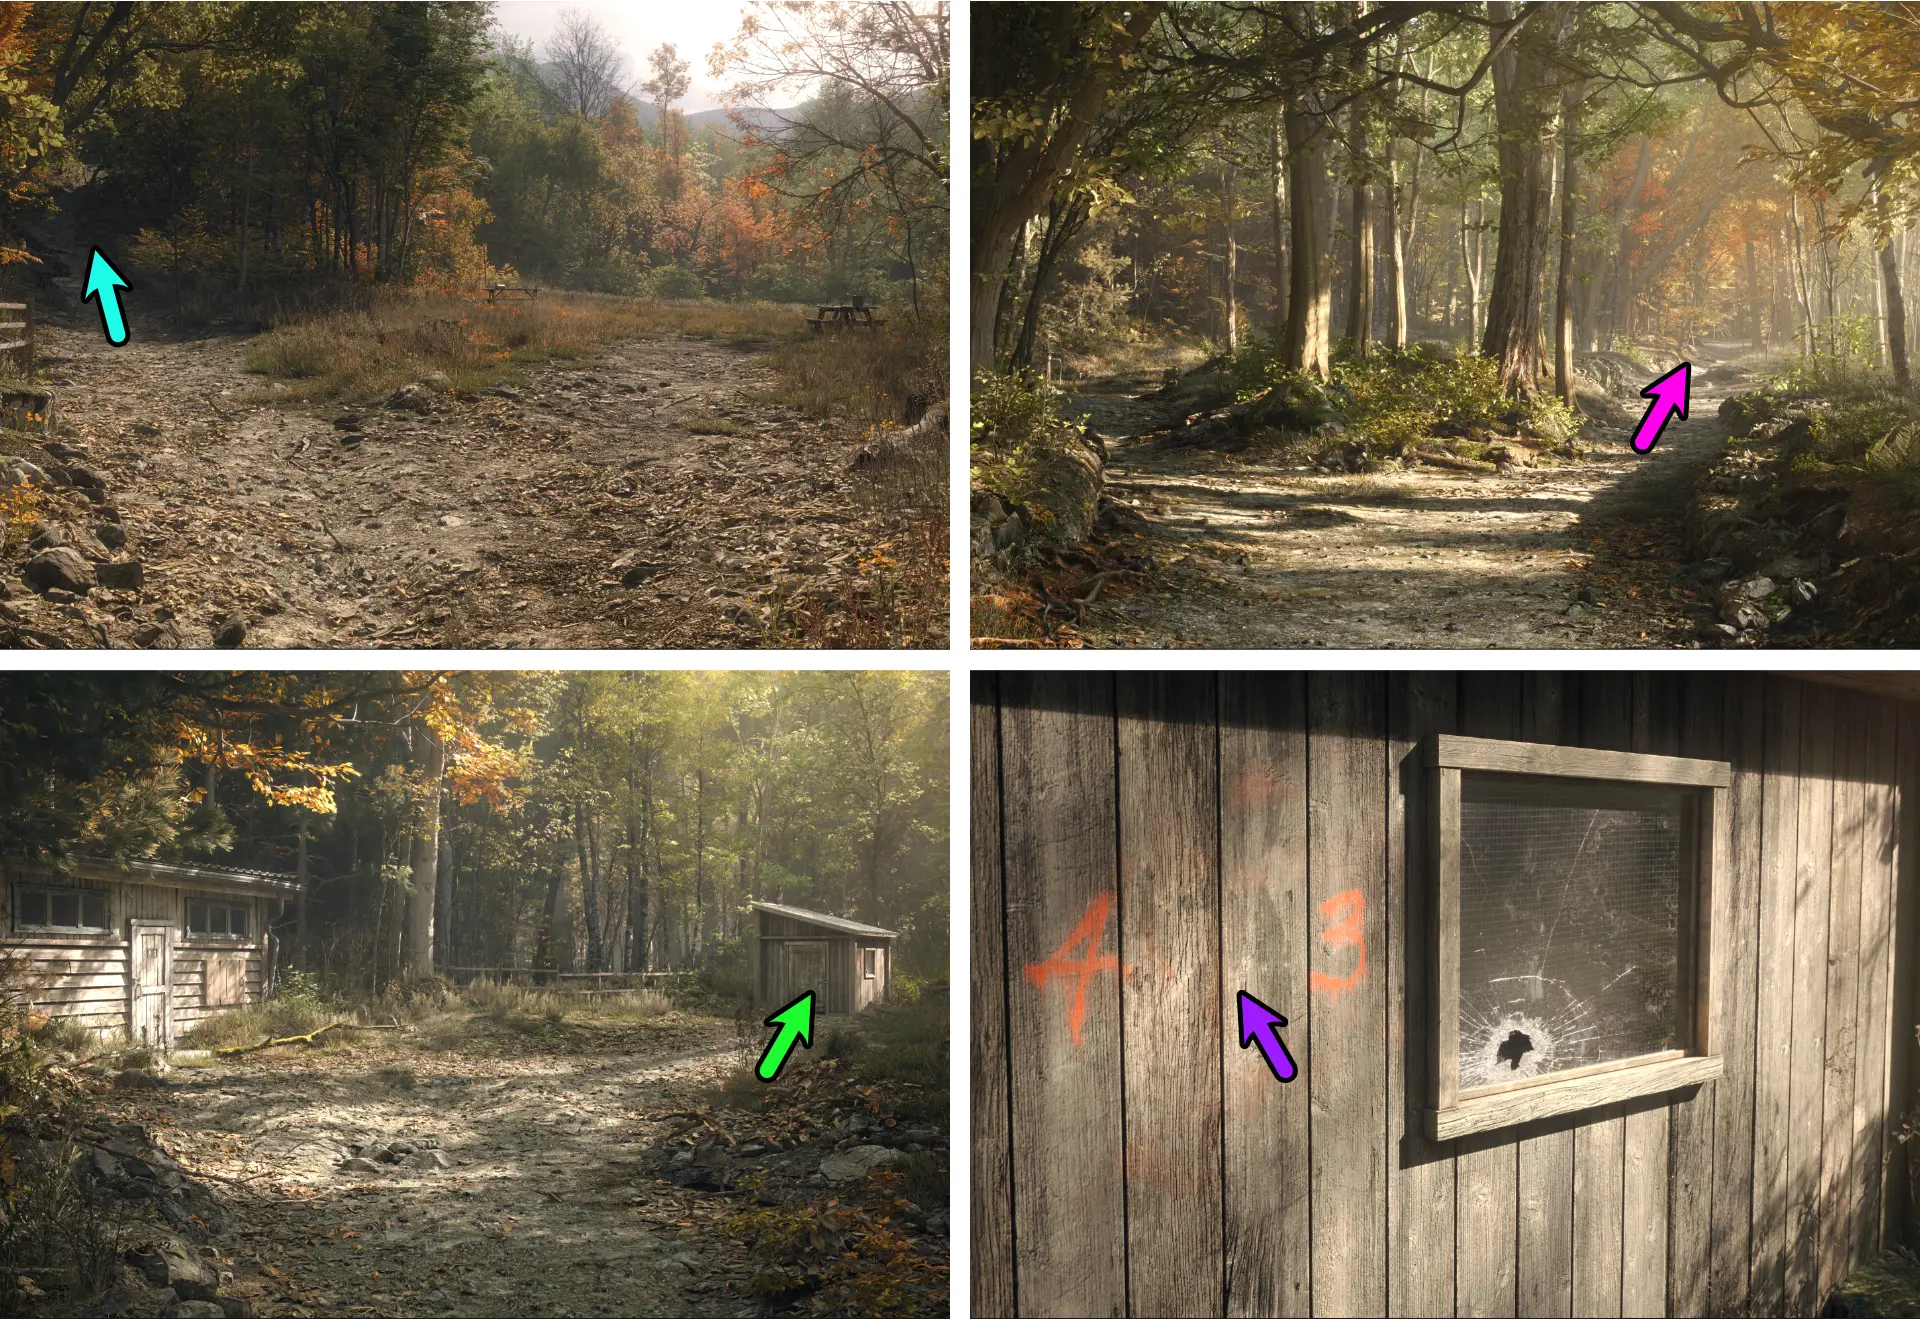
Upon arriving at Trapper’s Trail, keep moving forward until you find a fork in the road (a split path). Go to the right where the picnic benches are and you’ll find a red tool box with an 8-digit combination lock with different shapes for each digit.
To get the correct combination for the lock, you’ll need to find clues in the form of numbers that are scattered in the park.
1st Clue – found on the right picnic bench’s table. There is a 7 inside a circle and an 8 to the upper right of it.
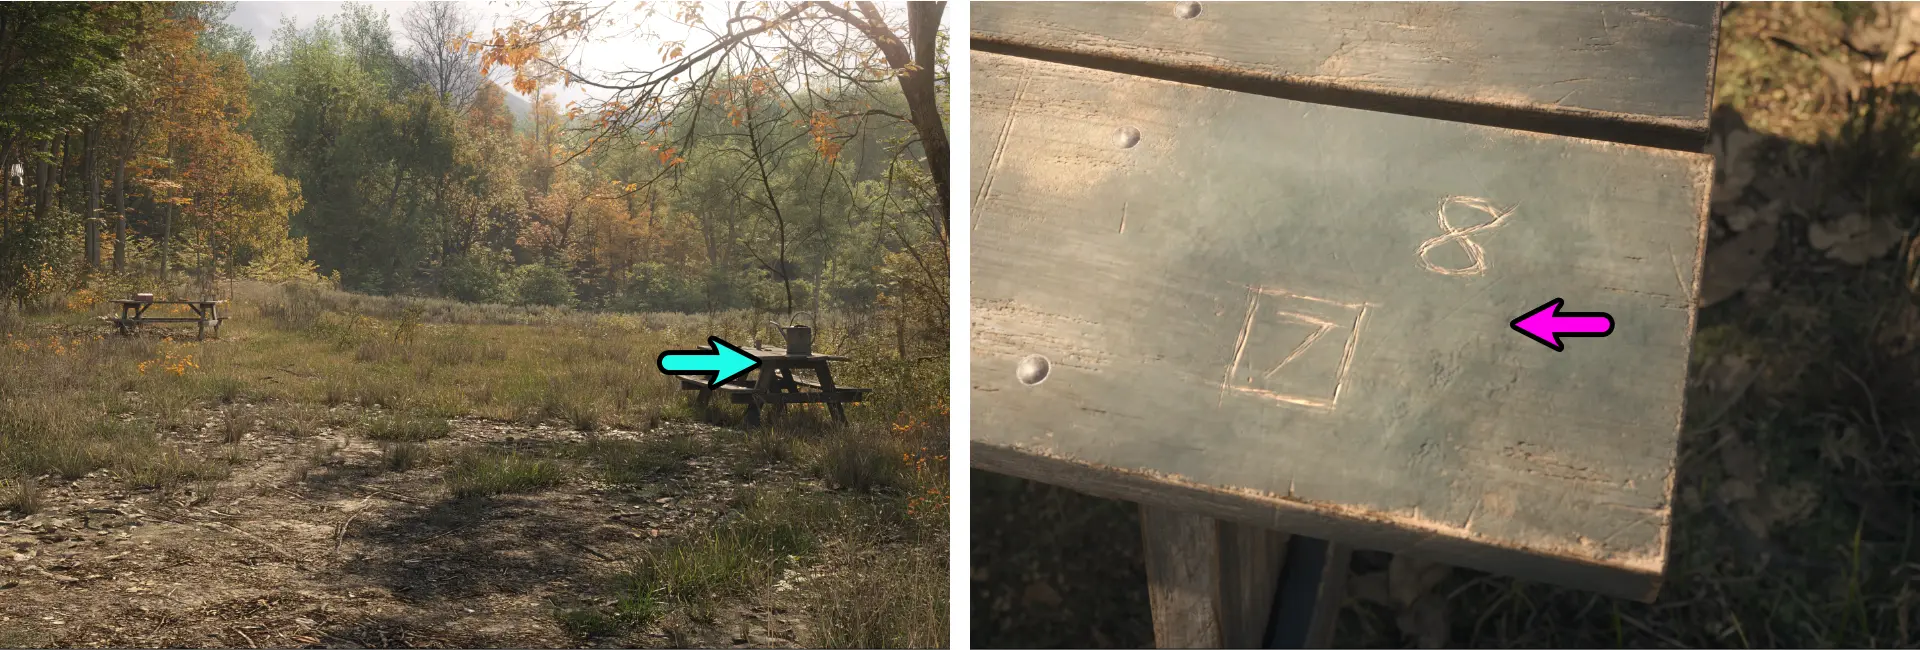
2nd Clue – found on a sign at the left path from the first fork on the road. There is a 1 inside a square and a 2 to the bottom right of it.
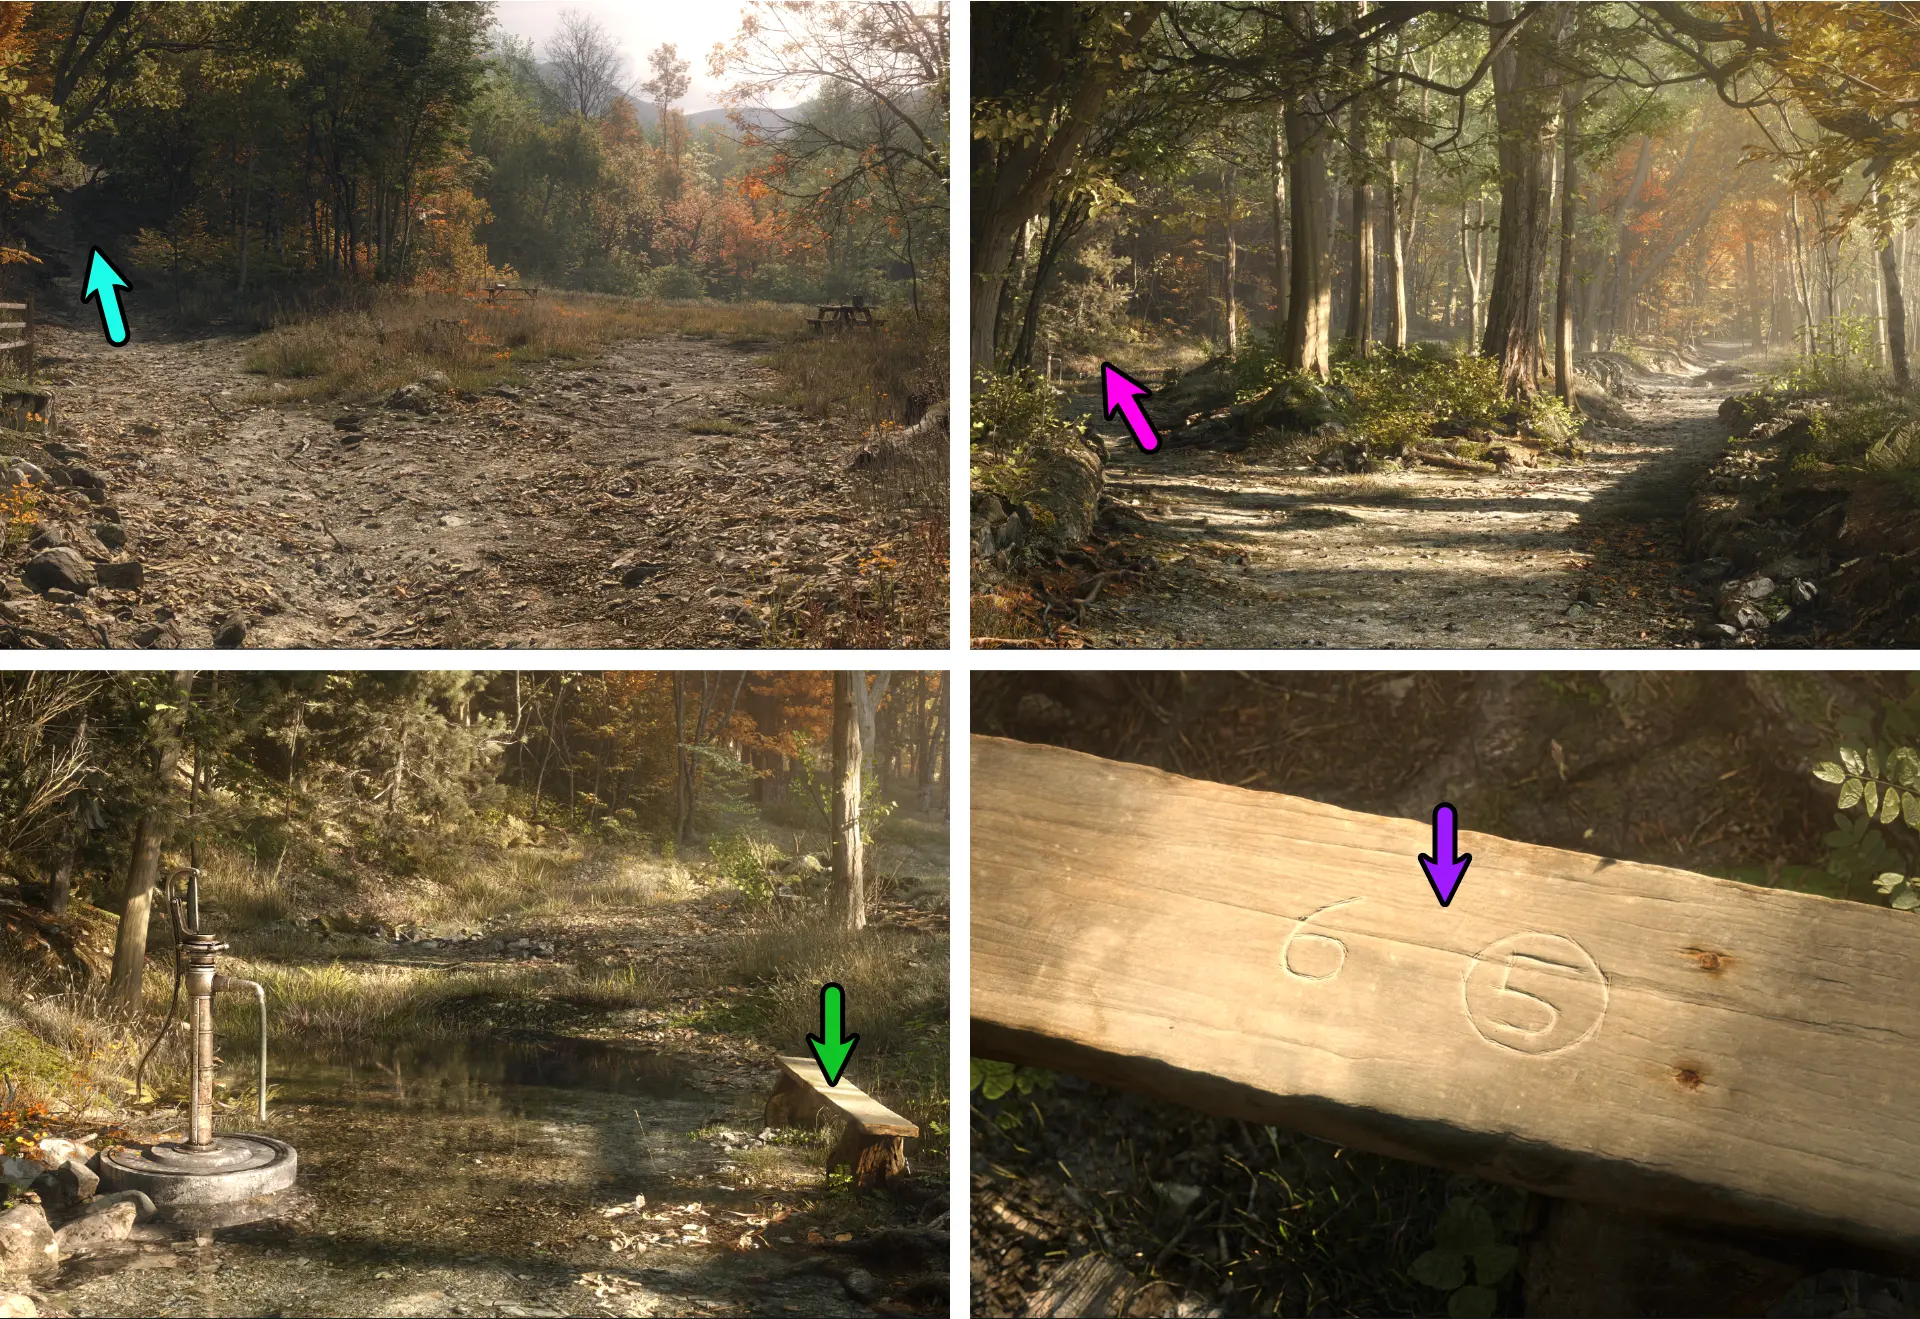
3rd Clue – found on a bench where the water pump is. You can find the area by going to the left path from the first split path, then going to the left path from the second split path. There is a 5 inside a circle and a 6 to the left of it.
4th Clue – found on the wall of the right side of the Tool Shed. You can find the area by going to the left path from the first split path, then going to the right path from the second split path. There is a 4 and a 3 with no shapes around it.
You’ll need to apply all of the clues together to figure out the correct positions of the numbers without any overlaps. The solution should look like the image below:
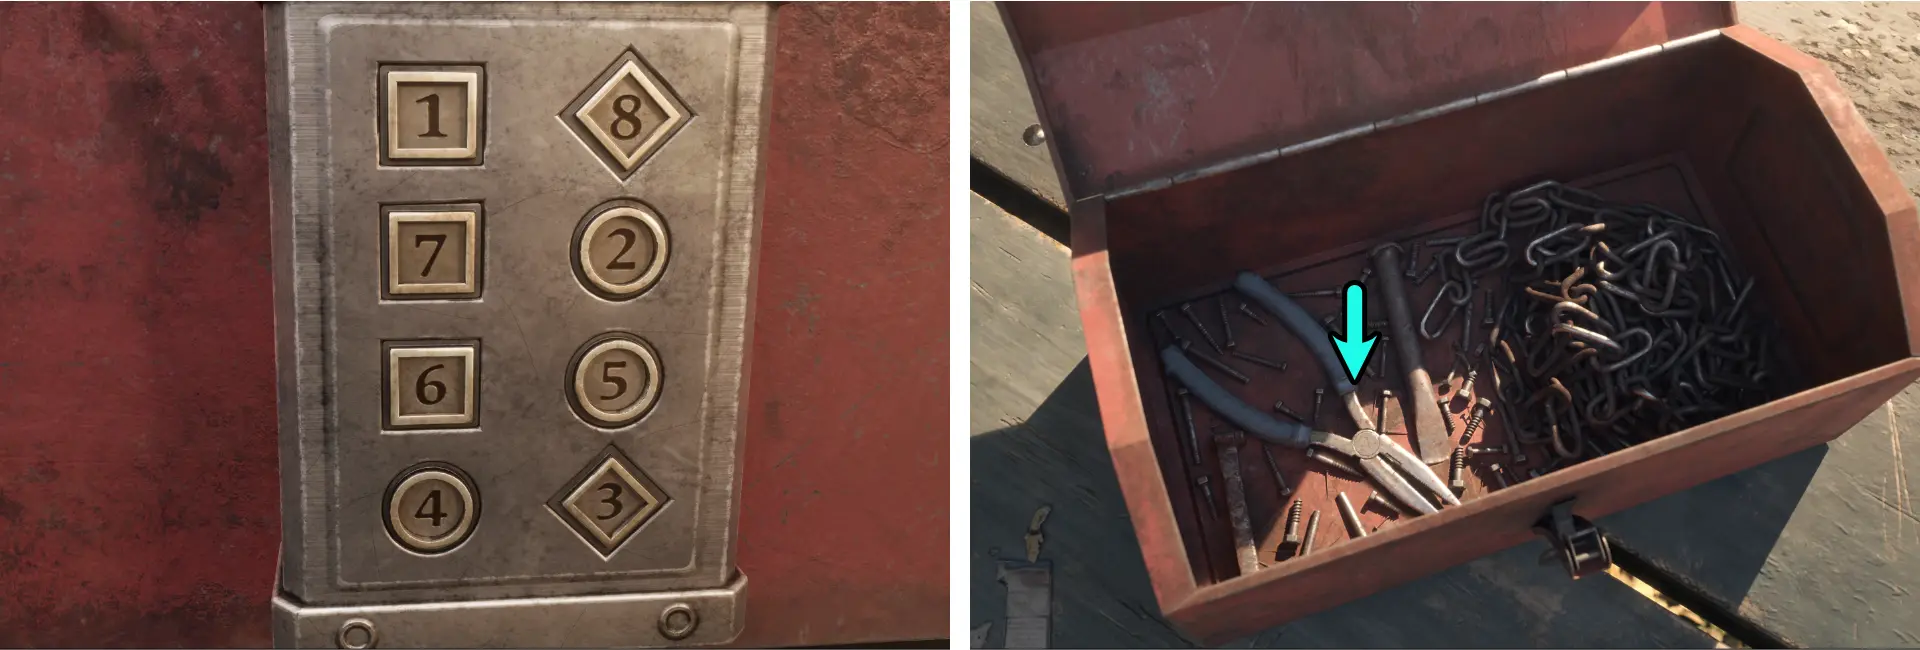
Once the toolbox has been opened, take the Pliers inside it.
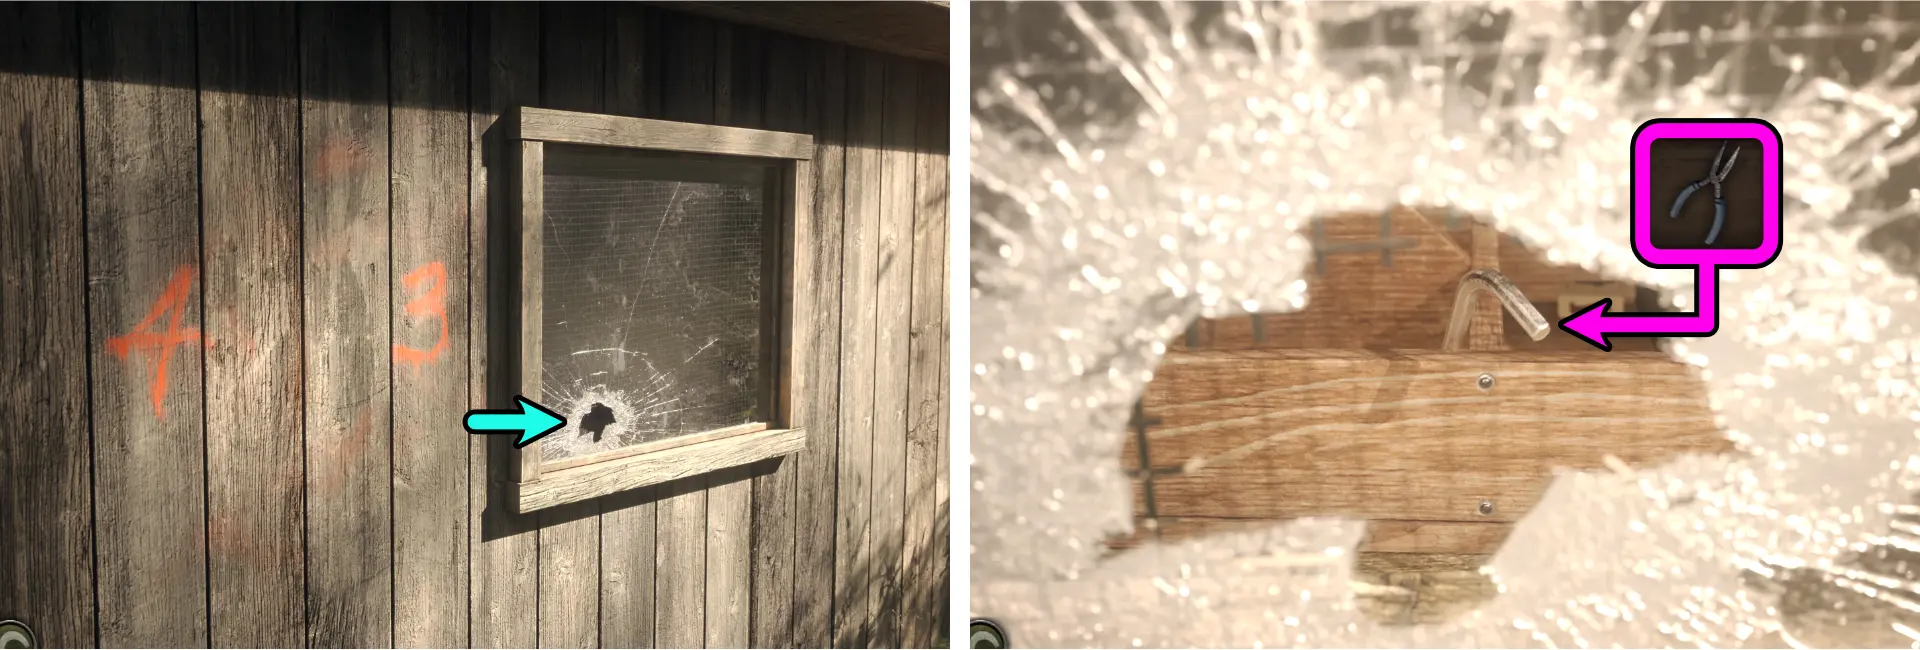
Unlocking the Trash Bin
Once you’ve obtained the Pliers from the red tool box:
- Go to the right side of the Tool Shed and take a peek at the broken window.
- Use the Pliers to take the Hex Key.
- Go to the trash bin. This is found by going 2 steps forward from the start of the trail. It is the area with stairs going to the upper right of the screen.
- Use the Hex Key on the panel of the trash bin to see the locking mechanism.

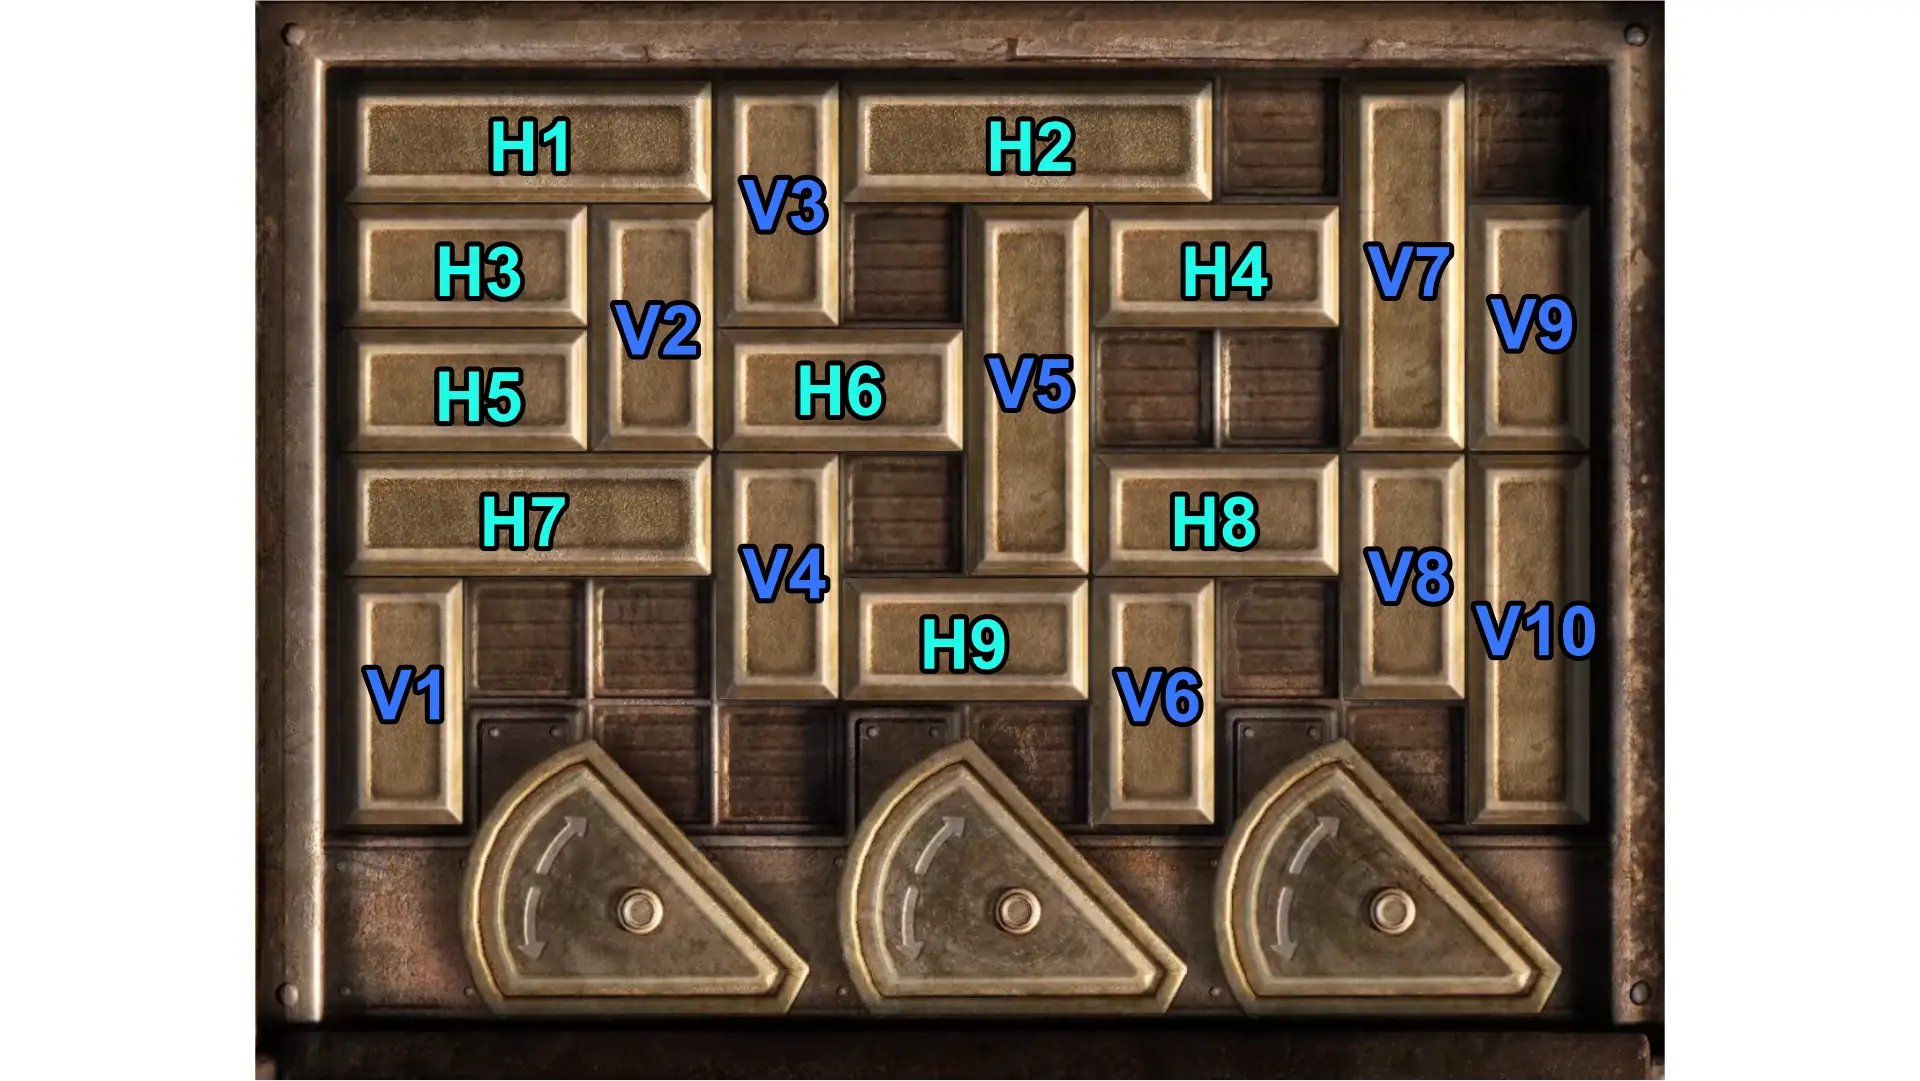
For the trash bin’s lock puzzle, you need to rearrange the bars to release the rotatable pieces at the bottom. The step-by-step instructions we’ve written below is only one of many possible solutions for this particular puzzle. To make our instructions easier to follow, we’ve labeled all horizontal bars with H and a number and all vertical bars with V and a number.
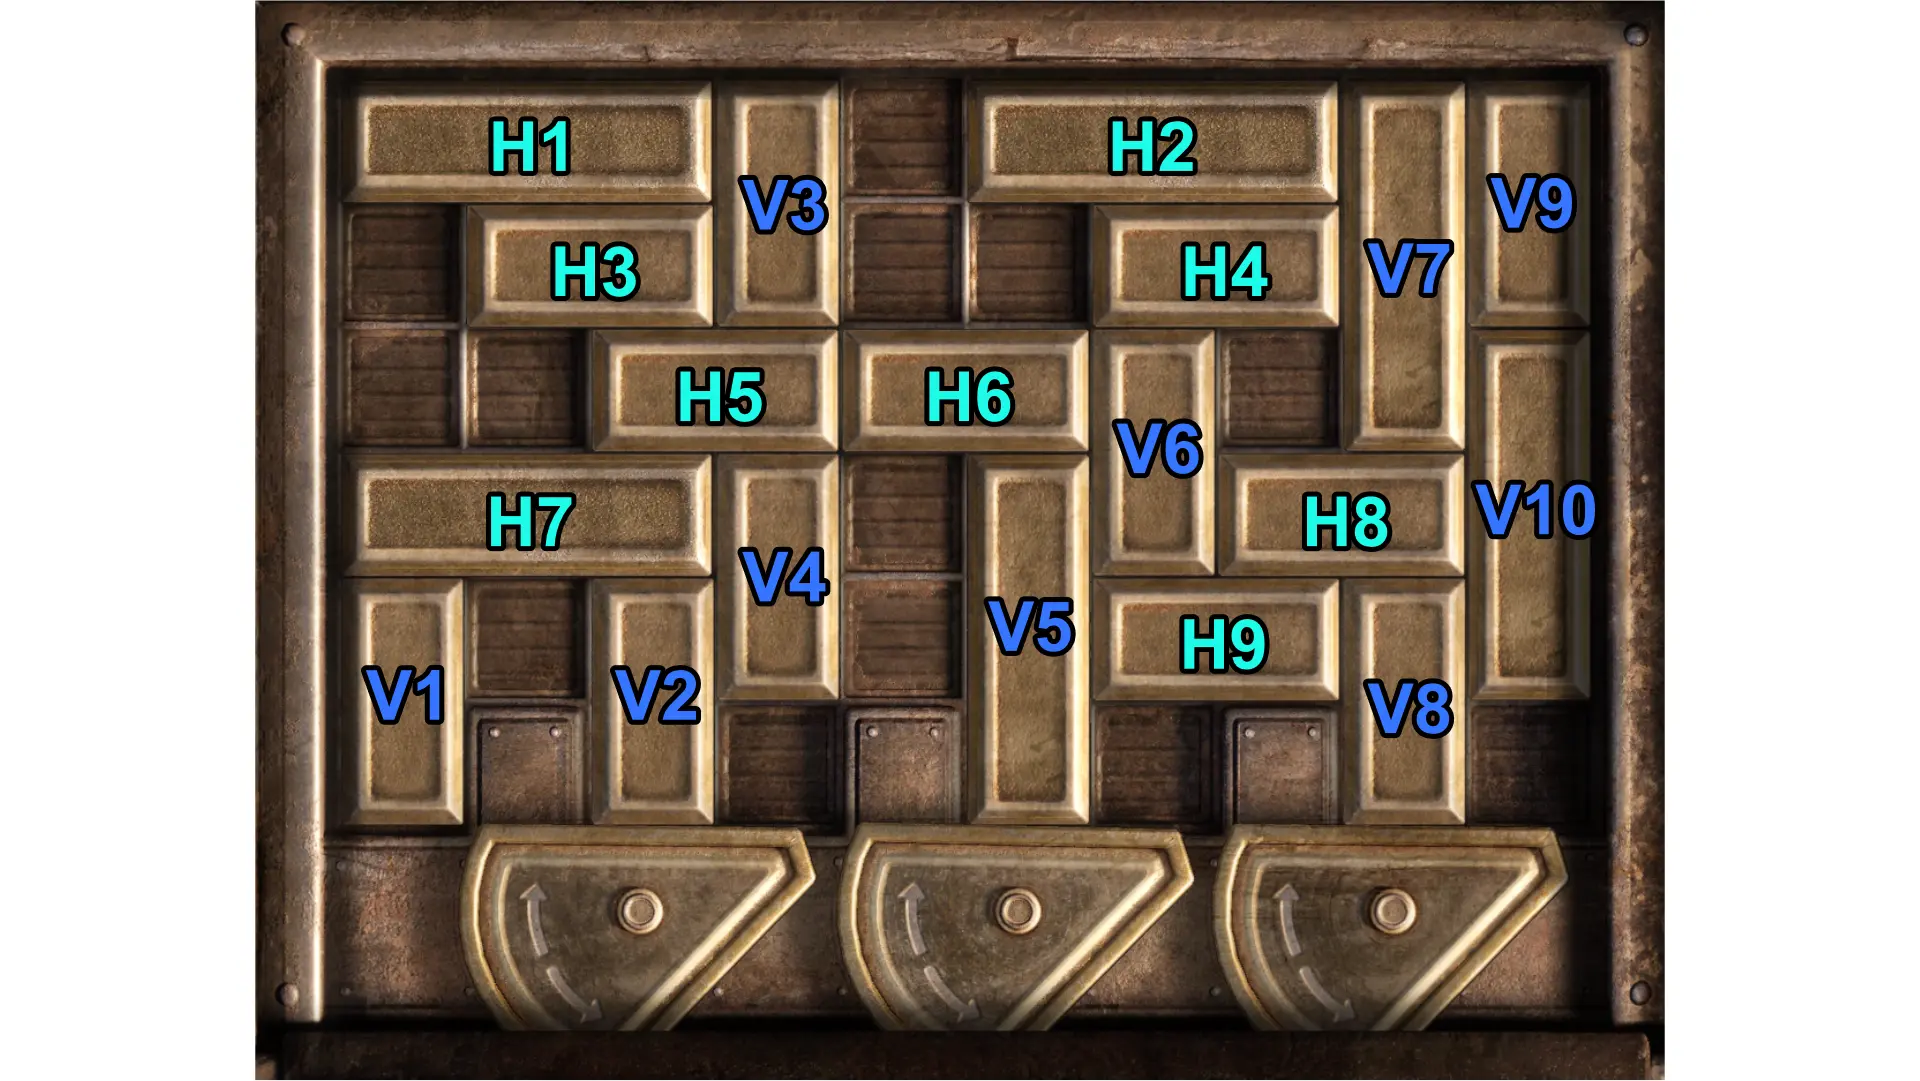
- Move H3 and H5 to the left end of the board.
- Move V4 to the bottom of the board.
- Move H7 1 space to the right.
- Move V1 1 space upward.
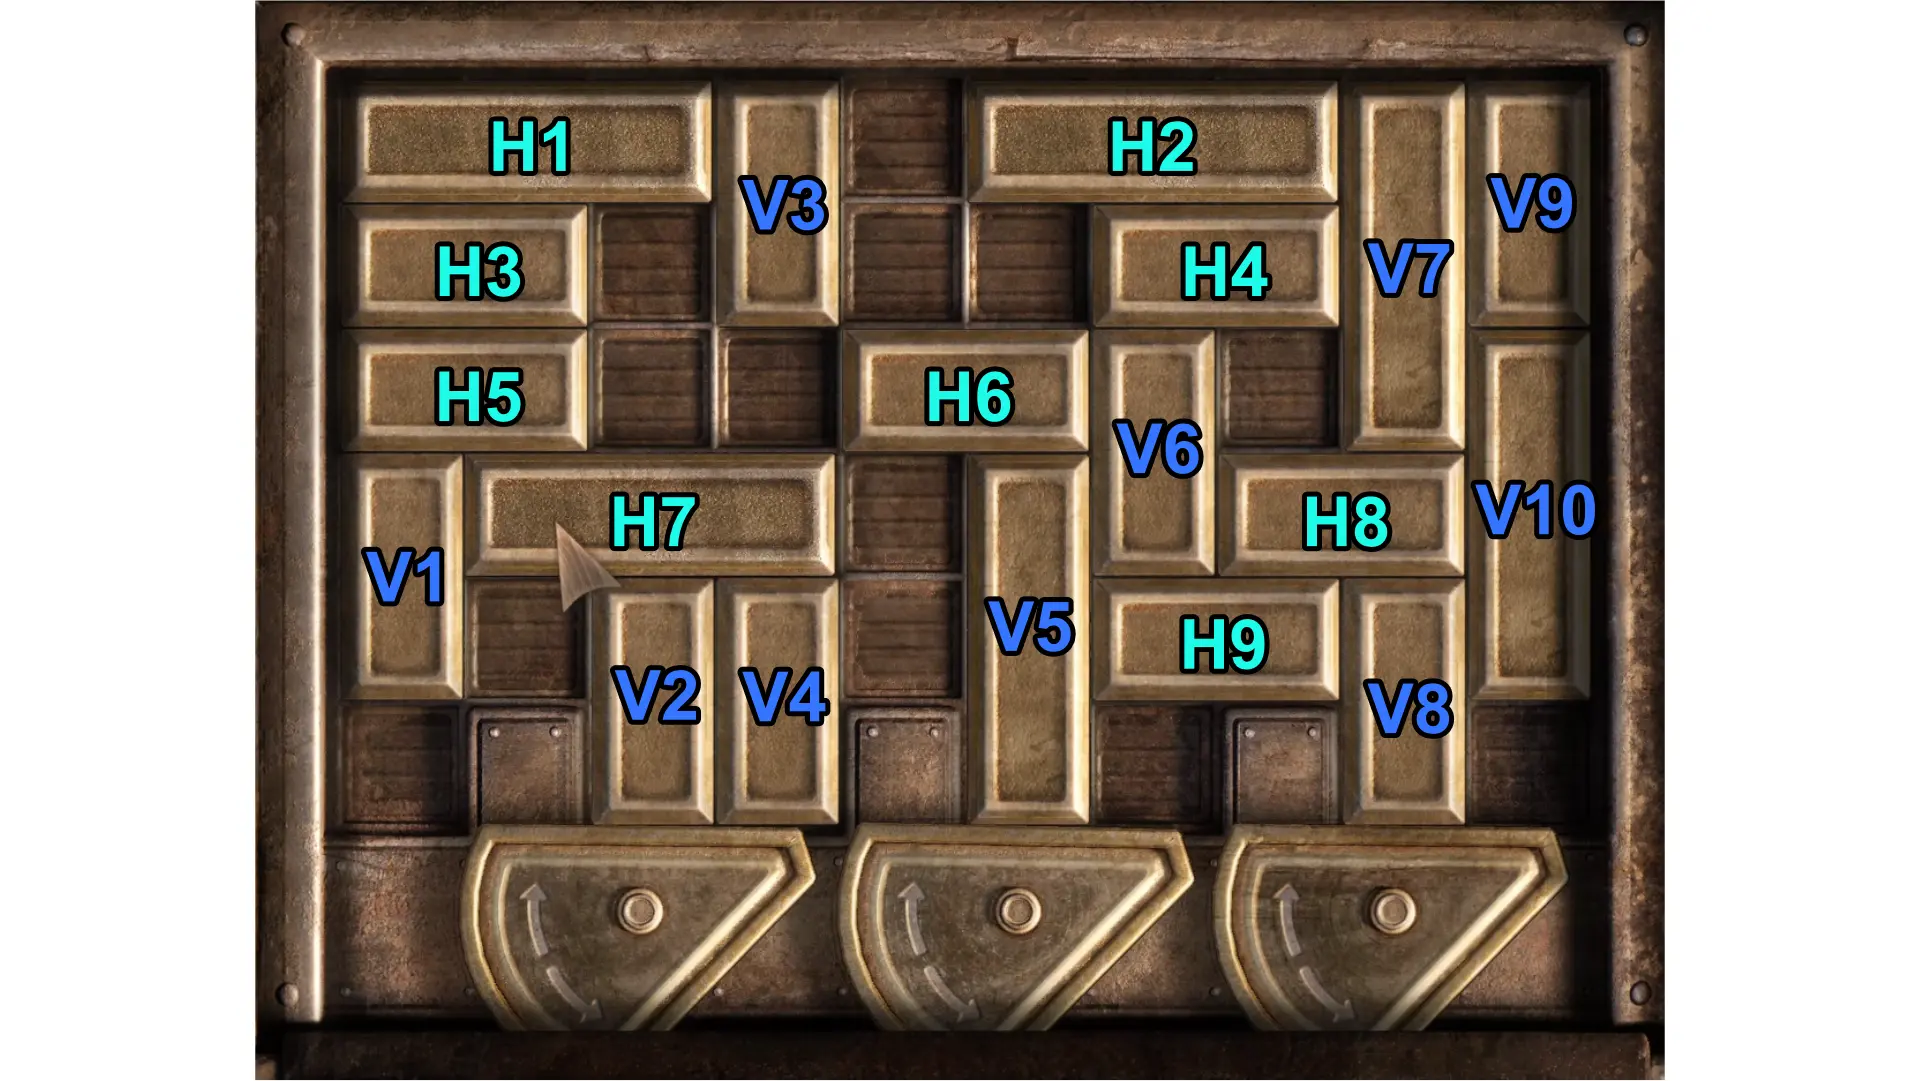
- Move H6 2 spaces to the left.
- Move V5 2 spaces upward.
- Move H9 2 spaces to the left.
- Move V6 to the bottom of the board.
- Move H8 1 space to the left.
- Move V8 1 space upward.
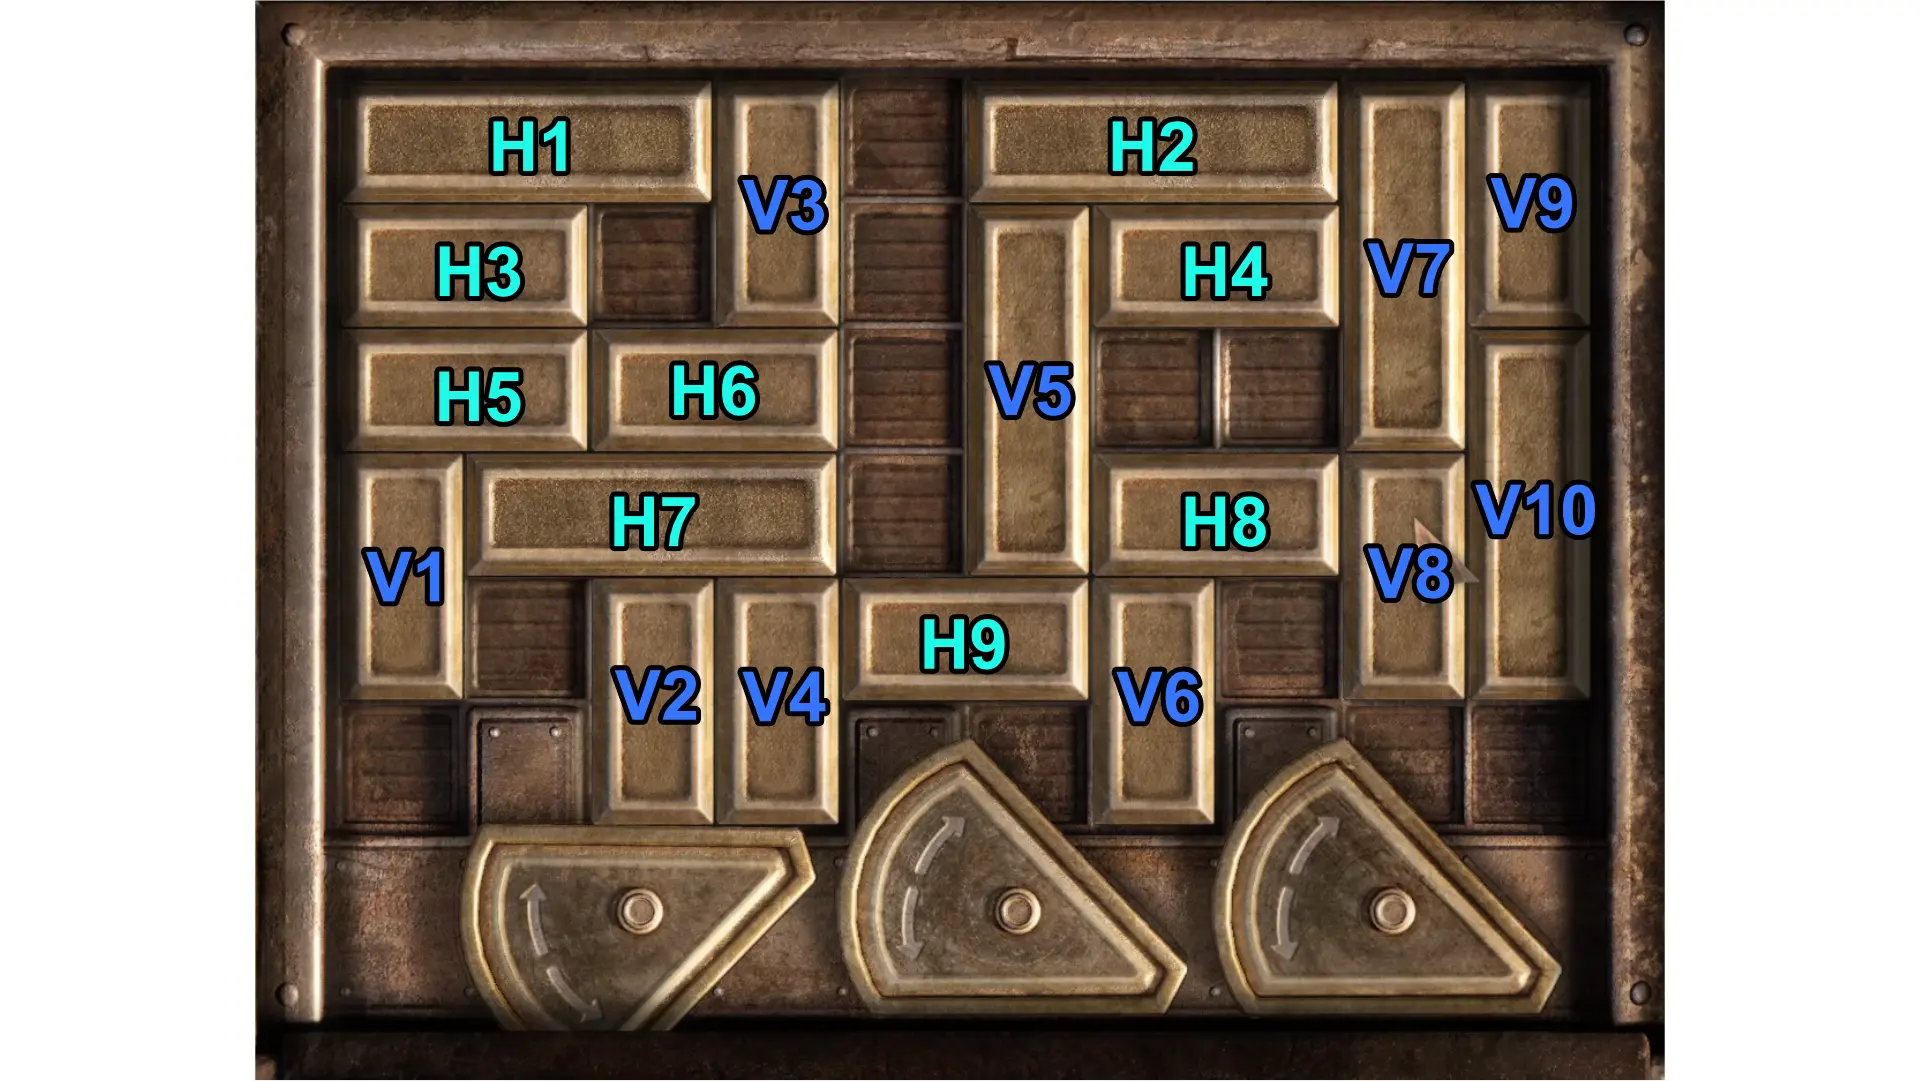
- Move V8 and V10 to the bottom end of the board with V7 and V9 following above them.
- Move V1 to the bottom of the board.
- Move H7 to the left end of the board.
- Move H2 to the right end of the board.
- Move V5 to the top of the board.
- Move H7 3 spaces to the right.
- Move V2 1 space upward.
- Move H6 1 space to the right.
- Move V2 2 spaces upward.
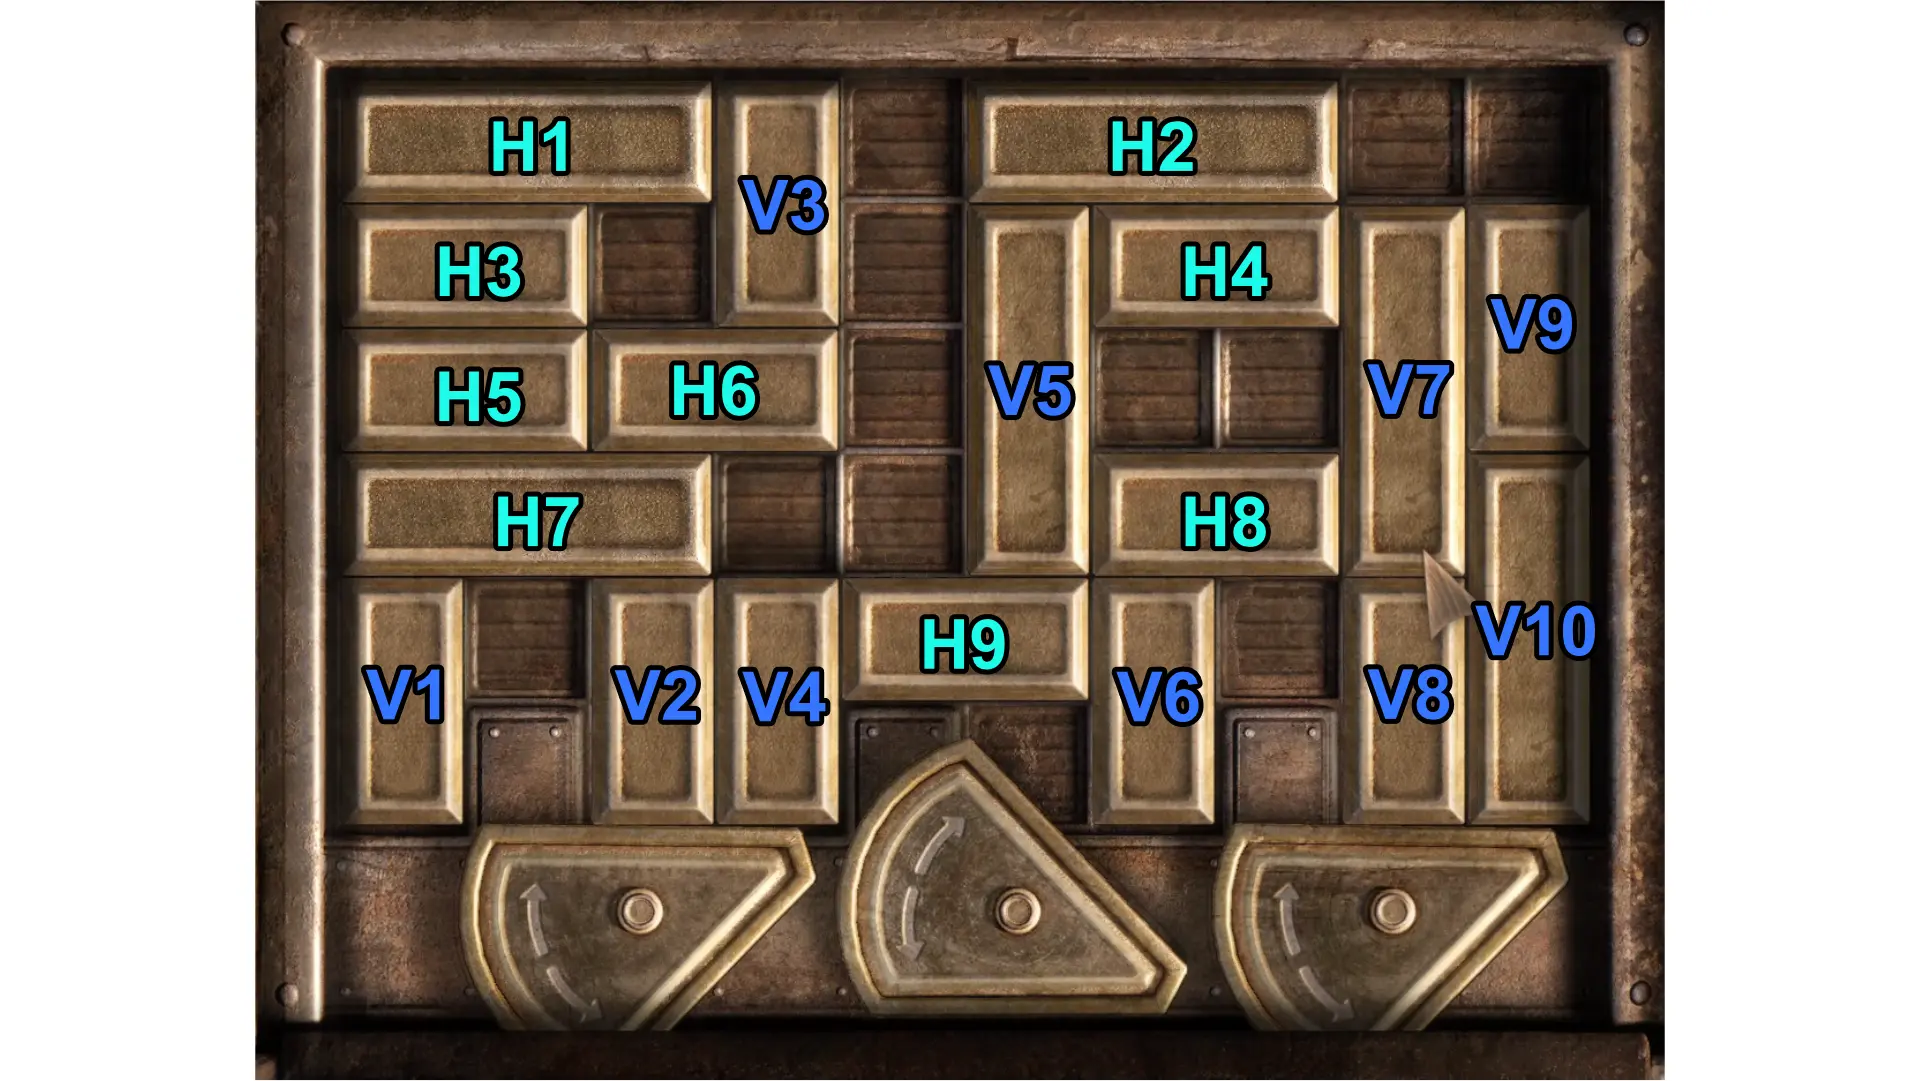
- Move H7 to the left end of the board.
- Move V4 1 space upward.
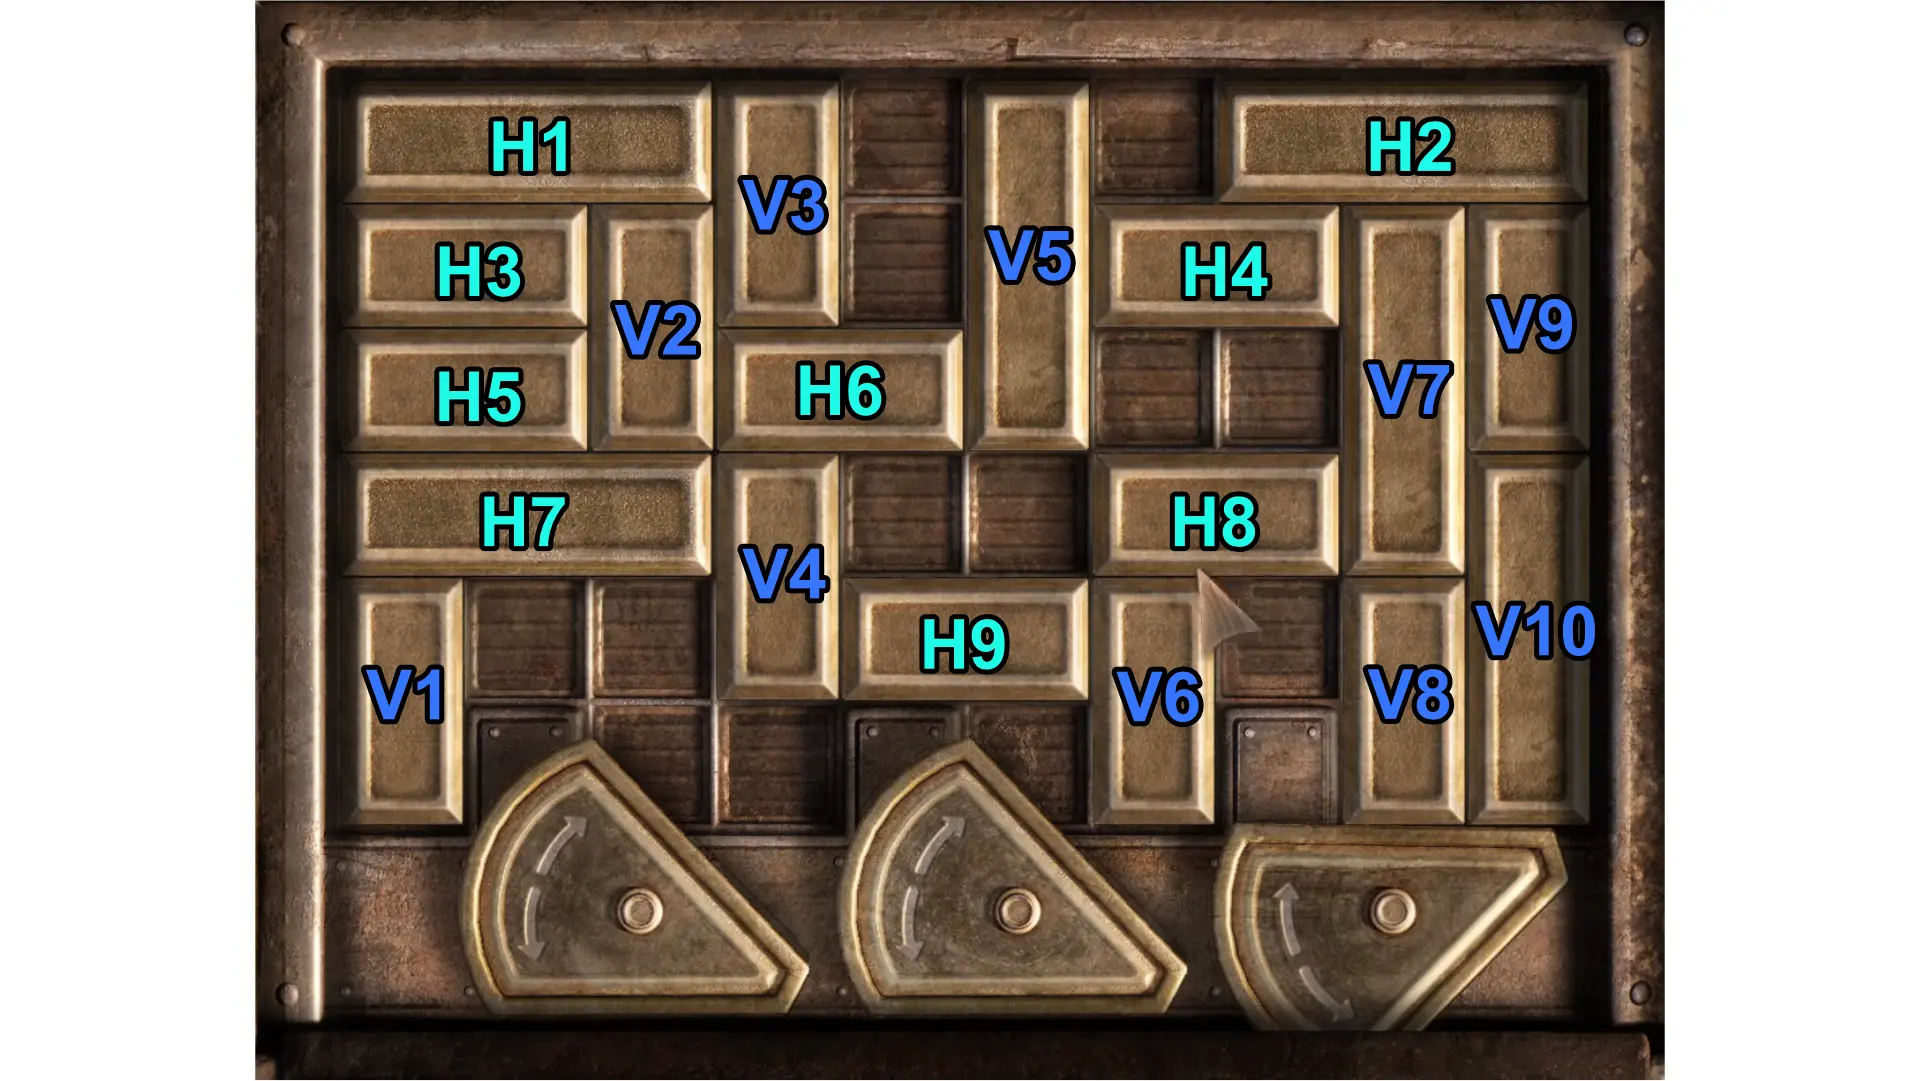
- Move V5 1 space downward.
- Move H2 3 spaces to the left.
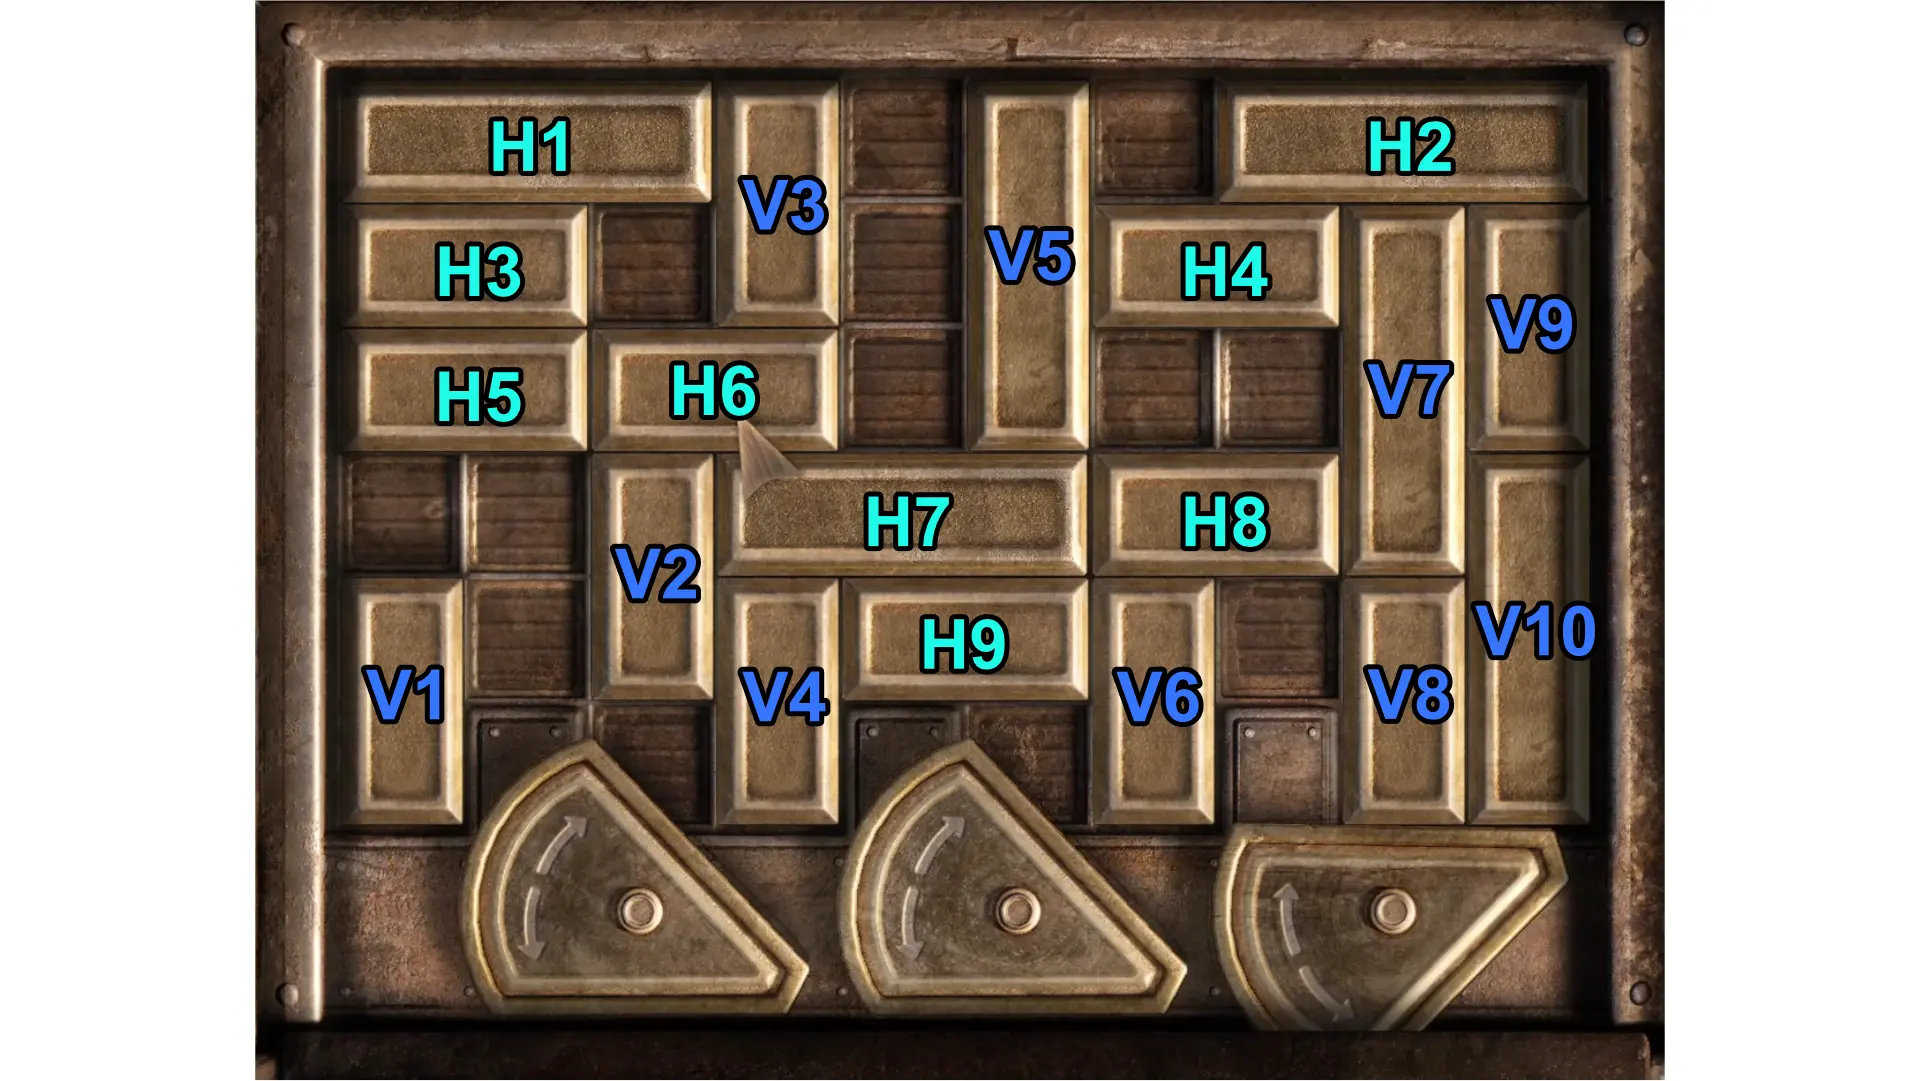
- Move V7 to the top of the board, followed by V8 below it, solving the puzzle.
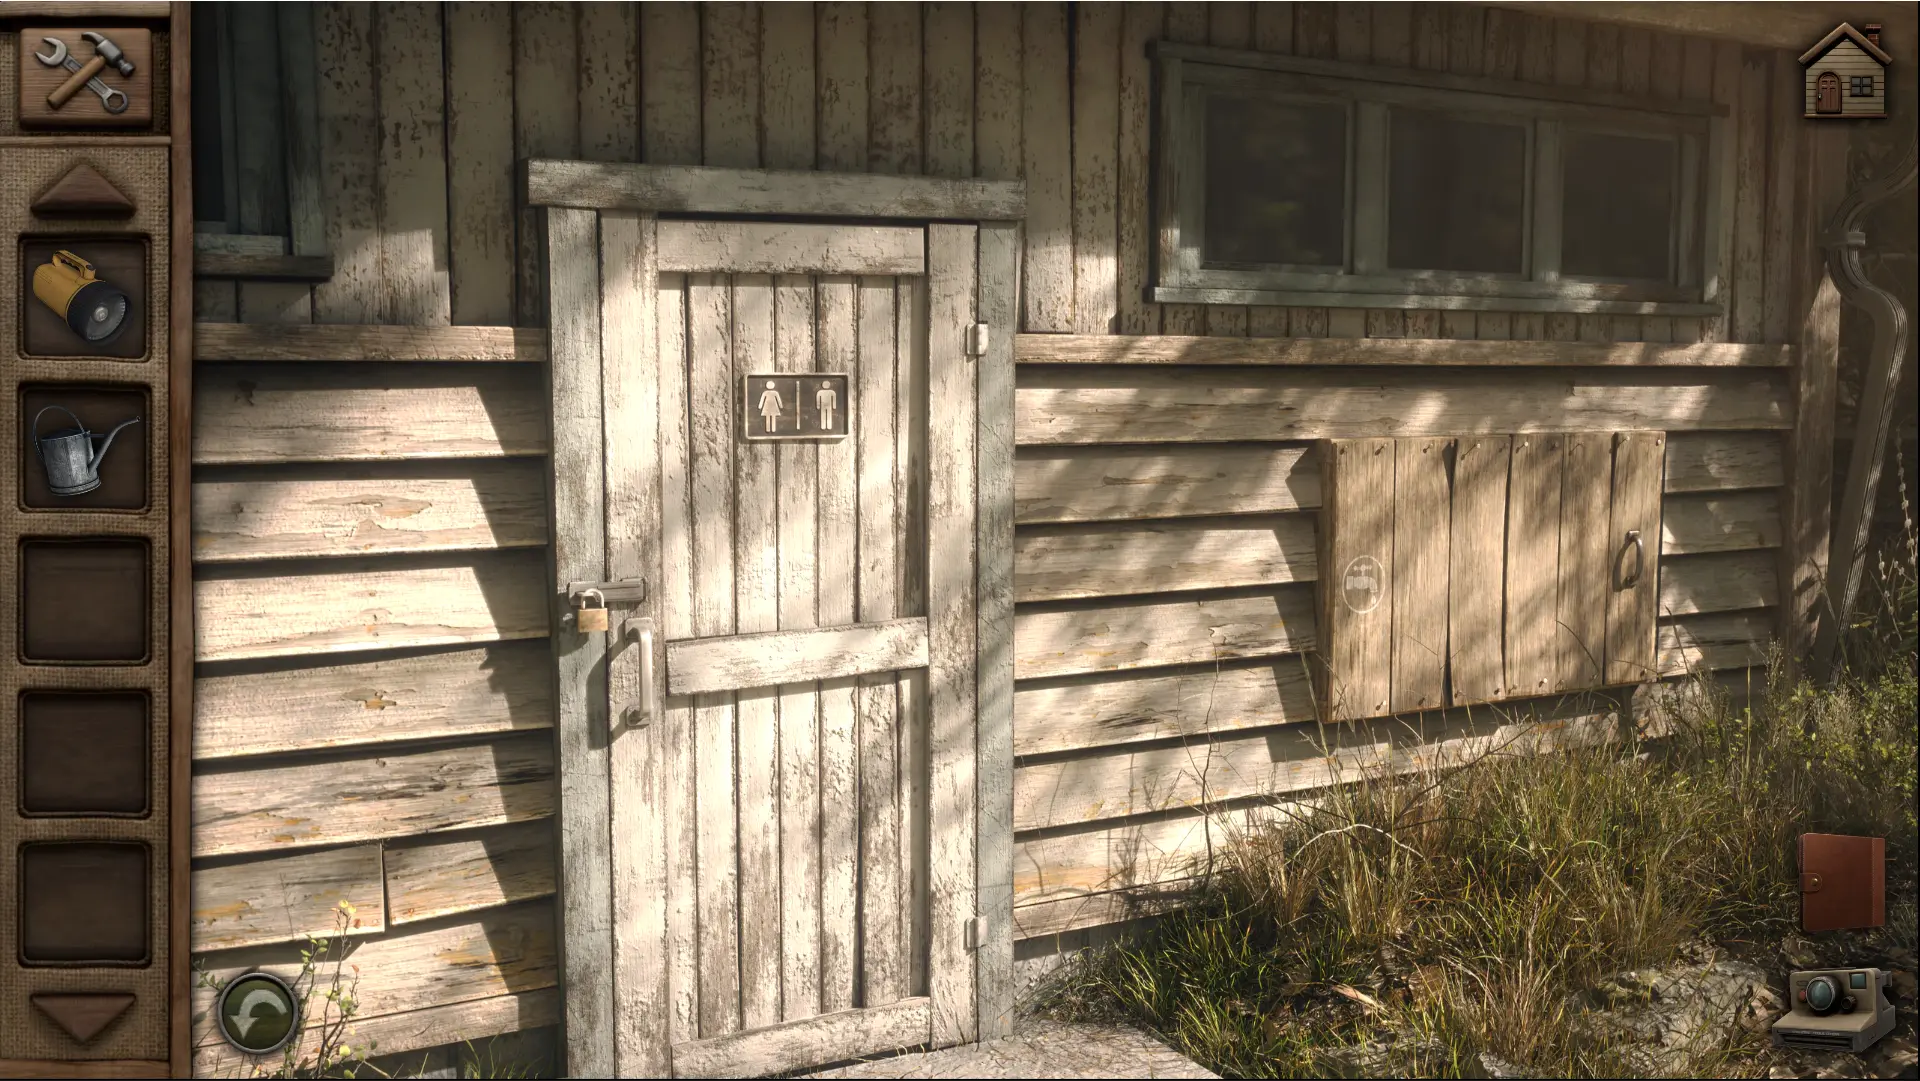
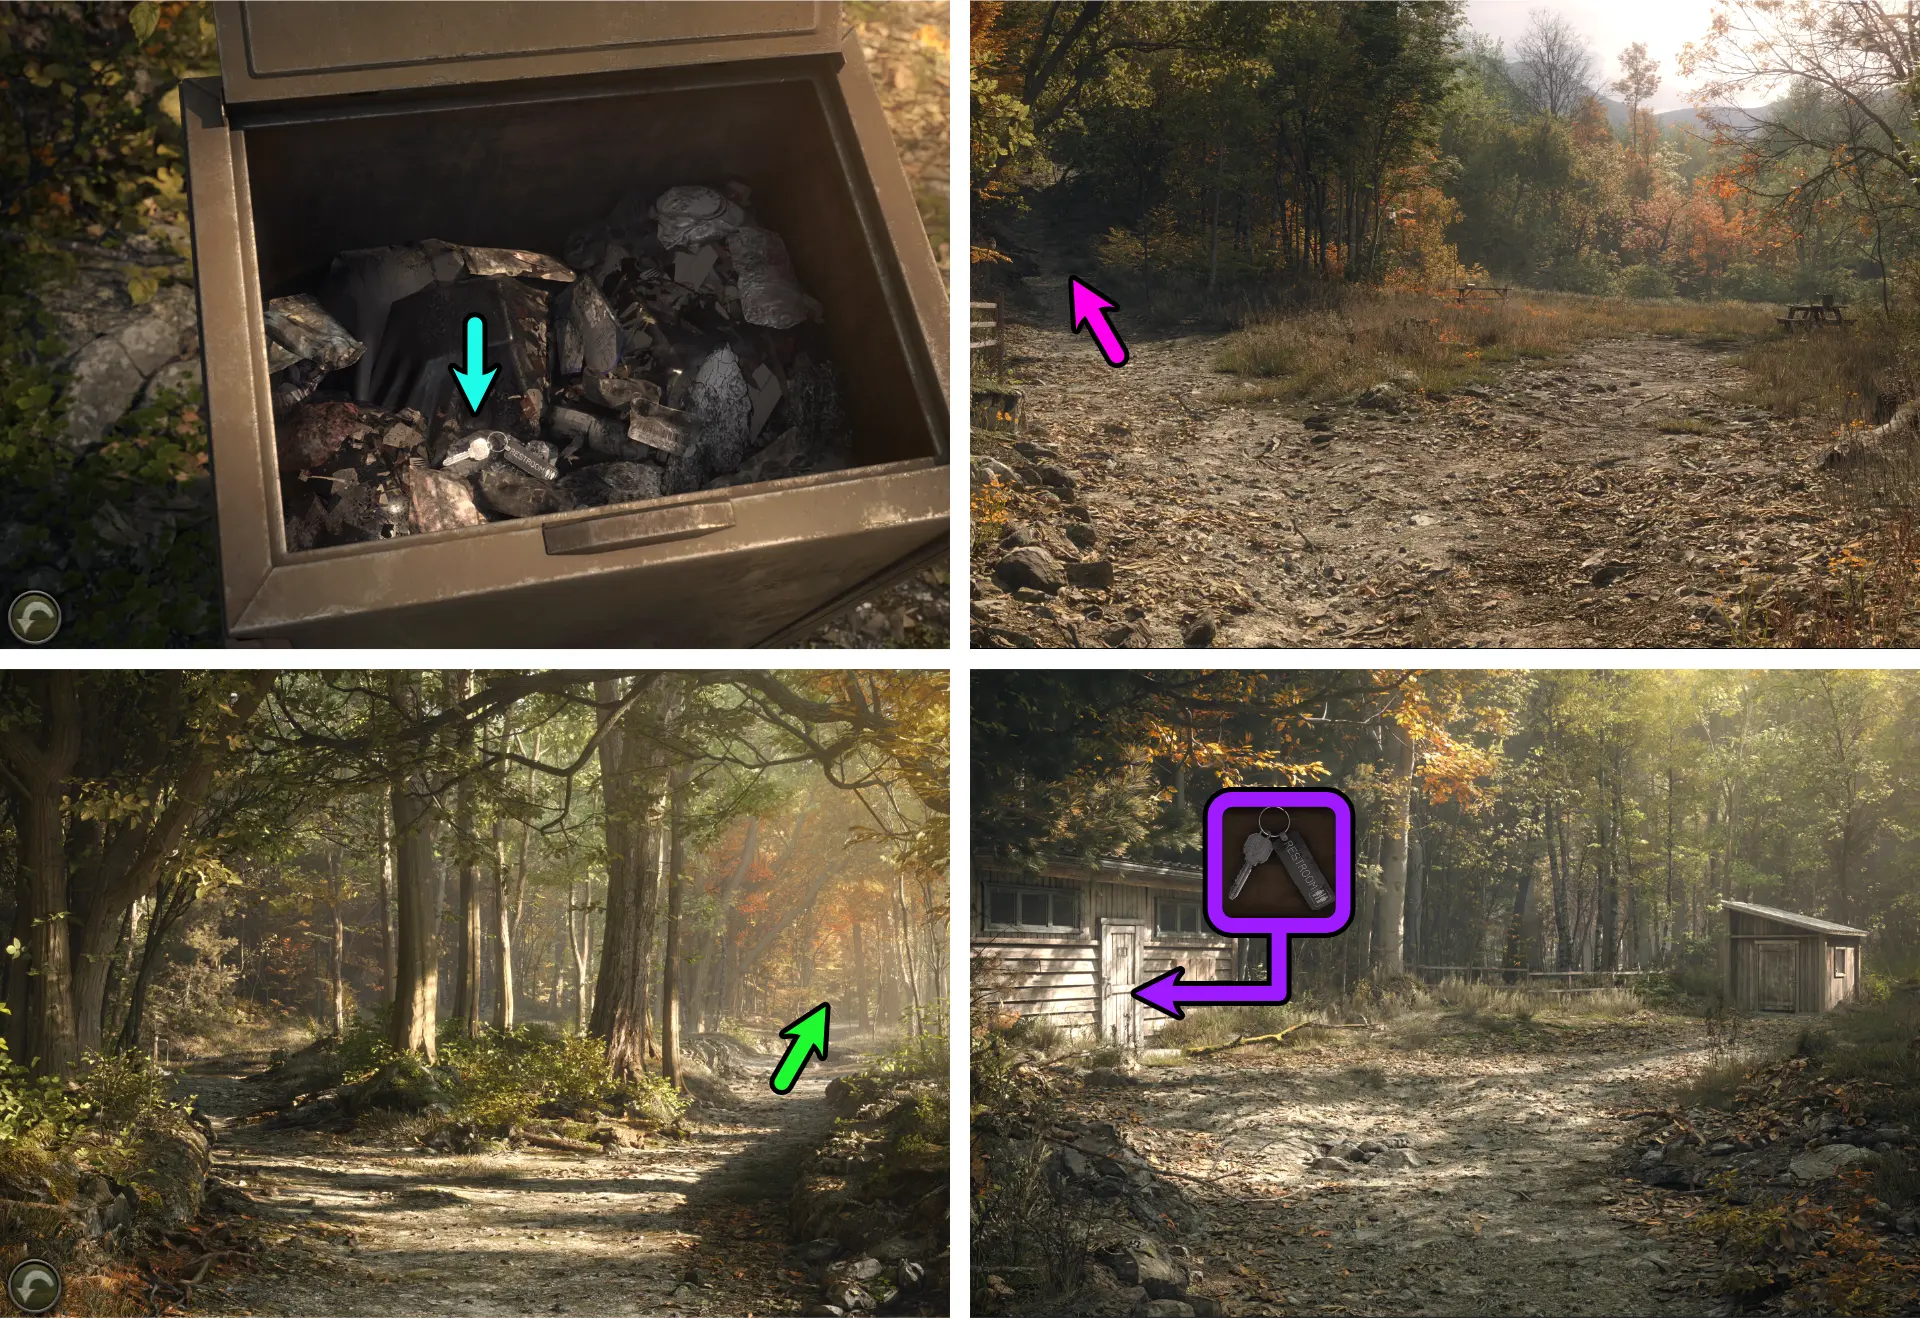
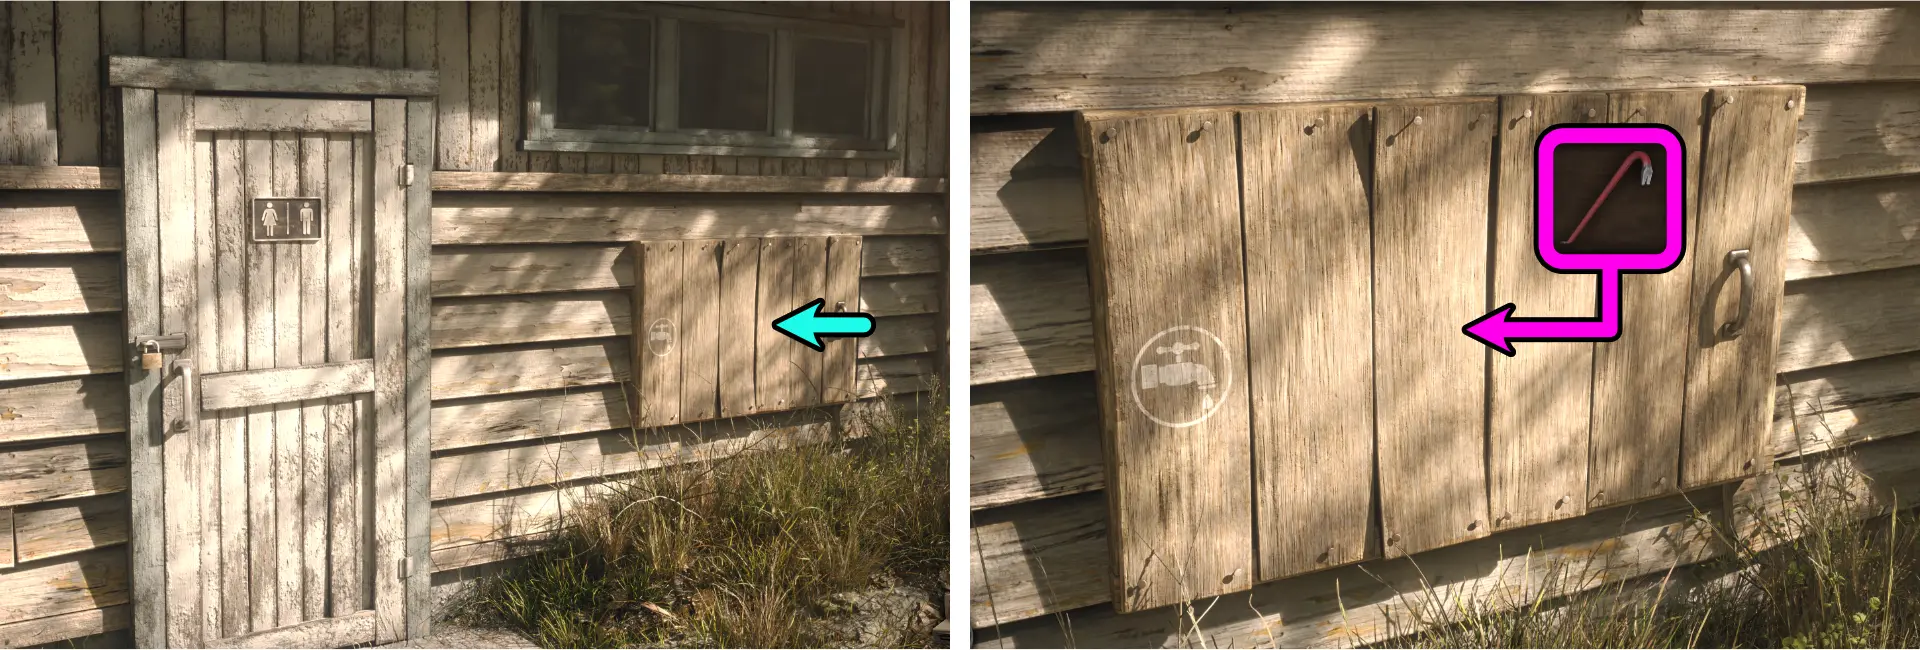
Upon opening the trash bin, take the Restroom key inside it. Go to the Restroom, and unlock it. The Restroom can be found by going to the left path at the first split path, and then the right path at the second split path.
Finding the Compass

Inside the Restroom, you’ll see a photograph taped on the wall by the window. It’s a note from Jen telling you to meet her north east into the forest at a bearing of 45° starting from the old tool shed. You’ll need to find a Compass to follow her directions.
Unlocking the Tool Shed
To unlock the Tool Shed, you’ll need to get a 5-symbol combination. To find the clue for this, you’ll need to go into the Restroom and investigate the blue toilet paper. You’ll need to pull it downward to find all 5 symbols as shown below.

Lining all the symbols together results in the combination shown in the image below:
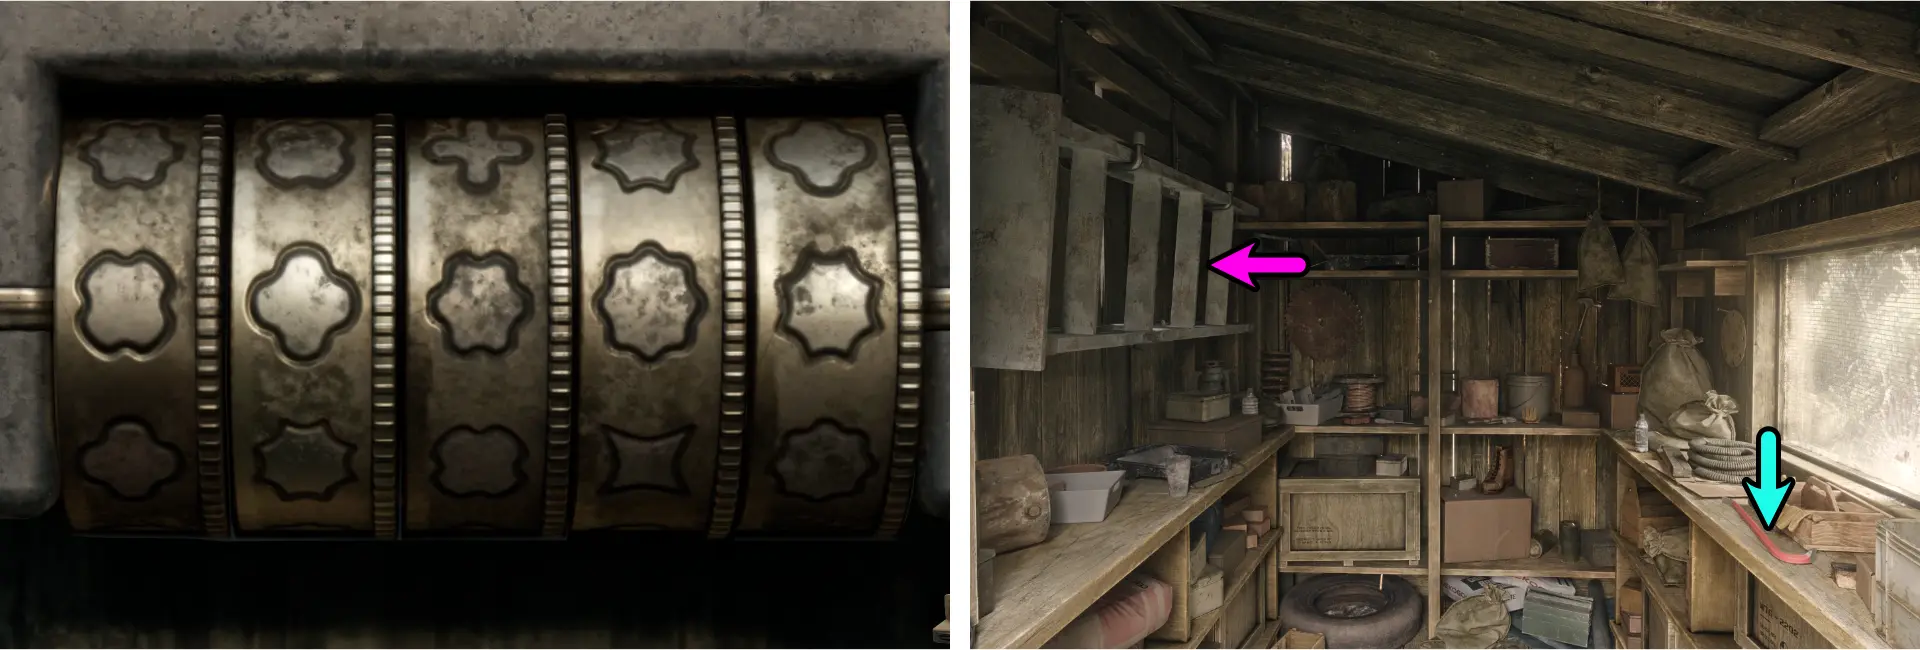
Upon unlocking the Tool Shed, take the Crowbar at the right, near the window, and the Ladder at the left, hanging from the wall.
Removing the Compass from the Pipes
If you go inside the Restroom’s stall, you’ll notice that the pipe for the toilet is misaligned and loose.
- Use the Crowbar on the loose pipe.
- Take a peek into the pipe and use your Flashlight on it.
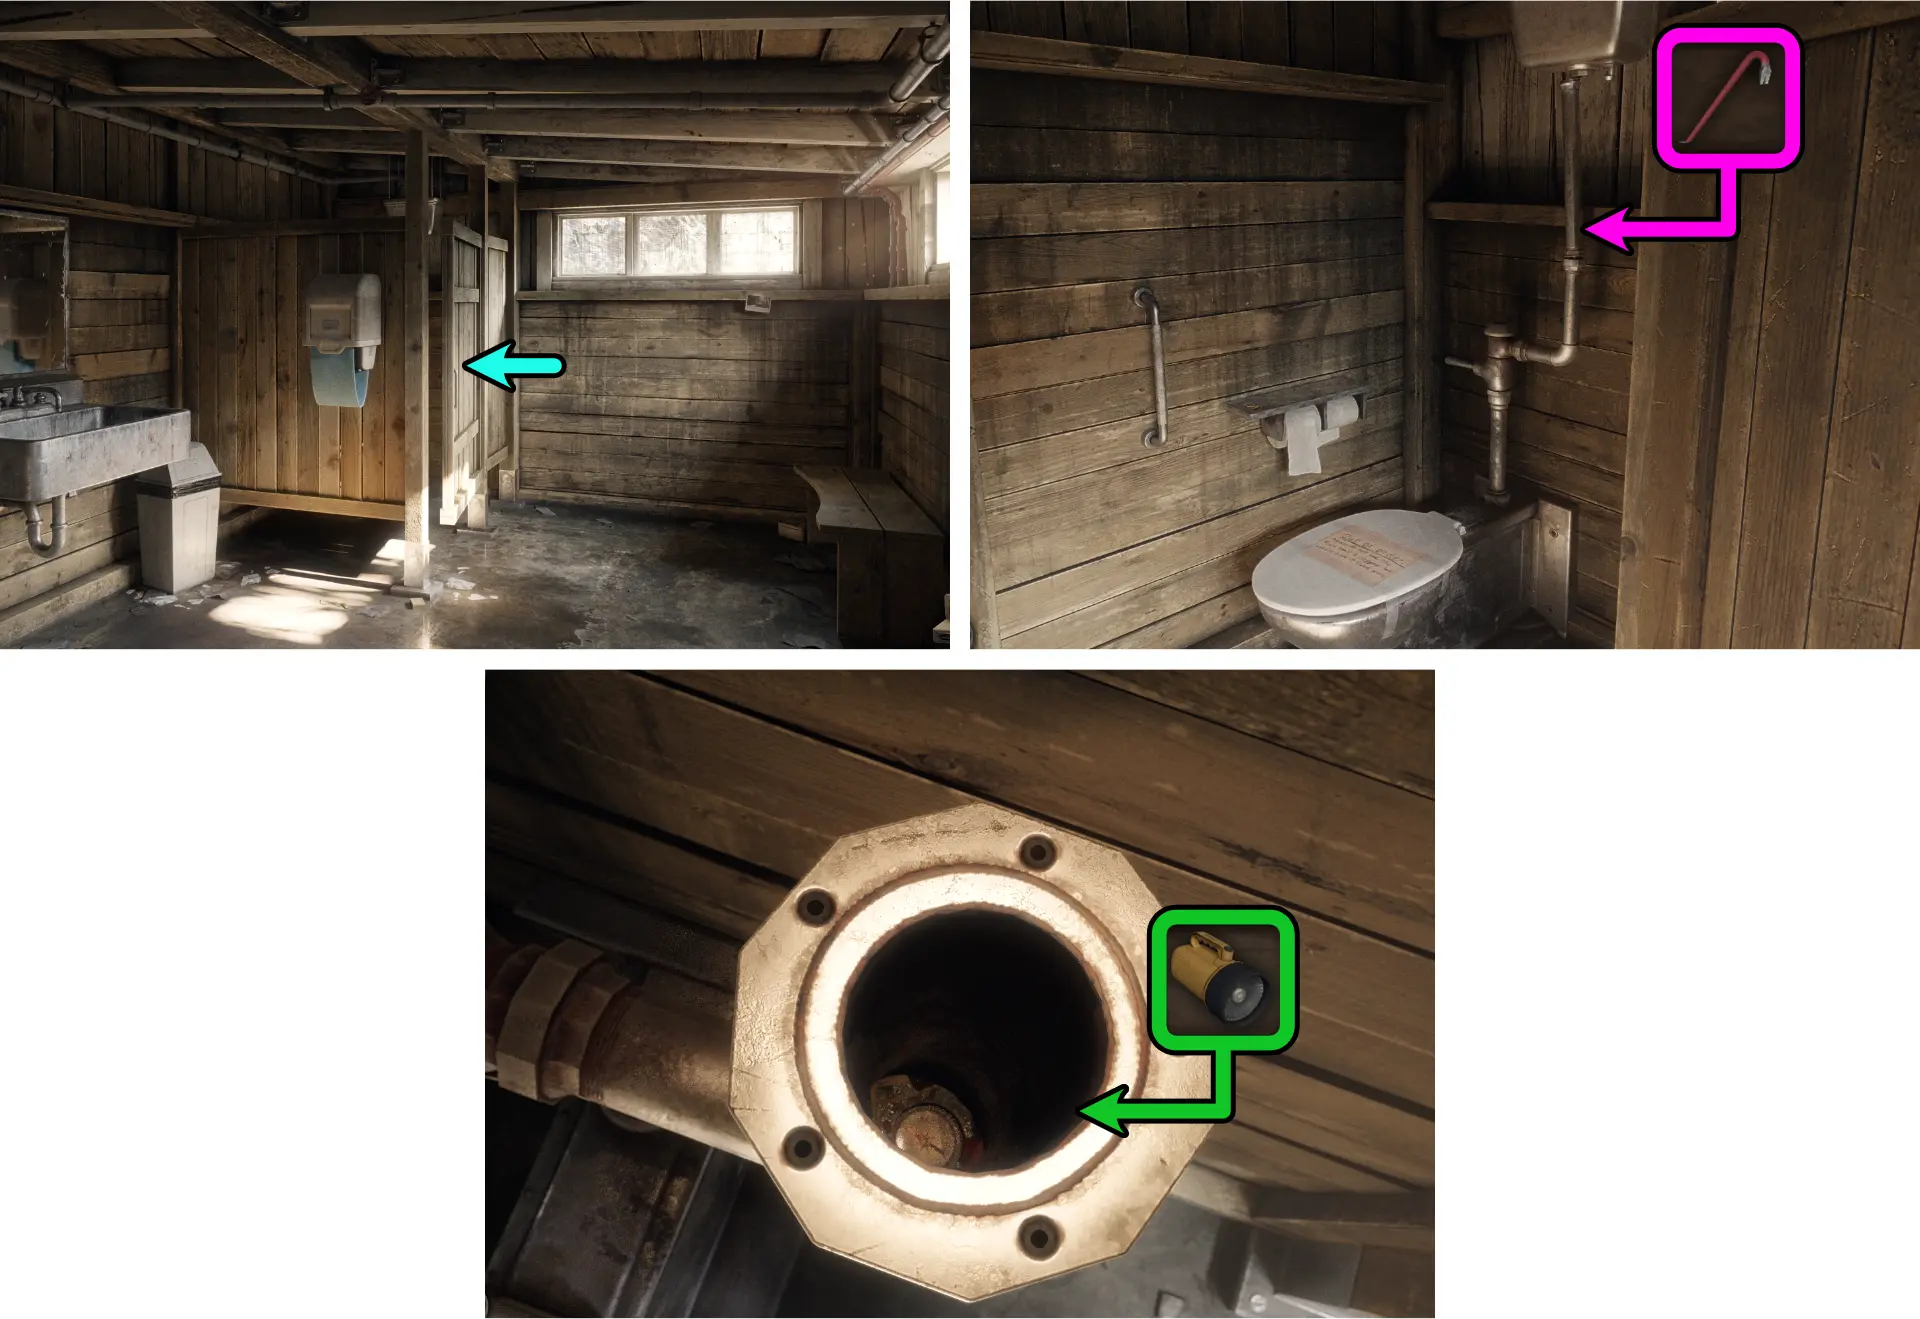
The Flashlight will momentarily reveal the Compass stuck in the pipe before running out of batteries. You’ll need water to pour into the pipe and new batteries for your Flashlight to light up the pipe.
Getting Water
If you try to turn the faucet on, you’ll notice that no water is coming out. You’ll need to find a way to fix it.
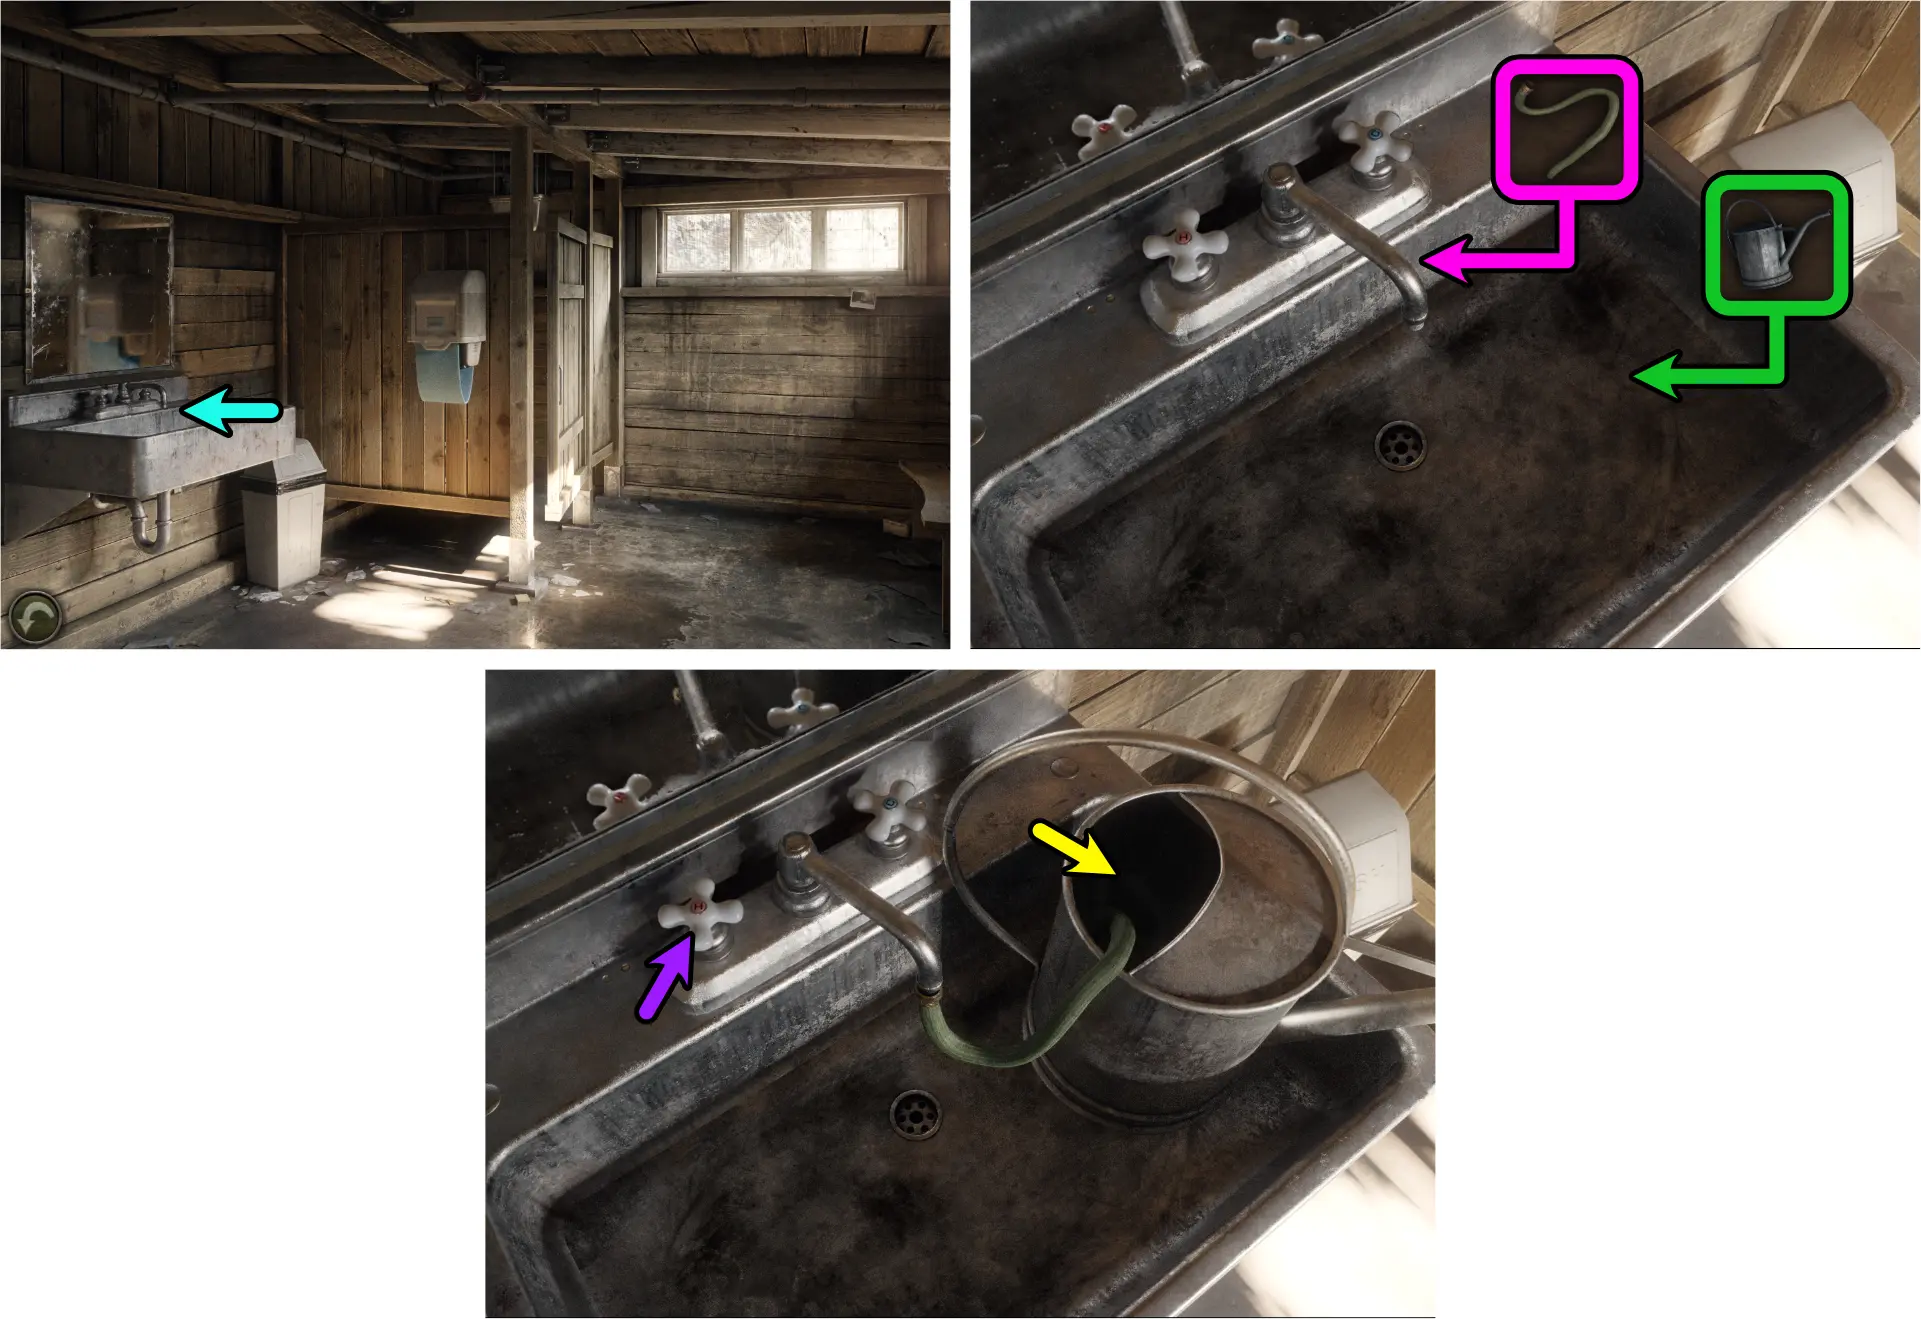
Using the Crowbar you’ve obtained from the Tool Shed, open the wooden hatch outside of the Restroom to take a look at the water pipes.
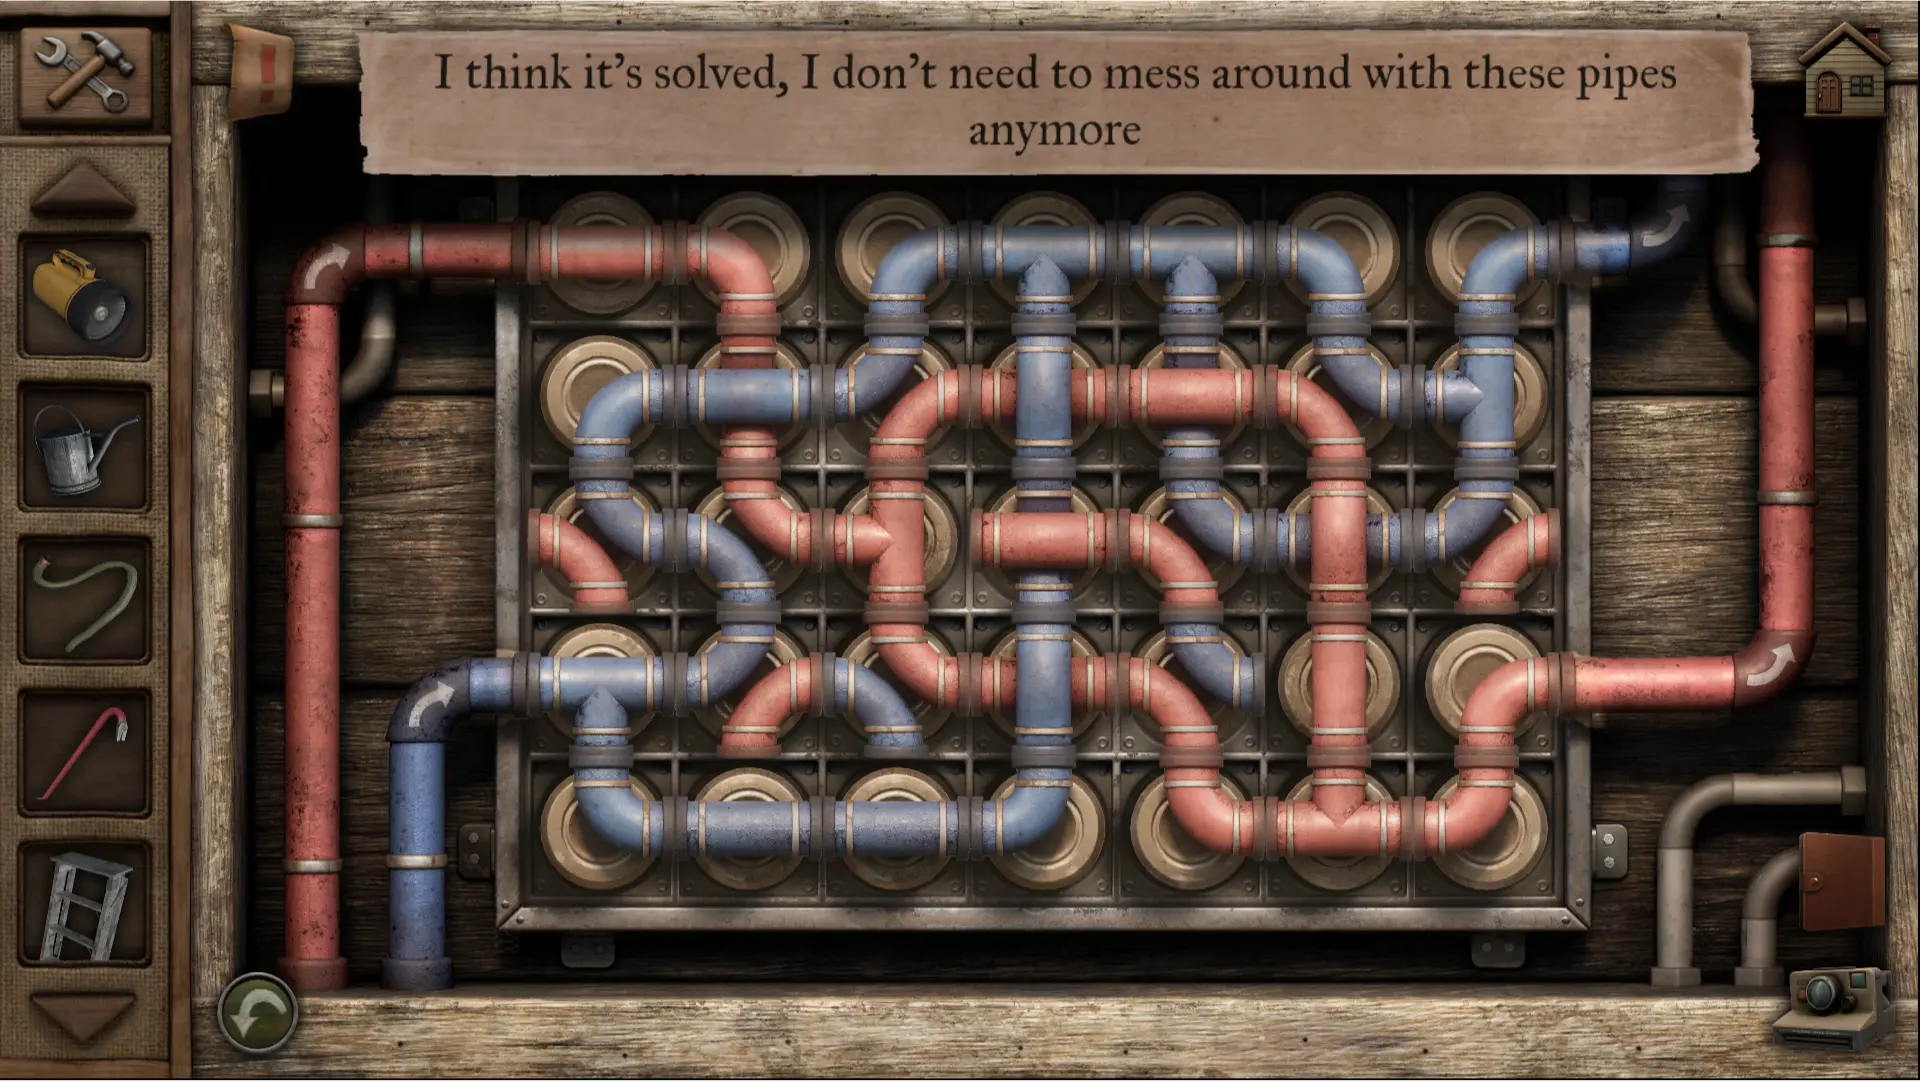
To solve the pipe puzzle, you’ll need to connect the red and blue pipes at the left to the red and blue pipes to the right. The colors must match to the correct pipe. The best way to solve this type of puzzle is to start from the destination and work your way to the source. But you can also just follow the solution in the image below:
Once you’ve fixed the pipes, you’ll need to get a Watering Can and a Hose to collect water from the faucet.
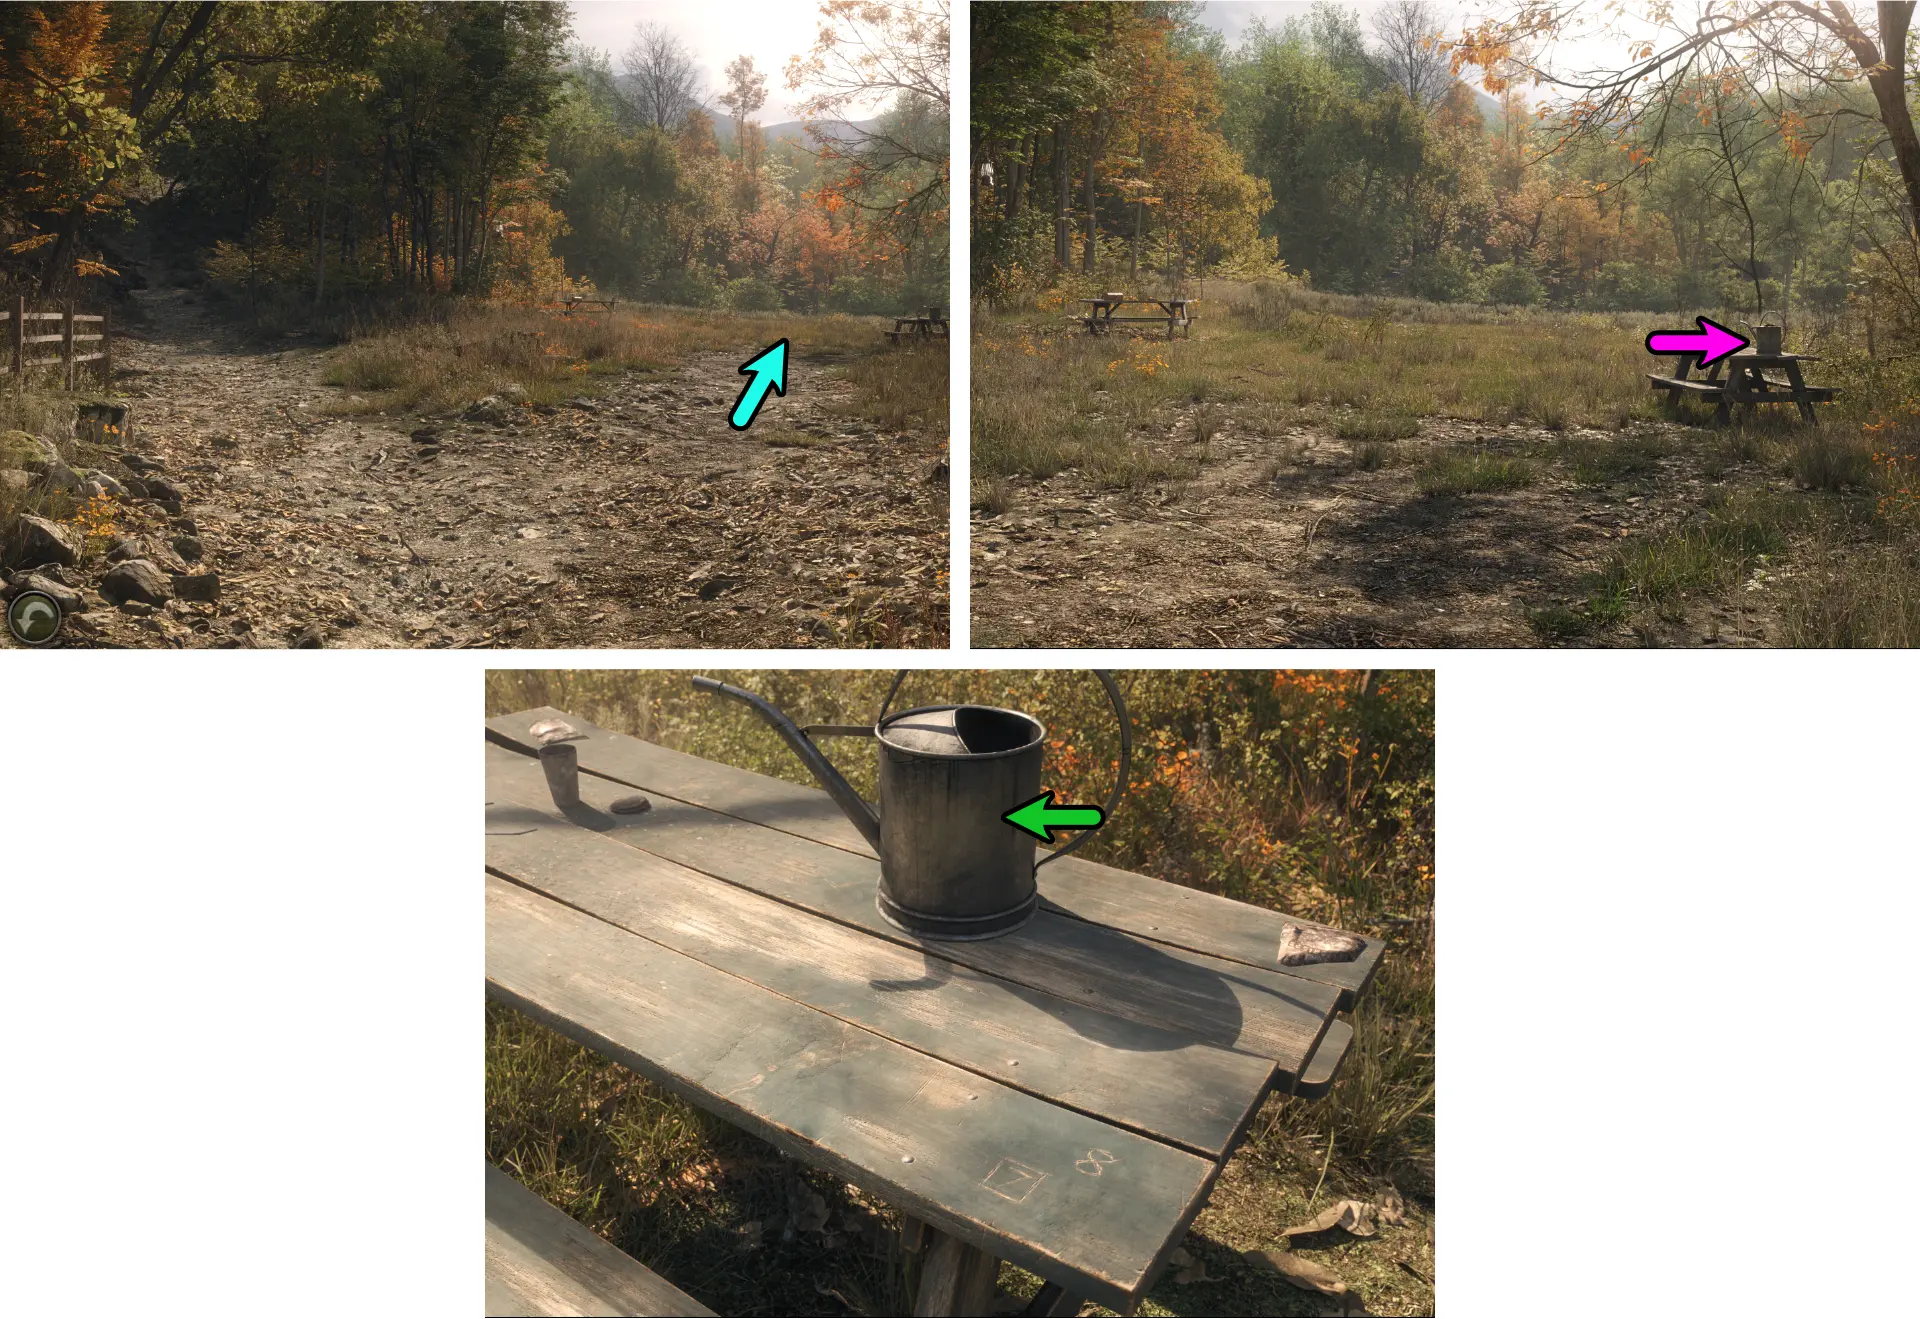
Watering Can – found at the area with the picnic tables are (to the right of the first split path). It is on the right picnic table.
Hose – found attached to a water pump. The water pump is found by going to the left of the first split path, then going to the left of the second split path. You can detach the Hose from the water pump by using your Pliers on it.

Once you have both items:
- Attach the Hose to the faucet.
- Place the Watering Can on the sink.
- Turn the faucet on to fill up the Watering Can.
- Take the Watering Can.
Getting a New Battery
To get a new battery, you’ll need to take them from a lantern.
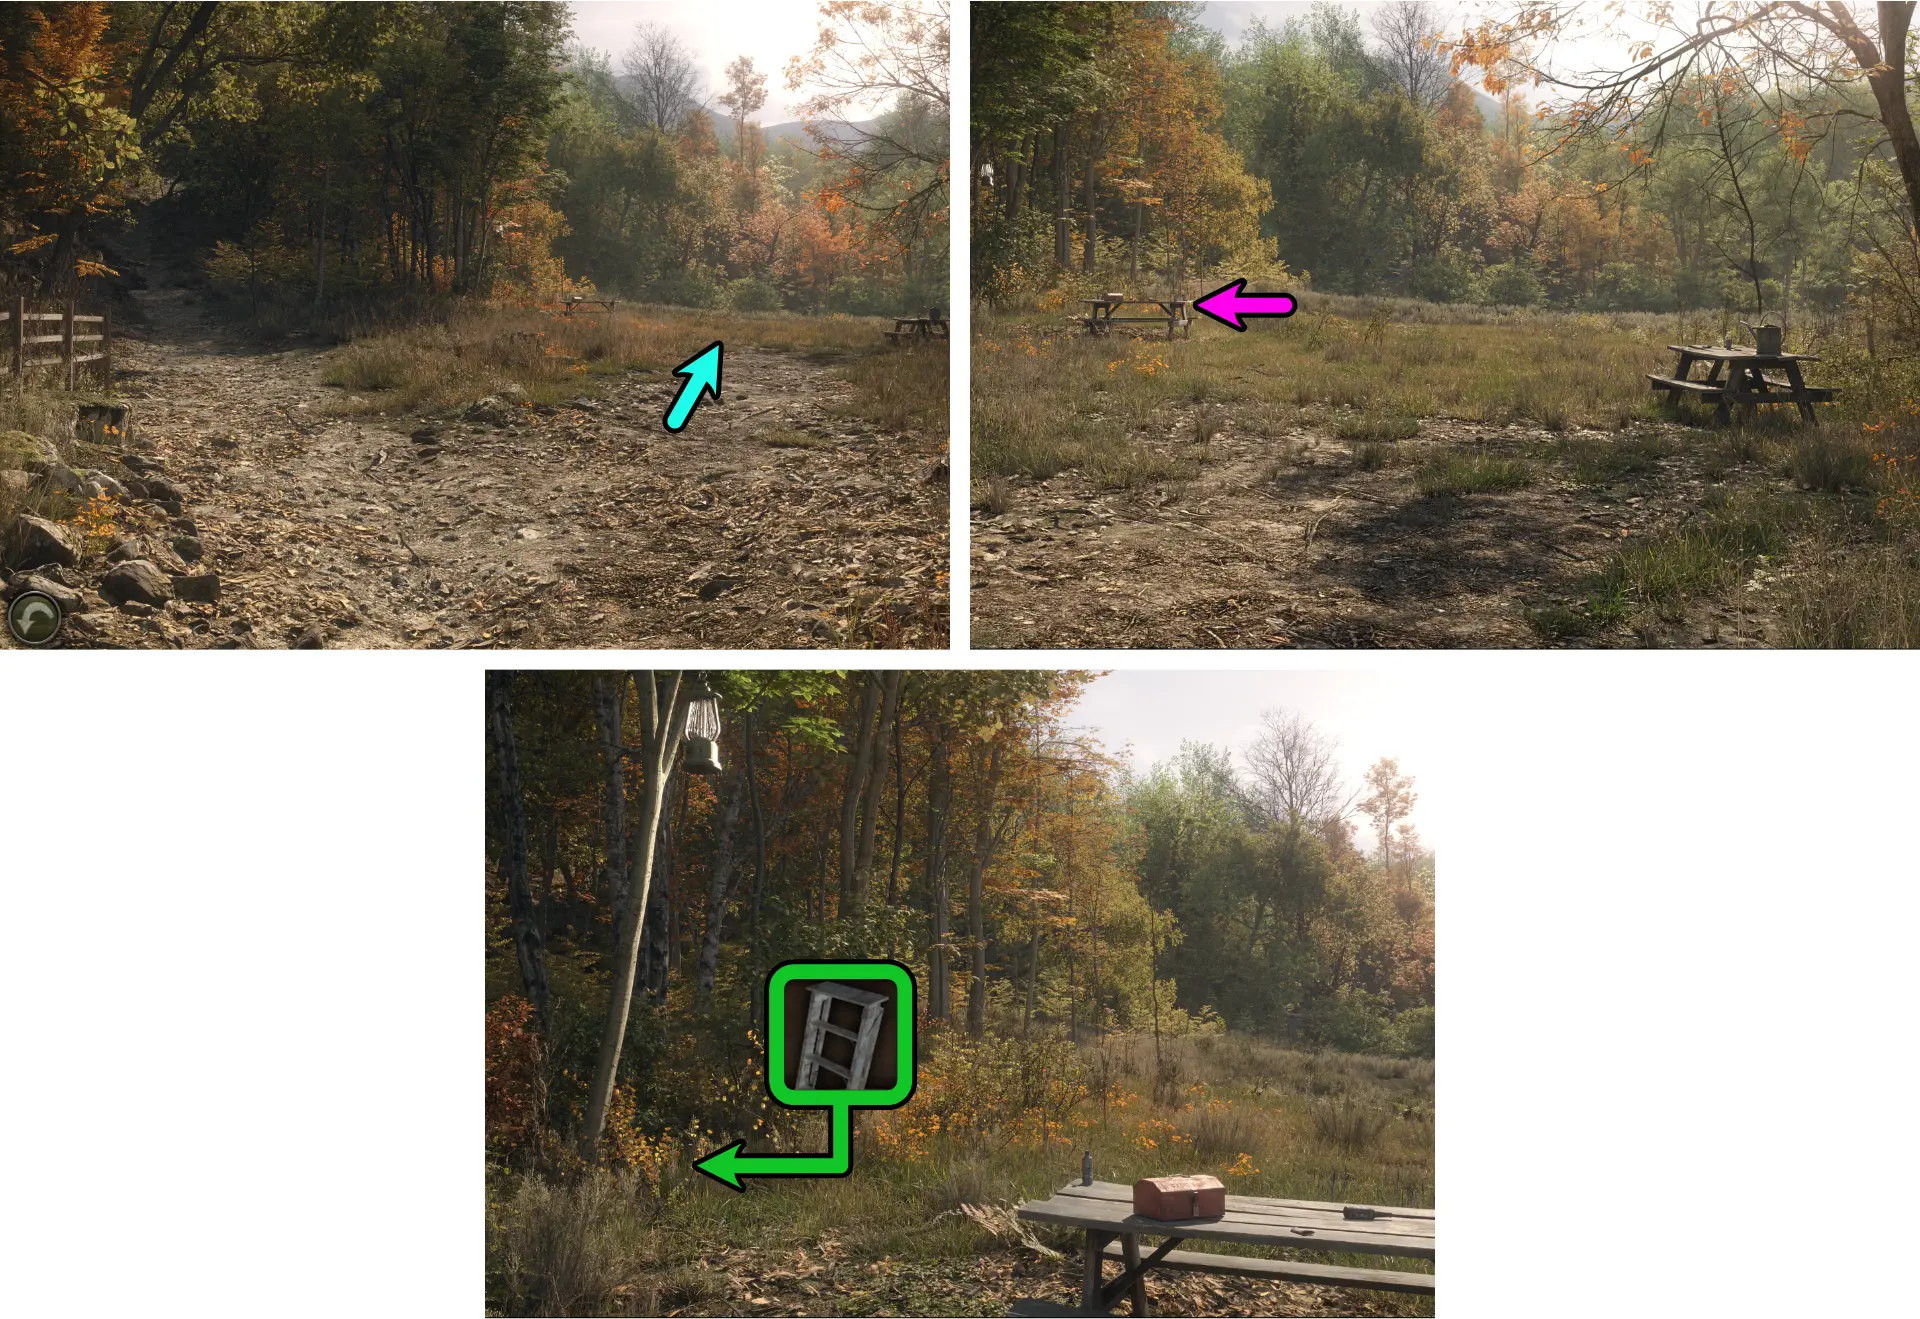
- Go to the area where the picnic tables are (to the right of the first split path).
- Go to the left picnic table area.
- Place the Ladder you found inside the Tool Shed below the lantern.
- Use the Ladder to reach the lantern and open its hatch.
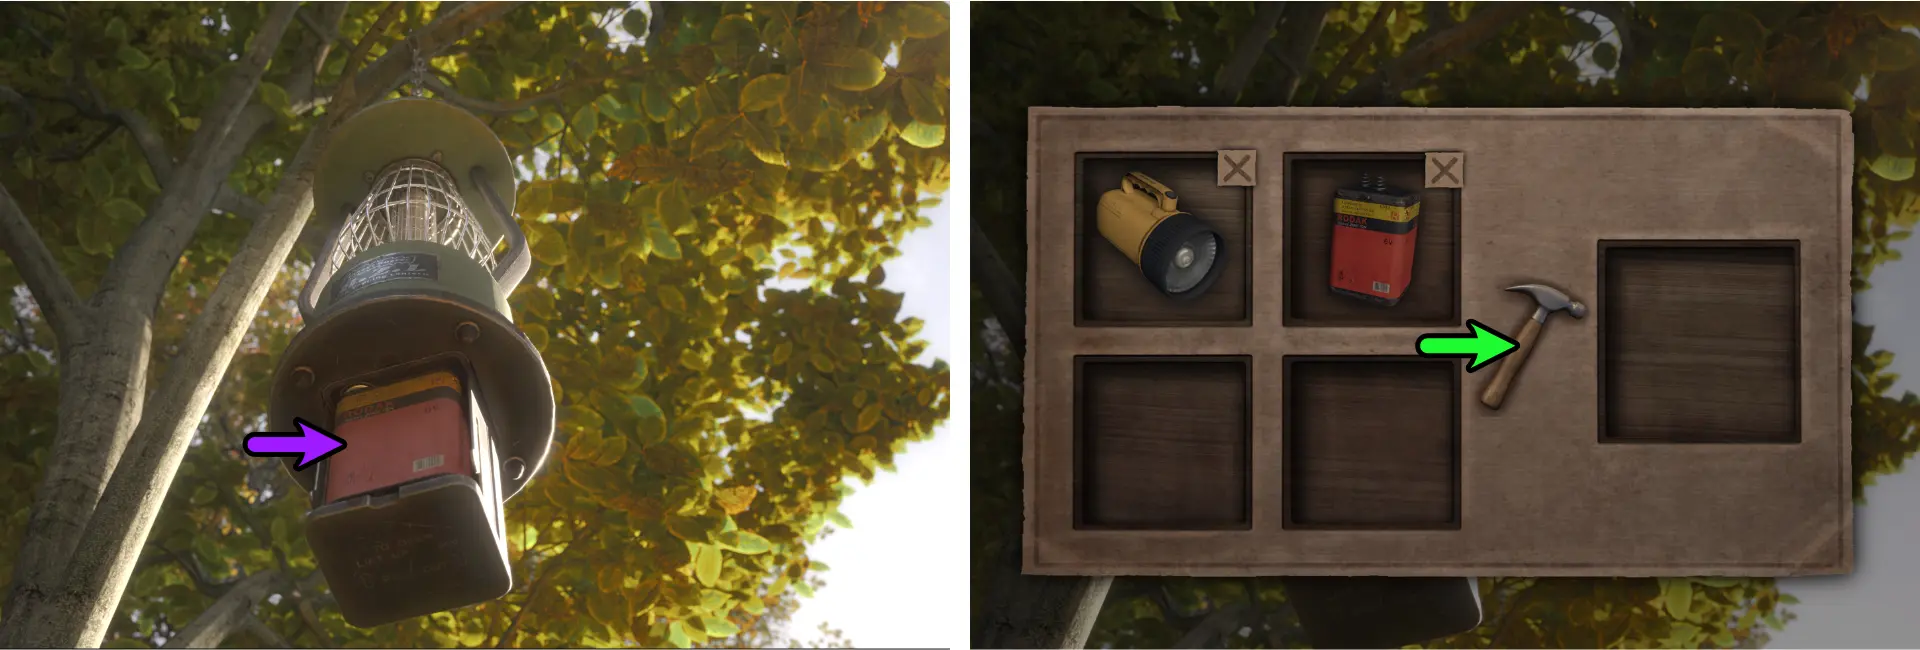
- Take the Battery.
- Combine the Battery and the Flashlight to replace the batteries.
Getting the Compass from the Pipes
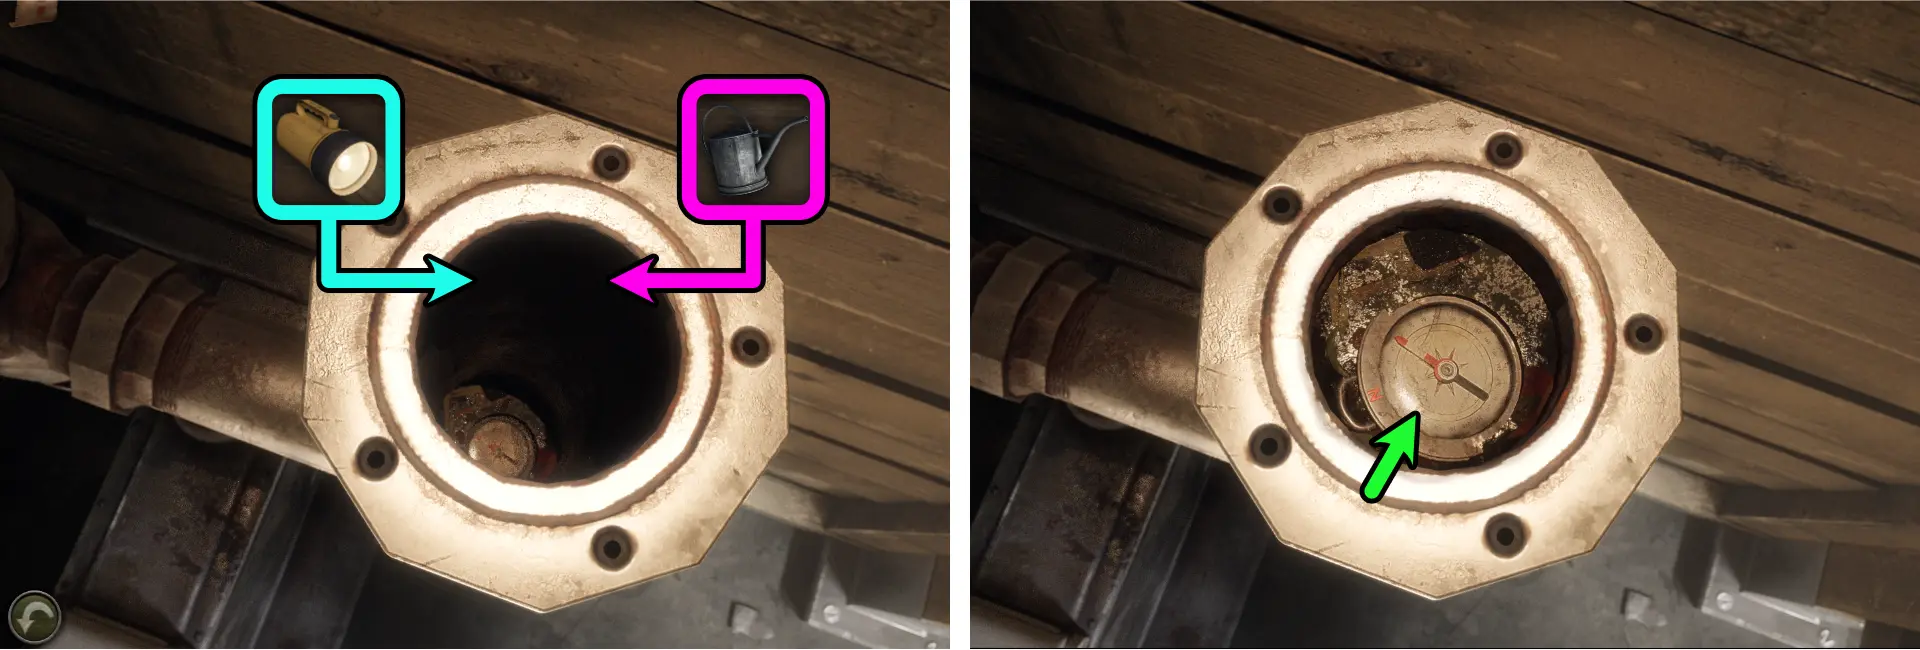
To take out the Compass from the pipes:
- Use the Flashlight once more on the pipe.
- Use the Watering Can on the pipe to bring the compass to the surface.
- Take the Compass.
Once you have the Compass on hand, leave the bathroom and go to the path to the right of the Tool Shed to play a cutscene and complete Chapter 1 of Aurora Hills.
And this marks the end of our Walkthrough for Aurora Hills Chapter 1! We hope that our instructions were clear and concise and that they were able to help you get through those tricky puzzles!
What do you think about the game? Which puzzle was your favorite? Are there other games you’d like us to cover? How can we improve our guides? Let us know in the comment section!
We hope to see you again when Chapter 2 of Aurora Hills drops!