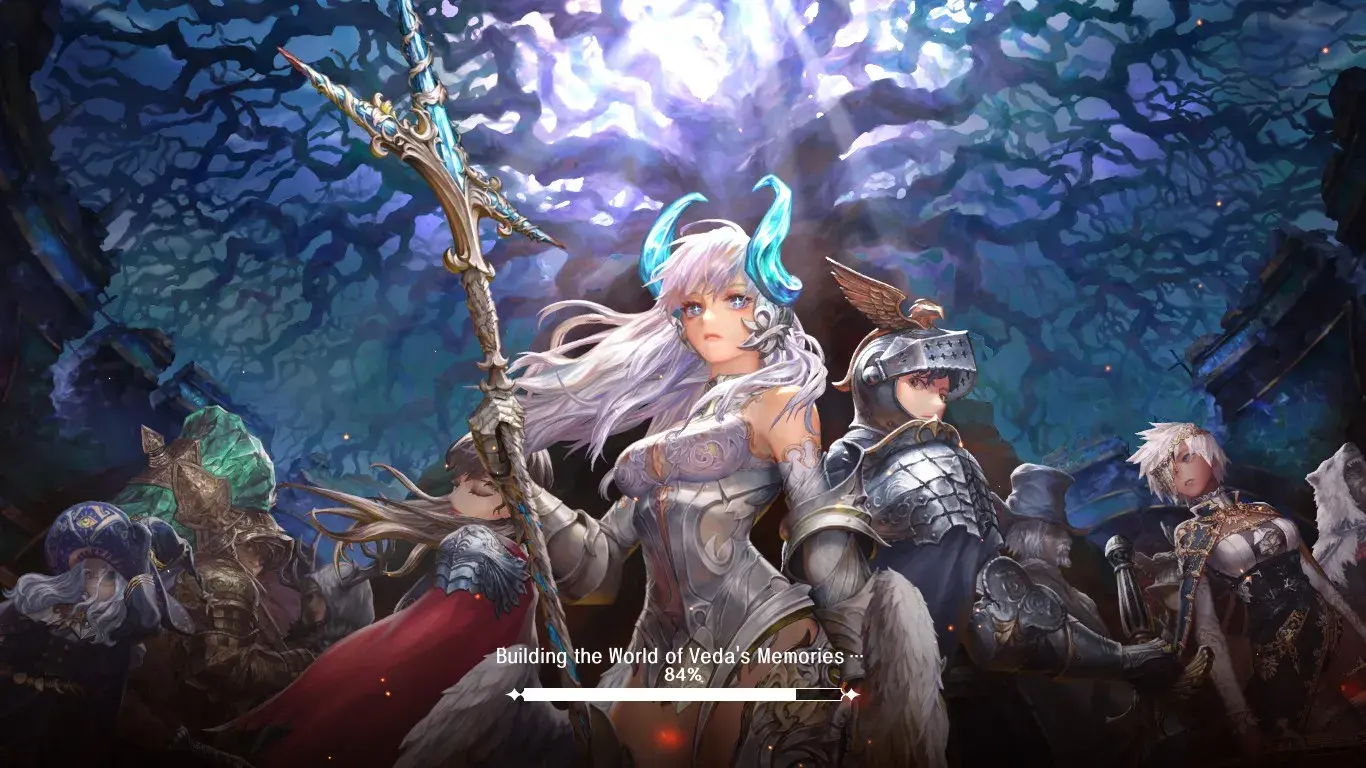
A cruel tyrant, a people’s cry. A final, desperate charge. Amidst the smoke and flames, you fought and made your final stand. You died bravely. Fate, however, wasn’t done with you yet. You awake, separated from your corporeal body in an astral realm. Before you, a goddess – Veda, the goddess of war and your savior – who gives you a new lease on life and a mission.
Arise, Knight of Veda.

As a newly arisen Knight of Veda, you’ll need to use the power of the 13th book to call on the power of your fellow knights in your quest to revive Veda, your patron goddess, who needs 12 fragments of her being brought together to return to the world.
Astra: Knights of Veda is a side-scrolling action RPG where you hack, slash, cast, dodge, and roll through a horde of foes. Whether you’re here for the story, the characters, or the thrill of battle, the game has something for you with its dark storyline and fantastic art. Astra: Knights of Veda is available on both the Google Play Store and the App Store. If you’re on PC, you can also nab the game on Steam or the game’s website via a standalone client. For reference, I’ll be using screenshots from both the Android and PC versions for this guide.
Astra: Knights of Veda is, at its heart, a 2D side-scrolling beat ‘em up, similar to Dragon’s Crown. The team-focused, character-swapping combat style also draws comparisons to Genshin Impact, though keep in mind that Astra: Knights of Veda is an action game, not an open-world one.
In this beginner’s guide to Astra: Knights of Veda, we’ll be going over the following topics:
- Knights of the Book – we’ll go over the basics of each character here: their stats, skills, equipment, and so on. If you’re already familiar with character basics in gacha RPGs, you can skip this part.
- Battlefield Controls – this is a beat ‘em up, after all! Let’s take your knights out for a spin. Or several.
- Bolstering the Knighthood – now that you’ve worked off that aggression by beating the crap out of some monsters, let’s look at how to make your knights stronger and make even bigger numbers fly!
- Harvesting Resources – because, for some reason, nobody will work for free even when it’s the literal end of the world. Here’s how to get the resources you need to make your team stronger.
- Gaming the Gacha – getting the most out of the game also means learning how to work its gacha to your advantage. Here we’ll talk about banners, pity, the different types of pull currencies, and more.
Lastly, feel free to jump to the “Quick Tips” subsection in each part if you’re just looking for a fast breakdown of the game.
Knights of the Book
The 13th book that Veda granted you is key to your success in Astra: Knights of Veda. While blessed by your goddess, you’re still just one warrior, and to achieve your goals of defeating the tyranny of King Magnus and restoring Veda to her true form, you’ll need to learn all about your fellow knights.
Quick Tips:
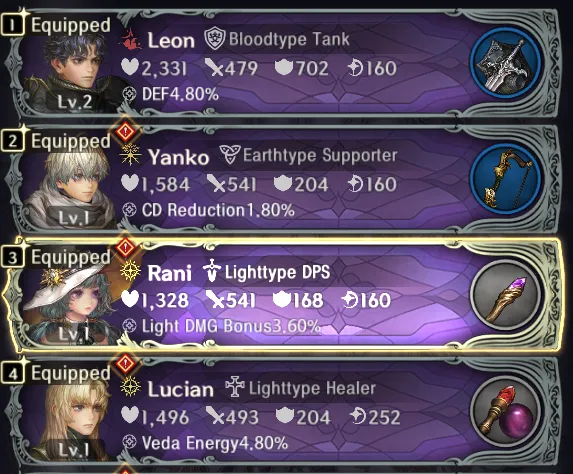
- Each knight has stats that dictate how it performs in battle.
- Each knight has different skills – a normal attack (split into normal/strong/dash attacks), a skill, an ultimate, and a dodge.
- Strong attacks come in three general variants – a block and counter, a charged attack, and a continuous attack.
- Skills can be used freely but have a cooldown. Ultimates both require Veda Energy (which you get from hitting enemies and using skills) and have a cooldown.
- Dodges are different for melee and ranged knights. Holding a direction will always have dodge in that direction.
- There are two elemental weakness/resistance cycles in Astra: Knights of Veda. You deal bonus damage when attacking a foe weak to your element.
- The first cycle is Fire -> Poison -> Earth -> Lightning -> Water -> Fire.
- The second cycle is Light -> Blood -> Darkness -> Light.
- Characters tend to boast high resistance against their own element.
- There are four roles that determine a hero’s niche: tank, DPS, healer, or support.
- You can view a character’s element and role in the knights menu.
- Each knight can equip a weapon, a ring, and an amulet.
- Rarer equipment gives better stats. Rarities are white -> green -> blue -> purple -> orange. Weapons that are at least blue also have a passive ability.
- Body armor is equipped exclusively on your character (Master of the Book). Body armor can be switched in the Tunic menu and applies to every knight in your team.
- Each knight can equip five relics, which bolster their stats. Each relic also belongs to a set; each set has passive bonuses that trigger when 2 or 4 pieces are equipped.
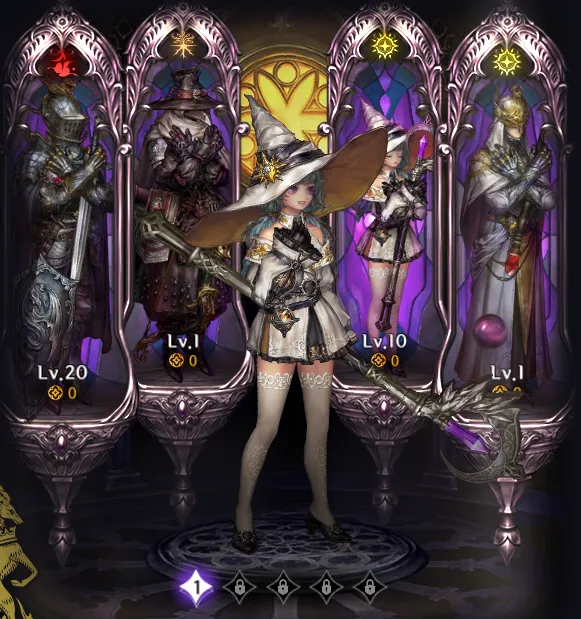
- A knight’s Fate nodes are unlocked by pulling duplicates of that character. Each character has six Fate nodes.
- The 3rd and 5th Fate nodes always improve the levels of a character’s skill and ultimate.
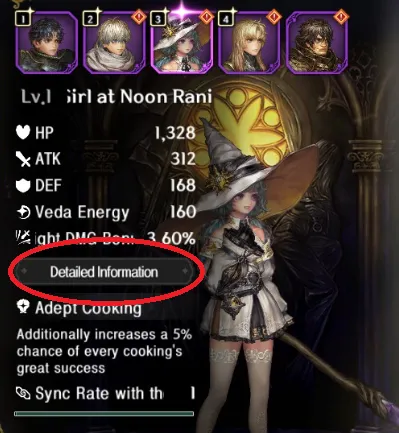
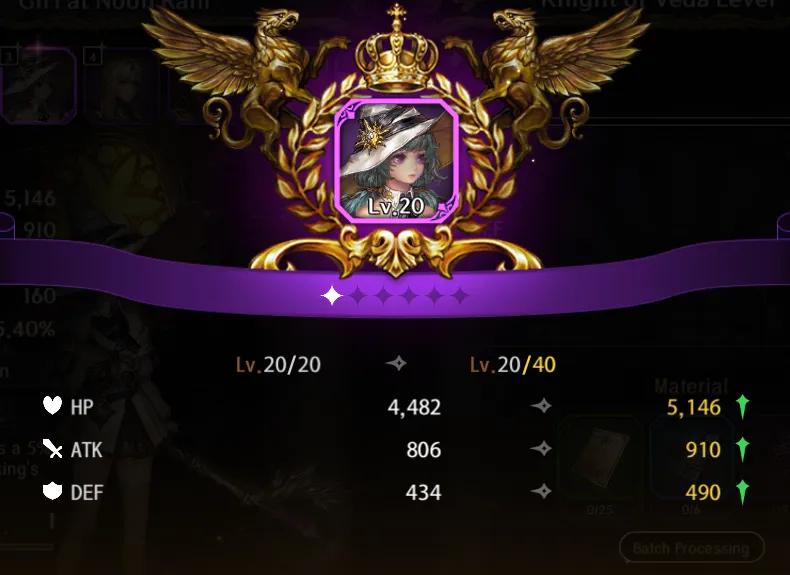
Stats
A knight’s stats dictate how well he or she does in certain aspects of the game.
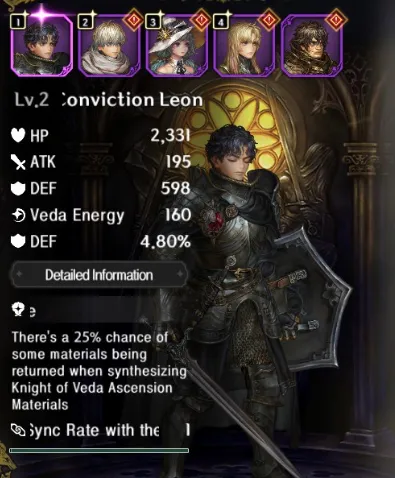
For beginners, there are a few key stats to focus on:
- HP – how much damage this knight can take before dying. If a knight is dead, you can’t use them until you either return to base or revive them somehow. Everyone needs some modicum of HP.
- ATK – attack power. The more of this a knight has, the more damage they do.
- DEF – defense power. A higher DEF stat means you take less damage from enemy attacks.
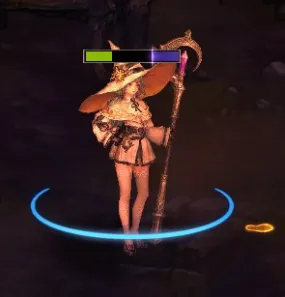
- Stamina – how much stamina this knight has. Stamina is used for actions such as dodging, dashing, and quick recovers. As Astra: Knights of Veda is a beat ‘em up, mobility is key in this game, and a higher stamina score can greatly help with that.
- Veda Energy – Veda Energy is required for a character to use their ultimate, and this stat indicates a knight’s Veda Energy cap. In general, a hero’s Veda Energy stat is also how much Veda Energy they need to use their ultimate.
- Tenacity – poise and resistance to interruption. The more Tenacity a knight has, the more damage they can take before going into a “flinch” state – though I will add that it’s better to dodge around and not get hit in the first place!
There are also more in-depth stats that you can access by tapping on the “Detailed Information” button here:
- ATK SPD – a percentage bonus applied to the attack speed animations of a character; the more of this you have, the faster you can attack.
- Movement SPD Bonus – a percentage bonus applied to your move speed.
- Crit Chance – the chance of landing a critical hit. Base crit chance is 10%.
- Crit Damage – how much more damage a critical hit does. Base crit damage is 50%.
- Ignore DEF Rate – the percentage of an enemy’s DEF this character’s attacks bypass. This does not bypass elemental resistances, only the DEF stat.
- Lifesteal Chance – the chance that an attack will have a lifesteal effect attached to it.
- Lifesteal Rate – the percentage of damage converted to healing when a lifesteal attack procs.
- Veda Energy Regeneration – how much bonus Veda Energy this character gains when they generate Veda Energy. A higher Veda Energy Regeneration stat means that a character’s ultimate can be used faster and more often!
- Reduce Veda Energy Consumption – how much of a Veda Energy discount this character has when using their ultimate.
- CD Reduction – affects how quickly a character’s skill and ultimate go off cooldown.
- DoT – bonus damage dealt by this character’s DoTs.
- Reduce Incoming DoT DMG – reduces damage from incoming DoTs. Doesn’t affect the rate at which you get afflicted by DoTs.
- Wound Rate Bonus – helps characters deal more wound damage, which is harder to heal.
- Reduce Incoming Wound Rate – reduces the portion of damage inflicted as wounds, helping a character survive longer by making more of their health bar healable.
- Heal – a bonus to outgoing heals.
- Incoming Heal – a bonus to incoming heals.
- Elemental Overload Charging – a bonus to how much a character fills up the Elemental Overload bar.
- Guard Rate – helps mitigate damage and stamina drain when guarding.
Lastly, we have the elemental stats. Elemental here refers to the following elements: Blood, Light, Darkness, Fire, Water, Electric, Earth, and Poison.
- Elemental Res – resistance to a particular element. You can see how much damage reduction this is, in percent, beside the number. Note that this is not the same as DEF. In general, characters are resistant to their own element.
- Elemental DMG Bonus – bonus damage applied to attacks of this element. As characters usually only deal elemental damage of their type, it’s always a good idea to go all-in on that type.
- Reduce Incoming Elemental DMG – reduces damage from an element. This isn’t the same as elemental resistance or defense.
Keep these stats in mind as you progress – they may not be relevant just yet, but they’ll let you fine-tune your characters as you make progress in the game!
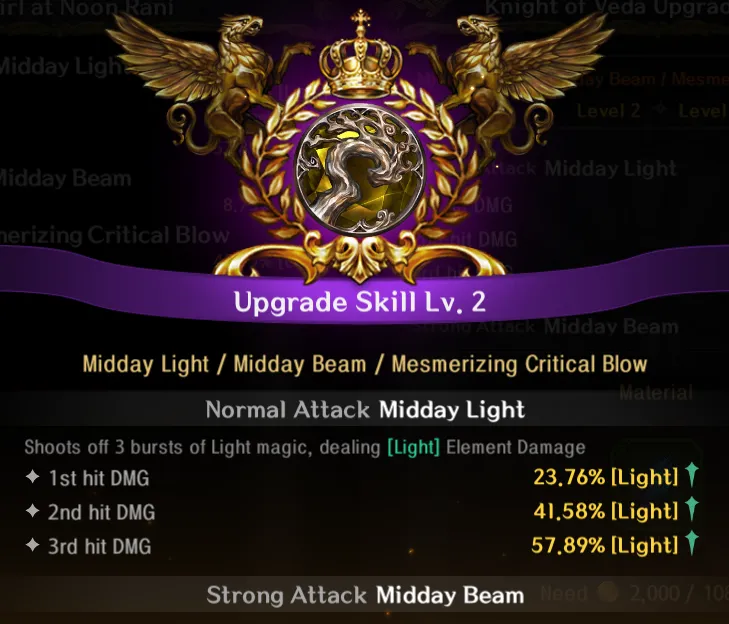
Skills
Let’s talk about skills. Each knight has several unique skills that they use in battle, and using these skills well is key to victory.
Skills can be broken down into four categories: normal attacks, normal skills (which I’ll just call their skill), signatures (which I’ll just refer to as ultimates), and dodges. Let’s start with normal attacks.
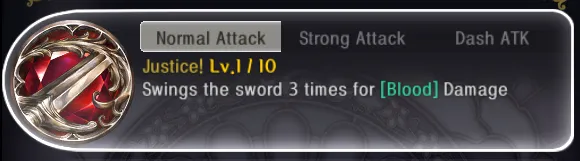
Normal attacks cover three categories: normal attack, strong attack, and dashing attack. A character’s normal attack is executed by tapping the attack button in combat, strong attacks are performed by holding down and then releasing the attack button (you can adjust how long you need to hold this down in the options), and dashing attacks are done by pressing the attack button during a dash – note that this will end the dash.
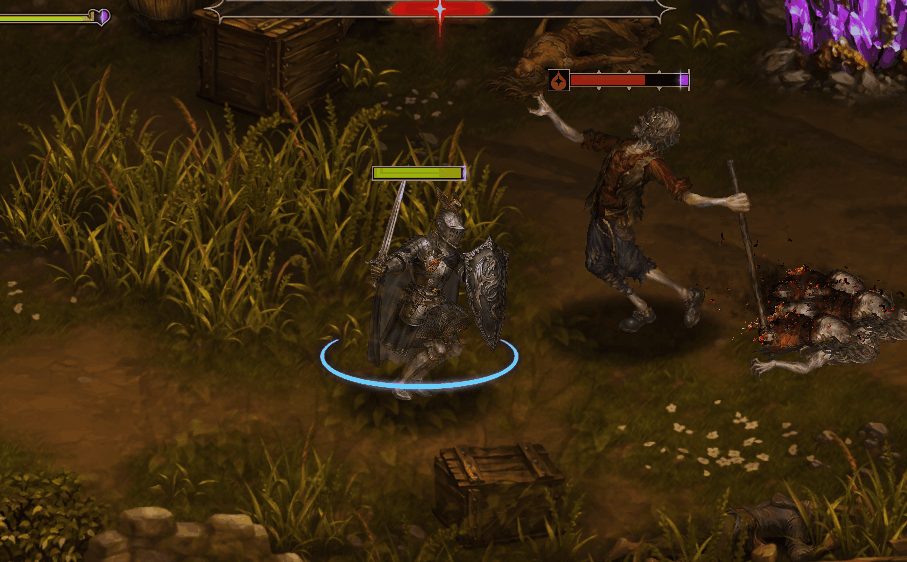
While normal attacks usually only do damage, always double-check a character’s strong attack as many of these can be central to a character’s gameplay. For example, take a look at Leon’s strong attack:
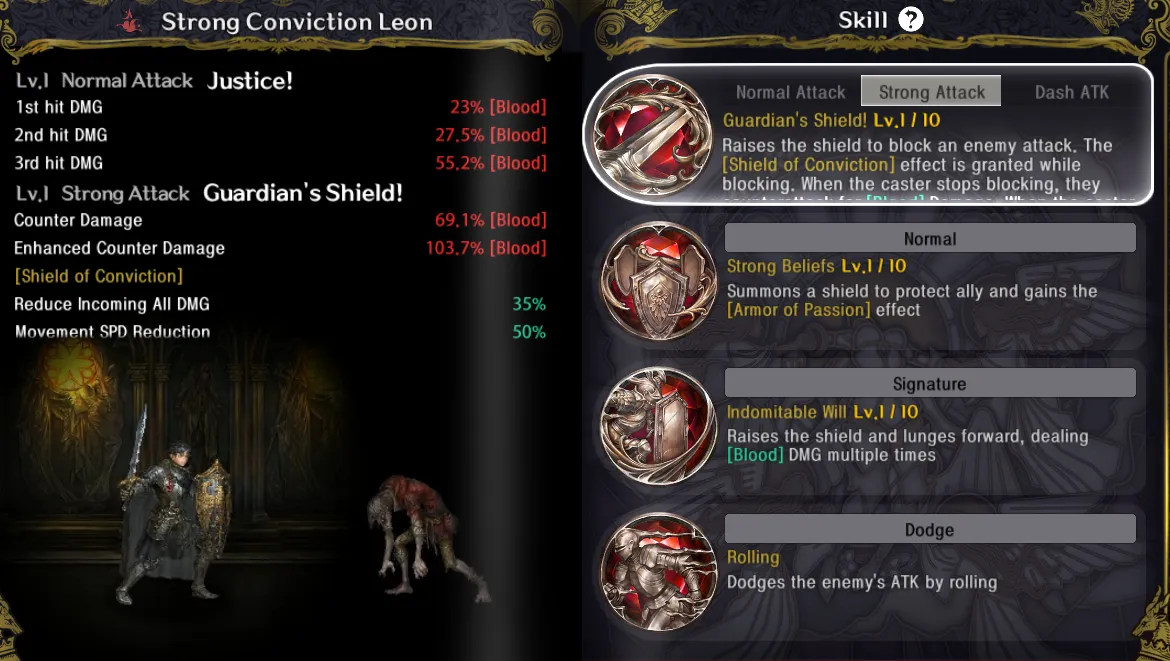
As you can see, it’s a block and counter move that does more damage if you time the counter perfectly. There are three general types of strong attacks: a guard and counter, a charged attack that goes through several stages, and a continuous attack that persists for as long as the button is held.
Next up is a character’s normal skill.
A character’s skill is a unique move that can do a lot of things, from dealing damage to debuffing enemies or even healing allies. The best part about skills is that they tend to persist through hero switches, meaning that you can switch to a tank, support, or healer, pop their skill, and then switch back to your DPS. Using skills costs nothing, but puts the skill on cooldown.
A knight’s signature skill (which I’ll just refer to as “ultimate”) is an incredibly potent ability that can only be used once they’ve accumulated enough Veda Energy.
Veda Energy is built up by hitting enemies and using skills – note that all characters gain Veda Energy, but your on-field character gains much more energy. Once you have enough energy, you can use a hero’s ultimate. Ultimates also have a cooldown on top of their Veda Energy requirements.
Last is a hero’s dodge ability.
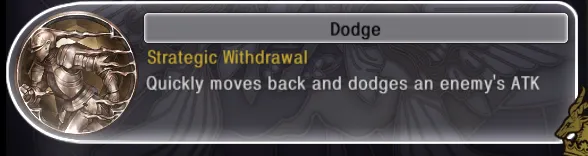
The only thing you need to pay attention to here is in which direction a hero dashes. Melee heroes like Leon tend to have rolls that move you in the direction you’re facing, while ranged knights like Yanko and Rani have backdashes that put them out of danger. Note that dodges perform differently when a directional input is held at the same time; for example, if you hold left while dodging, you’ll always dodge left, no matter if you’re playing as a melee or ranged knight.
Elements
Each Knight of Veda also has an element, also known as an attribute in-game. A knight’s element not only dictates what type of damage he or she usually does with their attacks but also influences their elemental strengths and weaknesses.
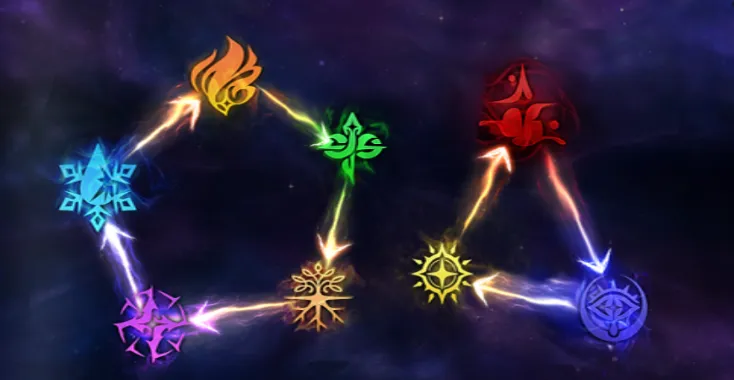
There are two weakness and resistance tables in Astra: Knights of Veda:
- Fire -> Poison -> Earth -> Lightning -> Water -> Fire
- Light -> Blood -> Darkness -> Light
As I mentioned earlier, characters are not only strong against one other element but are also highly resistant to their element. That said, it’s always better to field a team of knights who can cover each other’s elemental weaknesses rather than go all-in on a single element!
Role
Your Knights of Veda are sorted not only by element but also by role. This allows you to determine what their function is in battle with a simple glance.
There are four roles in Astra: Knights of Veda: tanks, DPS, healers, and supports.
- Tanks are sturdy heroes who often have more HP and defense as well as skills and normal attacks that contribute to their survivability. When it comes to weathering a foe’s attacks, tanks are second to none, and their skills often extend their survivability to their allies as well.
- DPS knights are your main damage dealers. Their only role is to wipe the battlefield clear of any foes – but they’re very good at their job. Note that while powerful, DPS heroes need the backing of tanks, healers, and supports as they have little to no survivability!
- Healers restore HP. That’s it. A simple but nonetheless important job.
- Supports facilitate the rest of your team in varied ways. Some supports summon minions, others may inflict debuffs, while still others can work in unpredictable ways. The right choice of support goes a long way in making not only a cohesive but competent team.
You can see a character’s role and element in the knights menu.
Equipment
Each Knight of Veda can also equip items to bolster their power.
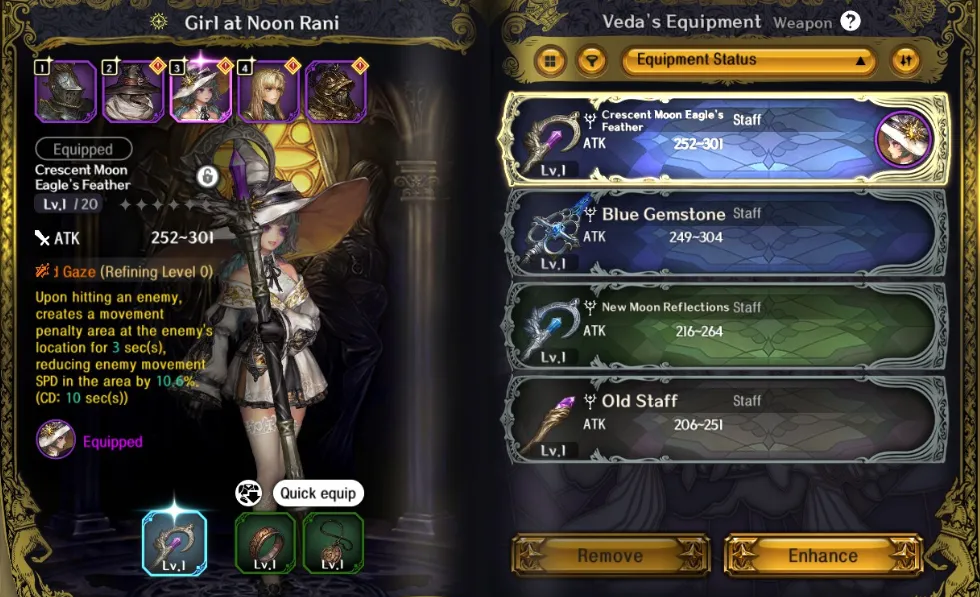
Knights of Veda have room for a weapon, a ring, and an amulet. Weapons boost raw ATK, rings boost offensive stats, and amulets boost defensive stats. In essence, they’re all just stat sticks.
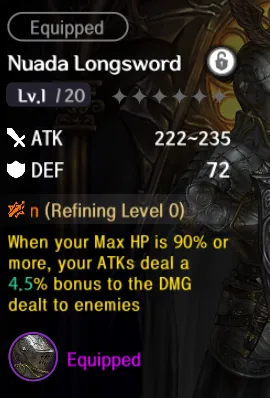
Equipment has rarity. The higher an equipment’s rarity, the better its stats can be. Rarities, from lowest to highest, are white, green, blue, purple, and orange. Note too that equipment of at least blue rarity (especially weapons) have passive abilities, like so:
It’s not just the knights in your book that you need to equip. If you’ve been following the story, you know that you’re actually borrowing their equipment and appearance – so you’ll also have to equip items on yourself to boost stats.
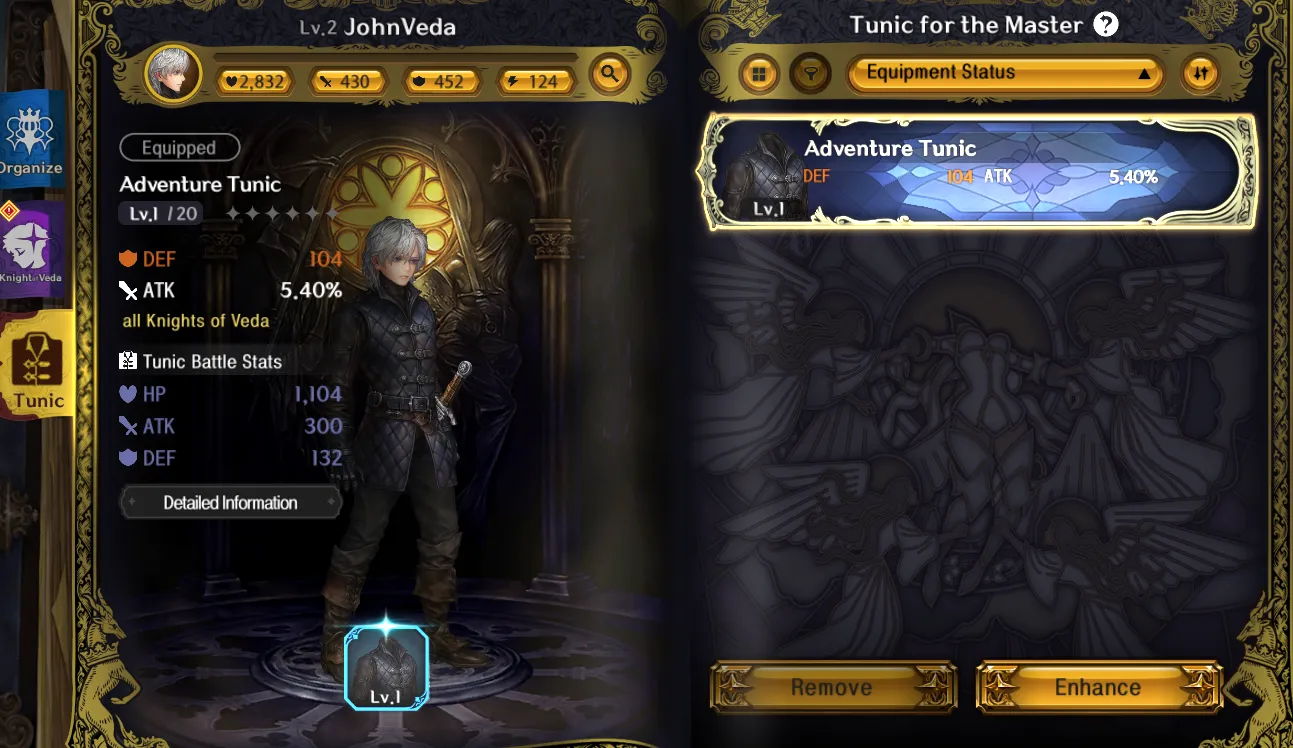
As Master of the Book, you can also equip a different tunic (body armor). Since you’re just taking on the appearance and abilities of your fellow knights, tunic stats apply to every knight on your team. To switch your tunic, tap on “Tunic” on the left side of the screen while in the knights menu.
We’ll talk about strengthening equipment and passives later.
At the beginning of the game, don’t worry about grinding for the absolute best items. Just fill up every slot available. Later on, once you’re comfortable in the game, you can start grinding in earnest starting at Adventure Level 5 as that’s when orange gear can start dropping.
Relics
Apart from a weapon and accessories, each knight can also equip relics, a group of five items that are designed to work with their own set.
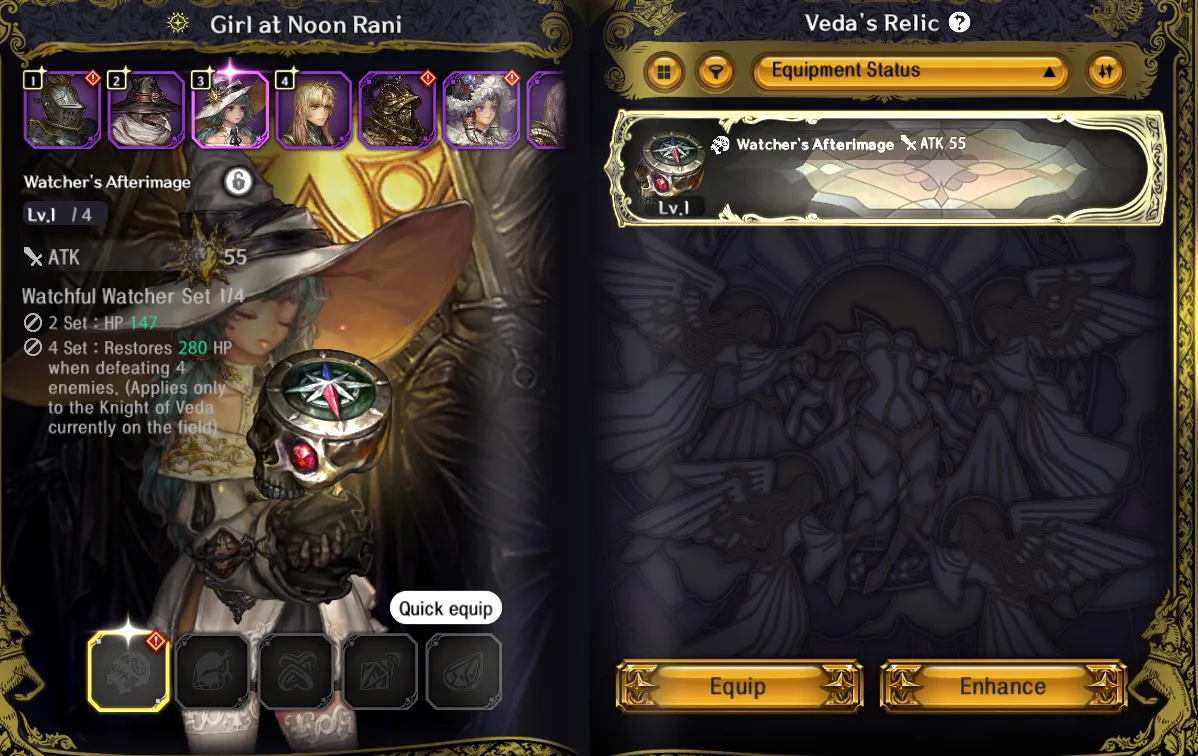
Each set has two passive effects which trigger when you equip two and four items of the same set, with the 4-item bonus usually being better. This also means that you can mix and match sets and trigger two 2-set bonuses if that’s what you want. Note that relics only apply their set bonus to the knight equipping them.
As with grinding for weapons, just focus on filling your relic slots up in the early game – you’ll want a higher Adventure Level before grinding in earnest for the good stuff.
Fate
Each Knight of Veda has access to the Fate system.
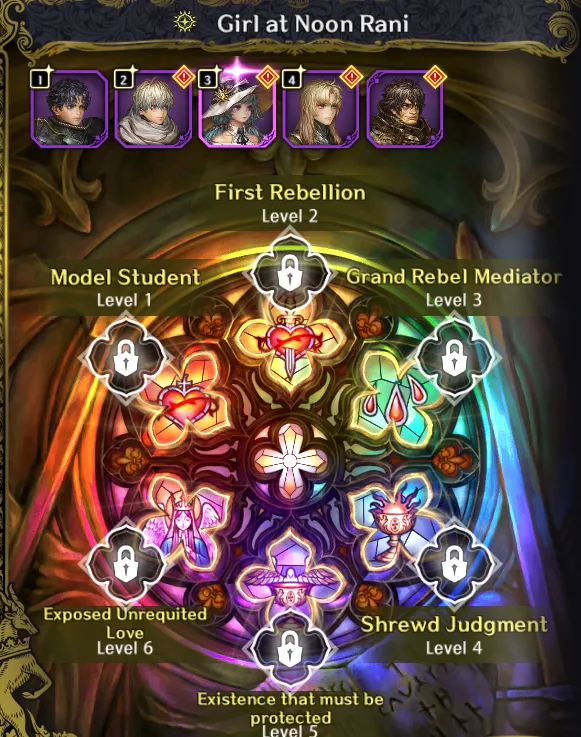
Each duplicate that you pull unlocks the next node in a knight’s Fate, and each unlocked node gives progressively more powerful bonuses. Note that the third and fifth fate nodes always improve the skill levels of their skill and ultimate, and that Fate nodes aren’t lit up automatically – you need to go to this menu and tap on each node to unlock it. Nodes must also be locked sequentially; you can’t just skip to node six.
Battlefield Controls
Astra: Knights of Veda does have a functional tutorial, it’s during a very chaotic battle, meaning that if you just skim through it, you might miss a few basics. Regardless, it’s always good to go through the details of a game’s combat system, and we’ll do that here.
Quick Tips:
- Tap normal attack for combos, hold for strong attack, tap it after dashing for your dashing attack. Note that dashing attacks end the dash.
- Holding a direction lets you choose which way to dodge. Holding the dodge button lets you dash instead.
- Dodges provide not only invincibility frames but also allow you to tactically reposition yourself in combat.
- You can dodge out of the knocked down state.
- Dodging uses stamina. Stamina is represented by the blue ring around your current character. It regenerates quickly over time, so long as you haven’t dodged or dashed recently.
- Dashing can be used to not only get around faster but also to separate mobs, disengage from a strong enemy, or position your ranged characters better. Like dodging, dashing consumes stamina.
- Don’t forget about strong attacks and dashing attacks as some heroes have different modes or buffs/debuffs tied to these attacks.
- You can tap on a hero’s ultimate icon beside their portrait to swap them in and immediately use their ultimate.
- Hitting an enemy with the same element repeatedly builds up its resistance to that element. This resistance shows up as a bubble around that enemy; while the bubble is up, they’ll take massively reduced damage from whatever element the bubble is made of. Build teams of different elements and switch characters out to counter this mechanic.
- Elemental shields can be broken more easily by attacking them with the element they’re weak against. Blood shields, for example, can be broken more quickly by hitting them with Light attacks.
- While a character has a shield, they are treated as if they were that element. An enemy with a Light shield temporarily becomes Light type, so Dark attacks will not only break the shield faster but also do more damage!
- Your characters can also gain the elemental resistance bubble if they take too many hits of a particular element.
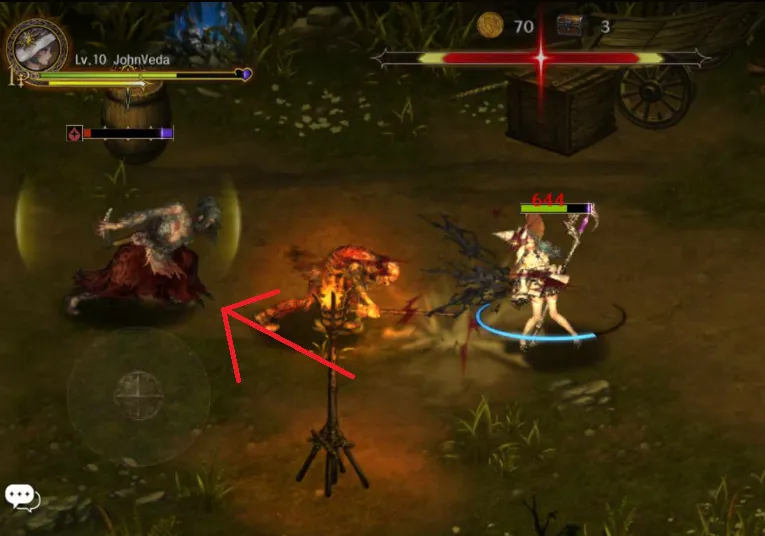
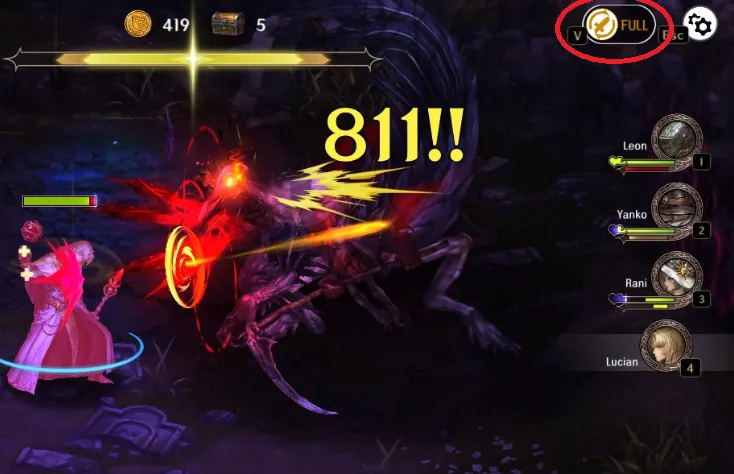
- Bosses have a stun meter above their health. This can be filled up by continuously attacking the boss. Filling up this gauge puts the boss in a stunned state – perfect for bursting it down with your ultimates and powerful skills!
- Dealing elemental damage fills up the Overflowing Power of the Stars, a bar at the top of the screen.
- Each color on the bar represents a particular damage type. The color in the middle is the most dominant damage type.
- Once filled, you can activate Overflow mode (not official in-game terminology). During Overflow mode, the Overflow bar will change to match the color of the most dominant damage type. Characters of that type gain massively reduced cooldowns and continuously regenerate Veda Energy.
- Some damage you take or inflict is instead dealt as wounds, which show up as purple on health bars. Wounds cannot be restored by healers and effectively cap your max HP.
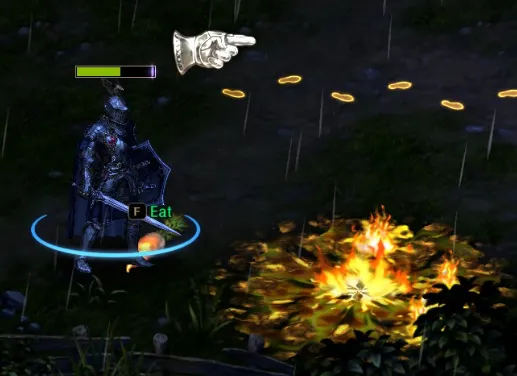
- Wounds can be restored by picking up food, which also restores some health. Note that only the character who eats the food will receive the healing!
- Astra: Knights of Veda is a team-based game. You can bring four heroes into battle, so try to have a logical formation and a team that works well with each other.
- At the very least, each team should have one DPS and one healer.
Mobile Controls
Let’s go over the mobile controls real quick.
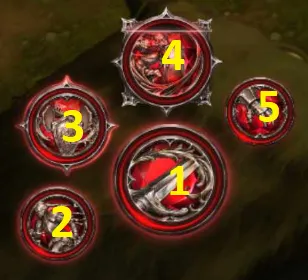
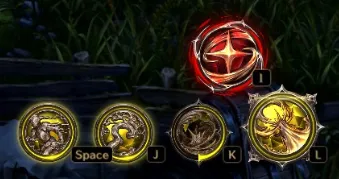
- 1 – your normal attack button. Tap to perform your normal attack string, hold to perform your strong attack, and tap during a dash to perform a dashing attack.
- 2 – dash and dodge. Tap to dodge, hold a direction and tap to dodge in that way, tap and hold to dash.
- 3 – skill. Tap to use your active character’s skill. If it’s on cooldown or otherwise unavailable, the button will be grayed out.
- 4 – ultimate. Tap to use your ultimate, which requires Veda Energy. You gain energy when you hit enemies or use skills.
- 5 – interact. Used to pick up items on the ground or interact with certain stage mechanics. This button only appears if there’s something you can interact with nearby.
Dodging
While the tutorial at the start of the game covers this, it’s not unheard of for players to forget that they can dodge and dash!
To dodge, tap on the dodge button. This will put you into a rolling state that provides a few frames of invulnerability, allowing you to avoid powerful attacks and reposition yourself. Skillful fighters will incorporate dodges into their fighting style, weaving seamlessly between attack and defense while picking at an opponent’s weak spots.
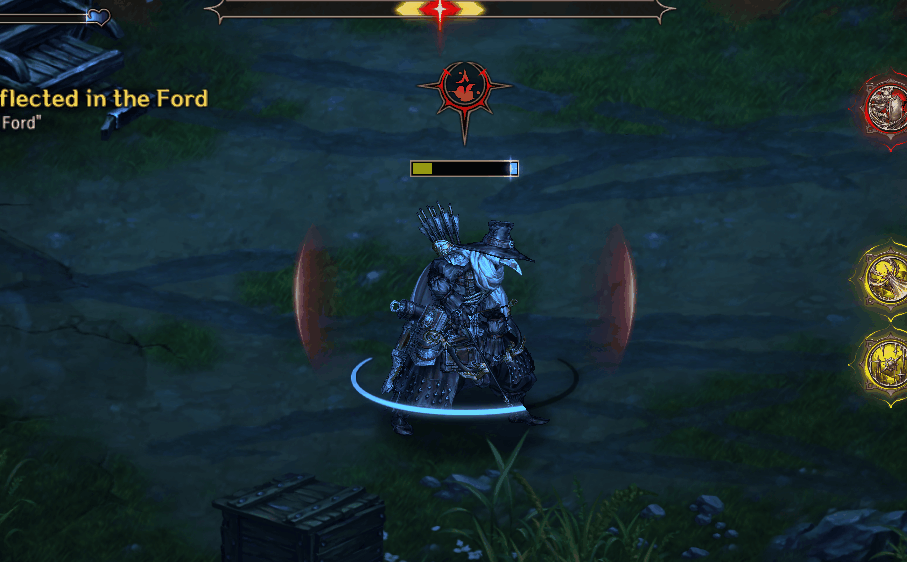
Note that you can also dodge out of the knocked down state, which can save you from taking more damage:
Dodging requires stamina, which can be seen below your character’s health bar or in the blue ring around your hero. Stamina regenerates on its own over time unless you’ve dodged or dashed recently.
Dashing
The dodge button can also be used to dash if held down.
While dashing, you move significantly faster but burn through your stamina at a rapid rate. This isn’t just for getting around quickly; tactical dashes can allow you to exploit openings in a foe’s attack patterns and relocate yourself for easier offense and defense.
Always keep in mind that dodging and dashing share the same stamina bar. You don’t want to be caught in a bad situation where you can’t escape because you spent all your stamina running around.
Strong Attacks and Dash Attacks
Keep in mind that a lot of heroes have hidden functionality locked behind their strong and dashing attacks!
Strong attacks are performed by holding down the attack button, and then releasing it. This usually results in an attack that’s much more powerful and inflicts more knockback than a normal attack. Keep in mind what I said earlier – some knights have strong attacks that can complement their skill set, such as Leon’s strong attack being a guard and counter on top of a damaging move. Again, you can adjust how long you need to hold down the button for a strong attack in the game’s settings.
Dash attacks, on the other hand, can only be performed at the end of a dash. These are usually quick, low-damage attacks meant to make your dashes safer, though some characters make extra use of them!
Quick Ultimates
You know about using skills and ultimates, but did you know that you can immediately call in an ally to use their ultimate when it’s ready?
When a knight’s ultimate is ready, it will show up as a glowing emblem beside their name. On mobile, you can tap on that icon directly to swap to that hero and immediately use their ultimate, saving you time. If you’re on PC, you can hold Alt and press the corresponding number to do the same.
Building Resistance
Remember that part in the “Knights of the Book” section where I said that it’s always better to build a team of multiple elements? One reason is that you don’t want to be bottlenecked by foes of a specific element; the other reason is because enemies build up resistance to an elements they’re repeatedly hit with. This shield is extremely hefty and brute forcing your way through it isn’t an option.
These shields aren’t entirely bad, though. While a character has an elemental shield, they are treated as if they were of that element. For example, hitting an enemy too many times with Leon’s attacks will generate a Blood shield; since the enemy is now Blood, you can switch to Rani to turn that shield into an advantage for you and get in some bonus damage!
Normal enemies don’t have enough health for this system to be a problem, but be sure to keep an eye out for shield bubbles that form around bosses and mid-bosses.
You’ll also be happy to know that, surprisingly, this system also works for you if you get hit too many times by an enemy of a particular element.
The Stun Gauge
Bosses in Astra: Knights of Veda are powerful and relentless, but they have a weakness in the form of the stun gauge. This blue bar can be found above the boss’ health bar.
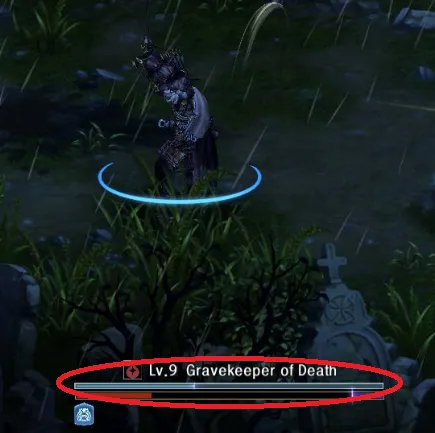
As you damage a boss, its stun gauge will fill up. Keep attacking it to fill up the bar – once it fills up, the boss will enter a stunned state. Use this time to unleash your ultimates and slow, powerful skills!
Overflowing Power of the Stars
As you deal damage in combat, you may notice a bar filling up at the top of the screen.
This is the Power of the Stars, which records both the damage you do and the type of damage you did. Each damage type has a unique color; Fire damage, for example, shows up as the orange part of the bar, Light damage shows up as yellow, Blood damage is red, and so on. Only the two most dominant damage types will appear on the bar.
Once the bar is filled up, you can trigger the Overflow state by tapping a new button that will appear.
During the Overflow state, the bar will glow and change all its colors to match the most dominant damage type it had. This provides massive buffs for characters of that element, as the Overflow state gives a huge damage increase to those characters as well as a massive cooldown reduction bonus AND a large chunk of Veda Energy. You also get your own anime-style power up theme song during this state, which is a nice touch.
Wounds and Food
You may have noticed that when you hit or get hit, a portion of your health bar becomes purple instead of black. The purple part represents wounds, and you can’t heal HP above your wounds, essentially capping your max HP for the rest of the battle.
Wounds are difficult to treat, and not even healers can restore the HP lost from wounds until after a fight. However, picking up food items on the ground does heal wounds and some HP too, but only for the character that picks up the food item. Food drops from defeated foes, but more commonly from smashing boxes and debris lying around in a level.
Note that food is more of a convenience than a substitute for a full healer, and is mostly there to help you patch up wound damage!
Team Composition
Astra: Knights of Veda’s combat, as I mentioned in the introduction, often relies on swapping party members out. There’s no character (yet) that can do it all, and coordination between skills, status effect procs, buffs, and debuffs between your multiple knights is key to success.
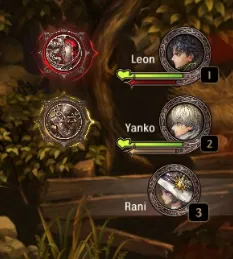
While you could always just unga bunga your way to victory, creating a team with a solid game plan is always a better idea. The first trio of knights you get are a clear example – Leon is a tank, with his shield skill; Yanko is a support who deploys a turret and increases the damage enemies take with his ultimate, and Rani is your on-field DPS.
Any team will work, but for new players, it’s a good idea to focus on one DPS and one healer.This is because strictly speaking, tanks and supports are optional, especially if you’re good at dodging and if your DPS knights are dealing enough damage. Healers, on the other hand, are always going to be relevant because even the best of us make mistakes when dodging and you don’t want to be caught in a bad situation where you can’t heal. The good news is that Lucian, a Light healer, is guaranteed to show up on every player’s account, so you can use him and Rani as your healer/DPS duo – at least until you find a better DPS.
Bolstering The Knighthood
Now that you’ve beaten up a few monsters and maybe got beat up yourself, it’s time to look at the various ways in which we can strengthen the knights in the 13th book. And while skillful play is a large factor in getting ahead in the game, so too are improved stats, equipment, skills, and so on!
Note that we won’t be covering Fates here as that system is dependent on your gacha luck and/or willingness to shell out real cash.
Quick Tips:
- Leveling up your knights is the fastest way to make them stronger. Each level bolsters their base stats.
- Certain level thresholds require ascension to be performed. Ascension requires special items in addition to gold.
- Your maximum knight ascension level is tied to your Adventure Level.
- Note that leveling up in Astra: Knights of Veda gets very expensive very quickly as the game is stingy when it comes to experience books and characters need a ton of books per level. Once again, it’s a good idea to focus on just one healer and one DPS as well as two other characters for your core team. Don’t spread your resources too thin as that will slow your progress!
- Ascending your characters also lets you level up their skills. The higher a skill’s level, the higher its multipliers become.
- Level up your characters’ normal attacks, skills, and ultimates to improve their numbers. Note that skill levels are capped by ascension.
- It’s a good idea to conserve resources by only leveling skills that you’re actively going to use. For example, there’s generally no point in leveling up a healer’s normal attack as you just need them for their HP recovery skill
- Upgrade your gear! The raw power that upgraded gear gives you can give you the edge you need.
- Weapons, accessories, and tunics, like knights, must be ascended at certain caps to reach higher levels.
- You can merge similar blue or higher rarity weapons to increase their passive ability’s numbers. Note that this doesn’t boost their stats!
- Relics can be acquired by fighting bosses in Veda’s Nightmare. Completing each chapter unlocks a new boss, each of which drops pieces of different relic sets.
- Relics have a maximum level based on their rarity. Each level grants a relic increased main stats.
- At certain levels, relics roll for substats. The higher a relic’s rarity, the more substats it can roll. Good luck with this.
- Food buffs can give you the edge you need to complete a particularly tough dungeon or for faster clearing and grinding.
Leveling Up
The fastest way to make the Knights of Veda stronger is by leveling them up. Each level grants a knight higher base stats. Nothing exciting, but you’ll need those numbers to keep up with your enemies.
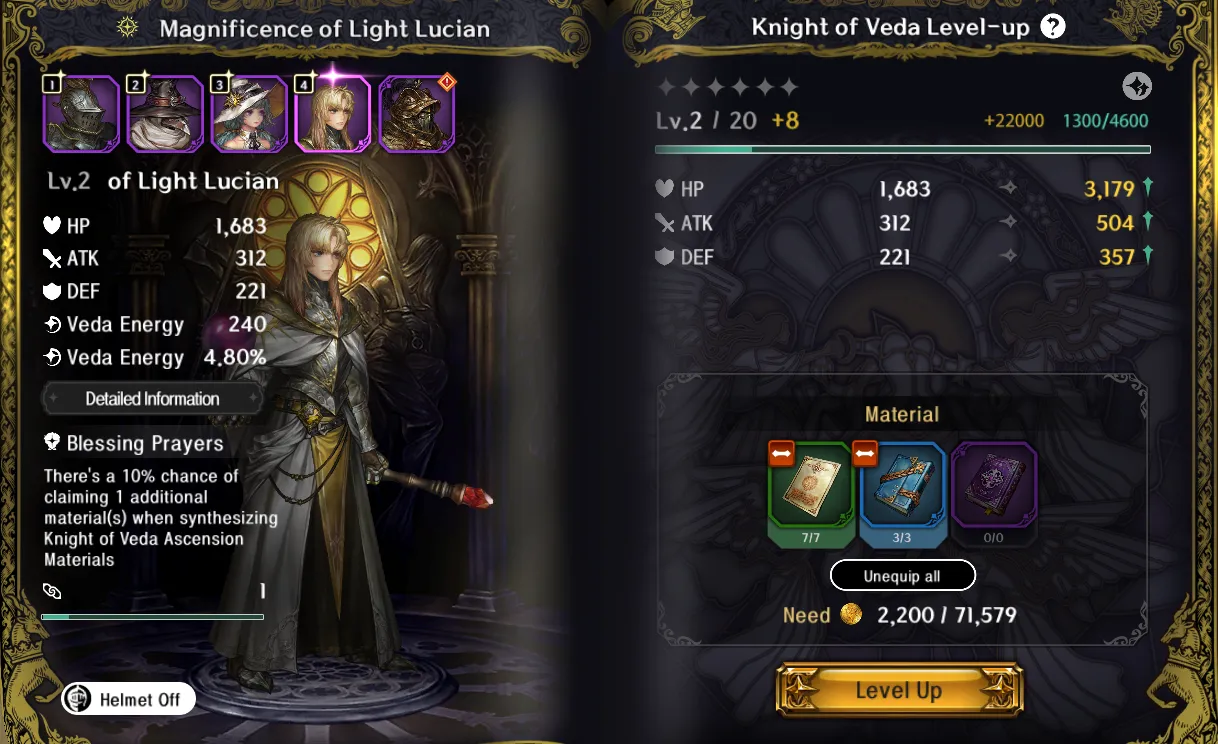
Leveling knights can be done by feeding them experience books in the knights menu.
Note that at certain level thresholds, you’ll have to ascend a knight. Once a knight ascends, they’ll not only get a new level but more importantly increase their level cap, allowing them to grow even more.
Ascension requires special materials, which you can get from certain stages. Your maximum ascension level is tied to your Adventure Level, with the first ascension opening up at Adventure Level 2. Until then, you’ll have to make do with level 20 heroes.
Astra: Knights of Veda is one of those games where leveling up becomes very expensive very quickly, especially in the early game where you don’t have a solid place to farm experience books. Stick to leveling a core team – ideally one DPS and one healer as well as two utility heroes – so you can get past the early game hump.
Upgrading Skills
As you ascend your Knights of Veda, you’ll also gain the ability to level up their skills. Leveling up skills improves the numbers on that skill, leading to more damage, better debuffs, more healing, and so on.
Note that skill levels are tied to ascension level – a knight must have ascended at least once to start leveling up their skills.
As a new player, try to get into the habit of only leveling skills that you’re actually going to use and will help your team. Yanko is a good example of this as he’s normally played by switching to him, summoning his turret and activating his ultimate for the debuff, then switching to your main DPS. This means that, in most cases, you don’t need to spend materials leveling up Yanko’s normal attacks as his job is to provide off-field damage and support his carry!
Upgrading Gear
Next is upgrading your gear. As a general rule, if you can equip it, you can upgrade it.
To upgrade gear, simply go to either your inventory or the knights screen, go to “Equipment” or “Relic” (depending on what you want to upgrade), then tap the thing you want to upgrade. Select “Enhance” and you’ll be taken to this screen…
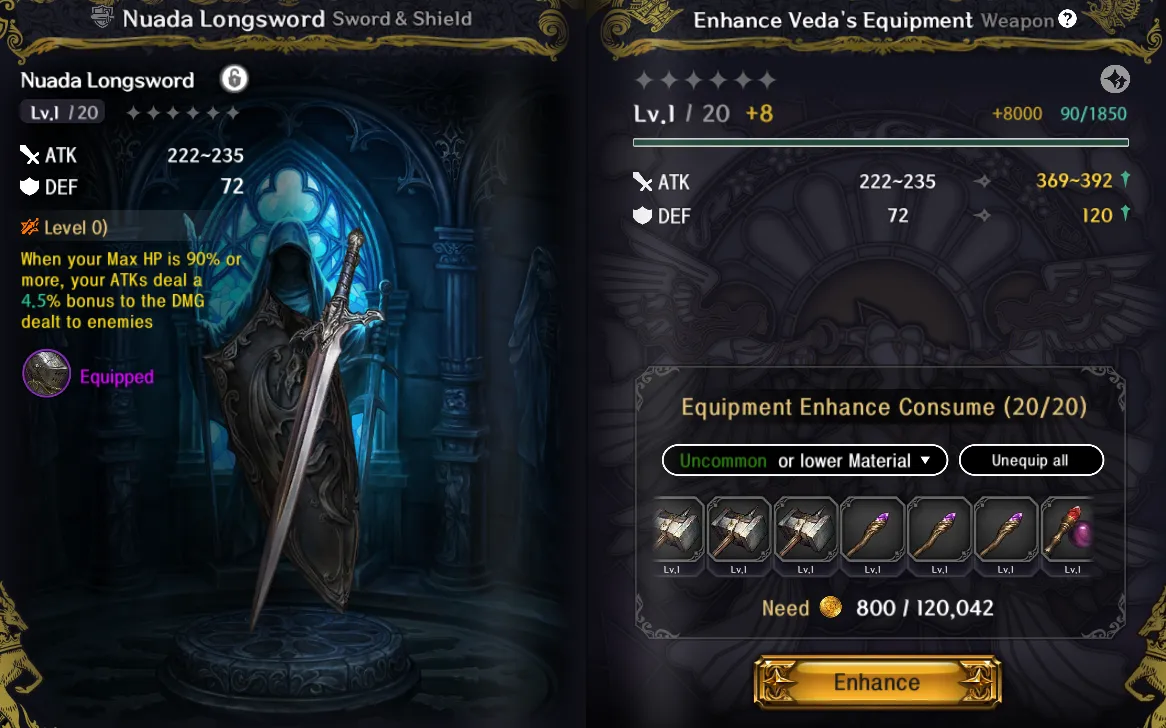
…where you can sacrifice materials to increase the level of your gear, which in turn gives it better base stats. A lot of problems can be overcome just by upgrading your gear, so make sure to keep your equipment in tip-top shape.
There are different rules for enhancing different types of equipment:
- Weapons need to be fed other weapons or Refining Stones. As with knights, you’ll need to ascend a weapon at certain levels to increase its maximum level.
- Rings and necklaces must be fed other rings and necklaces (respectively). You can also use Alchemy Stones as experience materials. Like weapons, you’ll have to ascend accessories at certain levels.
- The Master of the Book’s tunic can be upgraded by sacrificing different types of leather. Tunics must also be ascended at certain levels.
- Relics have a unique upgrade mechanic. We’ll talk about that in a little bit.
You can get upgrade materials from doing stages (smash those ore nodes and crystals in stages!) and getting AFK rewards. If you need more even materials, you can visit Todburg Village as there are NPCs that sell low-rarity equipment that you can sacrifice for that extra push.
Feel free to upgrade your early game gear, especially your blue items, as you can feed those to your higher-rarity equipment once they drop.
Refinement
Weapons can also be refined to improve their passive ability. To refine weapons, tap on “Refine” – it’s on the right side of the screen when you’re upgrading.
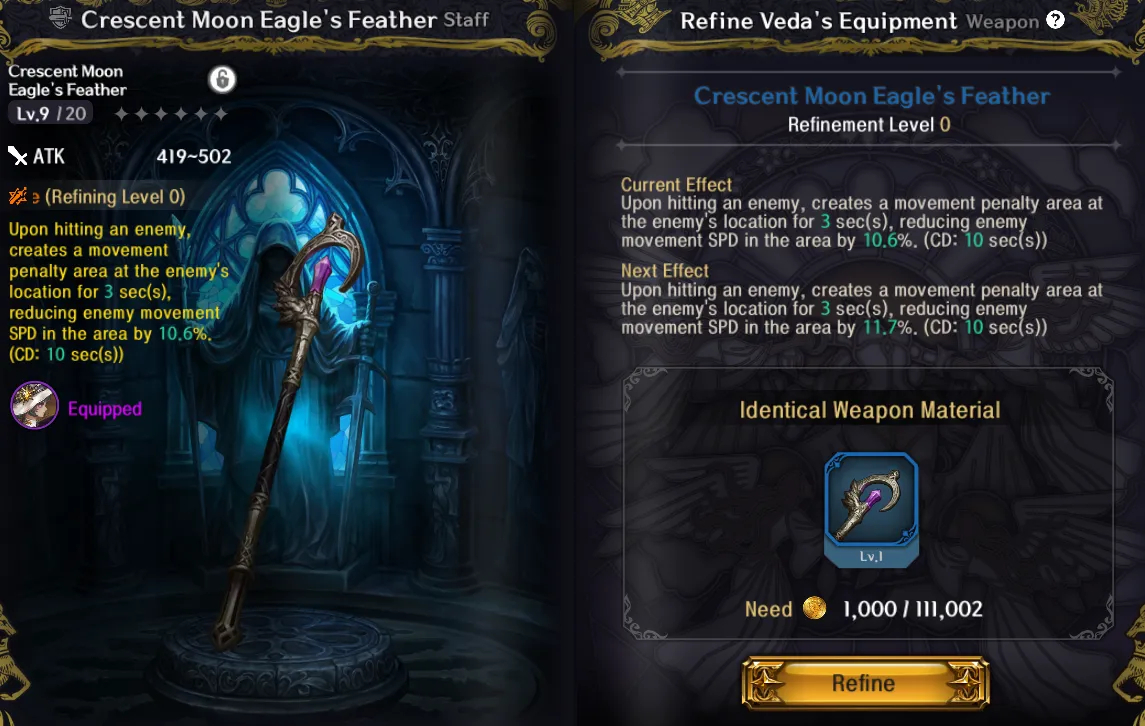
Refining a weapon levels up its passive ability (not its stats!). To refine a weapon, you’ll need to sacrifice a copy of it. Refinement goes up to five levels.
Once again, only blue or higher rarity weapons have passives, so you can’t refine white or green weapons.
Relics
Finding, equipping, and upgrading relics is a vital part of getting stronger. To get relics, you’ll need to challenge bosses in Veda’s Nightmare, the game’s AFK mode. Visit your bed in Todburg or just tap on the Nightmare icon in the main menu or upper left – it’s the thing with multiple faces.
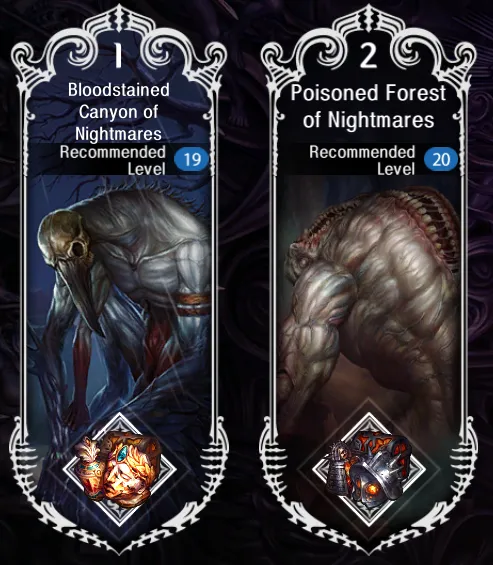
Each time you clear a story chapter, you’ll unlock that chapter’s boss as a new foe in the nightmare. Defeat the boss once again to get it to drop relic pieces. Each boss unlocks a new relic set, so keep an eye on those set bonuses.
Now, as I mentioned earlier, relics have a different mechanic for upgrading. This is both because of their rarity and substats.
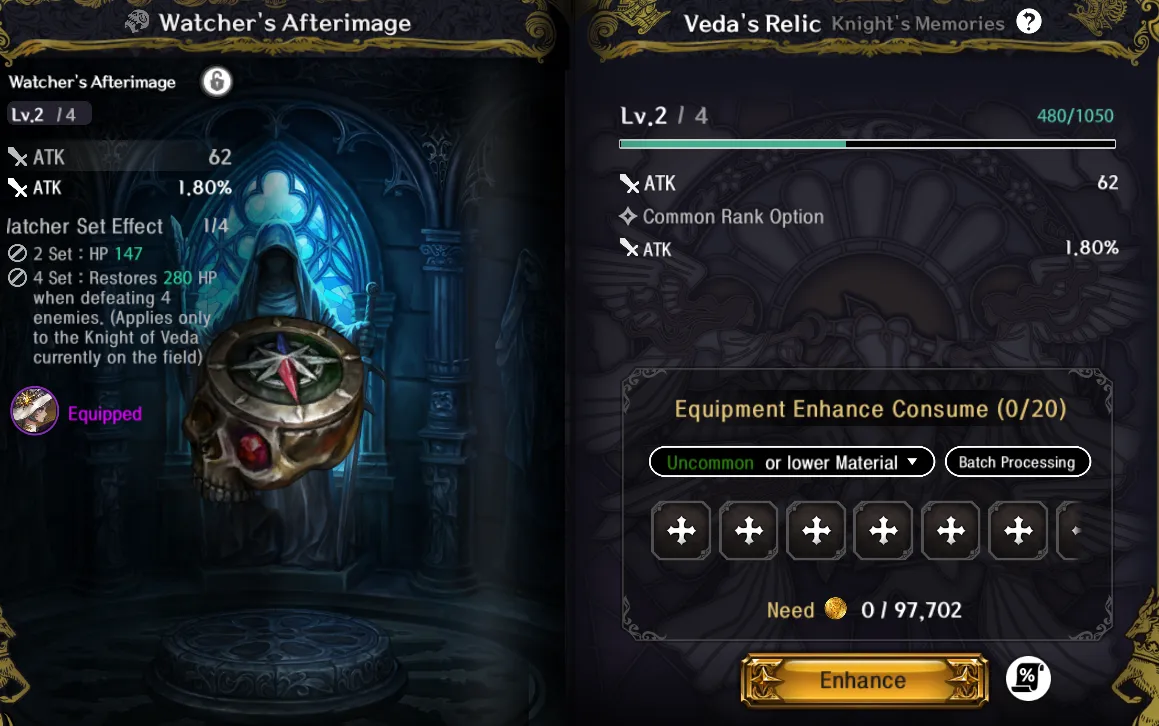
A relic is composed of at least 2 stats – its main stat and any potential substats. Leveling up a relic will always increase its main stat, and at certain levels, it rolls to gain substats. These substats are applied in addition to the main stat and can vary wildly, so good luck not only getting the exact substats you want but also getting the game to upgrade those substats.
The higher a relic’s rarity, the higher its level cap (in general, it’s rarity * 4, with white being 1 and orange being 5), meaning that rarer relics are much more valuable as they can not only reach higher main stat values but will also have more chances to roll substats. Again, good luck.
Relics must be fed other relics to level up.
Cooking and Food Buffs
Never underestimate the power of a good meal. With the right combination of ingredients and a little patience, you’ll be able to craft meals that will vitalize your knights and give them passive bonuses to help them in their next fight.
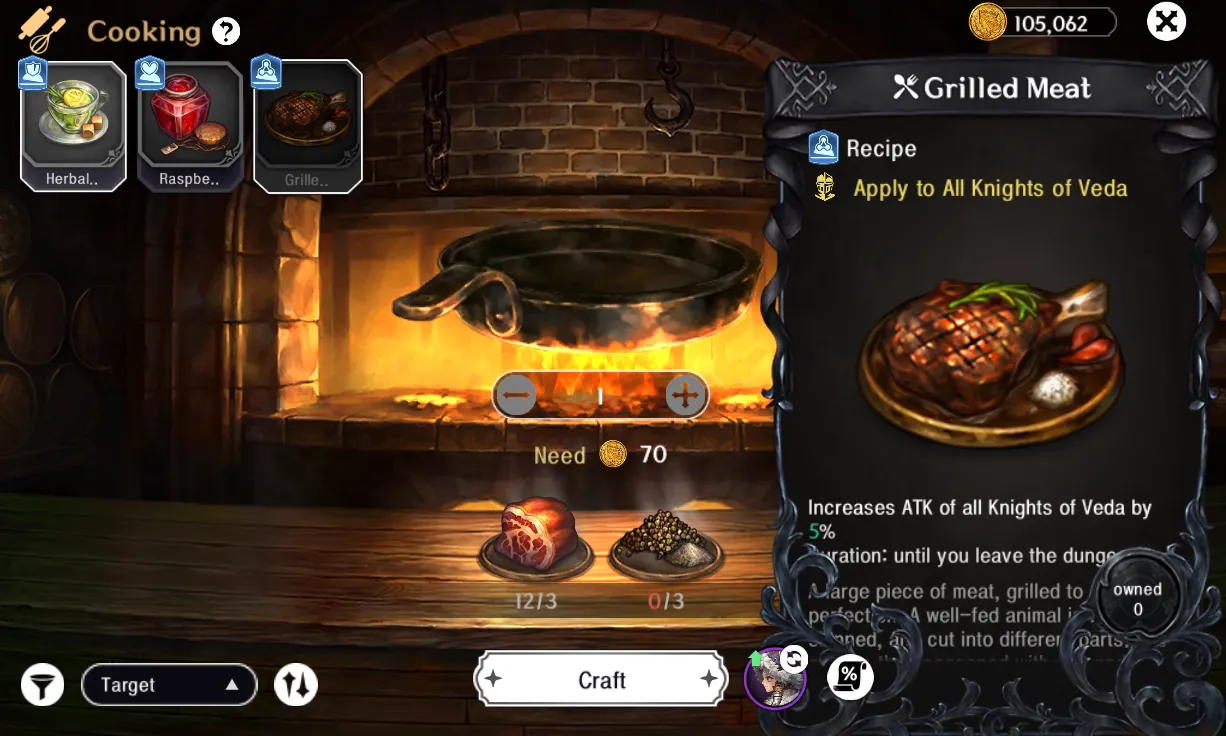
At the Guild Hall (or any grocer), you can cook ingredients into meals that provide potent passive buffs for one battle. While the duration may be short, don’t underestimate the power that food buffs can give you. As you play the game, you’ll unlock new, more powerful recipes as well.
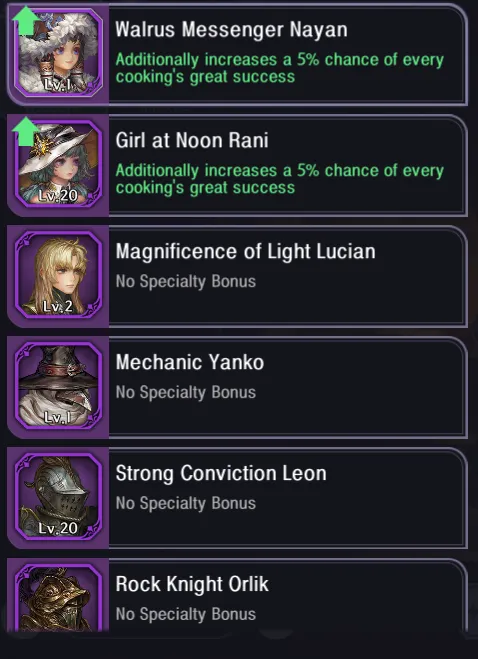
When cooking, you can occasionally whip up better dishes than normal, which provide superior buffs over their base versions. In general, the chance of producing a superior dish is 5%, but you can use characters with a cooking passive to slightly tilt the odds.
Cooking ingredients can be acquired from beating up enemies – yes, we’re really going to use the raw meat that a zombie was dragging around – or, more hygienically, by buying them from town NPCs. Cooking itself can be performed at grocer NPCs or the Guild Hall by going to the cooking pot.
Food buffs can be activated by using food from your inventory, or by tapping on the crossed spoon and fork before entering a combat zone.
Harvesting Resources
Knowing how to make your knights stronger is one thing, and knowing where and how to get the resources you’ll need to do so is another. This section will give you a quick rundown on where to get certain key resources in the early game.
Quick Tips:
- The adventure guide is an in-game reference sheet that will help you find out where to farm specific resources.
- You can tap on any item in the game to see where to get more of it.
- Your Adventure Levels, and by extension your Master Levels are key to efficient farming. The higher your Adventure Level, the harder foes become, and they’ll start dropping more and better loot.
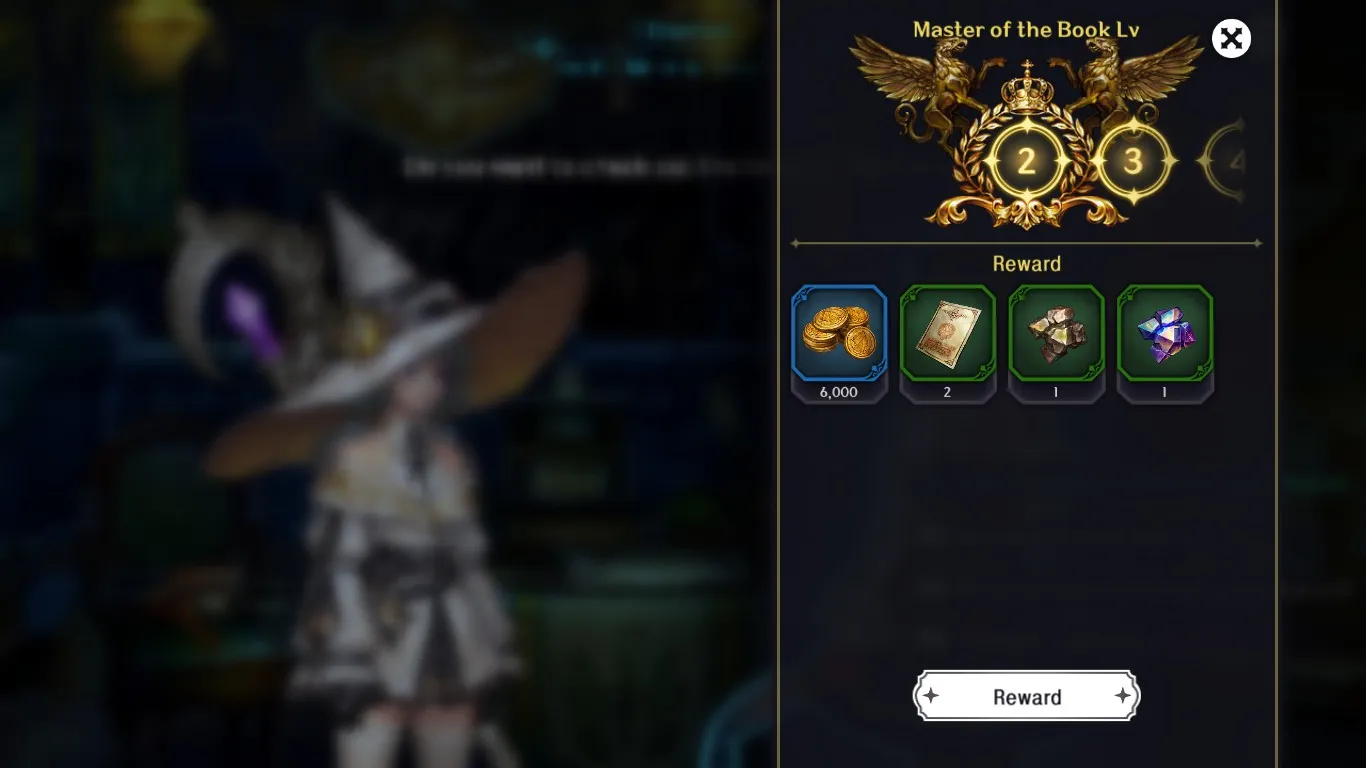
- You gain Master exp by playing the game – pretty much every game mode hands out some experience. At certain Master levels, you can undertake a special ascension quest that will raise your Adventure Level upon completion.
- Licorice in Todburg (the village, not the guild hall) will also give you rewards for each Master Level you achieve.
- Veda’s Nightmare is the game’s AFK mode. Note that it only holds 24 hours’ worth of resources.
- The more progress you’ve made in the main story, the bigger the income from the nightmare will be and the higher the nightmare’s stage.
- The nightmare will gather resources even while you’re playing!
- You can synthesize items by visiting Himith in Todburg. This lets you exchange materials of one type (like ascension materials) for other items of the same type, meaning that you can beeline towards certain resources you need by trading away items you don’t need.
- You can challenge any stage you’ve already completed for more resources. You’ll need Adventurer’s Shoes to leave with your loot though.
- If you’re just grinding stages, you can turn on auto combat. I suggest using auto combat sparingly and only in stages you know you can easily clear as the AI isn’t very smart.
- You can synthesize 80 Adventurer’s Shoes into 1 Hero’s Shoes. Hero’s Shoes can be spent instead of Adventurer’s Shoes in some modes and grants you multiple stage drops for the time cost of clearing it once. This allows you to grind far more effectively.
- In the early game, I suggest using your Hero’s Shoes on Veda’s Nightmare bosses to fill up your knights’ relic slots and for very large amounts of Master experience.
- Seriously, get into the habit of synthesizing Hero’s Shoes. It’ll save you a lot of time and energy.
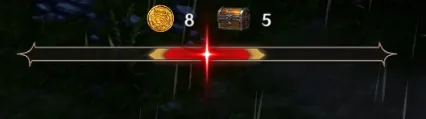
- Each main story stage you clear nets you up to three trophies; collect all trophies in a chapter to get some Starstones and unlock the next difficulty for that chapter, which will let you get more Starstones and resources.
- You get a small amount of Starstones by turning in achievements.
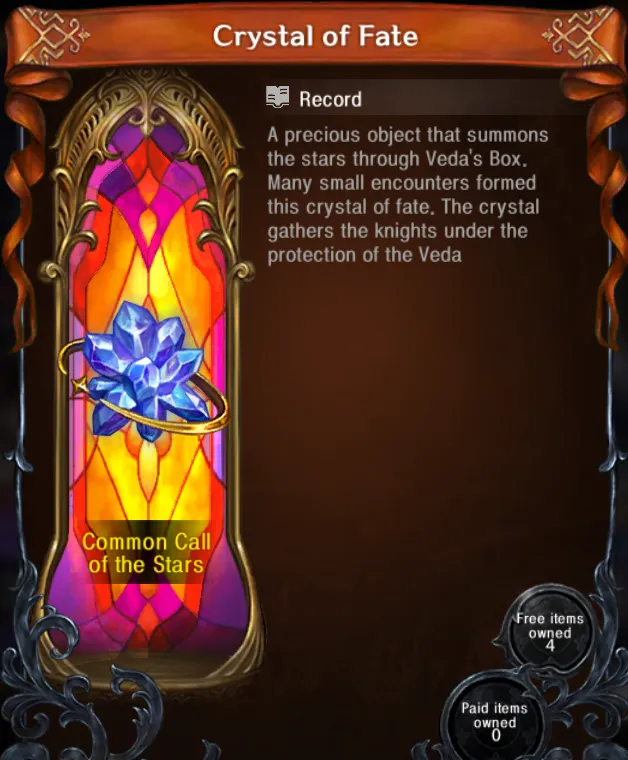
- Each knight also gives you one Crystal of Fate (standard banner currency) by visiting their detail page.
- The battle pass unlocks at around Master level 10. There’s both a paid and free track.
- Always join events. Events are very important in live service games.
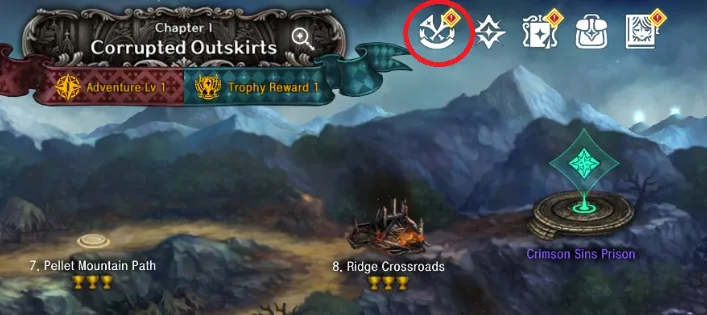
The Adventure Guide
Before we begin, let me introduce you to the adventure guide.
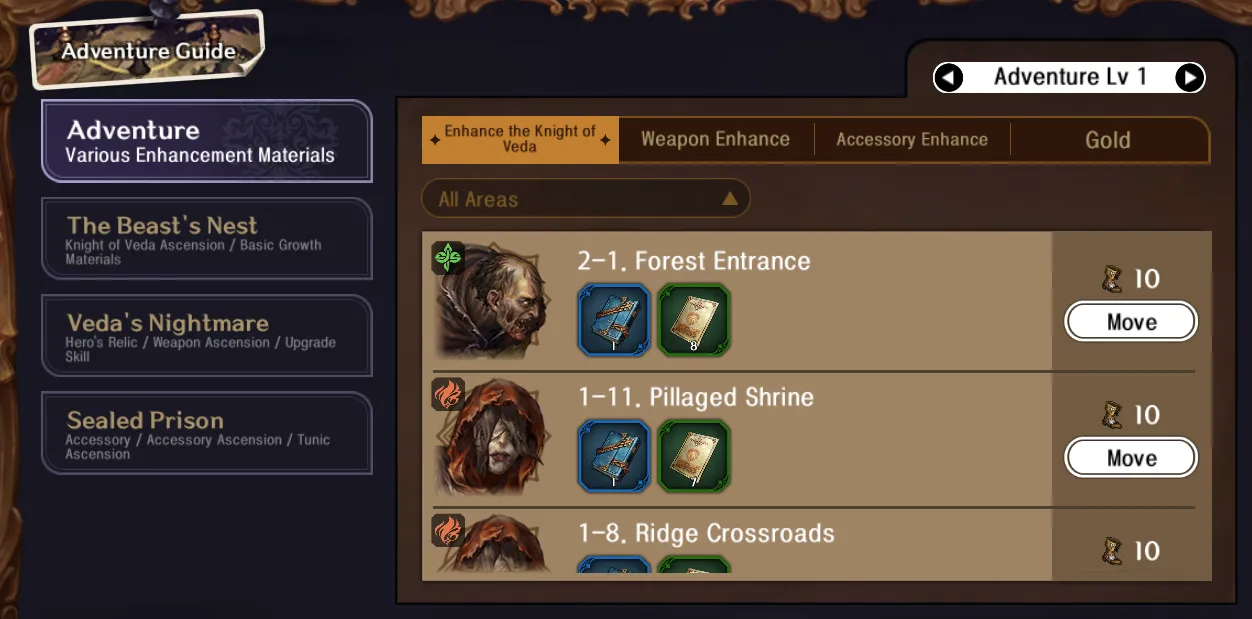
The adventure guide is an in-game reference sheet that will not only show you where to farm for specific materials but also let you go to those battles with one tap. You can sort through various resource types, such as experience books, gold, weapon enhancement materials, relics, and more – AND you can increase the Adventure Level here to see how the drops change. More on Adventure Level in a bit.
You can access the adventure guide from the main menu – tap on Belle in the upper left of the screen. You can also just tap on this button:
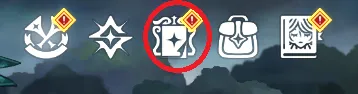
Item Sources
You can also just tap on an item to see where to get more of it if you don’t want to bother leafing through the entire guide:
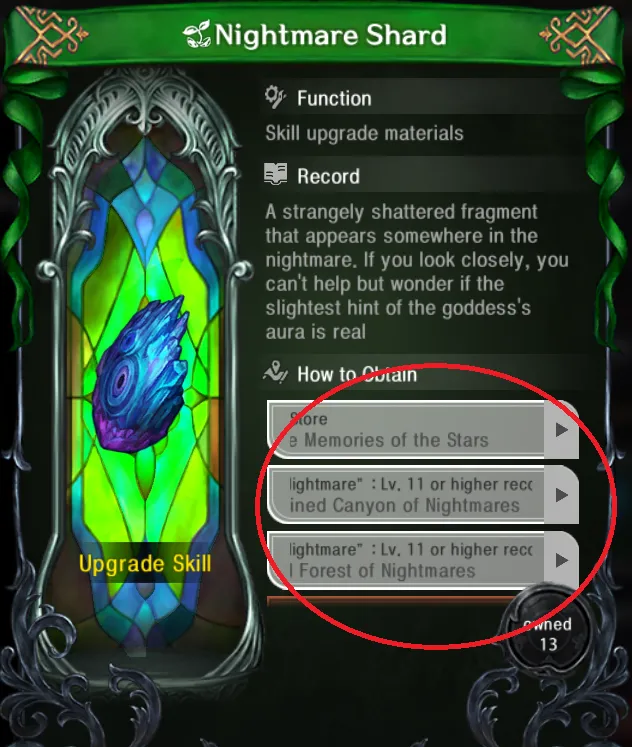
You can tap on any of the sources (encircled in the image above) to quickly move to that mode.
Adventure and Master Levels
You may have seen the term “Adventure Level” throughout this guide or while exploring the game on your own.
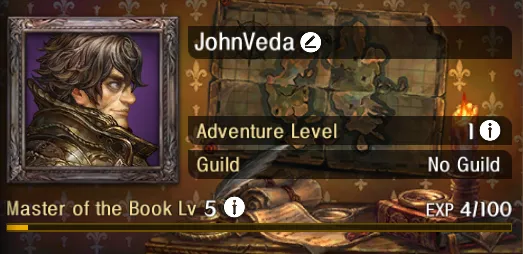
The long and short of it is that your Adventure Level shows how difficult your game currently is, with a higher Adventure Level resulting in stronger foes. It’s not all bad, though, as each Adventure Level also increases the amount and quality of rewards that you can get!
To raise your Adventure Level, you’ll need to raise your Master of the Book’s level. To do this, just play the game – pretty much any game mode gives some amount of Master exp. At levels 10, 20, 25, 30, 35, 40, and 45, you’ll gain access to a special ascension mission that, when completed, will raise your Adventure Level!
If your new Adventure Level is proving too difficult, you can reduce your Adventure Level by 1, allowing you to stay at the same game difficulty before your ascension. Don’t forget, though, that this also means you’ll be reducing your ability to farm by lowering drop quantity and quality!
Lastly, you also get rewards for each Master level you attain. To claim your rewards, visit Licorice in Todburg (she’s outside of the guild hall).
Veda’s Nightmare
Assembling Veda’s pieces won’t be easy, and you’ll need to constantly train to ensure that you and your knights are sufficiently powerful. That’s where Veda’s Nightmare comes in.
Veda’s Nightmare is essentially Astra: Knights of Veda’s AFK rewards mode. In the nightmare, you and your knights will face off against the undead in an unending battle. Luckily for us, enemies here drop gold, experience books, crafting materials, and equipment, so we can come back every so often to harvest our loot.
Note that the nightmare can only hold 24 hours’ worth of AFK gains; anything beyond 24 hours just vanishes, so be sure to check in from time to time and claim your free loot. You’ll also be happy to know that the nightmare accumulates resources even when you’re actively playing.
The more progress you make in the main story, the stronger Veda’s Nightmare becomes, and consequently, the better your AFK rewards. Always push as much main story progress as you can whenever you play!
You can access the nightmare from your bed at the Todburg Guild Hall or from the main menu.
Synthesis
Ever farmed for a whole bunch of stamina and discovered that you were grinding for the wrong thing all along? That’s where alchemy comes in. To synthesize, look for HImith in Todburg.
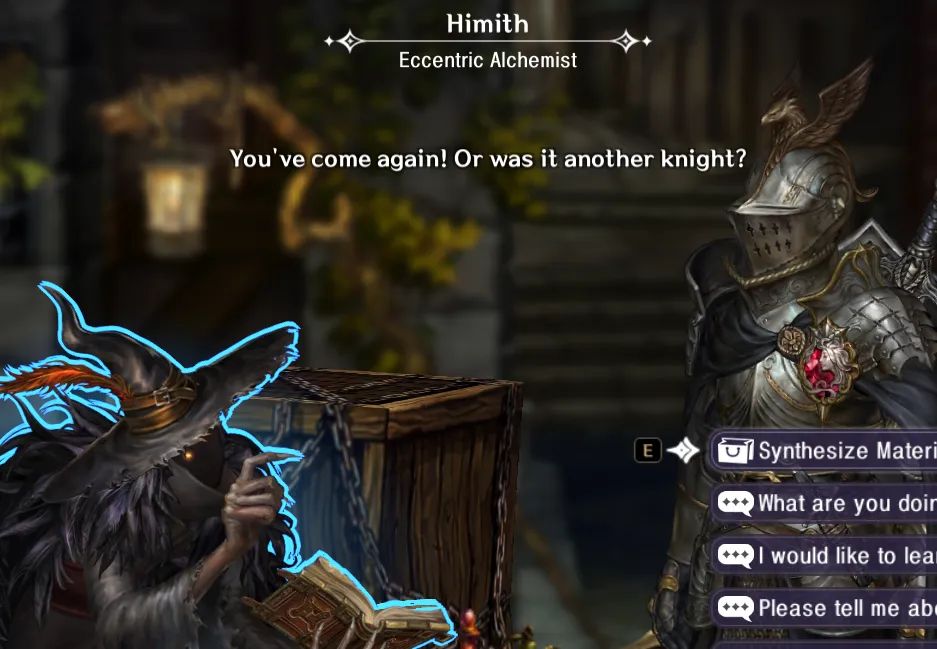
Synthesis allows you to convert materials into other materials. Items can only be switched into the same general classification of item – ascension materials, for example, can only be transformed into other ascension materials. While that may seem restrictive, alchemy is a great way to amass a large amount of materials that you do need by spending materials that you don’t need.
Grinding Stages
You can return to any stage you’ve already cleared and beat up the enemies there for more resources.
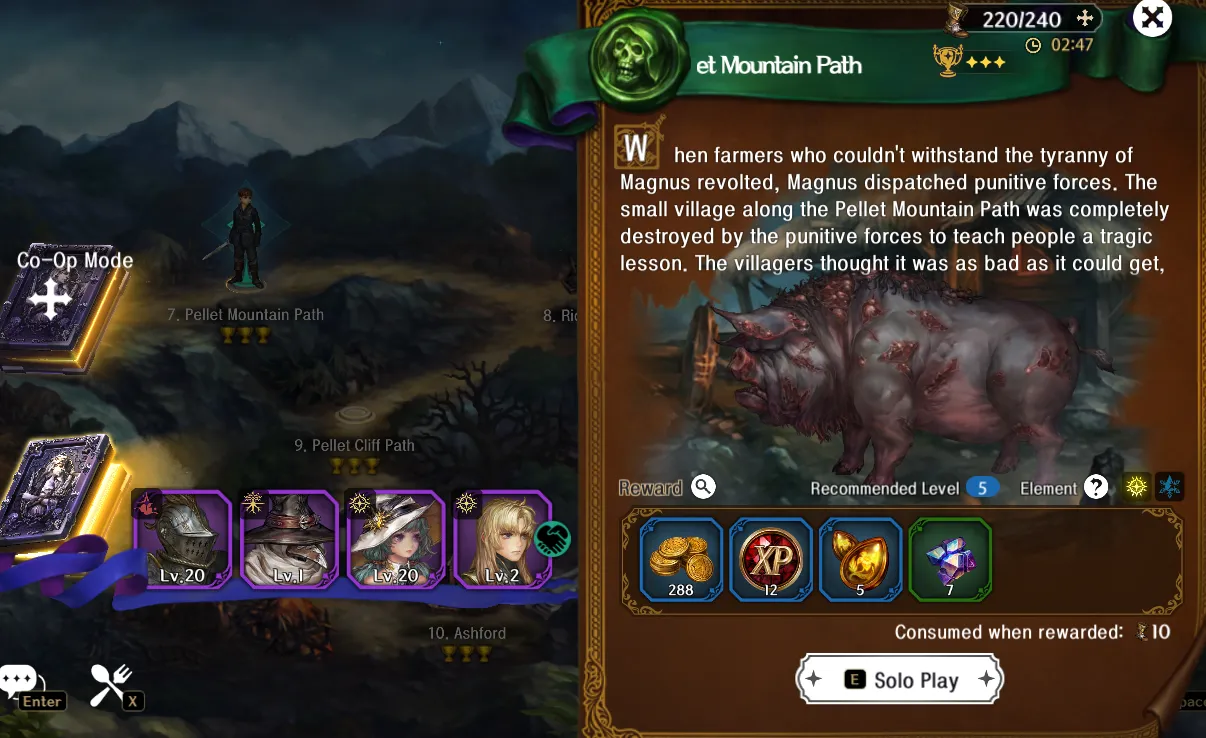
Sadly, this isn’t free – each time you claim the stage clear reward from a level you’ve already finished, you’ll need to spend some Adventurer’s Shoes (read: stamina) to get your prizes, effectively gating your active play progress. Spend your shoes judiciously and try to unlock as many stages as you can so that you’ll be able to grind more efficiently.
To help you with grinding stages, you can use auto combat, which you can trigger here:
Take note that the auto combat AI isn’t particularly smart. It rarely dodges, wastes ultimates and skills by popping them while bosses have elemental shields, and doesn’t prioritize using appropriate characters during Overflow. Still, if all you need are results, go ahead and turn it on.
Hero’s Shoes
While you can spend shoes normally by doing stages, a more time-efficient way of spending your stamina is by synthesizing shoes into Hero’s Shoes instead.
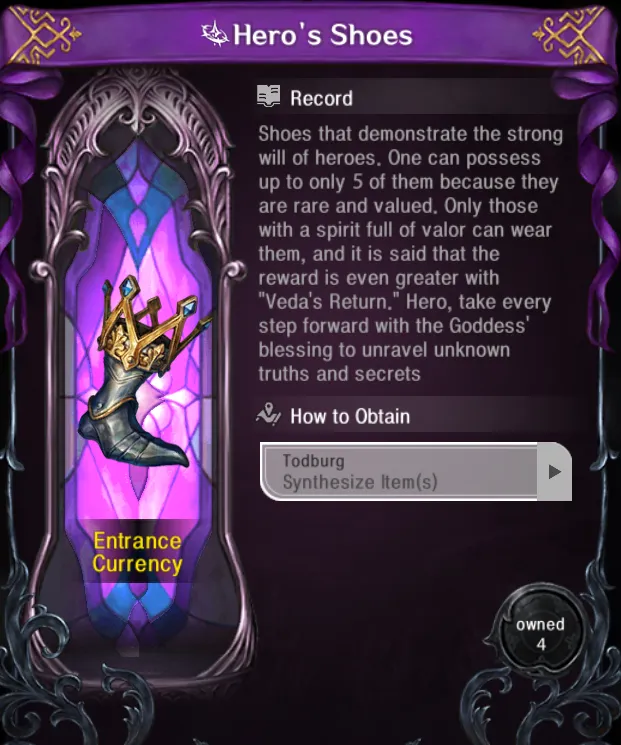
Hero’s Shoes can be spent in any menu that would require you to spend Adventurer’s Shoes. When spending Hero’s Shoes, you get much more drops than normal – including Master and knight experience – effectively letting you get multiple runs in for the time cost of one. I suggest using your Hero’s Shoes to fight Veda’s Nightmare bosses; not only will this help you fill out your relic slots, but each run also provides a large amount of Master experience!
Hero’s Shoes can be synthesized at the Himith in Todburg, the same guy you synthesize materials at. As you might expect, this costs 80 Adventurer’s Shoes – we’re condensing your stamina here after all. Note that you can only hold five Hero’s Shoes at once.
Get into the practice of making Hero’s Shoes. Seriously. It saves you so much time and energy.
Trophies and Difficulty
You may have noticed that you earn trophies at the end of each main story level. You can earn up to three trophies per stage if you’ve fulfilled the following criteria:
- Cleared the stage.
- Cleared the stage in less than a certain number of minutes.
- Cleared the stage without anyone dying.
Trophies aren’t just for show. Head over to a chapter’s Trophy Rewards to claim Starstones based on how many trophies you’ve earned in that chapter.
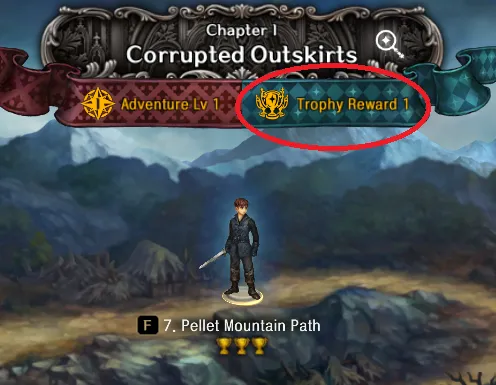
But wait, there’s more. Once you’ve earned every trophy possible in a chapter, you’ll also unlock the next difficulty of the area, which will reset your trophy progress and give you the chance to earn even more Starstones!
Note that you only need to finish an area on difficulty 1 to consider it as cleared for the main story.
Achievements
Astra: Knights of Veda’s achievements aren’t just for show. Each achievement you complete nets you a small amount of Starstones.
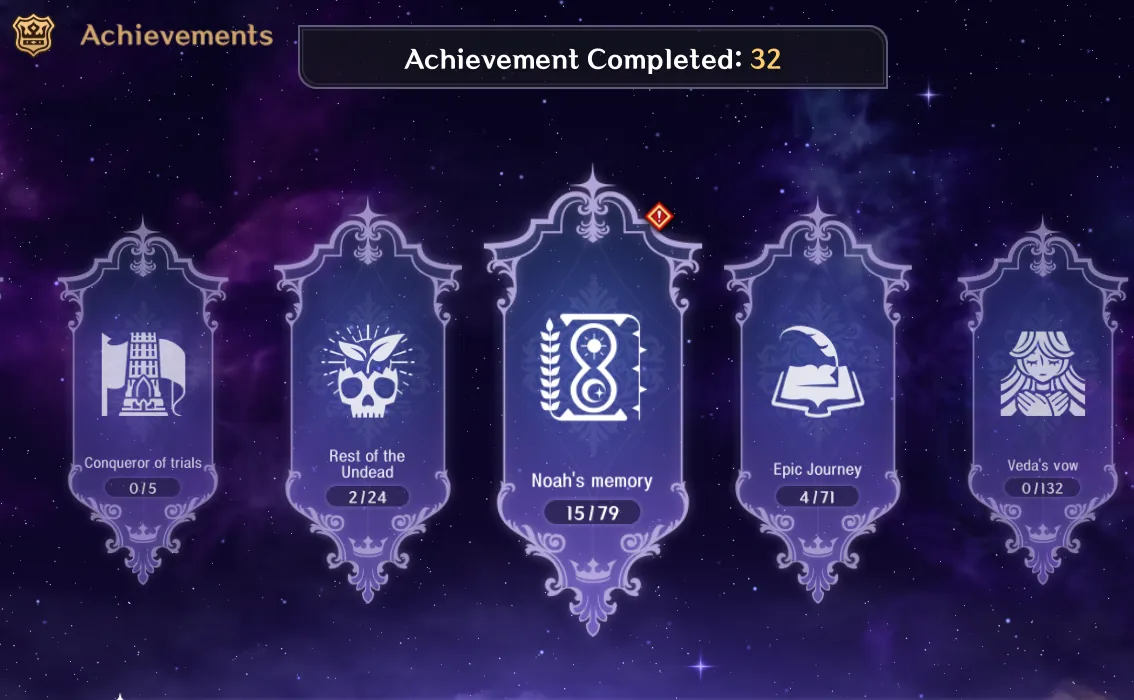
You can access your achievements via the main menu (tap on Belle).
Hero Freebies
Each new knight you get also nets you one Crystal of Fate for use in the gacha.
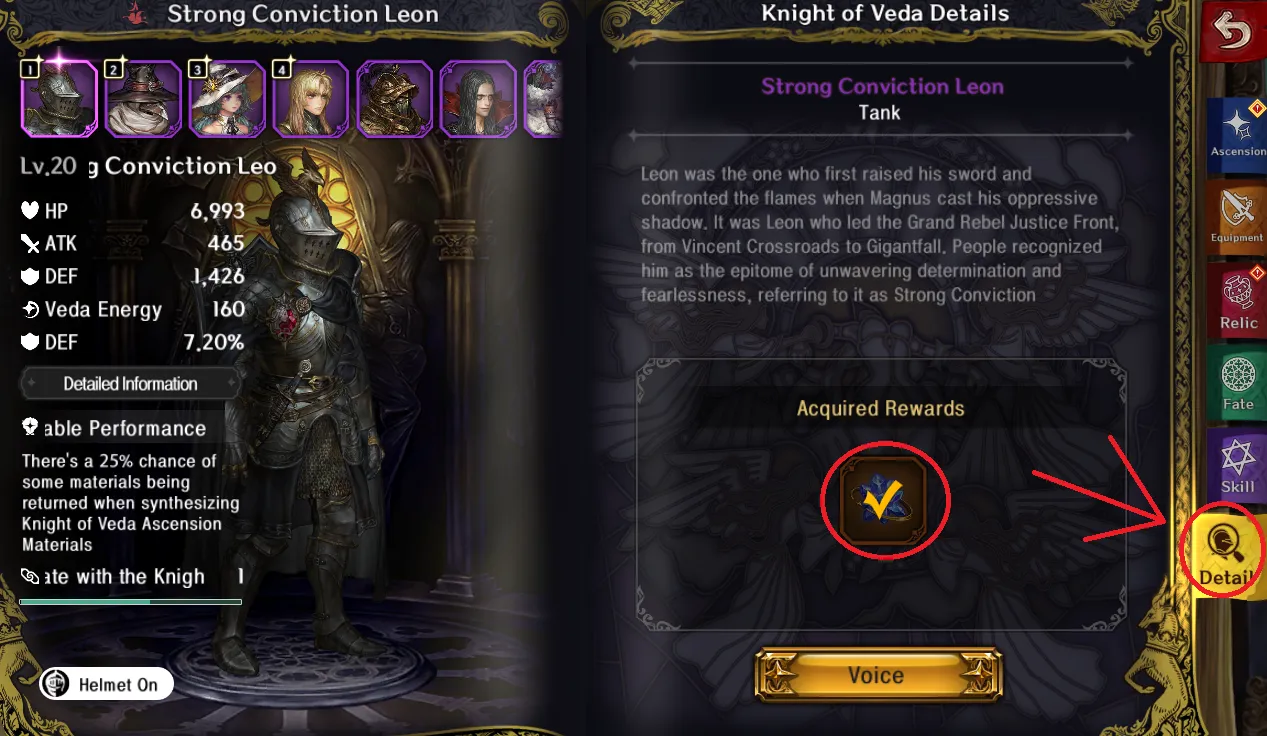
To claim this crystal, just go to “Detail” in the knight’s character sheet.
Battle Pass
Of course, Astra: Knights of Veda has a battle pass. You’ll unlock it around the same time you qualify for your first adventure level exam.
There’s both a paid path and a free path, with adequate freebies on both sides. Be sure to check in and do your daily, weekly, and seasonal missions to level up your pass and nab more rewards.
Events
As with most live service games, participating in events is a great way to earn tons of resources. You can access Astra: Knights of Veda’s events by going to the main menu and tapping “Guidance of the Book” or tapping here:
This will bring you to the list of the game’s current events, where there are a lot of freebies to be had – such as free pulls.
Gaming the Gacha
Fully enjoying a gacha game means learning how to navigate its many banners, pity systems, and currency. In this system, we’ll briefly go over Knights of Veda’s gacha system.
Quick Tips:
- “Beginner Call of the Stars” and “Call of the Stars” are the standard banners. They take blue Crystals of Fate as currency.
- The Beginner Call of the Stars banner guarantees at least one SSR knight in 50 pulls. It’s also discounted: you get 10 pulls for the price of 8, though you can’t do single pulls on that banner.
- “Event Call of the Stars” and “Exclusive Weapon Call of the Stars” are the limited banners. They take purple Crystals of Destiny as currency.
- Each pull on a banner increases your grace points (pity points). Soft pity begins on the 71st pull. Hard pity is at 90.
- Grace points are per banner. Grace points persist between limited banners.
- There’s a 50/50 system in play; if you pull a 5* on a limited banner, there’s a 50% chance it will be the featured character or weapon. If you fail to get it, the next 5* is guaranteed to be that knight or weapon.
- As of the May 2, 2024 update, 50/50 carries over between limited banners.
Banners and Pulls
Let’s start by distinguishing what the standard and event banners are.
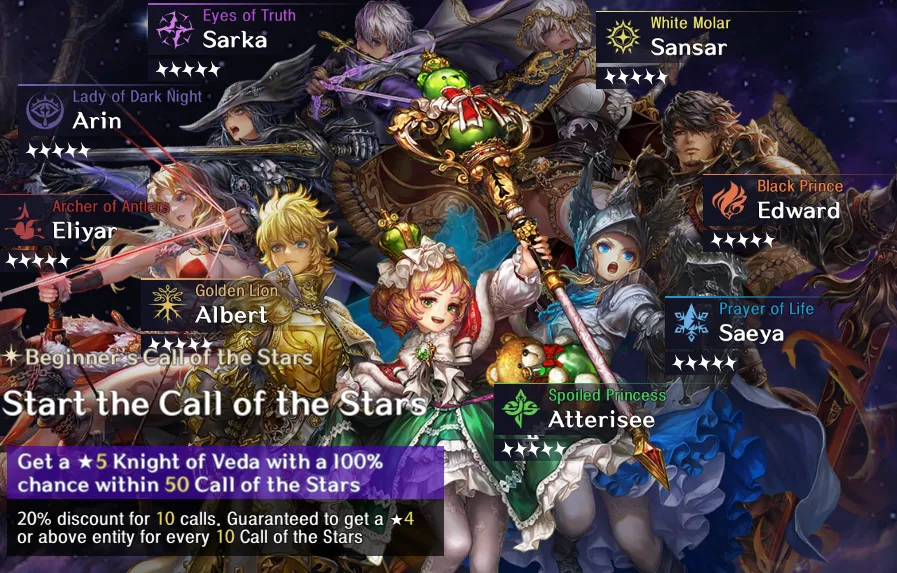
All banners are labeled as “Call of the Stars”, however, only the “Beginner Call of the Stars” as well as the regular “Call of the Stars” are standard banners. These banners are always available, though the beginner banner will vanish after 50 pulls – which will guarantee you at least one 5* Knight and only costs 8 pulls per 10-pull. The currency for pulling on these banners is the blue Crystal of Fate.
Next are limited banners.
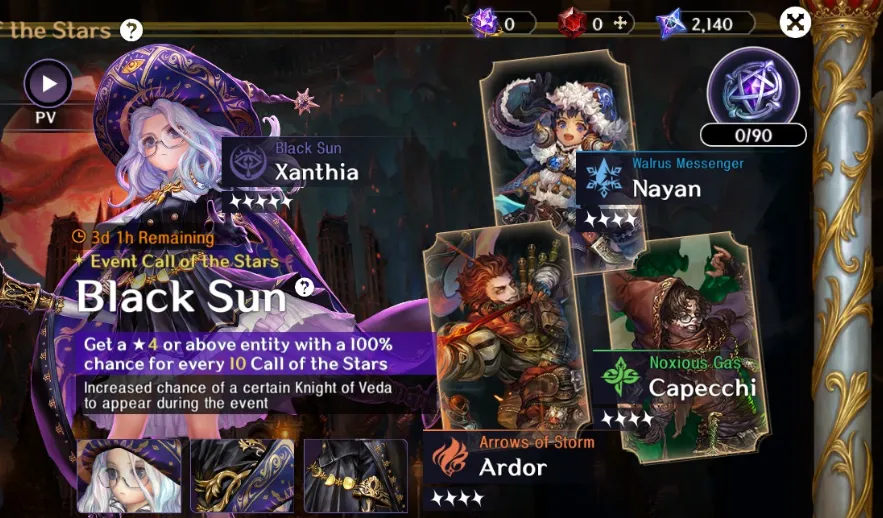
Limited banners are any banner that has “Event” or “Exclusive Weapon” tacked onto it – so that’s “Event Call of the Stars” for characters and “Exclusive Weapon Call of the Stars” for their signature weapons. These banners feature rate-up characters and weapons and require purple Crystals of Destiny.
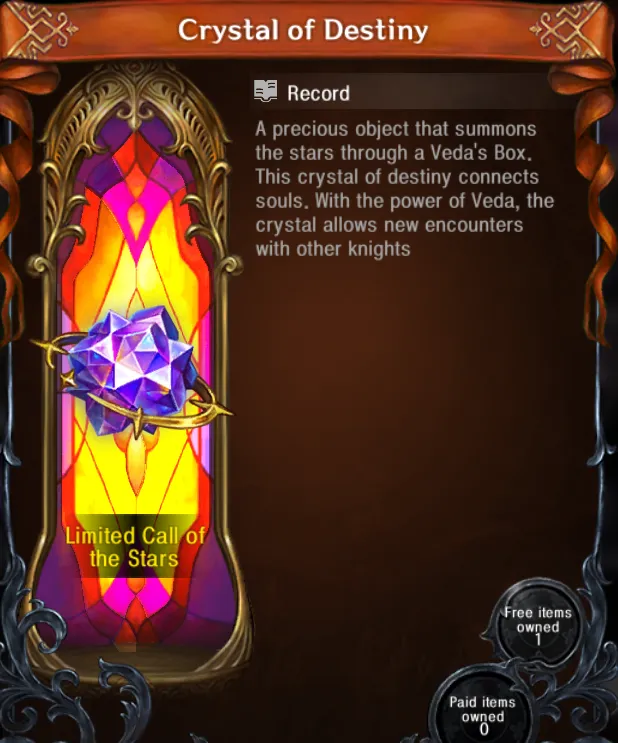
Again: Fate (blue) for standard, and Destiny (purple) for limited. Don’t make the mistake of buying the wrong type of pull as these crystals aren’t interchangeable. Each pull costs 160 Starstones; you can exchange for these directly on the banner window or in the cash shop.
Pity
Note: While Astra: Knights of Veda had a rocky start at the beginning of its lifespan due to its contentious pity system (specifically the lack of 50:50 carryover), the devs have addressed this, and 50:50 carry over has been implemented following the May 2, 2024 update. If you’re reading this before then, hold on to your Crystals!
Learning how to navigate a game’s pity system is core to maximizing your experience in any gacha game, and Astra: Knights of Veda is no different. In this game, pity is run through the Grace of the Holy Grail system, with each pull increasing the likelihood of pulling a 5*.
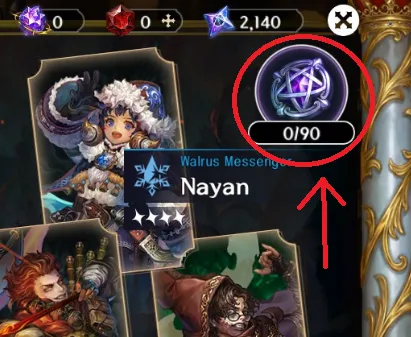
Soft pity begins at 71 pulls. From 0-70 pulls, the rate of a 5* is 0.6%; at 71 grace points, it becomes 5.6% and increases from there until it hits 100% at 90 pulls.
Pulling on a banner increases your grace points by how many pulls you did; a 10 pull gives you 10 grace points. At 90 grace points, you’re guaranteed a 5* knight or weapon. If you get a 5* before then, your grace points will drop to 0. Note that grace points are per banner type – each Call of the Stars banner has its own grace point pool. Grace points persist through limited banners; if you pull on a limited banner and have 10 grace points, then the banner changes, you’ll have 10 grace points on that banner off the bat.
Next is the topic of 50/50. When pulling on a limited banner, there’s a 50% chance that a 5* will be the featured knight or weapon. If it isn’t, your next 5* is guaranteed to be that character or weapon. Note that this also applies for any rate-up 4* character or weapons on the banner.
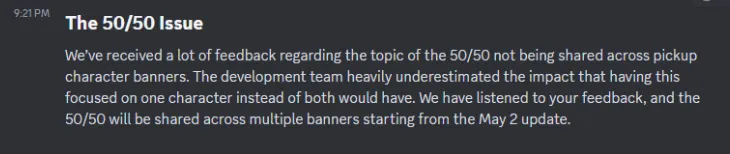
While the game initially didn’t have pity carry over from limited banner to limited banner, this has been changed with the May 2, 2024 update.
Memories and Abyss of the Stars
Didn’t get the knight or the weapon you wanted? That’s okay. You can still get some prizes.
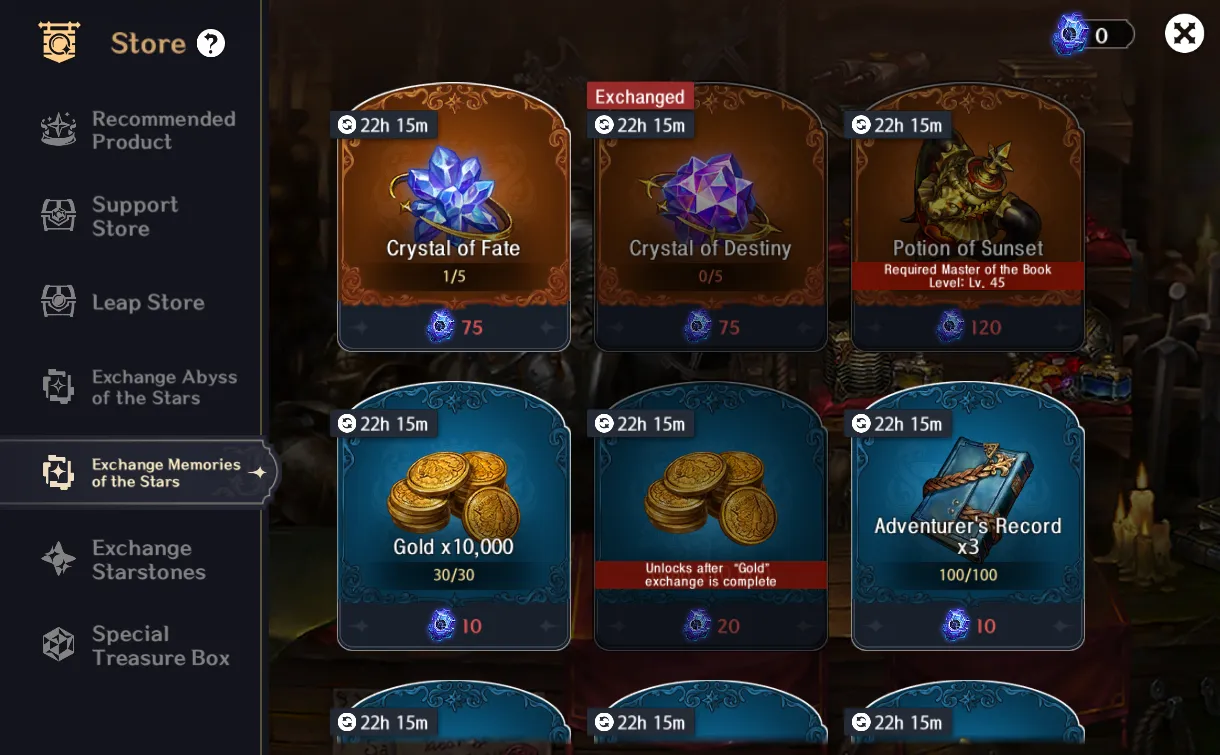
Pulling on a banner also nets you some Abyss of the Stars (for SR and SSR pulls) and Memories of the Stars (for R pulls). These can be exchanged in a special shop, found in the cash shop menu. The Abyss shop allows you to buy more pulls (5 Abysses per pull), SR characters, and SSR weapons, while the Memories shop sells character advancement materials, gold, and pulls – though you can only buy 5 of each type of pull here monthly.
Don’t forget to swing by after a pulling session and trade in your Abyss and Memories!
Rubies and Starstones
Rubies and Starstones are both premium currencies, but each has its own use.

Rubies are paid premium currency. When you swipe your credit card for premium currency, you’ll get Rubies. These precious gems are used to pay for bundles and packages in the cash shop and can be exchanged for Starstones. Note that Starstones cannot be turned back into Rubies!
Starstones, on the other hand, are used almost exclusively for gacha pulls. You can earn Starstones by playing the game, which is why you need Rubies to buy special stuff from the cash shop. Starstones can also be used to pay for some quality-of-life features, though I’d suggest just saving them for pulls.
The Hunt Begins
The quest for the pieces of Veda is sure to embroil us in several conflicts along the way. After all, the twelve books offer unlimited power and are a mere taste of her divinity – so their holders are sure to put up a fight before relinquishing them. But remember that even in this bleakest of worlds, there is hope so long as there are brave knights willing to stand up to tyranny and challenge the darkness.
That concludes this beginner’s guide to Astra: Knights of Veda, and I hope that, with this knowledge, you now have a solid understanding of the game’s basics and are more than ready to charge into the mid game and face even deadlier foes, and eventually, the Tower. If you have any suggestions on how to improve this guide (especially tips for new players) or have any corrections to make, let us know in the comment section!